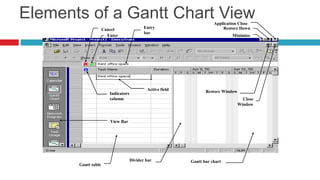
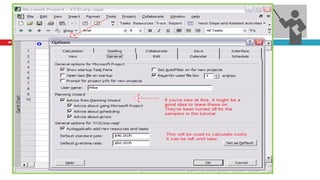
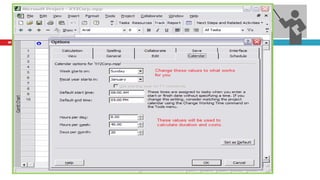
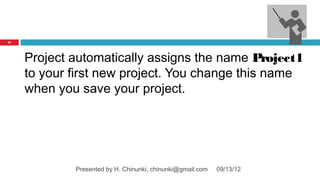
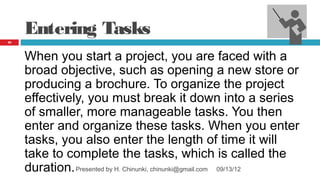
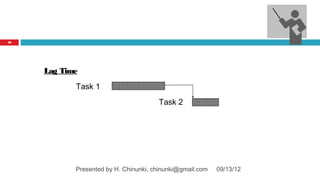
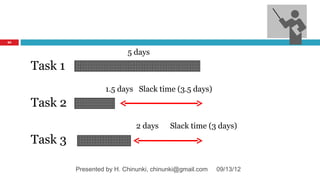
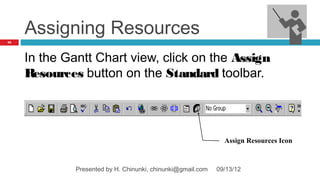
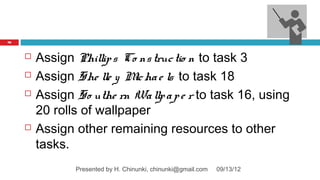
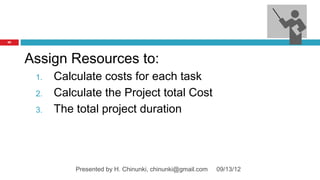
The document discusses planning, scheduling, and tracking projects using Microsoft Project. It covers defining projects and tasks, entering task information like duration and relationships between tasks, and tracking a project's progress. The key aspects covered are breaking down projects into tasks, scheduling tasks by considering factors like resources and dependencies, linking tasks using relationships, and tracking a project over time using Project.
This presentation explains the MS Project with proper steps. An example of particular project is taken and various steps such as creating project, WBS, adding outdent, indent, auto scheduling, setting up predecessors, adding Gantt bar chart, formula's, creating columns, assigning responsibilities, resources, changing currency, levelling over allocated resources, types of filters, switch anf iff function, calendar, macros, multiple project, earned value, report generation are explained.
Outline
MS Project Intro
Calendar
Project Summary
Network Diagram
WBS
Resources
Filter and Grouping
Customization
Constraint
Recurring Task
Resource Analysis and Leveling
Tracking
Earned Value Analysis
Reports
If you want more details or service related MS Project You can reach me through my email agrawalakshay28@gmail.com .
MS Project Integration: Tips, Tricks and What's New for YouCA Technologies
Have you scheduled in Microsoft Project (MSP) and are now presented with the "Tasks" to maintain a schedule in CA Project & Portfolio Manager (CA PPM)? Is your organization using CA PPM but still wants to schedule in MS Project? Have you noticed that the logic in how CA PPM schedules is different in MS Project? And most importantly – wouldn't it be awesome to be able to explain why CA PPM and MS Project behave differently but ultimately get you the same result? This presentation shows you where and how MSP and CA PPM bi-directionally map data, how to create and manage tasks, assignments and scheduling, as well as updating task status and work. It includes a broad discussion where and when data should be entered in CA PPM and MS Project, on defining data elements and how to capture them.
For more information on Management Cloud solutions from CA Technologies, please visit: http://bit.ly/1wEnPhz
I HAVE ATTACHED A PPT CONSIST OF VARIOUS COMMANDS OF MICROSOFT PROJECT.
I HAVE INCLUDED INTRODUCTION TO MACROS, WHICH ARE BEING USED IN NORMAL CONSTRUCTION INDUSTRY.
I HOPE YOU LIKE IT. REVIEWS & SUGGESTIONS ARE MOST WELCOME.
You can use customized field feature in Microsoft Project 2010 to create a dashboard and to quickly identify problem areas in the project. In this exercise, we will create the following four customized fields:
• Status_as_text: This will be a field with a drop down menu to select text: Red, Yellow, Green
• Status_as_Image: This will provide the user a drop down menu to select an image to display the status as an image.
• Status_as_Eval_text: This will be an automated field that evaluates %complete and displays the result as text.
• Status_as_Eval_Image: This will be an automated field to evaluate %complete and display the result as an image.
Product Management Training - MS Project Trainingguest2739cfb
Product Managers must wear many hats - Project Management is one important one. This overview helps Product Managers understand the expectations for planning, tracking, and managing a new Product Release project.
Project 2013 - 4 Simple & Practical Steps to Mastering Reporting Basics in un...DeltaBahn
Discover the efficient reporting possibilities of Project 2013 and explore the inner workings of tables and views in this last part of our Project 2013 basics series.
The whole blog post:
http://deltabahn.com/project-2013-microsoft-project-for-professionals-4-simple-practical-steps-to-mastering-reporting-basics-in-under-20-minutes/
The ninth lesson of the course on Planning and Managing Software projects (http://emanueledellavalle.org/Teaching/PMSP-2011-12.html) that I give at Politecnico di Milano
Gantt chart PowerPoint templates designed by skilled, experienced and professional graphic designers that are intended to solve the big issue of time consumption. These are fully editable slides and organized in a way to simplify the most complex topics and present it in an attractive manner. You can easily incorporate charts, diagrams and animations along with the content to these layouts in order to explore new technologies and trends of businesses in a unique way. All editable slides are digitally created to pinpoint and clarify the message, and summarize information regarding topic.
For this project you may choose one that is of interest to you or .docxbudbarber38650
For this project you may choose one that is of interest to you or you may choose to begin planning for your senior project. When selecting a project, avoid picking one that is either too big or too small. For example, do not decide to build a new stadium for your local sports team (too big) or to plant your summer garden (too small).
“The opening of a coffee shop” is my topic
Due Week 2: Project Charter
Due Week 3: Scope Statement
Due Week 4: Work Breakdown Structure and Network Diagram
Due Week 5: Risk Management Plan
Due Week 6: Resource Management Plan
Due Week 7: Communication Plan
Due Week 8: Final Project Package
Deliverables
Back to Top
Due Week 2: Project Charter
Provide a project charter of your selected project in accordance with the charter template found in Doc Sharing. The project will be the project your team will use for the remainder of this course.
For your new project, please develop a project team (citing names, e-mail addresses, and telephone numbers).
Be certain to include the following.
Project Objectives
Project Statement of Work
Milestones
All other sections as required in the project charter
Please put this in proper business writing format. Consider me to be your boss.
If working in a group, include a statement of participation, describing how each person contributed to this project deliverable. Please have each person sign the statement.
Deliverables:
Project charter (in MS Word)
Due Week 3: Scope Statement
Prepare a scope statement using either the model on pages 144-145 in the text as a template or the scope template in Doc Sharing. Remember to be tangible, measurable, and specific. Be sure to include all sections required in the Practitioner section of the Week 2 Lecture.
Deliverables:
Project scope statement (in MS Word)
If working in a group, include a statement of participation, describing how each person contributed to this project deliverable. Please have each person sign the statement.
Due Week 4: Work Breakdown Structure and Network Diagram
According to the PMBOK® Guide, "the WBS is a deliverable-oriented hierarchical decomposition of the work to be executed by the project team, to accomplish the project objectives and create the required deliverables." In other words, it lists the project's tasks, the subtasks, the sub-subtasks, and so on.
For this phase, you will create a work breakdown structure (WBS) for the project you selected during phase one. Remember that the WBS starts with your major deliverables (that you stated in your scope management plan) at the highest level. The lower levels have the tasks required to complete those deliverables. You should have at least three tasks under each deliverable, but you may have as many tasks as needed to ensure that the deliverables are complete. Review the textbook (and the PMBOK® Guide, if you have it) for some suggestions on how best to create a WBS. From your work breakdown structure, develop a project task list with dependencies, add durations,.
UiPath Test Automation using UiPath Test Suite series, part 4DianaGray10
Welcome to UiPath Test Automation using UiPath Test Suite series part 4. In this session, we will cover Test Manager overview along with SAP heatmap.
The UiPath Test Manager overview with SAP heatmap webinar offers a concise yet comprehensive exploration of the role of a Test Manager within SAP environments, coupled with the utilization of heatmaps for effective testing strategies.
Participants will gain insights into the responsibilities, challenges, and best practices associated with test management in SAP projects. Additionally, the webinar delves into the significance of heatmaps as a visual aid for identifying testing priorities, areas of risk, and resource allocation within SAP landscapes. Through this session, attendees can expect to enhance their understanding of test management principles while learning practical approaches to optimize testing processes in SAP environments using heatmap visualization techniques
What will you get from this session?
1. Insights into SAP testing best practices
2. Heatmap utilization for testing
3. Optimization of testing processes
4. Demo
Topics covered:
Execution from the test manager
Orchestrator execution result
Defect reporting
SAP heatmap example with demo
Speaker:
Deepak Rai, Automation Practice Lead, Boundaryless Group and UiPath MVP
Neuro-symbolic is not enough, we need neuro-*semantic*Frank van Harmelen
Neuro-symbolic (NeSy) AI is on the rise. However, simply machine learning on just any symbolic structure is not sufficient to really harvest the gains of NeSy. These will only be gained when the symbolic structures have an actual semantics. I give an operational definition of semantics as “predictable inference”.
All of this illustrated with link prediction over knowledge graphs, but the argument is general.
Accelerate your Kubernetes clusters with Varnish CachingThijs Feryn
A presentation about the usage and availability of Varnish on Kubernetes. This talk explores the capabilities of Varnish caching and shows how to use the Varnish Helm chart to deploy it to Kubernetes.
This presentation was delivered at K8SUG Singapore. See https://feryn.eu/presentations/accelerate-your-kubernetes-clusters-with-varnish-caching-k8sug-singapore-28-2024 for more details.
Epistemic Interaction - tuning interfaces to provide information for AI supportAlan Dix
Paper presented at SYNERGY workshop at AVI 2024, Genoa, Italy. 3rd June 2024
https://alandix.com/academic/papers/synergy2024-epistemic/
As machine learning integrates deeper into human-computer interactions, the concept of epistemic interaction emerges, aiming to refine these interactions to enhance system adaptability. This approach encourages minor, intentional adjustments in user behaviour to enrich the data available for system learning. This paper introduces epistemic interaction within the context of human-system communication, illustrating how deliberate interaction design can improve system understanding and adaptation. Through concrete examples, we demonstrate the potential of epistemic interaction to significantly advance human-computer interaction by leveraging intuitive human communication strategies to inform system design and functionality, offering a novel pathway for enriching user-system engagements.
Let's dive deeper into the world of ODC! Ricardo Alves (OutSystems) will join us to tell all about the new Data Fabric. After that, Sezen de Bruijn (OutSystems) will get into the details on how to best design a sturdy architecture within ODC.
Dev Dives: Train smarter, not harder – active learning and UiPath LLMs for do...UiPathCommunity
💥 Speed, accuracy, and scaling – discover the superpowers of GenAI in action with UiPath Document Understanding and Communications Mining™:
See how to accelerate model training and optimize model performance with active learning
Learn about the latest enhancements to out-of-the-box document processing – with little to no training required
Get an exclusive demo of the new family of UiPath LLMs – GenAI models specialized for processing different types of documents and messages
This is a hands-on session specifically designed for automation developers and AI enthusiasts seeking to enhance their knowledge in leveraging the latest intelligent document processing capabilities offered by UiPath.
Speakers:
👨🏫 Andras Palfi, Senior Product Manager, UiPath
👩🏫 Lenka Dulovicova, Product Program Manager, UiPath
Builder.ai Founder Sachin Dev Duggal's Strategic Approach to Create an Innova...Ramesh Iyer
In today's fast-changing business world, Companies that adapt and embrace new ideas often need help to keep up with the competition. However, fostering a culture of innovation takes much work. It takes vision, leadership and willingness to take risks in the right proportion. Sachin Dev Duggal, co-founder of Builder.ai, has perfected the art of this balance, creating a company culture where creativity and growth are nurtured at each stage.
Slack (or Teams) Automation for Bonterra Impact Management (fka Social Soluti...Jeffrey Haguewood
Sidekick Solutions uses Bonterra Impact Management (fka Social Solutions Apricot) and automation solutions to integrate data for business workflows.
We believe integration and automation are essential to user experience and the promise of efficient work through technology. Automation is the critical ingredient to realizing that full vision. We develop integration products and services for Bonterra Case Management software to support the deployment of automations for a variety of use cases.
This video focuses on the notifications, alerts, and approval requests using Slack for Bonterra Impact Management. The solutions covered in this webinar can also be deployed for Microsoft Teams.
Interested in deploying notification automations for Bonterra Impact Management? Contact us at sales@sidekicksolutionsllc.com to discuss next steps.
Search and Society: Reimagining Information Access for Radical FuturesBhaskar Mitra
The field of Information retrieval (IR) is currently undergoing a transformative shift, at least partly due to the emerging applications of generative AI to information access. In this talk, we will deliberate on the sociotechnical implications of generative AI for information access. We will argue that there is both a critical necessity and an exciting opportunity for the IR community to re-center our research agendas on societal needs while dismantling the artificial separation between the work on fairness, accountability, transparency, and ethics in IR and the rest of IR research. Instead of adopting a reactionary strategy of trying to mitigate potential social harms from emerging technologies, the community should aim to proactively set the research agenda for the kinds of systems we should build inspired by diverse explicitly stated sociotechnical imaginaries. The sociotechnical imaginaries that underpin the design and development of information access technologies needs to be explicitly articulated, and we need to develop theories of change in context of these diverse perspectives. Our guiding future imaginaries must be informed by other academic fields, such as democratic theory and critical theory, and should be co-developed with social science scholars, legal scholars, civil rights and social justice activists, and artists, among others.
The Art of the Pitch: WordPress Relationships and SalesLaura Byrne
Clients don’t know what they don’t know. What web solutions are right for them? How does WordPress come into the picture? How do you make sure you understand scope and timeline? What do you do if sometime changes?
All these questions and more will be explored as we talk about matching clients’ needs with what your agency offers without pulling teeth or pulling your hair out. Practical tips, and strategies for successful relationship building that leads to closing the deal.
Essentials of Automations: Optimizing FME Workflows with ParametersSafe Software
Are you looking to streamline your workflows and boost your projects’ efficiency? Do you find yourself searching for ways to add flexibility and control over your FME workflows? If so, you’re in the right place.
Join us for an insightful dive into the world of FME parameters, a critical element in optimizing workflow efficiency. This webinar marks the beginning of our three-part “Essentials of Automation” series. This first webinar is designed to equip you with the knowledge and skills to utilize parameters effectively: enhancing the flexibility, maintainability, and user control of your FME projects.
Here’s what you’ll gain:
- Essentials of FME Parameters: Understand the pivotal role of parameters, including Reader/Writer, Transformer, User, and FME Flow categories. Discover how they are the key to unlocking automation and optimization within your workflows.
- Practical Applications in FME Form: Delve into key user parameter types including choice, connections, and file URLs. Allow users to control how a workflow runs, making your workflows more reusable. Learn to import values and deliver the best user experience for your workflows while enhancing accuracy.
- Optimization Strategies in FME Flow: Explore the creation and strategic deployment of parameters in FME Flow, including the use of deployment and geometry parameters, to maximize workflow efficiency.
- Pro Tips for Success: Gain insights on parameterizing connections and leveraging new features like Conditional Visibility for clarity and simplicity.
We’ll wrap up with a glimpse into future webinars, followed by a Q&A session to address your specific questions surrounding this topic.
Don’t miss this opportunity to elevate your FME expertise and drive your projects to new heights of efficiency.
Essentials of Automations: Optimizing FME Workflows with Parameters
Ms project management
1. PLANNING, SCHEDULING
AND
TRACKING RESOURCES
USING
MS PROJECT MANAGEMENT
Presented by: Harrison Chinunki – +268 7623 0566,
chinunki@gmail.com
2. DEFINING PROJECTS
2
A Project is a series of activities designed to
achieve a specific outcome with a set of budget
and time-scale
Presented by H. Chinunki, chinunki@gmail.com 09/13/12
3. Getting Started with Project
3
Microsoft Project is a Windows based, graphical
application that allows you to manage projects.
Project management involves three basic
activities:
1. Planning
2. Scheduling and
3. Tracking
Presented by H. Chinunki, chinunki@gmail.com 09/13/12
4. 4
What types of projects do you plan,
schedule, and track in your job?
Presented by H. Chinunki, chinunki@gmail.com 09/13/12
5. 5
Typically, you are given a project consisting of a
broad goal or objective, and you must plan,
schedule, and track the project activities and the
people or resources assigned to the project so
that you achieve the desired goal.
Presented by H. Chinunki, chinunki@gmail.com 09/13/12
6. Factors considering scheduling
6
You must 1. You can have a task that one
person working full-time can
consider many finish in a week.
factors when
2. Another option is to assign
scheduling tasks two people to the task,
in a project thereby cutting the time in
half.
3. Another option is to assign
one person who can work
Presented by H. Chinunki, chinunki@gmail.com 09/13/12
overtime.
7. Tasks
7
Tasks are often dependent on other tasks. Even
if you have assigned ample resources to a task,
you may still need to wait for the completion of
another task. For example, you cannot start a
remodeling job until the blueprints are ready.
You therefore need to create relationships
between tasks that depend on each another.
Presented by H. Chinunki, chinunki@gmail.com 09/13/12
8. 8
After you have assigned the time you think it will
take to complete a task, the resources needed
to complete the task, and the task relationships,
you have the foundation of your project. Once
the project begins, you must track the project to
make sure that tasks are completed on time and
within budget.
Presented by H. Chinunki, chinunki@gmail.com 09/13/12
9. 9
Project helps simplify project management by
allowing you to do the following on a personal
computer:
Presented by H. Chinunki, chinunki@gmail.com 09/13/12
10. 10
Enter tasks. Track progress and costs
Enter the duration for each once the project begins.
task. Track planned vs. actual
Link tasks to other tasks progress and costs.
Assign resources to tasks
Produce reports on every
to effectively schedule and aspect of your project.
utilize a resource’s time. Access and distribute
Assign costs to resources project information over an
and tasks. intranet or the World Wide
Web.
Presented by H. Chinunki, chinunki@gmail.com 09/13/12
11. Starting Project
11
The first thing you need to do is start the Project
application. Project automatically creates a new
project upon startup, and you can create
additional projects once you are in the
application
Presented by H. Chinunki, chinunki@gmail.com 09/13/12
12. 12
Presented by H. Chinunki, chinunki@gmail.com 09/13/12
13. Gantt Chart View
13
Essentially, Project is a large database that
stores all of the information for your project.
Because the database contains many different
components, Project uses views to display
related information on the screen
Presented by H. Chinunki, chinunki@gmail.com 09/13/12
14. 14
The default view is the Gantt Chart view, which
contains two panes. The left pane displays the
Gantt table, which lists each task, the task’s
duration, and other task information. The right
pane displays the Gantt bar chart, which
graphically represents the schedule information.
The two panes are separated by the divider bar.
You can drag the divider bar to see more of
either pane. by H. Chinunki, chinunki@gmail.com 09/13/12
Presented
15. Elements of a Gantt Chart View Application Close
Cancel Entry Restore Down
bar
Enter Minimize
Active field Restore Window
Indicators
column Close
Window
View Bar
Divider bar Gantt bar chart
Gantt table
16. Entering Project Information and Tasks
16
When you start a new project, you need to
enter general information, such as the start
date, costs, project user for the project.
Project uses this information when printing
reports and scheduling tasks. Start by
defining the properties of the project that
you are Presented by H. Chinunki, chinunki@gmail.com 09/13/12
going to manage.
17. 17
To enter project information,
Click on the Project menu and click on Project
Information.
Project displays the Project Information dialog
box
Presented by H. Chinunki, chinunki@gmail.com 09/13/12
18. 18
Presented by H. Chinunki, chinunki@gmail.com 09/13/12
19. 19
Presented by H. Chinunki, chinunki@gmail.com 09/13/12
20. 20
Presented by H. Chinunki, chinunki@gmail.com 09/13/12
21. 21
Project automatically assigns the name Project1
to your first new project. You change this name
when you save your project.
Presented by H. Chinunki, chinunki@gmail.com 09/13/12
22. Entering Tasks
22
When you start a project, you are faced with a
broad objective, such as opening a new store or
producing a brochure. To organize the project
effectively, you must break it down into a series
of smaller, more manageable tasks. You then
enter and organize these tasks. When you enter
tasks, you also enter the length of time it will
take to complete the tasks, which is called the
duration. Presented by H. Chinunki, chinunki@gmail.com 09/13/12
23. 23
How do you break down tasks in your
projects at work?
Presented by H. Chinunki, chinunki@gmail.com 09/13/12
24. 24
There are two basic approaches to entering
tasks.
1.One is to enter the high-level tasks (summary
tasks) first and then enter the low-level tasks
(subtasks) later.
2.The other approach, is to enter all the subtasks
first and then group them under summary tasks.
Presented by H. Chinunki, chinunki@gmail.com 09/13/12
25. 25
Enter task names and durations in your project
as below:
Presented by H. Chinunki, chinunki@gmail.com 09/13/12
26. 26
Presented by H. Chinunki, chinunki@gmail.com 09/13/12
27. 27
If a task extends over nonworking time (such as
Saturdays and Sundays), Project displays the Gantt
bar over the nonworking time but does not count
them towards the completion of the task. To count
nonworking time, specify elapsed duration by
prefixing an e to a unit of time. Use the following
abbreviations: e m in (elapsed minute), e hr (elapsed
hour), e d a y (elapsed day), e wk (elapsed week), or
e m o (elapsed month). For example, 2 e d a y
specifies a full 48-hour period.
Presented by H. Chinunki, chinunki@gmail.com 09/13/12
28. Inserting Tasks
28
After you create and enter the tasks in your
project, you may want to add tasks that you had
not thought of or new tasks that you have
discovered. These tasks will not always go at
the end of the project, so you may have to insert
them between existing tasks.
Presented by H. Chinunki, chinunki@gmail.com 09/13/12
29. 29
Presented by H. Chinunki, chinunki@gmail.com 09/13/12
30. Entering Recurring Tasks
30
A recurring task is any task that occurs at
regular intervals (daily, weekly, monthly, or
yearly) during the course of a project. Examples
of such tasks might be weekly visits to a project
site, daily preparation of project status reports,
or monthly meetings with members of the project
team.
Presented by H. Chinunki, chinunki@gmail.com 09/13/12
31. 31
When you create a recurring task, you insert a new
task. You cannot convert an existing task into a
recurring task. Project bolds the recurring task,
indicating that it is a summary task. Project creates
a subtask for each occurrence of the recurring task.
For example, if you insert a recurring task for a
meeting that occurs every Friday for four weeks, the
recurring task actually represents four separate
subtasks.
Presented by H. Chinunki, chinunki@gmail.com 09/13/12
32. 32
Presented by H. Chinunki, chinunki@gmail.com 09/13/12
33. Exercise
33
Click on task 4, and insert a recurring task
named H update m
old eeting.
Schedule it for 2 hours every Monday for 4
occurrences.
Presented by H. Chinunki, chinunki@gmail.com 09/13/12
34. 34
Project creates a Gantt bar for each occurrence
of the recurring task and displays an icon in the
Indicators column indicating that it is a recurring
task
Recurring task icon Recurring tasks
Presented by H. Chinunki, chinunki@gmail.com 09/13/12
35. 35
If a field contains text, and the column is not
wide enough to display all of the text, Project
cuts off the text. If the field contains numeric
data, Project displays number signs (#######).
Demonstrate how to expand the Duration field.
Presented by H. Chinunki, chinunki@gmail.com 09/13/12
36. 36
Notice that the task name of the recurring task is
preceded by a plus sign (+). You can click on the
plus sign to display the individual occurrences of
the recurring task.
Project replaces the plus sign with a minus sign
(–).
Presented by H. Chinunki, chinunki@gmail.com 09/13/12
37. Entering Milestones
37
A milestone is a check point in your project that
must occur but does not take any time. Two
examples are an approval or sign‑off before the
project can proceed, and the completion of a
stage of the project. To Project, a milestone is a
task with a zero time duration.
Presented by H. Chinunki, chinunki@gmail.com 09/13/12
38. 38
Enter the three milestones from the screen
shot that follows
Presented by H. Chinunki, chinunki@gmail.com 09/13/12
39. 39
Milestones
Presented by H. Chinunki, chinunki@gmail.com 09/13/12
40. Case Study
40
What distinguishes a recurring task from a
regular task?
Why would you want to create a milestone
instead of a regular task?
Presented by H. Chinunki, chinunki@gmail.com 09/13/12
41. Specifying Task Relationships
41
When you enter tasks initially, Project schedules
each task to begin on the project start date and
to run for the task duration. You may, however,
want your tasks to occur in a particular
sequence. For example, you may have a task
that cannot begin until another task is complete.
Presented by H. Chinunki, chinunki@gmail.com 09/13/12
42. 42
You can link tasks together using task
relationships to organize your tasks into the
desired sequence. A task that must start or finish
before another task can start or finish is called a
predecessor task. A task that cannot start or
finish until another task starts or finishes is
called a successor task.
Presented by H. Chinunki, chinunki@gmail.com 09/13/12
43. 43
Relationship Description
Finish-to-Start A relationship in which a task cannot start until its predecessor
(FS) task finishes. This is the default and most common task
relationship.
Start-to-Start A relationship in which linked tasks begin simultaneously based
(SS) on the predecessor task.
Finish-to-Finish A relationship in which linked tasks end simultaneously based on
(FF) the predecessor task.
Start-to-Finish A relationship in which a task finishes when its predecessor
(SF) starts. This task relationship is not used very often.
Presented by H. Chinunki, chinunki@gmail.com 09/13/12
45. Linking Tasks with FS Relationships
45
When you link a series of tasks with
Finish‑to‑Start relationships, you create a
sequential series of tasks. The start of the next
task depends on the completion of the previous
task.
Presented by H. Chinunki, chinunki@gmail.com 09/13/12
46. 46
To link a series of tasks, you must select the tasks
in the order in which you want to link them.
For example, selecting task 2 and then task 3
creates a different link order than does selecting
task 3 and then task 2.
Click on the Link Tasks button on the Standard
toolbar
Link Tasks
Presented by H. Chinunki, chinunki@gmail.com 09/13/12
47. Exercise
47
Link tasks 2 and 3.
Link tasks 10 and 11.
Link tasks 17 and 19.
Link tasks 12, 16, 17, 18.
Link tasks 10, 12, 13, 14, 15, 19, 20, 21.
Presented by H. Chinunki, chinunki@gmail.com 09/13/12
48. Note
48
If you insert a new task into a series of existing
tasks linked sequentially with Finish‑to‑Start
relationships, Project automatically inserts the
new task into the link. For example, if tasks 1, 2,
and 3 are linked with Finish‑to‑Start
relationships and you insert a new task at task 2,
Project adjusts the links so that tasks 1, 2, 3,
and 4 are linked sequentially with Finish‑to‑Start
relationships. by H. Chinunki, chinunki@gmail.com 09/13/12
Presented
49. Exercise
49
Insert a new task into a series of linked tasks so
that you can see the results. You can insert a
new task at task number 14 and call it Select
china and silverware. Make it a 1 day task.
Delete the task after experimenting.
Presented by H. Chinunki, chinunki@gmail.com 09/13/12
50. Linking Tasks with Other Types of Relationships
50
We have just learned how to link tasks quickly
with Finish‑to‑Start relationships using the Link
Tasks button. You may, however, have tasks that
you want to link using a different type of task
relationship.
To specify a task relationship other than a
Finish‑to-Start relationship:
Double‑click on the line connecting the two tasks
whose relationship you want to modify
Presented by H. Chinunki, chinunki@gmail.com 09/13/12
51. 51
Double-click here
Presented by H. Chinunki, chinunki@gmail.com 09/13/12
52. 52
Project displays the Task Dependency dialog box
Presented by H. Chinunki, chinunki@gmail.com 09/13/12
53. Exercise
53
Change the relationship between tasks 2 and
3 to Start-to-Start, and then change it back to
Finish-to-Start.
Presented by H. Chinunki, chinunki@gmail.com 09/13/12
54. Specifying Lag Time and Lead Time
54
When you link tasks with a Finish‑to‑Start
relationship, the successor task begins
immediately after its predecessor finishes.
However, what if you want a task to begin two
days after its predecessor finishes, or two days
before its predecessor finishes?
You can accomplish this using lag time or lead
time. Presented by H. Chinunki, chinunki@gmail.com 09/13/12
55. Lag Time
55
Lag time is delay time between the finish of the
predecessor task and the start of the successor
task. In a Finish‑to‑Start relationship, lag time is
the amount of time you want to wait after
completing the predecessor task before
beginning the successor task. In this situation,
lag time can be considered time added to the
relationship. by H. Chinunki, chinunki@gmail.com 09/13/12
Presented
56. 56
Lag Time
Task 1
Task 2
Presented by H. Chinunki, chinunki@gmail.com 09/13/12
57. Lead Time
57
Lead time is an overlap between tasks, in which
the successor task starts before the predecessor
task has finished. You enter lead time as
Negative Lag Time.
In this situation, lead time can be considered
time subtracted from the relationship.
Presented by H. Chinunki, chinunki@gmail.com 09/13/12
58. 58
Lead Time
Task 1
Task 2
Presented by H. Chinunki, chinunki@gmail.com 09/13/12
59. 59
In a Start‑to‑Start relationship, the predecessor
and successor tasks start at the same time, but
you can insert lag time into the relationship so
that Project delays the start of the successor
task. The arrangement of the Gantt bars may
look similar to lead time with a Finish‑to‑Start
relationship, but it is actually lag time because
Project delaysby H. Chinunki, chinunki@gmail.com 09/13/12
Presented the task.
60. 60
Original Task Relationship
Task Relationship with Lag
Task 1 Time
Task 2 Task 1
Task 2
Lag time
Presented by H. Chinunki, chinunki@gmail.com 09/13/12
61. Exercise
61
1. Specify a lead time of 3 days between tasks
2 and 3.
2. Specify a lag time of 5 days between tasks
10 and 12.
Presented by H. Chinunki, chinunki@gmail.com 09/13/12
62. Understanding Critical Tasks
62
When you enter tasks, Project schedules the tasks based on
the project’s start or finish date you have defined. Using this
schedule, Project determines the tasks that allow the earliest
completion of the project. These tasks are called critical
tasks, and they make up the critical path. The critical path
includes those tasks that affect the duration of the project.
Because other tasks are linked to the critical tasks, if a critical
task finishes late, it causes all of the tasks that follow to start
and finish late. Therefore, the project finishes late.
Conversely, if a critical task finishes early, the project can
finish early.Presented by H. Chinunki, chinunki@gmail.com 09/13/12
63. 63
In a very simple project in which all of the tasks start
on the same date, the longest task is the only critical
task. For example, if you have five tasks in your
project that all start on the same date, the task with
the longest duration is the only critical task, because
it is the only task that must start and finish on time
for the project to finish on time. The other tasks are
referred to as non‑critical tasks because you can
delay them without affecting the finish date of the
project.
Presented by H. Chinunki, chinunki@gmail.com 09/13/12
64. 64
The amount of time you can delay a non‑critical
task is called slack time. Suppose the critical
task is five days long, and a non‑critical task in
the project is only two days long. You can delay
the non‑critical task for three days without
affecting the project finish date.
Presented by H. Chinunki, chinunki@gmail.com 09/13/12
65. 65
5 days
Task 1
1.5 days Slack time (3.5 days)
Task 2
2 days Slack time (3 days)
Task 3
Presented by H. Chinunki, chinunki@gmail.com 09/13/12
66. 66
In most projects, you will have many tasks linked
to one another using task relationships. If you link
all tasks with only Finish‑to‑Start relationships, all
of the tasks are critical. The start of the successor
tasks depends on the completion of the
predecessor tasks, so all of the tasks must start
and finish on time. If you assign other types of
relationships inbyyour project, some 09/13/12 tasks
Presented H. Chinunki, chinunki@gmail.com
of your
67. Consider this Example
67
Why are tasks 1, 2,
2 days
Task 1 1.
1.5 days 4, and 5 critical?
Task 2
1 day
2. Why is Task 3 is
Task 3
not critical?
4 hours
3. What is slack time
Task 4 and on which task
2.5 days
is slack time?
Task 5
Presented by H. Chinunki, chinunki@gmail.com 09/13/12
68. 68
Tasks 1, 2, 4, and 5
2 days
Task 1
1.5 days are critical. They
Task 2
1 day
create the critical
path.
Slack time
Task 3
4 hours Task 3 is not critical.
It has slack time,
Task 4
2.5 days
Task 5 which means it can
Presented by H. Chinunki, chinunki@gmail.com delayed.
be 09/13/12
69. Navigating Through a Project
69
You can see only part of your project on screen
at any time, so when you want to work with the
information in your project, you need to move
around to view all of the information. Project
provides several navigation methods.
Presented by H. Chinunki, chinunki@gmail.com 09/13/12
70. 70
Zoom in or out, viewing a smaller area in
greater detail or a larger area in lesser detail.
Scroll to fields not currently visible on screen.
Move to different fields using different
keystroke combinations.
Go to the date in the Gantt bar chart for a
selected task.
Presented by H. Chinunki, chinunki@gmail.com 09/13/12
71. Creating Summary Tasks
71
If you have a large project, you can group
certain related tasks together under summary
tasks to define the major phases of your project.
For example, if you have five tasks in your
project that are all related to writing, you can
group them under a summary task called
W riting. The tasks under a summary task are
called subtasks.H. Chinunki, chinunki@gmail.com 09/13/12
Presented by
72. 72
Grouping tasks under summary tasks is also
referred to as outlining your project. The outline
format allows you to control the level of detail
Project displays. You can display every task in
your project, or you can display only the
summary tasks. Project allows you to have
multiple outline levels in your project.
Presented by H. Chinunki, chinunki@gmail.com 09/13/12
73. 73
You can use three basic approaches to outline
your project
1. Enter all of the tasks for your project, and then
convert them to summary tasks and subtasks.
2. Enter the subtasks first, and then insert the
summary tasks.
3. Enter the summary tasks first, and then insert
the subtasks.
Presented by H. Chinunki, chinunki@gmail.com 09/13/12
74. 74
You probably will use a combination of the three
approaches as you plan and organize your
project.
Presented by H. Chinunki, chinunki@gmail.com 09/13/12
75. Exercise
75
Change the task name of task 1 from Plan to
Research and R odel.
em
Add a new task 9 (H and Train P
ire ersonnel),
task 14 (P repare Location), and
task 21 (P repare for Opening).
Do not worry about typing a duration. The next
step will do this.
Presented by H. Chinunki, chinunki@gmail.com 09/13/12
76. 76
1. Tasks 2 – 3
Convert the following 2. Tasks 10 – 13
groups of tasks to 3. Tasks 15 – 20
subtasks 4. Tasks 22 - 23
Presented by H. Chinunki, chinunki@gmail.com 09/13/12
77. 77
Select a group of consecutive tasks that you
want to make subtasks.
Click on the Indent button on the Formatting
toolbar
Indent
Presented by H. Chinunki, chinunki@gmail.com 09/13/12
78. 78
The duration of the summary task now reflects
the roll up of its subtasks, including any lag or
lead time.
The summary task starts when its earliest
subtask starts, and ends when its latest subtask
ends.
Presented by H. Chinunki, chinunki@gmail.com 09/13/12
79. Collapsing and Expanding the Outline
79
One of the main benefits of outlining is that you can control
the level of detail that Project displays. If you want to
inform upper Mgt about the status of your project, they
may not be interested in the daily tasks, only the major
phases.
You can collapse (-) the outline to display only summary
tasks.
You can expand (+) the outline to display all of the tasks, or
You can display the subtasks for some summary tasks but
not for Presented by H. Chinunki, chinunki@gmail.com 09/13/12
others.
80. Working with Resources
80
Resources are the people, equipment, and
supplies required to complete a particular task.
Project helps you track the usage and costs of all
of your resources. A resource can be a person
(e.g. Carl Jones), a department (Engineering), a
company (Ross Consulting), a supply (concrete),
or any other entity you need to assign to a task.
Time, however, isChinunki,a resource. 09/13/12
Presented by H. not chinunki@gmail.com
81. 81
To track your resources, you enter them into the
resource pool. The resource pool contains all
the resources available for the project. The
Resource Sheet view allows you to enter and
view resources in the resource pool, as well as
enter and view resource costs, the number of
the resources available, and other information to
help you Presentedscheduling.
with by H. Chinunki, chinunki@gmail.com 09/13/12
82. 82
After you enter your tasks, you can assign the
necessary resources to each task. Project can
then notify you of the hours each resource is
working, whether any resource is over allocated,
and the cost of a task based on the resources
necessary to complete the task.
Presented by H. Chinunki, chinunki@gmail.com 09/13/12
83. Understanding Resources
83
In Project there are two types of resources.
1. Work Resources and
2. Material Resources.
Presented by H. Chinunki, chinunki@gmail.com 09/13/12
84. Work Resources
84
Work resources are the people or equipment
that completes tasks by expending time on the
task. You set up a work resource in the context
of time: maximum units and assignment units. A
worker can be available full-time (100%
maximum units) but may only be assigned to
work part-time on a particular assignment (20%
assignment units).
Presented by H. Chinunki, chinunki@gmail.com 09/13/12
85. Material Resources
85
Material resources are consumable items such
as supplies that are used to complete tasks in a
project. When you assign a material resource to
a task, you specify the material consumption
e.g. (50 tons concrete).
Presented by H. Chinunki, chinunki@gmail.com 09/13/12
86. Creating a Resource Sheet
86
Project allows you to create a resource sheet in
the Resource Sheet view that helps you keep
track of all of your resources and any pertinent
information about those resources. Once you
enter resource information, you can assign
resources to tasks.
To create a resource sheet, click on the
Resource Sheet button on the View Bar.
Presented by H. Chinunki, chinunki@gmail.com 09/13/12
87. 87
If the View Bar is not displayed on your screen
by default, you can click the View menu and
click on View Bar.
Click on the Resource Sheet button
Presented by H. Chinunki, chinunki@gmail.com 09/13/12
88. Entering Work Resources
88
Add the following work resource
Resource Name: She lle y M ha e ls
ic
Initials : SCM
Group : Kitc he n
Std. Rate : 25.00
Ovt. Rate : 35.00
Use default values for the other items.
Presented by H. Chinunki, chinunki@gmail.com 09/13/12
89. Entering Material Resources
89
Add the following material resource:
Resource Name: So uthe rn Wa llp a p e r
Material Label : Ro lls Wa llp a p e r
Initials : SW
Group : De c o ra to r
Cost/ Use : 500.00
Use default values for the other items.
Presented by H. Chinunki, chinunki@gmail.com 09/13/12
90. Enter the following Resources
90
Phillip s Co ns truc tio n Tra c y Sa ntina
She lle y M ha e ls
ic Jo hn Quine a lty
So uthe rn Wa llp a p e r Da nie le Vis o
Bills Co nc re te Ja ne Ke lle r
Sup p lie rs
Ka thry n Wils o n
Presented by H. Chinunki, chinunki@gmail.com 09/13/12
91. Tracking Costs
91
You must start by identifying the
resources available along with their costs.
Resource costs will be multiplied by
duration to calculate project costs.
You have to open the Resource sheet to
specify the project resources and
costs.Presented by H. Chinunki, chinunki@gmail.com 09/13/12
92. Insert A Cost Column
92
To track costs, you insert a Cost
column next to the Resources column.
Presented by H. Chinunki, chinunki@gmail.com 09/13/12
93. 93
Presented by H. Chinunki, chinunki@gmail.com 09/13/12
94. 94
You assign resources, people or material,
to each of the tasks.
A task may have several resources.
When you assign the resources to each
task, the costs will be calculated and
displayed.
Presented by H. Chinunki, chinunki@gmail.com 09/13/12
95. Assigning Resources
95
In the Gantt Chart view, click on the Assign
Resources button on the Standard toolbar.
Assign Resources Icon
Presented by H. Chinunki, chinunki@gmail.com 09/13/12
96. 96
Assign Phillip s Co ns truc tio n to task 3
Assign She lle y M ha e ls to task 18
ic
Assign So uthe rn Wa llp a p e r to task 16, using
20 rolls of wallpaper
Assign other remaining resources to other
tasks.
Presented by H. Chinunki, chinunki@gmail.com 09/13/12
97. 97
Assign Resources to:
1. Calculate costs for each task
2. Calculate the Project total Cost
3. The total project duration
Presented by H. Chinunki, chinunki@gmail.com 09/13/12
98. Move on next
to
•Using Project views
•Over Allocated ……
•Leveling …………..
•Reports ……………
98 Presented by H. Chinunki, chinunki@gmail.com 09/13/12