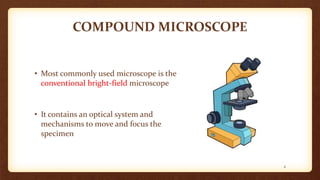
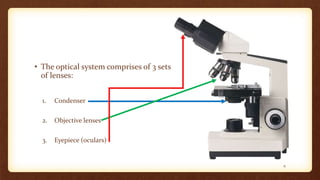
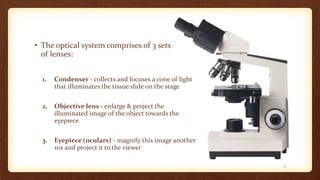
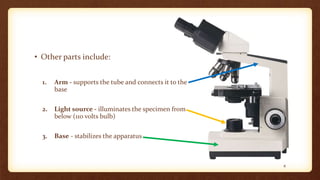
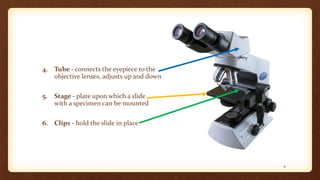
COMPOUND
MICROSCOPE
DR. SYED WAJAHAT HASIB
LECTURER (ANATOMY)
1
OBJECTIVES
• By the end of this 2-hour lab skills session, the 1st year MBBS student
should be able to:
• Describe the compound microscope
• Identify different parts of a compound microscope
• Describe the functions of different parts of a compound microscope
2
3
COMPOUND MICROSCOPE
• Most commonly used microscope is the
conventional bright-field microscope
• It contains an optical system and
mechanisms to move and focus the
specimen
4
PARTS OF A COMPOUND
MICROSCOPE
5
• The optical system comprises of 3 sets
of lenses:
1. Condenser
2. Objective lenses
3. Eyepiece (oculars)
6
• The optical system comprises of 3 sets
of lenses:
1. Condenser - collects and focuses a cone of light
that illuminates the tissue slide on the stage
2. Objective lens - enlarge & project the
illuminated image of the object towards the
eyepiece
3. Eyepiece (oculars) - magnify this image another
10x and project it to the viewer
7
• Other parts include:
1. Arm - supports the tube and connects it to the
base
2. Light source - illuminates the specimen from
below (110 volts bulb)
3. Base - stabilizes the apparatus
8
4. Tube - connects the eyepiece to the
objective lenses, adjusts up and down
5. Stage - plate upon which a slide
with a specimen can be mounted
6. Clips - hold the slide in place
9
7. Nosepiece - revolving plate attaching
different objective lenses
8. Focus:
• Coarse focus - raises / lowers stage to bring
image into focus
• Fine adjustment - brings image into sharp focus
10
HANDLING PROTOCOL
• Handle the microscope JUST DON’T MISHANDLE IT
• Always make sure they are placed on flat surface
• Make sure all backpacks are cleared from the table before you work on
a microscope
• Carry with one hand on the Arm and one hand on the Base, hold close
to your body
• Don’t lower the tube blindly on slide, do under direct vision
• Don’t touch the specimen on slide
11
HOW TO FOCUS
• Start with the lowest power objective lens first
• Place slide on stage with specimen in the center
• Place the lens down as close to the specimen as possible without
touching it, while looking from the side
• Look with both eyes
12
• Widen the gap b/w the binocular eyepieces & while looking in the eye
piece start closing in slowly until the two eye pieces circles combine
into one circular field
• Focus upward with coarse adjustment knob while looking through the
eyepiece lens until the image is sharp
• Sharpen the image by fine adjustment knob
• Continue with subsequent objective lenses and fine focus each time
13
TASK
• A student wants to view cells under the compound microscope at a
total magnification of 400X. If the eyepiece is 10X, which of the
following objective lenses should be used?
A 4X
B 10X
C 40X
D 100X
How do we calculate
magnification?
Eyepiece X Objective lens =
Total magnification
Correct Answer = C
14

Microscope.pptx

  • 1.
    COMPOUND MICROSCOPE DR. SYED WAJAHATHASIB LECTURER (ANATOMY) 1
  • 2.
    OBJECTIVES • By theend of this 2-hour lab skills session, the 1st year MBBS student should be able to: • Describe the compound microscope • Identify different parts of a compound microscope • Describe the functions of different parts of a compound microscope 2
  • 3.
  • 4.
    COMPOUND MICROSCOPE • Mostcommonly used microscope is the conventional bright-field microscope • It contains an optical system and mechanisms to move and focus the specimen 4
  • 5.
    PARTS OF ACOMPOUND MICROSCOPE 5
  • 6.
    • The opticalsystem comprises of 3 sets of lenses: 1. Condenser 2. Objective lenses 3. Eyepiece (oculars) 6
  • 7.
    • The opticalsystem comprises of 3 sets of lenses: 1. Condenser - collects and focuses a cone of light that illuminates the tissue slide on the stage 2. Objective lens - enlarge & project the illuminated image of the object towards the eyepiece 3. Eyepiece (oculars) - magnify this image another 10x and project it to the viewer 7
  • 8.
    • Other partsinclude: 1. Arm - supports the tube and connects it to the base 2. Light source - illuminates the specimen from below (110 volts bulb) 3. Base - stabilizes the apparatus 8
  • 9.
    4. Tube -connects the eyepiece to the objective lenses, adjusts up and down 5. Stage - plate upon which a slide with a specimen can be mounted 6. Clips - hold the slide in place 9
  • 10.
    7. Nosepiece -revolving plate attaching different objective lenses 8. Focus: • Coarse focus - raises / lowers stage to bring image into focus • Fine adjustment - brings image into sharp focus 10
  • 11.
    HANDLING PROTOCOL • Handlethe microscope JUST DON’T MISHANDLE IT • Always make sure they are placed on flat surface • Make sure all backpacks are cleared from the table before you work on a microscope • Carry with one hand on the Arm and one hand on the Base, hold close to your body • Don’t lower the tube blindly on slide, do under direct vision • Don’t touch the specimen on slide 11
  • 12.
    HOW TO FOCUS •Start with the lowest power objective lens first • Place slide on stage with specimen in the center • Place the lens down as close to the specimen as possible without touching it, while looking from the side • Look with both eyes 12
  • 13.
    • Widen thegap b/w the binocular eyepieces & while looking in the eye piece start closing in slowly until the two eye pieces circles combine into one circular field • Focus upward with coarse adjustment knob while looking through the eyepiece lens until the image is sharp • Sharpen the image by fine adjustment knob • Continue with subsequent objective lenses and fine focus each time 13
  • 14.
    TASK • A studentwants to view cells under the compound microscope at a total magnification of 400X. If the eyepiece is 10X, which of the following objective lenses should be used? A 4X B 10X C 40X D 100X How do we calculate magnification? Eyepiece X Objective lens = Total magnification Correct Answer = C 14

Editor's Notes

  • #7 Condenser - collects and focuses a cone of light that illuminates the tissue slide on the stage OL - enlarge & project the illuminated image of the object towards the eyepiece; 4x, 10x, 40x, and 100x Eye piece - magnify this image another 10x and project it to the viewer
  • #9 Light source is also called illuminator