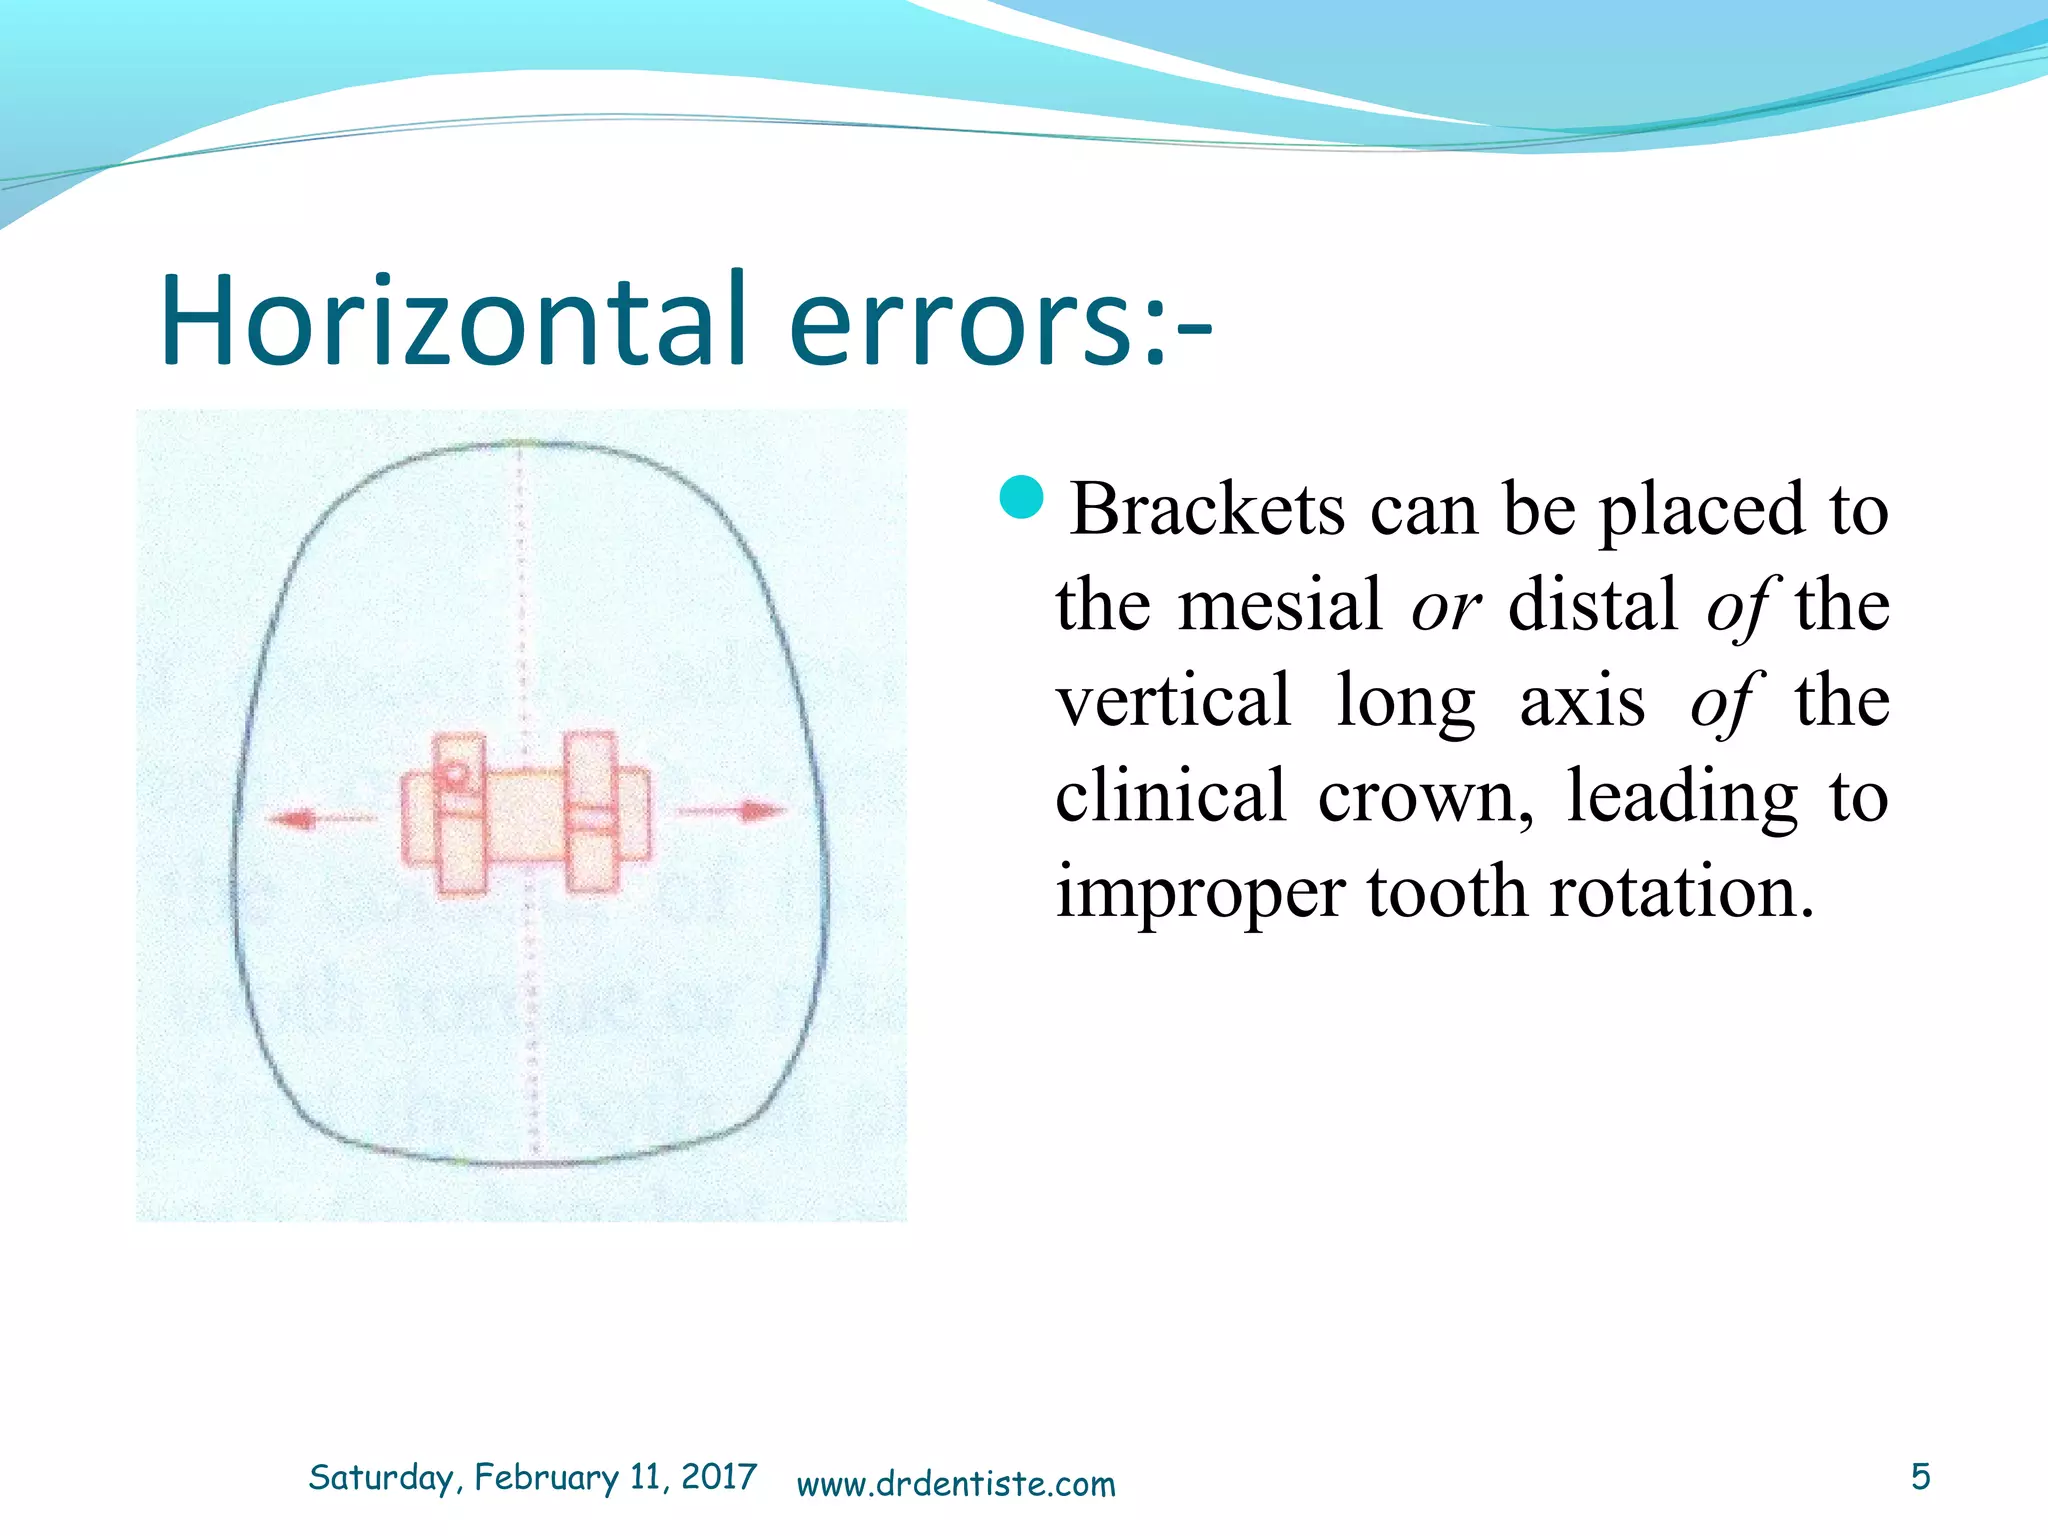
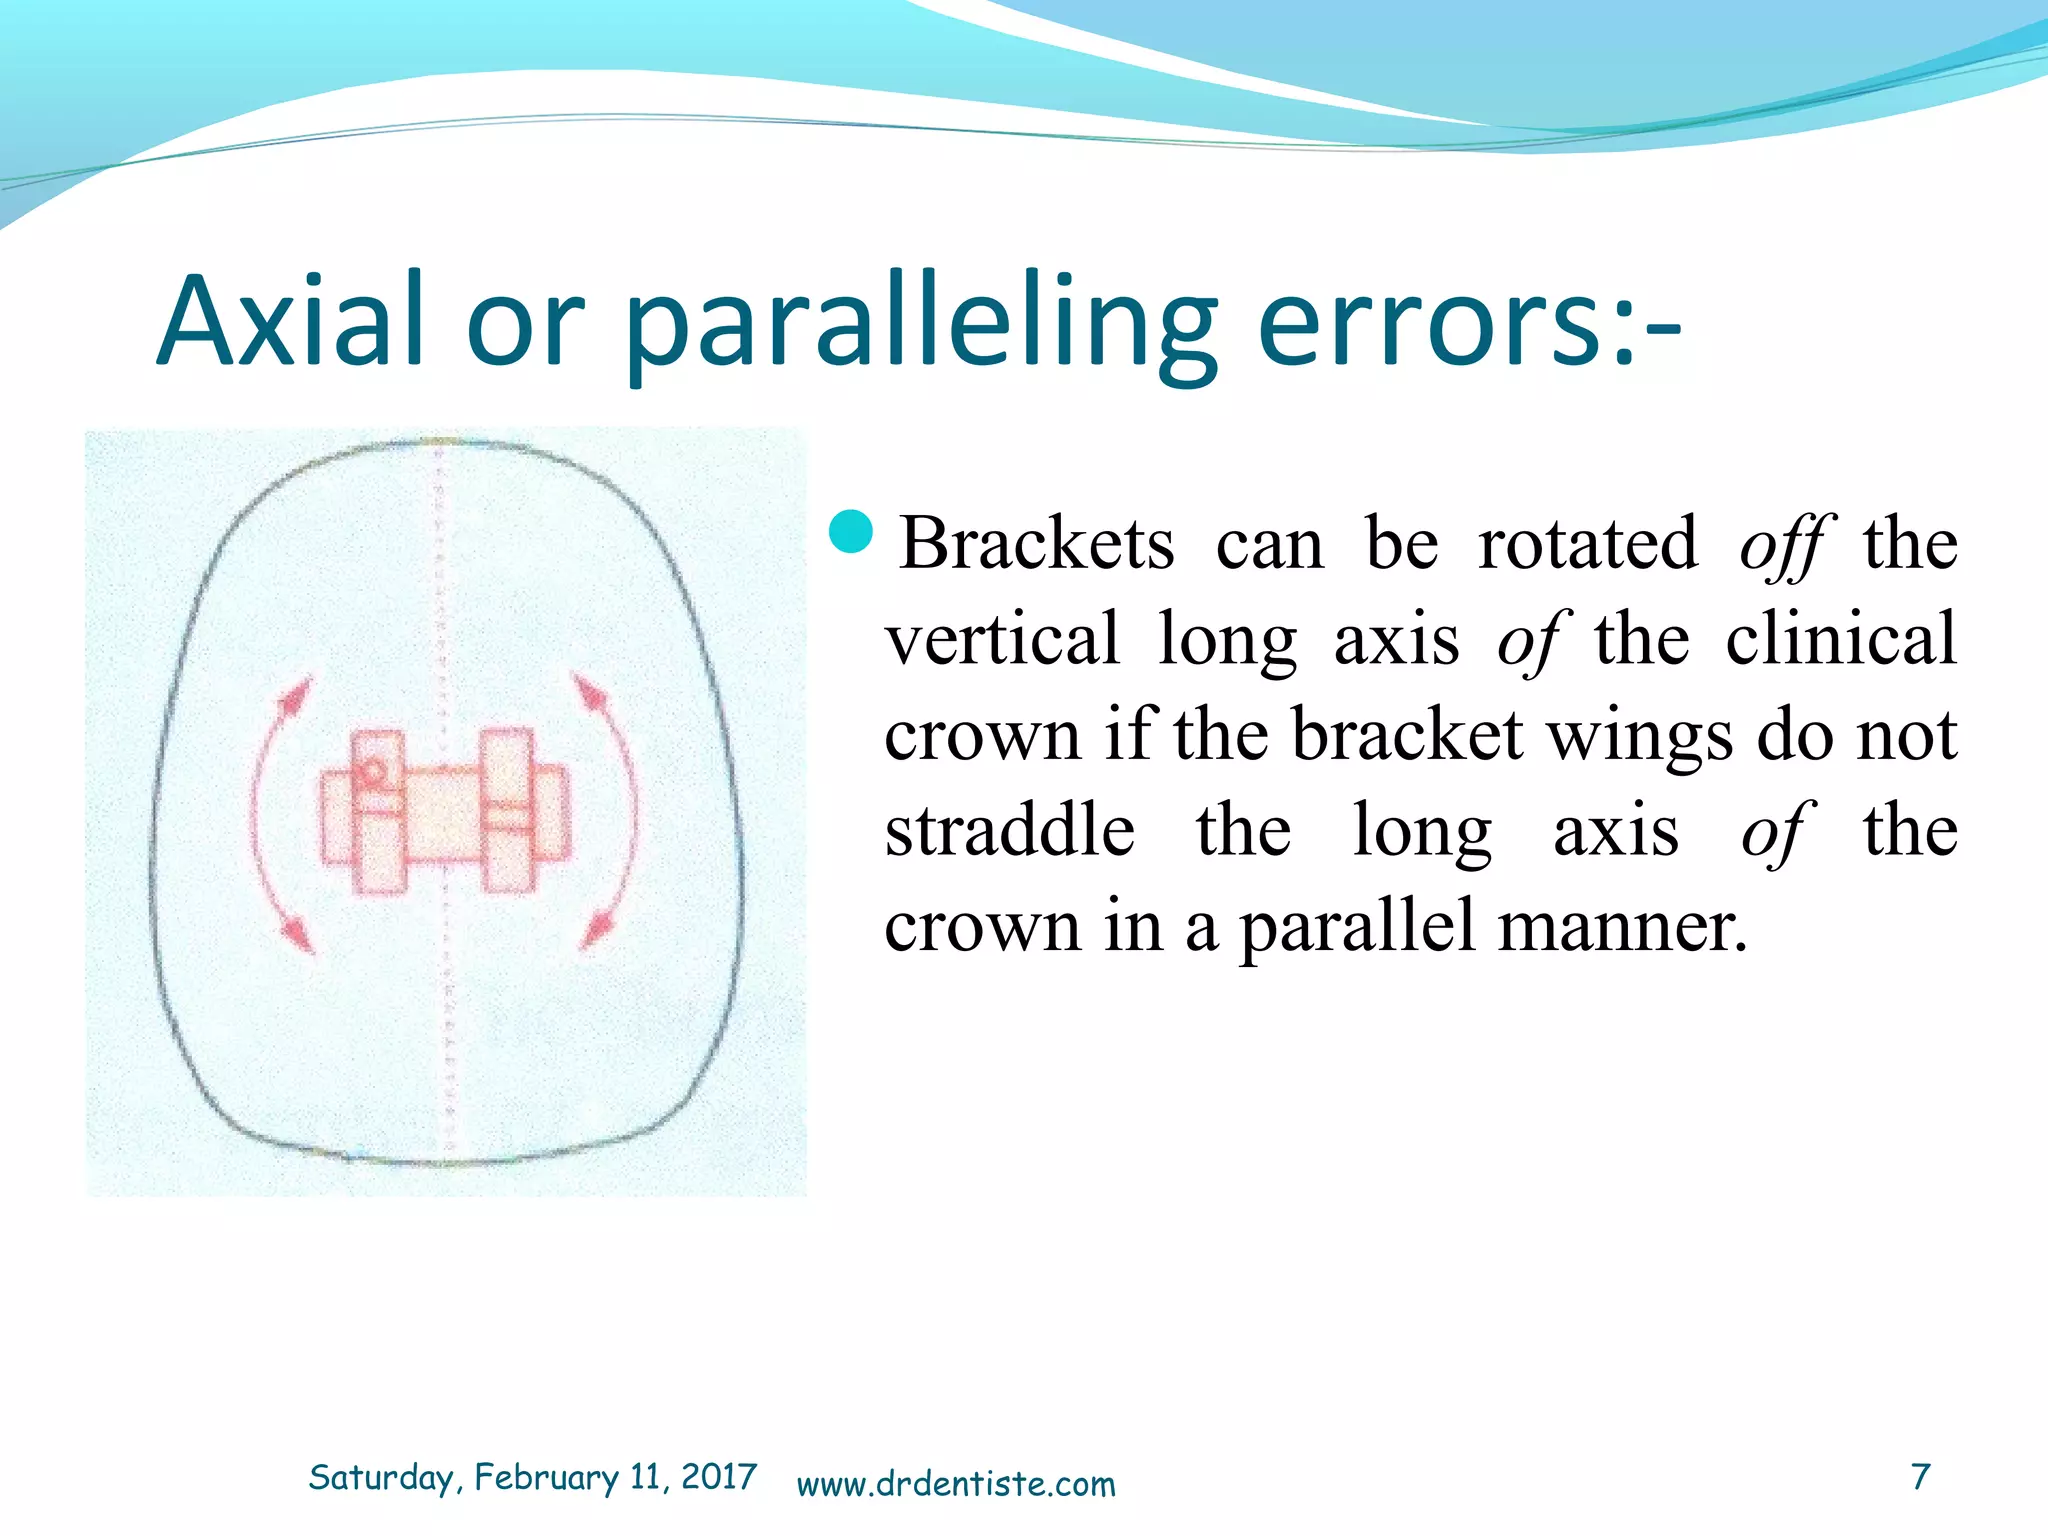
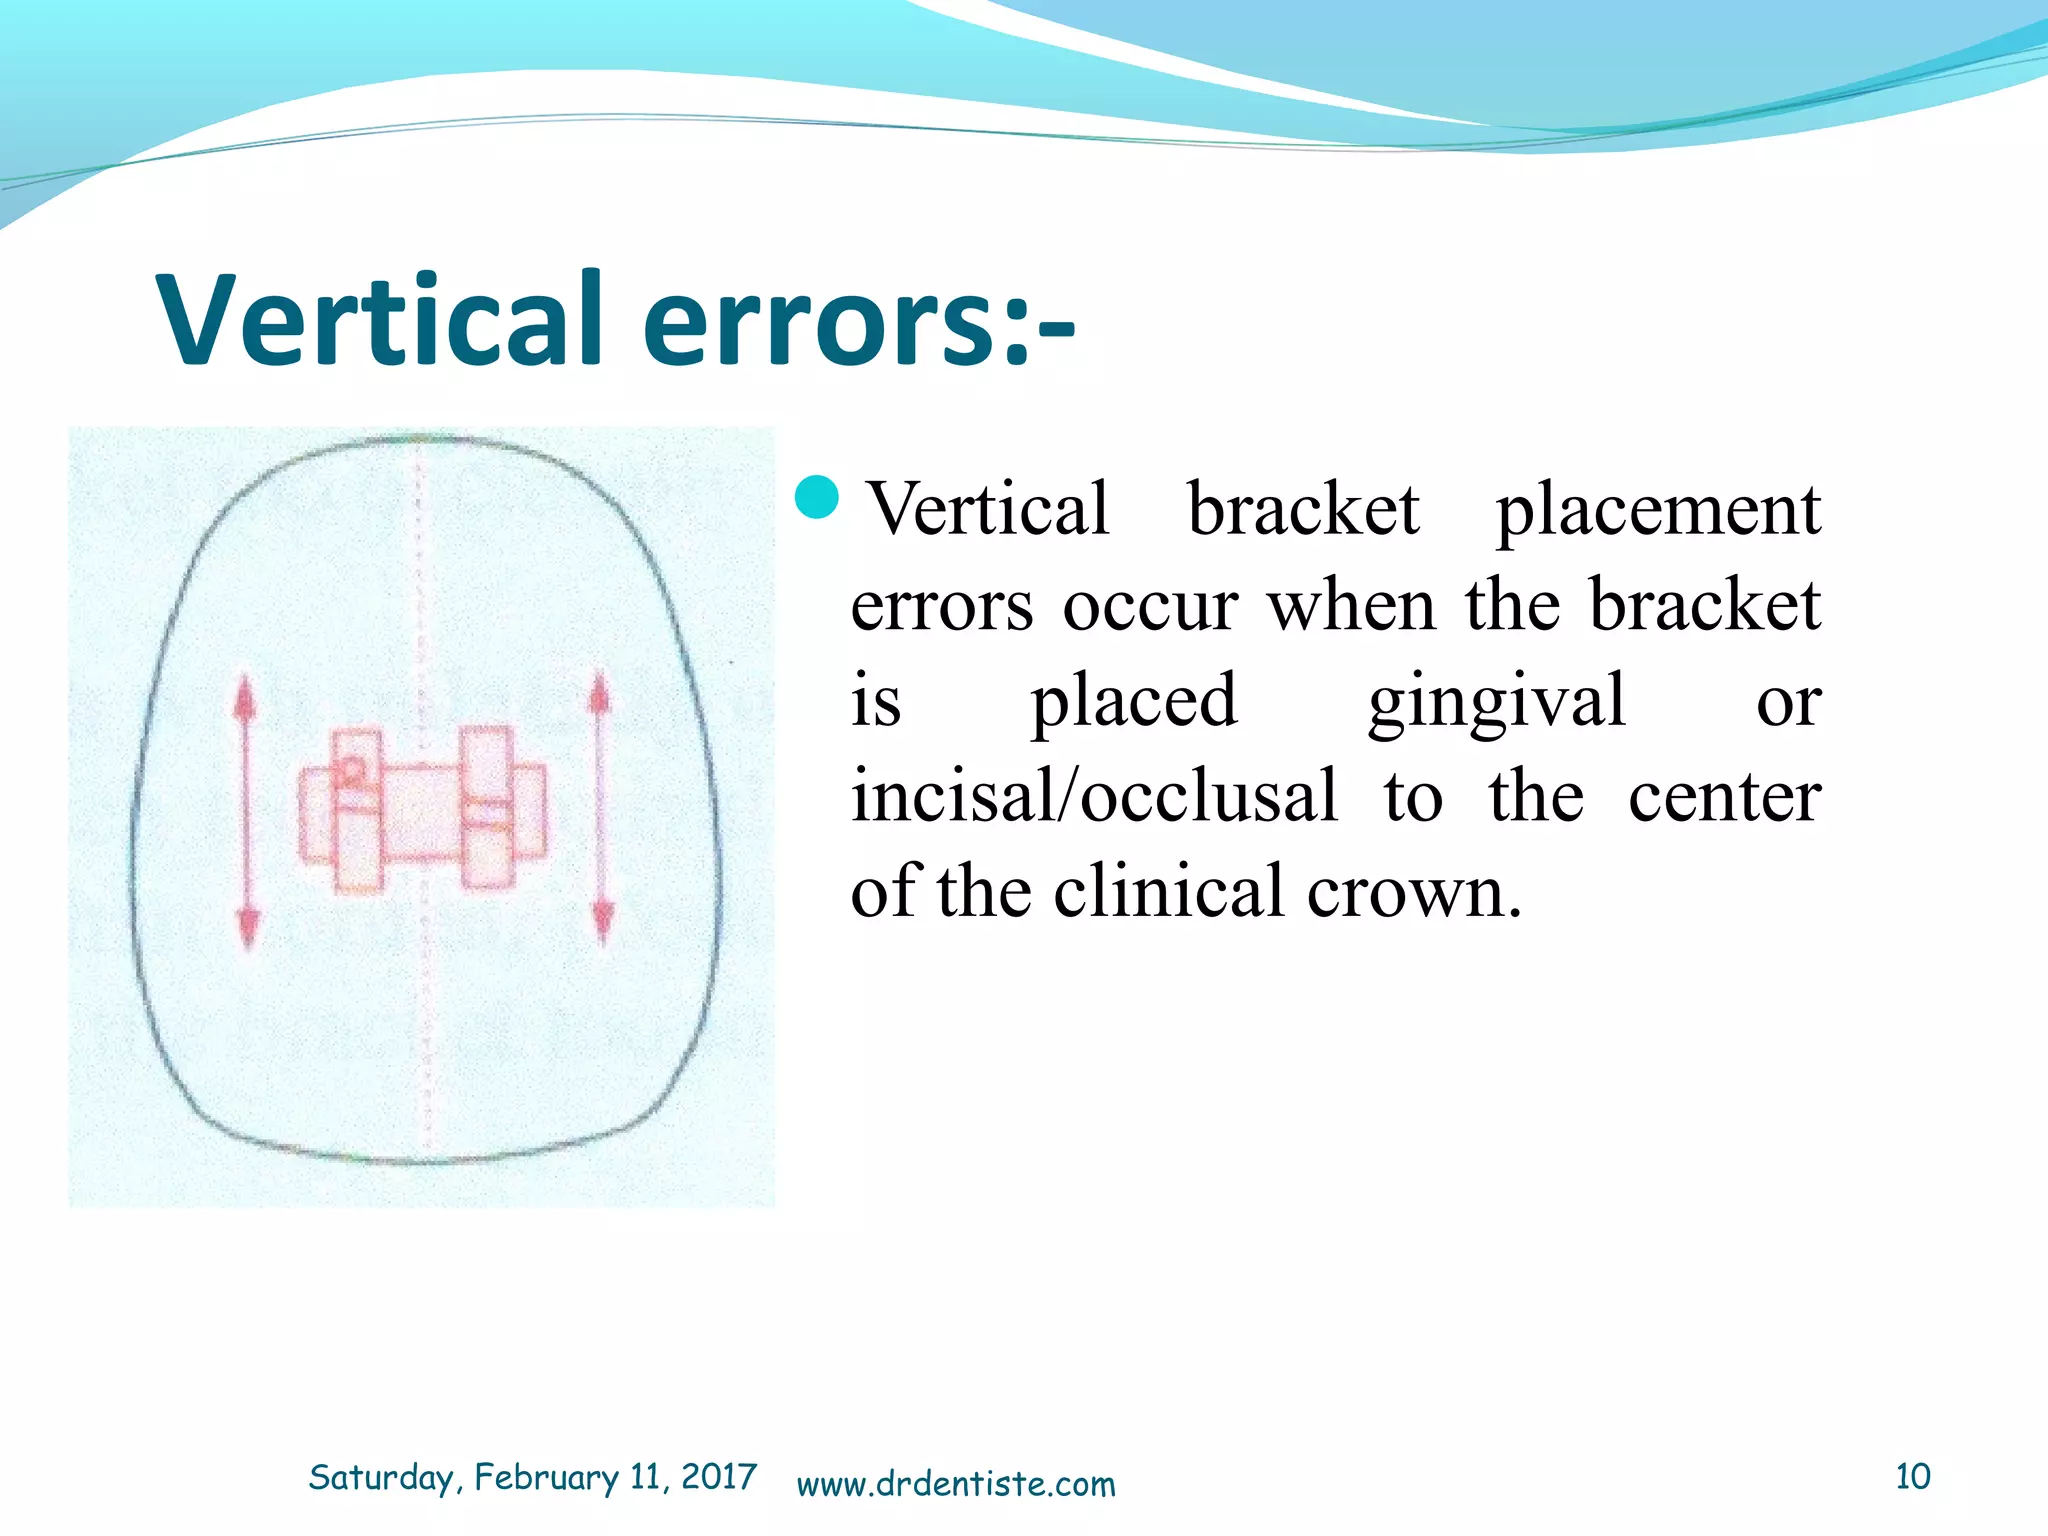
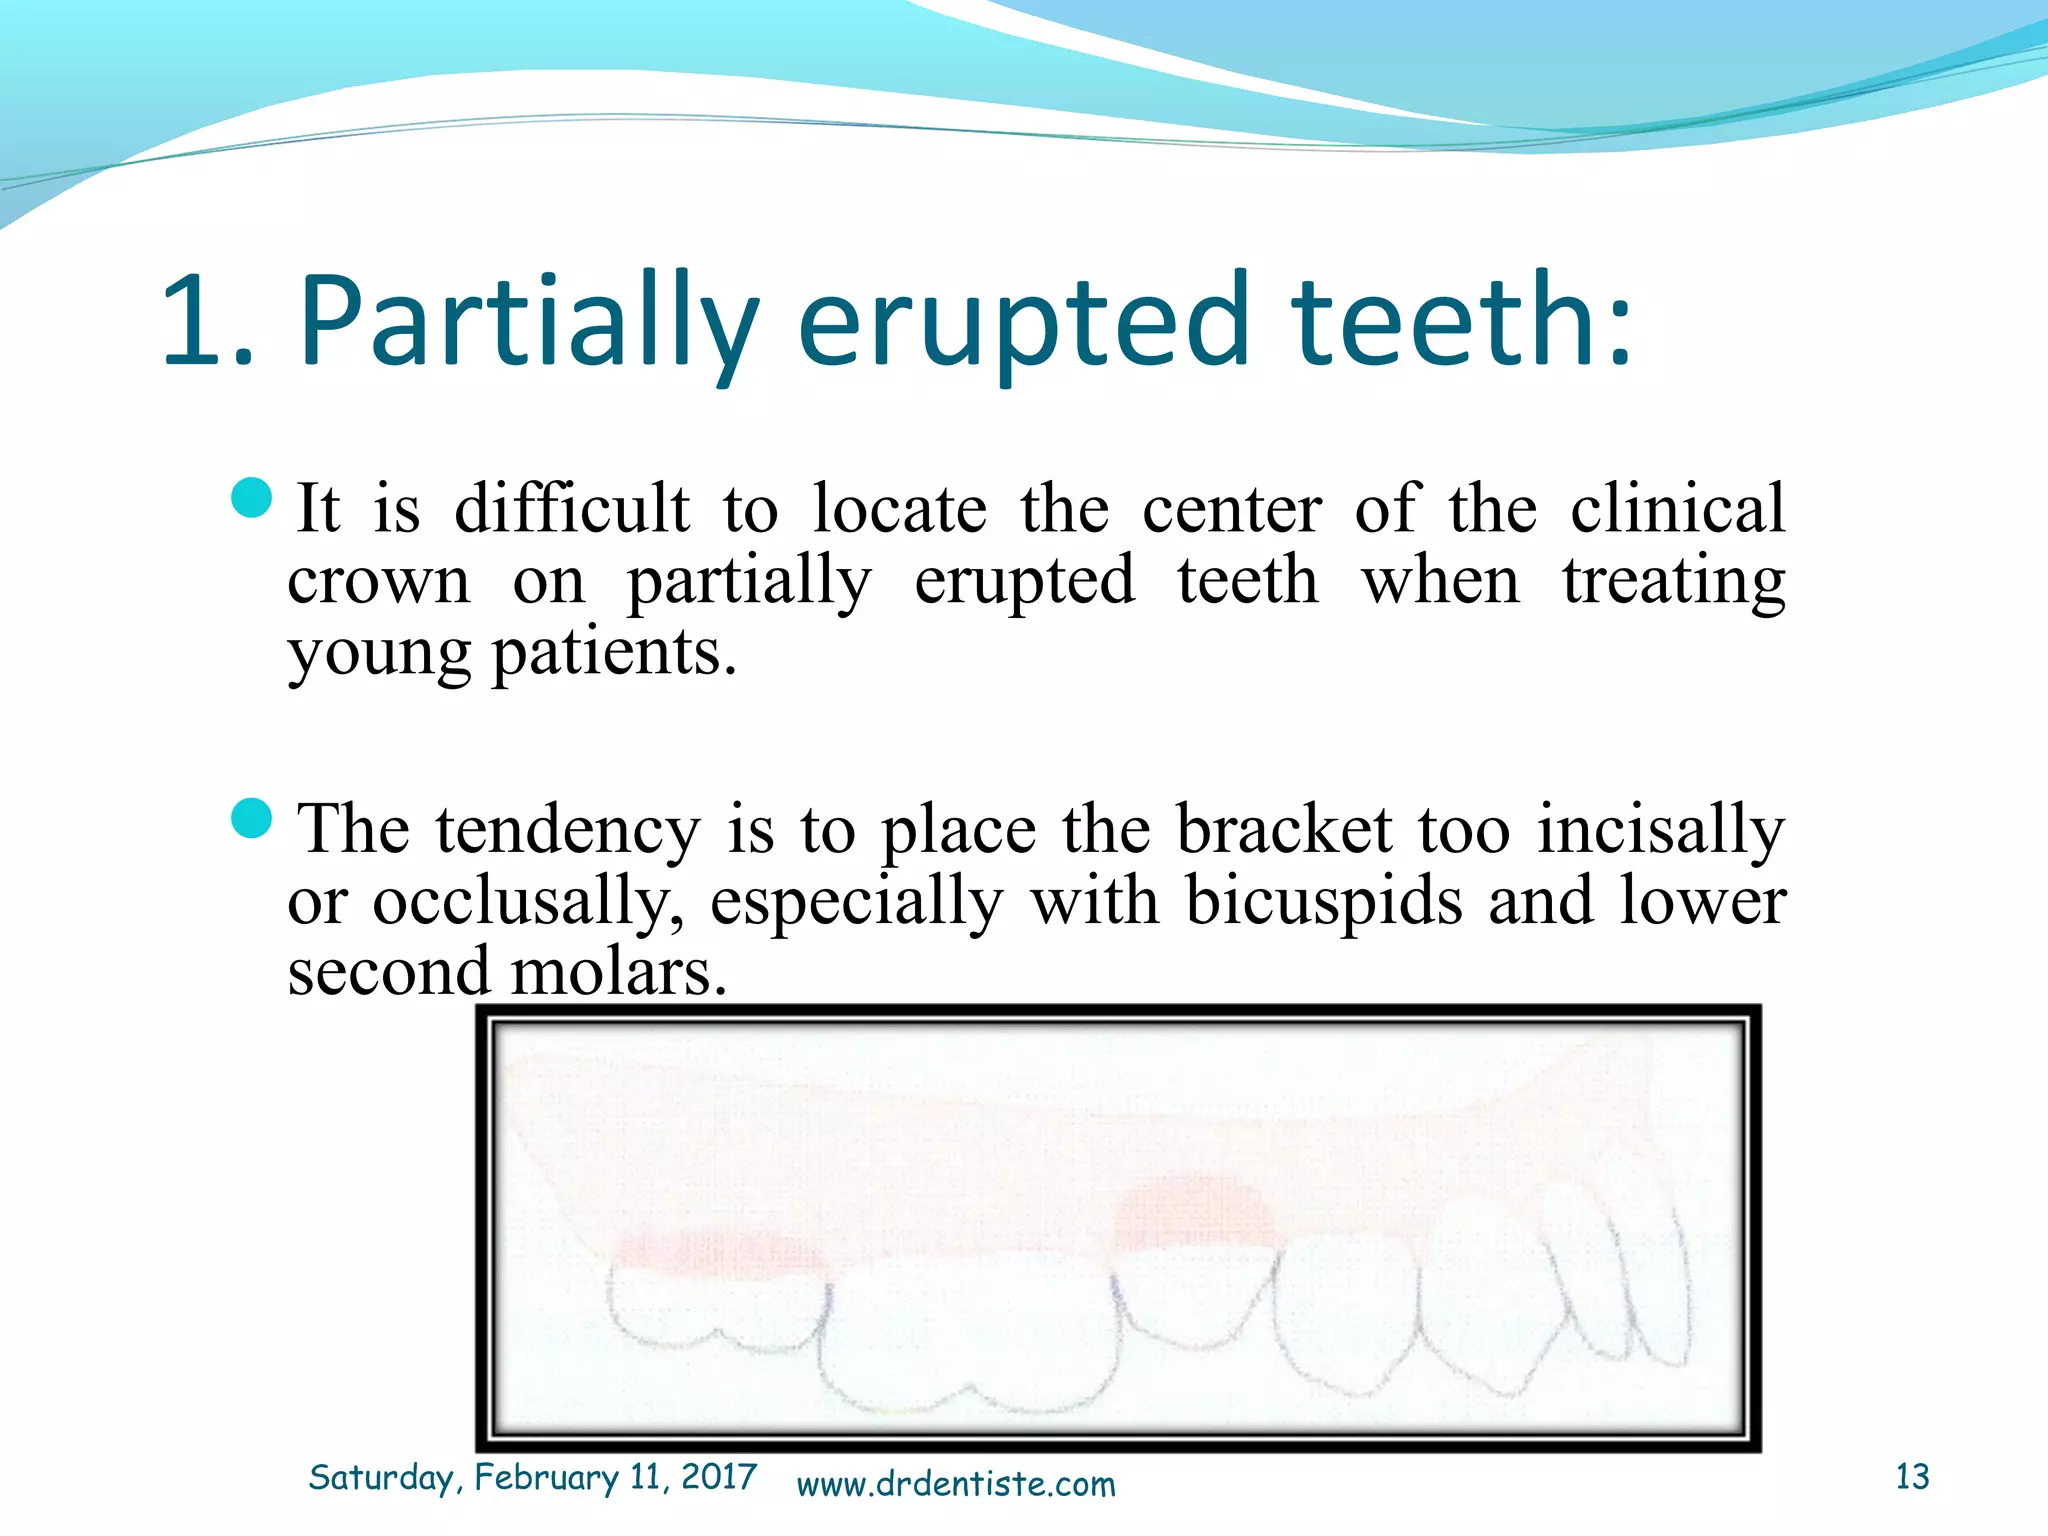
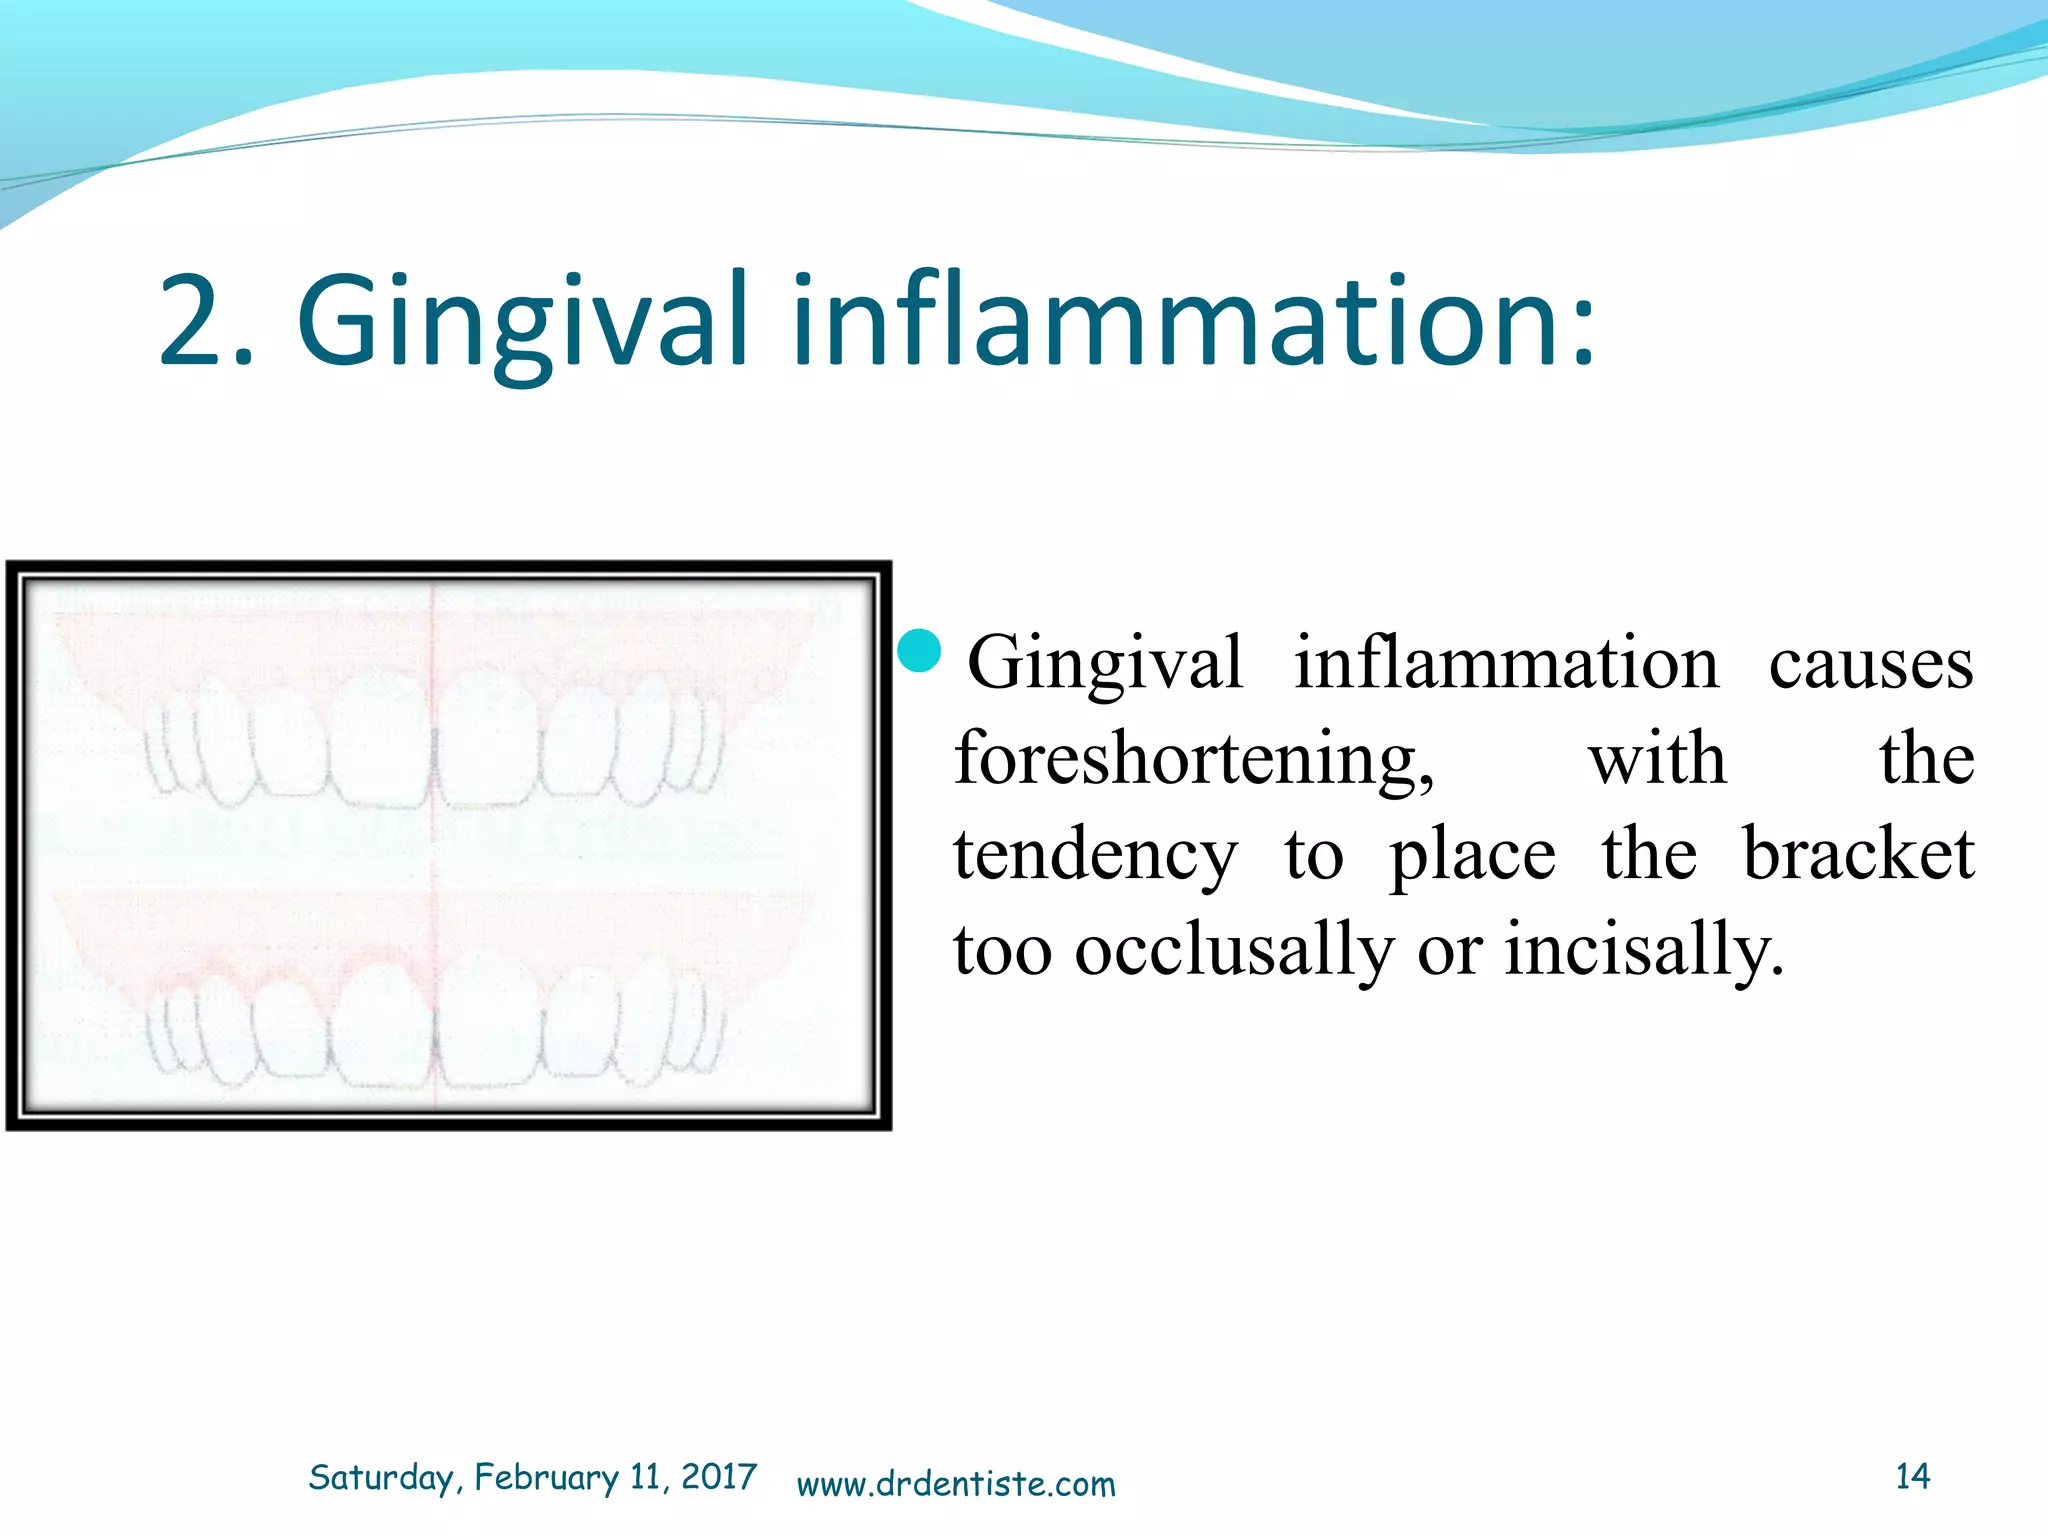
Saturday, February 11, 2017 1www.drdentiste.com
Saturday, February 11, 2017 2www.drdentiste.com
Andrew recommended that pre-adjusted appliance
brackets be placed with the twin bracket wings
straddling, in a parallel fashion, to the vertical long
axis of the clinical crown,
And that the center of the bracket slot be placed on
the center of the clinical crown.
Saturday, February 11, 2017 3www.drdentiste.com
Potential errors or potential deviations from this desired
position can occur as follows:
Saturday, February 11, 2017 4www.drdentiste.com
Horizontal errors:­
Brackets can be placed to
the mesial or distal of the
vertical long axis of the
clinical crown, leading to
improper tooth rotation.
Saturday, February 11, 2017 5www.drdentiste.com
Elimination of such errors can be best achieved by
visualizing the vertical long axis of the crown
directly from the facial surface, as well as from the
incisal or occlusal surface with a mouth mirror.
It is even better to draw a line through the vertical
long axis of the clinical crown for more accurate
visualization.
Saturday, February 11, 2017 6www.drdentiste.com
Axial or paralleling errors:­
Brackets can be rotated off the
vertical long axis of the clinical
crown if the bracket wings do not
straddle the long axis of the
crown in a parallel manner.
Saturday, February 11, 2017 7www.drdentiste.com
Thickness errors:­
Such errors can occur if excessive
adhesive is left underneath one
portion of the bracket base, or if the
contour of the tooth does not
correspond accurately to the
contour of the base of the bracket.
Saturday, February 11, 2017 8www.drdentiste.com
Such errors can cause improper tooth torque or
rotation, and can be eliminated by pressing the
bracket against the tooth at placement, so that
excessive adhesive flows from beneath the
bracket,
or by contouring the bracket base to more
accurately fit the tooth surface.
Saturday, February 11, 2017 9www.drdentiste.com
Vertical errors:­
Vertical bracket placement
errors occur when the bracket
is placed gingival or
incisal/occlusal to the center
of the clinical crown.
Saturday, February 11, 2017 10www.drdentiste.com
Such errors lead to extrusion or intrusion of teeth, as
well as potential torque and in/out errors.
The human eye is quite accurate at bisecting and
locating the center of a given object such as a crown.
Therefore, brackets can be placed accurately using
direct visualization on fully erupted and anatomically
normal teeth.
Saturday, February 11, 2017 11www.drdentiste.com
Saturday, February 11, 2017 12www.drdentiste.com
1. Partially erupted teeth:
It is difficult to locate the center of the clinical
crown on partially erupted teeth when treating
young patients.
The tendency is to place the bracket too incisally
or occlusally, especially with bicuspids and lower
second molars.
Saturday, February 11, 2017 13www.drdentiste.com
2. Gingival inflammation:
Gingival inflammation causes
foreshortening, with the
tendency to place the bracket
too occlusally or incisally.
Saturday, February 11, 2017 14www.drdentiste.com
3. Teeth with palatally or lingually
displaced roots:
With such teeth, gingival tissue covers a greater portion of
the clinical crown than normal, producing a shorter
clinical crown. The tendency is to place the bracket too
incisally or occlusally.
Saturday, February 11, 2017 15www.drdentiste.com
Saturday, February 11, 2017 16www.drdentiste.com
1. Incisal or Occlusal crown fractures or
tooth wear:
It is difficult to visualize the center of the
clinical crown since the apparent clinical crown
is foreshortened.
Saturday, February 11, 2017 17www.drdentiste.com
Correction of this problem can be made by either
restoring the crown to its appropriate length, or by
estimating how long the crown was before fracture or
wear.
Saturday, February 11, 2017 18www.drdentiste.com
2. Crowns with long tapered buccal
cusps:
Occasionally a crown on a tooth such as a cuspid
or bicuspid will show an unusually long and
tapered buccal cusp.
If the bracket is placed in the center of the clinical
crown, adjacent marginal ridges will not be
properly aligned.
This situation can be corrected by selectively
reducing the height of the cusp prior to bracket
placement.
Saturday, February 11, 2017 19www.drdentiste.com
Saturday, February 11, 2017 20www.drdentiste.com
In an attempt to reduce the errors inherent in using only a
direct visualization method of bracket placement, a study
was carried out to provide a method that could serve as a
supplement to the direct visualization technique. .
Saturday, February 11, 2017 21www.drdentiste.com
• The result of this study was the development of
a bracket placement chart:
Saturday, February 11, 2017 22www.drdentiste.com
Use of the Bracket Placement Chart eliminates
potential gingival errors because measurements are
made from the occlusal or incisal edge of the teeth.
This alone is a major advantage, since the majority of
vertical bracket placement errors that do occur are the
results of inability to accurately visualize the gingival
half of the clinical crown.
Saturday, February 11, 2017 23www.drdentiste.com
The only potential errors that cannot be avoided are
on crowns with incisal or occlusal fractures or wear,
or on crowns with unusually long tapered facial cusps.
When these situations occur, appropriate millimeter
adjustment needs to be made to allow the crown to be
properly positioned.
Saturday, February 11, 2017 24www.drdentiste.com
The technique that has been developed for
bracket placement with this method is as
follows:
Step one
Divider and a millimeter ruler are used to measure
the clinical crown heights on as many fully
erupted teeth as possible on the patient's study
models.
Saturday, February 11, 2017 25www.drdentiste.com
Step two
These figures are recorded, divided in half and
rounded to the nearest .5mm
Step three
The row on the bracket placement chart that
contains the greatest number of recorded figures is
selected for bracket placement.
Saturday, February 11, 2017 26www.drdentiste.com
Step four
At the time of banding and bonding, brackets are
placed by visualizing the vertical long axis of clinical
crowns (buccal groove on the molars) as a vertical
reference and the estimated center of the clinical
crown as a horizontal reference.
Saturday, February 11, 2017 27www.drdentiste.com
Step five:
A bracket placement gauge is then used to confirm that
the brackets are at a height that represents the
appropriate figures in the selected column of the bracket
placement chart.
Saturday, February 11, 2017 28www.drdentiste.com
Saturday, February 11, 2017 www.drdentiste.com 29

mbt bracket placement

  • 1.
    Saturday, February 11,2017 1www.drdentiste.com
  • 2.
    Saturday, February 11,2017 2www.drdentiste.com
  • 3.
    Andrew recommended thatpre-adjusted appliance brackets be placed with the twin bracket wings straddling, in a parallel fashion, to the vertical long axis of the clinical crown, And that the center of the bracket slot be placed on the center of the clinical crown. Saturday, February 11, 2017 3www.drdentiste.com
  • 4.
    Potential errors orpotential deviations from this desired position can occur as follows: Saturday, February 11, 2017 4www.drdentiste.com
  • 5.
    Horizontal errors:­ Brackets canbe placed to the mesial or distal of the vertical long axis of the clinical crown, leading to improper tooth rotation. Saturday, February 11, 2017 5www.drdentiste.com
  • 6.
    Elimination of sucherrors can be best achieved by visualizing the vertical long axis of the crown directly from the facial surface, as well as from the incisal or occlusal surface with a mouth mirror. It is even better to draw a line through the vertical long axis of the clinical crown for more accurate visualization. Saturday, February 11, 2017 6www.drdentiste.com
  • 7.
    Axial or parallelingerrors:­ Brackets can be rotated off the vertical long axis of the clinical crown if the bracket wings do not straddle the long axis of the crown in a parallel manner. Saturday, February 11, 2017 7www.drdentiste.com
  • 8.
    Thickness errors:­ Such errorscan occur if excessive adhesive is left underneath one portion of the bracket base, or if the contour of the tooth does not correspond accurately to the contour of the base of the bracket. Saturday, February 11, 2017 8www.drdentiste.com
  • 9.
    Such errors cancause improper tooth torque or rotation, and can be eliminated by pressing the bracket against the tooth at placement, so that excessive adhesive flows from beneath the bracket, or by contouring the bracket base to more accurately fit the tooth surface. Saturday, February 11, 2017 9www.drdentiste.com
  • 10.
    Vertical errors:­ Vertical bracketplacement errors occur when the bracket is placed gingival or incisal/occlusal to the center of the clinical crown. Saturday, February 11, 2017 10www.drdentiste.com
  • 11.
    Such errors leadto extrusion or intrusion of teeth, as well as potential torque and in/out errors. The human eye is quite accurate at bisecting and locating the center of a given object such as a crown. Therefore, brackets can be placed accurately using direct visualization on fully erupted and anatomically normal teeth. Saturday, February 11, 2017 11www.drdentiste.com
  • 12.
    Saturday, February 11,2017 12www.drdentiste.com
  • 13.
    1. Partially eruptedteeth: It is difficult to locate the center of the clinical crown on partially erupted teeth when treating young patients. The tendency is to place the bracket too incisally or occlusally, especially with bicuspids and lower second molars. Saturday, February 11, 2017 13www.drdentiste.com
  • 14.
    2. Gingival inflammation: Gingivalinflammation causes foreshortening, with the tendency to place the bracket too occlusally or incisally. Saturday, February 11, 2017 14www.drdentiste.com
  • 15.
    3. Teeth withpalatally or lingually displaced roots: With such teeth, gingival tissue covers a greater portion of the clinical crown than normal, producing a shorter clinical crown. The tendency is to place the bracket too incisally or occlusally. Saturday, February 11, 2017 15www.drdentiste.com
  • 16.
    Saturday, February 11,2017 16www.drdentiste.com
  • 17.
    1. Incisal orOcclusal crown fractures or tooth wear: It is difficult to visualize the center of the clinical crown since the apparent clinical crown is foreshortened. Saturday, February 11, 2017 17www.drdentiste.com
  • 18.
    Correction of thisproblem can be made by either restoring the crown to its appropriate length, or by estimating how long the crown was before fracture or wear. Saturday, February 11, 2017 18www.drdentiste.com
  • 19.
    2. Crowns withlong tapered buccal cusps: Occasionally a crown on a tooth such as a cuspid or bicuspid will show an unusually long and tapered buccal cusp. If the bracket is placed in the center of the clinical crown, adjacent marginal ridges will not be properly aligned. This situation can be corrected by selectively reducing the height of the cusp prior to bracket placement. Saturday, February 11, 2017 19www.drdentiste.com
  • 20.
    Saturday, February 11,2017 20www.drdentiste.com
  • 21.
    In an attemptto reduce the errors inherent in using only a direct visualization method of bracket placement, a study was carried out to provide a method that could serve as a supplement to the direct visualization technique. . Saturday, February 11, 2017 21www.drdentiste.com
  • 22.
    • The resultof this study was the development of a bracket placement chart: Saturday, February 11, 2017 22www.drdentiste.com
  • 23.
    Use of theBracket Placement Chart eliminates potential gingival errors because measurements are made from the occlusal or incisal edge of the teeth. This alone is a major advantage, since the majority of vertical bracket placement errors that do occur are the results of inability to accurately visualize the gingival half of the clinical crown. Saturday, February 11, 2017 23www.drdentiste.com
  • 24.
    The only potentialerrors that cannot be avoided are on crowns with incisal or occlusal fractures or wear, or on crowns with unusually long tapered facial cusps. When these situations occur, appropriate millimeter adjustment needs to be made to allow the crown to be properly positioned. Saturday, February 11, 2017 24www.drdentiste.com
  • 25.
    The technique thathas been developed for bracket placement with this method is as follows: Step one Divider and a millimeter ruler are used to measure the clinical crown heights on as many fully erupted teeth as possible on the patient's study models. Saturday, February 11, 2017 25www.drdentiste.com
  • 26.
    Step two These figuresare recorded, divided in half and rounded to the nearest .5mm Step three The row on the bracket placement chart that contains the greatest number of recorded figures is selected for bracket placement. Saturday, February 11, 2017 26www.drdentiste.com
  • 27.
    Step four At thetime of banding and bonding, brackets are placed by visualizing the vertical long axis of clinical crowns (buccal groove on the molars) as a vertical reference and the estimated center of the clinical crown as a horizontal reference. Saturday, February 11, 2017 27www.drdentiste.com
  • 28.
    Step five: A bracketplacement gauge is then used to confirm that the brackets are at a height that represents the appropriate figures in the selected column of the bracket placement chart. Saturday, February 11, 2017 28www.drdentiste.com
  • 29.
    Saturday, February 11,2017 www.drdentiste.com 29