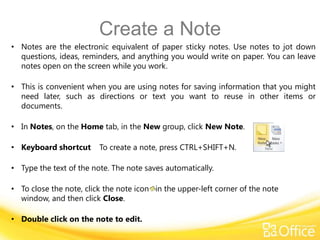
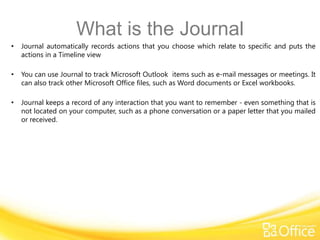
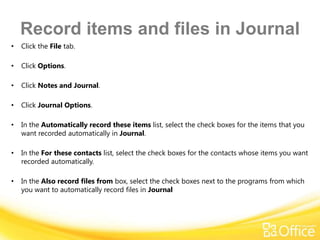
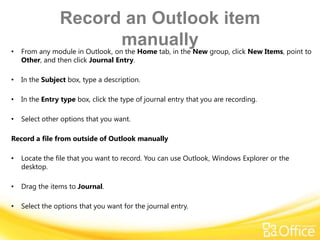
®           ®
Microsoft Outlook 2010 Training

Journal and Notes

                        NaveenKumar Namachivayam
                            Founder - testTalk Academy
                                  http://naveenkumarn.in
Course contents
• Create a Note
• Editing a Note
• What is the Journal
• Create a Journal Entry
• Summary
Create a Note
• Notes are the electronic equivalent of paper sticky notes. Use notes to jot down
  questions, ideas, reminders, and anything you would write on paper. You can leave
  notes open on the screen while you work.

• This is convenient when you are using notes for saving information that you might
  need later, such as directions or text you want to reuse in other items or
  documents.

• In Notes, on the Home tab, in the New group, click New Note.

• Keyboard shortcut      To create a note, press CTRL+SHIFT+N.

• Type the text of the note. The note saves automatically.

• To close the note, click the note icon in the upper-left corner of the note
  window, and then click Close.

• Double click on the note to edit.
What is the Journal
•   Journal automatically records actions that you choose which relate to specific and puts the
    actions in a Timeline view

•   You can use Journal to track Microsoft Outlook items such as e-mail messages or meetings. It
    can also track other Microsoft Office files, such as Word documents or Excel workbooks.

•   Journal keeps a record of any interaction that you want to remember - even something that is
    not located on your computer, such as a phone conversation or a paper letter that you mailed
    or received.
Record items and files in Journal
•   Click the File tab.

•   Click Options.

•   Click Notes and Journal.

•   Click Journal Options.

•   In the Automatically record these items list, select the check boxes for the items that you
    want recorded automatically in Journal.

•   In the For these contacts list, select the check boxes for the contacts whose items you want
    recorded automatically.

•   In the Also record files from box, select the check boxes next to the programs from which
    you want to automatically record files in Journal
Record an Outlook item
•
                      manually
    From any module in Outlook, on the Home tab, in the New group, click New Items, point to
    Other, and then click Journal Entry.

•   In the Subject box, type a description.

•   In the Entry type box, click the type of journal entry that you are recording.

•   Select other options that you want.

Record a file from outside of Outlook manually

•   Locate the file that you want to record. You can use Outlook, Windows Explorer or the
    desktop.

•   Drag the items to Journal.

•   Select the options that you want for the journal entry.
Summary
•Create a Note
•Editing a Note
•What is the Journal
•Create a Journal Entry

Journal and Notes

  • 1.
    ® ® Microsoft Outlook 2010 Training Journal and Notes NaveenKumar Namachivayam Founder - testTalk Academy http://naveenkumarn.in
  • 2.
    Course contents • Createa Note • Editing a Note • What is the Journal • Create a Journal Entry • Summary
  • 3.
    Create a Note •Notes are the electronic equivalent of paper sticky notes. Use notes to jot down questions, ideas, reminders, and anything you would write on paper. You can leave notes open on the screen while you work. • This is convenient when you are using notes for saving information that you might need later, such as directions or text you want to reuse in other items or documents. • In Notes, on the Home tab, in the New group, click New Note. • Keyboard shortcut To create a note, press CTRL+SHIFT+N. • Type the text of the note. The note saves automatically. • To close the note, click the note icon in the upper-left corner of the note window, and then click Close. • Double click on the note to edit.
  • 4.
    What is theJournal • Journal automatically records actions that you choose which relate to specific and puts the actions in a Timeline view • You can use Journal to track Microsoft Outlook items such as e-mail messages or meetings. It can also track other Microsoft Office files, such as Word documents or Excel workbooks. • Journal keeps a record of any interaction that you want to remember - even something that is not located on your computer, such as a phone conversation or a paper letter that you mailed or received.
  • 5.
    Record items andfiles in Journal • Click the File tab. • Click Options. • Click Notes and Journal. • Click Journal Options. • In the Automatically record these items list, select the check boxes for the items that you want recorded automatically in Journal. • In the For these contacts list, select the check boxes for the contacts whose items you want recorded automatically. • In the Also record files from box, select the check boxes next to the programs from which you want to automatically record files in Journal
  • 6.
    Record an Outlookitem • manually From any module in Outlook, on the Home tab, in the New group, click New Items, point to Other, and then click Journal Entry. • In the Subject box, type a description. • In the Entry type box, click the type of journal entry that you are recording. • Select other options that you want. Record a file from outside of Outlook manually • Locate the file that you want to record. You can use Outlook, Windows Explorer or the desktop. • Drag the items to Journal. • Select the options that you want for the journal entry.
  • 7.
    Summary •Create a Note •Editinga Note •What is the Journal •Create a Journal Entry

Editor's Notes

  • #2 [Notes to trainer: This presentation must beviewed in PowerPoint 2010.If you don’t have PowerPoint 2010, the videos included in the presentation will not play. If you don’t have PowerPoint 2010, download the PowerPoint Viewer to view these files(http://www.microsoft.com/downloads/details.aspx?displaylang=en&FamilyID=cb9bf144%2D1076%2D4615%2D9951%2D294eeb832823).If the yellow security bar appears at the top of the screen in PowerPoint, or if a Codec Unavailable message appears in the video playback window, the presentation might have opened in Protected View. To enable video playback, in the yellow security bar at the top of the PowerPoint window, click Enable Editing. To browse other downloadable Outlook training presentations, see the “Download Office 2010 training” page (http://office.microsoft.com/en-us/powerpoint-help/download-office-2010-training-HA101901726.aspx).For detailed help in customizing this template, see the very last slide. Also, look for additional lesson text in the notes pane of some slides.]
  • #14 Using This TemplateThis Microsoft PowerPoint® template has training content about using conditional formatting in MicrosoftOutlook® 2010 to help manage your Inbox, calendar, and to-do list. Its content is adapted from the Office.com Training course called “Manage your mail and more with conditional formatting.”PowerPoint version: The template must be viewed in PowerPoint 2010. If you don’t have PowerPoint 2010, the videos included in the presentation will not play. If you don’t have PowerPoint 2010, download the PowerPoint Viewer to view these files (http://www.microsoft.com/downloads/details.aspx?displaylang=en&FamilyID=cb9bf144%2D1076%2D4615%2D9951%2D294eeb832823).Video playback:If the yellow security bar appears at the top of the screen in PowerPoint, or if a Codec Unavailable message appears in the video playback window, the presentation might have opened in Protected View. To enable video playback, in the yellow security bar at the top of the PowerPoint window, click Enable Editing.Slide layouts: Each slide has a custom layout. To apply the custom layout to a new slide, right-click the slide thumbnail, point to Layout, and click the layout from the Layout gallery. To alter the layouts, open master view and alter the specific master layout in that view. You can find the layout’s title by pointing to its thumbnail.Animations: Custom animation effects are applied throughout the presentation. These include Float In (Up or Down option), Fade, and Zoom. To alter animation effects, click the Animations tab, and use the Add Animation gallery and Timing options. Effect Options gives you choices about the effect; click Animation Pane on the Animations tab to work with multiple animations. Transitions: One transition, Doors, is used to emphasize sections of the slide show. It’s applied on the Course Contents slide, Lesson slide, and the first test slide. Hyperlinks to online course: The template contains a link to the online version of this training course that takes you to the Quick Reference Card that is published for the course.Headers and footers: The template contains a footer that has the course title. To add footers such as the date or slide numbers, click the Insert tab, and click Header & Footer.