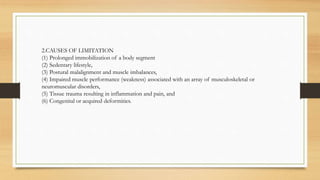
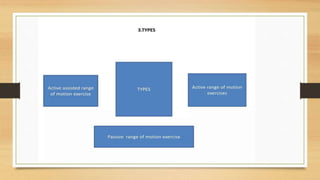
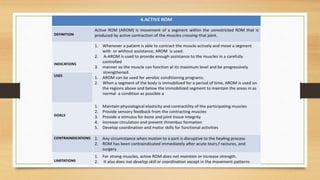
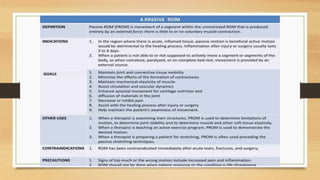
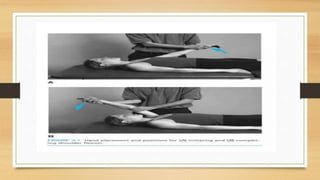
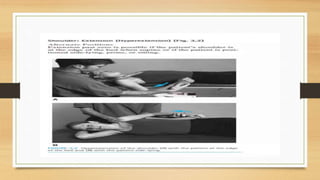
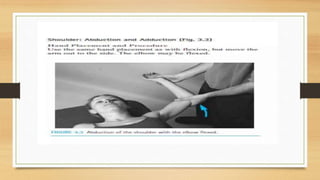
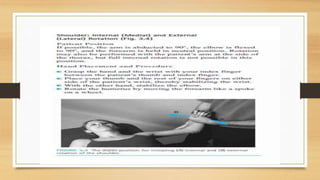
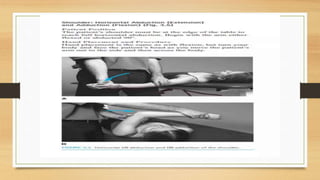
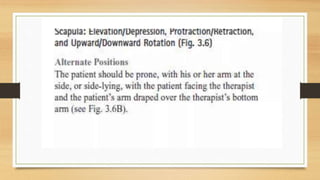
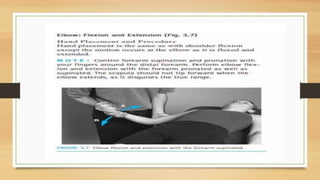
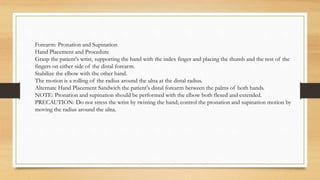
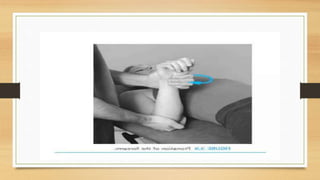
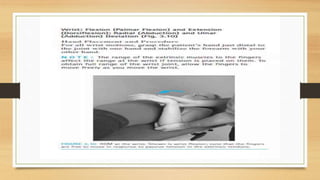
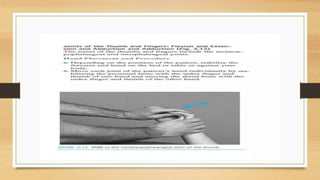
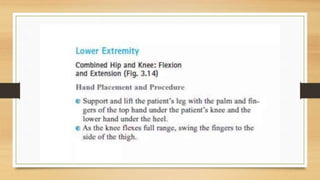
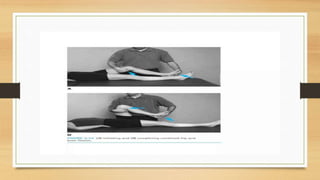
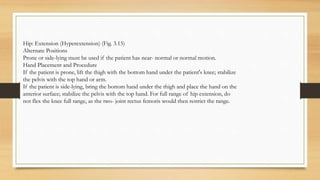
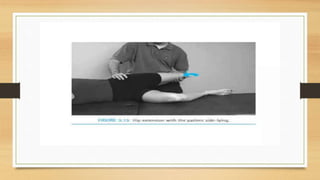
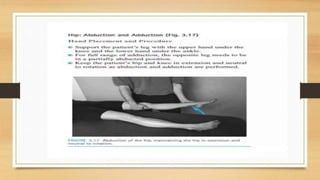
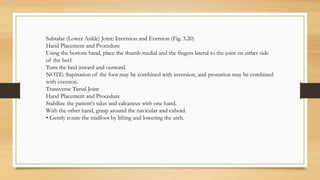
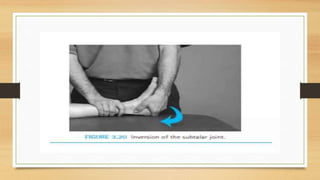
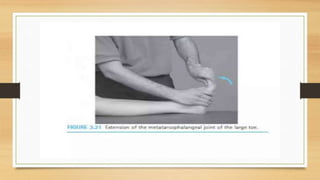
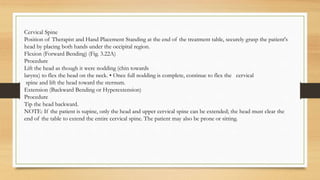
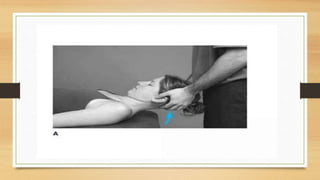
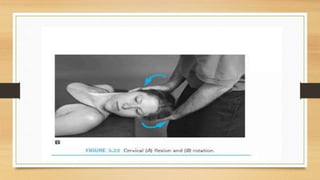
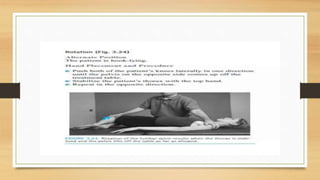
DR.BHARTI. S. PAWAR
MSK PT
DIRECTOR AND FOUNDER FLEX PHYSIOTHERAPY NASHIK
JOINT MOBILITY
Contents
1. Definition
2. Causes of limitation
3. Types
4. indication and contraindications
5. Principles, preparation and application
6. Technique
7. PROM for Individual joint.
1.DEFINITION OF MOBILITY:
The ability of structures or segments of the body to move or be moved in order to allow the
occurrence of range of motion (ROM) for functional activities (functional ROM).
Passive mobility is dependent on soft tissue (contractile and non contractile) extensibility; in
addition, active mobility requires neuromuscular activation.
2.CAUSES OF LIMITATION
(1) Prolonged immobilization of a body segment
(2) Sedentary lifestyle,
(3) Postural malalignment and muscle imbalances,
(4) Impaired muscle performance (weakness) associated with an array of musculoskeletal or
neuromuscular disorders,
(5) Tissue trauma resulting in inflammation and pain, and
(6) Congenital or acquired deformities.
Forearm: Pronation and Supination
Hand Placement and Procedure
Grasp the patient's wrist, supporting the hand with the index finger and placing the thumb and the rest of the
fingers on either side of the distal forearm.
Stabilize the elbow with the other hand.
The motion is a rolling of the radius around the ulna at the distal radius.
Alternate Hand Placement Sandwich the patient's distal forearm between the palms of both hands.
NOTE: Pronation and supination should be performed with the elbow both flexed and extended.
PRECAUTION: Do not stress the wrist by twisting the hand; control the pronation and supination motion by
moving the radius around the ulna.
Hip: Extension (Hyperextension) (Fig. 3.15)
Alternate Positions
Prone or side-lying must be used if the patient has near- normal or normal motion.
Hand Placement and Procedure
If the patient is prone, lift the thigh with the bottom hand under the patient's knee; stabilize
the pelvis with the top hand or arm.
If the patient is side-lying, bring the bottom hand under the thigh and place the hand on the
anterior surface; stabilize the pelvis with the top hand. For full range of hip extension, do
not flex the knee full range, as the two- joint rectus femoris would then restrict the range.
Hip: Internal (Medial) and External (Lateral) Rotation Hand Placement and Procedure
with the Hip and Knee Extended
• Grasp just proximal to the patient's knee with the top hand and just proximal to the
ankle with the bottom hand.
Roll the thigh inward and outward.
Hand Placement and Procedure for Rotation With the Hip and Knee Flexed (Fig. 3.18)
Flex the patient's hip and knee to 90°; support the knee with the top hand.
If the knee is unstable, cradle the thigh and support the proximal calf and knee with
the bottom hand.
Rotate the femur by moving the leg like a pendulum.
This hand placement provides some support to the knee but should be used with
caution if there is knee instability.
Ankle: Dorsiflexion (Fig. 3.19)
Hand Placement and Procedure
• Stabilize around the malleoli with the top hand. Cup the patient's heel with the bottom
hand and place the forearm along the bottom of the foot.
Pull the calcaneus distal ward with the thumb and fingers while pushing upward with the
forearm.
NOTE: If the knee is flexed, full range of the ankle joint can be obtained. If the knee is
extended, the lengthened range of the two-joint gastrocnemius muscle can be obtained, but
the gastrocnemius limits full range of dorsi- flexion. Apply dorsiflexion in both positions
of the knee to provide range to both the joint and the muscle.
Ankle: Plantarflexion
Hand Placement and Procedure
Support the heel with the bottom hand.
Place the top hand on the dorsum of the foot and push it into plantarflexion.
Subtalar (Lower Ankle) Joint: Inversion and Eversion (Fig. 3.20)
Hand Placement and Procedure
Using the bottom hand, place the thumb medial and the fingers lateral to the joint on either side
of the heel.
Turn the heel inward and outward.
NOTE: Supination of the foot may be combined with inversion, and pronation may be combined
with eversion.
Transverse Tarsal Joint
Hand Placement and Procedure
Stabilize the patient's talus and calcaneus with one hand.
With the other hand, grasp around the navicular and cuboid.
• Gently rotate the midfoot by lifting and lowering the arch.
Joints of the Toes: Flexion and Extension and Abduction and Adduction (Metatarsophalangeal
and Inter- phalangeal joints) (Fig. 3.21)
Hand Placement and Procedure
⚫ Stabilize the bone proximal to the joint that is to be moved with one hand, and move the distal
bone with the other hand.
The technique is the same as for ROM of the fingers.
Alternate Procedure
Several joints of the toes can be moved simultaneously if care is taken not to stress any structure.
Cervical Spine
Position of Therapist and Hand Placement Standing at the end of the treatment table, securely grasp the patient's
head by placing both hands under the occipital region.
Flexion (Forward Bending) (Fig. 3.22A)
Procedure
Lift the head as though it were nodding (chin towards
larynx) to flex the head on the neck. • Once full nodding is complete, continue to flex the cervical
spine and lift the head toward the sternum.
Extension (Backward Bending or Hyperextension)
Procedure
Tip the head backward.
NOTE: If the patient is supine, only the head and upper cervical spine can be extended; the head must clear the
end of the table to extend the entire cervical spine. The patient may also be prone or sitting.
Lateral Flexion (Side Bending) and Rotation (Fig. 3.22B)
Procedure
Maintain the cervical spine neutral to flexion and extension as you direct the head and neck into side
bending (approximate the ear toward the shoulder) and rotation (rotate from side to side).
Lumbar Spine
Flexion (Fig. 3.23)
Hand Placement and Procedure
• Bring both of the patient's knees to the chest by lifting under the knees (hip and knee flexion).
• Flexion of the spine occurs as the hips are flexed full range and the pelvis starts to rotate
posteriorly.
• Greater range of flexion can be obtained by lifting under the patient's sacrum with the lower
hand.
Extension
Alternate Position The patient is prone.
Hand Placement and Procedure With hands under the thighs, lift the thighs upward until the pelvis
rotates anteriorly and the lumbar spine extends.
REFERENCE
CAROLY KISNER, THERAPEUTIC EXERCISE, 5TH
EDITION.
THANK YOU!

JOINT MOBILTY IN PHYSIOTHERAPY PPT FILES

  • 1.
    DR.BHARTI. S. PAWAR MSKPT DIRECTOR AND FOUNDER FLEX PHYSIOTHERAPY NASHIK
  • 2.
    JOINT MOBILITY Contents 1. Definition 2.Causes of limitation 3. Types 4. indication and contraindications 5. Principles, preparation and application 6. Technique 7. PROM for Individual joint.
  • 3.
    1.DEFINITION OF MOBILITY: Theability of structures or segments of the body to move or be moved in order to allow the occurrence of range of motion (ROM) for functional activities (functional ROM). Passive mobility is dependent on soft tissue (contractile and non contractile) extensibility; in addition, active mobility requires neuromuscular activation.
  • 4.
    2.CAUSES OF LIMITATION (1)Prolonged immobilization of a body segment (2) Sedentary lifestyle, (3) Postural malalignment and muscle imbalances, (4) Impaired muscle performance (weakness) associated with an array of musculoskeletal or neuromuscular disorders, (5) Tissue trauma resulting in inflammation and pain, and (6) Congenital or acquired deformities.
  • 30.
    Forearm: Pronation andSupination Hand Placement and Procedure Grasp the patient's wrist, supporting the hand with the index finger and placing the thumb and the rest of the fingers on either side of the distal forearm. Stabilize the elbow with the other hand. The motion is a rolling of the radius around the ulna at the distal radius. Alternate Hand Placement Sandwich the patient's distal forearm between the palms of both hands. NOTE: Pronation and supination should be performed with the elbow both flexed and extended. PRECAUTION: Do not stress the wrist by twisting the hand; control the pronation and supination motion by moving the radius around the ulna.
  • 36.
    Hip: Extension (Hyperextension)(Fig. 3.15) Alternate Positions Prone or side-lying must be used if the patient has near- normal or normal motion. Hand Placement and Procedure If the patient is prone, lift the thigh with the bottom hand under the patient's knee; stabilize the pelvis with the top hand or arm. If the patient is side-lying, bring the bottom hand under the thigh and place the hand on the anterior surface; stabilize the pelvis with the top hand. For full range of hip extension, do not flex the knee full range, as the two- joint rectus femoris would then restrict the range.
  • 39.
    Hip: Internal (Medial)and External (Lateral) Rotation Hand Placement and Procedure with the Hip and Knee Extended • Grasp just proximal to the patient's knee with the top hand and just proximal to the ankle with the bottom hand. Roll the thigh inward and outward. Hand Placement and Procedure for Rotation With the Hip and Knee Flexed (Fig. 3.18) Flex the patient's hip and knee to 90°; support the knee with the top hand. If the knee is unstable, cradle the thigh and support the proximal calf and knee with the bottom hand. Rotate the femur by moving the leg like a pendulum. This hand placement provides some support to the knee but should be used with caution if there is knee instability.
  • 41.
    Ankle: Dorsiflexion (Fig.3.19) Hand Placement and Procedure • Stabilize around the malleoli with the top hand. Cup the patient's heel with the bottom hand and place the forearm along the bottom of the foot. Pull the calcaneus distal ward with the thumb and fingers while pushing upward with the forearm. NOTE: If the knee is flexed, full range of the ankle joint can be obtained. If the knee is extended, the lengthened range of the two-joint gastrocnemius muscle can be obtained, but the gastrocnemius limits full range of dorsi- flexion. Apply dorsiflexion in both positions of the knee to provide range to both the joint and the muscle. Ankle: Plantarflexion Hand Placement and Procedure Support the heel with the bottom hand. Place the top hand on the dorsum of the foot and push it into plantarflexion.
  • 43.
    Subtalar (Lower Ankle)Joint: Inversion and Eversion (Fig. 3.20) Hand Placement and Procedure Using the bottom hand, place the thumb medial and the fingers lateral to the joint on either side of the heel. Turn the heel inward and outward. NOTE: Supination of the foot may be combined with inversion, and pronation may be combined with eversion. Transverse Tarsal Joint Hand Placement and Procedure Stabilize the patient's talus and calcaneus with one hand. With the other hand, grasp around the navicular and cuboid. • Gently rotate the midfoot by lifting and lowering the arch.
  • 45.
    Joints of theToes: Flexion and Extension and Abduction and Adduction (Metatarsophalangeal and Inter- phalangeal joints) (Fig. 3.21) Hand Placement and Procedure ⚫ Stabilize the bone proximal to the joint that is to be moved with one hand, and move the distal bone with the other hand. The technique is the same as for ROM of the fingers. Alternate Procedure Several joints of the toes can be moved simultaneously if care is taken not to stress any structure.
  • 47.
    Cervical Spine Position ofTherapist and Hand Placement Standing at the end of the treatment table, securely grasp the patient's head by placing both hands under the occipital region. Flexion (Forward Bending) (Fig. 3.22A) Procedure Lift the head as though it were nodding (chin towards larynx) to flex the head on the neck. • Once full nodding is complete, continue to flex the cervical spine and lift the head toward the sternum. Extension (Backward Bending or Hyperextension) Procedure Tip the head backward. NOTE: If the patient is supine, only the head and upper cervical spine can be extended; the head must clear the end of the table to extend the entire cervical spine. The patient may also be prone or sitting.
  • 49.
    Lateral Flexion (SideBending) and Rotation (Fig. 3.22B) Procedure Maintain the cervical spine neutral to flexion and extension as you direct the head and neck into side bending (approximate the ear toward the shoulder) and rotation (rotate from side to side).
  • 51.
    Lumbar Spine Flexion (Fig.3.23) Hand Placement and Procedure • Bring both of the patient's knees to the chest by lifting under the knees (hip and knee flexion). • Flexion of the spine occurs as the hips are flexed full range and the pelvis starts to rotate posteriorly. • Greater range of flexion can be obtained by lifting under the patient's sacrum with the lower hand. Extension Alternate Position The patient is prone. Hand Placement and Procedure With hands under the thighs, lift the thighs upward until the pelvis rotates anteriorly and the lumbar spine extends.
  • 55.
  • 56.