Downloaded 36 times


![VIEW HIERARCHY
UIView
Views are placed relative to their
parents
View hierarchy is used to handle touch responses [1]:
lowest view in the hierarchy receives touch
if not handled, event gets passed to superview
recursively
Subview 1
Subview
1I
[1] Apple Docs: Event Delivery Responder Chain](https://image.slidesharecdn.com/layout-150925051141-lva1-app6892/85/iOS-Layout-Overview-5-320.jpg)
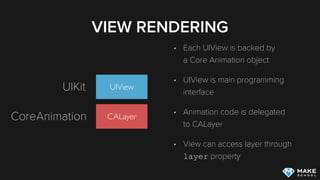
![VIEW RENDERING
Views are rendered initially when first added to the view
hierarchy, only re-rendered when necessary
Can trigger manual re-render by calling setNeedsDisplay
UIKit components provide private rendering code, custom UI
components can override drawRect for custom rendering
code [2]
[2] Apple Docs: Implementing your drawing code](https://image.slidesharecdn.com/layout-150925051141-lva1-app6892/85/iOS-Layout-Overview-7-320.jpg)

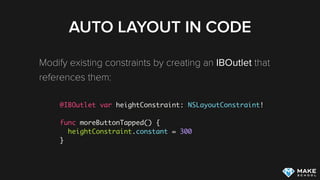
![AUTO LAYOUT IN CODE
Auto Layout API is very verbose
You can use Visual Format Language instead [3]:
let verticalConstraints =
NSLayoutConstraint.constraintsWithVisualFormat("V:|-200.0-[redView]-100.0-|",
options: NSLayoutFormatOptions(rawValue: 0), metrics: ["targetWidth": 200],
views: ["redView": redView])
[3] Apple Docs: Visual Format Language](https://image.slidesharecdn.com/layout-150925051141-lva1-app6892/85/iOS-Layout-Overview-19-320.jpg)
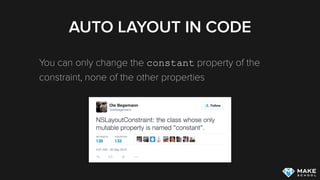
![AUTO LAYOUT IN CODE
Alternatively you can use third-party libraries, i.e.
Cartography [4]:
constrain(view1) { view1 in
view1.width == 100
view1.height == 100
view1.center == view.superview!.center
}
[4] Carthography on GitHub](https://image.slidesharecdn.com/layout-150925051141-lva1-app6892/85/iOS-Layout-Overview-20-320.jpg)


This document provides an overview of views and layout in iOS. It discusses view hierarchies, properties like frame and bounds, and how views are rendered. The bulk of the document focuses on Auto Layout - how it is used to define view positions through constraints rather than directly setting frames. It also covers size classes for different devices, and programmatically working with Auto Layout through outlets and the visual format language.