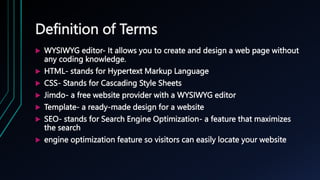
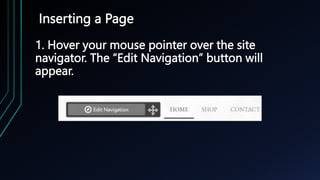
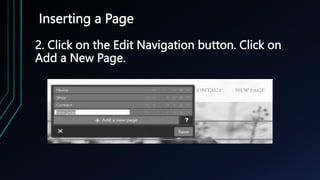
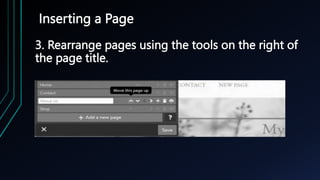
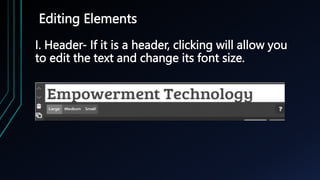
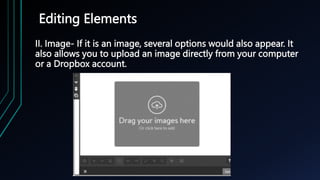
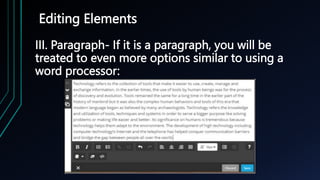
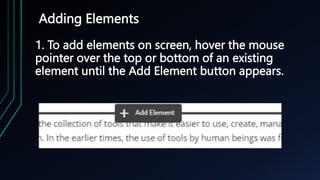
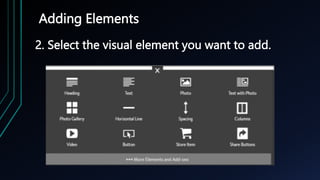
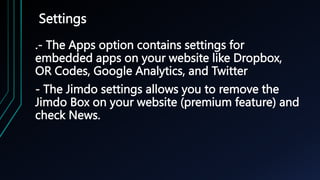
Web Page Design Using
Templates and Online
WYSIWYG Platforms
PRESENTATION OF GROUP 2
Definition of Terms
 WYSIWYG editor- It allows you to create and design a web page without
any coding knowledge.
 HTML- stands for Hypertext Markup Language
 CSS- Stands for Cascading Style Sheets
 Jimdo- a free website provider with a WYSIWYG editor
 Template- a ready-made design for a website
 SEO- stands for Search Engine Optimization- a feature that maximizes
the search
 engine optimization feature so visitors can easily locate your website
Online Platform
- is technologies that are grouped to be used as a
base upon which other applications processes or
technologies are developed.
WYSIWYG
- WYSIWYG is an editor that allows you to create and
design web pages without any coding knowledge. You
can use Microsoft Word and Microsoft Excel as a
WYSIWYG editor. Jimdo is a WYSIWYG web hosting
service offering free and paid services. Jimdo has tools
that will allow you to sell your products online. Create
your own photo gallery, and videos, and many more.
You can also maximize the search engine by properly
tagging your site.
WEB DESIGN PRINCIPLES
AND ELEMENTS
Website Template
- Also known as web template is a predesigned
webpage, simply by adding your text and
customization to create your desired web page. It
is usually built with HTML and CSS code.
WYSIWYG Editor
- It allows you to create and design a web page without
any coding knowledge.
- WYSIWYG- the acronym for “What You See Is What
You Get”
- This means that whatever you type, insert, draw, place,
rearrange, and everything you do on a page is what
the audience will see. It shows and prints whatever
you type on the screen.
Basic Web Page Creation
Creating a Website using Microsoft Word
1. Open Microsoft Word.
2. Type anything on the page like “Hello World!”
3. Click on File > Save As > Type any file name.
4. In the Save as Type, select “Web page (*.htm,
*.html)”
Creating a Website using Microsoft Word
- Click the “Change Title” button.
Creating a Website using Microsoft Word
- Input the title as seen below, then click OK then
Save.
- Open your saved file and you will see that you just
created a webpage using MS Word.
Creating Your Own
Website using Jimdo
Creating Your Own Website using Jimdo
- Jimdo is WYSIWYG web hosting service. It offers
free, professional, and business web hosting
service . Jimdo also has an iOS and Android app
which you can use to manage your website
whenever you do not have access to a PC. For this
exercise you will create own personal website that
focuses on your passion or hobby.
Creating Your Own Website using Jimdo
1. Create an account on Jimdo by going to www.jimdo.com and
clicking Create Your Website.
Creating Your Own Website using Jimdo
2. You will be instructed to choose a template. Pick any template
that you want.
Creating Your Own Website using Jimdo
3. Choose a URL for your website. Enter your email and
password.
Creating Your Own Website using Jimdo
4. Your website will be generated and soon you will end up in
the site’s WYSIWYG editor.
Creating Your Own Website using Jimdo
5. The editor is pretty easy to use. The center shows the preview of your
website. The design tools are located on the right. It is now time to edit the
website to your liking. Use the following tips to achieve it.
Tips in using the editor
Creating Your Own Website using Jimdo
- By default, the home page is shown on your
editor. To navigate to another page, simply click
the page title on your navigator. The site
navigator contains a set of links going through
the different pages of your website. The navigator
currently available to you depends on which
template you used.
Inserting a Page
1. Hover your mouse pointer over the site
navigator. The “Edit Navigation” button will
appear.
Inserting a Page
2. Click on the Edit Navigation button. Click on
Add a New Page.
Inserting a Page
3. Rearrange pages using the tools on the right of
the page title.
Inserting a Page
4. Click Save when done.
Editing Elements
Editing Elements
- Hovering over a text, image, or any element you
see on the website will highlight the element.
- Clicking on an element will show more options
regarding on what visual element you clicked:
Editing Elements
Move element up- used to move the
element up by one level
Move element down- used to move the
element one lower
Delete element- used to remove the
element
Copy element- used to copy the element
Drag tool- click and drag the element to
avoid part of the page
Editing Elements
I. Header- If it is a header, clicking will allow you
to edit the text and change its font size.
Editing Elements
II. Image- If it is an image, several options would also appear. It
also allows you to upload an image directly from your computer
or a Dropbox account.
Editing Elements
III. Paragraph- If it is a paragraph, you will be
treated to even more options similar to using a
word processor:
Adding Elements
Adding Elements
1. To add elements on screen, hover the mouse
pointer over the top or bottom of an existing
element until the Add Element button appears.
Adding Elements
2. Select the visual element you want to add.
Adding Elements
3. Edit the element to your liking then click Save.
Settings
Settings
- The settings option contains important information
that you should edit to make the most out of your
Jimdo website.
- The account settings include changing your
password, email, and personal profile.
- The website options allow you to change your site
title and footer; checks your storage; creates your
privacy policy and your favicon (the icon of your
website shown on a browser).
Settings
- The Mobile Settings is used to prepare you page for
mobile devices.
- The Email and Domain Management setting is a
premium feature. It is used to manage email accounts for
your website.
- The Store settings allow you to manage the items you
sell on your website.
- The SEO option is a premium feature that maximizes the
Search Engine Optimization feature of Jimdo so visitors
can easily locate you website.
Settings
.- The Apps option contains settings for
embedded apps on your website like Dropbox,
OR Codes, Google Analytics, and Twitter
- The Jimdo settings allows you to remove the
Jimdo Box on your website (premium feature) and
check News.
THANKS FOR WATCHING!

Empowerment Technology Quarter 2 module2

  • 1.
    Web Page DesignUsing Templates and Online WYSIWYG Platforms PRESENTATION OF GROUP 2
  • 2.
    Definition of Terms WYSIWYG editor- It allows you to create and design a web page without any coding knowledge.  HTML- stands for Hypertext Markup Language  CSS- Stands for Cascading Style Sheets  Jimdo- a free website provider with a WYSIWYG editor  Template- a ready-made design for a website  SEO- stands for Search Engine Optimization- a feature that maximizes the search  engine optimization feature so visitors can easily locate your website
  • 3.
    Online Platform - istechnologies that are grouped to be used as a base upon which other applications processes or technologies are developed.
  • 4.
    WYSIWYG - WYSIWYG isan editor that allows you to create and design web pages without any coding knowledge. You can use Microsoft Word and Microsoft Excel as a WYSIWYG editor. Jimdo is a WYSIWYG web hosting service offering free and paid services. Jimdo has tools that will allow you to sell your products online. Create your own photo gallery, and videos, and many more. You can also maximize the search engine by properly tagging your site.
  • 5.
  • 6.
    Website Template - Alsoknown as web template is a predesigned webpage, simply by adding your text and customization to create your desired web page. It is usually built with HTML and CSS code.
  • 7.
    WYSIWYG Editor - Itallows you to create and design a web page without any coding knowledge. - WYSIWYG- the acronym for “What You See Is What You Get” - This means that whatever you type, insert, draw, place, rearrange, and everything you do on a page is what the audience will see. It shows and prints whatever you type on the screen.
  • 8.
  • 9.
    Creating a Websiteusing Microsoft Word 1. Open Microsoft Word. 2. Type anything on the page like “Hello World!” 3. Click on File > Save As > Type any file name. 4. In the Save as Type, select “Web page (*.htm, *.html)”
  • 10.
    Creating a Websiteusing Microsoft Word
  • 11.
    Creating a Websiteusing Microsoft Word - Click the “Change Title” button.
  • 12.
    Creating a Websiteusing Microsoft Word - Input the title as seen below, then click OK then Save. - Open your saved file and you will see that you just created a webpage using MS Word.
  • 13.
  • 14.
    Creating Your OwnWebsite using Jimdo - Jimdo is WYSIWYG web hosting service. It offers free, professional, and business web hosting service . Jimdo also has an iOS and Android app which you can use to manage your website whenever you do not have access to a PC. For this exercise you will create own personal website that focuses on your passion or hobby.
  • 15.
    Creating Your OwnWebsite using Jimdo 1. Create an account on Jimdo by going to www.jimdo.com and clicking Create Your Website.
  • 16.
    Creating Your OwnWebsite using Jimdo 2. You will be instructed to choose a template. Pick any template that you want.
  • 17.
    Creating Your OwnWebsite using Jimdo 3. Choose a URL for your website. Enter your email and password.
  • 18.
    Creating Your OwnWebsite using Jimdo 4. Your website will be generated and soon you will end up in the site’s WYSIWYG editor.
  • 19.
    Creating Your OwnWebsite using Jimdo 5. The editor is pretty easy to use. The center shows the preview of your website. The design tools are located on the right. It is now time to edit the website to your liking. Use the following tips to achieve it.
  • 20.
    Tips in usingthe editor
  • 21.
    Creating Your OwnWebsite using Jimdo - By default, the home page is shown on your editor. To navigate to another page, simply click the page title on your navigator. The site navigator contains a set of links going through the different pages of your website. The navigator currently available to you depends on which template you used.
  • 22.
    Inserting a Page 1.Hover your mouse pointer over the site navigator. The “Edit Navigation” button will appear.
  • 23.
    Inserting a Page 2.Click on the Edit Navigation button. Click on Add a New Page.
  • 24.
    Inserting a Page 3.Rearrange pages using the tools on the right of the page title.
  • 25.
    Inserting a Page 4.Click Save when done.
  • 26.
  • 27.
    Editing Elements - Hoveringover a text, image, or any element you see on the website will highlight the element. - Clicking on an element will show more options regarding on what visual element you clicked:
  • 28.
    Editing Elements Move elementup- used to move the element up by one level Move element down- used to move the element one lower Delete element- used to remove the element Copy element- used to copy the element Drag tool- click and drag the element to avoid part of the page
  • 29.
    Editing Elements I. Header-If it is a header, clicking will allow you to edit the text and change its font size.
  • 30.
    Editing Elements II. Image-If it is an image, several options would also appear. It also allows you to upload an image directly from your computer or a Dropbox account.
  • 31.
    Editing Elements III. Paragraph-If it is a paragraph, you will be treated to even more options similar to using a word processor:
  • 32.
  • 33.
    Adding Elements 1. Toadd elements on screen, hover the mouse pointer over the top or bottom of an existing element until the Add Element button appears.
  • 34.
    Adding Elements 2. Selectthe visual element you want to add.
  • 35.
    Adding Elements 3. Editthe element to your liking then click Save.
  • 36.
  • 37.
    Settings - The settingsoption contains important information that you should edit to make the most out of your Jimdo website. - The account settings include changing your password, email, and personal profile. - The website options allow you to change your site title and footer; checks your storage; creates your privacy policy and your favicon (the icon of your website shown on a browser).
  • 38.
    Settings - The MobileSettings is used to prepare you page for mobile devices. - The Email and Domain Management setting is a premium feature. It is used to manage email accounts for your website. - The Store settings allow you to manage the items you sell on your website. - The SEO option is a premium feature that maximizes the Search Engine Optimization feature of Jimdo so visitors can easily locate you website.
  • 39.
    Settings .- The Appsoption contains settings for embedded apps on your website like Dropbox, OR Codes, Google Analytics, and Twitter - The Jimdo settings allows you to remove the Jimdo Box on your website (premium feature) and check News.
  • 40.