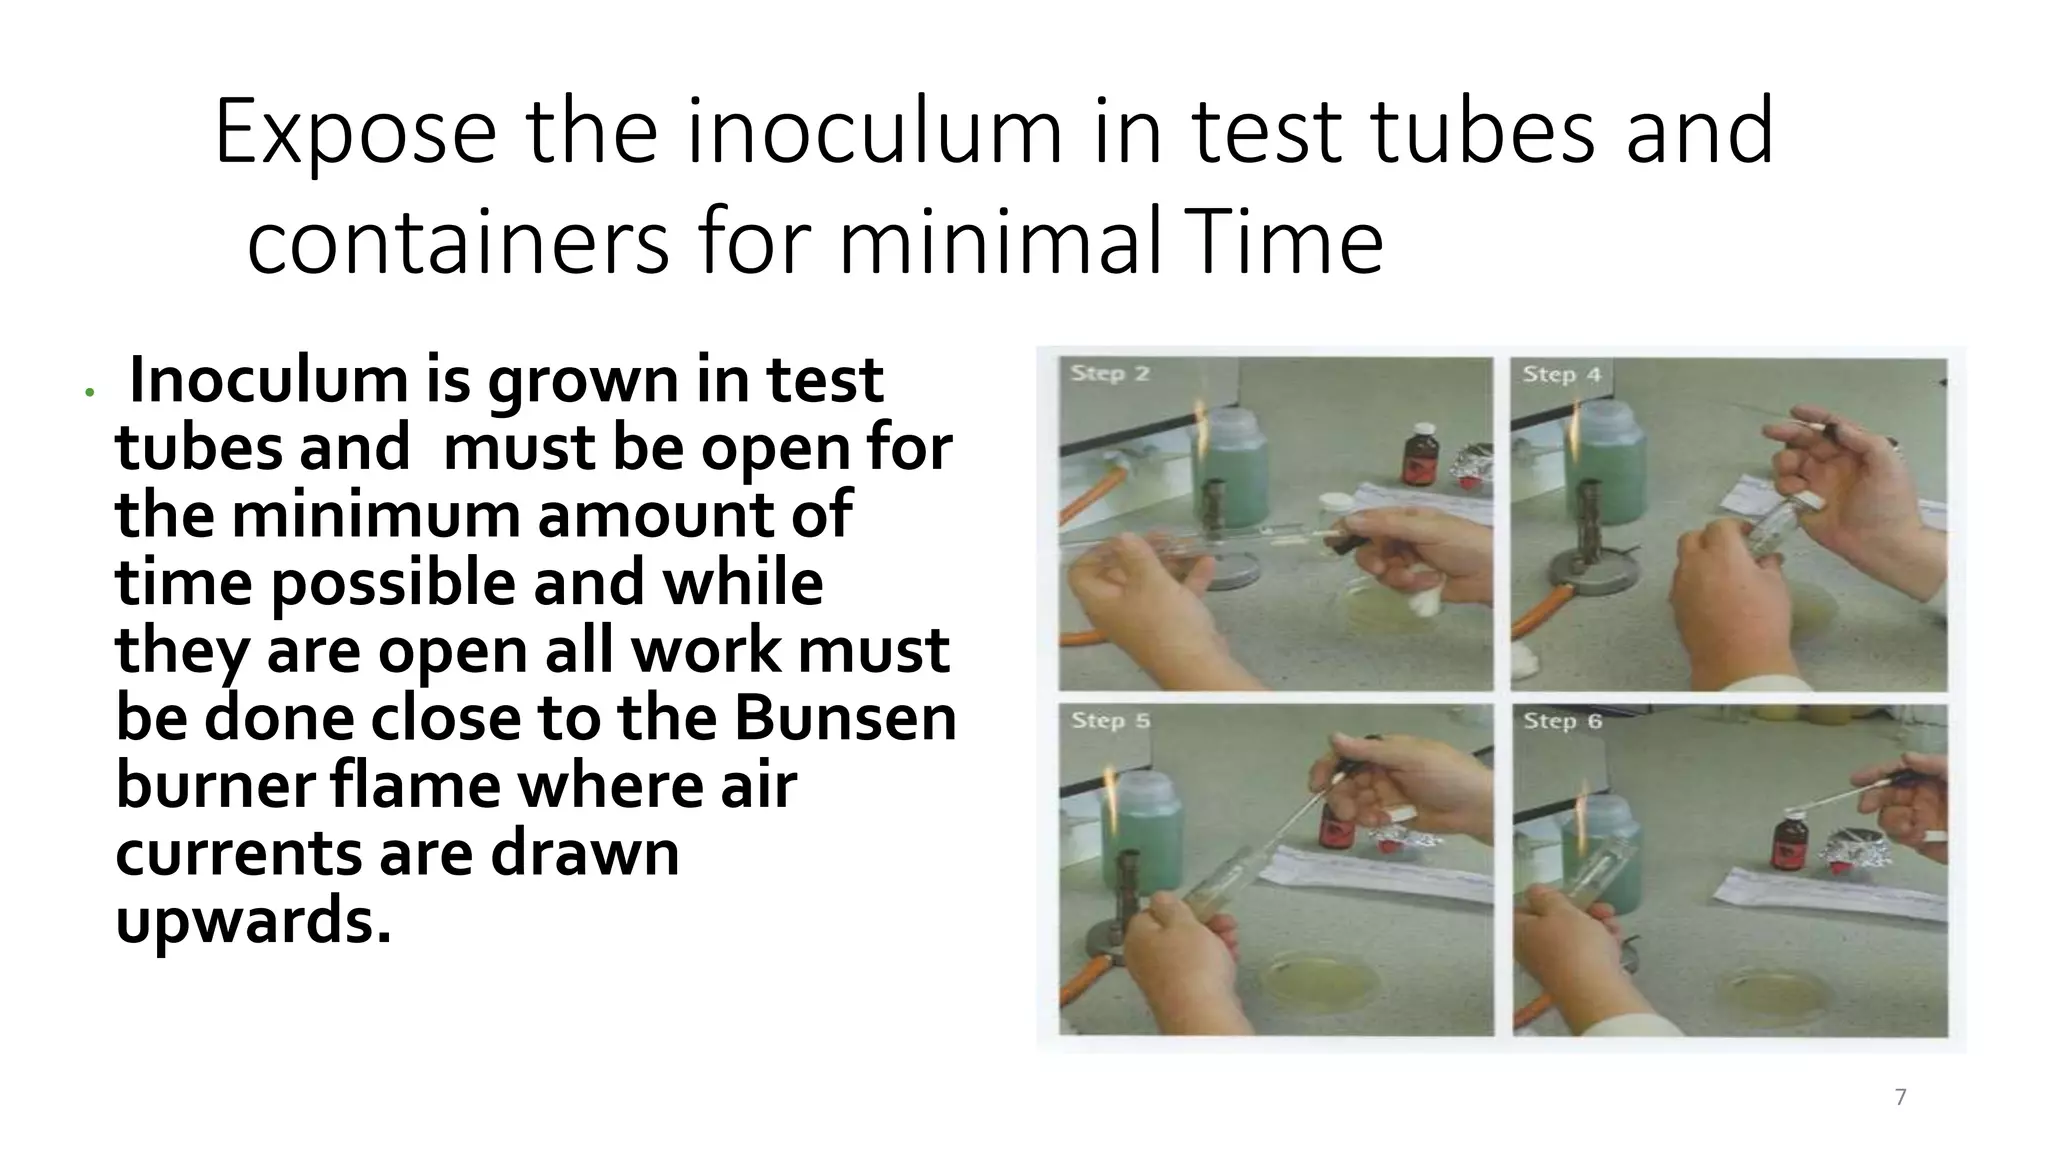
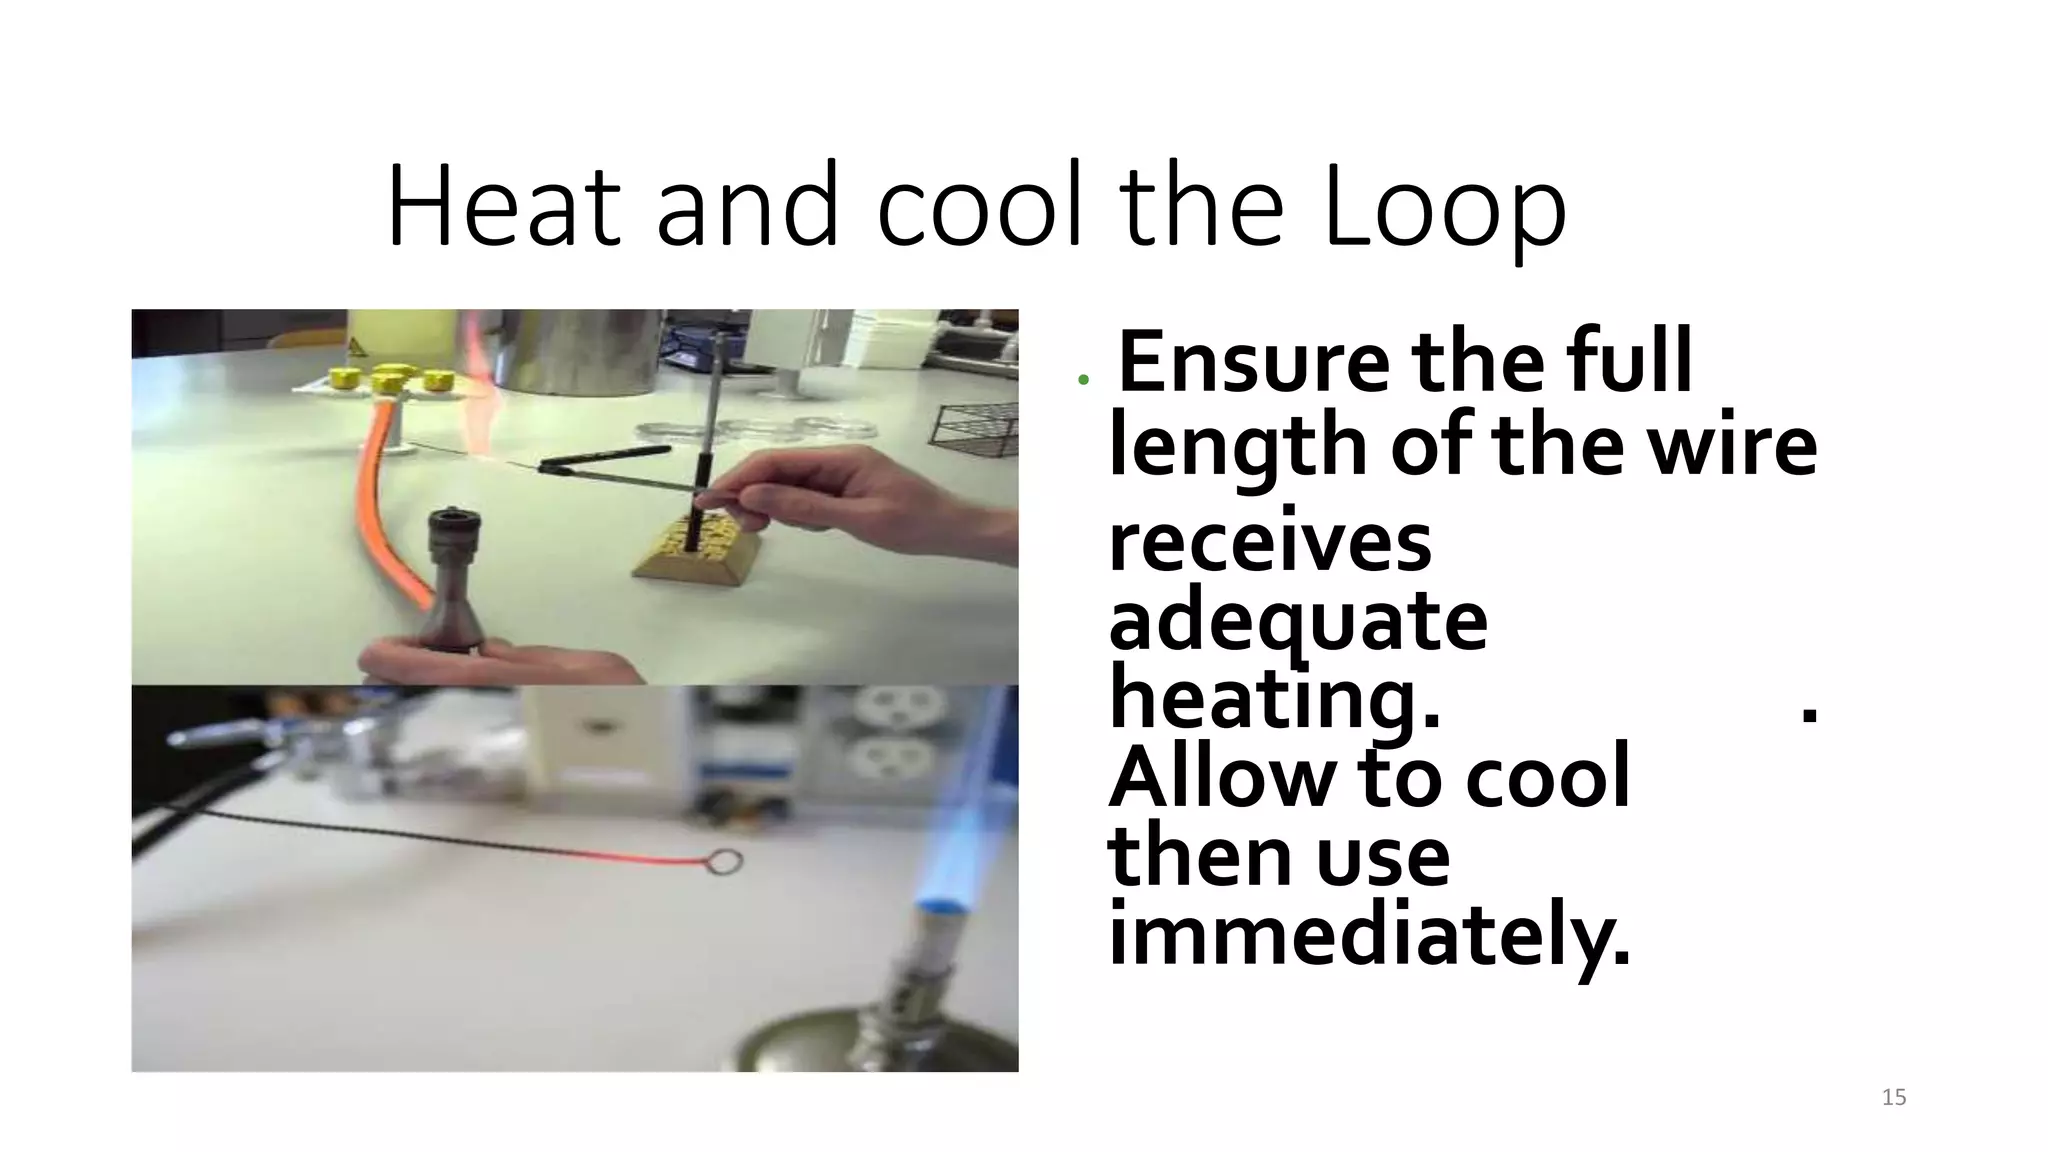
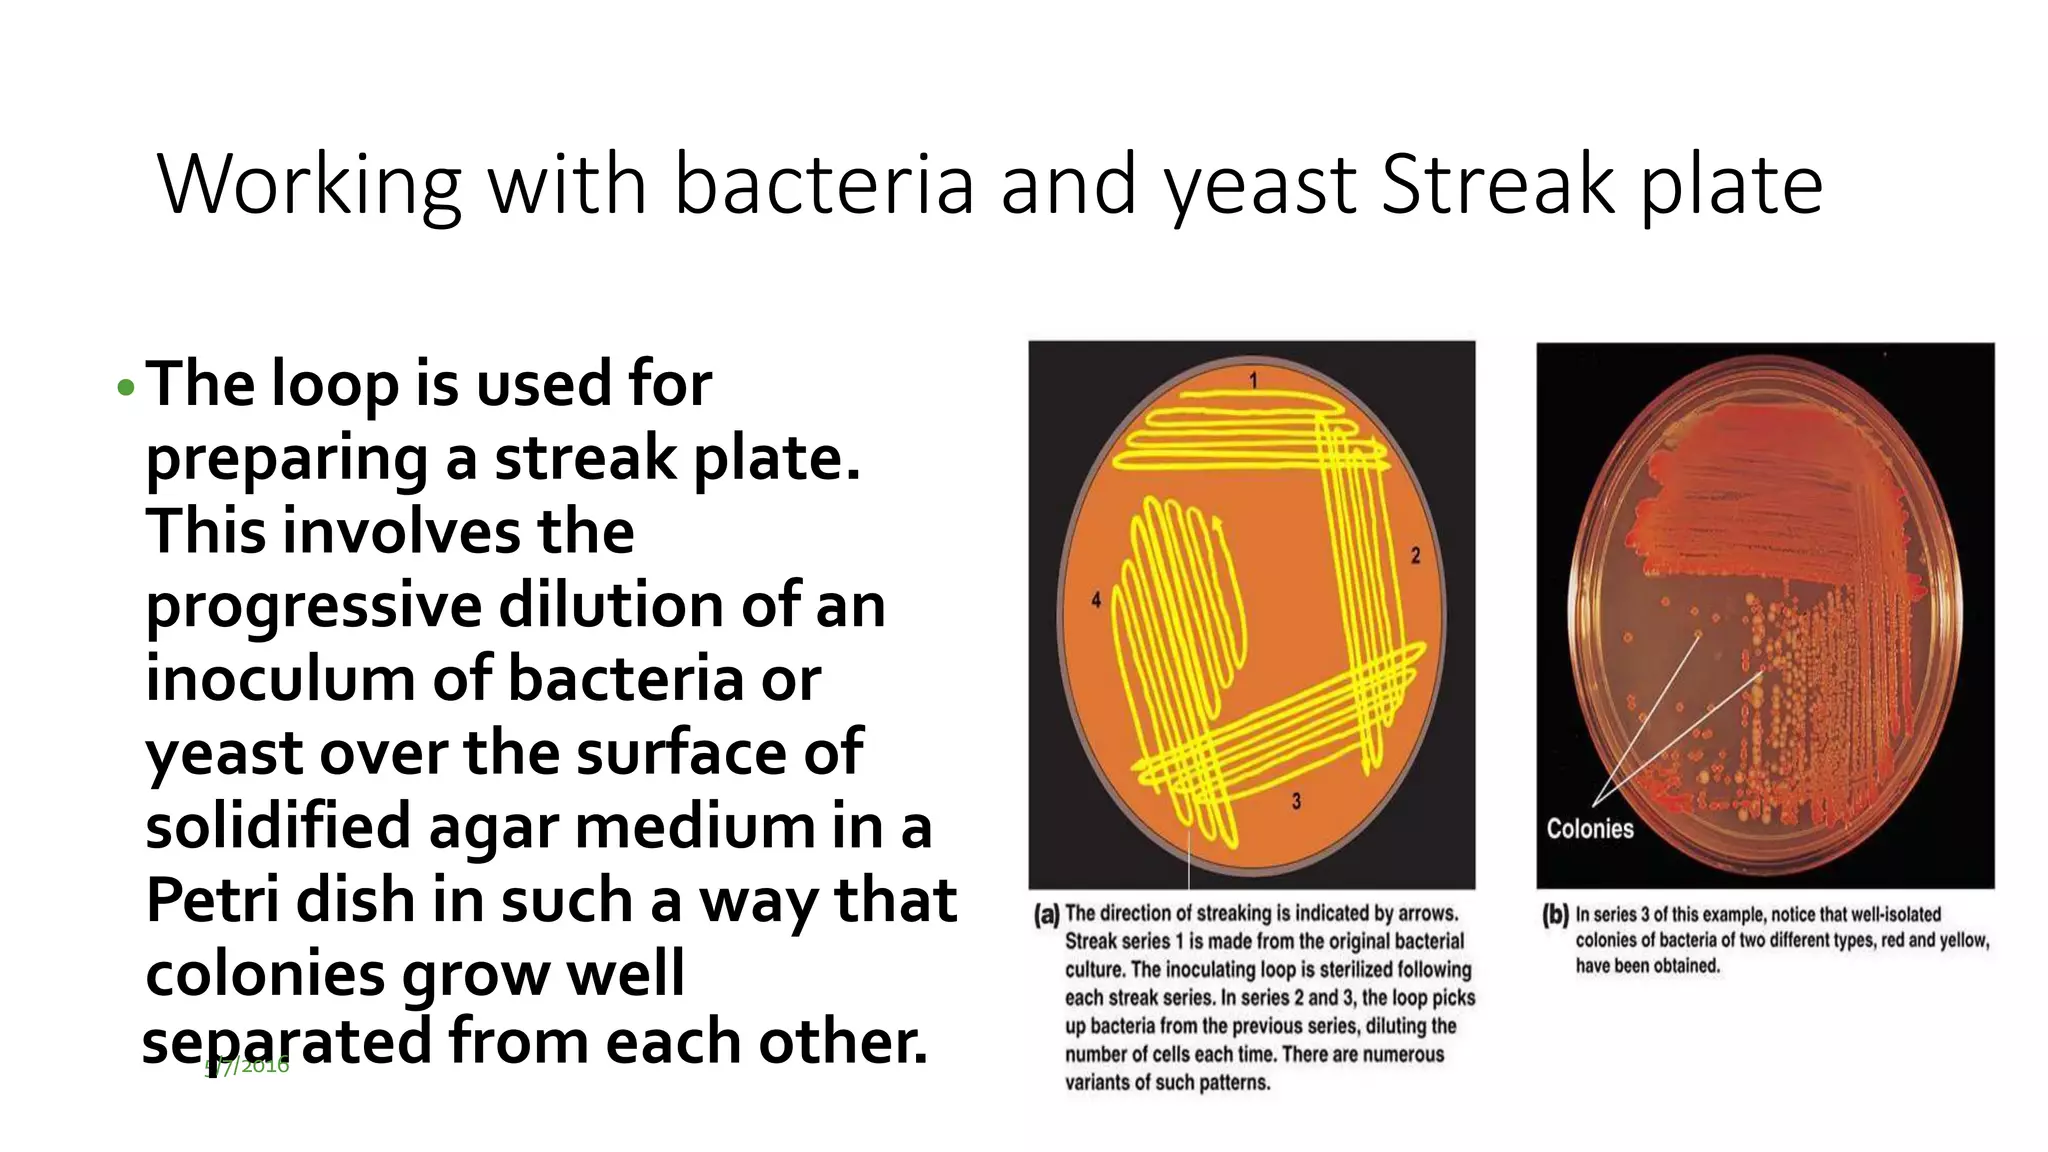
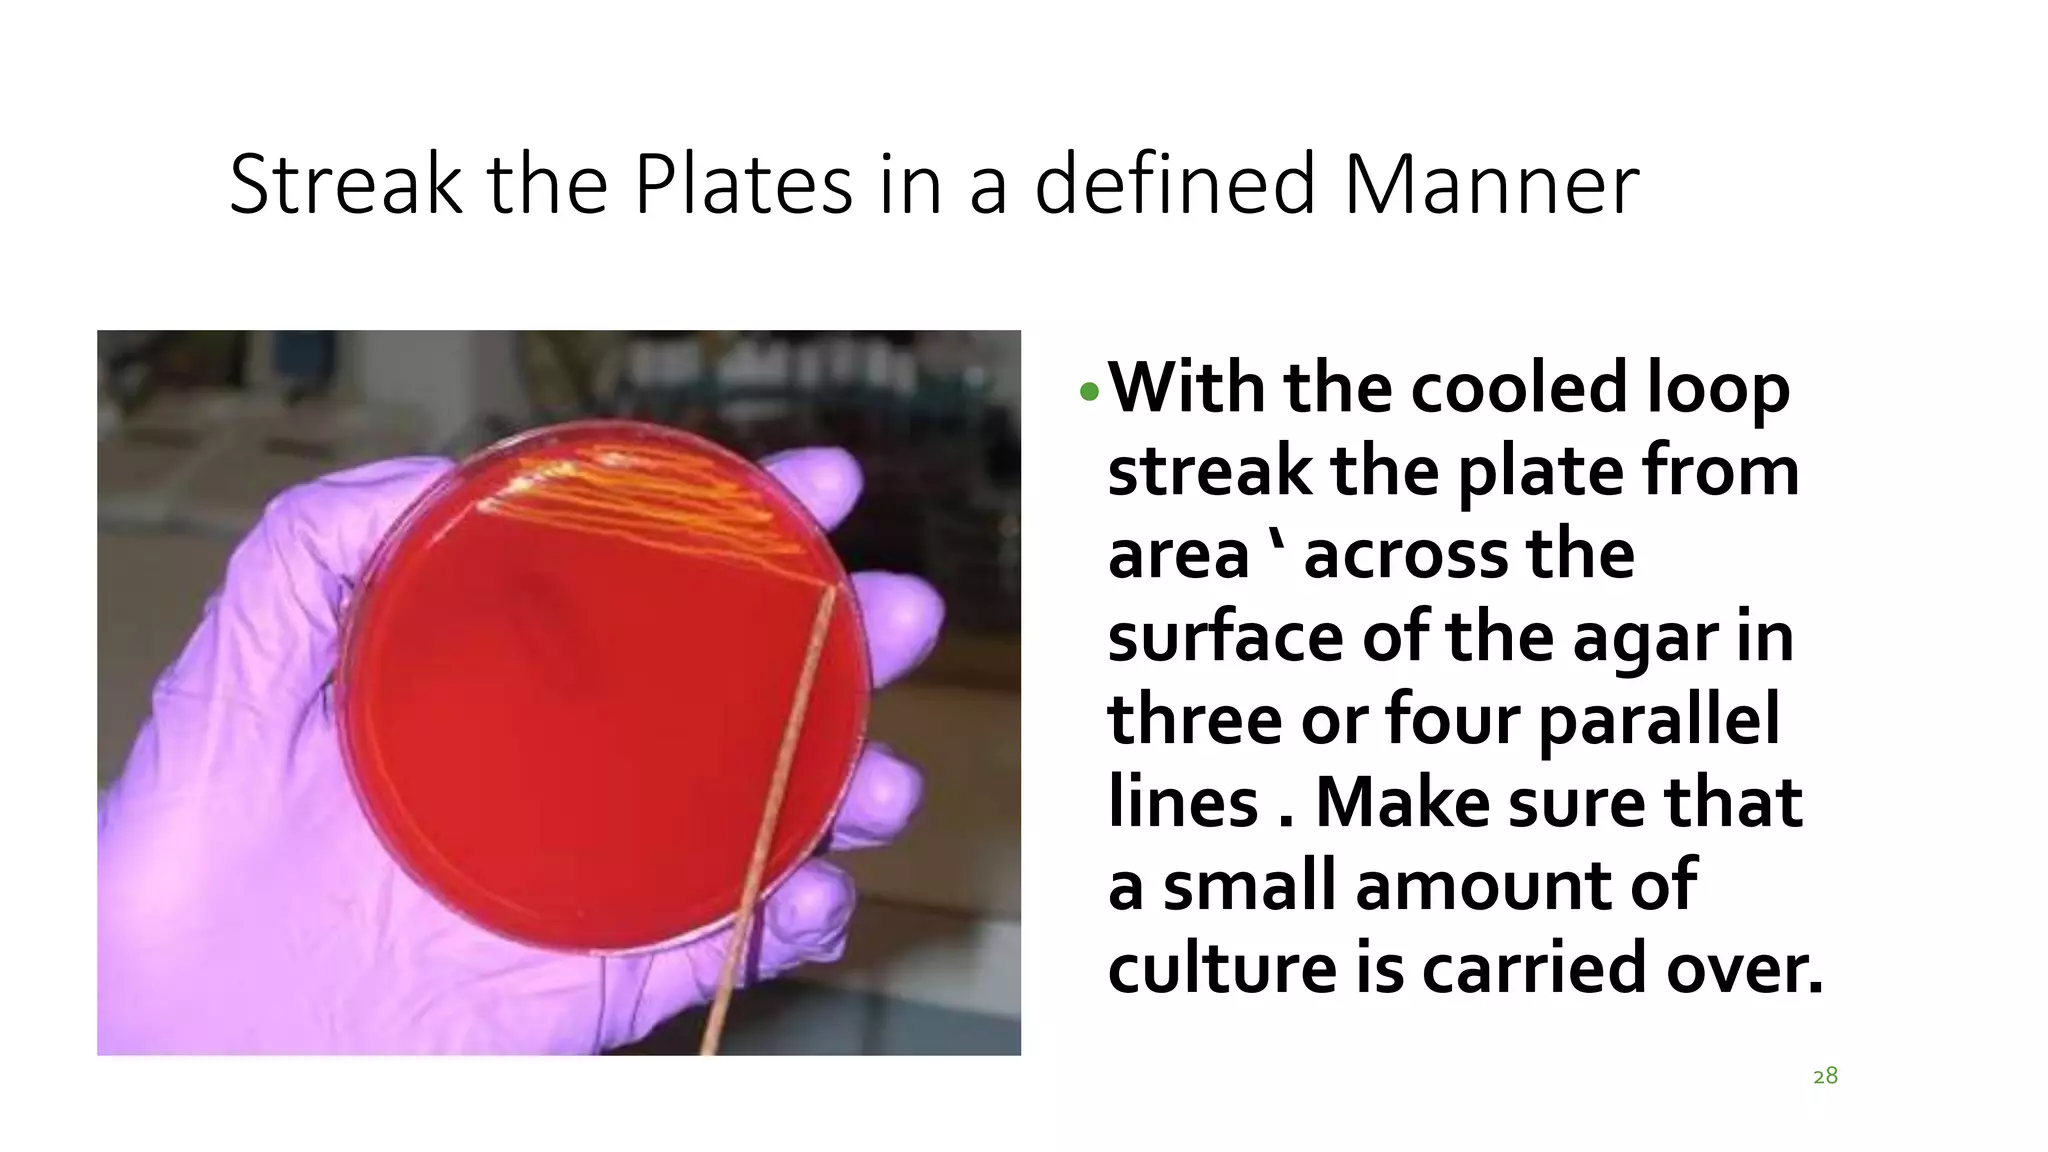
STREAKING
CULTURE PLATES
IN BACTERIOLOGY
Dr.T.V.Rao MD
5/7/2016 1
Think Before Inoculation
2
• Before inoculation,
important information is
written on the bottom of
the plates, close to the rim
• 1date of inoculation
• 2.temperature of incubation
• 3.duration of incubation
• 4.microorganism inoculated
What is streaking
3
• The most common method of inoculating an agar plate is streaking.
•Streak plates
• 1.With this method, a small amount of sample is placed on the side of the agar
plate (either with a swab, or as a drop from an inoculating loop if the sample is
a liquid).
• 2.A sterile loop (flamed until red hot, then cooled by touching the agar away
from the inoculated sample) is then used to spread the bacteria out in one
direction from the initial site of inoculation.This is done by moving the loop
from side to side, passing through the initial site
What is streaking
4
•The loop is then sterilised (by flaming) again and the
first streaks are then spread out themselves.
•.This is repeated 2-3 times, moving around the agar
plate.
•What should happen is that single bacterial cells get
isolated by the streaking, and when the plate is
incubated, forming discrete colonies that will have
started from just one bacterium each.
The essential step in inoculating
culture plates
5
•There are several
essential precautions that
must be taken during
inoculation procedures to
control the opportunities
for the contamination of
cultures, people or the
environment
Prompt action with Optimal
utility
6
•Operations must
not be started until
all requirements
are within
immediate reach
and must be
completed as
quickly as possible
Expose the inoculum in test tubes and
containers for minimal Time
7
• Inoculum is grown in test
tubes and must be open for
the minimum amount of
time possible and while
they are open all work must
be done close to the Bunsen
burner flame where air
currents are drawn
upwards.
The Neck of Test tube containing
inoculum to be heated briefly
8
•On being opened, the
neck of a test tube or
bottle must be
immediately warmed by
flaming so that any air
movement is outwards
and the vessel held as
near as possible to the
horizontal
Exposure to Environment should limited to
minimum
9
•During manipulations
involving a Petri dish,
exposure of the sterile
inner surfaces to
contamination from
the air must be limited
to the absolute
minimum
Work with absolute sterility
10
• The parts of sterile pipettes
that will be put into cultures or
sterile vessels must not be
touched or allowed to come in
contact with other non-sterile
surfaces, e.g. clothing, the
surface of the working area,
the outside of test
tubes/bottles
Work Using a wire loop
11
• Wire loops are sterilised using red
heat in a Bunsen flame before and
after use.They must be heated to red
hot to make sure that any
contaminating bacterial spores are
destroyed.The handle of the wire loop
is held close to the top, as you would a
pen, at an angle that is almost
vertical.This leaves the little finger
free to take hold of the cotton wool
plug/screw cap of a test tube/bottle
Flaming procedure
12
• The flaming procedure is
designed to heat the end of
the loop gradually because
after use it will contain
culture, which may
‘splutter’ on rapid heating
with the possibility of
releasing small particles of
culture and aerosol
formation
Handling of the Inoculating loop
13
•Position the
handle end of the
wire in the light
blue cone of the
flame.This is the
cool area of the
flame
Perfect the art handling the Inoculating
loop
14
•Draw the rest of the
wire upwards slowly up
into the hottest region
of the flame,
(immediately above
the light blue cone). .
Hold there until it is
red hot.
Heat and cool the Loop
15
• Ensure the full
length of the wire
receives
adequate
.
heating.
Allow to cool
then use
immediately.
Handle the Inoculating loop
16
Do not put the
loop down or wave
it around..
Re-sterilise the
loop immediately
after use.
Be careful some times the Loop may not contain
inoculum must redraw the inoculum
17
• If a loop does not hold any
liquid the loop has not made a
complete circle.To correct the
problem, first ensure that the
loop has been sterilised and
then reshape the loop with
forceps. Do not use your
fingers because of the
possibility of puncturing the
skin.
Working with bacteria and yeast Streak plate
•The loop is used for
preparing a streak plate.
This involves the
progressive dilution of an
inoculum of bacteria or
yeast over the surface of
solidified agar medium in a
Petri dish in such a way that
colonies grow well
se5
p
/7/2
a
01r
6 ated from each other.
19
The aim of the procedure is to obtain
single isolated pure colonies
• Loosen the cap of the bottle containing the inoculum.
• Hold the loop in the
.
right hand.
Flame the loop and
allow to cool.
20
21
Handling matters in getting the right
inoculum
Lift the bottle/test tube
containing the inoculum
with the left hand. .
Remove the cap/cotton
wool plug of the bottle/test
tube with the little finger of
the right hand. .
Flame the neck of the
bottle/test tube.
22
Handling loop and Inoculating the material
matters
•Insert the loop into
the culture broth
and withdraw. At
all times, hold the
loop as still as
possible. .
Flame neck of the
bottle/test tube.
23
Do not Practice the
way
24
Practice for
Perfection
• Replace the cap/cotton
wool plug on the
bottle/test tube using
the little finger. Place
bottle/test tube on
bench. . Partially lift the
lid of the Petri dish
containing the solid
medium.
25
Practice , Practice best way to Perfection
• Hold the charged loop
parallel with the surface of
the agar; smear the
inoculum backwards and
forwards across a small
area of the medium (see
streaked area .
26
Follow the Instructions for safe keeping of
Petri dish
• Remove the loop and
close the Petri dish.
. Flame the loop and
allow it to cool.
Turn the dish through
90° anticlockwise.
27
Streak the Plates in a defined Manner
•With the cooled loop
streak the plate from
area ‘ across the
surface of the agar in
three or four parallel
lines . Make sure that
a small amount of
culture is carried over.
28
Streak the Plates in a defined Manner
• Remove the loop and
close the Petri dish. .
Flame the loop and
allow to cool.Turn the
dish through 90°
anticlockwise again and
streak from ’ across the
surface of the agar in
three or four parallel
lines .
29
Carry with further inoculations
•Remove the loop and close
the Petri dish. Flame the
loop and allow to cool.Turn
the dish through
90°anticlockwise and streak
loop across the surface of the
agar from ‘ into the centre of
the plate
30
Complete the work Close the petri dish
• Remove the loop and
close the Petri dish.
Flame the loop.
. Seal and incubate the
plate in an inverted
position.There are
alternative methods for
preparing a streak.
31
References
32
•Basic Practical Microbiology© 2006 Society for
General Microbiology ISBN 0 95368 383 4
•Google resources from images

inoculating a culture plate in bacteriology

  • 1.
  • 2.
    Think Before Inoculation 2 •Before inoculation, important information is written on the bottom of the plates, close to the rim • 1date of inoculation • 2.temperature of incubation • 3.duration of incubation • 4.microorganism inoculated
  • 3.
    What is streaking 3 •The most common method of inoculating an agar plate is streaking. •Streak plates • 1.With this method, a small amount of sample is placed on the side of the agar plate (either with a swab, or as a drop from an inoculating loop if the sample is a liquid). • 2.A sterile loop (flamed until red hot, then cooled by touching the agar away from the inoculated sample) is then used to spread the bacteria out in one direction from the initial site of inoculation.This is done by moving the loop from side to side, passing through the initial site
  • 4.
    What is streaking 4 •Theloop is then sterilised (by flaming) again and the first streaks are then spread out themselves. •.This is repeated 2-3 times, moving around the agar plate. •What should happen is that single bacterial cells get isolated by the streaking, and when the plate is incubated, forming discrete colonies that will have started from just one bacterium each.
  • 5.
    The essential stepin inoculating culture plates 5 •There are several essential precautions that must be taken during inoculation procedures to control the opportunities for the contamination of cultures, people or the environment
  • 6.
    Prompt action withOptimal utility 6 •Operations must not be started until all requirements are within immediate reach and must be completed as quickly as possible
  • 7.
    Expose the inoculumin test tubes and containers for minimal Time 7 • Inoculum is grown in test tubes and must be open for the minimum amount of time possible and while they are open all work must be done close to the Bunsen burner flame where air currents are drawn upwards.
  • 8.
    The Neck ofTest tube containing inoculum to be heated briefly 8 •On being opened, the neck of a test tube or bottle must be immediately warmed by flaming so that any air movement is outwards and the vessel held as near as possible to the horizontal
  • 9.
    Exposure to Environmentshould limited to minimum 9 •During manipulations involving a Petri dish, exposure of the sterile inner surfaces to contamination from the air must be limited to the absolute minimum
  • 10.
    Work with absolutesterility 10 • The parts of sterile pipettes that will be put into cultures or sterile vessels must not be touched or allowed to come in contact with other non-sterile surfaces, e.g. clothing, the surface of the working area, the outside of test tubes/bottles
  • 11.
    Work Using awire loop 11 • Wire loops are sterilised using red heat in a Bunsen flame before and after use.They must be heated to red hot to make sure that any contaminating bacterial spores are destroyed.The handle of the wire loop is held close to the top, as you would a pen, at an angle that is almost vertical.This leaves the little finger free to take hold of the cotton wool plug/screw cap of a test tube/bottle
  • 12.
    Flaming procedure 12 • Theflaming procedure is designed to heat the end of the loop gradually because after use it will contain culture, which may ‘splutter’ on rapid heating with the possibility of releasing small particles of culture and aerosol formation
  • 13.
    Handling of theInoculating loop 13 •Position the handle end of the wire in the light blue cone of the flame.This is the cool area of the flame
  • 14.
    Perfect the arthandling the Inoculating loop 14 •Draw the rest of the wire upwards slowly up into the hottest region of the flame, (immediately above the light blue cone). . Hold there until it is red hot.
  • 15.
    Heat and coolthe Loop 15 • Ensure the full length of the wire receives adequate . heating. Allow to cool then use immediately.
  • 16.
    Handle the Inoculatingloop 16 Do not put the loop down or wave it around.. Re-sterilise the loop immediately after use.
  • 17.
    Be careful sometimes the Loop may not contain inoculum must redraw the inoculum 17 • If a loop does not hold any liquid the loop has not made a complete circle.To correct the problem, first ensure that the loop has been sterilised and then reshape the loop with forceps. Do not use your fingers because of the possibility of puncturing the skin.
  • 18.
    Working with bacteriaand yeast Streak plate •The loop is used for preparing a streak plate. This involves the progressive dilution of an inoculum of bacteria or yeast over the surface of solidified agar medium in a Petri dish in such a way that colonies grow well se5 p /7/2 a 01r 6 ated from each other.
  • 19.
  • 20.
    The aim ofthe procedure is to obtain single isolated pure colonies • Loosen the cap of the bottle containing the inoculum. • Hold the loop in the . right hand. Flame the loop and allow to cool. 20
  • 21.
  • 22.
    Handling matters ingetting the right inoculum Lift the bottle/test tube containing the inoculum with the left hand. . Remove the cap/cotton wool plug of the bottle/test tube with the little finger of the right hand. . Flame the neck of the bottle/test tube. 22
  • 23.
    Handling loop andInoculating the material matters •Insert the loop into the culture broth and withdraw. At all times, hold the loop as still as possible. . Flame neck of the bottle/test tube. 23
  • 24.
    Do not Practicethe way 24
  • 25.
    Practice for Perfection • Replacethe cap/cotton wool plug on the bottle/test tube using the little finger. Place bottle/test tube on bench. . Partially lift the lid of the Petri dish containing the solid medium. 25
  • 26.
    Practice , Practicebest way to Perfection • Hold the charged loop parallel with the surface of the agar; smear the inoculum backwards and forwards across a small area of the medium (see streaked area . 26
  • 27.
    Follow the Instructionsfor safe keeping of Petri dish • Remove the loop and close the Petri dish. . Flame the loop and allow it to cool. Turn the dish through 90° anticlockwise. 27
  • 28.
    Streak the Platesin a defined Manner •With the cooled loop streak the plate from area ‘ across the surface of the agar in three or four parallel lines . Make sure that a small amount of culture is carried over. 28
  • 29.
    Streak the Platesin a defined Manner • Remove the loop and close the Petri dish. . Flame the loop and allow to cool.Turn the dish through 90° anticlockwise again and streak from ’ across the surface of the agar in three or four parallel lines . 29
  • 30.
    Carry with furtherinoculations •Remove the loop and close the Petri dish. Flame the loop and allow to cool.Turn the dish through 90°anticlockwise and streak loop across the surface of the agar from ‘ into the centre of the plate 30
  • 31.
    Complete the workClose the petri dish • Remove the loop and close the Petri dish. Flame the loop. . Seal and incubate the plate in an inverted position.There are alternative methods for preparing a streak. 31
  • 32.
    References 32 •Basic Practical Microbiology©2006 Society for General Microbiology ISBN 0 95368 383 4 •Google resources from images