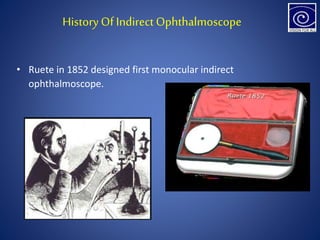
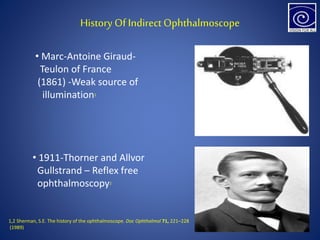
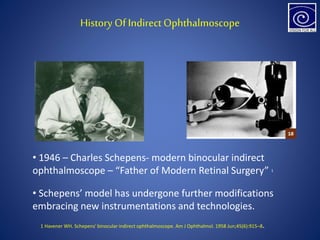
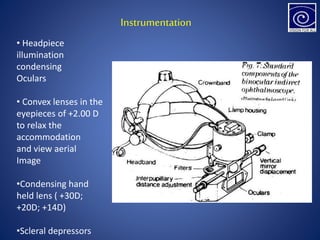
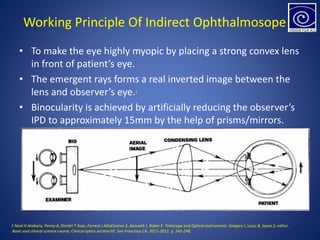
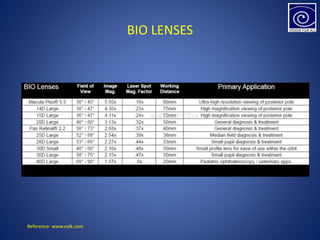
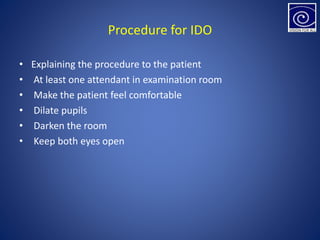
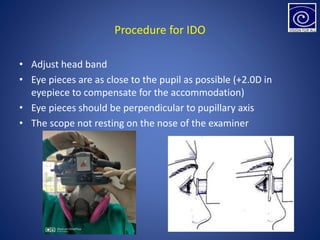
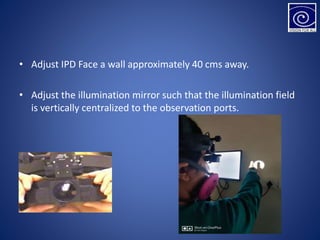
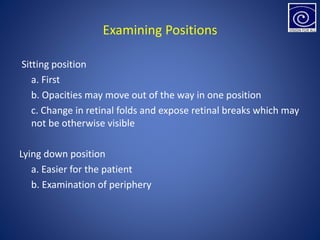
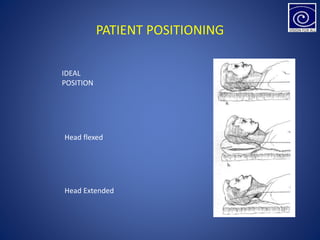
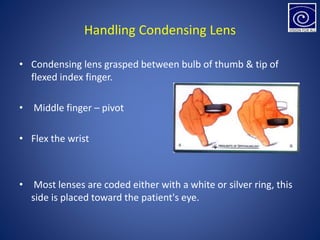
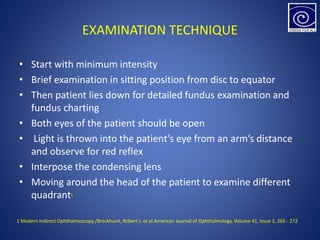
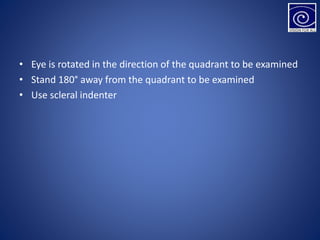
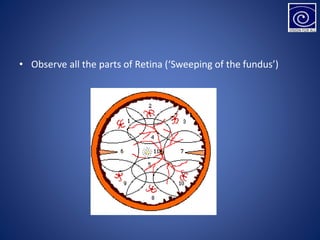
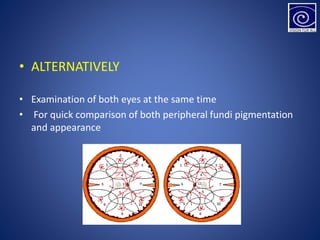
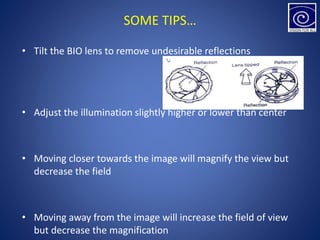
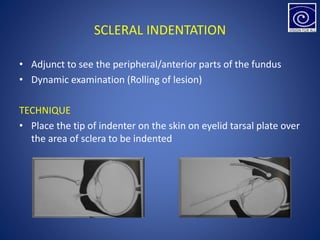
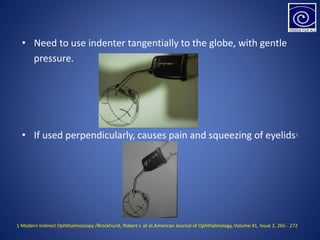
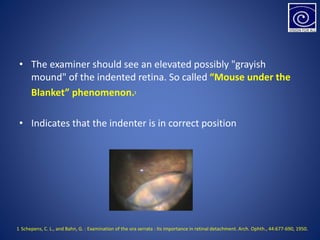
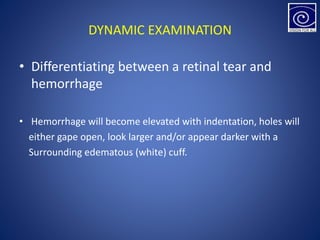
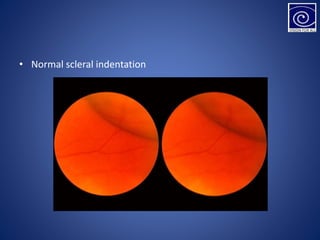
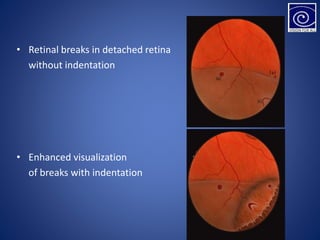
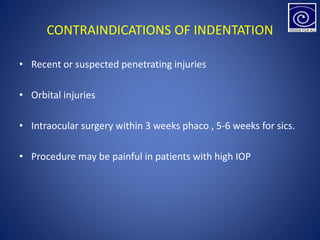
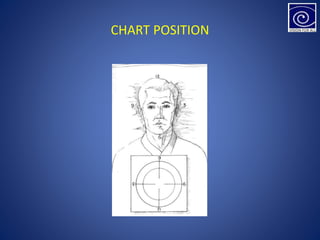
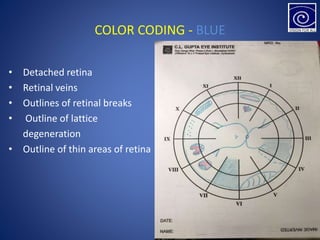
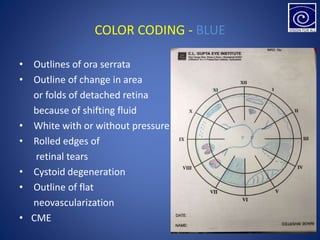
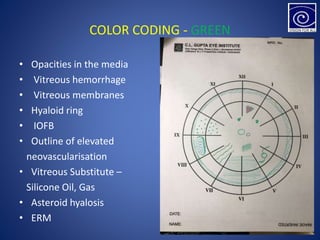
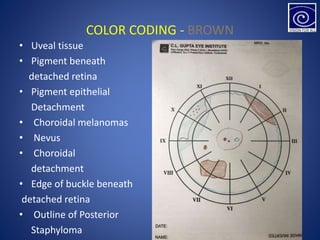
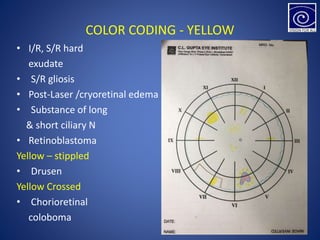
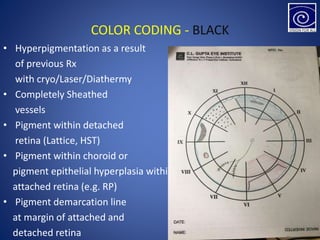
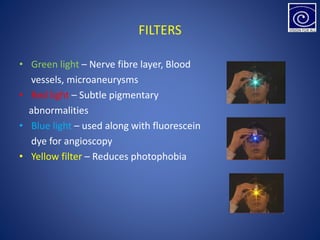
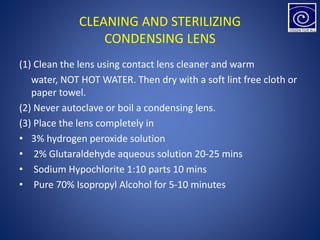
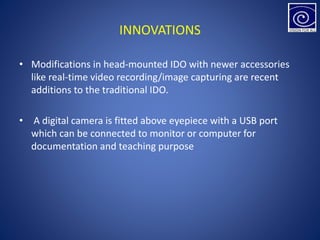
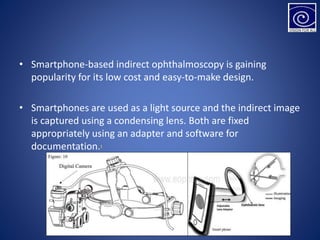
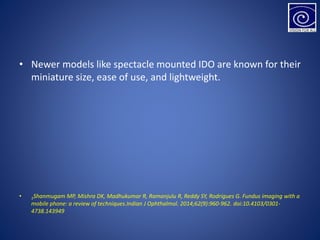
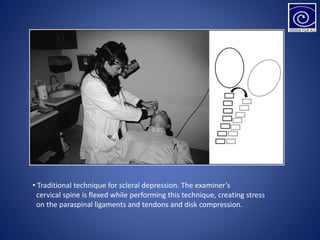
DIVING DEEP INTO THE EYE
Binocular Indirect Ophthalmoscopy &
Fundus Drawing
29-09-20
CL Gupta Eye Institute
Moradabad
Presenter: Dr. Sonali Raj Singh
Moderator: Dr. Abhishek Varshney
OBJECTIVES
• Brief History
• Working principle
• Examination technique
• Fundus Drawing / Color Coding
• Ergonomics
• Ruete in 1852 designed first monocular indirect
ophthalmoscope.
HistoryOf Indirect Ophthalmoscope
History Of Indirect Ophthalmoscope
• Marc-Antoine Giraud-
Teulon of France
(1861) -Weak source of
illumination1
• 1911-Thorner and Allvor
Gullstrand – Reflex free
ophthalmoscopy2
1,2 Sherman, S.E. The history of the ophthalmoscope. Doc Ophthalmol 71, 221–228
(1989)
History Of Indirect Ophthalmoscope
• 1946 – Charles Schepens- modern binocular indirect
ophthalmoscope – “Father of Modern Retinal Surgery” 1
• Schepens’ model has undergone further modifications
embracing new instrumentations and technologies.
1 Havener WH. Schepens' binocular indirect ophthalmoscope. Am J Ophthalmol. 1958 Jun;45(6):915–8.
Instrumentation
• Headpiece
illumination
condensing
Oculars
• Convex lenses in the
eyepieces of +2.00 D
to relax the
accommodation
and view aerial
Image
•Condensing hand
held lens ( +30D;
+20D; +14D)
•Scleral depressors
Working Principle Of Indirect Ophthalmosope
• To make the eye highly myopic by placing a strong convex lens
in front of patient’s eye.
• The emergent rays forms a real inverted image between the
lens and observer’s eye.1
• Binocularity is achieved by artificially reducing the observer’s
IPD to approximately 15mm by the help of prisms/mirrors.
1 Neal H Atebara, Penny A, Dimitri T Azar, Forrest J AllisEleanor E, Kenneth J, Rober E. Telescope and Optical instruments. Gregory l, Loius B, Jayne S, editor.
Basic and clinical science course, Clinical optics section 03. San Francisco CA. 2011-2012. p. 245-248.
Image Characteristics
• Real, inverted and magnified
• Magnification depends on: -
-Dioptric power of the convex lens*
-Position of lens in relation to the eyeball
-Refractive state of the eyeball
• Field of view is directly proportional to power of lens while Magnification is inversely
proportional .
• As the power of the condensing lens decreases, the field of view decreases but image
magnification and working distance increase.
BIO LENSES
Reference- www.volk.com
Procedure for IDO
• Explaining the procedure to the patient
• At least one attendant in examination room
• Make the patient feel comfortable
• Dilate pupils
• Darken the room
• Keep both eyes open
Procedure for IDO
• Adjust head band
• Eye pieces are as close to the pupil as possible (+2.0D in
eyepiece to compensate for the accommodation)
• Eye pieces should be perpendicular to pupillary axis
• The scope not resting on the nose of the examiner
• Adjust IPD Face a wall approximately 40 cms away.
• Adjust the illumination mirror such that the illumination field
is vertically centralized to the observation ports.
Examining Positions
Sitting position
a. First
b. Opacities may move out of the way in one position
c. Change in retinal folds and expose retinal breaks which may
not be otherwise visible
Lying down position
a. Easier for the patient
b. Examination of periphery
PATIENT POSITIONING
IDEAL
POSITION
Head flexed
Head Extended
Handling Condensing Lens
• Condensing lens grasped between bulb of thumb & tip of
flexed index finger.
• Middle finger – pivot
• Flex the wrist
• Most lenses are coded either with a white or silver ring, this
side is placed toward the patient's eye.
EXAMINATION TECHNIQUE
• Start with minimum intensity
• Brief examination in sitting position from disc to equator
• Then patient lies down for detailed fundus examination and
fundus charting
• Both eyes of the patient should be open
• Light is thrown into the patient’s eye from an arm’s distance
and observe for red reflex
• Interpose the condensing lens
• Moving around the head of the patient to examine different
quadrant1
1 Modern Indirect Ophthalmoscopy /Brockhurst, Robert J. et al.American Journal of Ophthalmology, Volume 41, Issue 2, 265 - 272
EXAMINATION TECHNIQUE
• Maintain a common line of sight by imagining that the fundus
under examination, the centre of the patient’s pupil, the
centre of the condensing lens and the examiners visual axis
are all connected by an imaginary line
PERIPHERAL FUNDUS EXAMINATION
Correct position of the eye: -
•Provide a target like patient’s thumb
•Non seeing eye: - proprioceptive
impulses
PERIPHERAL FUNDUS EXAMINATION
• During examination of fundus periphery, the patient’s pupil
appears elliptic to the observer
• While viewing fundus periphery much of the light is imaged
outside the patient’s pupil. The light source should be
adjusted to bring the image of the light source inside the
elliptic pupil
• Eye is rotated in the direction of the quadrant to be examined
• Stand 180° away from the quadrant to be examined
• Use scleral indenter
• Observe all the parts of Retina (‘Sweeping of the fundus’)
• Using variable pupil function and altering the covergence
angle of right and left image steropsis can be achieved.
• ALTERNATIVELY
• Examination of both eyes at the same time
• For quick comparison of both peripheral fundi pigmentation
and appearance
SOME TIPS…
• Tilt the BIO lens to remove undesirable reflections
• Adjust the illumination slightly higher or lower than center
• Moving closer towards the image will magnify the view but
decrease the field
• Moving away from the image will increase the field of view
but decrease the magnification
TYPES OF SCLERAL DEPRESSORS
SCLERAL INDENTATION
• Adjunct to see the peripheral/anterior parts of the fundus
• Dynamic examination (Rolling of lesion)
TECHNIQUE
• Place the tip of indenter on the skin on eyelid tarsal plate over
the area of sclera to be indented
• Need to use indenter tangentially to the globe, with gentle
pressure.
• If used perpendicularly, causes pain and squeezing of eyelids1
1 Modern Indirect Ophthalmoscopy /Brockhurst, Robert J. et al.American Journal of Ophthalmology, Volume 41, Issue 2, 265 - 272
• The examiner should see an elevated possibly "grayish
mound" of the indented retina. So called “Mouse under the
Blanket” phenomenon.1
• Indicates that the indenter is in correct position
1 Schepens, C. L., and Bahn, G. : Examination of the ora serrata : Its importance in retinal detachment. Arch. Ophth., 44:677-690, 1950.
DYNAMIC EXAMINATION
• Differentiating between a retinal tear and
hemorrhage
• Hemorrhage will become elevated with indentation, holes will
either gape open, look larger and/or appear darker with a
Surrounding edematous (white) cuff.
• Normal scleral indentation
• Retinal breaks in detached retina
without indentation
• Enhanced visualization
of breaks with indentation
ADVANTAGES OF SCLERAL DEPRESSION
• Area near pars plana and ora can be examined
• Enhances contrast between lesions and surrounding retinal
tissue
• Retinal lesions that are not well defined like suspected retinal
hole , tears or vitreo retinal adhesions are examined with
ease1
1REVIEWOFOPTOMETRY.COM/ARTICLE/THELOSTARTOFOPTOMETRYPART1AREFRESHERONSCLERALDEPRESSION
CONTRAINDICATIONS OF INDENTATION
• Recent or suspected penetrating injuries
• Orbital injuries
• Intraocular surgery within 3 weeks phaco , 5-6 weeks for sics.
• Procedure may be painful in patients with high IOP
FUNDUS DRAWING
JUNCTION OF PARS PLICATA
AND PARS PLANA
ORA SERRATA
EQUATOR
CHART POSITION
PENNING FUNDUS FINDINGS ON PAPER
• Disregard Sup/Inf and Temp/Nasal while drawing
• What ever appears closer to the observer in the condensing
lens is peripheral (anterior)
• Observe the disc and follow a vessel to the periphery
• Observe the macula at the end for best patient cooperation
• Draw as you see the lesion in the condensing lens
COLOR CODING – RED
• Hemorrhages (preretinal and intraretinal, SHH)
• Attached retina
• Retinal arterioles
• Neovascularization
• Vascular abnormalities
/anomalies
• Vascular tumors
• Open interior of conventional
retinal breaks (tears,holes)
• Open portion of Giant
retinal tear (GRT) or large dialyses
• Inner portion of thin areas
• of retina
COLOR CODING - BLUE
• Detached retina
• Retinal veins
• Outlines of retinal breaks
• Outline of lattice
degeneration
• Outline of thin areas of retina
COLOR CODING - BLUE
• Outlines of ora serrata
• Outline of change in area
or folds of detached retina
because of shifting fluid
• White with or without pressure
• Rolled edges of
retinal tears
• Cystoid degeneration
• Outline of flat
neovascularization
• CME
COLOR CODING - GREEN
• Opacities in the media
• Vitreous hemorrhage
• Vitreous membranes
• Hyaloid ring
• IOFB
• Outline of elevated
neovascularisation
• Vitreous Substitute –
Silicone Oil, Gas
• Asteroid hyalosis
• ERM
COLOR CODING - BROWN
• Uveal tissue
• Pigment beneath
detached retina
• Pigment epithelial
Detachment
• Choroidal melanomas
• Nevus
• Choroidal
detachment
• Edge of buckle beneath
detached retina
• Outline of Posterior
Staphyloma
COLOR CODING - YELLOW
• I/R, S/R hard
exudate
• S/R gliosis
• Post-Laser /cryoretinal edema
• Substance of long
& short ciliary N
• Retinoblastoma
Yellow – stippled
• Drusen
Yellow Crossed
• Chorioretinal
coloboma
COLOR CODING - BLACK
• Hyperpigmentation as a result
of previous Rx
with cryo/Laser/Diathermy
• Completely Sheathed
vessels
• Pigment within detached
retina (Lattice, HST)
• Pigment within choroid or
pigment epithelial hyperplasia within
attached retina (e.g. RP)
• Pigment demarcation line
at margin of attached and
detached retina
FILTERS
• Green light – Nerve fibre layer, Blood
vessels, microaneurysms
• Red light – Subtle pigmentary
abnormalities
• Blue light – used along with fluorescein
dye for angioscopy
• Yellow filter – Reduces photophobia
CLEANING AND STERILIZING
CONDENSING LENS
(1) Clean the lens using contact lens cleaner and warm
water, NOT HOT WATER. Then dry with a soft lint free cloth or
paper towel.
(2) Never autoclave or boil a condensing lens.
(3) Place the lens completely in
• 3% hydrogen peroxide solution
• 2% Glutaraldehyde aqueous solution 20-25 mins
• Sodium Hypochlorite 1:10 parts 10 mins
• Pure 70% Isopropyl Alcohol for 5-10 minutes
INNOVATIONS
• Modifications in head-mounted IDO with newer accessories
like real-time video recording/image capturing are recent
additions to the traditional IDO.
• A digital camera is fitted above eyepiece with a USB port
which can be connected to monitor or computer for
documentation and teaching purpose
• Smartphone-based indirect ophthalmoscopy is gaining
popularity for its low cost and easy-to-make design.
• Smartphones are used as a light source and the indirect image
is captured using a condensing lens. Both are fixed
appropriately using an adapter and software for
documentation.1
• Newer models like spectacle mounted IDO are known for their
miniature size, ease of use, and lightweight.
• 1Shanmugam MP, Mishra DK, Madhukumar R, Ramanjulu R, Reddy SY, Rodrigues G. Fundus imaging with a
mobile phone: a review of techniques.Indian J Ophthalmol. 2014;62(9):960-962. doi:10.4103/0301-
4738.143949
ERGONOMICS
• Several studies have evaluated the occurrence of occupation-
related musculoskeletal diseases in ophthalmologists and
report an incidence of 30% to 70% for neck pain and 40% to
80% for back pain.1,2
• These studies have additionally identified indirect
ophthalmoscopy and laser photocoagulation surgery as the
factors associated with neck and back pain in
ophthalmologists
• 1 Dhimitri KC, McGwin G, McNeal SF, et al. Symptoms of musculoskeletal disorders in ophthalmologists. Am J Ophthalmol 2005;139:179–181
• 2 Kitzmann AS, Fethke NB, Baratz KH, et al. A survey study of musculoskeletal disorders among eye care physicians compared with family
medicine physicians. Ophthalmology 2012; 119:213–220.
• Traditional technique for scleral depression. The examiner’s
cervical spine is flexed while performing this technique, creating stress
on the paraspinal ligaments and tendons and disk compression.
• Ergonomic technique for scleral depression in the clinic. The patient has been
reclined slightly, and the head has been tilted 45° towardthe examiner. The
examiner’s head and neck are in neutral position
• Avoiding Neck Strain in Vitreoretinal Surgery: An Ergonomic Approach to Indirect Ophthalmoscopy and Laser Photocoagulation RETINA, THE
JOURNAL OF RETINAL AND VITREOUS DISEASES 2013 VOLUME 33 NUMBER 2
• Ergonomic technique for scleral depression in the operating room. The neutral
position of the surgeon’s head and neck decreasing stress on the paraspinal
ligaments and tendons. The patient’s head has been tilted 45° toward the surgeon
• Avoiding Neck Strain in Vitreoretinal Surgery: An Ergonomic Approach to Indirect Ophthalmoscopy and Laser Photocoagulation RETINA, THE
JOURNAL OF RETINAL AND VITREOUS DISEASES 2013 VOLUME 33 NUMBER 2
• Ergonomic technique for indirect laser photocoagulation. The technique can also
be used in the neonatal intensive care unit during laser photocoagulation of ROP.
• Avoiding Neck Strain in Vitreoretinal Surgery: An Ergonomic Approach to Indirect Ophthalmoscopy and Laser Photocoagulation RETINA, THE
JOURNAL OF RETINAL AND VITREOUS DISEASES 2013 VOLUME 33 NUMBER 2
TO SUMMARISE...
• An indirect ophthalmoscope gives us a stereoscopic view of
fundus and a wider field. Though low magnification and
inverted images are troublesome in the beginning, mastering
the technique makes it an ideal tool for retinal examination.
THANK YOU

Indirect ophthalmoscopy and fundus drawing

  • 1.
    DIVING DEEP INTOTHE EYE Binocular Indirect Ophthalmoscopy & Fundus Drawing 29-09-20 CL Gupta Eye Institute Moradabad Presenter: Dr. Sonali Raj Singh Moderator: Dr. Abhishek Varshney
  • 2.
    OBJECTIVES • Brief History •Working principle • Examination technique • Fundus Drawing / Color Coding • Ergonomics
  • 3.
    • Ruete in1852 designed first monocular indirect ophthalmoscope. HistoryOf Indirect Ophthalmoscope
  • 4.
    History Of IndirectOphthalmoscope • Marc-Antoine Giraud- Teulon of France (1861) -Weak source of illumination1 • 1911-Thorner and Allvor Gullstrand – Reflex free ophthalmoscopy2 1,2 Sherman, S.E. The history of the ophthalmoscope. Doc Ophthalmol 71, 221–228 (1989)
  • 5.
    History Of IndirectOphthalmoscope • 1946 – Charles Schepens- modern binocular indirect ophthalmoscope – “Father of Modern Retinal Surgery” 1 • Schepens’ model has undergone further modifications embracing new instrumentations and technologies. 1 Havener WH. Schepens' binocular indirect ophthalmoscope. Am J Ophthalmol. 1958 Jun;45(6):915–8.
  • 6.
    Instrumentation • Headpiece illumination condensing Oculars • Convexlenses in the eyepieces of +2.00 D to relax the accommodation and view aerial Image •Condensing hand held lens ( +30D; +20D; +14D) •Scleral depressors
  • 7.
    Working Principle OfIndirect Ophthalmosope • To make the eye highly myopic by placing a strong convex lens in front of patient’s eye. • The emergent rays forms a real inverted image between the lens and observer’s eye.1 • Binocularity is achieved by artificially reducing the observer’s IPD to approximately 15mm by the help of prisms/mirrors. 1 Neal H Atebara, Penny A, Dimitri T Azar, Forrest J AllisEleanor E, Kenneth J, Rober E. Telescope and Optical instruments. Gregory l, Loius B, Jayne S, editor. Basic and clinical science course, Clinical optics section 03. San Francisco CA. 2011-2012. p. 245-248.
  • 8.
    Image Characteristics • Real,inverted and magnified • Magnification depends on: - -Dioptric power of the convex lens* -Position of lens in relation to the eyeball -Refractive state of the eyeball • Field of view is directly proportional to power of lens while Magnification is inversely proportional . • As the power of the condensing lens decreases, the field of view decreases but image magnification and working distance increase.
  • 9.
  • 10.
    Procedure for IDO •Explaining the procedure to the patient • At least one attendant in examination room • Make the patient feel comfortable • Dilate pupils • Darken the room • Keep both eyes open
  • 11.
    Procedure for IDO •Adjust head band • Eye pieces are as close to the pupil as possible (+2.0D in eyepiece to compensate for the accommodation) • Eye pieces should be perpendicular to pupillary axis • The scope not resting on the nose of the examiner
  • 12.
    • Adjust IPDFace a wall approximately 40 cms away. • Adjust the illumination mirror such that the illumination field is vertically centralized to the observation ports.
  • 13.
    Examining Positions Sitting position a.First b. Opacities may move out of the way in one position c. Change in retinal folds and expose retinal breaks which may not be otherwise visible Lying down position a. Easier for the patient b. Examination of periphery
  • 14.
  • 15.
    Handling Condensing Lens •Condensing lens grasped between bulb of thumb & tip of flexed index finger. • Middle finger – pivot • Flex the wrist • Most lenses are coded either with a white or silver ring, this side is placed toward the patient's eye.
  • 16.
    EXAMINATION TECHNIQUE • Startwith minimum intensity • Brief examination in sitting position from disc to equator • Then patient lies down for detailed fundus examination and fundus charting • Both eyes of the patient should be open • Light is thrown into the patient’s eye from an arm’s distance and observe for red reflex • Interpose the condensing lens • Moving around the head of the patient to examine different quadrant1 1 Modern Indirect Ophthalmoscopy /Brockhurst, Robert J. et al.American Journal of Ophthalmology, Volume 41, Issue 2, 265 - 272
  • 17.
    EXAMINATION TECHNIQUE • Maintaina common line of sight by imagining that the fundus under examination, the centre of the patient’s pupil, the centre of the condensing lens and the examiners visual axis are all connected by an imaginary line
  • 18.
    PERIPHERAL FUNDUS EXAMINATION Correctposition of the eye: - •Provide a target like patient’s thumb •Non seeing eye: - proprioceptive impulses
  • 19.
    PERIPHERAL FUNDUS EXAMINATION •During examination of fundus periphery, the patient’s pupil appears elliptic to the observer
  • 20.
    • While viewingfundus periphery much of the light is imaged outside the patient’s pupil. The light source should be adjusted to bring the image of the light source inside the elliptic pupil
  • 21.
    • Eye isrotated in the direction of the quadrant to be examined • Stand 180° away from the quadrant to be examined • Use scleral indenter
  • 22.
    • Observe allthe parts of Retina (‘Sweeping of the fundus’)
  • 23.
    • Using variablepupil function and altering the covergence angle of right and left image steropsis can be achieved.
  • 24.
    • ALTERNATIVELY • Examinationof both eyes at the same time • For quick comparison of both peripheral fundi pigmentation and appearance
  • 25.
    SOME TIPS… • Tiltthe BIO lens to remove undesirable reflections • Adjust the illumination slightly higher or lower than center • Moving closer towards the image will magnify the view but decrease the field • Moving away from the image will increase the field of view but decrease the magnification
  • 26.
    TYPES OF SCLERALDEPRESSORS
  • 27.
    SCLERAL INDENTATION • Adjunctto see the peripheral/anterior parts of the fundus • Dynamic examination (Rolling of lesion) TECHNIQUE • Place the tip of indenter on the skin on eyelid tarsal plate over the area of sclera to be indented
  • 28.
    • Need touse indenter tangentially to the globe, with gentle pressure. • If used perpendicularly, causes pain and squeezing of eyelids1 1 Modern Indirect Ophthalmoscopy /Brockhurst, Robert J. et al.American Journal of Ophthalmology, Volume 41, Issue 2, 265 - 272
  • 29.
    • The examinershould see an elevated possibly "grayish mound" of the indented retina. So called “Mouse under the Blanket” phenomenon.1 • Indicates that the indenter is in correct position 1 Schepens, C. L., and Bahn, G. : Examination of the ora serrata : Its importance in retinal detachment. Arch. Ophth., 44:677-690, 1950.
  • 30.
    DYNAMIC EXAMINATION • Differentiatingbetween a retinal tear and hemorrhage • Hemorrhage will become elevated with indentation, holes will either gape open, look larger and/or appear darker with a Surrounding edematous (white) cuff.
  • 31.
    • Normal scleralindentation
  • 32.
    • Retinal breaksin detached retina without indentation • Enhanced visualization of breaks with indentation
  • 33.
    ADVANTAGES OF SCLERALDEPRESSION • Area near pars plana and ora can be examined • Enhances contrast between lesions and surrounding retinal tissue • Retinal lesions that are not well defined like suspected retinal hole , tears or vitreo retinal adhesions are examined with ease1 1REVIEWOFOPTOMETRY.COM/ARTICLE/THELOSTARTOFOPTOMETRYPART1AREFRESHERONSCLERALDEPRESSION
  • 34.
    CONTRAINDICATIONS OF INDENTATION •Recent or suspected penetrating injuries • Orbital injuries • Intraocular surgery within 3 weeks phaco , 5-6 weeks for sics. • Procedure may be painful in patients with high IOP
  • 35.
    FUNDUS DRAWING JUNCTION OFPARS PLICATA AND PARS PLANA ORA SERRATA EQUATOR
  • 36.
  • 37.
    PENNING FUNDUS FINDINGSON PAPER • Disregard Sup/Inf and Temp/Nasal while drawing • What ever appears closer to the observer in the condensing lens is peripheral (anterior) • Observe the disc and follow a vessel to the periphery • Observe the macula at the end for best patient cooperation
  • 38.
    • Draw asyou see the lesion in the condensing lens
  • 39.
    COLOR CODING –RED • Hemorrhages (preretinal and intraretinal, SHH) • Attached retina • Retinal arterioles • Neovascularization • Vascular abnormalities /anomalies
  • 40.
    • Vascular tumors •Open interior of conventional retinal breaks (tears,holes) • Open portion of Giant retinal tear (GRT) or large dialyses • Inner portion of thin areas • of retina
  • 41.
    COLOR CODING -BLUE • Detached retina • Retinal veins • Outlines of retinal breaks • Outline of lattice degeneration • Outline of thin areas of retina
  • 42.
    COLOR CODING -BLUE • Outlines of ora serrata • Outline of change in area or folds of detached retina because of shifting fluid • White with or without pressure • Rolled edges of retinal tears • Cystoid degeneration • Outline of flat neovascularization • CME
  • 43.
    COLOR CODING -GREEN • Opacities in the media • Vitreous hemorrhage • Vitreous membranes • Hyaloid ring • IOFB • Outline of elevated neovascularisation • Vitreous Substitute – Silicone Oil, Gas • Asteroid hyalosis • ERM
  • 44.
    COLOR CODING -BROWN • Uveal tissue • Pigment beneath detached retina • Pigment epithelial Detachment • Choroidal melanomas • Nevus • Choroidal detachment • Edge of buckle beneath detached retina • Outline of Posterior Staphyloma
  • 45.
    COLOR CODING -YELLOW • I/R, S/R hard exudate • S/R gliosis • Post-Laser /cryoretinal edema • Substance of long & short ciliary N • Retinoblastoma Yellow – stippled • Drusen Yellow Crossed • Chorioretinal coloboma
  • 46.
    COLOR CODING -BLACK • Hyperpigmentation as a result of previous Rx with cryo/Laser/Diathermy • Completely Sheathed vessels • Pigment within detached retina (Lattice, HST) • Pigment within choroid or pigment epithelial hyperplasia within attached retina (e.g. RP) • Pigment demarcation line at margin of attached and detached retina
  • 47.
    FILTERS • Green light– Nerve fibre layer, Blood vessels, microaneurysms • Red light – Subtle pigmentary abnormalities • Blue light – used along with fluorescein dye for angioscopy • Yellow filter – Reduces photophobia
  • 48.
    CLEANING AND STERILIZING CONDENSINGLENS (1) Clean the lens using contact lens cleaner and warm water, NOT HOT WATER. Then dry with a soft lint free cloth or paper towel. (2) Never autoclave or boil a condensing lens. (3) Place the lens completely in • 3% hydrogen peroxide solution • 2% Glutaraldehyde aqueous solution 20-25 mins • Sodium Hypochlorite 1:10 parts 10 mins • Pure 70% Isopropyl Alcohol for 5-10 minutes
  • 49.
    INNOVATIONS • Modifications inhead-mounted IDO with newer accessories like real-time video recording/image capturing are recent additions to the traditional IDO. • A digital camera is fitted above eyepiece with a USB port which can be connected to monitor or computer for documentation and teaching purpose
  • 50.
    • Smartphone-based indirectophthalmoscopy is gaining popularity for its low cost and easy-to-make design. • Smartphones are used as a light source and the indirect image is captured using a condensing lens. Both are fixed appropriately using an adapter and software for documentation.1
  • 51.
    • Newer modelslike spectacle mounted IDO are known for their miniature size, ease of use, and lightweight. • 1Shanmugam MP, Mishra DK, Madhukumar R, Ramanjulu R, Reddy SY, Rodrigues G. Fundus imaging with a mobile phone: a review of techniques.Indian J Ophthalmol. 2014;62(9):960-962. doi:10.4103/0301- 4738.143949
  • 52.
    ERGONOMICS • Several studieshave evaluated the occurrence of occupation- related musculoskeletal diseases in ophthalmologists and report an incidence of 30% to 70% for neck pain and 40% to 80% for back pain.1,2 • These studies have additionally identified indirect ophthalmoscopy and laser photocoagulation surgery as the factors associated with neck and back pain in ophthalmologists • 1 Dhimitri KC, McGwin G, McNeal SF, et al. Symptoms of musculoskeletal disorders in ophthalmologists. Am J Ophthalmol 2005;139:179–181 • 2 Kitzmann AS, Fethke NB, Baratz KH, et al. A survey study of musculoskeletal disorders among eye care physicians compared with family medicine physicians. Ophthalmology 2012; 119:213–220.
  • 53.
    • Traditional techniquefor scleral depression. The examiner’s cervical spine is flexed while performing this technique, creating stress on the paraspinal ligaments and tendons and disk compression.
  • 54.
    • Ergonomic techniquefor scleral depression in the clinic. The patient has been reclined slightly, and the head has been tilted 45° towardthe examiner. The examiner’s head and neck are in neutral position • Avoiding Neck Strain in Vitreoretinal Surgery: An Ergonomic Approach to Indirect Ophthalmoscopy and Laser Photocoagulation RETINA, THE JOURNAL OF RETINAL AND VITREOUS DISEASES 2013 VOLUME 33 NUMBER 2
  • 55.
    • Ergonomic techniquefor scleral depression in the operating room. The neutral position of the surgeon’s head and neck decreasing stress on the paraspinal ligaments and tendons. The patient’s head has been tilted 45° toward the surgeon • Avoiding Neck Strain in Vitreoretinal Surgery: An Ergonomic Approach to Indirect Ophthalmoscopy and Laser Photocoagulation RETINA, THE JOURNAL OF RETINAL AND VITREOUS DISEASES 2013 VOLUME 33 NUMBER 2
  • 56.
    • Ergonomic techniquefor indirect laser photocoagulation. The technique can also be used in the neonatal intensive care unit during laser photocoagulation of ROP. • Avoiding Neck Strain in Vitreoretinal Surgery: An Ergonomic Approach to Indirect Ophthalmoscopy and Laser Photocoagulation RETINA, THE JOURNAL OF RETINAL AND VITREOUS DISEASES 2013 VOLUME 33 NUMBER 2
  • 57.
    TO SUMMARISE... • Anindirect ophthalmoscope gives us a stereoscopic view of fundus and a wider field. Though low magnification and inverted images are troublesome in the beginning, mastering the technique makes it an ideal tool for retinal examination.
  • 58.