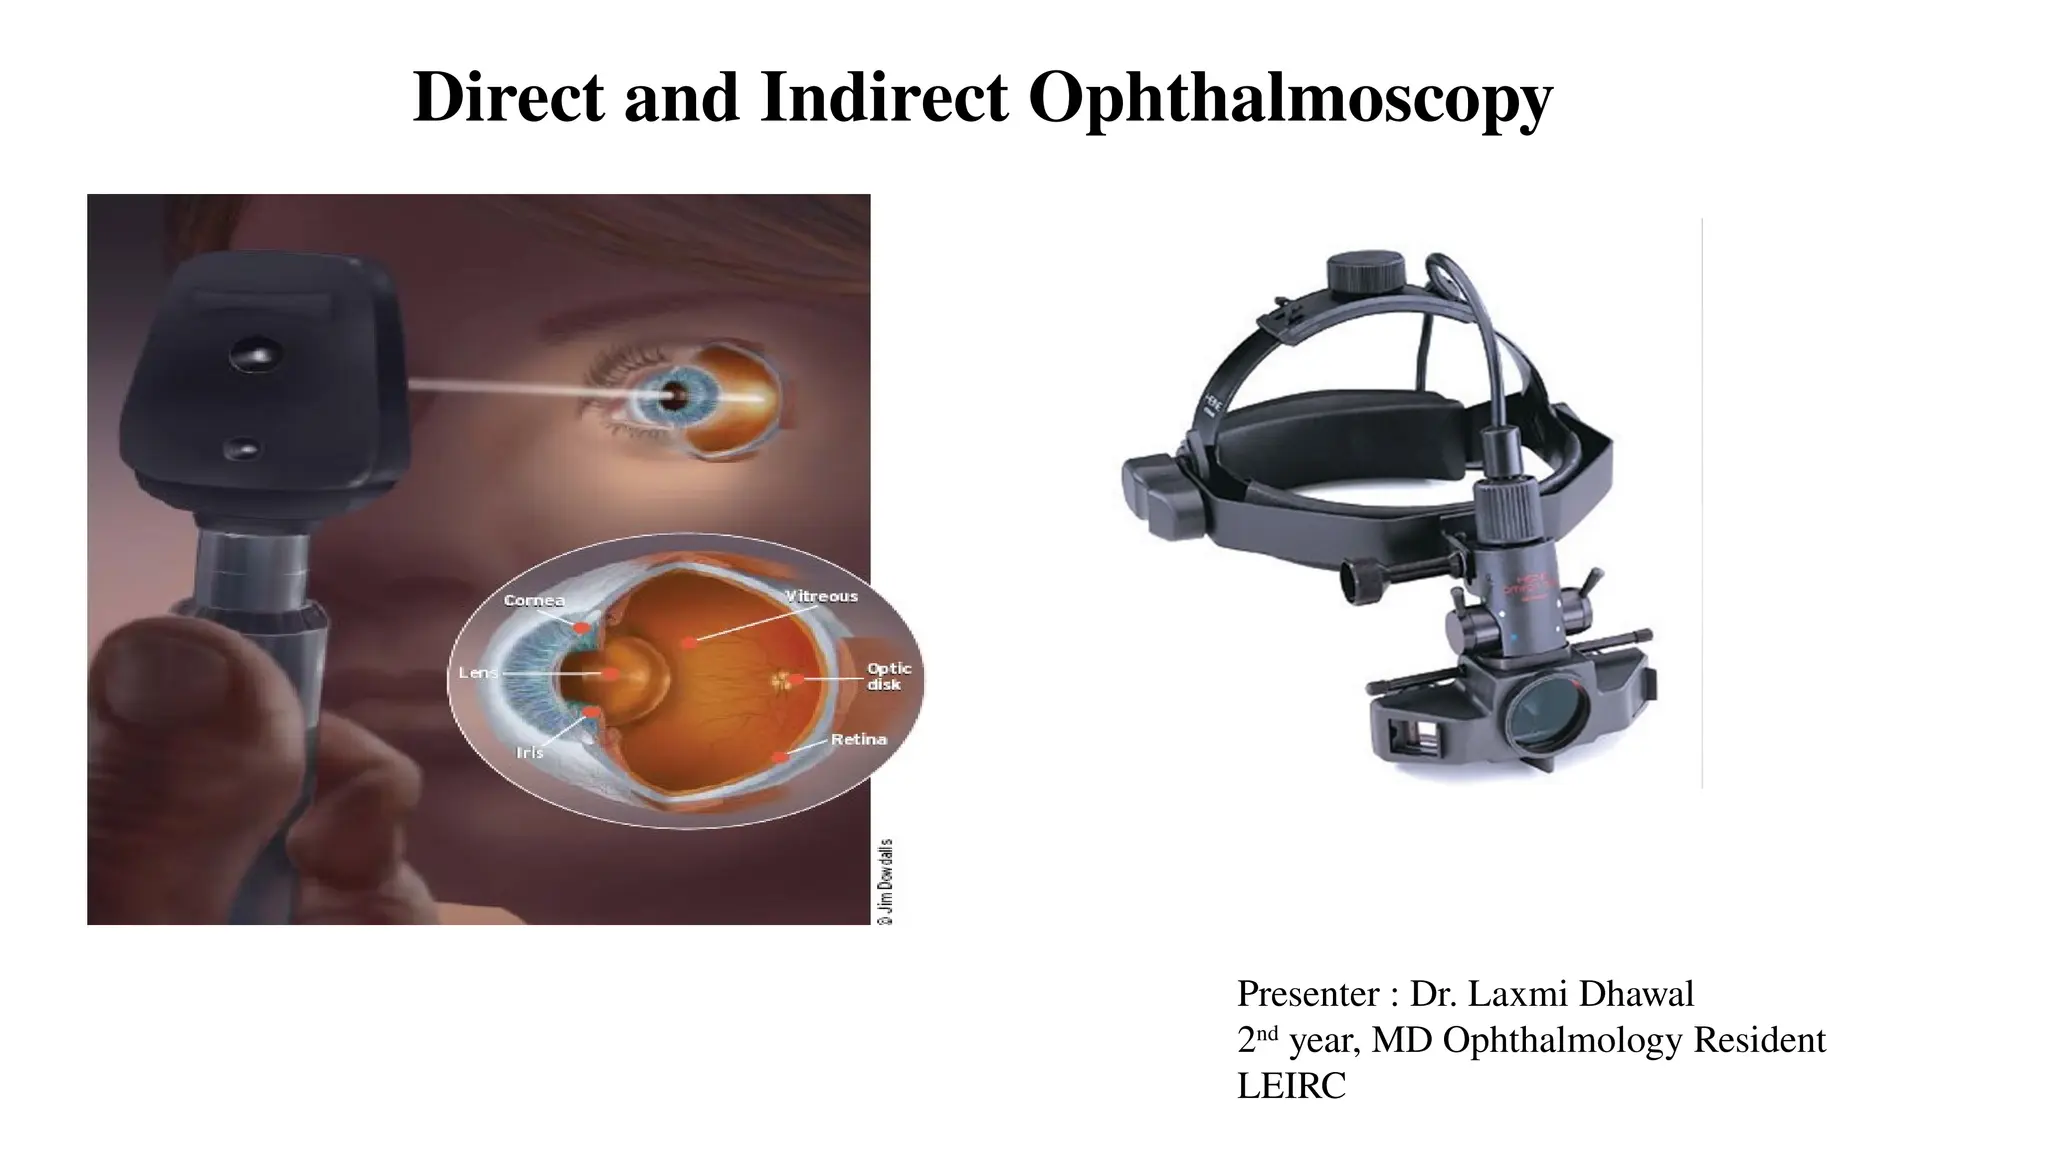
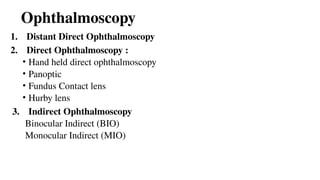
Direct and IndirectOphthalmoscopy
Presenter : Dr. Laxmi Dhawal
2nd
year, MD Ophthalmology Resident
LEIRC
2.
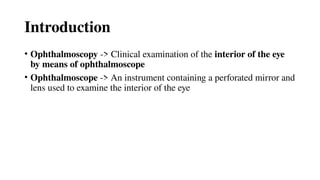
Introduction
• Ophthalmoscopy ->Clinical examination of the interior of the eye
by means of ophthalmoscope
• Ophthalmoscope -> An instrument containing a perforated mirror and
lens used to examine the interior of the eye
3.
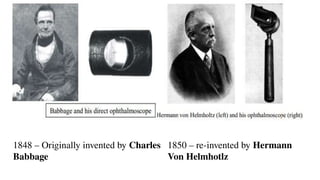
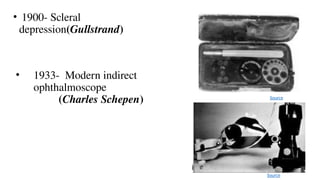
1848 – Originallyinvented by Charles
Babbage
1850 – re-invented by Hermann
Von Helmhotlz
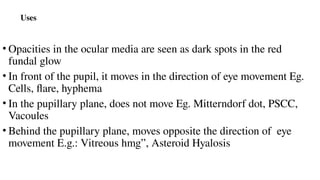
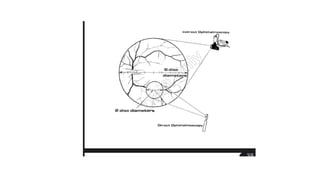
Uses
• Opacities inthe ocular media are seen as dark spots in the red
fundal glow
• In front of the pupil, it moves in the direction of eye movement Eg.
Cells, flare, hyphema
• In the pupillary plane, does not move Eg. Mitterndorf dot, PSCC,
Vacoules
• Behind the pupillary plane, moves opposite the direction of eye
movement E.g.: Vitreous hmg”, Asteroid Hyalosis
11.
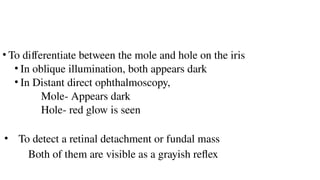
• To differentiatebetween the mole and hole on the iris
• In oblique illumination, both appears dark
• In Distant direct ophthalmoscopy,
Mole- Appears dark
Hole- red glow is seen
• To detect a retinal detachment or fundal mass
Both of them are visible as a grayish reflex
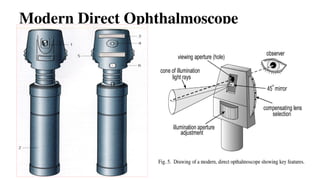
Illumination System
• Incandescentlamp: A xenon halogen bright white lamp powered by a 2.5V
non-rechargeable or 3.5V [NiMH (Nickel Metal Hydride) or LiION (Lithium
Ion)] rechargable battery
• Condensing Lens: two in number, one on either side of the aperture dial which
focus the light onto the mirror/prism
• Reflecting mirror/prism : A mirror angled at 45° which is partially reflecting
or has a central peephole. It makes the light cone projected upon the patient eye
appear as if it has originated from the mirror itself
16.
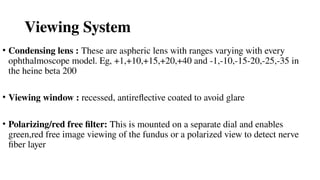
Viewing System
• Condensinglens : These are aspheric lens with ranges varying with every
ophthalmoscope model. Eg, +1,+10,+15,+20,+40 and -1,-10,-15-20,-25,-35 in
the heine beta 200
• Viewing window : recessed, antireflective coated to avoid glare
• Polarizing/red free filter: This is mounted on a separate dial and enables
green,red free image viewing of the fundus or a polarized view to detect nerve
fiber layer
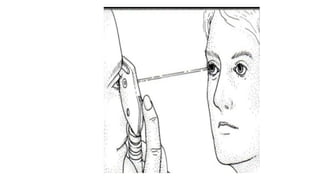
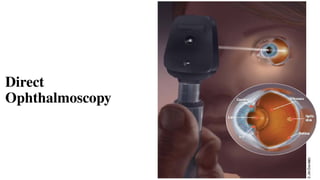
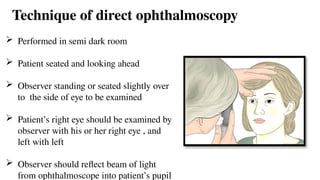
Technique of directophthalmoscopy
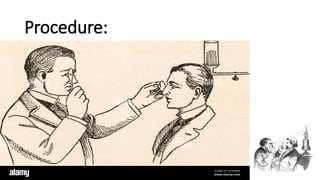
Performed in semi dark room
Patient seated and looking ahead
Observer standing or seated slightly over
to the side of eye to be examined
Patient’s right eye should be examined by
observer with his or her right eye , and
left with left
Observer should reflect beam of light
from ophthalmoscope into patient’s pupil
22.
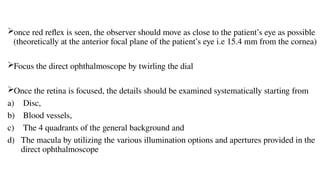
once red reflexis seen, the observer should move as close to the patient’s eye as possible
(theoretically at the anterior focal plane of the patient’s eye i.e 15.4 mm from the cornea)
Focus the direct ophthalmoscope by twirling the dial
Once the retina is focused, the details should be examined systematically starting from
a) Disc,
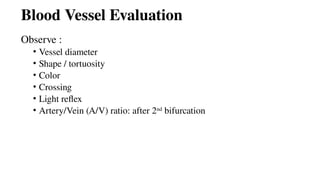
b) Blood vessels,
c) The 4 quadrants of the general background and
d) The macula by utilizing the various illumination options and apertures provided in the
direct ophthalmoscope
23.
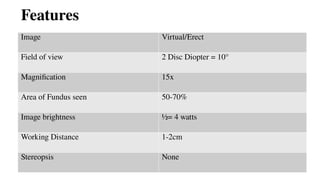
Features
Image Virtual/Erect
Field ofview 2 Disc Diopter = 10°
Magnification 15x
Area of Fundus seen 50-70%
Image brightness ½= 4 watts
Working Distance 1-2cm
Stereopsis None
Magnification
• Depends onthe refractive power of the patient and the doctor; axial
lengths, compensating lenses.
• Magnification = Power/4
= 60/4=15
• Refractive error
• Hyperopes +10 Magnification = 50/4 = 12.5x
• Myopes – 10D Magnification = 70/4 = 17.5x
26.
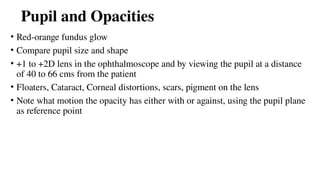
Pupil and Opacities
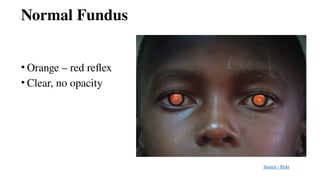
•Red-orange fundus glow
• Compare pupil size and shape
• +1 to +2D lens in the ophthalmoscope and by viewing the pupil at a distance
of 40 to 66 cms from the patient
• Floaters, Cataract, Corneal distortions, scars, pigment on the lens
• Note what motion the opacity has either with or against, using the pupil plane
as reference point
27.
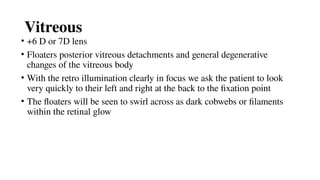
Vitreous
• +6 Dor 7D lens
• Floaters posterior vitreous detachments and general degenerative
changes of the vitreous body
• With the retro illumination clearly in focus we ask the patient to look
very quickly to their left and right at the back to the fixation point
• The floaters will be seen to swirl across as dark cobwebs or filaments
within the retinal glow
28.
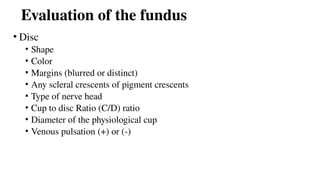
Evaluation of thefundus
• Disc
• Shape
• Color
• Margins (blurred or distinct)
• Any scleral crescents of pigment crescents
• Type of nerve head
• Cup to disc Ratio (C/D) ratio
• Diameter of the physiological cup
• Venous pulsation (+) or (-)
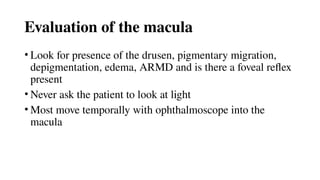
Evaluation of themacula
• Look for presence of the drusen, pigmentary migration,
depigmentation, edema, ARMD and is there a foveal reflex
present
• Never ask the patient to look at light
• Most move temporally with ophthalmoscope into the
macula
31.
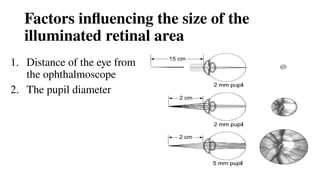
Factors influencing thesize of the
illuminated retinal area
1. Distance of the eye from
the ophthalmoscope
2. The pupil diameter
32.
Advantages
• Simple techniqueto perform
• Erect view of the fundus with 15X magnification
• Can be performed in undilated pupil
• Can be easily performed with the patient sitting upright
• Cheap
• Rough estimation of refractive error
• Opacities in media
33.
Disadvantages
• Lack ofstereopsis
• Inadequate illumination in the presence of media opacities
• Necessary to place examiner’s face in close proximity to the patient’s face
• Severe degradation of the image when significant lens opacities are present
• Impossible to adequately examine in case of high degree of astigmatism or
spherical ametropia
• Does not allow view of the peripheral retina
Brückner Test
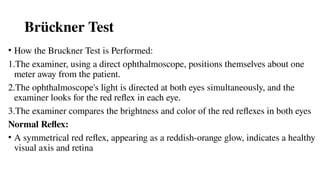
• Howthe Bruckner Test is Performed:
1.The examiner, using a direct ophthalmoscope, positions themselves about one
meter away from the patient.
2.The ophthalmoscope's light is directed at both eyes simultaneously, and the
examiner looks for the red reflex in each eye.
3.The examiner compares the brightness and color of the red reflexes in both eyes
Normal Reflex:
• A symmetrical red reflex, appearing as a reddish-orange glow, indicates a healthy
visual axis and retina
38.
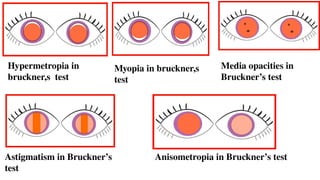
Hypermetropia in
bruckner,s test
Myopiain bruckner,s
test
Astigmatism in Bruckner’s
test
Anisometropia in Bruckner’s test
Media opacities in
Bruckner’s test
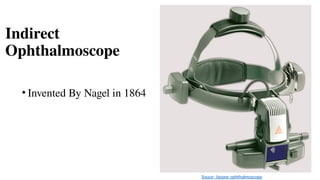
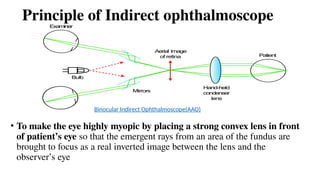
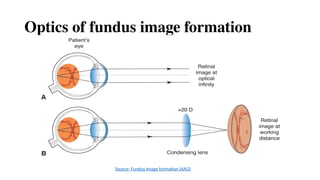
Principle of Indirectophthalmoscope
• To make the eye highly myopic by placing a strong convex lens in front
of patient’s eye so that the emergent rays from an area of the fundus are
brought to focus as a real inverted image between the lens and the
observer’s eye
Binocular Indirect Ophthalmoscope(AAO)
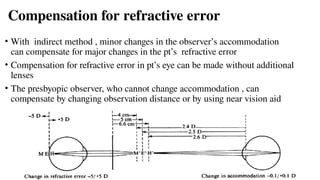
Compensation for refractiveerror
• With indirect method , minor changes in the observer’s accommodation
can compensate for major changes in the pt’s refractive error
• Compensation for refractive error in pt’s eye can be made without additional
lenses
• The presbyopic observer, who cannot change accommodation , can
compensate by changing observation distance or by using near vision aid
48.
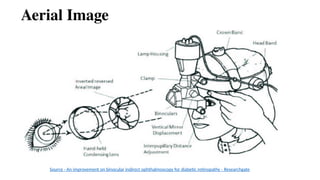
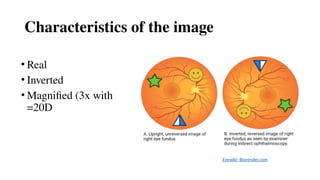
Characteristics of theimage
• Real
• Inverted
• Magnified (3x with
=20D
Eyewiki- Biorender.com
49.
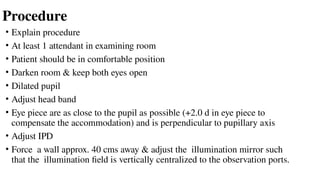
Procedure
• Explain procedure
•At least 1 attendant in examining room
• Patient should be in comfortable position
• Darken room & keep both eyes open
• Dilated pupil
• Adjust head band
• Eye piece are as close to the pupil as possible (+2.0 d in eye piece to
compensate the accommodation) and is perpendicular to pupillary axis
• Adjust IPD
• Force a wall approx. 40 cms away & adjust the illumination mirror such
that the illumination field is vertically centralized to the observation ports.
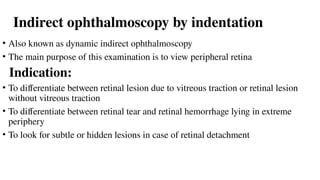
Indirect ophthalmoscopy byindentation
• Also known as dynamic indirect ophthalmoscopy
• The main purpose of this examination is to view peripheral retina
Indication:
• To differentiate between retinal lesion due to vitreous traction or retinal lesion
without vitreous traction
• To differentiate between retinal tear and retinal hemorrhage lying in extreme
periphery
• To look for subtle or hidden lesions in case of retinal detachment
Advantages
• An excellentfield of view (approx. 40 degree)
• The ability to move around the patient and therefore enlarge upon the
field of view
• A stereoscopic view
• Excellent illumination
• Scleral indentation
61.
Disadvantage of indirectophthalmoscope
• Direct ophthalmoscopy is comparatively easy to learn than indirect
• Inversion of image with indirect method of ophthalmoscopy—need
practice to overcome
• Instrument diplopia in learners who accommodate on inverted image
& necessarily converge as well causing homonymous diplopia
• Less magnification
• Patient is more uncomfortable with bright light
#3 Originally invented by babbage but its importance was not recognized and it was re invented by hermann
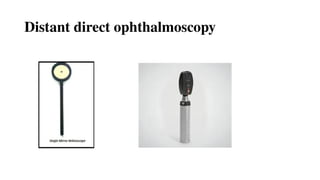
#7 Routinely done before doing a direct ophthalmoscopy
Equipment needed- self illuminated ophthalmoscope or plane mirror with a hole in center
#8 Should be performed in a semi dark room
The ophthalmoscope should be kept at a distance of 20-25cm from the patient’s eye
Normally a red reflex is seen at the pupillary area
#10 The plane of the opacities can be assessed by asking the patient to move the eye from side to side while the examiner is observing the pupillary glow (based on parallax principle)
#13 Light source
Battery housing
Head pad
Viewing aperture
Focusing dial for Rekoss disc
Window indicator of lens power
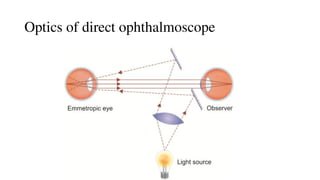
#17 •illuminating=light passes through Lens 1 → Aperture → Lens 2 → Mirror
The mirror reflects the focused light into the patient’s eye
Creates a cone of light entering the eye through the cornea, pupil, and onto the retina
Aperture is placed so that its image is focused on the retina (for emmetropic eyes), forming a clear disk of light
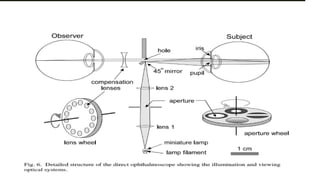
Viewing System
Reflected light from the illuminated retinal area exits the eye (through pupil, lens, cornea)
In emmetropic eyes, rays leave the cornea as parallel rays
Some rays hit the mirror and are lost; others pass through the viewing aperture
Compensating lenses behind the aperture help focus the retinal image for non-emmetropic eyes (like eyeglasses)
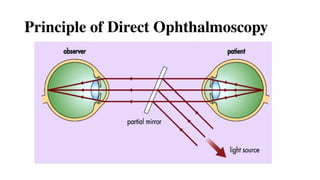
#18 3 basic principles described by Hermann von Helmholtz
pt & observer should be emmetropic
retina of the pt should be sufficiently illuminated
optical alignment of light source & observer’s pupil
If the patient’s eye is emmetropic, light rays emanating from a point on the fundus emerge as a parallel beam. If this beam enters the pupil of an emmetropic observer, the rays are focused on the observer’s retina and form an image of the patient’s retina on the observer’s retina. This is called direct ophthalmoscopy.
#19 A convergent beam of light is reflected into patient ppupil(dotted line)
The emergent rays from any point on the patient fundus reach the observer’s retina through the viewing hole in opthalmoscope(continuous line)
Emergent rays from the patient,s eye are parallel & brought to focus on the retina of emmetropic observer when accommodation is relaxed
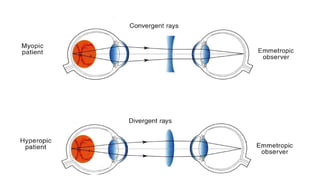
Viewing system of a direct ophthalmoscope.
A, A bundle of light rays emerges from the emmetropic eye with zero vergence.
B, A bundle of light rays emerges converging from the myopic eye with positive vergence; the corrective lens is minus.
C, A bundle of rays with negative vergence diverges coming out of the hyperopic eye; the corrective lens is plus.
#20 Myopic=emergent rays will be convergent & thus can be brought to focus on the observers retina by the help of concave lens
therefore, if the pt or/& observer is/are emmetropic , a correcting lens (equivalent to the sum of pt,s & observer ).ref. error must be imposed (from the system of plus & minus lenses, in-built in the modern ophthalmology
Hypermetropic=emergent ray from the illuminating area of retina will be divergent & thus can be brought to the focus on the observer’s retina if the latter accommodates , or by the help of a convex lens
#21 Review the instrument
Choose low light setting from the light source
Set the aperture to large circle and white color
No filtration and no refractive correction
#22 The D.O Should then be focused by twirling the dial for the reskoss disc,which has several plus-minus powered lasers.
Optimal focusing lens on the reskoss disc depends on the pt’s R.E ,EXAMINERS R.E(including unintended accommodation ) & the examn distance
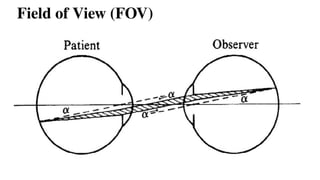
#25 The area of retina which can be seen at any one time is called FOV
The maximum field of view is determined by the most oblique pencil of rays (shaded) that can still pass from one pupil to other
10° or 2 DD
Limited by: Peripheral light rays
Expanded by : Maximizing pupillary dilation and decreasing working distance
FOV in myopic is smaller, larger in hypermetropes than in emmetrope
#26 25 cm is ordinarily taken as the average distance of most distinct vision for an emmetrope. In metre 0.25 m=1/4
Power of cornea 40 and lens 20
Larger area with least magnification is seen in hyperopes and
Smaller area with maximum magnification is noted in myopes
#29 Disc edema is focused and dioptric power noted.
Adjacent retina is focused and
diopteric power noted
Difference gives the elvation of disc surface.
+3D = 1mm elevation of disc in phakic
+3D = 2mm elevation of disc in aphakic
#30 Artery bright red,vein darker with wider calibre
#32 In Fig. 9A, the ophthalmoscope is relatively far (15 cm) from an emmetropic eye with a 2 mm diameter pupil. Notice that the illumination rays in the eye converge to a very small retinal area.5 With the ophthalmoscope so far from the eye, we would only be able to see an extremely small portion of the retina, perhaps a short segment of a retinal vessel (200-300 μm in diameter) as shown to the right. When theophthalmoscope is brought much closer to the eye, as shown in Fig. 9B, however, a much larger retinal area is illuminated, even with the same size pupil. In this case, we would be able to see the entire optic disk which is about 1.5 mm in diameter. Finally, if we are able to dilate the pupil, a much larger retinal area is visible as shown in Fig. 9C. There, the pupil is 5 mm in diameter while the illumination source is exactly as in 9B. The field of view as shown on the right is about 3 mm in diameter, twice as large as that in 9B. Dilating the pupil with a mydriatic will dramatically increase your ability to view the fundus.
#39 Dimmer reflex is normal=when eyes are aligned raysfocus on the fovea which has tightly packed photoreceptors cells which absorb light thus reflex is dimmer
Brighter reflex abnormal=when eye deviated the rays focus an extra foveal area (peripheral retina)where photoreceptors cells are less and light reflected more ,thus bright pupillary is seen in strabismic eye
#40 AHYPEROPE=.Lighter cerscennt is visible at the top of red reflex
With increasing degrees of hyperopia,the overall red reflex will become dimmer
B.MYOPIA=LIGHTER CRESCENT IS AT THE BOTTOM OF RED REFLEX
WITH INCREASING DEGREES OF MYOPIA, THE OVERALL RED REFLEX WILL BECOME DIMMER
C.astigmatism=red reflex flattens into a straight line across the pupil rather than a crescent,this occurs due to an increase converging in 1 meridian as compared to other
d.Anisometropia =higher the R.E dimmer the reflex so the colour is diffn,size,position &colour of crescents are also clearly diffn in each eye
E.Media opacities seen black against fundus reflex,corneal abbrasions and corneal scars will appear as black mark on the red reflex
#43 Principle-to make the eye highly myopic by placing a strong convex lens in front of pt’s eye
Both of the observer’s pupils must be imaged into the patient’s pupil.
For this, the observers interpupillary distance must be reduced using mirrors
#45 A retinal image is formed at optical infinity. B, A condensing lens focuses a bundle of parallel rays to a place closer to the viewer than his or her hand.
#46 A rays can be traced from the patient’s fundus to the observer’s retina
An intermediate,inverted but real image of pt’s fundus is formed in the focal plane of the ophthalmoscopy lens betn the lens and the observer
The observer must accommodate this image
Usually located within arm’s length of the observer.
#47 Normal ipd is about 60mm
Reduced to 15 mm by use of prism in IDO
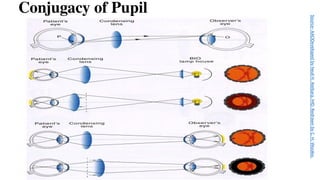
A) In indirect ophthalmoscopy, the observer’s pupil (O) and patient’s pupil (P) are conjugate to avoid “wasting” light. B) If the condensing lens is too close to the patient’s eye, the peripheral retina will not be illuminated. C) If the condensing lens is too far from the patient’s eye, light from the patient’s peripheral retina will not reach the observer’s eye.
#48 GULLSTRAND PRINCIPLE:the illuminating and viewing beams must be totally separated through the cornea,pupillary aperture &lens(to avoid reflection)but must coincide bon the retina to permit viewing
Illumination System
A mirrored beam directs light into the patient’s eye, right in front of the observer’s pupil.
This beam passes through the ophthalmoscopy lens.
For maximum brightness, the filament image (light source) should be located in the patient’s pupil.
Because the patient's pupil and the observer’s pupil are conjugate planes, the filament or an intermediate image must be positioned near the observer’s pupillary plane.
2. Binocular Viewing & Stereopsis
Indirect ophthalmoscopy allows binocular vision, meaning the observer uses both eyes.
This enables stereopsis (depth perception).
To fit both eyes' views through the limited pupil size of the patient, the observer’s interpupillary distance (PD) must be:
Smaller than or equal to the image of the patient’s pupil.
Reduced using prisms or mirrors (as shown in Fig. 16B).
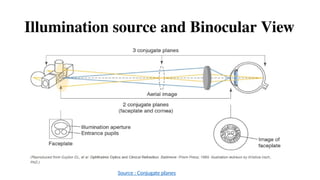
3. Conjugate Planes
The following are optically conjugate (linked in focus) in indirect ophthalmoscopy:
Patient’s retina
Aerial image (floating image formed by the ophthalmoscopy lens)
Examiner’s retina
Faceplate of the ophthalmoscope
Patient’s cornea
This optical alignment ensures a clear and magnified view of the retina.
#49 Fig;Compensation for refractive error. With the indirect method, minor changes in the observer's accommodation can compensate for major changes in the patient's refractive error.
If the patient is emmetropic (E), the aerial image (E') will be 5 cm from the lens; if the observer is 45 cm from the ophthalmoscopy lens, he or she must accommodate for 40 cm (2.5 D). If the fundus detail observed lies in a plane (M) representing 5 D of myopia, the aerial image (M') will be at approximately 20 + 5 = 25 D = 4 cm. The accommodation required will be for 41 cm (2.45 D). A fundus detail representing 5 diopters of hyperopia (H) will form an aerial image (H') at 20 - 5 = 15 D = 6.6 cm, requiring an accommodative increase to 38.3 cm (2.6 D). Thus, minor changes in the examiner's accommodation can easily account for major refractive errors that the patient may have.
#50 Image magnification:power of eye (60D)/POWER OF THE CONDENSING LENS
Eg.20D lens produces 3X lateral magnification
30D lens produces 2X lateral magnification
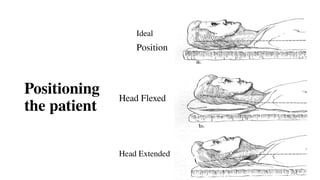
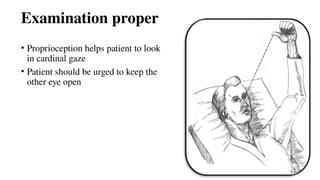
#54 Ask the reclining fully dilated patient to gaze steadily at a distant target on the ceiling..have pt to look just above and beyond your shoulder..rt shoulder when examining the right eye..help to align your view on posterior pole.. Pt with poor vision extend arm and staer at their outstretched thumb..
While standing above pt direct headset light by tilting head so that it illuminates fundus when focused through condensing lens,,
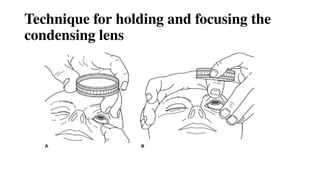
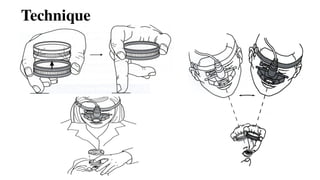
#55 Lens used convex +14D,+20D,+28D,+30D
Condensing lens grasped between bulb of thumb and and tip of flexed index finger
Middle finger holds one lid and thumb of other hand, the other lid
Flex the wrist
Most lenses are coded either with a white or silver ring, this side is placed towards the patient’s eye
#56 Holding the condensed lens with non-dominant hand
Dominant hand for multiple functions which requires dexetenity like=keeping lid apart when necessary,using scleral depressor,adjusting klnobs of ophthalmoscope,sketch fundus draw
Condensing lens grasped betn bulb of thumb & tip of flexed index finger
Middle finger holds 1 lid & thumb of other hands,the other lid
Flex wrist
Most lenses are coded either with a white or silver ring,this side is placed towards the pat
SEQUENCE OF examn
Media
Disc
Peripapillary
Vesssels
Macula
VR interface
periphery
#58 In this image, the patient is correctly positioned in supine for BIO. The examiner is gently stabilizing the lens against the patient’s head approximately 2 inches from the eye and performing scleral depression
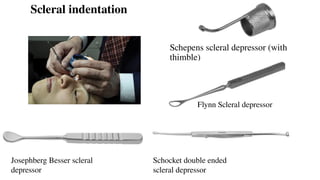
Cotton tipped applicator
B-C - Double ended S-type indenter (flat and side view ) Oconnor scleral depressor (usually used intraoperatively)
Schocket double ended scleral depressor-josephberg besser scleral depressor,Flynn scleral depressor
To examine periphery betn equator & ora by creating a mound to view
Start superonasal—sup,suptemporal,IT,inferior,IN
Indentation beyond tarsal plate
Don’t make mistake of indenting too anteriorly
If mound of fundus not seen—u r in wrong position
Don’t need too much pressure
Use finger than wrist
Contraindication of scleral indentation
Recent or suspected penetrating injuries,orbital injuries,intraocular SURGERY WITHIN 8 WEEKS,CORRECT INDENETATIONis not believed to enlarge retinal hole or cause RD
To depress the sclera, a scleral depressor is placed against the sclera (either on the globe or on the eyelid overlying the globe) and gentle firm pressure is applied.
For example, to examine the superior retina with scleral depression, have the patient look inferiorly, place the depressor in the superior lid crease and gently press inward while the patient looks up.
When recording your findings, remember that everything in your view is upside down and backward, but in the same clock hour you are examining.
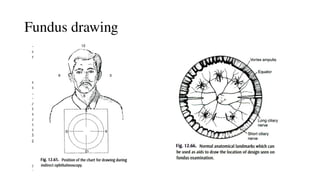
#59 12 o clock meridian towards pt’s feet & transforming the image towards 180 degree
Follow vessels & bifurcation in each quadrant then with scleral indentation terminal branches
Ora serrata then fundal lesions with relations
Record landmarks that make holes easier th find at surgery
Folds,pigment,hemorrhage,vortex veins & vessels can serve as landmarks
Ora should be drawn only if it has been examiined
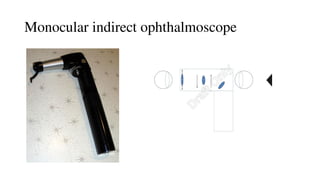
#62 Instrument=magnifying eyepiece
Relay system re-inverts image to a real one
Image is focused using eye piece
Indication=small pupils,un cooperative children,pt intolerant to bright illumination,one handed technique,person who is monocular
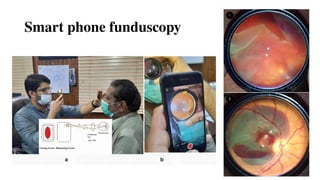
#67 You still need a 20- or 28-diopter lens in the other hand, but your smartphone serves as the ophthalmoscope, the coaxial light source, and the recording device.”
A Positioning of examiner with 20D lens in one hand and smartphone with a flashlight on in another hand. B View of the focused retina on the display screen of a smartphoneThe main concept is to use the smartphone screen to perform the exam rather than a binocular indirect ophthalmoscope
FUNDUS IMAGES. (1) Giant retinal tear and (2) retinal macroaneurysm images taken via smartphone funduscopy.
Some apps are also available
Problems faced : glare caused by the reflection of a smartphone flashlight from a 20D lens,resolution of an image in video mode is not as high as taken in still photography mode

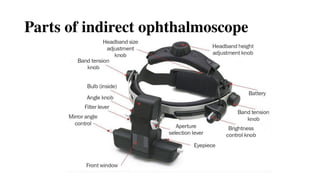
![Illumination System
• Incandescent lamp: A xenon halogen bright white lamp powered by a 2.5V
non-rechargeable or 3.5V [NiMH (Nickel Metal Hydride) or LiION (Lithium
Ion)] rechargable battery
• Condensing Lens: two in number, one on either side of the aperture dial which
focus the light onto the mirror/prism
• Reflecting mirror/prism : A mirror angled at 45° which is partially reflecting
or has a central peephole. It makes the light cone projected upon the patient eye
appear as if it has originated from the mirror itself](https://image.slidesharecdn.com/directandindirectophthalmoscopy-250820044856-a6fefd52/85/Direct-and-Indirect-Ophthalmoscopy-pptx-14-320.jpg)


![Dry_Eye_Presentation_Final[1].pptx......](https://cdn.slidesharecdn.com/ss_thumbnails/dryeyepresentationfinal1-250516163834-f963ff70-thumbnail.jpg?width=640&height=640&fit=bounds)


