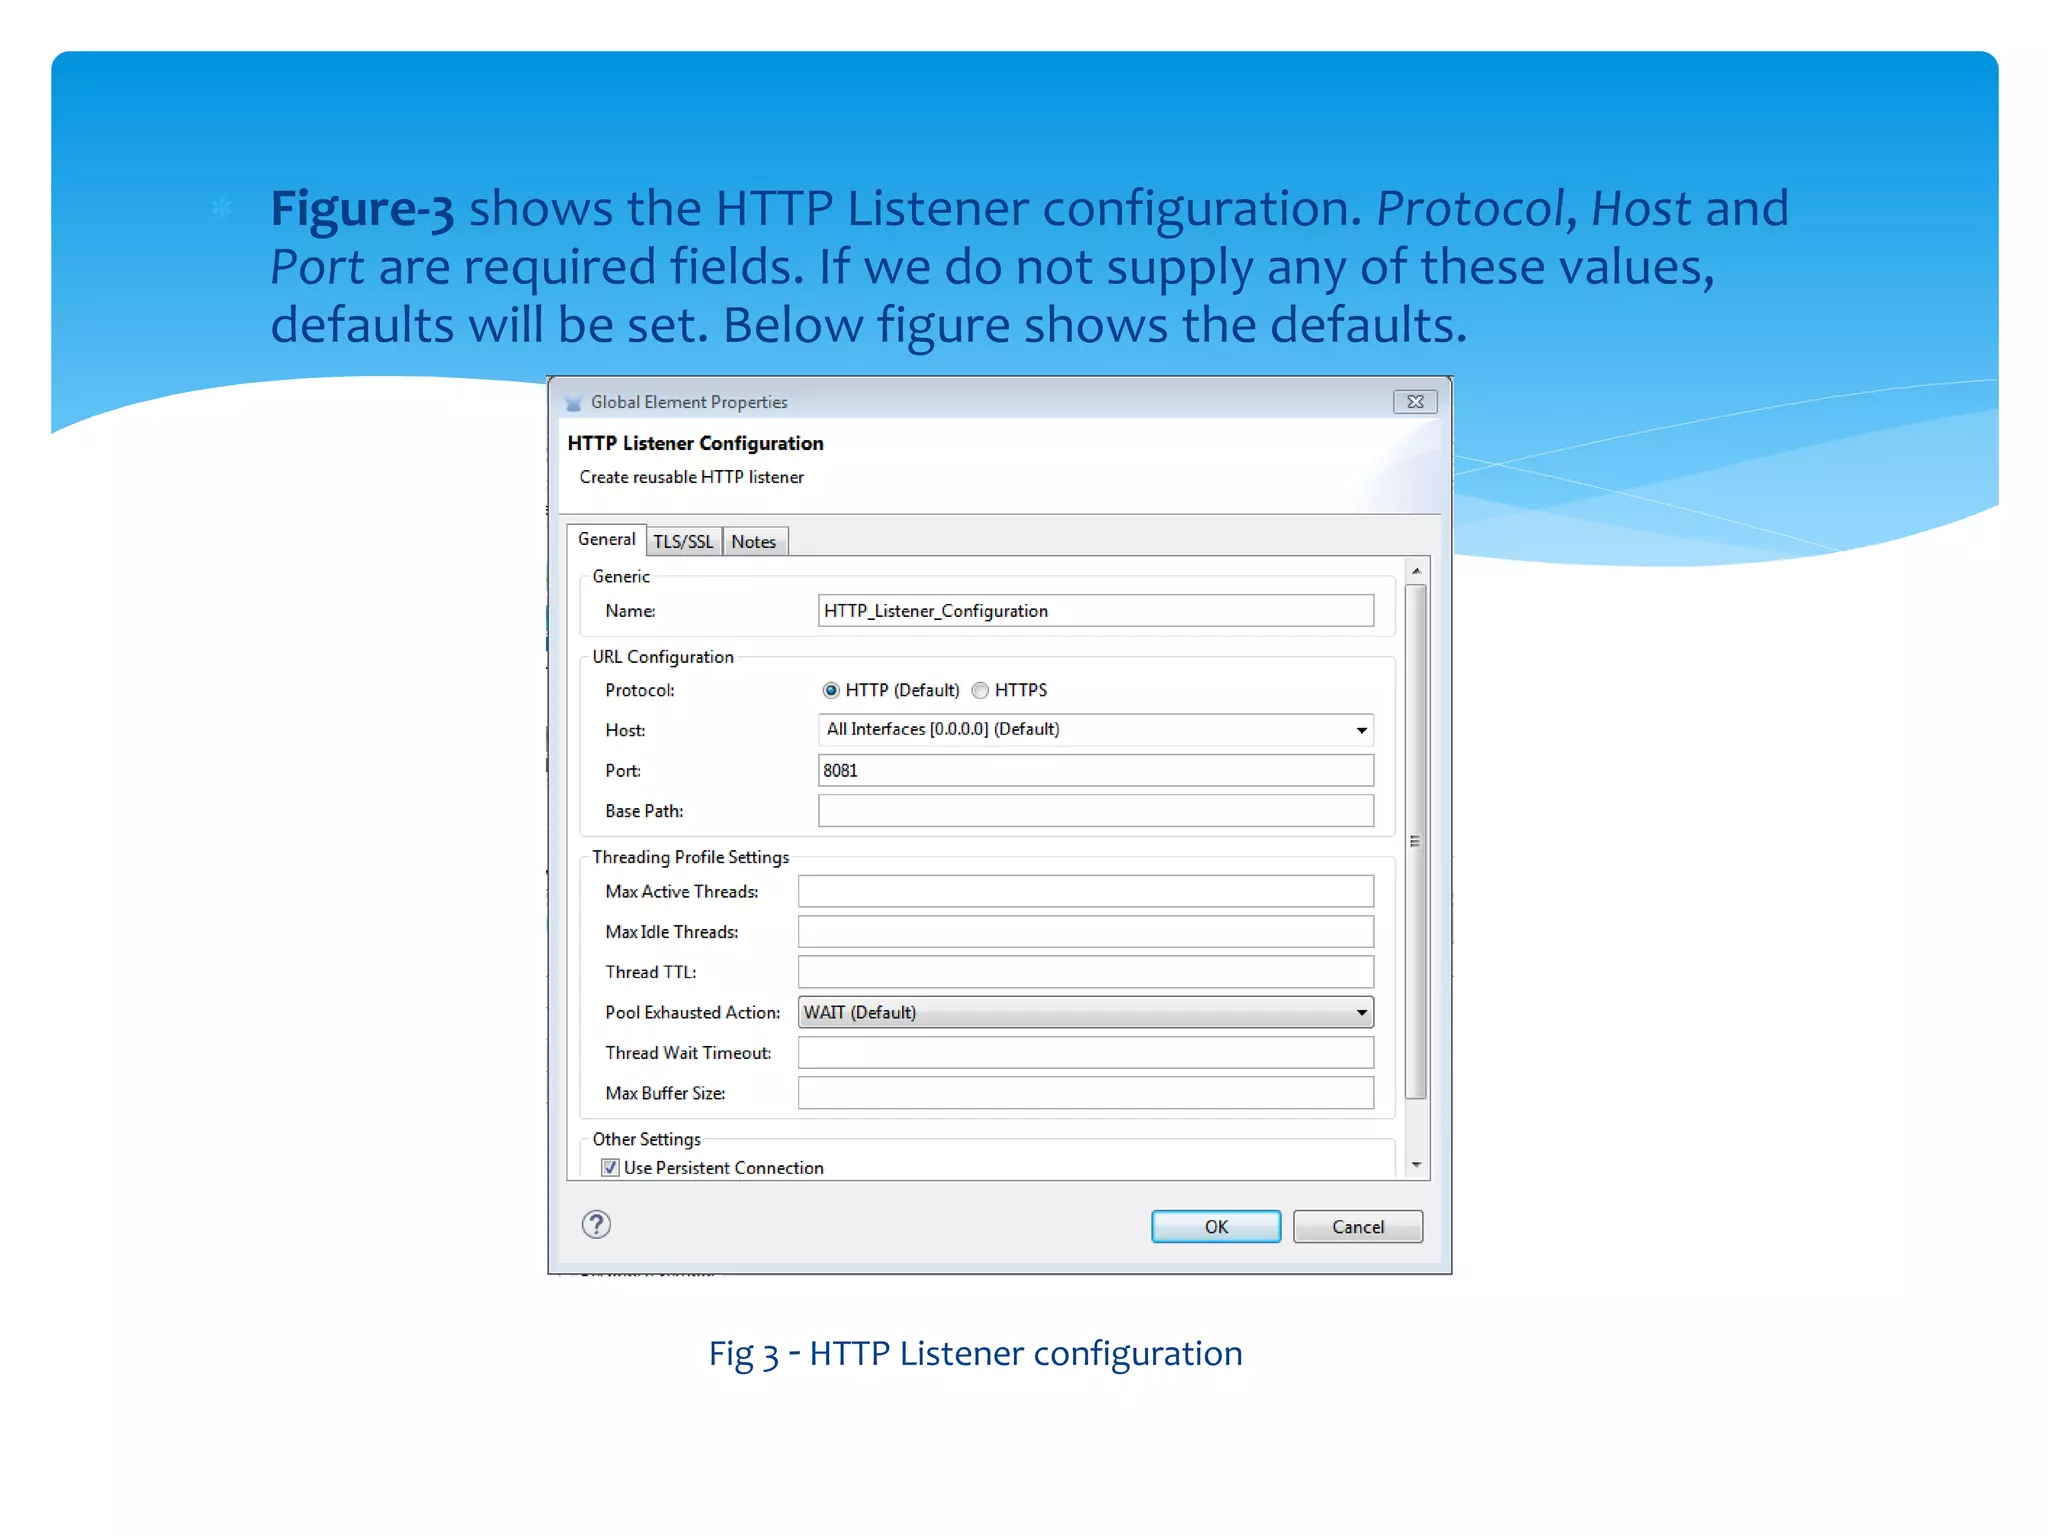
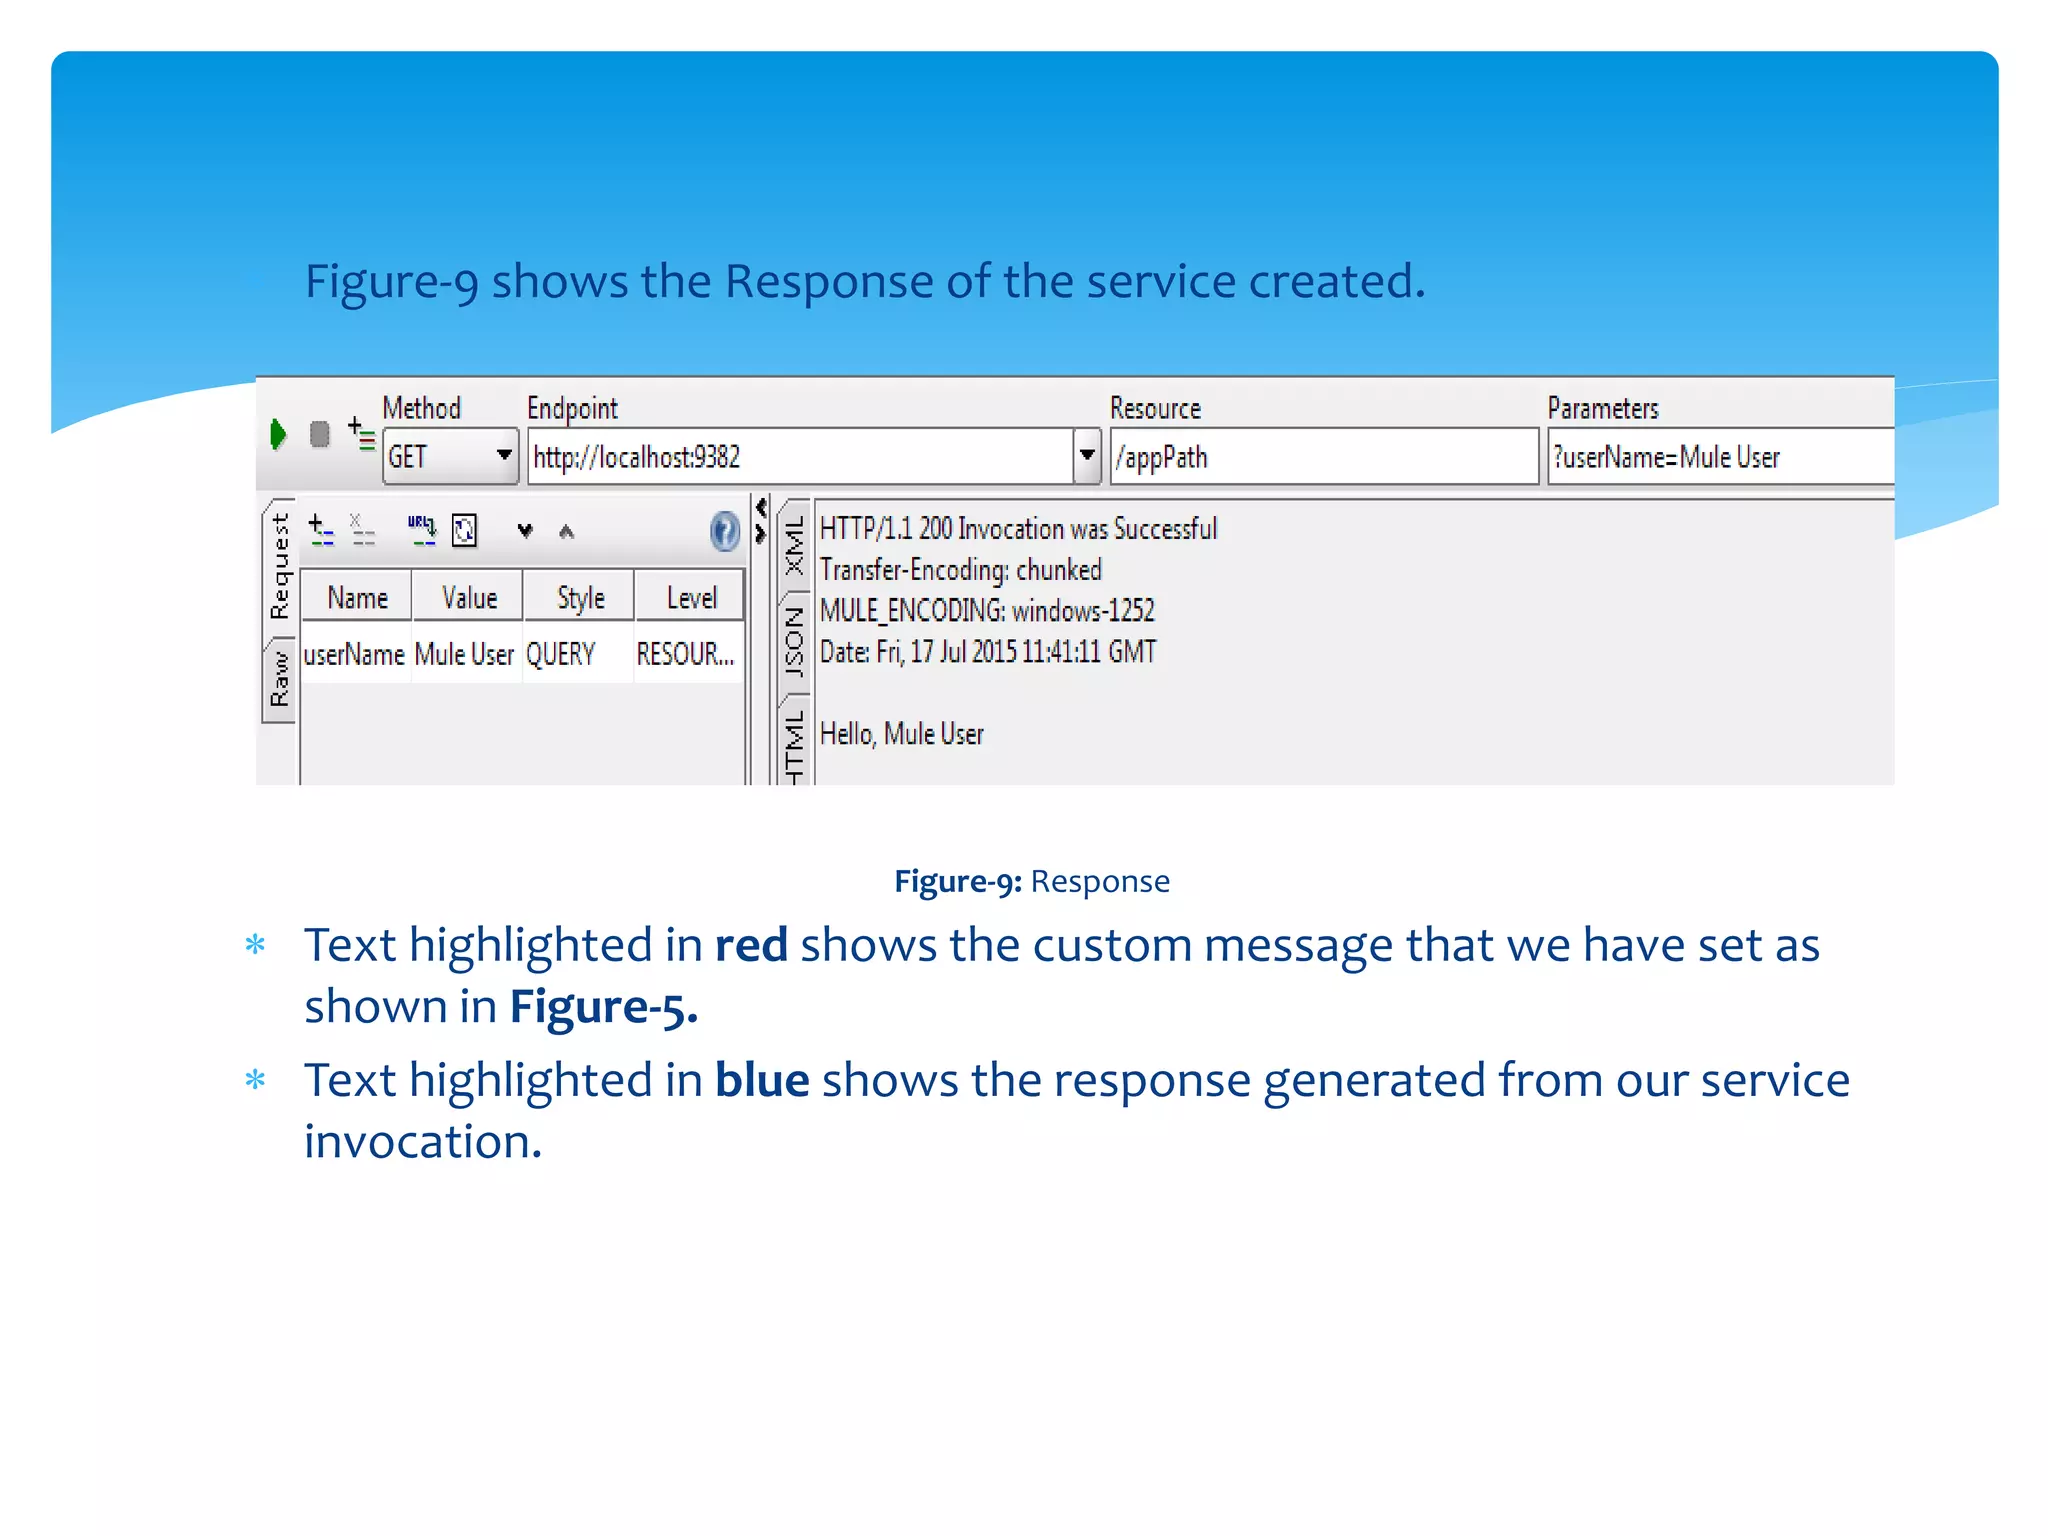
Mule – HTTP Connector
K Karthik
HTTP Listener :
 HTTP Listener connector provides a way to listen HTTP requests. Below
figure shows the HTTP listener.
Fig 1 - Http listener/Inbound Endpoint
HTTP
 Figure-2 shows the listener configuration, required fields are Connector
configuration and Path. Click “+” highlighted in red to create a global
connector for HTTP Listener. This connector will be available for all
HTTP Listeners within the application.
Fig 2 - Configuration for HTTP Listener
 Figure-3 shows the HTTP Listener configuration. Protocol, Host and
Port are required fields. If we do not supply any of these values,
defaults will be set. Below figure shows the defaults.
Fig 3 - HTTP Listener configuration
 Figure-4 shows the configuration for the Path element in the HTTP
Listener (Figure-2) highlighted in green. All flows which are configured to
use same HTTP Listener connector (Figure-3) will have the same URL. This
path will be appended at the end of the URL and helps in accessing a
specific application/flow.
Fig 4 - Basic Settings in HTTP Listener connector.
 Figure-5 shows the configuration XML for the flow created.
Fig 5 - Configuration XML.
 Code highlighted in orange shows the response builder for the service.
 statusCode- is the HTTP status code
 reasonPhrase- is the text if given, appears along with statusCode when the
response gets generated.
Fig 6 - HTTP Listener properties.
Figure-6 shows the HTTP Listener properties. This allows us to specify custom
message for HTTP Response and Error Response based on the status code.
The same reason will be shown in the HTTP Header.
HTTP Request:
• The HTTP Request Connector provides the most practical way to
consume an external HTTP service. When sending HTTP requests, you
can choose what method to use (GET, POST, etc) and may include a
body, headers, attachments, query parameters, form parameters and
URI parameters. The response is then received by the connector and is
passed on to the next element in the flow.
• Figure-6 shows the HTTP Request Configuration. Like HTTP Listener,
HTTP Request can also have a global connector defined. This global
connector is similar to the HTTP Listener connector created.
Figure-7: HTTP Request Transport
• Connector Configuration and Path are similar to the HTTP Listener.
Connector Configuration will have the details of the HTTP Service we
want to invoke. Path is same as mentioned for that application.
• Method lets us specify the HTTP method that the service accepts. This
attribute can take dynamic values also.
 Parameters let us supply the parameters that the service we are invoking
expects. These parameter can be header, query-params etc.. we can
choose from the list of options provided. We need to provide a Name
and a Value for each parameter we create. These Name and Value fields
also accept dynamic values.
 Figure-8 shows the configuration XML for the Greeter Service.
Figure-8 : Configuration XML
 Figure-9 shows the Response of the service created.
Figure-9: Response
 Text highlighted in red shows the custom message that we have set as
shown in Figure-5.
 Text highlighted in blue shows the response generated from our service
invocation.
THANK YOU 

Http mule

  • 1.
    Mule – HTTPConnector K Karthik
  • 2.
    HTTP Listener : HTTP Listener connector provides a way to listen HTTP requests. Below figure shows the HTTP listener. Fig 1 - Http listener/Inbound Endpoint HTTP
  • 3.
     Figure-2 showsthe listener configuration, required fields are Connector configuration and Path. Click “+” highlighted in red to create a global connector for HTTP Listener. This connector will be available for all HTTP Listeners within the application. Fig 2 - Configuration for HTTP Listener
  • 4.
     Figure-3 showsthe HTTP Listener configuration. Protocol, Host and Port are required fields. If we do not supply any of these values, defaults will be set. Below figure shows the defaults. Fig 3 - HTTP Listener configuration
  • 5.
     Figure-4 showsthe configuration for the Path element in the HTTP Listener (Figure-2) highlighted in green. All flows which are configured to use same HTTP Listener connector (Figure-3) will have the same URL. This path will be appended at the end of the URL and helps in accessing a specific application/flow. Fig 4 - Basic Settings in HTTP Listener connector.  Figure-5 shows the configuration XML for the flow created. Fig 5 - Configuration XML.
  • 6.
     Code highlightedin orange shows the response builder for the service.  statusCode- is the HTTP status code  reasonPhrase- is the text if given, appears along with statusCode when the response gets generated. Fig 6 - HTTP Listener properties.
  • 7.
    Figure-6 shows theHTTP Listener properties. This allows us to specify custom message for HTTP Response and Error Response based on the status code. The same reason will be shown in the HTTP Header. HTTP Request: • The HTTP Request Connector provides the most practical way to consume an external HTTP service. When sending HTTP requests, you can choose what method to use (GET, POST, etc) and may include a body, headers, attachments, query parameters, form parameters and URI parameters. The response is then received by the connector and is passed on to the next element in the flow. • Figure-6 shows the HTTP Request Configuration. Like HTTP Listener, HTTP Request can also have a global connector defined. This global connector is similar to the HTTP Listener connector created.
  • 8.
    Figure-7: HTTP RequestTransport • Connector Configuration and Path are similar to the HTTP Listener. Connector Configuration will have the details of the HTTP Service we want to invoke. Path is same as mentioned for that application. • Method lets us specify the HTTP method that the service accepts. This attribute can take dynamic values also.
  • 9.
     Parameters letus supply the parameters that the service we are invoking expects. These parameter can be header, query-params etc.. we can choose from the list of options provided. We need to provide a Name and a Value for each parameter we create. These Name and Value fields also accept dynamic values.  Figure-8 shows the configuration XML for the Greeter Service. Figure-8 : Configuration XML
  • 10.
     Figure-9 showsthe Response of the service created. Figure-9: Response  Text highlighted in red shows the custom message that we have set as shown in Figure-5.  Text highlighted in blue shows the response generated from our service invocation.
  • 11.