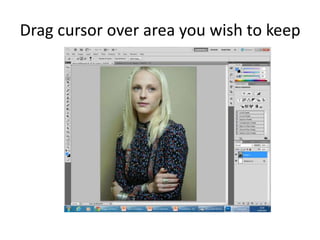
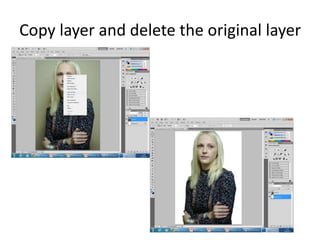
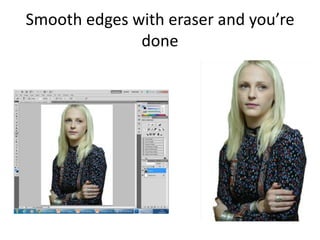
The quick selection tool allows you to select parts of an image; drag it over the area you want to keep, then copy that layer and delete the original layer to isolate it. You can then smooth the edges of the selection with the eraser tool.
The document provides instructions for completing Step 3 of a tribal mask tattoo design lesson in Adobe Illustrator:
1. Describe how to use the distort tools to alter a design in an unusual way by focusing on thin lines and avoiding dense black areas.
2. Explain how to use the Reflect tool or Reflect command to flip an image horizontally, vertically, or at an angle.
3. Instruct the reader to clean up their design, select and delete large areas, and ensure changes are made on both sides in order to make the black line work into a compound path that can be filled with a gradient.
The document describes various tools and functions in Photoshop related to shapes, paths, and selections. It discusses tools for drawing shapes and paths with precision, moving and modifying anchor points, applying strokes and fills, and converting paths to selections. Specific steps are outlined for applying strokes to paths, filling closed paths, and converting paths to selections. Tools are also described for drawing basic shapes like rectangles, ovals, polygons, as well as custom shapes from a library of designs.
The document provides instructions for creating a digital illustration of a torch in Photoshop. It involves taking a fire image and manipulating it using various tools to create 3 flame layers. Additional layers are used to add glowing embers and wispy smoke clouds above the flames. Layer styles like gradients, outer glows, and patterns are applied to integrate all the elements into a cohesive torch composition. Following the steps carefully results in a realistic digital artwork of a burning torch.
The document describes various photo editing tools in Photoshop including the healing brush tool, spot healing brush tool, pattern stamp tool, eraser tool, background eraser tool, magic eraser tool, smudge tool, sharpen tool, liquefy tool, dodge tool, and burn tool. It provides brief explanations of what each tool is used for, such as repairing scratches, removing blemishes, making patterns, erasing parts of images, blurring edges, increasing or decreasing brightness and saturation.
To put text behind an image in Photoshop, insert the image and use the Polygonal Lasso Tool to crop around the subject's head. Right click and select "Layer via Copy" to place the cropped area on its own layer. Then add the text layer below the cropped head layer so it appears behind the image.
This document provides instructions for using various photo editing tools in Adobe Photoshop. It includes steps for cropping images, converting images to grayscale, removing red eye, removing blemishes, adjusting colors using selective color, changing colors, adjusting brightness and contrast, adding a tan effect, combining images, adding tattoos, changing skin tone, and more. The instructions are brief, listing the key tools and steps to achieve each effect in 3 sentences or less.
The document describes various painting and selection tools in image editing software. It explains tools for applying brush strokes, filling areas with color, replacing color, and applying gradients. Key tools covered are the brush, paint bucket, history brush, magic wand, and gradient tools. Each tool has options to control properties like size, opacity, blending mode, and tolerance.
This document provides instructions for manipulating images in Photoshop. It explains how to open an image, resize it, and place it into a Photoshop document. It then describes how to zoom in on areas of interest and use selection tools like the lasso and magic wand to select parts of the image to delete. It also discusses using the eraser tool to smoothly edit image edges. Finally, it mentions adding the edited image to another document or layer.
This presentation discusses 3D display methods. It is presented by 4 group members and covers topics such as parallel projection, perspective projection, depth cueing, visible line identification, visible surface identification, and surface rendering. Parallel projection discards the z-coordinate and extends parallel lines until they intersect the view plane, while perspective projection shows lines converging to give a realistic view. Depth cueing identifies the front and back of objects by varying intensity. Algorithms also determine which lines and surfaces are visible from the viewing position. Surface rendering sets intensities based on lighting and material properties.
The document discusses the various tools available in the toolbox of photo editing software. It describes the functions of selection tools like the marquee, magnetic lasso, and crop tools. It also covers tools for retouching like the spot healing brush, clone stamp, and eraser as well as tools that modify aspects of photos like the blur, smudge, and gradient tools. Finally, it mentions color selection tools and tools for measuring and viewing compositions at different magnifications.
This document provides instructions for selectively editing images in Photoshop to give them a "magazine treatment" by improving aspects like skin tone and hair color. It outlines using the brush tool to paint and select specific areas, inverting the selection, and then adjusting the color balance, brightness, contrast or applying filters only to that selected region to refine it.
The document provides instructions for transforming a snake face texture in multiple steps: flipping it vertically, warping it twice to transform the shape, erasing edges and dodging/burning to add shadows and brightness, sharpening, and adjusting hue and saturation to complete the effect.
This document provides instructions for using Photoshop tools to smooth and soften skin in a photo in 9 steps. The key steps are:
1. Create duplicate layers to work on non-destructively.
2. Use the Spot Healing Brush tool to remove blemishes.
3. Apply the High Pass filter and Gaussian Blur filter to detect edges and add texture.
4. Change the blend mode of the softened skin layer to Linear Light for contrast.
The document provides instructions for performing several image editing tasks in steps of 3 sentences or less each: cropping an image, changing an image to grayscale, removing red eye, removing spots on skin, adjusting selective color, changing color of a selected area, changing red to pink, adjusting brightness and contrast, and tanning skin color in a selected area.
The document discusses using motion guides in graphic animation to create movements that are not in a straight line. It provides instructions to draw a path or line using the pencil tool on a guide layer, then snap a graphic symbol to the beginning and end of that path on another layer to make the object follow the curved path through a motion tween. Additional tweens and properties like rotate and orient to path can be added to customize how the object moves along the guide.
The document provides instructions for removing body hair from a photo of a hand using Photoshop in 3 steps:
1. Duplicate the background layer and make a selection around the hand and arm.
2. Use the smudge tool to blur and remove hair from the selected area of the arm.
3. Further refine the area around the bracelet and palm using the blur tool, add surface blur to a copy of the layer, adjust the layer style, and add a layer mask to improve lighting contrast and the overall appearance.
The canvas menu contains controls for shading mode, camera selection, and gizmo switch. The canvas displays the scene with a default camera that allows panning, rotating, and zooming. Shortcut keys are provided for rotate, pan, and zoom camera controls. The scene hierarchy displays all scene entities and relationships. The bin contains imported and created materials, textures, sounds and other assets. Entity components like materials, transformations and geometry can be accessed by selecting entities in the scene hierarchy.
This document provides steps for editing images using Photoshop. It outlines five steps: 1) Editing lighting levels using the levels adjustment, 2) Editing color balance using the hue/saturation adjustment, 3) Adding photo filters, 4) Removing backgrounds using the magic wand and eraser tools, and 5) Further editing like spot healing, burning, smudging and sharpening. It also describes how to change the background using the paint bucket tool and finish by adjusting exposure and contrast.
Photoshop Basics - Review of All Toolsnombre thera
This document provides an overview of various tools and techniques in Photoshop CS6 for selecting, editing, and adjusting images. It describes selection tools like the marquee, lasso, and magic wand tools. It also covers content-aware tools, cloning and healing brushes, and tools for filling, blurring, sharpening, and distorting selected areas. Additional sections explain how to adjust text styles, use guides and transforms, work with shapes and layers, make selections using alpha channels, and apply effects like lighting, blurring, and textures using filters and brushes. Adjustment layers and defining custom brushes are also briefly covered.
This document provides a 12 step process for changing eye color in Photoshop:
1. Zoom in on the eyes
2. Select the Lasso Tool and draw a selection around each eye
3. Add a Hue/Saturation adjustment layer and select the "Colorize" option
4. Drag the Hue slider to select the eye color and the Saturation slider to adjust intensity
5. Change the adjustment layer's blend mode to "Color"
6. Select the layer mask and Brush Tool
7. Set the foreground color to black and paint around the iris to clean up edges
The document provides instructions for using various pen tools in Photoshop to create paths and shapes. It describes how to use the standard pen tool to draw straight lines and curves by clicking to add anchor points. It also covers using the freeform pen tool to draw paths automatically, and the magnetic pen tool which allows paths to snap to edges in an image. Key steps include dragging the pen tool to extend direction lines to control the shape of curves, and holding alt to convert smooth points to corners when drawing multiple curved segments.
To create a drop shadow on text, the user first selects the text, then clicks on the 'fx' button and chooses 'drop shadow'. Finally, the user adjusts settings like color, angle, distance and spread to customize the drop shadow effect being added to the selected text.
Photoshop Tutorial for Selecting Colour Effecttlcurtis
This document provides instructions for applying a color effect to an image in which only certain areas remain in color while the rest are converted to black and white. The process involves using the lasso tool to select the areas to retain color, inverting the selection, and adding black and white layers that can then be edited to gradually remove color from more parts of the image until the desired color effect is achieved.
This document provides a 11 step tutorial for creating a canvas eyelet banner in Photoshop. The steps include setting up a new document, placing an image, duplicating layers, adding texture effects to make it look like canvas, adding photo filters, creating shiny beveled eyelets using shapes and layer styles, and cutting holes through the banner layer for the eyelets. Ruler guides are used to evenly space multiple duplicated eyelet layers across the top of the banner.
The document summarizes various tools available in Illustrator, Premier Pro, and Photoshop. In Illustrator, basic shapes, grids, and the gradient tool allow for vector drawing and editing. Premier Pro's timeline, audio mixer, and Lumetri color panel facilitate video editing and color grading. Photoshop offers selection, editing, and layer tools like the magic wand, quick selection, replace color, and blend modes for bitmap image manipulation.
This document provides instructions for creating a green screen effect using Photoshop to composite an image against a new background. It describes how to isolate the foreground subject from the green screen using the color range selection tool and eyedropper. It then explains how to replace the green screen with a new background image and discusses an alternative method using the background eraser tool.
Photoshop is unlike other common software interfaces which emulate virtual typewriters or graphing paper. Photoshop creates an artist's virtual studio/darkroom. When you open the program you see a toolbox on the left with tools you will use to manipulate your images, and on the right, a white square which is your "canvas" or work area. The gray area surrounding the canvas is not part of your image, but only defines its edges.
This document provides a 7 step process for creating the appearance of a vinyl record in an image editing program:
1) Create a dark grey "vinyl" layer with added noise and apply radial blur to create a circular texture. Duplicate and adjust the layer for more texture.
2) Use the ellipse tool to create a circular shape layer and center it. Mask the "vinyl" layer with the shape to cut out the circle.
3) Add shine by filtering clouds and difference clouds on a "contrast" layer, applying radial blur. Adjust brightness and contrast and mask to keep highlights.
4) Create gradients by dragging, transforming, and stretching layers set to soft light to add highlights around the
This Photoshop tutorial teaches techniques for combining two landscape photos and applying effects to create a breathtaking composite scene. It provides step-by-step instructions for masking seagulls from one photo and placing them into another landscape photo. Various photo editing techniques are demonstrated, including layer masking, refining selection edges, correcting sharpness with blur filters, and blending edges for a natural appearance. The goal is to realistically integrate elements from multiple photos into a single enhanced landscape image.
Harvey Johnson used the quick selection tool to select a specific part of an image for editing. He dragged the cursor over the areas he wanted to select, then copied the selection to a new layer. This allowed him to apply effects to the background without affecting the model in the image.
The document is a chapter from an Adobe Photoshop manual describing various selection tools and keyboard shortcuts. It provides instructions on how to use selection tools like the marquee, lasso and quick selection tools to select objects. It also describes how to move, duplicate and refine selections. The chapter discusses using grids, guides and the history panel and how to create and modify keyboard shortcuts. The objectives are to learn how to effectively select and manipulate objects and customize keyboard shortcuts in Photoshop.
Learning Photoshop CS6 with 100 practical exercisesMCB Press
Photoshop is the photo editing and image processing tool par excellence. With this manual you will learn how to take advantage of the many tools and functions. In this new CS6 version of Photoshop, which is the subject(talking point) of this book, Adobe has included interesting and groundbreaking developments that improve and facilitate the flow of work and increase image editing possibilities.
Using this book:
you will get to know the new crop in perspective tool.
you will retouch images with incredible features such as fill according to content and the new Content-Aware Patch tool.
you will freely transform certain parts of an image.
you will manage the layers of your documents more easily with the improvements that have been made in the Layers panel.
you will work on a new and spectacular three-dimensional interface to achieve the best 3D effects.
Photoshop step by step powerpoint presentation - hayley ip 10 fHayley Ip
The document provides step-by-step instructions for creating an album cover in Photoshop. The creator imports background images of a city skyline and a photo of themselves, then uses selection and layer tools to combine the images. Additional elements like clouds, an audience, lights, and fire effects are added to make the cover dynamic. Text is also styled and positioned to complete the final product. The overall process involves selecting and preparing multiple images, adjusting layers and effects to merge elements realistically, and adding specialized touches to convey the upbeat nature of pop music.
The document provides descriptions of various tools in Photoshop and elements of the Photoshop interface. It describes the functions of selection, navigation, and editing tools. It also outlines the main components of the Photoshop workspace including the toolbar, menus, and panes that display options and history. Various tools are explained including selection tools, painting and erasing tools, and filters. The interface elements such as menus and panes are introduced.
To add a drop shadow to a plug, first have your plug ready as a shape layer. Then double click the shape layer and select drop shadow, choosing your preferred settings for the shadow effect. This will add a drop shadow to the plug layer for a three-dimensional appearance.
To change hair color in Photoshop, create a new layer above the photo and color the hair area using the brush tool. Change the layer blending mode to soft light and use the colorize option to apply the color evenly. Duplicate the layer to intensify the color and erase any mistakes. The same process can be used to add makeup by coloring specific areas of the face.
The student reflects on what they learned from creating a preliminary magazine cover task compared to their final music magazine cover. For the preliminary task, they learned about magazine conventions, photography, Photoshop skills, and the research process. However, looking back, they realize the preliminary cover lacked professionalism and realism. Key areas for improvement included the cover lines, main image background, and color scheme. Creating the music magazine cover helped them apply these lessons to design a more realistic and polished final product that better followed industry conventions.
This document discusses technologies learned from constructing a product including quick selection, lighting effects, transform/scale/rotation/crop tools, paint brush/opacity tools, and layer styles in Photoshop. The respondent used these tools like spotlight, scaling, cropping, brush opacity, and layer styles to darken black areas and lighten white areas of an image.
Bauer is an experienced media institution that specializes in distributing music magazines. They have been successful in distributing magazines like Kerrang! and Mojo. I would want Bauer to distribute my alternative music magazine because they have expertise in this genre and could help my magazine reach a wide global audience. Their large budget and experience with digital platforms would help promote my magazine and improve its content.
Question 1:In what ways does your media product use, develop or challenge for...courtneythornton1996
The document discusses the design elements used in a magazine created by the author. Key points include:
- The magazine uses continuity through a consistent base font, three colors (red, black, white), and featuring the same band throughout.
- Elements like the masthead, sell line, plugs, and features follow magazine conventions and the alternative music genre's color schemes.
- Images, articles, and page elements create realism by referencing real bands, festivals, and magazines. Original photos were also included.
- Page designs for the cover, contents, and feature spread maintain the house style while using conventional formatting and layouts seen in other magazines.
This slide is special for master students (MIBS & MIFB) in UUM. Also useful for readers who are interested in the topic of contemporary Islamic banking.
How to Make a Field Mandatory in Odoo 17Celine George
In Odoo, making a field required can be done through both Python code and XML views. When you set the required attribute to True in Python code, it makes the field required across all views where it's used. Conversely, when you set the required attribute in XML views, it makes the field required only in the context of that particular view.
ISO/IEC 27001, ISO/IEC 42001, and GDPR: Best Practices for Implementation and...PECB
Denis is a dynamic and results-driven Chief Information Officer (CIO) with a distinguished career spanning information systems analysis and technical project management. With a proven track record of spearheading the design and delivery of cutting-edge Information Management solutions, he has consistently elevated business operations, streamlined reporting functions, and maximized process efficiency.
Certified as an ISO/IEC 27001: Information Security Management Systems (ISMS) Lead Implementer, Data Protection Officer, and Cyber Risks Analyst, Denis brings a heightened focus on data security, privacy, and cyber resilience to every endeavor.
His expertise extends across a diverse spectrum of reporting, database, and web development applications, underpinned by an exceptional grasp of data storage and virtualization technologies. His proficiency in application testing, database administration, and data cleansing ensures seamless execution of complex projects.
What sets Denis apart is his comprehensive understanding of Business and Systems Analysis technologies, honed through involvement in all phases of the Software Development Lifecycle (SDLC). From meticulous requirements gathering to precise analysis, innovative design, rigorous development, thorough testing, and successful implementation, he has consistently delivered exceptional results.
Throughout his career, he has taken on multifaceted roles, from leading technical project management teams to owning solutions that drive operational excellence. His conscientious and proactive approach is unwavering, whether he is working independently or collaboratively within a team. His ability to connect with colleagues on a personal level underscores his commitment to fostering a harmonious and productive workplace environment.
Date: May 29, 2024
Tags: Information Security, ISO/IEC 27001, ISO/IEC 42001, Artificial Intelligence, GDPR
-------------------------------------------------------------------------------
Find out more about ISO training and certification services
Training: ISO/IEC 27001 Information Security Management System - EN | PECB
ISO/IEC 42001 Artificial Intelligence Management System - EN | PECB
General Data Protection Regulation (GDPR) - Training Courses - EN | PECB
Webinars: https://pecb.com/webinars
Article: https://pecb.com/article
-------------------------------------------------------------------------------
For more information about PECB:
Website: https://pecb.com/
LinkedIn: https://www.linkedin.com/company/pecb/
Facebook: https://www.facebook.com/PECBInternational/
Slideshare: http://www.slideshare.net/PECBCERTIFICATION
How to Fix the Import Error in the Odoo 17Celine George
An import error occurs when a program fails to import a module or library, disrupting its execution. In languages like Python, this issue arises when the specified module cannot be found or accessed, hindering the program's functionality. Resolving import errors is crucial for maintaining smooth software operation and uninterrupted development processes.
A workshop hosted by the South African Journal of Science aimed at postgraduate students and early career researchers with little or no experience in writing and publishing journal articles.
LAND USE LAND COVER AND NDVI OF MIRZAPUR DISTRICT, UPRAHUL
This Dissertation explores the particular circumstances of Mirzapur, a region located in the
core of India. Mirzapur, with its varied terrains and abundant biodiversity, offers an optimal
environment for investigating the changes in vegetation cover dynamics. Our study utilizes
advanced technologies such as GIS (Geographic Information Systems) and Remote sensing to
analyze the transformations that have taken place over the course of a decade.
The complex relationship between human activities and the environment has been the focus
of extensive research and worry. As the global community grapples with swift urbanization,
population expansion, and economic progress, the effects on natural ecosystems are becoming
more evident. A crucial element of this impact is the alteration of vegetation cover, which plays a
significant role in maintaining the ecological equilibrium of our planet.Land serves as the foundation for all human activities and provides the necessary materials for
these activities. As the most crucial natural resource, its utilization by humans results in different
'Land uses,' which are determined by both human activities and the physical characteristics of the
land.
The utilization of land is impacted by human needs and environmental factors. In countries
like India, rapid population growth and the emphasis on extensive resource exploitation can lead
to significant land degradation, adversely affecting the region's land cover.
Therefore, human intervention has significantly influenced land use patterns over many
centuries, evolving its structure over time and space. In the present era, these changes have
accelerated due to factors such as agriculture and urbanization. Information regarding land use and
cover is essential for various planning and management tasks related to the Earth's surface,
providing crucial environmental data for scientific, resource management, policy purposes, and
diverse human activities.
Accurate understanding of land use and cover is imperative for the development planning
of any area. Consequently, a wide range of professionals, including earth system scientists, land
and water managers, and urban planners, are interested in obtaining data on land use and cover
changes, conversion trends, and other related patterns. The spatial dimensions of land use and
cover support policymakers and scientists in making well-informed decisions, as alterations in
these patterns indicate shifts in economic and social conditions. Monitoring such changes with the
help of Advanced technologies like Remote Sensing and Geographic Information Systems is
crucial for coordinated efforts across different administrative levels. Advanced technologies like
Remote Sensing and Geographic Information Systems
9
Changes in vegetation cover refer to variations in the distribution, composition, and overall
structure of plant communities across different temporal and spatial scales. These changes can
occur natural.
How to Add Chatter in the odoo 17 ERP ModuleCeline George
In Odoo, the chatter is like a chat tool that helps you work together on records. You can leave notes and track things, making it easier to talk with your team and partners. Inside chatter, all communication history, activity, and changes will be displayed.
বাংলাদেশের অর্থনৈতিক সমীক্ষা ২০২৪ [Bangladesh Economic Review 2024 Bangla.pdf] কম্পিউটার , ট্যাব ও স্মার্ট ফোন ভার্সন সহ সম্পূর্ণ বাংলা ই-বুক বা pdf বই " সুচিপত্র ...বুকমার্ক মেনু 🔖 ও হাইপার লিংক মেনু 📝👆 যুক্ত ..
আমাদের সবার জন্য খুব খুব গুরুত্বপূর্ণ একটি বই ..বিসিএস, ব্যাংক, ইউনিভার্সিটি ভর্তি ও যে কোন প্রতিযোগিতা মূলক পরীক্ষার জন্য এর খুব ইম্পরট্যান্ট একটি বিষয় ...তাছাড়া বাংলাদেশের সাম্প্রতিক যে কোন ডাটা বা তথ্য এই বইতে পাবেন ...
তাই একজন নাগরিক হিসাবে এই তথ্য গুলো আপনার জানা প্রয়োজন ...।
বিসিএস ও ব্যাংক এর লিখিত পরীক্ষা ...+এছাড়া মাধ্যমিক ও উচ্চমাধ্যমিকের স্টুডেন্টদের জন্য অনেক কাজে আসবে ...
This presentation includes basic of PCOS their pathology and treatment and also Ayurveda correlation of PCOS and Ayurvedic line of treatment mentioned in classics.
How to Manage Your Lost Opportunities in Odoo 17 CRMCeline George
Odoo 17 CRM allows us to track why we lose sales opportunities with "Lost Reasons." This helps analyze our sales process and identify areas for improvement. Here's how to configure lost reasons in Odoo 17 CRM
How to Setup Warehouse & Location in Odoo 17 InventoryCeline George
In this slide, we'll explore how to set up warehouses and locations in Odoo 17 Inventory. This will help us manage our stock effectively, track inventory levels, and streamline warehouse operations.