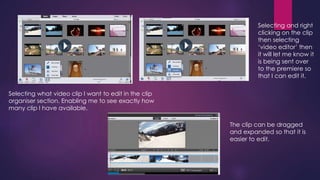
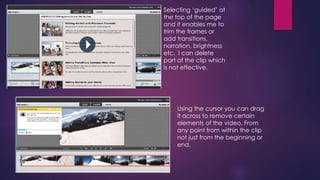
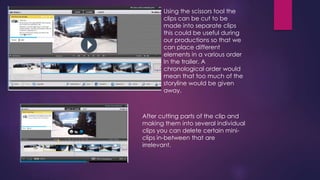
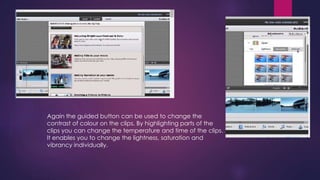
Guided edits in 
premiere elements
Selecting what video clip I want to edit in the clip 
organiser section. Enabling me to see exactly how 
many clip I have available. 
Selecting and right 
clicking on the clip 
then selecting 
‘video editor’ then 
it will let me know it 
is being sent over 
to the premiere so 
that I can edit it. 
The clip can be dragged 
and expanded so that it is 
easier to edit.
Selecting ‘guided’ at 
the top of the page 
and it enables me to 
trim the frames or 
add transitions, 
narration, brightness 
etc. I can delete 
part of the clip which 
is not effective. 
Using the cursor you can drag 
it across to remove certain 
elements of the video. From 
any point from within the clip 
not just from the beginning or 
end.
Using the scissors tool the 
clips can be cut to be 
made into separate clips 
this could be useful during 
our productions so that we 
can place different 
elements in a various order 
In the trailer. A 
chronological order would 
mean that too much of the 
storyline would be given 
away. 
After cutting parts of the clip and 
making them into several individual 
clips you can delete certain mini-clips 
in-between that are 
irrelevant.
Again the guided button can be used to change the 
contrast of colour on the clips. By highlighting parts of the 
clips you can change the temperature and time of the clips. 
It enables you to change the lightness, saturation and 
vibrancy individually.
 Watching this tutorial has enabled me to understand how to edit 
clips and cut them for smoother transitions. In our production we will 
be able to cut out parts of clips to make them faster and more 
suited to the format of a trailer. It also means that during a particular 
scene where we film the couple at the park bench in evening, we 
can film in a brighter light and edit later on to make the transition 
progress to evening time. It means there can be a stronger focus on 
the use of colour in relation to the romance genre.

Homework edits

  • 1.
    Guided edits in premiere elements
  • 2.
    Selecting what videoclip I want to edit in the clip organiser section. Enabling me to see exactly how many clip I have available. Selecting and right clicking on the clip then selecting ‘video editor’ then it will let me know it is being sent over to the premiere so that I can edit it. The clip can be dragged and expanded so that it is easier to edit.
  • 3.
    Selecting ‘guided’ at the top of the page and it enables me to trim the frames or add transitions, narration, brightness etc. I can delete part of the clip which is not effective. Using the cursor you can drag it across to remove certain elements of the video. From any point from within the clip not just from the beginning or end.
  • 4.
    Using the scissorstool the clips can be cut to be made into separate clips this could be useful during our productions so that we can place different elements in a various order In the trailer. A chronological order would mean that too much of the storyline would be given away. After cutting parts of the clip and making them into several individual clips you can delete certain mini-clips in-between that are irrelevant.
  • 5.
    Again the guidedbutton can be used to change the contrast of colour on the clips. By highlighting parts of the clips you can change the temperature and time of the clips. It enables you to change the lightness, saturation and vibrancy individually.
  • 6.
     Watching thistutorial has enabled me to understand how to edit clips and cut them for smoother transitions. In our production we will be able to cut out parts of clips to make them faster and more suited to the format of a trailer. It also means that during a particular scene where we film the couple at the park bench in evening, we can film in a brighter light and edit later on to make the transition progress to evening time. It means there can be a stronger focus on the use of colour in relation to the romance genre.