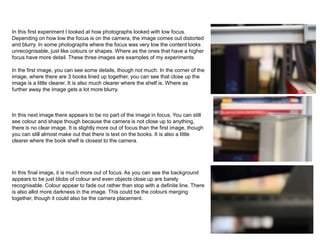
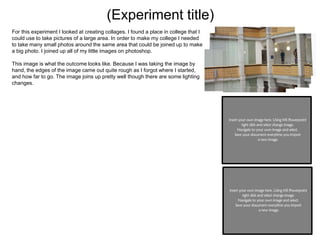
Experimental Photography
Chloe Stead
1
In this first experiment I looked at how photographs looked with low focus.
Depending on how low the focus is on the camera, the image comes out distorted
and blurry. In some photographs where the focus was very low the content looks
unrecognisable, just like colours or shapes. Where as the ones that have a higher
focus have more detail. These three images are examples of my experiments.
In the first image, you can see some details, though not much. In the corner of the
image, where there are 3 books lined up together, you can see that close up the
image is a little clearer. It is also much clearer where the shelf is. Where as
further away the image gets a lot more blurry.
In this next image there appears to be no part of the image in focus. You can still
see colour and shape though because the camera is not close up to anything,
there is no clear image. It is slightly more out of focus than the first image, though
you can still almost make out that there is text on the books. It is also a little
clearer where the book shelf is closest to the camera.
In this final image, it is much more out of focus. As you can see the background
appears to be just blobs of colour and even objects close up are barely
recognisable. Colour appear to fade out rather than stop with a definite line. There
is also allot more darkness in the image. This could be the colours merging
together, though it could also be the camera placement.
Use this slide to annotate your best image
The shelf which is
the thing closest
to the camera is
the thing most in
focus. You can see
defined shape and
colour.
Parts of the books closest to
the camera are more in focus.
Colours and shape
definition starts to
fade at the
second row of
books.
The
background
where objects
are further
away there is
no definition.
Everything is
out of focus
and it makes it
almost all one
colour. Any
objects there
are completely
unrecognisable.
(Experiment title)
For these experiment, I looked at how images looked with different shutter
speeds. The images with higher shutter speeds came out with less distortion,
and images looked almost recognizable. Where as images with a lower shutter
speed appeared very distorted and you could not recognize any objects in the
image.
As you can see in this first image, there is only a slightly low shutter speed. You
can see the camera shake by the way things are blurred and things in the image
appear to be doubled. Though you can make out some definition such as the
tables and chairs on the ground floor and the staircase.
For this image the shutter speed was slightly lower. As you can see almost
everything is blurred and distorted. You can just about make out the floor.
When I took this image instead of just relying on natural camera shake like the
image before, I purposefully twisted the camera around. This gave the image
almost a smoky effect, this must have been because the camera caught some
light and distorted it.
This final image was captured with the lowest shutter speed. You can no longer
make out anything in this image, it just appears to be a grey blur. You can tell I
have again twisted the camera round while taking the picture. You can almost
make out where certain lines have been repeated around the image. This image
also captured and distorted some light, though the lights tracks look much
more defined this time.
Use this slide to annotate your best image
Image looks
doubled. Can
almost make out 2
staircases.
The person looks
barely there as the
camera was too
slow to capture
them before they
disappeared down
the stairs.
Can see multiple
faded versions of
the tables and
chairs.
(Experiment title)
For this experiment I looked at creating collages. I found a place in college that I
could use to take pictures of a large area. In order to make my college I needed
to take many small photos around the same area that could be joined up to make
a big photo. I joined up all of my little images on photoshop.
This image is what the outcome looks like. Because I was taking the image by
hand, the edges of the image came out quite rough as I forgot where I started,
and how far to go. The image joins up pretty well though there are some lighting
changes.
Use this slide to annotate your best image
Rough edges around the image
where I have gone down to far
or not gone down enough
A few lighting changes over the
image making it obvious this
photo is made up of many
images
Reflections
This time I did experiments with reflections.
As you can see in this first image you can see a slight reflection in the glass
where the light hits the hand railing strongest. You can see the reflecting of the
main railing and the parts where the railing join to the glass.
In this next image you can see the reflection of many windows in this piece of
glass. You can also see the first 3 letters of the York College logo. You can also
make out some more subtle reflections in this image such as a ladder and my
own reflection.
In this final image you can see some slightly more subtle reflections that the ones
previous. In the glass you can make out that there is something reflected though
it is not quite clear what it is. You can see some shapes and light but nothing
particularly specific.
Use this slide to annotate your best image
Clear reflections
of all the windows
at the front of the
building.
Can see the YOR in
the York College
logo Ever so slight reflection
continuing onto the floor
Can slightly
see my own
reflection
Can slightly make
out the ladder
Some slight
light distortion

Experiments Evidence Template

  • 1.
  • 2.
    In this firstexperiment I looked at how photographs looked with low focus. Depending on how low the focus is on the camera, the image comes out distorted and blurry. In some photographs where the focus was very low the content looks unrecognisable, just like colours or shapes. Where as the ones that have a higher focus have more detail. These three images are examples of my experiments. In the first image, you can see some details, though not much. In the corner of the image, where there are 3 books lined up together, you can see that close up the image is a little clearer. It is also much clearer where the shelf is. Where as further away the image gets a lot more blurry. In this next image there appears to be no part of the image in focus. You can still see colour and shape though because the camera is not close up to anything, there is no clear image. It is slightly more out of focus than the first image, though you can still almost make out that there is text on the books. It is also a little clearer where the book shelf is closest to the camera. In this final image, it is much more out of focus. As you can see the background appears to be just blobs of colour and even objects close up are barely recognisable. Colour appear to fade out rather than stop with a definite line. There is also allot more darkness in the image. This could be the colours merging together, though it could also be the camera placement.
  • 3.
    Use this slideto annotate your best image The shelf which is the thing closest to the camera is the thing most in focus. You can see defined shape and colour. Parts of the books closest to the camera are more in focus. Colours and shape definition starts to fade at the second row of books. The background where objects are further away there is no definition. Everything is out of focus and it makes it almost all one colour. Any objects there are completely unrecognisable.
  • 4.
    (Experiment title) For theseexperiment, I looked at how images looked with different shutter speeds. The images with higher shutter speeds came out with less distortion, and images looked almost recognizable. Where as images with a lower shutter speed appeared very distorted and you could not recognize any objects in the image. As you can see in this first image, there is only a slightly low shutter speed. You can see the camera shake by the way things are blurred and things in the image appear to be doubled. Though you can make out some definition such as the tables and chairs on the ground floor and the staircase. For this image the shutter speed was slightly lower. As you can see almost everything is blurred and distorted. You can just about make out the floor. When I took this image instead of just relying on natural camera shake like the image before, I purposefully twisted the camera around. This gave the image almost a smoky effect, this must have been because the camera caught some light and distorted it. This final image was captured with the lowest shutter speed. You can no longer make out anything in this image, it just appears to be a grey blur. You can tell I have again twisted the camera round while taking the picture. You can almost make out where certain lines have been repeated around the image. This image also captured and distorted some light, though the lights tracks look much more defined this time.
  • 5.
    Use this slideto annotate your best image Image looks doubled. Can almost make out 2 staircases. The person looks barely there as the camera was too slow to capture them before they disappeared down the stairs. Can see multiple faded versions of the tables and chairs.
  • 6.
    (Experiment title) For thisexperiment I looked at creating collages. I found a place in college that I could use to take pictures of a large area. In order to make my college I needed to take many small photos around the same area that could be joined up to make a big photo. I joined up all of my little images on photoshop. This image is what the outcome looks like. Because I was taking the image by hand, the edges of the image came out quite rough as I forgot where I started, and how far to go. The image joins up pretty well though there are some lighting changes.
  • 7.
    Use this slideto annotate your best image Rough edges around the image where I have gone down to far or not gone down enough A few lighting changes over the image making it obvious this photo is made up of many images
  • 8.
    Reflections This time Idid experiments with reflections. As you can see in this first image you can see a slight reflection in the glass where the light hits the hand railing strongest. You can see the reflecting of the main railing and the parts where the railing join to the glass. In this next image you can see the reflection of many windows in this piece of glass. You can also see the first 3 letters of the York College logo. You can also make out some more subtle reflections in this image such as a ladder and my own reflection. In this final image you can see some slightly more subtle reflections that the ones previous. In the glass you can make out that there is something reflected though it is not quite clear what it is. You can see some shapes and light but nothing particularly specific.
  • 9.
    Use this slideto annotate your best image Clear reflections of all the windows at the front of the building. Can see the YOR in the York College logo Ever so slight reflection continuing onto the floor Can slightly see my own reflection Can slightly make out the ladder Some slight light distortion