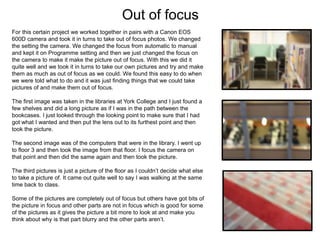
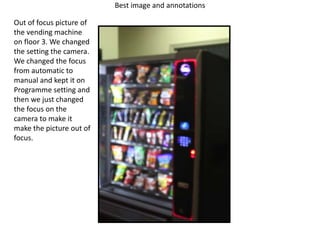
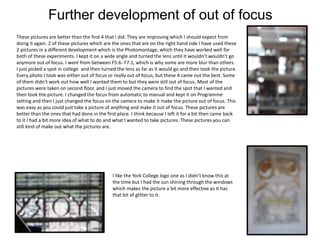
Experimental Photography
Stephanie Yarrow
1
Out of focus
For this certain project we worked together in pairs with a Canon EOS
600D camera and took it in turns to take out of focus photos. We changed
the setting the camera. We changed the focus from automatic to manual
and kept it on Programme setting and then we just changed the focus on
the camera to make it make the picture out of focus. With this we did it
quite well and we took it in turns to take our own pictures and try and make
them as much as out of focus as we could. We found this easy to do when
we were told what to do and it was just finding things that we could take
pictures of and make them out of focus.
The first image was taken in the libraries at York College and I just found a
few shelves and did a long picture as if I was in the path between the
bookcases. I just looked through the looking point to make sure that I had
got what I wanted and then put the lens out to its furthest point and then
took the picture.
The second image was of the computers that were in the library. I went up
to floor 3 and then took the image from that floor. I focus the camera on
that point and then did the same again and then took the picture.
The third pictures is just a picture of the floor as I couldn’t decide what else
to take a picture of. It came out quite well to say I was walking at the same
time back to class.
Some of the pictures are completely out of focus but others have got bits of
the picture in focus and other parts are not in focus which is good for some
of the pictures as it gives the picture a bit more to look at and make you
think about why is that part blurry and the other parts aren’t.
Best image and annotations
Out of focus picture of
the vending machine
on floor 3. We changed
the setting the camera.
We changed the focus
from automatic to
manual and kept it on
Programme setting and
then we just changed
the focus on the
camera to make it
make the picture out of
focus.
Further development of out of focus
These pictures are better than the first 4 that I did. They are improving which I should expect from
doing it again. 2 of these pictures which are the ones that are on the right hand side I have used these
2 pictures in a different development which is the Photomontage, which they have worked well for
both of these experiments. I kept it on a wide angle and turned the lens until it wouldn’t wouldn’t go
anymore out of focus. I went from between F5.6- F7.1, which is why some are more blur than others.
I just picked a spot in college and then turned the lens as far as it would go and then took the picture.
Every photo I took was either out of focus or really out of focus, but these 4 came out the best. Some
of them didn’t work out how well I wanted them to but they were still out of focus. Most of the
pictures were taken on second floor, and I just moved the camera to find the spot that I wanted and
then took the picture. I changed the focus from automatic to manual and kept it on Programme
setting and then I just changed the focus on the camera to make it make the picture out of focus. This
was easy as you could just take a picture of anything and make it out of focus. These pictures are
better than the ones that had done in the first place. I think because I left it for a bit then came back
to it I had a bit more idea of what to do and what I wanted to take pictures. These pictures you can
still kind of make out what the pictures are.
I like the York College logo one as I didn’t know this at
the time but I had the sun shining through the windows
which makes the picture a bit more effective as it has
that bit of glitter to it.
This picture I like best out
of all of them that I have
taken as it is different and
there is lots of detail to it.
There is a lot of
different shapes and
colours in this
picture.
This is the roof inside of the college that
was taken from the third floor. Shapes: Rectangles, circles and squares
Colours: black, white, blue, grey, very
light purple
I think these pictures are better than my
others as even though it is out of focus
there is still a pattern and colour to it.
Movement
With movement task we either had to move the camera around when you had
pressed the button or you had to find something that moved e.g. people’s legs or
with the lens you would twist it to move the lens in and out, again for this certain
task we used the Cannon 600D. At first we didn’t understand what we were doing
at first and then when it all became clear we went out and took pictures of
peoples legs as they walked by and then we messed around with the lens in the
picture. We found it quite hard to do but after a while we got the hang of it and got
a few good shots. The results I got were ok but I think I could have done better
shots but the shots we got were ok but that was after we knew what we were
doing as the first few shots that we did didn’t work at all and we didn’t know what
we were doing to make the movement photos we tried to move the camera
around when we clicked the button but I think we had the shutter speed on the
wrong setting.
The first image is of the corridor and we were just messing around with the lens
so you got this kind of blur, I think we moved it around at the same time so it
didn’t work fully but it is still a movement picture. The other 2 are off people’s legs
as they walked pasted us. I think there maybe a bit of camera shake on them too
but I’m not 100% sure. These are the legs of some of our class mate that were
walking past us at that certain time. These are good pictures but if we had more
time and more time to do the whole project I think I could have got a few better
pictures.
I think some of the pictures have a bit of camera shake because we were holding
the camera and it wasn’t on a flat surface to make it steady plus they are also at
an angle which is ok as it is different but they still have camera shake because
they were hand held. If I had to do these images again then I would either get a
flat surface that I can put the camera on or I would hire or borrow a tripod to put
the camera on so then you won’t get this camera shake.
People that have walked past we
took a picture of but we have
camera shake as well as movement.
This is a good picture but I could maybe next time
do some different images and check the shutter
speed that I have it on.
This picture was taken on third floor
as I was coming back to class.
You can make out what it is
and there is many different
colours in this photo.
Further development of movement
The movement photos are better than the first pictures than I have taken. I
think this is because I had better control of the camera and most of the
picture that I have taken is just using the lens and moving it back and forth.
These are different to the ones that I took before as the others were just
pictures of peoples feet as they were walking as that was movement.
I started outside and took a few outside just trying out different ways of doing
movement photos. A few of them turned out ok and worked well and others
just were either too blurry or they just were a white picture.
Once I had finished outside I came back in and went back up to second floor
and then just took some pictures of the inside and did the same thing for the
indoor pictures as well.
These are good photos, they are better than the first lot that I took the first
time that I did this topic.
If I did these again I would probably try something
different like may transport or nature etc. I would also
maybe go to a different scene or area to get different
movement photos.
I like this photo as I think
it is really strange how the
light has formed while it
has been on a long shutter
speed. To me it kind of
looks like lightening.
This was created by
moving the lens in
and out again and
pointing the camera
up to the lights on
3rd floor
I think that if I did lots of
pictures together then I
could use multiply
exposure to create a
picture that looks like
lots of lightening inside
the college.
There is lots of colours
and shapes in this
picture
Shapes: triangle, square,
rectangle. Circle
Colours: light purple,
yellow, blue, white
There is some sort
of reflection in this
photo as the lights
reflecting off
maybe the glass on
the stairwells.
Photomontage
The photomontage work was really fun to do I really enjoyed doing this but to me I had
something else that I wanted to do for the final products. These were very easy to do
and for these as we needed no fancy lens or special setting I used my own camera. The
first couple I didn’t work because they were around the same colour so it didn’t work on
adobe Photoshop as it was all the same colour so it couldn't work out which part went
were so I had to go and take some pictures of something else . You started at one side
and then went across the certain thing until you had taken a photo of each section of
that certain thing.
How to get a photomontage picture:
1. Start by opening Photoshop up and inserting the back ground you want, then
add your other picture on to the picture by going File > place to get the second
picture that you want to use.
2. Once you are happy with your 2 pictures then you click Layer >New Adjustment
layer>black and white and with that you can change it any way you want.
3. Once you are happy with the black and white then you will need to probably do
some changing to the light. To do that you click Layer > New Adjustment layer >
curves. When you get this layer if you don’t click ALT and click the layer you want
to change then it will change the whole picture .
The pictures I got were of the college staircase which I did in colour and black and white
just to see the difference. The other one was a picture that was hanging on the wall and
it seemed like a good place to start.
Once we had got the images we had to upload them into different files so then you could
just have all of one picture ready to do the photomontage.
How to get a photomontage picture:
1. Start by opening Photoshop up and
inserting the back ground you want, then
add your other picture on to the picture
by going File > place to get the second
picture that you want to use.
2. Once you are happy with your 2 pictures
then you click Layer >New Adjustment
layer>black and white and with that you
can change it any way you want.
3. Once you are happy with the black and
white then you will need to probably do
some changing to the light. To do that
you click Layer > New Adjustment layer >
curves. When you get this layer if you
don’t click ALT and click the layer you
want to change then it will change the
whole picture .
reflection
Reflection topic was fun but the problem for me is that my batteries died half way
through taking pictures so they aren’t as good as they could be. With this one
again you needed no special lens or setting so I could just use my camera. All you
had to do was find a reflective surface and take en exciting picture but mine
weren’t that exciting as I have said my battery died.
The result I have got is two of them are in the mac computer screen and another
one was the gum bins that are around college. They weren’t the best reflective
surfaces at all and they weren’t the best ones that I could have done.
This task was going ok until my batteries died so I couldn’t carry on as I didn’t
have any spare batteries and I didn’t have the lead for my phone so I couldn’t do
it that way either.
If I had to do these again which I would have done then I would get better pictures
and maybe use things like a puddle or a window reflection surface.
This is a good picture as it has 2
reflections but I think that maybe I
could use different reflections and
not include myself in the image.
Several colours but it isn’t unique. My
battery died so had to go back to class
early so didn’t get very good shots
Picture was taken on third floor.
Next time I will use different objects to
create the reflection photos.
Further development of reflection
Further development in the reflection photos have been improved from the other
photos when I first day that that I did this topic. It is a shame that there was no puddles
outside from the weather that we had over the weekend as they would have been some
good reflection photographs, but the sun has dried up all of the puddles around college,
so I had to try and find some reflections inside the college. My ISO was on 800 and I kept
the setting on P (program). These photos on the side have turned out the best, out of the
20 photos I took.
I think I would crop the first 2 so then it focuses more on the reflection. If you stood at
an angle at the picture then you got the reflection on the object. The light from the lights
or the sun reflecting through the window reflected onto the object in this case the
display cases.
I went outside first to see if there was any puddles left on the college grounds but
because it was hot the puddles had dried up. So I had to find reflections that were inside
the college grounds or in the building itself.
I found it quite hard as there was many reflections but the thing was when I took the
picture it didn’t show up on the picture it just looked like a normal phone reflection. I
couldn’t find many different reflections do many of then were reflection that came off
the display cases but I had to get it at the right angle otherwise you wouldn’t get the
reflection.
If I had to do it again then I would probably use colleges camera again which was a
1000D canon camera. I would also maybe try different experiments like maybe the
reflection off water or different types of reflections.
I like this photo that I have
taken as it looks like the
reflection is wavy and it
also looks like there is 2
pictures in top of each
other.
I do like reflection but I
think that you need to know
what you want a reflection
of and what you want to
make it a good picture like
puddles as you get good
reflections from them.
I think that I would probably use the Photomontage as that one I know what I want to do,
plus I know what I am doing with that. With a bit more practice with the reflection I can
maybe get better photos.
This photo was on floor 1 inside York
college.
If you stand at an angle
with the light shining on
something like a picture
then you will get the
reflection of what is
opposite the picture.
I tried different
reflections but this one
seemed to work the
best. If there was
puddles outside then I
could maybe get a good
reflection photo with
them

Experiments evidence template finished resubmission

  • 1.
  • 2.
    Out of focus Forthis certain project we worked together in pairs with a Canon EOS 600D camera and took it in turns to take out of focus photos. We changed the setting the camera. We changed the focus from automatic to manual and kept it on Programme setting and then we just changed the focus on the camera to make it make the picture out of focus. With this we did it quite well and we took it in turns to take our own pictures and try and make them as much as out of focus as we could. We found this easy to do when we were told what to do and it was just finding things that we could take pictures of and make them out of focus. The first image was taken in the libraries at York College and I just found a few shelves and did a long picture as if I was in the path between the bookcases. I just looked through the looking point to make sure that I had got what I wanted and then put the lens out to its furthest point and then took the picture. The second image was of the computers that were in the library. I went up to floor 3 and then took the image from that floor. I focus the camera on that point and then did the same again and then took the picture. The third pictures is just a picture of the floor as I couldn’t decide what else to take a picture of. It came out quite well to say I was walking at the same time back to class. Some of the pictures are completely out of focus but others have got bits of the picture in focus and other parts are not in focus which is good for some of the pictures as it gives the picture a bit more to look at and make you think about why is that part blurry and the other parts aren’t.
  • 3.
    Best image andannotations Out of focus picture of the vending machine on floor 3. We changed the setting the camera. We changed the focus from automatic to manual and kept it on Programme setting and then we just changed the focus on the camera to make it make the picture out of focus.
  • 4.
    Further development ofout of focus These pictures are better than the first 4 that I did. They are improving which I should expect from doing it again. 2 of these pictures which are the ones that are on the right hand side I have used these 2 pictures in a different development which is the Photomontage, which they have worked well for both of these experiments. I kept it on a wide angle and turned the lens until it wouldn’t wouldn’t go anymore out of focus. I went from between F5.6- F7.1, which is why some are more blur than others. I just picked a spot in college and then turned the lens as far as it would go and then took the picture. Every photo I took was either out of focus or really out of focus, but these 4 came out the best. Some of them didn’t work out how well I wanted them to but they were still out of focus. Most of the pictures were taken on second floor, and I just moved the camera to find the spot that I wanted and then took the picture. I changed the focus from automatic to manual and kept it on Programme setting and then I just changed the focus on the camera to make it make the picture out of focus. This was easy as you could just take a picture of anything and make it out of focus. These pictures are better than the ones that had done in the first place. I think because I left it for a bit then came back to it I had a bit more idea of what to do and what I wanted to take pictures. These pictures you can still kind of make out what the pictures are. I like the York College logo one as I didn’t know this at the time but I had the sun shining through the windows which makes the picture a bit more effective as it has that bit of glitter to it.
  • 5.
    This picture Ilike best out of all of them that I have taken as it is different and there is lots of detail to it. There is a lot of different shapes and colours in this picture. This is the roof inside of the college that was taken from the third floor. Shapes: Rectangles, circles and squares Colours: black, white, blue, grey, very light purple I think these pictures are better than my others as even though it is out of focus there is still a pattern and colour to it.
  • 6.
    Movement With movement taskwe either had to move the camera around when you had pressed the button or you had to find something that moved e.g. people’s legs or with the lens you would twist it to move the lens in and out, again for this certain task we used the Cannon 600D. At first we didn’t understand what we were doing at first and then when it all became clear we went out and took pictures of peoples legs as they walked by and then we messed around with the lens in the picture. We found it quite hard to do but after a while we got the hang of it and got a few good shots. The results I got were ok but I think I could have done better shots but the shots we got were ok but that was after we knew what we were doing as the first few shots that we did didn’t work at all and we didn’t know what we were doing to make the movement photos we tried to move the camera around when we clicked the button but I think we had the shutter speed on the wrong setting. The first image is of the corridor and we were just messing around with the lens so you got this kind of blur, I think we moved it around at the same time so it didn’t work fully but it is still a movement picture. The other 2 are off people’s legs as they walked pasted us. I think there maybe a bit of camera shake on them too but I’m not 100% sure. These are the legs of some of our class mate that were walking past us at that certain time. These are good pictures but if we had more time and more time to do the whole project I think I could have got a few better pictures. I think some of the pictures have a bit of camera shake because we were holding the camera and it wasn’t on a flat surface to make it steady plus they are also at an angle which is ok as it is different but they still have camera shake because they were hand held. If I had to do these images again then I would either get a flat surface that I can put the camera on or I would hire or borrow a tripod to put the camera on so then you won’t get this camera shake.
  • 7.
    People that havewalked past we took a picture of but we have camera shake as well as movement. This is a good picture but I could maybe next time do some different images and check the shutter speed that I have it on. This picture was taken on third floor as I was coming back to class. You can make out what it is and there is many different colours in this photo.
  • 8.
    Further development ofmovement The movement photos are better than the first pictures than I have taken. I think this is because I had better control of the camera and most of the picture that I have taken is just using the lens and moving it back and forth. These are different to the ones that I took before as the others were just pictures of peoples feet as they were walking as that was movement. I started outside and took a few outside just trying out different ways of doing movement photos. A few of them turned out ok and worked well and others just were either too blurry or they just were a white picture. Once I had finished outside I came back in and went back up to second floor and then just took some pictures of the inside and did the same thing for the indoor pictures as well. These are good photos, they are better than the first lot that I took the first time that I did this topic. If I did these again I would probably try something different like may transport or nature etc. I would also maybe go to a different scene or area to get different movement photos.
  • 9.
    I like thisphoto as I think it is really strange how the light has formed while it has been on a long shutter speed. To me it kind of looks like lightening. This was created by moving the lens in and out again and pointing the camera up to the lights on 3rd floor I think that if I did lots of pictures together then I could use multiply exposure to create a picture that looks like lots of lightening inside the college. There is lots of colours and shapes in this picture Shapes: triangle, square, rectangle. Circle Colours: light purple, yellow, blue, white There is some sort of reflection in this photo as the lights reflecting off maybe the glass on the stairwells.
  • 10.
    Photomontage The photomontage workwas really fun to do I really enjoyed doing this but to me I had something else that I wanted to do for the final products. These were very easy to do and for these as we needed no fancy lens or special setting I used my own camera. The first couple I didn’t work because they were around the same colour so it didn’t work on adobe Photoshop as it was all the same colour so it couldn't work out which part went were so I had to go and take some pictures of something else . You started at one side and then went across the certain thing until you had taken a photo of each section of that certain thing. How to get a photomontage picture: 1. Start by opening Photoshop up and inserting the back ground you want, then add your other picture on to the picture by going File > place to get the second picture that you want to use. 2. Once you are happy with your 2 pictures then you click Layer >New Adjustment layer>black and white and with that you can change it any way you want. 3. Once you are happy with the black and white then you will need to probably do some changing to the light. To do that you click Layer > New Adjustment layer > curves. When you get this layer if you don’t click ALT and click the layer you want to change then it will change the whole picture . The pictures I got were of the college staircase which I did in colour and black and white just to see the difference. The other one was a picture that was hanging on the wall and it seemed like a good place to start. Once we had got the images we had to upload them into different files so then you could just have all of one picture ready to do the photomontage.
  • 11.
    How to geta photomontage picture: 1. Start by opening Photoshop up and inserting the back ground you want, then add your other picture on to the picture by going File > place to get the second picture that you want to use. 2. Once you are happy with your 2 pictures then you click Layer >New Adjustment layer>black and white and with that you can change it any way you want. 3. Once you are happy with the black and white then you will need to probably do some changing to the light. To do that you click Layer > New Adjustment layer > curves. When you get this layer if you don’t click ALT and click the layer you want to change then it will change the whole picture .
  • 12.
    reflection Reflection topic wasfun but the problem for me is that my batteries died half way through taking pictures so they aren’t as good as they could be. With this one again you needed no special lens or setting so I could just use my camera. All you had to do was find a reflective surface and take en exciting picture but mine weren’t that exciting as I have said my battery died. The result I have got is two of them are in the mac computer screen and another one was the gum bins that are around college. They weren’t the best reflective surfaces at all and they weren’t the best ones that I could have done. This task was going ok until my batteries died so I couldn’t carry on as I didn’t have any spare batteries and I didn’t have the lead for my phone so I couldn’t do it that way either. If I had to do these again which I would have done then I would get better pictures and maybe use things like a puddle or a window reflection surface.
  • 13.
    This is agood picture as it has 2 reflections but I think that maybe I could use different reflections and not include myself in the image. Several colours but it isn’t unique. My battery died so had to go back to class early so didn’t get very good shots Picture was taken on third floor. Next time I will use different objects to create the reflection photos.
  • 14.
    Further development ofreflection Further development in the reflection photos have been improved from the other photos when I first day that that I did this topic. It is a shame that there was no puddles outside from the weather that we had over the weekend as they would have been some good reflection photographs, but the sun has dried up all of the puddles around college, so I had to try and find some reflections inside the college. My ISO was on 800 and I kept the setting on P (program). These photos on the side have turned out the best, out of the 20 photos I took. I think I would crop the first 2 so then it focuses more on the reflection. If you stood at an angle at the picture then you got the reflection on the object. The light from the lights or the sun reflecting through the window reflected onto the object in this case the display cases. I went outside first to see if there was any puddles left on the college grounds but because it was hot the puddles had dried up. So I had to find reflections that were inside the college grounds or in the building itself. I found it quite hard as there was many reflections but the thing was when I took the picture it didn’t show up on the picture it just looked like a normal phone reflection. I couldn’t find many different reflections do many of then were reflection that came off the display cases but I had to get it at the right angle otherwise you wouldn’t get the reflection. If I had to do it again then I would probably use colleges camera again which was a 1000D canon camera. I would also maybe try different experiments like maybe the reflection off water or different types of reflections.
  • 15.
    I like thisphoto that I have taken as it looks like the reflection is wavy and it also looks like there is 2 pictures in top of each other. I do like reflection but I think that you need to know what you want a reflection of and what you want to make it a good picture like puddles as you get good reflections from them. I think that I would probably use the Photomontage as that one I know what I want to do, plus I know what I am doing with that. With a bit more practice with the reflection I can maybe get better photos. This photo was on floor 1 inside York college. If you stand at an angle with the light shining on something like a picture then you will get the reflection of what is opposite the picture. I tried different reflections but this one seemed to work the best. If there was puddles outside then I could maybe get a good reflection photo with them