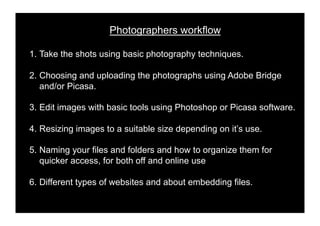
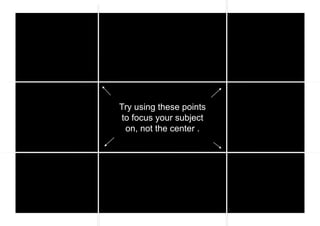
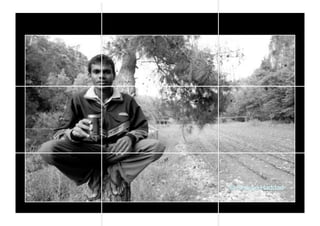
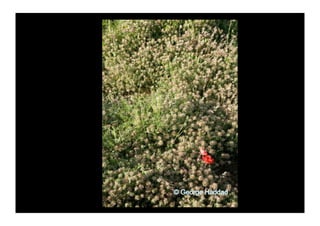
Digital Photography
       with

   George Haddad
Photographers workflow

1.! Take the shots using basic photography techniques.

2.! Choosing and uploading the photographs using Adobe Bridge
    and/or Picasa.

3.! Edit images with basic tools using Photoshop or Picasa software.

4.! Resizing images to a suitable size depending on it’s use.

5.! Naming your files and folders and how to organize them for
    quicker access, for both off and online use

6.! Different types of websites and about embedding files.
A basic photography principle.
•! If your photographs are not good enough,
you’re not close enough.
Get close
•! It takes days for some photographers to get
   the shot they want. Don’t rush, take your time.
   Find what you want to capture and move in.

•! In some circumstances when people or
   children are involved, they’ll come closer to
   you.
The rule of Thirds
Try using these points
 to focus your subject
  on, not the center .
Use the lines as guides.
And remember
Sometimes you can break the rules.
Something to add more effect.
Tilt the camera…
•! Too much tilt will
Go vertical.
•! Architecture and people can look good in
   vertical images.

•! You can also use this technique when there
   are visible lines leading away from you, or tall
   objects in the image.
•! When photographing people focus on their
   eyes, faces and their expressions. These are
   the areas where most of the attention is drawn
   to.
A little about natural and artificial (flash) light.
Well maybe just a bit more than a little.
•!The word photography means light drawing.

•!The best times of day to photograph (outdoors)
are early in the morning, or late in the afternoon.
The light is softer and the low sun creates
shadows that can give an added effect.

•!Unless you want to create a silhouette effect or
are shooting a sunset, try to avoid photographing
with the sun or bright lights facing you.
Using a flash to fill in the dark areas.
•! During midday or under artificial lights, the overhead
   light can cause dark shadows in certain areas, you
   can use the flash to “fill in” those areas .

•! You can also use the flash as a fill in if the sun or
   bright lights are facing you. This can be used to
   cancel the silhouette effect.

•! Don’t use the flash to light up the image.
•! More light means you
   can shoot faster, and
   capture moving objects.
Keep it simple
•! Try to avoid distractions in your images.

•! Even most landscape images have a point of
   focus or attention. Find a point in the image
   you want to emphasis and frame it using the
   rule of thirds.
•! It takes time and lots of practice to get better
   at something.

•! Try to apply these tips while you’re out
   photographing, and in time they will become
   second nature.
Choosing and uploading your images using
Adobe Bridge or Windows file browser.
Basic editing using Photoshop.
Resizing and renaming for the web.
Uploading your images to the web. Some
useful websites to store and display your
photographs
•! www.lightstalkers.com : Social networking site for journalists
   and photographers. You can create your own photo galleries
   viewable to the public. It’s for free and has lots of other
   functions.

•! www.demotix.com : Citizen journalist site. Great place to read
   and post features or breaking news from citizens and
   professional journalists. You can create a photo gallery and
   write an article for it. It’s free and its possible sell some
   images through this site.

•! www.facebook.com : Social networking site. You can upload
   photos and create galleries for people in your contact list to
   see. It’s free and a good way to show your work to other
   people.

•!
•! www.photoshelter.com : Online gallery and archive storage.
   Depending on your subscription you have certain amounts of
   storage space to keep an archive of your work. You can also
   create galleries for the public where your work can be viewed
   and sold.

•! www.flikr.com : Must have a Yahoo ID to use this website.

•! www.picasa.com : Online gallery and archive storage.
   Galleries can be shared with friends or family by inviting them.
   It’s for free and comes with an image editing software that you
   can install on your computer, it also has an upload feature
   that will upload your images directly into a gallery on the
   website.

Better Digital Photography

  • 2.
    Digital Photography with George Haddad
  • 3.
    Photographers workflow 1.! Takethe shots using basic photography techniques. 2.! Choosing and uploading the photographs using Adobe Bridge and/or Picasa. 3.! Edit images with basic tools using Photoshop or Picasa software. 4.! Resizing images to a suitable size depending on it’s use. 5.! Naming your files and folders and how to organize them for quicker access, for both off and online use 6.! Different types of websites and about embedding files.
  • 4.
  • 5.
    •! If yourphotographs are not good enough, you’re not close enough.
  • 7.
  • 9.
    •! It takesdays for some photographers to get the shot they want. Don’t rush, take your time. Find what you want to capture and move in. •! In some circumstances when people or children are involved, they’ll come closer to you.
  • 14.
  • 16.
    Try using thesepoints to focus your subject on, not the center .
  • 18.
    Use the linesas guides.
  • 19.
  • 20.
    Sometimes you canbreak the rules.
  • 25.
    Something to addmore effect.
  • 26.
  • 29.
    •! Too muchtilt will
  • 30.
  • 32.
    •! Architecture andpeople can look good in vertical images. •! You can also use this technique when there are visible lines leading away from you, or tall objects in the image.
  • 37.
    •! When photographingpeople focus on their eyes, faces and their expressions. These are the areas where most of the attention is drawn to.
  • 42.
    A little aboutnatural and artificial (flash) light.
  • 43.
    Well maybe justa bit more than a little.
  • 44.
    •!The word photographymeans light drawing. •!The best times of day to photograph (outdoors) are early in the morning, or late in the afternoon. The light is softer and the low sun creates shadows that can give an added effect. •!Unless you want to create a silhouette effect or are shooting a sunset, try to avoid photographing with the sun or bright lights facing you.
  • 51.
    Using a flashto fill in the dark areas.
  • 52.
    •! During middayor under artificial lights, the overhead light can cause dark shadows in certain areas, you can use the flash to “fill in” those areas . •! You can also use the flash as a fill in if the sun or bright lights are facing you. This can be used to cancel the silhouette effect. •! Don’t use the flash to light up the image.
  • 55.
    •! More lightmeans you can shoot faster, and capture moving objects.
  • 57.
  • 58.
    •! Try toavoid distractions in your images. •! Even most landscape images have a point of focus or attention. Find a point in the image you want to emphasis and frame it using the rule of thirds.
  • 62.
    •! It takestime and lots of practice to get better at something. •! Try to apply these tips while you’re out photographing, and in time they will become second nature.
  • 63.
    Choosing and uploadingyour images using Adobe Bridge or Windows file browser.
  • 64.
  • 65.
  • 66.
    Uploading your imagesto the web. Some useful websites to store and display your photographs
  • 67.
    •! www.lightstalkers.com :Social networking site for journalists and photographers. You can create your own photo galleries viewable to the public. It’s for free and has lots of other functions. •! www.demotix.com : Citizen journalist site. Great place to read and post features or breaking news from citizens and professional journalists. You can create a photo gallery and write an article for it. It’s free and its possible sell some images through this site. •! www.facebook.com : Social networking site. You can upload photos and create galleries for people in your contact list to see. It’s free and a good way to show your work to other people. •!
  • 68.
    •! www.photoshelter.com :Online gallery and archive storage. Depending on your subscription you have certain amounts of storage space to keep an archive of your work. You can also create galleries for the public where your work can be viewed and sold. •! www.flikr.com : Must have a Yahoo ID to use this website. •! www.picasa.com : Online gallery and archive storage. Galleries can be shared with friends or family by inviting them. It’s for free and comes with an image editing software that you can install on your computer, it also has an upload feature that will upload your images directly into a gallery on the website.