Incoming and Outgoing Shipments in 1 STEP Using Odoo 17
Evaluation Unit 7
1. By: Jonathan Newton
Evaluation
The programs I used to make this bag in the pre-production and production
stages was: Microsoft Word, Microsoft Power Point, to do the research before
making the bag. Google Chrome and Adobe Photoshop CS 5.1 to make the bag
and find the images I needed. I also used Google Chrome as well in the
research stage.
In Adobe Photoshop the tools I used was; the crop tool to crop the pictures,
the eye drop tool to sample the colours on a picture to find the colour I
needed, I used the brush tool and the pencil tool to draw
lines on photos, I used the eraser to erase the
background, I also used the gradient tool to create my
own background on the bottom of my bag. I used the
paint bucket tool as well to fill in space I made, I used this tool on all the sides
of my bag. I used the line tool to get a perfect line. I
used filtersto change the effects on my photos I used. I
also used the rota scope technique because this
created a great effect and is just what I wanted.
All the tools and techniques I used, I had never used before and I had to learn
how to use them and perfect the skills to a fine degree because I wanted my
product to look as professional as possible.
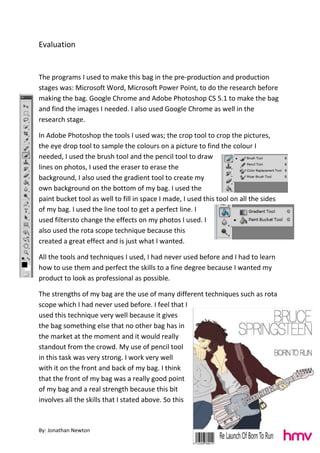
The strengths of my bag are the use of many different techniques such as rota
scope which I had never used before. I feel that I
used this technique very well because it gives
the bag something else that no other bag has in
the market at the moment and it would really
standout from the crowd. My use of pencil tool
in this task was very strong. I work very well
with it on the front and back of my bag. I think
that the front of my bag was a really good point
of my bag and a real strength because this bit
involves all the skills that I stated above. So this
2. By: Jonathan Newton
would give me a very high level which is very good. But more important the
front looks professional and very appealing to the eye because of how I have
used Photoshop to the best of my abilityand used all of my skills. I think that I
have shaded in his shirt very well so it gives the bag a better depth and feeling.
Also the minor details in the bag such as the arm lines add up to create such a
great product because all of the detail helps it to become great.
I think that the sides of my bag are the main weakness because; there is not a
lot of skill in making them. I could have maybe added a back ground to the logo
or changed the colour of the HMV logo to make the bag more appealing. The
reason for them not being how I wished them to be is because I ran out of time
because of how long it took to do the front cover. If I was to do this product
again I would spend more time on the sides of the bag. But not cut down on
the time I spent on the front because I feel that the front of the bag is the life
and soul of the bag. So I would spend more time outside of school to complete
the bag better.
I’m very pleased with my bag and the way it has turned out because it looks
very professional and fulfils my vision of what my product would look like at
the end of the unit.
If I was to do this task again I would change the sides like I said before. I would
do this by adding a background and also an effect such as liquefying the picture
and pulling or condensing it in different areas giving it an old effect which
would make the bag more retro and fit in better with the rest if the bag. This
would also fit in better with the fashion right now in bags. If I was to do this
task again I would maybe do my research in more detail to help me make the
bag a lot quicker.
In conclusion and all parts considered, I think this task went very well and will
give me a good level because of all the effort and skill that is involved into
making the bag. But also all the Pre-production work is a very key part to my
product because it gives u ideas and really helps complete the task.