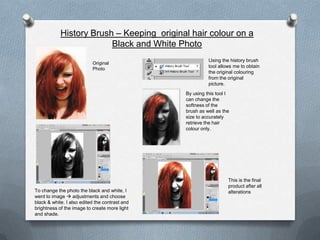
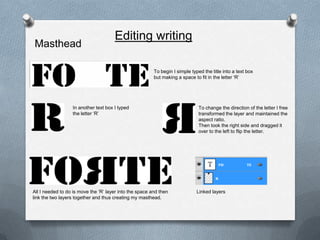
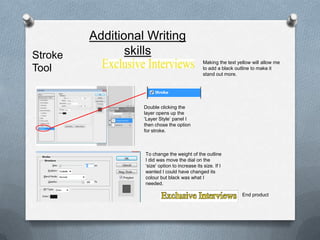
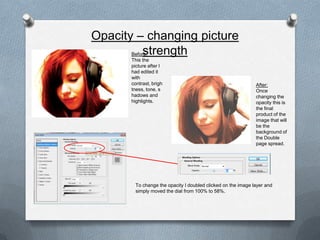
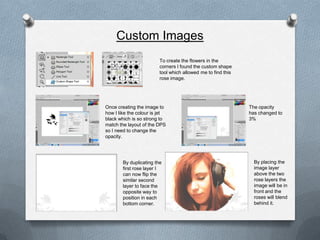
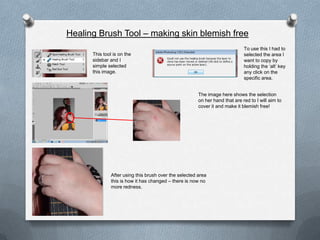
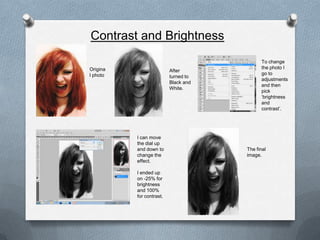
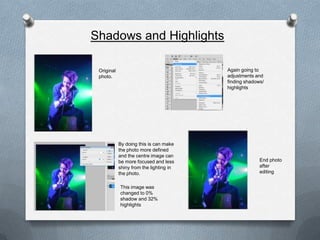
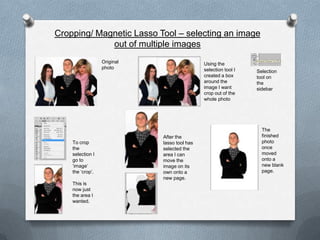
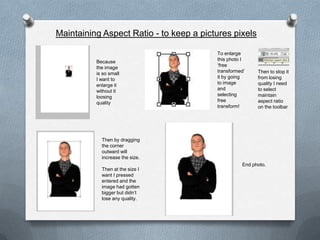
FORTE Magazine:

Skills Development
    By Hannah Penton
History Brush – Keeping original hair colour on a
                         Black and White Photo
                                                          Using the history brush
                           Original
                                                          tool allows me to obtain
                           Photo
                                                          the original colouring
                                                          from the original
                                                          picture.
                                                By using this tool I
                                                can change the
                                                softness of the
                                                brush as well as the
                                                size to accurately
                                                retrieve the hair
                                                colour only.


                                                                   This is the final
                                                                   product after all
To change the photo the black and white, I                         alterations
went to image  adjustments and choose
black & white. I also edited the contrast and
brightness of the image to create more light
and shade.
Editing writing
Masthead

                                                         To begin I simple typed the title into a text box
                                                         but making a space to fit in the letter ‘R’


                  In another text box I typed                                  To change the direction of the letter I free
                  the letter ‘R’                                               transformed the layer and maintained the
                                                                               aspect ratio.
                                                                               Then took the right side and dragged it
                                                                               over to the left to flip the letter.


All I needed to do is move the ‘R’ layer into the space and then              Linked layers
link the two layers together and thus creating my masthead.
Additional Writing
Stroke          skills
                                                 Making the text yellow will allow me
Tool                                             to add a black outline to make it
                                                 stand out more.


                   Double clicking the
                   layer opens up the
                   ‘Layer Style’ panel I
                   then chose the option
                   for stroke.


                   To change the weight of the outline
                   I did was move the dial on the
                   ‘size’ option to increase its size. If I
                   wanted I could have changed its
                   colour but black was what I
                   needed.

                                                                   End product
Opacity – changing picture
         strength
       Before:
       This the
       picture after I
       had edited it
       with
       contrast, brigh                                        After:
       tness, tone, s                                         Once
       hadows and                                             changing the
       highlights.                                            opacity this is
                                                              the final
                                                              product of the
                                                              image that will
                                                              be the
                                                              background of
                                                              the Double
                                                              page spread.


        To change the opacity I doubled clicked on the image layer and
        simply moved the dial from 100% to 58%.
Custom Images
                         To create the flowers in the
                         corners I found the custom shape
                         tool which allowed me to find this
                         rose image.


Once creating the image to                                    The opacity
how I like the colour is jet                                  has changed to
black which is so strong to                                   3%
match the layout of the DPS
so I need to change the
opacity.


        By duplicating the                                      By placing the
        first rose layer I                                      image layer
        can now flip the                                        above the two
        similar second                                          rose layers the
        layer to face the                                       image will be in
        opposite way to                                         front and the
        position in each                                        roses will blend
        bottom corner.                                          behind it.
Healing Brush Tool – making skin blemish free
                                                                              To use this I had to
      This tool is on the                                                     selected the area I
      sidebar and I                                                           want to copy by
      simple selected                                                         holding the ‘alt’ key
      this image.                                                             any click on the
                                                                              specific area.


                                                        The image here shows the selection
                                                        on her hand that are red to I will aim to
                                                        cover it and make it blemish free!


               After using this brush over the selected area
               this is how it has changed – there is now no
               more redness.
Contrast and Brightness
                                             To change
Origina                                      the photo I
                          After
l photo                                      go to
                          turned to
                                             adjustments
                          Black and
                                             and then
                          White.
                                             pick
                                             ‘brightness
                                             and
                                             contrast’.


          I can move
          the dial up
          and down to                 The final
          change the                  image.
          effect.

          I ended up
          on -25% for
          brightness
          and 100%
          for contrast.
Shadows and Highlights

 Original                                Again going to
 photo.                                  adjustments and
                                         finding shadows/
                                         highlights


            By doing this is can make
            the photo more defined
            and the centre image can
            be more focused and less                   End photo
            shiny from the lighting in                 after
            the photo.                                 editing


            This image was
            changed to 0%
            shadow and 32%
            highlights
Cropping/ Magnetic Lasso Tool – selecting an image
             out of multiple images
                  Original                    Using the
                  photo                       selection tool I   Selection
                                              created a box      tool on
                                              around the         the
                                              image I want       sidebar
                                              crop out of the
                                              whole photo


                                                                   The
                             After the                             finished
    To crop                  lasso tool has                        photo
    the                      selected the                          once
    selection I              area I can                            moved
    go to                    move the                              onto a
    ‘image’                  image on its                          new blank
    the ‘crop’.              own onto a                            page.
                             new page.
    This is
    now just
    the area I
    wanted.
Maintaining Aspect Ratio - to keep a pictures pixels

                                         To enlarge
          Because                        this photo I
          the image                      ‘free
          is so small                    transformed’    Then to stop it
          I want to                      it by going     from losing
          enlarge it                     to image        quality I need
          without it                     and             to select
          loosing                        selecting       maintain
          quality                        free            aspect ratio
                                         transform!      on the toolbar


            Then by dragging
            the corner
            outward will
            increase the size.
                                                   End photo.
            Then at the size I
            want I pressed
            entered and the
            image had gotten
            bigger but didn’t
            lose any quality.

Skills development

  • 1.
  • 2.
    History Brush –Keeping original hair colour on a Black and White Photo Using the history brush Original tool allows me to obtain Photo the original colouring from the original picture. By using this tool I can change the softness of the brush as well as the size to accurately retrieve the hair colour only. This is the final product after all To change the photo the black and white, I alterations went to image  adjustments and choose black & white. I also edited the contrast and brightness of the image to create more light and shade.
  • 3.
    Editing writing Masthead To begin I simple typed the title into a text box but making a space to fit in the letter ‘R’ In another text box I typed To change the direction of the letter I free the letter ‘R’ transformed the layer and maintained the aspect ratio. Then took the right side and dragged it over to the left to flip the letter. All I needed to do is move the ‘R’ layer into the space and then Linked layers link the two layers together and thus creating my masthead.
  • 4.
    Additional Writing Stroke skills Making the text yellow will allow me Tool to add a black outline to make it stand out more. Double clicking the layer opens up the ‘Layer Style’ panel I then chose the option for stroke. To change the weight of the outline I did was move the dial on the ‘size’ option to increase its size. If I wanted I could have changed its colour but black was what I needed. End product
  • 5.
    Opacity – changingpicture strength Before: This the picture after I had edited it with contrast, brigh After: tness, tone, s Once hadows and changing the highlights. opacity this is the final product of the image that will be the background of the Double page spread. To change the opacity I doubled clicked on the image layer and simply moved the dial from 100% to 58%.
  • 6.
    Custom Images To create the flowers in the corners I found the custom shape tool which allowed me to find this rose image. Once creating the image to The opacity how I like the colour is jet has changed to black which is so strong to 3% match the layout of the DPS so I need to change the opacity. By duplicating the By placing the first rose layer I image layer can now flip the above the two similar second rose layers the layer to face the image will be in opposite way to front and the position in each roses will blend bottom corner. behind it.
  • 7.
    Healing Brush Tool– making skin blemish free To use this I had to This tool is on the selected the area I sidebar and I want to copy by simple selected holding the ‘alt’ key this image. any click on the specific area. The image here shows the selection on her hand that are red to I will aim to cover it and make it blemish free! After using this brush over the selected area this is how it has changed – there is now no more redness.
  • 8.
    Contrast and Brightness To change Origina the photo I After l photo go to turned to adjustments Black and and then White. pick ‘brightness and contrast’. I can move the dial up and down to The final change the image. effect. I ended up on -25% for brightness and 100% for contrast.
  • 9.
    Shadows and Highlights Original Again going to photo. adjustments and finding shadows/ highlights By doing this is can make the photo more defined and the centre image can be more focused and less End photo shiny from the lighting in after the photo. editing This image was changed to 0% shadow and 32% highlights
  • 10.
    Cropping/ Magnetic LassoTool – selecting an image out of multiple images Original Using the photo selection tool I Selection created a box tool on around the the image I want sidebar crop out of the whole photo The After the finished To crop lasso tool has photo the selected the once selection I area I can moved go to move the onto a ‘image’ image on its new blank the ‘crop’. own onto a page. new page. This is now just the area I wanted.
  • 11.
    Maintaining Aspect Ratio- to keep a pictures pixels To enlarge Because this photo I the image ‘free is so small transformed’ Then to stop it I want to it by going from losing enlarge it to image quality I need without it and to select loosing selecting maintain quality free aspect ratio transform! on the toolbar Then by dragging the corner outward will increase the size. End photo. Then at the size I want I pressed entered and the image had gotten bigger but didn’t lose any quality.