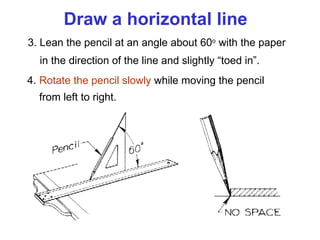
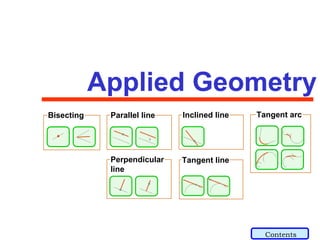
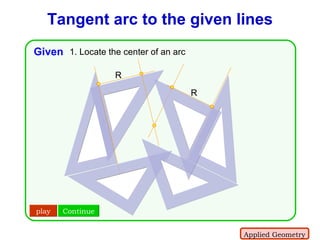
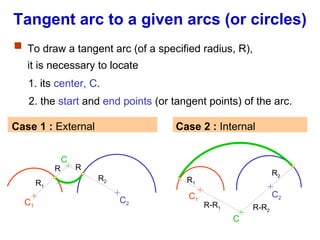
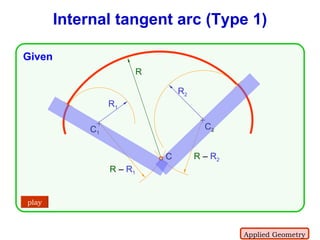
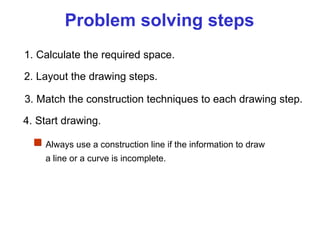
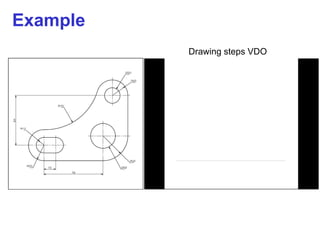
Chapter 2 Using drawing tools & applied geometry
Contents Applied Geometry (or geometrical constructions) Using of tools Preparation of tools Problem solving steps
Preparation of Tools Contents
1. Paper  2. Pencils 3. Compass Fastening a sheet to a drafting board Sharpening the lead Sharpening the lead Tools to be prepared
Paper 1. Place a paper  close to the left edge of a table where a drafter can work conveniently. 3. Move the paper until its lower edge lies close to the top edge of a T-square. 4. Align the top edge of the paper with T-square blade. 5. Attach the paper’s corners with tape. 6. Move T-square down to smooth the paper. 7. Attach the remaining paper’s corners with tape. 2. Place a T-square.
1.  Remove the wood with penknife while expose a lead about 8-10 mm. 2. Polish the lead into a conical shape with a sandpaper. 3. Clean the lead with tissue paper. Pencil
Compass 2.  Adjust the  needle  and the   lead  so that the tip of  the needle extends slightly more than the lead. 1.  Sharpen the lead with a sandpaper. needle lead
Using the Tools Contents
Straight line Arc, Circle 4. Circle template 1. T-square 2. Triangles 3. Compass Tools Shape to be drawn  Function of the tools T-square and triangles can be used together to draw an inclined line with 15 o  increment, i.e. 15 o , 30 o , 45 o , 60 o , 75 o , 90 o , 105 o , 120 o , 135 o , 150 o , 165 o , 180 o  etc.
To keep your drawing clean Do Don’t
Using a compass 1.  Locate the center of the circle to be drawn. Draw two intersecting lines.  2. Adjust the distance between a needle and a lead   to be a radius of the circle. 3. Set the needle point at the circle’s center.
4.  Start circle.  Apply enough pressure to the needle,    holding the compass handle between thumb and index    fingers. 5.  Complete circle.  Revolve the handle clockwise. Using a compass
1. Draw two perpendicular lines that pass through center of    a circle to be drawn.  2. Align all markings on template with the center lines.  3. Tracing the circle. Given Using a template Construction line Visible line Center of a circle to be drawn
Draw a line through the given points 1. Place the pencil tip at one of the    given points. 2. Place the triangle against the    pencil tip. 3. Swing the triangle around the    pencil tip until its edge aligns with    the second point. 4. Draw a line. Given play Explanations A B
Draw a horizontal line 1.  Press the T-square head against the left edge   of the table. 2.  Smooth the blade to the right.
Draw a horizontal line 3. Lean the pencil at an angle about 60 o  with the paper   in the direction of the line and slightly “toed in”. 4.  Rotate the pencil slowly  while moving the pencil   from left to right.
Draw a horizontal line 5. Move T-square up or down to draw another horizontal line.
Draw a vertical line 1. Set T-square as before. Place any triangle on T-square edge. 2. Use your left hand to hold both T-square and triangle   in position.
Draw a vertical line 3. Lean the pencil to the triangle. 4. Draw the line upward while  rotating the pencil slowly .
1. Place 30 o -60 o  triangle on the T-square edge and press  them firmly against the paper. 2. Draw the line in the direction as shown below. Draw a line at 30 o  with horizontal
Draw a line at 45 o  with horizontal 2. Draw the line in the direction as shown below. 1. Place 45 o  triangle on the T-square edge and press   them firmly against the paper.
Draw a line at 60 o  with horizontal 1. Place 30 o -60 o  triangle on the T-square edge and press  them firmly against the paper. 2. Draw the line in the direction as shown below.
Draw a line at 15 o  with horizontal 1 2 + -30 o 45 o = 15 o  CCW + 60 o (-45 o ) = 15 o  CCW
Draw a line at 75 o  with horizontal 1 2 + 30 o 45 o = 75 o  CCW + 45 o 30 o = 75 o  CCW
Draw a line at 105 o  with horizontal 1 2 + 60 o 45 o = 105 o  CCW + 45 o 60 o = 105 o  CCW
Practice by Yourself Arrange the triangles to draw a line at 120 o 135 o 150 o with a horizontal.
Applied Geometry r Bisecting Parallel line Perpendicular line Inclined line Tangent line Tangent arc Contents
Bisecting a line and an angle Applied Geometry Contents
To bisect a given line 1. Swing two arcs having a radius   greater than half-length of the   line with the centers at the   ends of the line. 2. Join the intersection points of   the arcs with a line. 3. Locate the midpoint. Given play Explanations A B r 1 r 1 Applied Geometry
To bisect a given angle 2. Swing the arcs of any radius   from the intersection points between the previous arc and the lines. 3. Draw the line. 1. Swing an arc of any radius whose centers at the vertex. Given play Explanations r 1 A B C r 2 r 2 Applied Geometry
Drawing a parallel line Applied Geometry Contents
Line parallel to a given line through a given point Given play Explanations 3. Slide the first triangle until its   edge passes through the    given point. 1. Line an edge of a triangle up   to a given line. 2.  Support the triangle with    another one. 4. Draw a line. + C Applied Geometry
Line parallel to a given line at a given distance Given play Explanations 3. Draw a line parallel to a given   line and tangent to the arc. 1. Choose a convenient point on   a given line. 2. Use that point as center of an   arc with a radius equal to a   given distance. r Applied Geometry r
Drawing a perpendicular line Applied Geometry Contents
Line perpendicular to a point in a line Revolve method Given play Explanations 3. Flip the first triangle and slide until its  edge passes through the given point. 1.  Line an  opposite  edge of a 45 o     triangle up to a given line. 2.  Support the triangle with another    one. 4. Draw a line . + C Applied Geometry
Adjacent-sides method Given play Line perpendicular to a point in a line Explanations 3.  Slide the first triangle until    another adjacent edge passes    through the given point. 1.  Line an  adjacent  edge of a 45 o     triangle up to a given line. 2.  Support the triangle with another    one. 4. Draw a line . + C Applied Geometry
Given play Line perpendicular to a point in a line Compass method Explanations 1. Use a given point as center,  draw the arc with any radius. 2.  Bisect the distance between the    intersection points between an    arc and a given line.  3. Draw a line . r 1 r 2 + C r 2 r 2  > r 1 A B D Applied Geometry
Line perpendicular to a given line through a point outside the line Given play Adjacent-sides method Explanations 3.  Slide the first triangle until    another adjacent edge passes    through the given point. 1.  Line an  adjacent  edge of a 45 o     triangle up to a given line. 2.  Support the triangle with another    one. 4. Draw a line . + C Applied Geometry
Given play Line perpendicular to a given line through a point outside the line Compass method Explanations 1.  Use a given point as a center,     d raw the arc with any radius that    intersect the given line. 2.  Bisect the distance between the    intersection points between an    arc and a given line.  3. Draw a line . r 2 + C r 2 r 1 B A D Applied Geometry
Practice by Yourself Draw a line perpendicular to a given line and pass through a point lies outside using  revolved  method. Applied Geometry
Drawing an inclined line Applied Geometry Contents
Line making 15 o  with a given line through a given point + C + C Given play Given play Applied Geometry
Line making 30 o  with a given line through a given point + C + C Given play Given play Applied Geometry
Line making 75 o  with a given line through a given point + C Given play Given play + C Applied Geometry
Drawing a Tangent line to an arc (or a circle) Applied Geometry Contents
C Tangent line to a given arc (or circle) play Case 1 : A given point lies on an arc Given Explanations 3.  Slide the first triangle until    another adjacent edge passes    through the given point. 1.  Line an  adjacent  edge of a 45 o     triangle up to the center of an    arc and a given given. 2. Support the triangle with another    one . 4. Draw a line . Applied Geometry
Tangent line to a given arc (or circle) play C play C Case 2 : A given point lies outside an arc Given Given 1 st  method 2 nd  method Applied Geometry
Drawing a tangent curve to the given lines Applied Geometry Contents
Key Concept 1. its  center, C . To draw a tangent arc (of a specified radius, R), it is necessary to locate 2. the  start  and  end points (or tangent points) of the arc. It places outside a line for a distance equal to a radius of an arc.  It lies on a given line in the way that the line passing through this  point and the center of an arc be perpendicular to a given line.  R R R
Tangent arc to the given lines R R play Given 1. Locate the center of an arc Continue Applied Geometry
Tangent arc to the given lines 2. Locate the tangent points Replay TP.1 TP.2 Applied Geometry
Drawing a tangent curve to the given curves Applied Geometry Contents
Tangent point lies on the line passes through the centers of each arc (or circle). Key Concept R 1 R 2 R 3
Tangent arc to a given arcs (or circles) C 2 C 1 C C 1 C 2 C 1. its  center, C . To draw a tangent arc (of a specified radius, R), it is necessary to locate Case 1 :  External  Case 2 :  Internal 2. the  start  and  end points  (or tangent points) of the arc. R 1 R R R 2 R 1 R-R 1 R-R 2 R 2
+ + C 1 C 2 R  +  R 1 R  +  R 2 R 1 R 2 C External tangent arc R play Given Applied Geometry
+ + C 1 C 2 R  –  R 2 Internal tangent arc (Type 1) R  –  R 1 R 1 R 2 C R play Given Applied Geometry
R  +  R 2 R  –  R 1 C Internal tangent arc (Type 2) + + C 1 C 2 R 1 R 2 play R Given Applied Geometry
Problem solving steps 1. Calculate the required space. 2. Layout the drawing steps. 3. Match the construction techniques to each drawing step. 4. Start drawing. Always use a construction line if the information to draw a line or a curve is incomplete.
Example Drawing steps VDO

Engineering Drawing: Chapter 02 using drawing tools

  • 1.
    Chapter 2 Usingdrawing tools & applied geometry
  • 2.
    Contents Applied Geometry(or geometrical constructions) Using of tools Preparation of tools Problem solving steps
  • 3.
  • 4.
    1. Paper 2. Pencils 3. Compass Fastening a sheet to a drafting board Sharpening the lead Sharpening the lead Tools to be prepared
  • 5.
    Paper 1. Placea paper close to the left edge of a table where a drafter can work conveniently. 3. Move the paper until its lower edge lies close to the top edge of a T-square. 4. Align the top edge of the paper with T-square blade. 5. Attach the paper’s corners with tape. 6. Move T-square down to smooth the paper. 7. Attach the remaining paper’s corners with tape. 2. Place a T-square.
  • 6.
    1. Removethe wood with penknife while expose a lead about 8-10 mm. 2. Polish the lead into a conical shape with a sandpaper. 3. Clean the lead with tissue paper. Pencil
  • 7.
    Compass 2. Adjust the needle and the lead so that the tip of the needle extends slightly more than the lead. 1. Sharpen the lead with a sandpaper. needle lead
  • 8.
  • 9.
    Straight line Arc,Circle 4. Circle template 1. T-square 2. Triangles 3. Compass Tools Shape to be drawn Function of the tools T-square and triangles can be used together to draw an inclined line with 15 o increment, i.e. 15 o , 30 o , 45 o , 60 o , 75 o , 90 o , 105 o , 120 o , 135 o , 150 o , 165 o , 180 o etc.
  • 10.
    To keep yourdrawing clean Do Don’t
  • 11.
    Using a compass1. Locate the center of the circle to be drawn. Draw two intersecting lines. 2. Adjust the distance between a needle and a lead to be a radius of the circle. 3. Set the needle point at the circle’s center.
  • 12.
    4. Startcircle. Apply enough pressure to the needle, holding the compass handle between thumb and index fingers. 5. Complete circle. Revolve the handle clockwise. Using a compass
  • 13.
    1. Draw twoperpendicular lines that pass through center of a circle to be drawn. 2. Align all markings on template with the center lines. 3. Tracing the circle. Given Using a template Construction line Visible line Center of a circle to be drawn
  • 14.
    Draw a linethrough the given points 1. Place the pencil tip at one of the given points. 2. Place the triangle against the pencil tip. 3. Swing the triangle around the pencil tip until its edge aligns with the second point. 4. Draw a line. Given play Explanations A B
  • 15.
    Draw a horizontalline 1. Press the T-square head against the left edge of the table. 2. Smooth the blade to the right.
  • 16.
    Draw a horizontalline 3. Lean the pencil at an angle about 60 o with the paper in the direction of the line and slightly “toed in”. 4. Rotate the pencil slowly while moving the pencil from left to right.
  • 17.
    Draw a horizontalline 5. Move T-square up or down to draw another horizontal line.
  • 18.
    Draw a verticalline 1. Set T-square as before. Place any triangle on T-square edge. 2. Use your left hand to hold both T-square and triangle in position.
  • 19.
    Draw a verticalline 3. Lean the pencil to the triangle. 4. Draw the line upward while rotating the pencil slowly .
  • 20.
    1. Place 30o -60 o triangle on the T-square edge and press them firmly against the paper. 2. Draw the line in the direction as shown below. Draw a line at 30 o with horizontal
  • 21.
    Draw a lineat 45 o with horizontal 2. Draw the line in the direction as shown below. 1. Place 45 o triangle on the T-square edge and press them firmly against the paper.
  • 22.
    Draw a lineat 60 o with horizontal 1. Place 30 o -60 o triangle on the T-square edge and press them firmly against the paper. 2. Draw the line in the direction as shown below.
  • 23.
    Draw a lineat 15 o with horizontal 1 2 + -30 o 45 o = 15 o CCW + 60 o (-45 o ) = 15 o CCW
  • 24.
    Draw a lineat 75 o with horizontal 1 2 + 30 o 45 o = 75 o CCW + 45 o 30 o = 75 o CCW
  • 25.
    Draw a lineat 105 o with horizontal 1 2 + 60 o 45 o = 105 o CCW + 45 o 60 o = 105 o CCW
  • 26.
    Practice by YourselfArrange the triangles to draw a line at 120 o 135 o 150 o with a horizontal.
  • 27.
    Applied Geometry rBisecting Parallel line Perpendicular line Inclined line Tangent line Tangent arc Contents
  • 28.
    Bisecting a lineand an angle Applied Geometry Contents
  • 29.
    To bisect agiven line 1. Swing two arcs having a radius greater than half-length of the line with the centers at the ends of the line. 2. Join the intersection points of the arcs with a line. 3. Locate the midpoint. Given play Explanations A B r 1 r 1 Applied Geometry
  • 30.
    To bisect agiven angle 2. Swing the arcs of any radius from the intersection points between the previous arc and the lines. 3. Draw the line. 1. Swing an arc of any radius whose centers at the vertex. Given play Explanations r 1 A B C r 2 r 2 Applied Geometry
  • 31.
    Drawing a parallelline Applied Geometry Contents
  • 32.
    Line parallel toa given line through a given point Given play Explanations 3. Slide the first triangle until its edge passes through the given point. 1. Line an edge of a triangle up to a given line. 2. Support the triangle with another one. 4. Draw a line. + C Applied Geometry
  • 33.
    Line parallel toa given line at a given distance Given play Explanations 3. Draw a line parallel to a given line and tangent to the arc. 1. Choose a convenient point on a given line. 2. Use that point as center of an arc with a radius equal to a given distance. r Applied Geometry r
  • 34.
    Drawing a perpendicularline Applied Geometry Contents
  • 35.
    Line perpendicular toa point in a line Revolve method Given play Explanations 3. Flip the first triangle and slide until its edge passes through the given point. 1. Line an opposite edge of a 45 o triangle up to a given line. 2. Support the triangle with another one. 4. Draw a line . + C Applied Geometry
  • 36.
    Adjacent-sides method Givenplay Line perpendicular to a point in a line Explanations 3. Slide the first triangle until another adjacent edge passes through the given point. 1. Line an adjacent edge of a 45 o triangle up to a given line. 2. Support the triangle with another one. 4. Draw a line . + C Applied Geometry
  • 37.
    Given play Lineperpendicular to a point in a line Compass method Explanations 1. Use a given point as center, draw the arc with any radius. 2. Bisect the distance between the intersection points between an arc and a given line. 3. Draw a line . r 1 r 2 + C r 2 r 2 > r 1 A B D Applied Geometry
  • 38.
    Line perpendicular toa given line through a point outside the line Given play Adjacent-sides method Explanations 3. Slide the first triangle until another adjacent edge passes through the given point. 1. Line an adjacent edge of a 45 o triangle up to a given line. 2. Support the triangle with another one. 4. Draw a line . + C Applied Geometry
  • 39.
    Given play Lineperpendicular to a given line through a point outside the line Compass method Explanations 1. Use a given point as a center, d raw the arc with any radius that intersect the given line. 2. Bisect the distance between the intersection points between an arc and a given line. 3. Draw a line . r 2 + C r 2 r 1 B A D Applied Geometry
  • 40.
    Practice by YourselfDraw a line perpendicular to a given line and pass through a point lies outside using revolved method. Applied Geometry
  • 41.
    Drawing an inclinedline Applied Geometry Contents
  • 42.
    Line making 15o with a given line through a given point + C + C Given play Given play Applied Geometry
  • 43.
    Line making 30o with a given line through a given point + C + C Given play Given play Applied Geometry
  • 44.
    Line making 75o with a given line through a given point + C Given play Given play + C Applied Geometry
  • 45.
    Drawing a Tangentline to an arc (or a circle) Applied Geometry Contents
  • 46.
    C Tangent lineto a given arc (or circle) play Case 1 : A given point lies on an arc Given Explanations 3. Slide the first triangle until another adjacent edge passes through the given point. 1. Line an adjacent edge of a 45 o triangle up to the center of an arc and a given given. 2. Support the triangle with another one . 4. Draw a line . Applied Geometry
  • 47.
    Tangent line toa given arc (or circle) play C play C Case 2 : A given point lies outside an arc Given Given 1 st method 2 nd method Applied Geometry
  • 48.
    Drawing a tangentcurve to the given lines Applied Geometry Contents
  • 49.
    Key Concept 1.its center, C . To draw a tangent arc (of a specified radius, R), it is necessary to locate 2. the start and end points (or tangent points) of the arc. It places outside a line for a distance equal to a radius of an arc. It lies on a given line in the way that the line passing through this point and the center of an arc be perpendicular to a given line. R R R
  • 50.
    Tangent arc tothe given lines R R play Given 1. Locate the center of an arc Continue Applied Geometry
  • 51.
    Tangent arc tothe given lines 2. Locate the tangent points Replay TP.1 TP.2 Applied Geometry
  • 52.
    Drawing a tangentcurve to the given curves Applied Geometry Contents
  • 53.
    Tangent point lieson the line passes through the centers of each arc (or circle). Key Concept R 1 R 2 R 3
  • 54.
    Tangent arc toa given arcs (or circles) C 2 C 1 C C 1 C 2 C 1. its center, C . To draw a tangent arc (of a specified radius, R), it is necessary to locate Case 1 : External Case 2 : Internal 2. the start and end points (or tangent points) of the arc. R 1 R R R 2 R 1 R-R 1 R-R 2 R 2
  • 55.
    + + C1 C 2 R + R 1 R + R 2 R 1 R 2 C External tangent arc R play Given Applied Geometry
  • 56.
    + + C1 C 2 R – R 2 Internal tangent arc (Type 1) R – R 1 R 1 R 2 C R play Given Applied Geometry
  • 57.
    R + R 2 R – R 1 C Internal tangent arc (Type 2) + + C 1 C 2 R 1 R 2 play R Given Applied Geometry
  • 58.
    Problem solving steps1. Calculate the required space. 2. Layout the drawing steps. 3. Match the construction techniques to each drawing step. 4. Start drawing. Always use a construction line if the information to draw a line or a curve is incomplete.
  • 59.