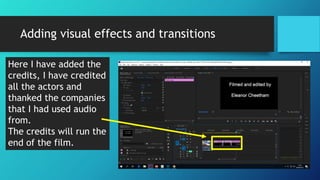
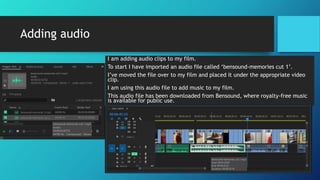
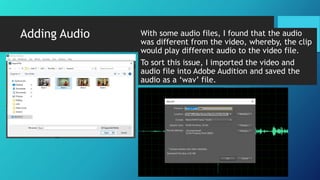
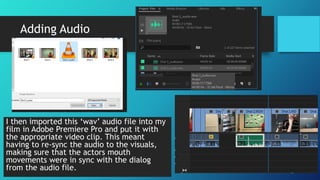
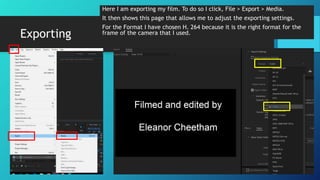
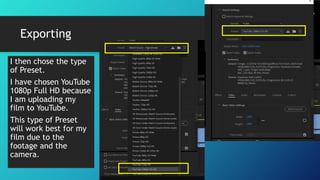
LO4: Editing Evidence Log
Unit 17
Adding visual effects and transitions
Edited clip: Here I have now zoomed in.
The original scale was 100, it has now been increased to 135.1..
Original clip:
I am going to zoom in this shot
because I don’t want the
character’s phone to be seen.
Adding visual effects and transitions
I have now added three title
sequences.
The first is my production
logo, ‘Elemental
Production’.
The second is introducing the
title of the film, ‘Element
Production Presents’.
The third is the title,
‘Exclusively Un-Established’.
I have edited these JPEGS
into the film before it
begins.
Adding visual effects and transitions
I have added my production company logo,
production company title and my title
sequence.
Here I have edited visual effects to the
opening title sequences.
As you can see I have added a fade effect to
this shot. Whereby, I have started with 00.0%
opacity to begin with and then increased this
to 100.0%. This means that it gradually fades
to image from 00.0% to 100.0%. It currently
at 83.2% to show the fading process.
I will also add this effect when the image
changes.
Adding visual effects and transitions
Here I have added the
credits, I have credited
all the actors and
thanked the companies
that I had used audio
from.
The credits will run the
end of the film.
Adding audio
I am adding audio clips to my film.
To start I have imported an audio file called ‘bensound-memories cut 1’.
I’ve moved the file over to my film and placed it under the appropriate video
clip.
I am using this audio file to add music to my film.
This audio file has been downloaded from Bensound, where royalty-free music
is available for public use.
Adding Audio With some audio files, I found that the audio
was different from the video, whereby, the clip
would play different audio to the video file.
To sort this issue, I imported the video and
audio file into Adobe Audition and saved the
audio as a ‘wav’ file.
Adding Audio
I then imported this ‘wav’ audio file into my
film in Adobe Premiere Pro and put it with
the appropriate video clip. This meant
having to re-sync the audio to the visuals,
making sure that the actors mouth
movements were in sync with the dialog
from the audio file.
Exporting
Here I am exporting my film. To do so I click, File > Export > Media.
It then shows this page that allows me to adjust the exporting settings.
For the Format I have chosen H. 264 because it is the right format for the
frame of the camera that I used.
Exporting
I then chose the type
of Preset.
I have chosen YouTube
1080p Full HD because
I am uploading my
film to YouTube.
This type of Preset
will work best for my
film due to the
footage and the
camera.
I click on ‘Output Name’ where I can then chose
a folder and name my film.
I am saving it in ‘Exported Film’, ‘Exclusively Un-
Established (Elfie Cheetham)’.

Editing evidence log done

  • 1.
  • 2.
    Adding visual effectsand transitions Edited clip: Here I have now zoomed in. The original scale was 100, it has now been increased to 135.1.. Original clip: I am going to zoom in this shot because I don’t want the character’s phone to be seen.
  • 3.
    Adding visual effectsand transitions I have now added three title sequences. The first is my production logo, ‘Elemental Production’. The second is introducing the title of the film, ‘Element Production Presents’. The third is the title, ‘Exclusively Un-Established’. I have edited these JPEGS into the film before it begins.
  • 4.
    Adding visual effectsand transitions I have added my production company logo, production company title and my title sequence. Here I have edited visual effects to the opening title sequences. As you can see I have added a fade effect to this shot. Whereby, I have started with 00.0% opacity to begin with and then increased this to 100.0%. This means that it gradually fades to image from 00.0% to 100.0%. It currently at 83.2% to show the fading process. I will also add this effect when the image changes.
  • 5.
    Adding visual effectsand transitions Here I have added the credits, I have credited all the actors and thanked the companies that I had used audio from. The credits will run the end of the film.
  • 6.
    Adding audio I amadding audio clips to my film. To start I have imported an audio file called ‘bensound-memories cut 1’. I’ve moved the file over to my film and placed it under the appropriate video clip. I am using this audio file to add music to my film. This audio file has been downloaded from Bensound, where royalty-free music is available for public use.
  • 7.
    Adding Audio Withsome audio files, I found that the audio was different from the video, whereby, the clip would play different audio to the video file. To sort this issue, I imported the video and audio file into Adobe Audition and saved the audio as a ‘wav’ file.
  • 8.
    Adding Audio I thenimported this ‘wav’ audio file into my film in Adobe Premiere Pro and put it with the appropriate video clip. This meant having to re-sync the audio to the visuals, making sure that the actors mouth movements were in sync with the dialog from the audio file.
  • 9.
    Exporting Here I amexporting my film. To do so I click, File > Export > Media. It then shows this page that allows me to adjust the exporting settings. For the Format I have chosen H. 264 because it is the right format for the frame of the camera that I used.
  • 10.
    Exporting I then chosethe type of Preset. I have chosen YouTube 1080p Full HD because I am uploading my film to YouTube. This type of Preset will work best for my film due to the footage and the camera.
  • 11.
    I click on‘Output Name’ where I can then chose a folder and name my film. I am saving it in ‘Exported Film’, ‘Exclusively Un- Established (Elfie Cheetham)’.