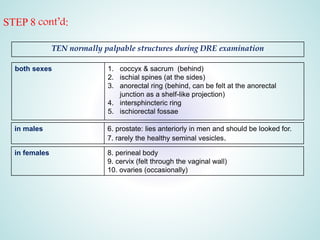
Digital Rectal Examination (DRE) is an important procedure in surgical practice used to examine the rectum and surrounding structures. It involves visual inspection of the external anal area and digital palpation of the internal rectum. The 12 key steps of a DRE are outlined, including introducing the procedure to the patient, inspecting externally, lubricating the finger, inserting the finger to palpate internal structures, and communicating findings to the patient. DRE allows examination of the prostate, cervix, and other pelvic structures to detect abnormalities like masses, hemorrhoids, or tenderness that can indicate various diseases.
Presentation by Andreas Schleicher Tackling the School Absenteeism Crisis 30 ...
Digital Rectal Examination for Surgical Trainees
1. Digital Rectal Examination
for Surgical Trainees
(OSCE and Descriptive)
BY
Hosam M. Hamza, MD
Senior Lecturer of General Surgery
Faculty of Medicine
Minia University - Egypt
Senior Registrar of General Surgery
KSA
2020
2. A wag once remarked, with considerable truth, that a
consultant is a doctor who makes a rectal
examination.
—R. H. MAJOR, M.D.
3. Digital Rectal Examination (DRE) is a famous procedure in daily
surgical practice.
It is a relatively common OSCE station.
Busy practitioners often omit DRE or leave it to the most junior of
the team for a variety of reasons, as patient discomfort and that the
exam is not aesthetically pleasing. In many diseases, however,
examination of the rectum will point the physician in the proper
diagnostic direction.
Rectal examination can be defined as the visual inspection of the
perianal skin, digital palpation of the rectum, and assessment of
neuromuscular function of the perineum.
5. The anus – the junction of the gut with the skin – is the lowermost 4
cm of large bowel.
It extends between 2 readily palpable muscular landmarks: the
anorectal ring (above) & the intersphincteric ring (below).
It is directed downwards & backwards making the perineal flexure
(a backward concave bend at anorectal junction).
6. The ‘watershed’ – the muco-cutaneous junction, sometimes called
Hilton’s white line – is a wavy white line, seen in the lower third of the
anal canal on proctoscopy.
7. Rectum begins as the continuation of the sigmoid colon (about 12
cm from the anal verge) and ends at the anorectal junction. Its
length is about 6 inches (10-15 cm).
The upper rectum has the same diameter as the sigmoid, while
lower rectum is dilated (rectal ampulla).
Rectum is straight in lower mammals (hence its name) but curved
in man to fit into the sacral hollow.
8. The anterior wall of the rectum has a number of close key anatomical structures that can
therefore be palpated digitally via the rectum to identify several disease processes.
Most significant are the prostate and seminal vesicles in males, and cervix in females. Bony
structures, such as the sacrum and coccyx, may also be palpated in both sexes.
9. An important landmark both anatomically and clinically is the
pectinate (dentate) line where the rectum and upper half of the anal
canal merge, approximately 3 to 4 cm from the skin.
This line serves as a demarcation for venous and lymphatic
drainage and for the nerve supply.
10. Above the pectinate (dentate) line Below the pectinate (dentate) line
Upper 1/2 of anal canal Lower 1/2 of anal canal
Ebryologic
origin
Endodermal (from cloaca) Ectodermal (from proctodeum)
Epithelial
lining
Simple columnar (with anal
columns, sinuses & valves)
Upper part: stratified squamous
non-keratinzed epith.
Lower part: true skin
Carcinoma adenocarcinoma a squamous tumour
Arterial
supply
Superior rectal artery (single)
Middle rectal art. (1 on each side)
Inferior rectal art. (1 on each side)
Venous
drainage
Sup. rectal vein (portal) Mid. & inf. rectal veins (systemic)
Lymphatic
drainage
To internal iliac nodes To superficial inguinal nodes
Nerve supply Autonomic nerves
(this part is insensitive to pain,
sensitive only to stretching)
Somatic = inferior rectal N
(sensitive to pain)
Haemorrhoids covered by mucosa covered by skin
11. Rectum & anal canal are supplied from S2,3,4 (i.e. pelvic splanchnic
nerve; parasympathetic); these are the same segments supplying the
wall of urinary bladder, this explains why disturbances of the ano-
rectum may produce reflex bladder effects (e.g. urine retention
following haemorrhoidectomy).
13. 1. DRE is part of a full physical examination.
2. Often incorporated in a focused urologic, gynaecologic,
gastrointestinal, and neurologic examination.
3. To facilitate the placement of a rectal tube and suppository
medication.
4. Disease processes investigated with a RE include, but are not
limited to:
- bleeding per rectum - haemorrhoids and anal fissures
- anal condyloma - faecal incontinence
- inflammatory bowel disease - bowel obstruction
- manual evacuation of impacted faecal matter
- anorectal cancer - prostatitis and BPH
- prostatic cancer: according to the American Urological Association (AUA),
DRE may be indicated for prostate cancer screening
after discussing risks and benefits with the patient.
14. DRE in trauma ?
In clinical assessment of trauma victims, rectal assessment may be
indicated in selected patients:
a. lower abdominal and/or perineal injury.
b. rectal bleeding.
c. for assessment of:
anal sphincter tone (loss of tone suggests a spinal cord
injury, normal tone does NOT exclude cord injury).
rectal wall integrity.
palpable pelvic fracture or haematoma.
prostate position: a high riding prostate suggests rupture of
the posterior urethra (DRE here is near useless, anyone ever
felt it?😊)
Traditional ATLS teaching was that a DRE is mandatory in trauma
patients: “a finger or tube in every orifice”. This is no longer the case.
DRE rarely changes the management of trauma patients (0 to 4% of
cases).
16. There are ONLY two absolute contraindications for DRE:
1. a patient without a rectum.
2. a doctor without a finger.
NO clinical circumstances make DRE overtly contraindicated, but
caution should be exercised (AVOID vigorous manipulation) with the
following patients:
a. infants and young children.
b. severe neutropenia.
c. acutely painful anal conditions (e.g. acute fissure, thrombosed piles).
d. anal stricture.
e. prostatic abscesses or acute bacterial prostatitis.
f. recent anal surgery
18. 1. Privacy: ensure adequate patient’s privacy.
2. Safety:
Ensure adequate patient’s safety.
DRE should be performed with the patient in a safe position in
case vasovagal syncope should occur (not an uncommon event,
particularly in younger males).L
1. L
2. ::
3. Positioning: multiple positions may be used – as shown in the
next slide; whatever the position you prefer, patient should be made to
feel privacy and security in a relaxed environment.
4. Exposure: uncover the patient from the waist down to the
midthighs including any undergarments.
5. Dignity: Cover the patient with a blanket when appropriate.
21. If the patient has neutropenia or acute bacterial prostatitis
and there is a need to check for a fluctuant prostate
signifying abscess, antibiotic therapy should be started
before DRE and after all cultures are obtained.
23. 1. Patient’s rectum.
2. Doctor’s finger (index finger, with the nail trimmed appropriately and
any jewellery removed).
3. Personal protective equipment (gloves, apron and tissue).
4. Generous lubrication (alcohol-based lubricants are irritant to mucous
membranes, use water-based or silicone-based gel instead).
5. Good light.
6. No anaesthesia is needed, although in some cases, it is better to
perform examination under anaesthesia (EUA) concomitantly with
other procedures that require general sedation.
24. The 12-Step
DRE
For the purpose of O.S.C.E. exams
You’ll be expected to pick up the
relevant clinical signs using your
examination skills and demonstrate
appropriate communication skills.
You will be provided with a
mannequin, however you should
25. STEP 1: wash your hands thoroughly and put on apron and gloves.
STEP 2: introduce yourself to the patient.
STEP 3: clarify patient’s identity (name, DOB, medical ID)
STEP 4: explain what you will do and OBTAIN CONSTENT.
- briefly explain the procedure, position and degree of
exposure required.
- reassure the patient about being a slightly uncomfortable
non-painful procedure.
- reassure you can stop if is painful at any point
- now you are about to start, ensure you have all needed
equipment.
26. STEP 5: EXTERNAL INSPECTION:
- separate the buttocks till the anal orifice and natal cleft are exposed.
- Inspect FOUR AREAS: the anus, the surrounding peri-anal area,
posterior perineum and gluteal folds.
- Inspect these areas with and without the patient starting straining or cough.
27. STEP 5 cont’d: EXTERNAL INSPECTION:
Look for any of these abnormalities:
1. peri-anal discharge or faecal soiling 2. bleeding per rectum
3. skin excoriation, rash or signs of STDs 4. skin erythema or swelling (?abscess)
5. external haemorrhoids 6. prolapsing internal haemorrhoids
7. anal fissures (majority located midline posteriorly ) 8. fistulous openings
9. masses or malignancies 10. patulous anus (lost anal tone)
(e.g. polyps, peri-anal haematoma, condyloma, melanoma, rectal cancer )
11. rectal prolapse (ask patient to cough) 12. decubitus ulcer
13. scarring (common with fistula – in – ano, anal surgery or obstetric injury)
14. infestation
28.
29. NOTE:
During inspection, patient is asked to strain to evaluate:
- recto- or cystocele
- prolapsed internal haemorrhoids
- rectal prolapse
- perineal descent
In normal individuals, the perineum lies about 2.5 cm above the
ischial tuberosities. When straining at stool, the perineum will
descend approximately 1.5 cm or to a level about 1 cm above the
ischial tuberosities.
Assessment of sensation (e.g. patients with faecal incontinence):
− touch or strike the perianal skin with a finger or cotton-tipped
applicator stick.
− presence of the ano-cutaneous reflex (anal “wink”) suggests
an intact sacral reflex arc and pudendal nerve innervation of
the external anal sphincter.
− THIS IS NOT A STEP OF ROUTINE DRE
30. STEP 6:
- Generously lubricate the index finger of dominant hand.
- Tell the patient you are about to start your procedure.
STEP 7: DIGITAL EXAM:
- NON-DOMINANT HAND FIRST:
Place fingers of the non-dominant on either side of the anus and gently
stretch the anal orifice to see if there is any spasm associated with an acute
fissure, which may be visible; DRE may be too painful to be carried out in
these circumstances and EUA may be needed.
If no spasm, use your non-dominant hand to steady the patient’s hip to start
the digital exam.
31. STEP 7 cont’d:
- Place the pulp of your lubricated finger – pointing anteriorly – on the anus.
- Apply gentle – but steady pressure to the centre of the anal orifice and at the same
time press backwards against the underlying puborectalis sling. This overcomes most
of the tone in the anal sphincter and allows your finger to straighten and slip into the
rectum.
Never Use Force To Enter The Anal Canal
Never Thrust the Tip of Your Finger Straight In
32. STEP 7 cont’d:
- Maintain the pressure till your finger slowly enters the rectum.
- Wait for a few seconds for the sphincter to acclimatise and relax slightly, so
the digit is advanced further.
- Ask the patient to breathe in deeply and relax to loosen the sphincter.
- Assess the sphincter tone:
− the resting sphincter tone (a function of the internal anal sphincter).
− the squeeze pressure (a function of the external anal sphincter) by asking the
patient to squeeze your finger and assess the tone.
33. STEP 8: PALPATION OF INTERNAL STRUCTURES:
Palpation should proceed in a systematic fashion:
- Sweep your finger 360o around the full ano-rectum (in both clockwise and anti-
clockwise directions).
- Feel for any abnormalities.
- Through out the whole digital exam, look at the patient’s face for signs of distress or
pain. Severe pain signifies an anal fissure, abscess or ulcer.
34. STEP 8 cont’d:
TEN normally palpable structures during DRE examination
both sexes 1. coccyx & sacrum (behind)
2. ischial spines (at the sides)
3. anorectal ring (behind, can be felt at the anorectal
junction as a shelf-like projection)
4. intersphincteric ring
5. ischiorectal fossae
in males 6. prostate: lies anteriorly in men and should be looked for.
7. rarely the healthy seminal vesicles.
in females 8. perineal body
9. cervix (felt through the vaginal wall)
10. ovaries (occasionally)
35. STEP 8 cont’d:
abnormalities that can be detected include:
A. within the lumen of the
ano-rectum
faecal impaction
foreign bodies (FBs)
B. in the ano-rectal wall ano-rectal ulcers (e.g. herpes, IBD) or growths
strictures
granulomata
NB internal haemorrhoids are not felt unless thrombosed
C. outside the wall in both sexes:
pelvic bony tumours
distended urinary bladder
collections or masses in the recto-versical pouch
in males:
abnormalities of seminal vesicles (e.g. TB) & prostate
membranous urethra: can not be felt unless there is a
stone or bougie inside
bulbo-urethral glands: can not felt unless enlarged (e.g.
gonorrhea)
in females:
uterine or ovarian enlargement
NB do not be deceived by FBs placed in vagina (e.g
tampon,pessary).
36. Tenderness is one of the more helpful signs on DRE:
location and degree of tenderness may provide additional or
convincing evidence of such disorders as:
- prostatitis
- pelvic inflammatory disease
- tubo-ovarian abscesses
- ovarian cysts
- ectopic pregnancy
rectal tenderness in suspected appendicitis has been touted as an
important diagnostic clue, but the weight of evidence suggests that
this finding is of little help.
37. STEP 9:
- Rotate your wrist, so that the finger pulp is facing posteriorly again, then remove your finger.
- Examine the glove for faeces, mucus or blood.
STEP 10:
- Clean off any lubricant left around the anus.
- Remove and dispose of your gloves in the clinical waste bin.
STEP 11:
Allow the patient the privacy to dress and thank him/her.
STEP 12: Finalize your procedure:
- Wash your hands thoroughly
- Simplify your findings to the patient and discuss and agree plan.
- Report your findings (findings are usually described by convention of a clockface, with
anterior as 12 o’clock and posterior as 6 o’clock e.g. a 2 cm firm irregular mass at 9
o’clock).
38. 1. Patients with fissures or abscesses may have so much spasm that digital examination is
extremely painful. In these circumstances, gently try to insert your finger, and if there is any
reaction from the patient, abort the procedure.
2. Feel all around the rectum as high as possible. You may have to push quite hard in a fatty
patient, and in some it is difficult to feel much beyond the anal canal.
3. A palpable mass should be known whether it is within or outside the ano-rectal wall, by testing
the mobility of the mucosa over it. This is a most important distinction.
NOTES
39. 1. F
2. F
3. F
4. Posteriorly, rectum turns away at a right-angle, it is easy to miss a small swelling in this area.
5. Faeces may feel like a ‘mass’ but are indentable, the only rectal mass that is.
6. If a possible mass is just detected at your fingertip, ask the patient to strain or push down. This
will often move the mass down 1 or 2 cm or so and bring it within your reach.
NOTES, cont’d
40. 1.F
2.F
3.F
4.G
5.G
6.g
7. THE PRSOTATE:
The general surgeon should NEVER miss an abnormal prostate gland during DRE.
Before the advent of serum prostate-specific antigen (PSA) testing in 1986, DRE
was the sole method of screening men for prostate cancer.
By DRE, a normal adult prostate has the following characteristics:
- a heart-shaped gland.
- in the size of a walnut (approximately 4 × 3 × 2 cm).
- about 4 cm from the anal verge – in front of the lower
rectum – gland’s posterior surface can be felt firm,
smooth with a palpable central sulcus.
- gland is symmterical on each side of the central
sulcus.
NOTES
41. PROSTATE cont’d :
Check for
Size of the prostate
symmetry..
tenderness..
nodules..
− Enlarged prostate with a deep sulcus →
benign prostatic hyperplasia
− Enlarged with severe tenderness →
prostatitis
− Enlarged, hard with rough nodule(s) or
asymmetrical → prostatic cancer