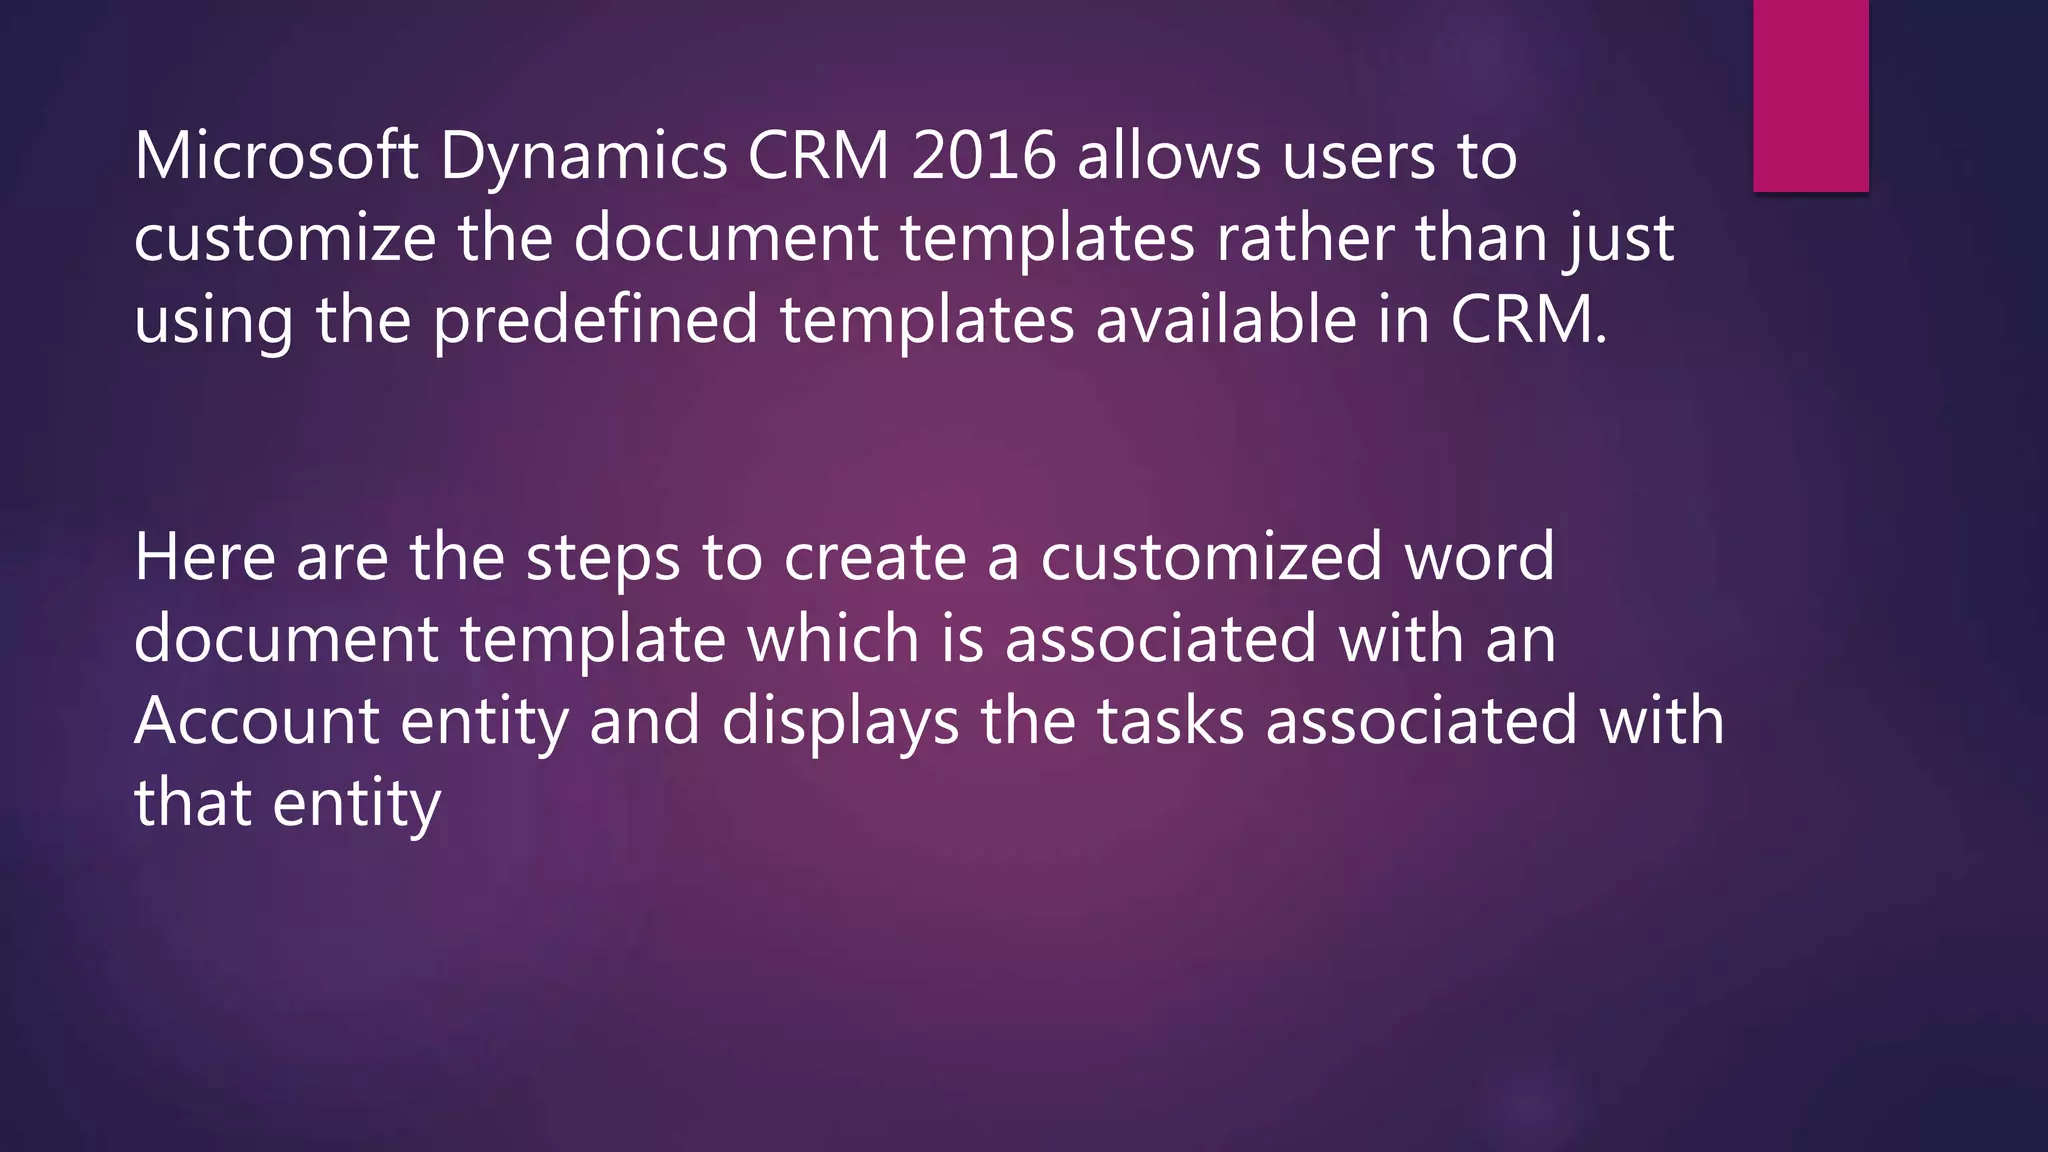
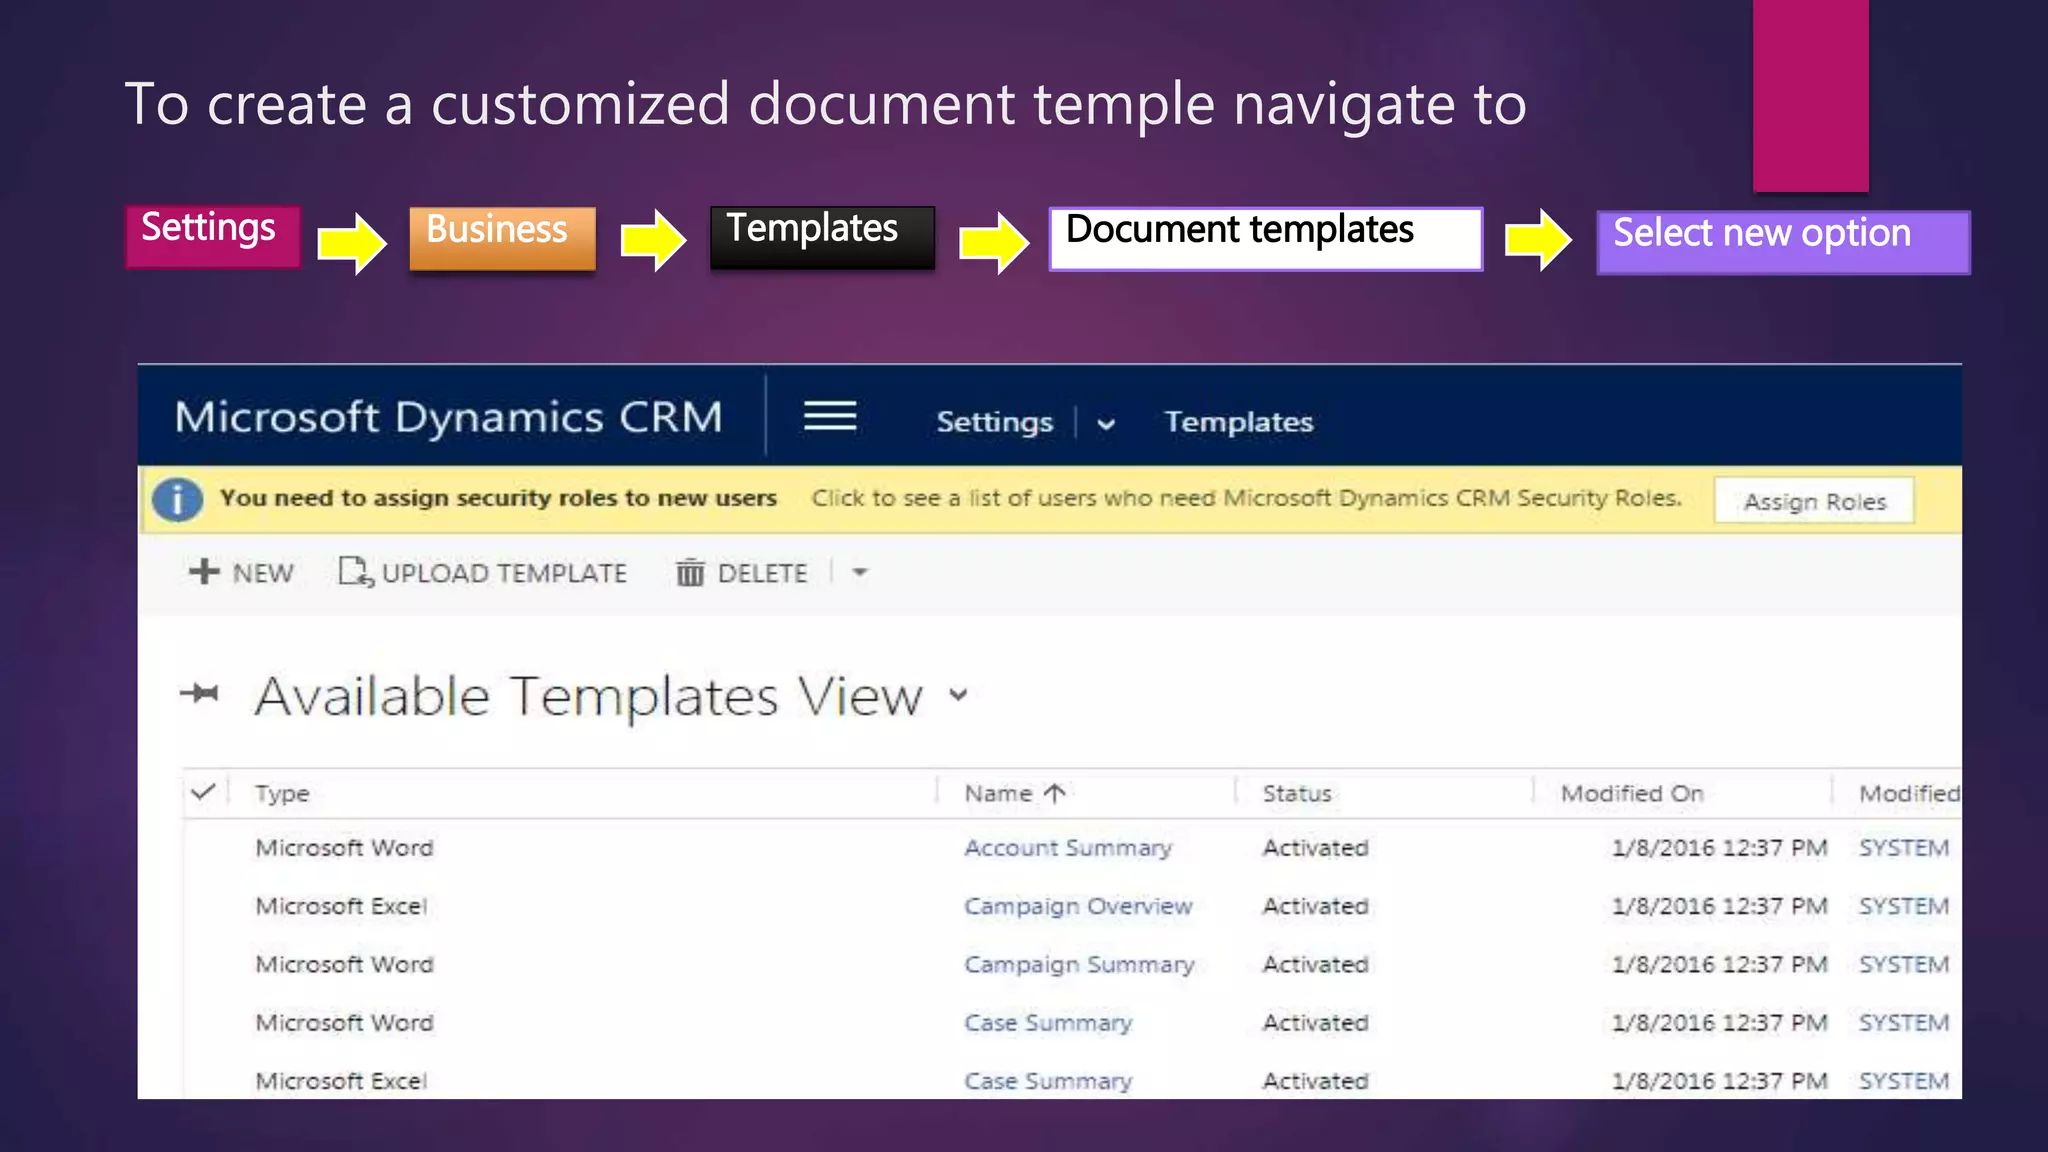
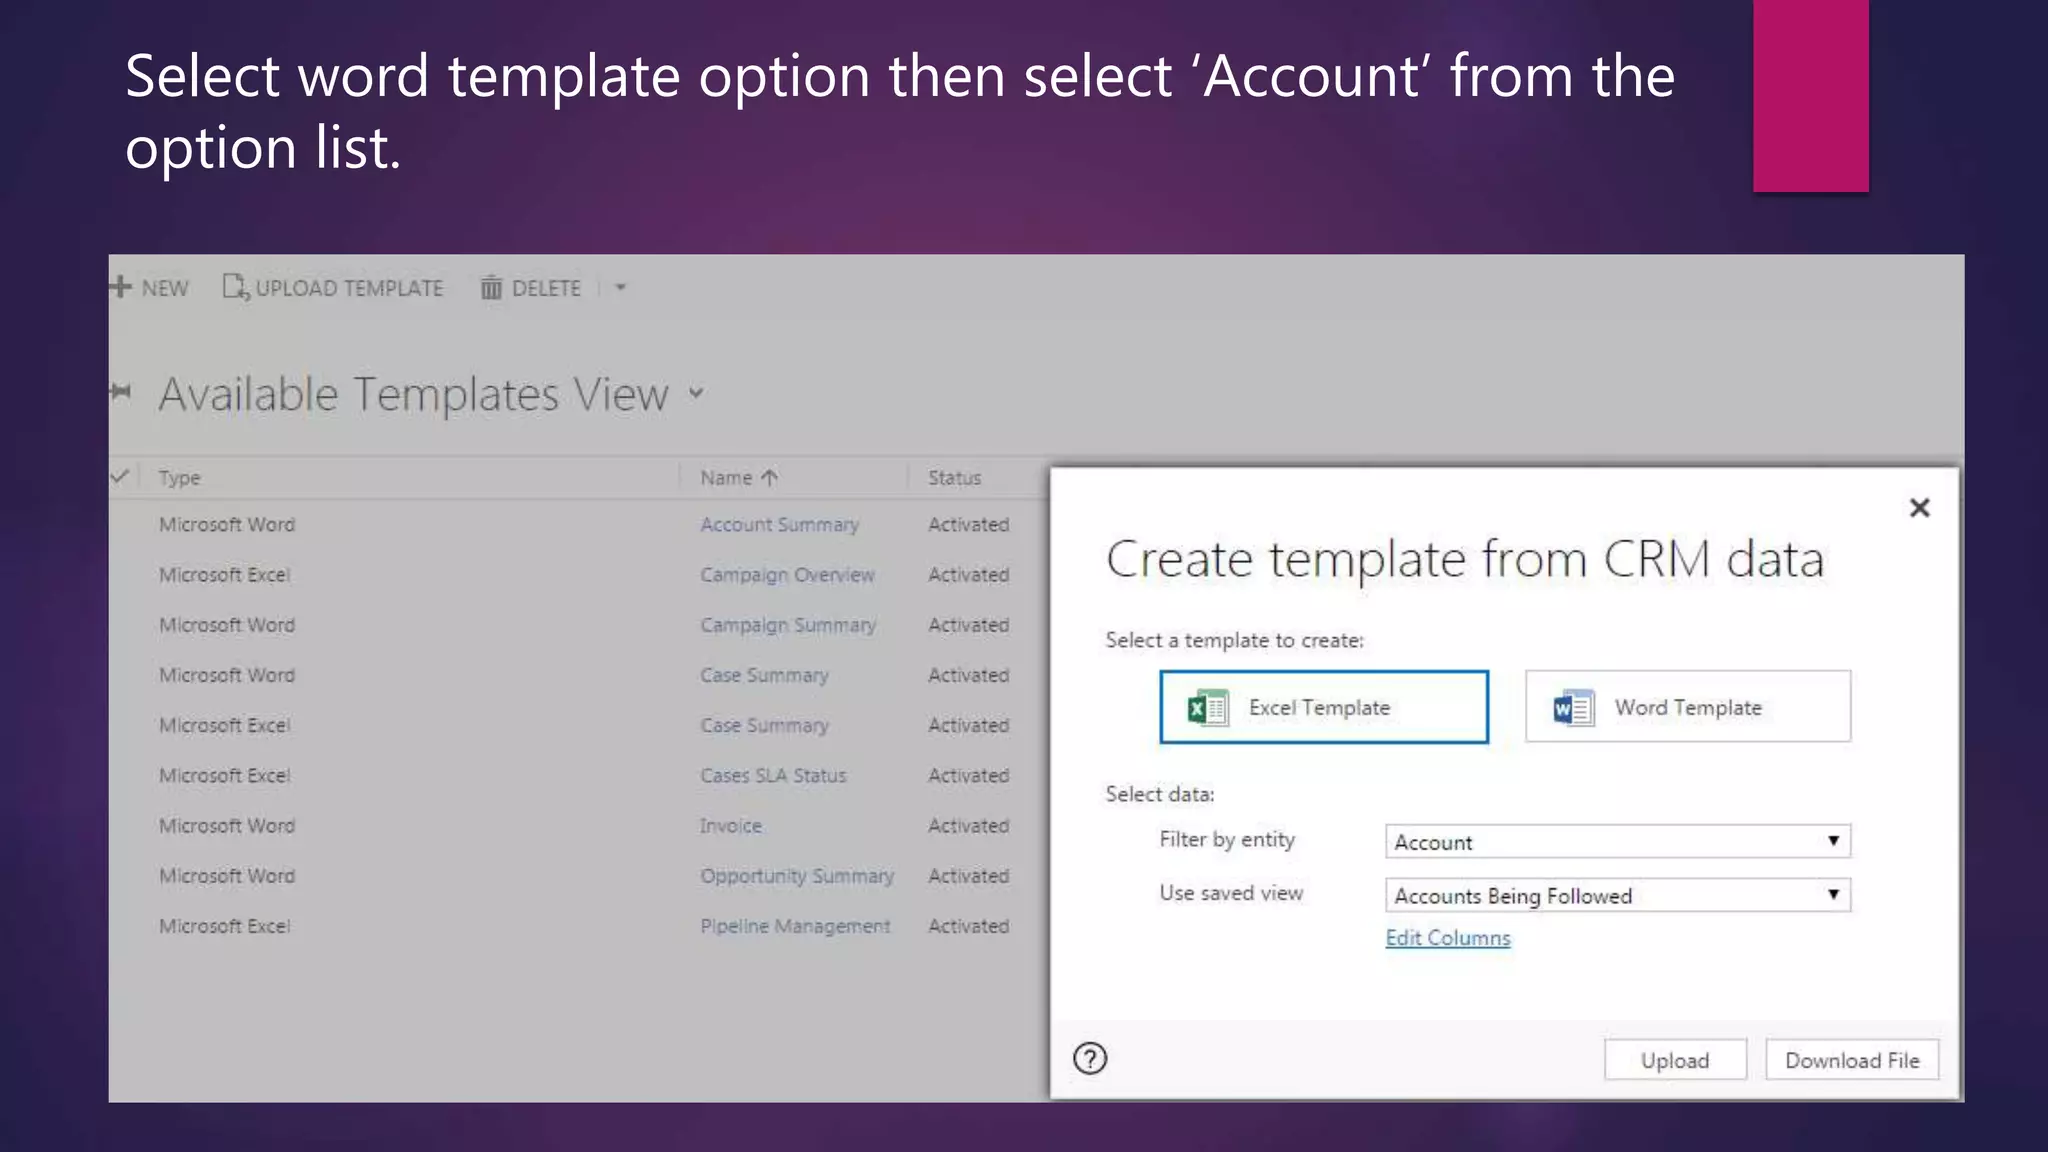
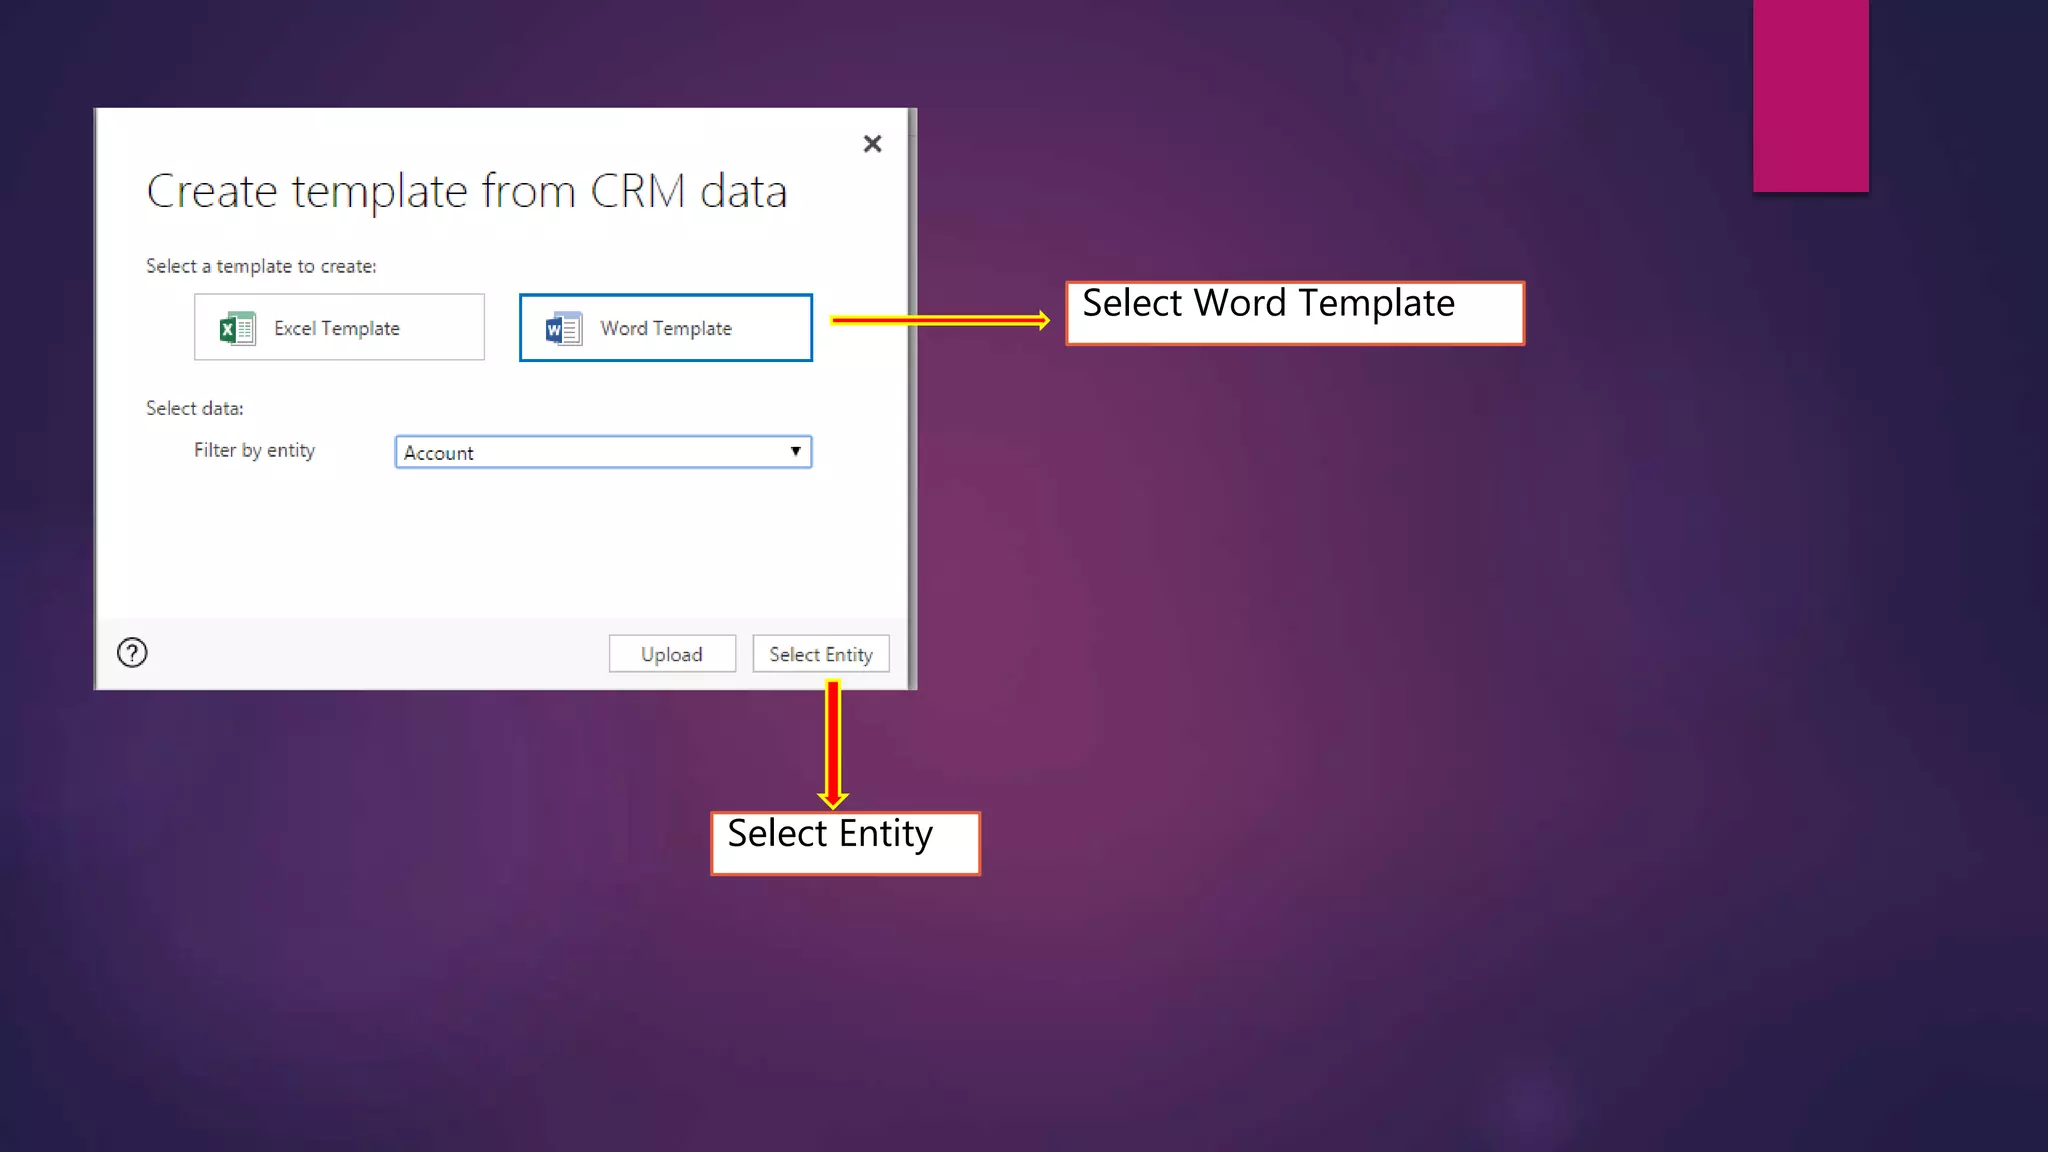
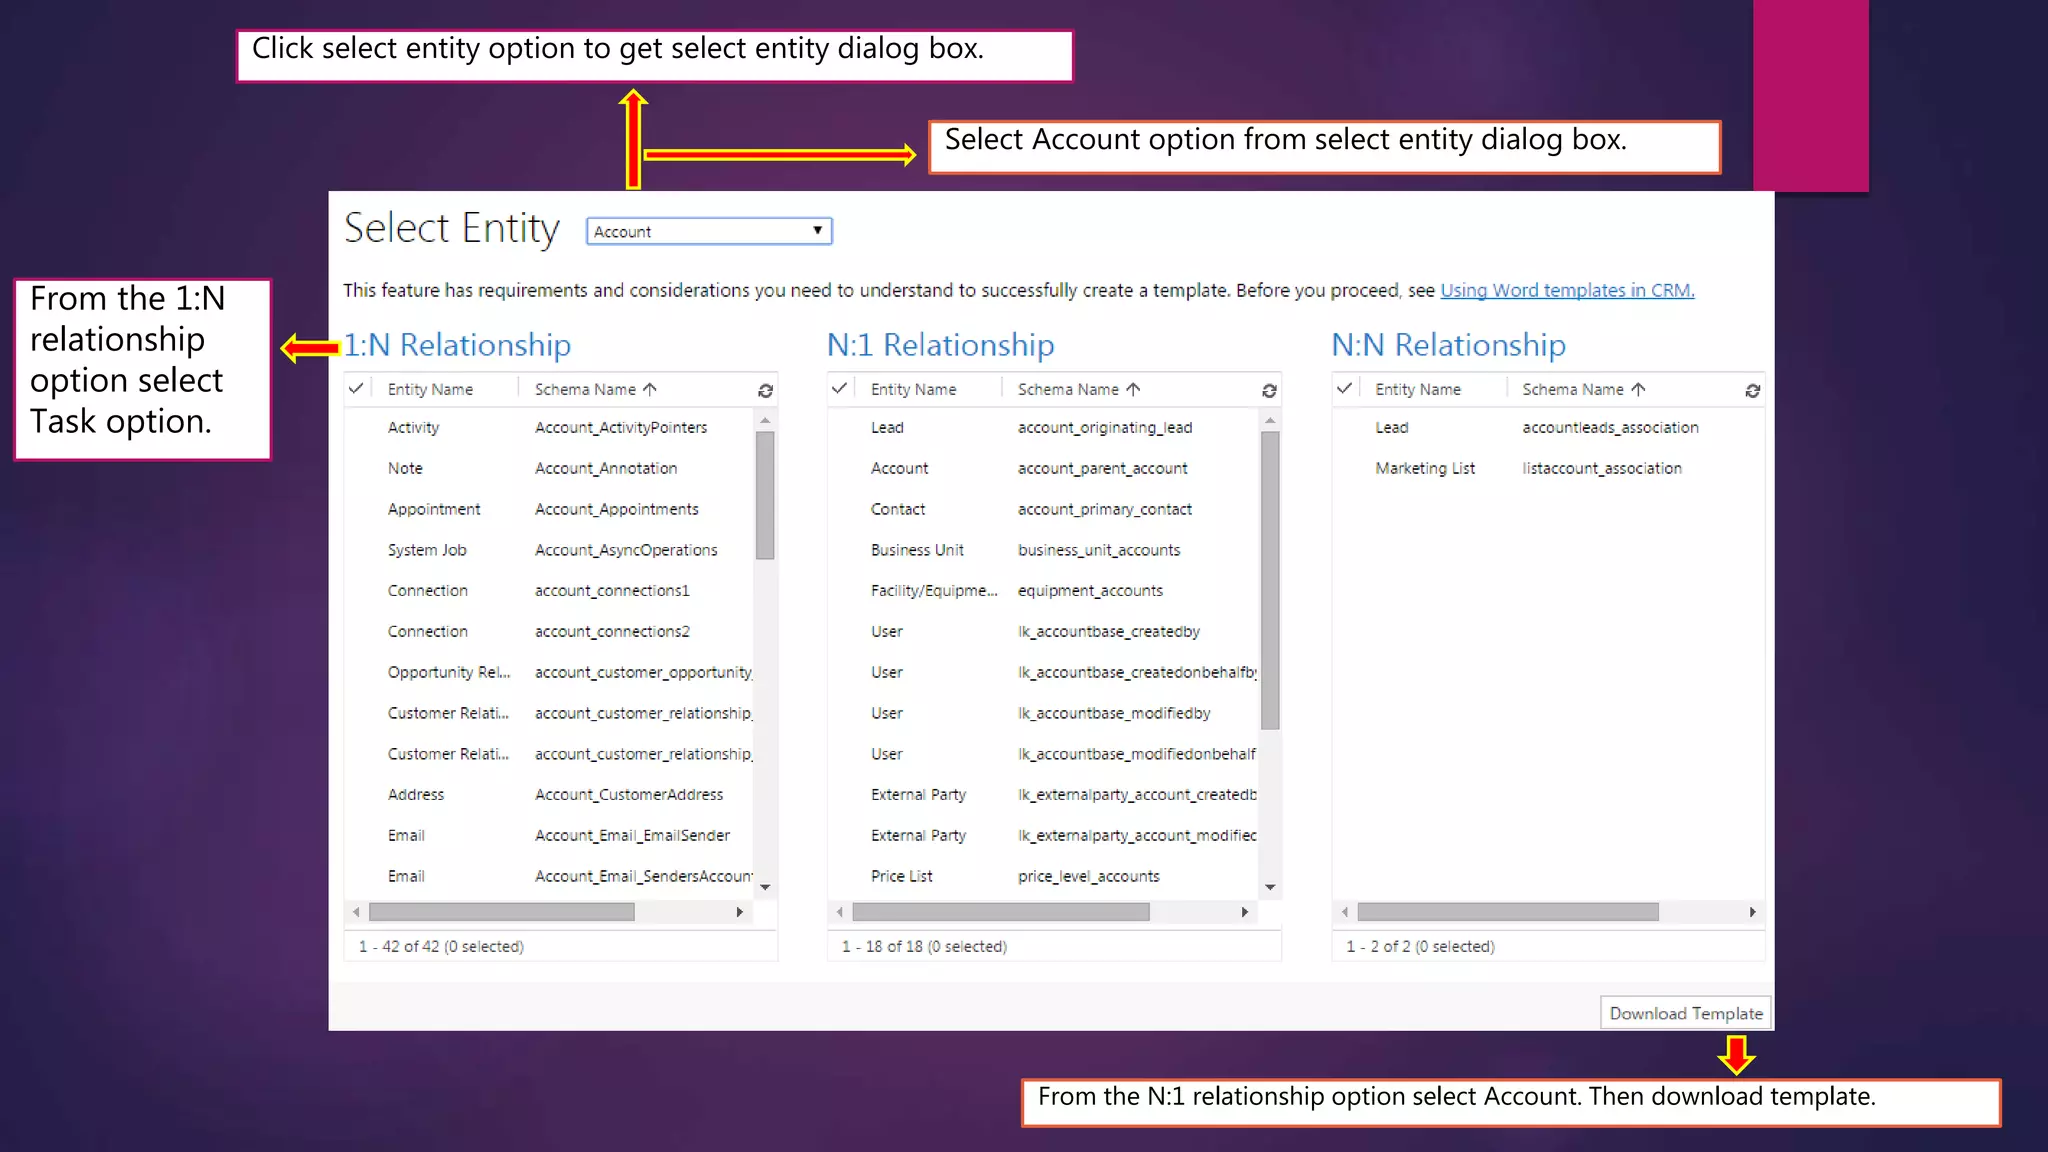
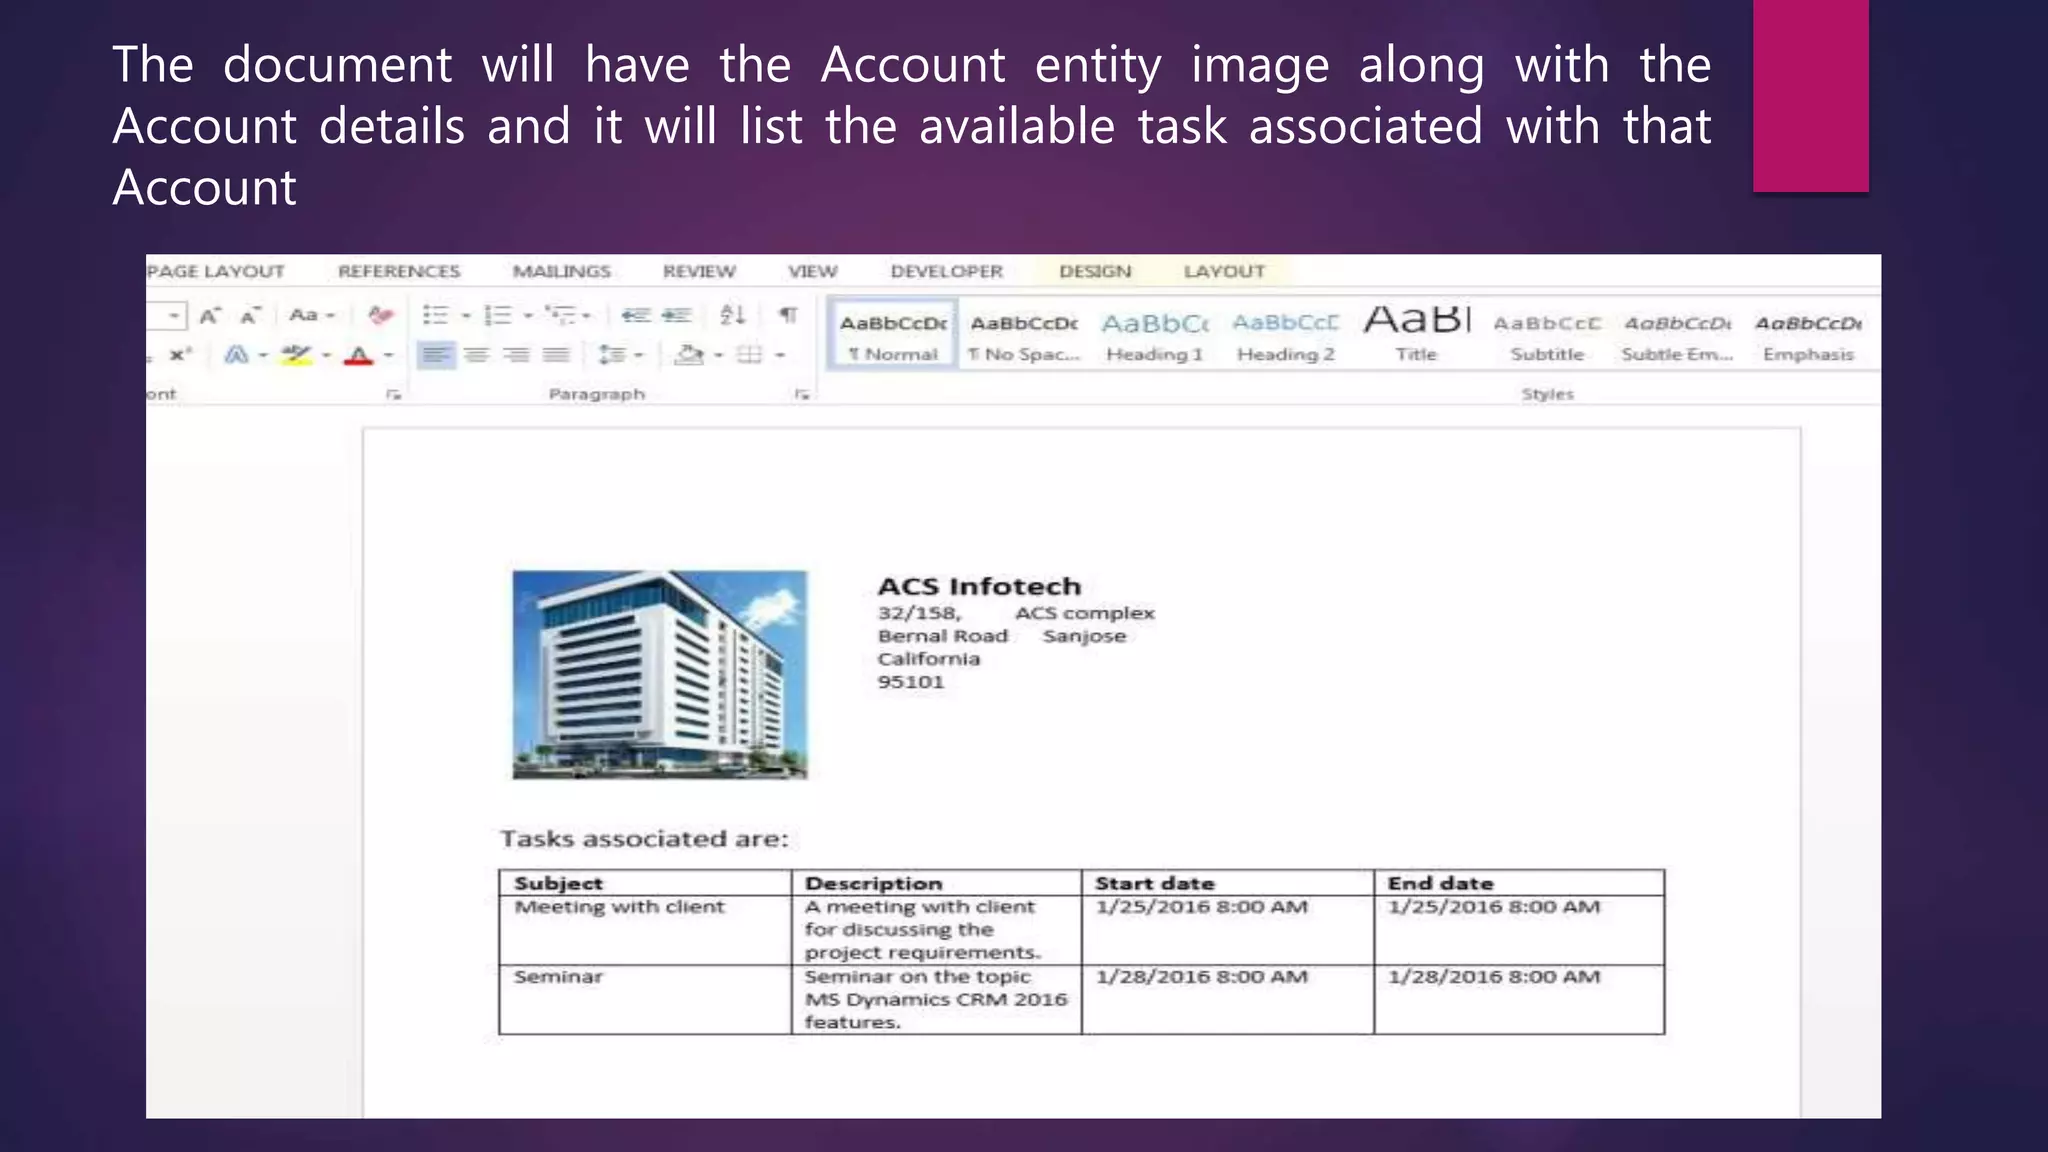
Microsoft Dynamics CRM
2016
CUSTOMIZING DOCUMENT TEMPLATE
Microsoft Dynamics CRM 2016 allows users to
customize the document templates rather than just
using the predefined templates available in CRM.
Here are the steps to create a customized word
document template which is associated with an
Account entity and displays the tasks associated with
that entity
To create a customized document temple navigate to
.
Settings Business Templates Document templates Select new option
Select word template option then select ‘Account’ from the
option list.
Select Word Template
Select Entity
Click select entity option to get select entity dialog box.
From the 1:N
relationship
option select
Task option.
Select Account option from select entity dialog box.
From the N:1 relationship option select Account. Then download template.
Find the downloaded template in downloads folder in the
computer and open it. The word document will be empty.
Then enable developer tab in word document and use
XML mapping pane to insert the controls in to word
document.
Note: To enable developer tab navigate to
File>Options->Customize ribbon->Tick the developer check
box option. Now the developer tab will be visible with other
word tab options. Click on it and select XML mapping pane.
We can start designing the word document now. To add an entity image form control to
document right click on the entity image option under the Account Entity in task pane.
Expand the ‘Custom XML part’ drop down in the XML pane and choose the
urn:microsoft-crm…..option. Now the CRM fields related to Account and Tasks will
be displayed under the drop down.
The control will be inserted into the document. Now add a 2*2 table in document and give
headings like subject,description,start date,end date.Now click on the cell below the subject option
in table and to insert a subject field right click on the subject option under the Task option in task
pane.
Then choose Insert content control->Picture. Then choose Map to selected content control . The
control will be inserted into the document. Now add a 2*2 table in document and give headings
like subject,description,start date,end date.Now click on the cell below the subject option in table
and to insert a subject field right click on the subject option under the Task option in task pane.
Now in order to make the last row of the table a repeating row[an Account may
contain more than one Task select the whole row and in the task pane right click on
Task option and choose Insert content control->repeating. We can perform more
designing if wanted after that save the word document.
Now open CRM and navigate to Settings->Business->Templates->Document
Templates->Choose Upload Template option. Browse and upload the previously
saved word document.
After uploading it we can see the document template in the Available templates
view along with other templates
Now to create a document using this template navigate to Accounts view and open
any Account. From the more menu choose word Templates->Choose the template
created by us. Then the document will be downloaded to the system.
The document will have the Account entity image along with the
Account details and it will list the available task associated with that
Account
Thank you
K.Naveen Kumar
Microsoft Dynamics CRM Technical Consultant

Customizing document templates

  • 1.
  • 2.
    Microsoft Dynamics CRM2016 allows users to customize the document templates rather than just using the predefined templates available in CRM. Here are the steps to create a customized word document template which is associated with an Account entity and displays the tasks associated with that entity
  • 3.
    To create acustomized document temple navigate to . Settings Business Templates Document templates Select new option
  • 4.
    Select word templateoption then select ‘Account’ from the option list.
  • 5.
  • 6.
    Click select entityoption to get select entity dialog box. From the 1:N relationship option select Task option. Select Account option from select entity dialog box. From the N:1 relationship option select Account. Then download template.
  • 7.
    Find the downloadedtemplate in downloads folder in the computer and open it. The word document will be empty. Then enable developer tab in word document and use XML mapping pane to insert the controls in to word document. Note: To enable developer tab navigate to File>Options->Customize ribbon->Tick the developer check box option. Now the developer tab will be visible with other word tab options. Click on it and select XML mapping pane.
  • 8.
    We can startdesigning the word document now. To add an entity image form control to document right click on the entity image option under the Account Entity in task pane. Expand the ‘Custom XML part’ drop down in the XML pane and choose the urn:microsoft-crm…..option. Now the CRM fields related to Account and Tasks will be displayed under the drop down. The control will be inserted into the document. Now add a 2*2 table in document and give headings like subject,description,start date,end date.Now click on the cell below the subject option in table and to insert a subject field right click on the subject option under the Task option in task pane. Then choose Insert content control->Picture. Then choose Map to selected content control . The control will be inserted into the document. Now add a 2*2 table in document and give headings like subject,description,start date,end date.Now click on the cell below the subject option in table and to insert a subject field right click on the subject option under the Task option in task pane.
  • 10.
    Now in orderto make the last row of the table a repeating row[an Account may contain more than one Task select the whole row and in the task pane right click on Task option and choose Insert content control->repeating. We can perform more designing if wanted after that save the word document.
  • 11.
    Now open CRMand navigate to Settings->Business->Templates->Document Templates->Choose Upload Template option. Browse and upload the previously saved word document.
  • 12.
    After uploading itwe can see the document template in the Available templates view along with other templates
  • 13.
    Now to createa document using this template navigate to Accounts view and open any Account. From the more menu choose word Templates->Choose the template created by us. Then the document will be downloaded to the system.
  • 14.
    The document willhave the Account entity image along with the Account details and it will list the available task associated with that Account
  • 15.
    Thank you K.Naveen Kumar MicrosoftDynamics CRM Technical Consultant