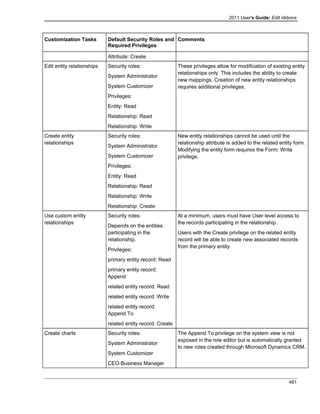
Download to read offline


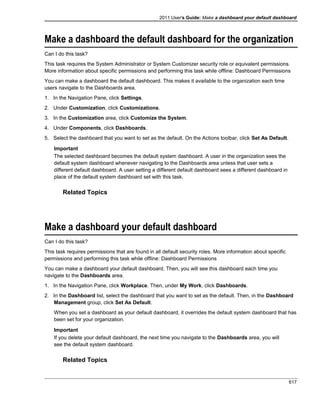
![2011 User's Guide: Tips
• Work with goals (on page 326)
• Work with goal metrics (on page 326)
• Work with rollup queries (on page 332)
Microsoft Dynamics CRM for Microsoft Office Outlook
Microsoft Dynamics CRM for Outlook is add-on program for Outlook that provides Microsoft Dynamics CRM
functionality within Outlook. The information is kept in synchronization automatically between Outlook and
Microsoft Dynamics CRM. When you run Microsoft Dynamics CRM for Outlook, you can work either in online
or offline mode.
More information:
• Doing CRM Work in Outlook (on page 447)
• Working Offline (on page 473)
• Synchronizing Information (on page 472)
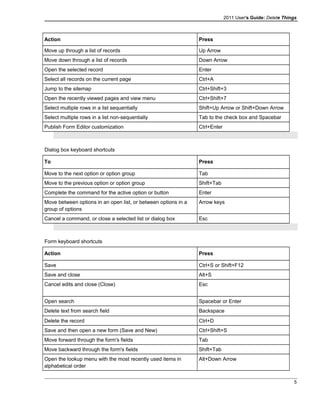
Use Keyboard Shortcuts
The shortcut keys described in this section refer to the U.S. keyboard layout. Keys on other layouts might not
correspond exactly to the keys on a U.S. keyboard.
General keyboard shortcuts
Action Press
Copy text Ctrl+C
Paste text Ctrl+V
Undo previous text change Ctrl+Z
Save a record Ctrl+S
Close a record Esc
Cut text Ctrl+X
Delete text Delete
Delete selected text immediately without putting it on the
Clipboard
Shift+Delete
Move to the first tab on the ribbon Ctrl+[
Move to the last tab on the ribbon Ctrl+]
Move the insertion point to the start of the next word Ctrl+Right Arrow
Move the insertion point to the start of the previous word Ctrl+Left Arrow
Select all text in the current field Ctrl+A
Display the System menu for the active window Alt+Spacebar
Display the shortcut menu for the selected item Shift+F10
Cancel the current task or command, or close a selected list or
dialog box
Esc
4](https://image.slidesharecdn.com/microsoftdynamicscrm2011usersguide-150227043452-conversion-gate01/85/Microsoft-dynamics-crm-2011-user-s-guide-32-320.jpg)
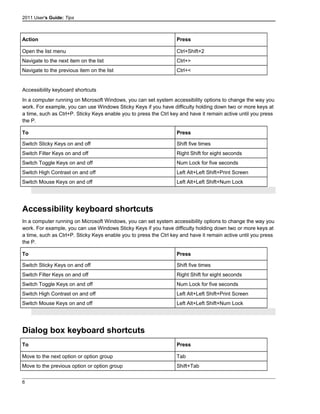

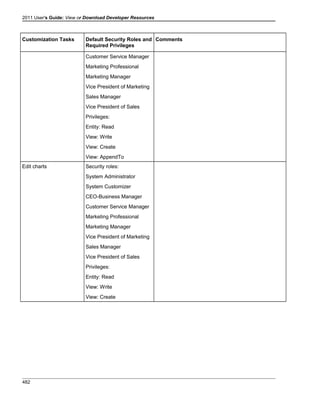
![2011 User's Guide: Tips
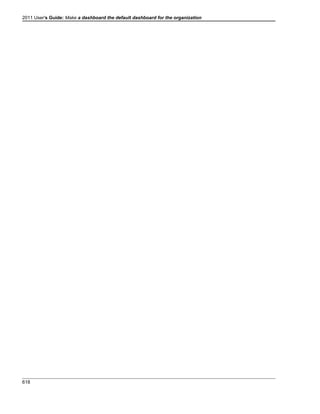
Action Press
Delete selected text immediately without putting it on the
Clipboard
Shift+Delete
Move to the first tab on the ribbon Ctrl+[
Move to the last tab on the ribbon Ctrl+]
Move the insertion point to the start of the next word Ctrl+Right Arrow
Move the insertion point to the start of the previous word Ctrl+Left Arrow
Select all text in the current field Ctrl+A
Display the System menu for the active window Alt+Spacebar
Display the shortcut menu for the selected item Shift+F10
Cancel the current task or command, or close a selected list or
dialog box
Esc
Move up through a list of records Up Arrow
Move down through a list of records Down Arrow
Open the selected record Enter
Select all records on the current page Ctrl+A
Jump to the sitemap Ctrl+Shift+3
Open the recently viewed pages and view menu Ctrl+Shift+7
Select multiple rows in a list sequentially Shift+Up Arrow or Shift+Down Arrow
Select multiple rows in a list non-sequentially Tab to the check box and Spacebar
Publish Form Editor customization Ctrl+Enter
Find Things
There are several ways to locate a specific record when you are working with a list of records, or when you
are filling out a form. With Advanced Find, you can also save your search as a saved view to use again later.
Find records in a list
Can I do this task?
This task requires permissions that are found in all default security roles. More information about specific
permissions and performing this task while offline: Common Task Permissions
• Use one of the following methods to find records in a list:
Filter a list
8](https://image.slidesharecdn.com/microsoftdynamicscrm2011usersguide-150227043452-conversion-gate01/85/Microsoft-dynamics-crm-2011-user-s-guide-36-320.jpg)


![2011 User's Guide: Tips
• To display the information you want and select the format, in the Mail Merge wizard, click
Address Block and then Greeting Line.
• To add data fields to display more information, click More Items. You can use up to 64 data
fields.
11. If you are working in Microsoft Dynamics CRM for Outlook and you have either created a new template or
updated an existing template, you can upload the template.
To save the document as a template, on the Complete the Merge pane, click Upload Template to
CRM.
If you are working in the Web application, you can upload the template in the Settings area. More
information: Work with Mail Merge Templates
12. When you have completed work on the mail merge document, close it, and then delete the interim mail-
merge document (Mail_Merge_nnnn.xml) and the associated text file (Mail_Merge_nnnn.txt) with the
same name.
Warning Mail merge may leave sensitive data on your computer.
The mail merge process creates two files in addition to your mail merge documents. These files are the
data sources used by mail merge and contain Microsoft Dynamics CRM data, which may include
sensitive customer data. You should delete these data source files after you complete the mail merge.
Both files have the same name: Mail_Merge[nnnn], where nnnn is a 4-character, randomly generated
number. One file is a .doc file and the other is a .txt file. Unless you moved the files or saved them to
another directory, these files are usually in a temporary files folder on your computer.
13. If you are working in Microsoft Dynamics CRM for Outlook, after you print or send the document, you can
choose to create activities for mail-merge items.
1. In the Create Activities dialog box, click Create Microsoft Dynamics CRM activities.
2. If you want to change the default values for the activity, click Activity Details, and then make any
changes. To save the changes, click OK.
3. Under Assign activities to, select to whom the new activities should be assigned.
4. You can choose to have the new activities closed immediately. E-mail activities are closed as soon as
the messages are sent.
5. If you are creating a mail merge from a marketing list, you can also make the mail merge a quick
campaign and include an link in e-mail messages for customers to remove themselves from your
marketing lists.
6. Click OK to save the changes and create the activities.
Closed activities appear in the history list of the customer record. Open activities appear in the activities list of
the customer record and in your list of active activities.
NOTE: The following Microsoft Word 2003 toolbar options do not create activities: Merge to New Documents,
Merge to Printer, and Merge to Word.
Note
If an account or contact does not have a valid e-mail address or has the Do Not Allow option set for
Bulk E-mail, the message is not sent to them, and no e-mail activity is created.
160](https://image.slidesharecdn.com/microsoftdynamicscrm2011usersguide-150227043452-conversion-gate01/85/Microsoft-dynamics-crm-2011-user-s-guide-188-320.jpg)
![2011 User's Guide: Tips
8. In the Mail Merge Recipient dialog box, verify that the list is accurate, and then click OK.
9. To continue the mail merge, follow the instructions provided by the Mail Merge pane. For more
information, see the Microsoft Office Word Help documentation.
Tip
To display the information you want and select the format, in the Mail Merge wizard, click Address
Block and then Greeting Line.
To add data fields to display more information, click More Items. You can use up to 64 data fields.
10. If you are working in Microsoft Dynamics CRM for Outlook and you have either created a new template or
updated an existing template, you can upload the template.
To save the document as a template, on the Complete the Merge pane, click Upload Template to
CRM.
If you are working in the Web application, you can upload the template in the Settings area. More
information: Work with Mail Merge Templates
11. When you have completed work on the mail merge document, close it, and then delete the interim mail-
merge document (Mail_Merge_nnnn.xml) and the associated text file (Mail_Merge_nnnn.txt) with the
same name.
Warning Mail merge may leave sensitive data on your computer.
The mail merge process creates two files in addition to your mail merge documents. These files are the
data sources used by mail merge and contain Microsoft Dynamics CRM data, which may include
sensitive customer data. You should delete these data source files after you complete the mail merge.
Both files have the same name: Mail_Merge[nnnn], where nnnn is a 4-character, randomly generated
number. One file is a .doc file and the other is a .txt file. Unless you moved the files or saved them to
another directory, these files are usually in a temporary files folder on your computer.
12. If you are working in Microsoft Dynamics CRM for Outlook, you can choose to create Microsoft Dynamics
CRM activities for mail merge items.
1. In the Create Activities dialog box, click Create Microsoft Dynamics CRM activities.
2. If you want to change the default values for the activity, click Activity Details, and then make any
changes. To save the changes, click OK.
3. Under Assign activities to, select to whom the new activities should be assigned.
4. You can choose to have the new activities closed immediately. E-mail activities are closed as soon as
the messages are sent.
5. If you are creating a mail merge from a marketing list, you can also make the mail merge a quick
campaign and include an link in e-mail messages for customers to remove themselves from your
marketing lists.
6. Click OK to save the changes and create the activities.
Closed activities appear in the history list of the customer record. Open activities appear in the activities list of
the customer record and in your list of active activities.
NOTE: The following Microsoft Word 2003 toolbar options do not create activities: Merge to New Documents,
Merge to Printer, and Merge to Word.
162](https://image.slidesharecdn.com/microsoftdynamicscrm2011usersguide-150227043452-conversion-gate01/85/Microsoft-dynamics-crm-2011-user-s-guide-190-320.jpg)
![2011 User's Guide: Tips
This is not your mail-merge document. This is an interim page. Follow the directions in the Word
document, including clicking CRM.
8. In the Mail Merge Recipient dialog box, verify that the list is accurate, and then click OK.
9. To continue the mail merge, follow the instructions provided by the Mail Merge pane. For more
information, see the Microsoft Office Word Help documentation.
Tip
To display the information you want and select the format, in the Mail Merge wizard, click Address
Block and then Greeting Line.
To add data fields to display more information, click More Items. You can use up to 64 data fields.
10. If you are working in Microsoft Dynamics CRM for Outlook and you have either created a new template or
updated an existing template, you can upload the template.
To save the document as a template, on the Complete the Merge pane, click Upload Template to
CRM.
If you are working in the Web application, you can upload the template in the Settings area. More
information: Work with Mail Merge Templates
11. When you have completed work on the mail merge document, close it, and then delete the interim mail-
merge document (Mail_Merge_nnnn.xml) and the associated text file (Mail_Merge_nnnn.txt) with the
same name.
Warning Mail merge may leave sensitive data on your computer.
The mail merge process creates two files in addition to your mail merge documents. These files are the
data sources used by mail merge and contain Microsoft Dynamics CRM data, which may include
sensitive customer data. You should delete these data source files after you complete the mail merge.
Both files have the same name: Mail_Merge[nnnn], where nnnn is a 4-character, randomly generated
number. One file is a .doc file and the other is a .txt file. Unless you moved the files or saved them to
another directory, these files are usually in a temporary files folder on your computer.
12. If you are working in Microsoft Dynamics CRM for Outlook, after you merge the new document, you can
choose to create Microsoft Dynamics CRM activities for mail-merge items.
1. In the Create Activities dialog box, click Create Microsoft Dynamics CRM activities.
2. If you want to change the default values for the activity, click Activity Details, and then make any
changes. To save the changes, click OK.
3. Under Assign activities to, select to whom the new activities should be assigned.
4. You can choose to have the new activities closed immediately. E-mail activities are closed as soon as
the messages are sent.
5. If you are creating a mail merge from a marketing list, you can also make the mail merge a quick
campaign and include an link in e-mail messages for customers to remove themselves from your
marketing lists.
6. Click OK to save the changes and create the activities.
Closed activities appear in the history list of the customer record. Open activities appear in the activities list of
the customer record and in your list of active activities.
164](https://image.slidesharecdn.com/microsoftdynamicscrm2011usersguide-150227043452-conversion-gate01/85/Microsoft-dynamics-crm-2011-user-s-guide-192-320.jpg)


This document provides an overview and instructions for using the key features of Microsoft Dynamics CRM 2011, including: - Managing accounts, contacts, leads, opportunities, activities and other sales data - Creating, running and customizing reports - Importing and exporting data - Configuring workflows and processes - Customizing the user interface - Integrating with Microsoft Office applications