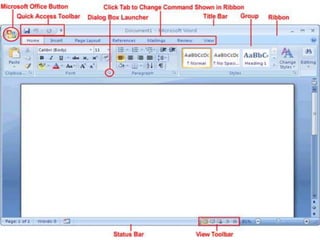
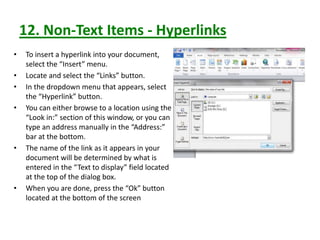
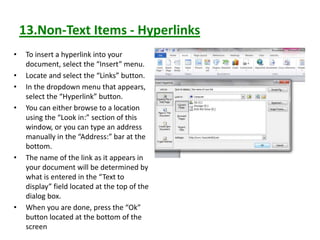
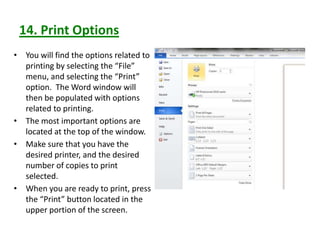
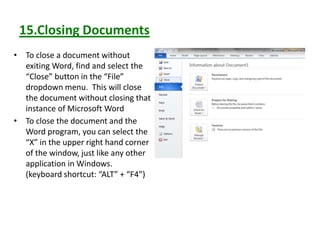
MODULE-2
Microsoft Office
• Microsoft Office is a suite of desktop productivity
applications that is designed specifically to be used for
office or business use.
• It is a proprietary product of Microsoft Corporation
and was first released in 1990.
• Microsoft Office is available in 35 different languages
and is supported by Windows, Mac and most Linux
variants.
It mainly consists of Word, Excel, PowerPoint, Access,
OneNote, Outlook and Publisher applications.
Microsoft Office was primarily created to automate the
manual office work with a collection of purpose-built
applications.
 Each of the applications in Microsoft Office serves as specific knowledge or
office domain such as:
1. Microsoft Word: Helps users in creating text documents.
2. Microsoft Excel: Creates simple to complex data/numerical spreadsheets.
3. Microsoft PowerPoint: Stand-alone application for creating professional
multimedia presentations.
4. Microsoft Access: Database management application.
5. Microsoft Publisher: Introductory application for creating and publishing
marketing materials.
6. Microsoft OneNote: Alternate to a paper notebook, it enables an user to
neatly organize their notes.
MICROSOFT WORD
 Microsoft Word (often called Word) is a graphical
word processing program that users can type with. It
is made by the company Microsoft.
 The purpose of the MS Word is to allow the users to
type and save documents.
 It allows the users to type and save documents.
 It allows users to create and edit text documents.
What can we do with MS WORD
 Can create business documents having various graphics
including pictures, charts, and diagrams.
 Can store and reuse readymade content and formatted
elements such as cover pages and sidebars.
 Can create letters and letterheads for personal and
business purpose.
 Can design different documents such as resumes or
invitation cards etc.
 Can create a range of correspondence from a simple
office memo to legal copies and reference documents.
Advantages of MS Word
1.Availability
One of the advantages of using Microsoft Word is
that it is available practically everywhere. Word
comes standard on many PCs. You can typically
find it on your work computer, computers at
school and your home PC. This makes it easy to
save documents on a flash drive, take them with
you and work on them somewhere else. If you
need to do some work, you can usually find a
computer with Word on it.
2.Integration With Office Programs
Another benefit of using Microsoft Word is that it easily
integrates with other Microsoft Office programs. For
example, if you have a spreadsheet that you created on
Microsoft Excel, you can easily paste it into a Word
document. You can work with programs such as
PowerPoint as well. This makes it possible to complete
a wide array of computing tasks without having to
spend time converting documents or files so that they
are usable on other programs.
3.Instant Help
While you are creating a document, Word also
helps you make sure that it is the best it can be.
When you misspell a word, Microsoft Word will
immediately underline it. You can then click on
the word and get suggested spellings. If you
type a sentence that has poor grammar, Word
will underline the sentence for you. This allows
you to change the document while you are still
working on it.
4.Navigation Pane
Microsoft Word offers an easy-to-use navigation
pane at the top. This allows you to see visual
representations of many of the functions that you
might need. You can simply hold your mouse
cursor over an icon to see exactly what it does.
Then you can click on the buttons to initiate certain
functions and tasks. Instead of having to scroll
through multiple menus to find something, you can
usually find what you need on the pane.
5.Document Flexibility
Word lets you create simple word-processing
documents like letters and reports and make them
as basic or as jazzed-up as you wish -- you can add
color, use clip art, write in a variety of fonts and
sizes, and use tables, borders and bullet
formatting. Word also offers templates to help you
create numerous other documents, such as
calendars and greeting cards. You can also save
documents in a variety of formats, including a Web
page.
6. Self explanatory dialogue boxes and menu
options.
7. Increased office efficiency and improved
human resource utilization.
8. Content is displayed using the standard HTML
formatting , allowing great compatibility and
creating a standardized ,easy-to-control layout.
Basic operations in MS Word.
1. Creating a word document
1.) Windows Start  All Programs  Microsoft
Office  Microsoft Office Word
2) Right click on the desktop  New  Microsoft
office Word Document
3) Find on desktop for an icon shortcut to
Microsoft Office Word
2. Opening an Existing Document
• To open an existing
document, first locate and
select the “File” menu and
select “Open”.
• In the dialog box that
appears, browse to your file
and press the button labeled
“Open” located at the lower
right corner of this box.
• Alternatively, the keyboard
shortcut CTRL + “O” may be
used.
3.Saving a Document for the First Time
• If you are saving a document for
the first time, you should specify
a file name and the location to
which the file will be saved.
• To save a document for the first
time, select the “File” dropdown
menu, and select “Save as”.
• The “Save as” window will
appear, at which point you
should locate and select the
location that you want the file to
be saved to, as well as naming
the file what you would like it to
be called.
4.Saving a Document
• To simply save a
document without
renaming or relocating
it, locate and select the
“File” menu.
• Select the “Save” option.
• Alternatively, the
keyboard shortcut CTRL
+ S may be used.
5.Working With Text
• In addition to simply typing words into a document, you can highlight, select,
copy, cut, and paste items using either standard Windows shortcut methods,
or buttons in Word.
• To select a block of text, click and hold the left mouse button at the
beginning portion of the block you wish to select, and then drag the mouse
over the desired text. You will notice that the text will be highlighted as you
do this.
• Once you have the desired text selected, release the mouse button.
• Note that while clicking on another part of the document while you have text
selected will deselect it.
Working With Text (cont.)
• Once you have the desired content selected, you can cut, or copy it to use it in another
location.
• To cut the selected content, locate and select the “cut” button in the “Clipboard”
portion of the “Home” ribbon menu. This will remove the selected content from its
current location and allow you to use it elsewhere. (keyboard shortcut: “CTRL” + “X”)
• To copy the selected content, locate and select the “Copy” button in the “Clipboard
portion of the “Home” ribbon menu. This will copy the selected content, allowing you
to use it elsewhere without removing it from the document. (keyboard shortcut:
“CTRL” + “C”)
• To paste the text, locate and select the are of the document in which you would like to
paste, then locate and select “Paste” button located in the clipboard portion of the
“Home Ribbon Menu. (keyboard shortcut: “CTRL” + “V”)
6.Formatting - Margins
• To set margins, locate and select the
“Page Layout” menu.
• Select the “Margins” button.
• A number of preset margin settings
will drop down in a menu. You can
select one of those, or select
“Custom Margins” at the bottom of
this menu to specify your own.
• A dialog box will appear. The basic
margin settings are located at the
top of this box.
• Also note the “Orientation” portion
of this menu.
7.Formatting – Headers and Footers
• Options for headers and footers
will be located in the “Insert”
ribbon menu in the “Header &
Footer” section.
• To add a header, or footer, press
the “Header”, or “footer” button.
• A dialog box will appear which will
allow you to specify the type of
header that you would like to add.
• To just add a simple header, select
the “Blank” header.
• To navigate to or away from the
header, just double-click on the
area of the document that you
would like to move to.
8. Formatting – Page Numbers
• Page numbers are a very
commonly used header element.
• To add page numbers to your
header or footer, first create and
select a header or footer.
• After you have created a header
or footer, locate and select the
“Page Number” button located in
the “header and footer” portion of
the “insert” ribbon menu.
• In the dropdown menus that
appears, select the location in
which you want to place your page
numbers.
9.Non-Text Items - Bullets
• To use bulleted lists, find and select the “Home” menu.
• Select the bullet button located the “paragraph” section of this
menu to start the list.
• To create the next bullet in the list, press “enter”.
10. Non-Text Items – Tables (cont.)
• Once you place a table and are ready to format it, select the
table and right click on the icon in the upper left corner of the
table. A contextual menu will appear.
• The most notable selections in this menu are “Table Properties”,
“Insert”, and “Delete Cells”.
11.Non-Text Items - Images
• To insert an image into
your document, first
select the “Insert”
menu.
• Locate and press the
“Picture” button in the
“Illustrations” section.
• In the Dialog box that
appears, browse to the
photo you wish to insert
and press the “Insert”
button.
12. Non-Text Items - Hyperlinks
• To insert a hyperlink into your document,
select the “Insert” menu.
• Locate and select the “Links” button.
• In the dropdown menu that appears, select
the “Hyperlink” button.
• You can either browse to a location using the
“Look in:” section of this window, or you can
type an address manually in the “Address:”
bar at the bottom.
• The name of the link as it appears in your
document will be determined by what is
entered in the “Text to display” field located
at the top of the dialog box.
• When you are done, press the “Ok” button
located at the bottom of the screen
13.Non-Text Items - Hyperlinks
• To insert a hyperlink into your
document, select the “Insert” menu.
• Locate and select the “Links” button.
• In the dropdown menu that appears,
select the “Hyperlink” button.
• You can either browse to a location
using the “Look in:” section of this
window, or you can type an address
manually in the “Address:” bar at the
bottom.
• The name of the link as it appears in
your document will be determined by
what is entered in the “Text to
display” field located at the top of the
dialog box.
• When you are done, press the “Ok”
button located at the bottom of the
screen
14. Print Options
• You will find the options related to
printing by selecting the “File”
menu, and selecting the “Print”
option. The Word window will
then be populated with options
related to printing.
• The most important options are
located at the top of the window.
• Make sure that you have the
desired printer, and the desired
number of copies to print
selected.
• When you are ready to print, press
the “Print” button located in the
upper portion of the screen.
15.Closing Documents
• To close a document without
exiting Word, find and select the
“Close” button in the “File”
dropdown menu. This will close
the document without closing that
instance of Microsoft Word
• To close the document and the
Word program, you can select the
“X” in the upper right hand corner
of the window, just like any other
application in Windows.
(keyboard shortcut: “ALT” + “F4”)
Mail Merge
• Mail merge is a feature within most data
processing applications that enables users to
send a similar letter or document to multiple
recipients. It enables connecting a single form
template with a data source that contains
information about the recipient’s name, address
and other predefined and supported data.
• Mail merge primarily enables automating the process of sending bulk mail
to customers, subscribers or general individuals. Mail merge works when a
data file is stored that includes the information of the recipients to whom
the letter is to be sent. This file can be a spreadsheet or database file
containing separate fields for each different type of information to be
merged within the letter.
• The second file is the word document or the letter template. The
recipients' information on the letter template is kept empty. When the
mail merge process is initiated, the recipients' data from spreadsheet or
database is fetched and placed within the empty field in the letter, one by
one, until all letters are created.
Steps in mail merge
1. Open MS Word
2. Select mailings
3. Start mail merge
4. Step by Step mail merge wizard
5. Select document type(letters , envelop, e-mail messages , Labels..)
6. Starting document
Select the starting document(Use the current document, start from a template ,
start from a existing document.)
7. Select recipients
8. Select recipients from- use an existing list , Select from outlook contacts, type a new
list
9. If u select the new list , create the list
10. Save the list in your system
11. Save your document
12. Write your letter
13. Insert merge field(Address block, Greeting line)
14. Preview your letter
15. Edit individual letters

module 2.pptx

  • 1.
  • 2.
    Microsoft Office • MicrosoftOffice is a suite of desktop productivity applications that is designed specifically to be used for office or business use. • It is a proprietary product of Microsoft Corporation and was first released in 1990. • Microsoft Office is available in 35 different languages and is supported by Windows, Mac and most Linux variants.
  • 3.
    It mainly consistsof Word, Excel, PowerPoint, Access, OneNote, Outlook and Publisher applications. Microsoft Office was primarily created to automate the manual office work with a collection of purpose-built applications.
  • 4.
     Each ofthe applications in Microsoft Office serves as specific knowledge or office domain such as: 1. Microsoft Word: Helps users in creating text documents. 2. Microsoft Excel: Creates simple to complex data/numerical spreadsheets. 3. Microsoft PowerPoint: Stand-alone application for creating professional multimedia presentations. 4. Microsoft Access: Database management application. 5. Microsoft Publisher: Introductory application for creating and publishing marketing materials. 6. Microsoft OneNote: Alternate to a paper notebook, it enables an user to neatly organize their notes.
  • 5.
    MICROSOFT WORD  MicrosoftWord (often called Word) is a graphical word processing program that users can type with. It is made by the company Microsoft.  The purpose of the MS Word is to allow the users to type and save documents.  It allows the users to type and save documents.  It allows users to create and edit text documents.
  • 7.
    What can wedo with MS WORD  Can create business documents having various graphics including pictures, charts, and diagrams.  Can store and reuse readymade content and formatted elements such as cover pages and sidebars.  Can create letters and letterheads for personal and business purpose.  Can design different documents such as resumes or invitation cards etc.  Can create a range of correspondence from a simple office memo to legal copies and reference documents.
  • 8.
    Advantages of MSWord 1.Availability One of the advantages of using Microsoft Word is that it is available practically everywhere. Word comes standard on many PCs. You can typically find it on your work computer, computers at school and your home PC. This makes it easy to save documents on a flash drive, take them with you and work on them somewhere else. If you need to do some work, you can usually find a computer with Word on it.
  • 9.
    2.Integration With OfficePrograms Another benefit of using Microsoft Word is that it easily integrates with other Microsoft Office programs. For example, if you have a spreadsheet that you created on Microsoft Excel, you can easily paste it into a Word document. You can work with programs such as PowerPoint as well. This makes it possible to complete a wide array of computing tasks without having to spend time converting documents or files so that they are usable on other programs.
  • 10.
    3.Instant Help While youare creating a document, Word also helps you make sure that it is the best it can be. When you misspell a word, Microsoft Word will immediately underline it. You can then click on the word and get suggested spellings. If you type a sentence that has poor grammar, Word will underline the sentence for you. This allows you to change the document while you are still working on it.
  • 11.
    4.Navigation Pane Microsoft Wordoffers an easy-to-use navigation pane at the top. This allows you to see visual representations of many of the functions that you might need. You can simply hold your mouse cursor over an icon to see exactly what it does. Then you can click on the buttons to initiate certain functions and tasks. Instead of having to scroll through multiple menus to find something, you can usually find what you need on the pane.
  • 12.
    5.Document Flexibility Word letsyou create simple word-processing documents like letters and reports and make them as basic or as jazzed-up as you wish -- you can add color, use clip art, write in a variety of fonts and sizes, and use tables, borders and bullet formatting. Word also offers templates to help you create numerous other documents, such as calendars and greeting cards. You can also save documents in a variety of formats, including a Web page.
  • 13.
    6. Self explanatorydialogue boxes and menu options. 7. Increased office efficiency and improved human resource utilization. 8. Content is displayed using the standard HTML formatting , allowing great compatibility and creating a standardized ,easy-to-control layout.
  • 14.
    Basic operations inMS Word. 1. Creating a word document 1.) Windows Start  All Programs  Microsoft Office  Microsoft Office Word 2) Right click on the desktop  New  Microsoft office Word Document 3) Find on desktop for an icon shortcut to Microsoft Office Word
  • 15.
    2. Opening anExisting Document • To open an existing document, first locate and select the “File” menu and select “Open”. • In the dialog box that appears, browse to your file and press the button labeled “Open” located at the lower right corner of this box. • Alternatively, the keyboard shortcut CTRL + “O” may be used.
  • 16.
    3.Saving a Documentfor the First Time • If you are saving a document for the first time, you should specify a file name and the location to which the file will be saved. • To save a document for the first time, select the “File” dropdown menu, and select “Save as”. • The “Save as” window will appear, at which point you should locate and select the location that you want the file to be saved to, as well as naming the file what you would like it to be called.
  • 17.
    4.Saving a Document •To simply save a document without renaming or relocating it, locate and select the “File” menu. • Select the “Save” option. • Alternatively, the keyboard shortcut CTRL + S may be used.
  • 18.
    5.Working With Text •In addition to simply typing words into a document, you can highlight, select, copy, cut, and paste items using either standard Windows shortcut methods, or buttons in Word. • To select a block of text, click and hold the left mouse button at the beginning portion of the block you wish to select, and then drag the mouse over the desired text. You will notice that the text will be highlighted as you do this. • Once you have the desired text selected, release the mouse button. • Note that while clicking on another part of the document while you have text selected will deselect it.
  • 19.
    Working With Text(cont.) • Once you have the desired content selected, you can cut, or copy it to use it in another location. • To cut the selected content, locate and select the “cut” button in the “Clipboard” portion of the “Home” ribbon menu. This will remove the selected content from its current location and allow you to use it elsewhere. (keyboard shortcut: “CTRL” + “X”) • To copy the selected content, locate and select the “Copy” button in the “Clipboard portion of the “Home” ribbon menu. This will copy the selected content, allowing you to use it elsewhere without removing it from the document. (keyboard shortcut: “CTRL” + “C”) • To paste the text, locate and select the are of the document in which you would like to paste, then locate and select “Paste” button located in the clipboard portion of the “Home Ribbon Menu. (keyboard shortcut: “CTRL” + “V”)
  • 20.
    6.Formatting - Margins •To set margins, locate and select the “Page Layout” menu. • Select the “Margins” button. • A number of preset margin settings will drop down in a menu. You can select one of those, or select “Custom Margins” at the bottom of this menu to specify your own. • A dialog box will appear. The basic margin settings are located at the top of this box. • Also note the “Orientation” portion of this menu.
  • 21.
    7.Formatting – Headersand Footers • Options for headers and footers will be located in the “Insert” ribbon menu in the “Header & Footer” section. • To add a header, or footer, press the “Header”, or “footer” button. • A dialog box will appear which will allow you to specify the type of header that you would like to add. • To just add a simple header, select the “Blank” header. • To navigate to or away from the header, just double-click on the area of the document that you would like to move to.
  • 22.
    8. Formatting –Page Numbers • Page numbers are a very commonly used header element. • To add page numbers to your header or footer, first create and select a header or footer. • After you have created a header or footer, locate and select the “Page Number” button located in the “header and footer” portion of the “insert” ribbon menu. • In the dropdown menus that appears, select the location in which you want to place your page numbers.
  • 23.
    9.Non-Text Items -Bullets • To use bulleted lists, find and select the “Home” menu. • Select the bullet button located the “paragraph” section of this menu to start the list. • To create the next bullet in the list, press “enter”.
  • 24.
    10. Non-Text Items– Tables (cont.) • Once you place a table and are ready to format it, select the table and right click on the icon in the upper left corner of the table. A contextual menu will appear. • The most notable selections in this menu are “Table Properties”, “Insert”, and “Delete Cells”.
  • 25.
    11.Non-Text Items -Images • To insert an image into your document, first select the “Insert” menu. • Locate and press the “Picture” button in the “Illustrations” section. • In the Dialog box that appears, browse to the photo you wish to insert and press the “Insert” button.
  • 26.
    12. Non-Text Items- Hyperlinks • To insert a hyperlink into your document, select the “Insert” menu. • Locate and select the “Links” button. • In the dropdown menu that appears, select the “Hyperlink” button. • You can either browse to a location using the “Look in:” section of this window, or you can type an address manually in the “Address:” bar at the bottom. • The name of the link as it appears in your document will be determined by what is entered in the “Text to display” field located at the top of the dialog box. • When you are done, press the “Ok” button located at the bottom of the screen
  • 27.
    13.Non-Text Items -Hyperlinks • To insert a hyperlink into your document, select the “Insert” menu. • Locate and select the “Links” button. • In the dropdown menu that appears, select the “Hyperlink” button. • You can either browse to a location using the “Look in:” section of this window, or you can type an address manually in the “Address:” bar at the bottom. • The name of the link as it appears in your document will be determined by what is entered in the “Text to display” field located at the top of the dialog box. • When you are done, press the “Ok” button located at the bottom of the screen
  • 28.
    14. Print Options •You will find the options related to printing by selecting the “File” menu, and selecting the “Print” option. The Word window will then be populated with options related to printing. • The most important options are located at the top of the window. • Make sure that you have the desired printer, and the desired number of copies to print selected. • When you are ready to print, press the “Print” button located in the upper portion of the screen.
  • 29.
    15.Closing Documents • Toclose a document without exiting Word, find and select the “Close” button in the “File” dropdown menu. This will close the document without closing that instance of Microsoft Word • To close the document and the Word program, you can select the “X” in the upper right hand corner of the window, just like any other application in Windows. (keyboard shortcut: “ALT” + “F4”)
  • 30.
    Mail Merge • Mailmerge is a feature within most data processing applications that enables users to send a similar letter or document to multiple recipients. It enables connecting a single form template with a data source that contains information about the recipient’s name, address and other predefined and supported data.
  • 31.
    • Mail mergeprimarily enables automating the process of sending bulk mail to customers, subscribers or general individuals. Mail merge works when a data file is stored that includes the information of the recipients to whom the letter is to be sent. This file can be a spreadsheet or database file containing separate fields for each different type of information to be merged within the letter. • The second file is the word document or the letter template. The recipients' information on the letter template is kept empty. When the mail merge process is initiated, the recipients' data from spreadsheet or database is fetched and placed within the empty field in the letter, one by one, until all letters are created.
  • 32.
    Steps in mailmerge 1. Open MS Word 2. Select mailings 3. Start mail merge 4. Step by Step mail merge wizard 5. Select document type(letters , envelop, e-mail messages , Labels..) 6. Starting document Select the starting document(Use the current document, start from a template , start from a existing document.) 7. Select recipients 8. Select recipients from- use an existing list , Select from outlook contacts, type a new list 9. If u select the new list , create the list 10. Save the list in your system 11. Save your document 12. Write your letter 13. Insert merge field(Address block, Greeting line) 14. Preview your letter 15. Edit individual letters