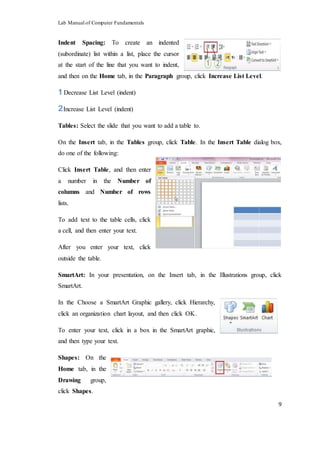
Lab Manual of Computer Fundamentals
LAB Manual
Fundamentals of Computer
Government College University Faisalabad
Lab Manual of Computer Fundamentals
i
Table of Contents
Exp. No. Name Of Experiment Page No.
Lab 1 Basic Computer Organization 1
Lab 2 Office tool & Overview of Different Browsers 3
i. Microsoft Word 3
ii. Microsoft Power Point 7
iii. Microsoft Excel 12
Lab 3 Computer Peripheral Devices
Lab 4 Operating System
Lab 5 Familiarization of MS-DOS Commands
Lab 6 Microsoft Window
Lab 7 Use of Flow Charts
Lab 8 Programming Language
Lab Manual of Computer Fundamentals
1
Experiment No. 1
Basic Computer Organization
A computer made up of two main parts – Computer Software and Hardware.
 Computer Software
Computer software (often called just software) is untouchable components of
computer. It compiles all logic instructions that the system uses to do different tasks,
including the applications(game or a word processor) and the operating system(Mac
OS, Microsoft Windows, Linux, etc.).
Types of Software
There are two types a software on the basis of their functionality - System software
and Application software.
System Software
It is used to start and run computer systems and networks. It controls the operations
and/or extends the processing capability of a computer system. Some commonly
known types of system software are: (Operating systems, programming language
translator, communications software, utility programs).
Application Software
It is the set of one or more programs, which solve specific problems, or specific tasks.
Some commonly known application software is: (Word processing software,
Database software, Personal assistance software, etc.).
 Computer Hardware
Computer hardware (usually simply called hardware) every physical part (touchable)
of computer such as the I/O Card, Memory, Motherboard, Power Supply, Screen. Etc.
Basic hardware components of a modern personal computer
There are many basic components of modern personal computer hardware; some of
these are described below.
Lab Manual of Computer Fundamentals
2
Motherboard
The motherboard is the main component of a computer. It is a hard, plastic film that
contains every electronic circuit and connection where all the devices (like the CPU,
the RAM, the disk drives, power supply etc.) are switched.
I/O Devices
Input devices allow the user to enter information into the system, or control its
operation. For example: keyboard, mouse, microphone, scanner, etc. On other hand,
Output devices display information in a human readable form. Such devices could
include printers, speakers, monitors, etc.
I/O Peripheral Devices
I/O Peripheral used by processor to give information to user and vice versa. For
example: router, touchable screen, etc.
Computer’s Memory
There are two types of memory, volatile (RAM) or non-volatile (ROM).
Random Access Memory (RAM)
A computer’s main memory uses volatile RAM chips. RAM chips are of two types -
dynamic and static. Dynamic RAM (DRAM) uses an external circuitry to
periodically “regenerate” or refresh storage charge to retain storage data. On other
hand, Static RAM (SRAM) does not need any special regenerator circuit to retain the
stored data.
Read Only Memory (ROM)
It is a non-volatile memory chips in which data is stored permanently. There are two
types of ROM – Manufacturer programmed and User programmed.
Manufacturer-programmed ROM is one which data is burnt in by the manufacturer
of the electronic equipment in which it used. On other hand, User programmed ROM
is one which a user can loud and store “read-only” program and data.
Lab Manual of Computer Fundamentals
3
Experiment No. 2
Microsoft Office
 Microsoft Word
Microsoft word is a word processor developed by Microsoft. The purpose of
Microsoft word is to allow the users to type and save documents.
New Document: First of all, we
click the File tab, and then click
New, and then Double-click Blank
document.
Save: First of all, click the File tab, then right click Save As or Save, then in the File
name box enter a name for the file and Click Save.
Template: Click the File tab, and then click New, then Under Available Templates,
do one of the following:
i. Click Sample Templates to select a template that is available on your
computer.
ii. Click one of the links under Office.com.
NOTE To download a template that is listed under Office.com, you must be
connected to the Internet.
In the last, Double-click the template that you want.
Font: On the Home tab, click the Font Dialog Box Launcher, and then click the Font
tab.
Then select the options that you want to
apply to the default font, such as font
style and font size.
If you selected text in step 1, the properties of the selected text are set in the dialog
box. Click Set as Default, and then click OK.
Lab Manual of Computer Fundamentals
4
Heading: Type the text of your heading, and then select it. On the Home tab, in the
Styles group, click the heading style that you want. If you don't see the style that you
want, click the more button to expand the Quick Styles gallery.
NOTE For quick access press CTRL+SHIFT+S.
Line spacing: On the Home tab, in the Paragraph group, click Line Spacing.
Then click the number of line spaces that you want.
For example, click 1.0 to single-space with the spacing that is used in earlier versions
of Word. Click 2.0, to double-space the selected paragraph.
WordArt: On the Insert tab, in the Text
group, click WordArt, and then click the
WordArt style that you want and then enter
your text.
For Example:
Text Effect: First of all, select the text that you want to add an effect to. Then on the
Home tab, in the Font group, click Text
Effect.
Click the effect that you want.
For Example:
NOTE On the Compatibility Mode this function of Microsoft word is disabled.
Lab Manual of Computer Fundamentals
5
Strikethrough: Select the text that you want to
format. On the Home tab, in the Font group,
click Strikethrough.
For Example: CH. Zulqarnain Akram is very obedient boy.
Superscript or Subscript: Select the text that you want to format as superscript or
subscript, and then do one of the following:
On the Home tab, in the Font group, click
Superscript. Or press CTRL+SHIFT+=.
For Example: m3
On the Home tab, in the Font group, click
Subscript. Or press CTRL+=.
For Example: log10
Click where you want to create the table.
Tables: On the Insert tab, in the Tables group,
click Table, and then click Draw Table and
then to define the outer table boundaries, draw
a rectangle. Then draw the column lines and row lines inside the
rectangle.
To erase a line or block of lines, under Table Tools, on the Design
tab, in the Draw Borders group, click Eraser.
When you finish drawing the table, click in a cell and start typing or insert a graphic.
For Example:
1 2 3 4 5 6 7
11 22 33 44 55 66 77
Lab Manual of Computer Fundamentals
6
Chart: we can insert many kinds of data charts and
graphs in three steps.
i. On the Insert tab, in the Illustrations group, click Chart.
ii. In the Insert Chart dialog box, click
the arrows to scroll through the chart
types.
Select the type of chart that you want
and then click OK.
iii. Edit the data in Excel 2010.
When you are finished editing your
data, you can close Excel.
For Example:
Section Break: On the Page Layout tab, in
the Page Setup group, click Breaks.
Click the type of section break that you
want to use.
Page break: Click where you want to start a
new page. On the Insert tab, in the Pages group, click Page
Break.
Equations: On the Insert tab, in the Symbols group, click the
arrow next to Equation, and then click the equation that you want.
For Example: 𝐴 = 𝜋𝑟2
0
5
10
Series
1
Series
2
Series
3
Category 1
Category 2
Category 3
Totel
Lab Manual of Computer Fundamentals
7
Symbols: On the Insert tab, in the Symbols group, click the
arrow next to Symbols, and then click the symbol that you want.
Header or Footer: On the Insert tab, in the Header & Footer
group, click Header or Footer.
Click the header or footer that you want to add to your document.
To return to the body of your document, click Close Header and
Footer on the Design tab (under Header & Footer Tools).
Page Number: On the Insert tab, in the Header & Footer
group, click Page Number. Click the page number location that
you want.
Then in the gallery, scroll through the options, and then click the
page number format that you want.
To return to the body of your document, click Close Header and Footer on the
Design tab (under Header & Footer Tools).
 Microsoft PowerPoint
Microsoft PowerPoint is a slide show presentation program currently developed by
Microsoft. PowerPoint initially named "Presenter” was created by Forethought Inc.
Microsoft’s version of PowerPoint was officially launched on May 22, 1990, as a part
of the Microsoft Office suite.
Add Text to Slide or placeholder: Below, the
dotted border represents the placeholder that
contains the title text for the slide.
Click inside the placeholder and then type or paste
text.
Line Spacing: To change the line spacing, do the following:
Drag to select one or more lines of text for which you want to change the spacing.
Lab Manual of Computer Fundamentals
8
On the Home tab, in the Paragraph
group, click the Dialog Box Launcher.
In the Paragraph dialog box, on the
Indents and Spacing tab, make any changes that you want to alignment, indentation,
or spacing, and then click OK.
Add Colour Text: Select the text that you want to change.
On the Home tab, in the Font group, click the arrow next to Font Colour , and
then select the colour that you want.
Theme Colour: On the Design tab, in
the Themes group, click
Colours.
Under Built-In, click the theme
colours that you want to use.
Add Bullets or Numbering: On the View tab, in the Presentation Views group.
Click Normal.
On the left-hand side of the PowerPoint window, in the pane that contains the Outline
and Slides tabs, click the Slides tab, and then click a slide thumbnail that you want to
add bulleted or numbered
text to.
On the slide, select the
lines of text in a text
placeholder or table that
you want to add bullets or
numbering to.
On the Home tab, in the
Paragraph group, click
Bullets or Numbering .
Lab Manual of Computer Fundamentals
9
Indent Spacing: To create an indented
(subordinate) list within a list, place the cursor
at the start of the line that you want to indent,
and then on the Home tab, in the Paragraph group, click Increase List Level.
Decrease List Level (indent)
Increase List Level (indent)
Tables: Select the slide that you want to add a table to.
On the Insert tab, in the Tables group, click Table. In the Insert Table dialog box,
do one of the following:
Click Insert Table, and then enter
a number in the Number of
columns and Number of rows
lists.
To add text to the table cells, click
a cell, and then enter your text.
After you enter your text, click
outside the table.
SmartArt: In your presentation, on the Insert tab, in the Illustrations group, click
SmartArt.
In the Choose a SmartArt Graphic gallery, click Hierarchy,
click an organization chart layout, and then click OK.
To enter your text, click in a box in the SmartArt graphic,
and then type your text.
Shapes: On the
Home tab, in the
Drawing group,
click Shapes.
Lab Manual of Computer Fundamentals
10
Click the shape that you want, click anywhere on the slide, and then drag to place the
shape.
Add Animation to an Object: Select the object that you want to animate.
On the Animations tab, in the
Animation group, click the more
buttons, and then select the
animation effect that you want.
Add Transition: In the pane that contains the Outline and Slides tabs, click the Slides
tab.
Select the slide thumbnail of the slide that you want to apply a transition to.
On the Transitions tab, in the
Transition to This Slide
group, click the slide
transition effect that you want
for that slide.
Charts: On the Insert tab, in the
Illustrations group, click Chart.
In the Insert Chart dialog box,
click the arrows to scroll through the chart types.
Select the type of chart that you want and then click OK.
When you are finished editing your data, you can close Excel.
Add or Change Picture Effect: Click
the picture that you want to add an
effect to. Under Picture Tools, on the
Format tab, in the Picture Styles
group, click Picture Effects.
Lab Manual of Computer Fundamentals
11
Insert clip art: Click the slide that you want to add
the clip art to.
On the Insert tab, in the Images group, click Clip
Art.
In the Clip Art task pane, in the Search for text box, type a word or phrase that
describes the clip art that you want, or type all or some of the file name of the clip art.
To narrow your search, in the Results should be list, select the check boxes next to
Illustrations, Photographs, Videos, and Audio to search those media types. Then
Click Go.
In the list of results, click the clip art to insert it.
Picture: Click where you want to insert the
picture.
On the Insert tab, in the Images group, click
Picture.
Locate the picture that you want to insert, and then double-click it. For example, you
might have a picture file located in My Documents.
To add multiple pictures, press and hold CTRL while you click the pictures that you
want to insert, and then click Insert.
Add a Screenshot: Click the slide that you want to add the screenshot to.
On the Insert tab, in the Images group, click
Screenshot.
To add the whole window, click the thumbnail in
the Available Windows gallery.
Lab Manual of Computer Fundamentals
12
WordArt: On the Insert tab, in the Text
group, click WordArt, and then click the
WordArt style that you want. Enter your text.
 Microsoft Excel
Microsoft Excel is a spread sheets program included in the Microsoft Office suite of
applications. Spread sheets present tables of values arranged in rows and columns that
can be manipulated mathematically using both basic and complex arithmetic
operations and functions.
Insert a Blank Cell on a worksheet: Select the cell or the range of cells where you
want to insert the new blank cells. Select the same number of cells as you want to
insert. For example, to insert five blank cells, select five cells.
On the Home tab, in the Cells group, click the arrow next to Insert,
and then click Insert Cells.
Wrap Text: In the Insert dialog box, click the
direction in which you want to shift the surrounding
cells. In a worksheet, select the cells that you want to
format.
On the Home tab, in the Alignment group, click Wrap Text .
Line Break: To start a new line of text at a specific point in a cell, double-click the
cell, click the location where you want to break the line in the cell, and then press
ALT+ENTER.
Number Format: To apply number formatting, click the
cell that contains the numbers that you want to format,
and then on the Home tab, in the Number group, click
the arrow next to General, and then click the format that
as you want.
Lab Manual of Computer Fundamentals
13
Font: To change the font, select the cells that
contain the data that you want to format, and
then on the Home tab, in the Font group, click
the format that you want.
Select All Cell on Worksheet: Click the Select All button.
OR
Press CTRL+A.
Merge or Centre: Select two or more
adjacent cells that you want to merge.
On the Home tab, in the Alignment
group, click Merge and Centre.
The cells will be merged in a row or column, and the cell contents will be cantered in
the merged cell. To merge cells without cantering, click the arrow next to Merge and
Centre, and then click Merge Across or Merge Cells.
To change the text alignment in the merged cell, select the cell, and then click any of
the alignment buttons in the Alignment group on the Home tab.
Split a MergedCell: Select the merged cell.
When you select a merged cell, the
Merge and canter button also
appears selected in the Alignment group
on the Home tab.
To split the merged cell, click Merge and canter .
The contents of the merged cell will appear in the upper-left cell of the range of split
cells.
Lab Manual of Computer Fundamentals
14
Apply Cell Border: On a worksheet, select the cell or range of cells that you want to
add a border to, change the border style on, or
remove a border from.
On the Home tab, in the Font group, to apply a
new or different border style, click the arrow next
to Borders , and then click a border style.
Text Colour: Select the cell, range of cells, text, or characters that you want to format
with a different text colour.
On the Home tab, in the Font group, to change
the text colour, click the arrow next to Font
Colour , and then under Theme Colours or
Standard Colours, click the colour that you
want to use.
Background Colour of Text:
Select the cell, range of cells, text, or characters that you want to format with a
different background colour.
On the Home tab, in the Font group, to change
the background colour, click the arrow next to
Fill Colour , and then under Theme Colours
or Standard Colours, click the background colour that you want to use.
Tables: On a worksheet, select the range of cells that you want to include in the table.
The cells can be empty or can contain data.
On the Insert tab, in the Tables group, click Table.
Keyboard shortcut, you can also press CTRL+L or
CTRL+T.
If the selected range contains data that you want to display as
table headers, select the table has headers check box.
Lab Manual of Computer Fundamentals
15
Table headers display default names if you do not select the table has headers check
box. You can change the default names by selecting the default header that you want
to replace, and then typing the text that you want.
Shape: On the Insert tab, in the Illustrations group, click Shapes.
Click the shape that you want, click anywhere in the workbook, and then drag to place
the shape.
To create a perfect square or circle (or constrain the dimensions of other shapes),
press and hold SHIFT while you drag.
WordArt: On the Insert tab,
in the Text group, click
WordArt, and then click the
WordArt style that you want.
Clip Art: Open the spread sheet that you want to add clip art to.
On the Insert tab, in the Illustrations group, click Clip Art.
In the Clip Art task pane, in the Search for text box, type a word or phrase that
describes the clip art that you want, or type all or some of the file name of the clip art.
To narrow your search, in the Results
should be list, select the check boxes next
to Illustrations, Photographs, Videos,
and Audio to search those media types.
Then Click Go.
In the list of results, click the clip art to insert it.

Microsoft Office

  • 1.
    Lab Manual ofComputer Fundamentals LAB Manual Fundamentals of Computer Government College University Faisalabad
  • 2.
    Lab Manual ofComputer Fundamentals i Table of Contents Exp. No. Name Of Experiment Page No. Lab 1 Basic Computer Organization 1 Lab 2 Office tool & Overview of Different Browsers 3 i. Microsoft Word 3 ii. Microsoft Power Point 7 iii. Microsoft Excel 12 Lab 3 Computer Peripheral Devices Lab 4 Operating System Lab 5 Familiarization of MS-DOS Commands Lab 6 Microsoft Window Lab 7 Use of Flow Charts Lab 8 Programming Language
  • 3.
    Lab Manual ofComputer Fundamentals 1 Experiment No. 1 Basic Computer Organization A computer made up of two main parts – Computer Software and Hardware.  Computer Software Computer software (often called just software) is untouchable components of computer. It compiles all logic instructions that the system uses to do different tasks, including the applications(game or a word processor) and the operating system(Mac OS, Microsoft Windows, Linux, etc.). Types of Software There are two types a software on the basis of their functionality - System software and Application software. System Software It is used to start and run computer systems and networks. It controls the operations and/or extends the processing capability of a computer system. Some commonly known types of system software are: (Operating systems, programming language translator, communications software, utility programs). Application Software It is the set of one or more programs, which solve specific problems, or specific tasks. Some commonly known application software is: (Word processing software, Database software, Personal assistance software, etc.).  Computer Hardware Computer hardware (usually simply called hardware) every physical part (touchable) of computer such as the I/O Card, Memory, Motherboard, Power Supply, Screen. Etc. Basic hardware components of a modern personal computer There are many basic components of modern personal computer hardware; some of these are described below.
  • 4.
    Lab Manual ofComputer Fundamentals 2 Motherboard The motherboard is the main component of a computer. It is a hard, plastic film that contains every electronic circuit and connection where all the devices (like the CPU, the RAM, the disk drives, power supply etc.) are switched. I/O Devices Input devices allow the user to enter information into the system, or control its operation. For example: keyboard, mouse, microphone, scanner, etc. On other hand, Output devices display information in a human readable form. Such devices could include printers, speakers, monitors, etc. I/O Peripheral Devices I/O Peripheral used by processor to give information to user and vice versa. For example: router, touchable screen, etc. Computer’s Memory There are two types of memory, volatile (RAM) or non-volatile (ROM). Random Access Memory (RAM) A computer’s main memory uses volatile RAM chips. RAM chips are of two types - dynamic and static. Dynamic RAM (DRAM) uses an external circuitry to periodically “regenerate” or refresh storage charge to retain storage data. On other hand, Static RAM (SRAM) does not need any special regenerator circuit to retain the stored data. Read Only Memory (ROM) It is a non-volatile memory chips in which data is stored permanently. There are two types of ROM – Manufacturer programmed and User programmed. Manufacturer-programmed ROM is one which data is burnt in by the manufacturer of the electronic equipment in which it used. On other hand, User programmed ROM is one which a user can loud and store “read-only” program and data.
  • 5.
    Lab Manual ofComputer Fundamentals 3 Experiment No. 2 Microsoft Office  Microsoft Word Microsoft word is a word processor developed by Microsoft. The purpose of Microsoft word is to allow the users to type and save documents. New Document: First of all, we click the File tab, and then click New, and then Double-click Blank document. Save: First of all, click the File tab, then right click Save As or Save, then in the File name box enter a name for the file and Click Save. Template: Click the File tab, and then click New, then Under Available Templates, do one of the following: i. Click Sample Templates to select a template that is available on your computer. ii. Click one of the links under Office.com. NOTE To download a template that is listed under Office.com, you must be connected to the Internet. In the last, Double-click the template that you want. Font: On the Home tab, click the Font Dialog Box Launcher, and then click the Font tab. Then select the options that you want to apply to the default font, such as font style and font size. If you selected text in step 1, the properties of the selected text are set in the dialog box. Click Set as Default, and then click OK.
  • 6.
    Lab Manual ofComputer Fundamentals 4 Heading: Type the text of your heading, and then select it. On the Home tab, in the Styles group, click the heading style that you want. If you don't see the style that you want, click the more button to expand the Quick Styles gallery. NOTE For quick access press CTRL+SHIFT+S. Line spacing: On the Home tab, in the Paragraph group, click Line Spacing. Then click the number of line spaces that you want. For example, click 1.0 to single-space with the spacing that is used in earlier versions of Word. Click 2.0, to double-space the selected paragraph. WordArt: On the Insert tab, in the Text group, click WordArt, and then click the WordArt style that you want and then enter your text. For Example: Text Effect: First of all, select the text that you want to add an effect to. Then on the Home tab, in the Font group, click Text Effect. Click the effect that you want. For Example: NOTE On the Compatibility Mode this function of Microsoft word is disabled.
  • 7.
    Lab Manual ofComputer Fundamentals 5 Strikethrough: Select the text that you want to format. On the Home tab, in the Font group, click Strikethrough. For Example: CH. Zulqarnain Akram is very obedient boy. Superscript or Subscript: Select the text that you want to format as superscript or subscript, and then do one of the following: On the Home tab, in the Font group, click Superscript. Or press CTRL+SHIFT+=. For Example: m3 On the Home tab, in the Font group, click Subscript. Or press CTRL+=. For Example: log10 Click where you want to create the table. Tables: On the Insert tab, in the Tables group, click Table, and then click Draw Table and then to define the outer table boundaries, draw a rectangle. Then draw the column lines and row lines inside the rectangle. To erase a line or block of lines, under Table Tools, on the Design tab, in the Draw Borders group, click Eraser. When you finish drawing the table, click in a cell and start typing or insert a graphic. For Example: 1 2 3 4 5 6 7 11 22 33 44 55 66 77
  • 8.
    Lab Manual ofComputer Fundamentals 6 Chart: we can insert many kinds of data charts and graphs in three steps. i. On the Insert tab, in the Illustrations group, click Chart. ii. In the Insert Chart dialog box, click the arrows to scroll through the chart types. Select the type of chart that you want and then click OK. iii. Edit the data in Excel 2010. When you are finished editing your data, you can close Excel. For Example: Section Break: On the Page Layout tab, in the Page Setup group, click Breaks. Click the type of section break that you want to use. Page break: Click where you want to start a new page. On the Insert tab, in the Pages group, click Page Break. Equations: On the Insert tab, in the Symbols group, click the arrow next to Equation, and then click the equation that you want. For Example: 𝐴 = 𝜋𝑟2 0 5 10 Series 1 Series 2 Series 3 Category 1 Category 2 Category 3 Totel
  • 9.
    Lab Manual ofComputer Fundamentals 7 Symbols: On the Insert tab, in the Symbols group, click the arrow next to Symbols, and then click the symbol that you want. Header or Footer: On the Insert tab, in the Header & Footer group, click Header or Footer. Click the header or footer that you want to add to your document. To return to the body of your document, click Close Header and Footer on the Design tab (under Header & Footer Tools). Page Number: On the Insert tab, in the Header & Footer group, click Page Number. Click the page number location that you want. Then in the gallery, scroll through the options, and then click the page number format that you want. To return to the body of your document, click Close Header and Footer on the Design tab (under Header & Footer Tools).  Microsoft PowerPoint Microsoft PowerPoint is a slide show presentation program currently developed by Microsoft. PowerPoint initially named "Presenter” was created by Forethought Inc. Microsoft’s version of PowerPoint was officially launched on May 22, 1990, as a part of the Microsoft Office suite. Add Text to Slide or placeholder: Below, the dotted border represents the placeholder that contains the title text for the slide. Click inside the placeholder and then type or paste text. Line Spacing: To change the line spacing, do the following: Drag to select one or more lines of text for which you want to change the spacing.
  • 10.
    Lab Manual ofComputer Fundamentals 8 On the Home tab, in the Paragraph group, click the Dialog Box Launcher. In the Paragraph dialog box, on the Indents and Spacing tab, make any changes that you want to alignment, indentation, or spacing, and then click OK. Add Colour Text: Select the text that you want to change. On the Home tab, in the Font group, click the arrow next to Font Colour , and then select the colour that you want. Theme Colour: On the Design tab, in the Themes group, click Colours. Under Built-In, click the theme colours that you want to use. Add Bullets or Numbering: On the View tab, in the Presentation Views group. Click Normal. On the left-hand side of the PowerPoint window, in the pane that contains the Outline and Slides tabs, click the Slides tab, and then click a slide thumbnail that you want to add bulleted or numbered text to. On the slide, select the lines of text in a text placeholder or table that you want to add bullets or numbering to. On the Home tab, in the Paragraph group, click Bullets or Numbering .
  • 11.
    Lab Manual ofComputer Fundamentals 9 Indent Spacing: To create an indented (subordinate) list within a list, place the cursor at the start of the line that you want to indent, and then on the Home tab, in the Paragraph group, click Increase List Level. Decrease List Level (indent) Increase List Level (indent) Tables: Select the slide that you want to add a table to. On the Insert tab, in the Tables group, click Table. In the Insert Table dialog box, do one of the following: Click Insert Table, and then enter a number in the Number of columns and Number of rows lists. To add text to the table cells, click a cell, and then enter your text. After you enter your text, click outside the table. SmartArt: In your presentation, on the Insert tab, in the Illustrations group, click SmartArt. In the Choose a SmartArt Graphic gallery, click Hierarchy, click an organization chart layout, and then click OK. To enter your text, click in a box in the SmartArt graphic, and then type your text. Shapes: On the Home tab, in the Drawing group, click Shapes.
  • 12.
    Lab Manual ofComputer Fundamentals 10 Click the shape that you want, click anywhere on the slide, and then drag to place the shape. Add Animation to an Object: Select the object that you want to animate. On the Animations tab, in the Animation group, click the more buttons, and then select the animation effect that you want. Add Transition: In the pane that contains the Outline and Slides tabs, click the Slides tab. Select the slide thumbnail of the slide that you want to apply a transition to. On the Transitions tab, in the Transition to This Slide group, click the slide transition effect that you want for that slide. Charts: On the Insert tab, in the Illustrations group, click Chart. In the Insert Chart dialog box, click the arrows to scroll through the chart types. Select the type of chart that you want and then click OK. When you are finished editing your data, you can close Excel. Add or Change Picture Effect: Click the picture that you want to add an effect to. Under Picture Tools, on the Format tab, in the Picture Styles group, click Picture Effects.
  • 13.
    Lab Manual ofComputer Fundamentals 11 Insert clip art: Click the slide that you want to add the clip art to. On the Insert tab, in the Images group, click Clip Art. In the Clip Art task pane, in the Search for text box, type a word or phrase that describes the clip art that you want, or type all or some of the file name of the clip art. To narrow your search, in the Results should be list, select the check boxes next to Illustrations, Photographs, Videos, and Audio to search those media types. Then Click Go. In the list of results, click the clip art to insert it. Picture: Click where you want to insert the picture. On the Insert tab, in the Images group, click Picture. Locate the picture that you want to insert, and then double-click it. For example, you might have a picture file located in My Documents. To add multiple pictures, press and hold CTRL while you click the pictures that you want to insert, and then click Insert. Add a Screenshot: Click the slide that you want to add the screenshot to. On the Insert tab, in the Images group, click Screenshot. To add the whole window, click the thumbnail in the Available Windows gallery.
  • 14.
    Lab Manual ofComputer Fundamentals 12 WordArt: On the Insert tab, in the Text group, click WordArt, and then click the WordArt style that you want. Enter your text.  Microsoft Excel Microsoft Excel is a spread sheets program included in the Microsoft Office suite of applications. Spread sheets present tables of values arranged in rows and columns that can be manipulated mathematically using both basic and complex arithmetic operations and functions. Insert a Blank Cell on a worksheet: Select the cell or the range of cells where you want to insert the new blank cells. Select the same number of cells as you want to insert. For example, to insert five blank cells, select five cells. On the Home tab, in the Cells group, click the arrow next to Insert, and then click Insert Cells. Wrap Text: In the Insert dialog box, click the direction in which you want to shift the surrounding cells. In a worksheet, select the cells that you want to format. On the Home tab, in the Alignment group, click Wrap Text . Line Break: To start a new line of text at a specific point in a cell, double-click the cell, click the location where you want to break the line in the cell, and then press ALT+ENTER. Number Format: To apply number formatting, click the cell that contains the numbers that you want to format, and then on the Home tab, in the Number group, click the arrow next to General, and then click the format that as you want.
  • 15.
    Lab Manual ofComputer Fundamentals 13 Font: To change the font, select the cells that contain the data that you want to format, and then on the Home tab, in the Font group, click the format that you want. Select All Cell on Worksheet: Click the Select All button. OR Press CTRL+A. Merge or Centre: Select two or more adjacent cells that you want to merge. On the Home tab, in the Alignment group, click Merge and Centre. The cells will be merged in a row or column, and the cell contents will be cantered in the merged cell. To merge cells without cantering, click the arrow next to Merge and Centre, and then click Merge Across or Merge Cells. To change the text alignment in the merged cell, select the cell, and then click any of the alignment buttons in the Alignment group on the Home tab. Split a MergedCell: Select the merged cell. When you select a merged cell, the Merge and canter button also appears selected in the Alignment group on the Home tab. To split the merged cell, click Merge and canter . The contents of the merged cell will appear in the upper-left cell of the range of split cells.
  • 16.
    Lab Manual ofComputer Fundamentals 14 Apply Cell Border: On a worksheet, select the cell or range of cells that you want to add a border to, change the border style on, or remove a border from. On the Home tab, in the Font group, to apply a new or different border style, click the arrow next to Borders , and then click a border style. Text Colour: Select the cell, range of cells, text, or characters that you want to format with a different text colour. On the Home tab, in the Font group, to change the text colour, click the arrow next to Font Colour , and then under Theme Colours or Standard Colours, click the colour that you want to use. Background Colour of Text: Select the cell, range of cells, text, or characters that you want to format with a different background colour. On the Home tab, in the Font group, to change the background colour, click the arrow next to Fill Colour , and then under Theme Colours or Standard Colours, click the background colour that you want to use. Tables: On a worksheet, select the range of cells that you want to include in the table. The cells can be empty or can contain data. On the Insert tab, in the Tables group, click Table. Keyboard shortcut, you can also press CTRL+L or CTRL+T. If the selected range contains data that you want to display as table headers, select the table has headers check box.
  • 17.
    Lab Manual ofComputer Fundamentals 15 Table headers display default names if you do not select the table has headers check box. You can change the default names by selecting the default header that you want to replace, and then typing the text that you want. Shape: On the Insert tab, in the Illustrations group, click Shapes. Click the shape that you want, click anywhere in the workbook, and then drag to place the shape. To create a perfect square or circle (or constrain the dimensions of other shapes), press and hold SHIFT while you drag. WordArt: On the Insert tab, in the Text group, click WordArt, and then click the WordArt style that you want. Clip Art: Open the spread sheet that you want to add clip art to. On the Insert tab, in the Illustrations group, click Clip Art. In the Clip Art task pane, in the Search for text box, type a word or phrase that describes the clip art that you want, or type all or some of the file name of the clip art. To narrow your search, in the Results should be list, select the check boxes next to Illustrations, Photographs, Videos, and Audio to search those media types. Then Click Go. In the list of results, click the clip art to insert it.