Camera connections
•Download as PPTX, PDF•
0 likes•5,451 views
Connecting a camera on Adobe Premiere Elements 12. (designed specifically for a school, yet should work on most computers)
Report
Share
Report
Share

Recommended
Opening a project
Opening and saving a project on Adobe Premiere Elements 12. (designed specifically for a school, yet should work on most computers)
How to Use Windows Movie Maker for Creating Videos?
One of the free tools for Windows Users is the Movie Maker — a great tool for creating and editing videos.
How To Use Movie Maker
This document provides instructions for using Windows Movie Maker to create movies. It describes how to import and edit video, audio, and pictures. Key tools explained include the timeline for arranging content, storyboard for organizing slides, and effects and transitions. The document also covers adding titles and credits, adjusting audio, and exporting the finished movie file.
How To Use Windows Live Movie Maker.pdf
This document provides step-by-step instructions for installing and using Windows Live Movie Maker on Windows 7 and other Windows operating systems that do not have the application pre-installed. It describes downloading the installer from Microsoft, running it to install Movie Maker, signing into a Windows Live account, adding photos and music to create a video project, editing and saving the project, and finally uploading the finished movie to YouTube so it can be viewed by others.
Easy -how-to-power-point
1. The document provides a step-by-step guide to creating a PowerPoint presentation, including choosing a template, adding slides, inserting text, images, audio, and video.
2. It describes how to record and insert audio, capture and insert video from the internet, and edit media files.
3. Additional tips are provided for formatting text, shapes, backgrounds, and slide elements as well as changing the color scheme and slide properties.
Windows Movie Maker 2012 basic tutoral
This document provides a basic tutorial for using movie maker to edit video clips. It outlines several key steps in the editing process including:
1) Adding video clips and audio to the project timeline.
2) Trimming clips by setting in and out points to select the best parts of each take.
3) Rearranging and adjusting clips by moving, adding transitions, and muting audio as needed.
4) Exporting the finished edited video project.
I Shot A Video....Now What?
Many of our teachers have Flip cameras and struggle with editing and burning to DVD. Here are some simple steps to accomplish this using Windows software.
Windows Movie Maker Tutorial
New & updated June 2009. This screen-by-screen tutorial shows you how to begin using the free Windows Movie Maker video editing program.
Simple Animations
1) The document provides instructions for creating simple animations using pictures, video editing software, and a computer.
2) Key steps include taking pictures, importing them into video editing software, adjusting the picture duration to less than half a second to create an animation, adding music, and sharing the finished animation.
3) Examples of topic ideas for animations are provided, such as scenes from stories, explaining math problems, or depicting the life cycle of a plant.
Power point notes
This document provides instructions for using basic features in PowerPoint, including:
- Opening PowerPoint and saving presentations
- Using different menus like Design, Animations, and Slide Show
- Adding text boxes, slides, clip art, pictures, video, and sound
- Formatting slides, backgrounds, slide layouts, and slide transitions
- Animating text and setting animation order and triggers
- Rearranging and deleting slides
Windows Live Movie Maker Tutorial
A basic how-to for journalism students and journalism educators for using this basic video editing program.
Windows Movie Maker
Windows Movie Maker is a free program that allows users to create and edit movies on their computer. It has simple drag and drop functionality to import pictures, videos, and audio files and arrange them on a timeline. Pictures can be photographs, drawings, maps or clip art imported from the user's computer or found online with consideration of copyright laws. The tutorial explains how to import various media files into the program, adjust their duration on the timeline, and save the movie project.
Jing Tutorial
This document provides step-by-step instructions for installing and using the screen capturing software Jing. It outlines downloading and installing Jing for Windows or Mac, creating an account, finding the Jing icon on your computer, and how to use the basic functions like taking screenshots, recording videos, adding annotations, and saving or copying captures. The tutorial concludes by emphasizing that Jing allows for easy screen capturing and video recording whenever needed.
Still and Video Screenshotting Mac OSX
1) There are several ways to take screenshots on a Mac, including taking screenshots of the whole screen, partial screenshots, and screenshots that are automatically copied to the clipboard.
2) Screen recordings can also be taken using QuickTime Player to capture videos of anything happening on the screen.
3) Screenshots and screen recordings can then be pasted or inserted into applications like Keynote, Google Docs, and iMovie for sharing or editing.
Diary for promotional film
The document summarizes the steps taken to create a promotional film using Adobe Premiere Elements and After Effects software. Key steps included:
1) Importing video files into Premiere Elements for editing.
2) Creating splash screens and effects like color corrections, text overlays, and sound mixing in the timeline.
3) Rendering and exporting the edited video file for uploading to YouTube.
Nathaniel reyes howtousemoviemaker
This document provides instructions for editing videos using Windows Movie Maker. It explains that Windows Movie Maker is a basic video editing software that allows users to enhance video presentations. It then outlines the three simple steps to make a video with Movie Maker: 1) capture video by importing clips, photos or audio, 2) edit the movie by adding effects, transitions and titles, and 3) finish the movie by saving and sharing the final video online or to other devices.
Invisible cloth streaming video presentation
The document provides instructions for creating bluescreen or chroma key effects using Adobe Premier Pro and Windows Movie Maker. It explains how to import video footage, add transitions like bluescreen, adjust settings to key out the blue/green background, and output the final video. Steps include capturing footage, selecting a solid colored background, dragging clips onto different video tracks, using the chroma key effect tool, and fine-tuning with sliders. Examples and links are provided to help explain the bluescreening process.
Photo story 3 guide
The document provides step-by-step instructions for creating a photo slideshow with narration using Microsoft Photo Story 3. It explains how to import pictures, add titles and transitions between slides, record narration, and save the finished project. The summary highlights that Photo Story 3 allows creating narrated slideshows from pictures alone, with small file sizes making them suitable for online sharing through systems like WebCT.
Zoom Ignite Video Making Instructions
This document provides step-by-step instructions for recording and saving a 10-minute narrated PowerPoint presentation as an mp4 video file using Zoom. The instructions include preparing the PowerPoint with slide timings, logging into Zoom, sharing your screen to show the PowerPoint presentation while also displaying your video, and saving the recording as an mp4 file once the meeting has ended. The mp4 file can then be transferred or uploaded to websites to share the presentation with others.
Smartboard Training Guide 18 To 25
The document provides instructions for various features in training modules 15 through 21 for intermediate users. It describes how to take screen captures, insert links, scan documents, play audio CDs/DVDs, use a screen shade, and export smartboard documents to PowerPoint. Key steps include clicking the "Capture" icon to take screen captures, copying and pasting URLs to insert links, using the scanner and "copy image" to include scans, playing DVDs/CDs using PowerDVD, saving screen shades in position, and exporting to PowerPoint by clicking "File" then "Export PowerPoint".
JING
This document provides instructions for installing and using the screen capturing software Jing. It is a 3 step process:
1. Download and install Jing by selecting the appropriate version for your operating system (Windows or Mac) from the Jing website. Follow the on-screen instructions to complete the installation.
2. Create a Jing account by providing your email address and other required information. Verify your email to complete the signup process.
3. Learn to use Jing's basic features which are accessed through the Sun Launcher icon. You can take screenshots or record videos using the Capture tool and save/share them through your Jing History. Settings are available through the More icon.
Screencast o-matic how to presentation
- To create a Screencast-o-matic video, go to their website and create a free account or use the provided login credentials.
- Once logged in, click "Start Recording" to begin recording your screen and microphone. You can pause, restart, or finish your recording and then name and publish the video.
- Published videos can be embedded on websites like Wikispaces by copying the embed code provided and pasting it into the website's video/widget section. This allows anyone with the link to view the screencast video.
How to Build a Slidecast
A step-by-step of how to build a slidecast. Includes tips for reducing file sizes on PDFs and syncing audio file. By Wm Pitzer - West Virginia University
Adobe beginners-guide
This document provides a beginner's guide to using Adobe Premiere Pro for video editing. It outlines the basic interface, which is split into 7 key areas - Project, Effect Controls, Video Preview, Effects, Timeline, Audio Levels, and Tools. It then explains how to import footage, edit it by dragging clips onto the timeline, cut unwanted parts, add effects by dragging them onto clips, and insert titles. The guide concludes by detailing how to export the finished video by specifying settings and destination folder.
How to use Jing
Jing is a screencasting software that allows users to capture images and videos of their computer screen and share them online or save them locally. It can be used to demonstrate and teach software features. The document provides step-by-step instructions on how to download, install, and use basic functions of Jing such as capturing screenshots, adding annotations, sharing screenshots online, and saving screenshots locally.
14 computer tricks
Do you know how to get back to the tab you accidentally turned off? Do you know how to take a screenshot of a part of the screen without installing software? If there's one thing that Reddit users are best at, it's definitely computer tricks. The 14 tricks below are great Reddit tips we all should know to make the desktop experience easier and more enjoyable than ever.
How to copy tv series to dvd on mac
This tutorial shows how to easily copy TV series to DVD on a Mac computer using DVD burning software. The software allows users to drag TV series video files into the program, select "DVD Disc" as the output format, and click "Burn" to copy the files to a DVD. The simple two-step process converts and burns the TV series for backup on DVD discs within the Mac DVD burner application.
Leslie chan how_tousegadwinprintscreen
This document provides instructions for downloading and using the Gadwin Printscreen freeware application. It explains how to download the application from gadwin.com, install it, access it through the start menu. It then describes how to take full screen, rectangular, and window screenshots using the capture widget and toolbar buttons. It also explains the various configuration and customization options available through the options menu like hotkeys, image options, and post-capture actions.
Design and plan 3.5
This document provides guidance for students creating a compelling design and pre-production plan for a short film. It outlines 8 sections to be included: 1) a visual treatment, 2) conventions of the genre, 3) location scouting, 4) test shots, 5) scripting and storyboarding, 6) font choices, 7) visual effects, and 8) revisions. For each section, detailed requirements are provided around visual and audio aspects, conventions, locations, test shots, scripts, fonts, effects, and allowing for revisions. The goal is for students to demonstrate effective design choices and planning to capture an audience's attention.
Exporting a project
Exporting a project from Adobe Premiere Elements 12. (designed specifically for a school, yet should work on most computers)
More Related Content
What's hot
Simple Animations
1) The document provides instructions for creating simple animations using pictures, video editing software, and a computer.
2) Key steps include taking pictures, importing them into video editing software, adjusting the picture duration to less than half a second to create an animation, adding music, and sharing the finished animation.
3) Examples of topic ideas for animations are provided, such as scenes from stories, explaining math problems, or depicting the life cycle of a plant.
Power point notes
This document provides instructions for using basic features in PowerPoint, including:
- Opening PowerPoint and saving presentations
- Using different menus like Design, Animations, and Slide Show
- Adding text boxes, slides, clip art, pictures, video, and sound
- Formatting slides, backgrounds, slide layouts, and slide transitions
- Animating text and setting animation order and triggers
- Rearranging and deleting slides
Windows Live Movie Maker Tutorial
A basic how-to for journalism students and journalism educators for using this basic video editing program.
Windows Movie Maker
Windows Movie Maker is a free program that allows users to create and edit movies on their computer. It has simple drag and drop functionality to import pictures, videos, and audio files and arrange them on a timeline. Pictures can be photographs, drawings, maps or clip art imported from the user's computer or found online with consideration of copyright laws. The tutorial explains how to import various media files into the program, adjust their duration on the timeline, and save the movie project.
Jing Tutorial
This document provides step-by-step instructions for installing and using the screen capturing software Jing. It outlines downloading and installing Jing for Windows or Mac, creating an account, finding the Jing icon on your computer, and how to use the basic functions like taking screenshots, recording videos, adding annotations, and saving or copying captures. The tutorial concludes by emphasizing that Jing allows for easy screen capturing and video recording whenever needed.
Still and Video Screenshotting Mac OSX
1) There are several ways to take screenshots on a Mac, including taking screenshots of the whole screen, partial screenshots, and screenshots that are automatically copied to the clipboard.
2) Screen recordings can also be taken using QuickTime Player to capture videos of anything happening on the screen.
3) Screenshots and screen recordings can then be pasted or inserted into applications like Keynote, Google Docs, and iMovie for sharing or editing.
Diary for promotional film
The document summarizes the steps taken to create a promotional film using Adobe Premiere Elements and After Effects software. Key steps included:
1) Importing video files into Premiere Elements for editing.
2) Creating splash screens and effects like color corrections, text overlays, and sound mixing in the timeline.
3) Rendering and exporting the edited video file for uploading to YouTube.
Nathaniel reyes howtousemoviemaker
This document provides instructions for editing videos using Windows Movie Maker. It explains that Windows Movie Maker is a basic video editing software that allows users to enhance video presentations. It then outlines the three simple steps to make a video with Movie Maker: 1) capture video by importing clips, photos or audio, 2) edit the movie by adding effects, transitions and titles, and 3) finish the movie by saving and sharing the final video online or to other devices.
Invisible cloth streaming video presentation
The document provides instructions for creating bluescreen or chroma key effects using Adobe Premier Pro and Windows Movie Maker. It explains how to import video footage, add transitions like bluescreen, adjust settings to key out the blue/green background, and output the final video. Steps include capturing footage, selecting a solid colored background, dragging clips onto different video tracks, using the chroma key effect tool, and fine-tuning with sliders. Examples and links are provided to help explain the bluescreening process.
Photo story 3 guide
The document provides step-by-step instructions for creating a photo slideshow with narration using Microsoft Photo Story 3. It explains how to import pictures, add titles and transitions between slides, record narration, and save the finished project. The summary highlights that Photo Story 3 allows creating narrated slideshows from pictures alone, with small file sizes making them suitable for online sharing through systems like WebCT.
Zoom Ignite Video Making Instructions
This document provides step-by-step instructions for recording and saving a 10-minute narrated PowerPoint presentation as an mp4 video file using Zoom. The instructions include preparing the PowerPoint with slide timings, logging into Zoom, sharing your screen to show the PowerPoint presentation while also displaying your video, and saving the recording as an mp4 file once the meeting has ended. The mp4 file can then be transferred or uploaded to websites to share the presentation with others.
Smartboard Training Guide 18 To 25
The document provides instructions for various features in training modules 15 through 21 for intermediate users. It describes how to take screen captures, insert links, scan documents, play audio CDs/DVDs, use a screen shade, and export smartboard documents to PowerPoint. Key steps include clicking the "Capture" icon to take screen captures, copying and pasting URLs to insert links, using the scanner and "copy image" to include scans, playing DVDs/CDs using PowerDVD, saving screen shades in position, and exporting to PowerPoint by clicking "File" then "Export PowerPoint".
JING
This document provides instructions for installing and using the screen capturing software Jing. It is a 3 step process:
1. Download and install Jing by selecting the appropriate version for your operating system (Windows or Mac) from the Jing website. Follow the on-screen instructions to complete the installation.
2. Create a Jing account by providing your email address and other required information. Verify your email to complete the signup process.
3. Learn to use Jing's basic features which are accessed through the Sun Launcher icon. You can take screenshots or record videos using the Capture tool and save/share them through your Jing History. Settings are available through the More icon.
Screencast o-matic how to presentation
- To create a Screencast-o-matic video, go to their website and create a free account or use the provided login credentials.
- Once logged in, click "Start Recording" to begin recording your screen and microphone. You can pause, restart, or finish your recording and then name and publish the video.
- Published videos can be embedded on websites like Wikispaces by copying the embed code provided and pasting it into the website's video/widget section. This allows anyone with the link to view the screencast video.
How to Build a Slidecast
A step-by-step of how to build a slidecast. Includes tips for reducing file sizes on PDFs and syncing audio file. By Wm Pitzer - West Virginia University
Adobe beginners-guide
This document provides a beginner's guide to using Adobe Premiere Pro for video editing. It outlines the basic interface, which is split into 7 key areas - Project, Effect Controls, Video Preview, Effects, Timeline, Audio Levels, and Tools. It then explains how to import footage, edit it by dragging clips onto the timeline, cut unwanted parts, add effects by dragging them onto clips, and insert titles. The guide concludes by detailing how to export the finished video by specifying settings and destination folder.
How to use Jing
Jing is a screencasting software that allows users to capture images and videos of their computer screen and share them online or save them locally. It can be used to demonstrate and teach software features. The document provides step-by-step instructions on how to download, install, and use basic functions of Jing such as capturing screenshots, adding annotations, sharing screenshots online, and saving screenshots locally.
14 computer tricks
Do you know how to get back to the tab you accidentally turned off? Do you know how to take a screenshot of a part of the screen without installing software? If there's one thing that Reddit users are best at, it's definitely computer tricks. The 14 tricks below are great Reddit tips we all should know to make the desktop experience easier and more enjoyable than ever.
How to copy tv series to dvd on mac
This tutorial shows how to easily copy TV series to DVD on a Mac computer using DVD burning software. The software allows users to drag TV series video files into the program, select "DVD Disc" as the output format, and click "Burn" to copy the files to a DVD. The simple two-step process converts and burns the TV series for backup on DVD discs within the Mac DVD burner application.
Leslie chan how_tousegadwinprintscreen
This document provides instructions for downloading and using the Gadwin Printscreen freeware application. It explains how to download the application from gadwin.com, install it, access it through the start menu. It then describes how to take full screen, rectangular, and window screenshots using the capture widget and toolbar buttons. It also explains the various configuration and customization options available through the options menu like hotkeys, image options, and post-capture actions.
What's hot (20)
Viewers also liked
Design and plan 3.5
This document provides guidance for students creating a compelling design and pre-production plan for a short film. It outlines 8 sections to be included: 1) a visual treatment, 2) conventions of the genre, 3) location scouting, 4) test shots, 5) scripting and storyboarding, 6) font choices, 7) visual effects, and 8) revisions. For each section, detailed requirements are provided around visual and audio aspects, conventions, locations, test shots, scripts, fonts, effects, and allowing for revisions. The goal is for students to demonstrate effective design choices and planning to capture an audience's attention.
Exporting a project
Exporting a project from Adobe Premiere Elements 12. (designed specifically for a school, yet should work on most computers)
2017 responses
This document provides instructions for using OneNote to complete work for a biology class. It outlines how students should listen in class, read powerpoints, think about and answer questions, complete online activities, Scipad work, and Moodle quizzes. It emphasizes thinking over copying notes. The document also includes information on achievement standards, exam specifications, and the topic outline covering responses to the environment.
Design and plan 1.5
This document provides guidance for students on developing a design and plan for a crafted media product. It outlines the requirements to achieve different levels of achievement, including producing a precise concept, detailed treatment, and pre-production activities. The treatment section describes how to develop a visual and audio treatment that establishes tone and appeals to the target audience. It also covers conventions, locations, storyboarding, practicalities, and revision. The document emphasizes developing ideas through reflection and reworking to craft an effective media product.
Conventions Of Film Noir
Film noir emerged in the 1940s-1950s as a genre of stylish crime dramas and detective films that emphasized cynical attitudes. Common conventions included flawed heroes, seedy urban settings, and convoluted narratives involving flashbacks. Visual styles like low-key lighting and Dutch angles created moods of paranoia and uncertainty. While often hopeless, noir films imbued crime stories with sexual themes and showed a corrupt world. Horror conventions include villains, victims, haunted houses, monsters, gore, screams, and the use of sound and close-ups to generate fear and tension. Both genres explore themes of isolation, anxiety, and the triumph of evil forces over humanity.
Film noir codes & conventions
Film noir cinematography is known for using distorted, uncomfortable angles and framing to put viewers on edge. It often features extreme close-ups, deep focus shots, and obscured views through objects. Mise-en-scene elements include everyday urban locations shot in low light with high contrasts between blacks and whites. Character archetypes regularly seen are down-on-their-luck private detectives and dangerously seductive femme fatales. The narratives typically involve crimes, double-crosses, and a downward spiral of events leading to misfortune.
Viewers also liked (6)
Similar to Camera connections
Camera connections
This document provides instructions for connecting a camera to a computer using a FireWire cable in order to upload footage. It explains that the large end of the FireWire cable connects to the computer's FireWire port, while the small end connects to the camera's FireWire port, which may be located in different places depending on the camera model. It then outlines the steps to open Adobe Elements and import footage from the connected DV camcorder.
Antonio´s presentation
The document provides tips and instructions for various computing tasks, including backing up files, using useful programs like WinRAR and Firefox, downloading videos from YouTube and VideoJug, backing up a DVD movie using DVD Shrink, backing up files using ImgBurn, resizing images using Microsoft Image Resizer, and more. Instructions are provided in point form with details on steps to complete each task.
Basic adobe instructions
This document provides step-by-step instructions for editing a video project in Adobe Premiere Pro. It outlines the following key steps:
1) Import raw footage files from a computer or camera into the project. Organize footage into bins.
2) Select clips to edit by setting in and out points on the source timeline. Drag clips onto the project timeline.
3) Add transitions between clips and apply video effects to clips using options in the effects panel.
4) Export the completed project from Premiere Pro in the desired file format, such as QuickTime.
Dvd menu creation_guide
The document provides instructions for creating custom menus for Rifftrax DVDs using DVD Lab Pro software. It discusses optional steps for adding background music and images. Backgrounds must be saved in the DVD Lab folder and music converted to MP2 or AC3 format. The guide then explains how to import movie files, add chapter markers, and create command objects to select the desired audio track when playing. It concludes by outlining the basic process of designing the main menu by adding a background image and text.
2010 Creating Videocast Lectures for Online Courses
Creating videocast lectures and embedding them in Pearson LearningStudio involves several steps:
1. Create a YouTube account to upload videos. Use iMovie or Windows Live Movie Maker to record a short lecture video under 10 minutes with good lighting and notes.
2. Upload the raw video file to YouTube. Then use editing tools to trim clips and add titles, music, etc. Save and publish the edited video to YouTube.
3. Copy the HTML embed code from the YouTube video page. Paste this code into the HTML view of a "Text/Multimedia" content item in Pearson LearningStudio. This embeds the YouTube video in the course.
2010 Creating Videocast Lectures
Creating videocast lectures allows instructors to engage online students who are separated by distance. The document provides instructions for creating a videocast lecture using iMovie or Windows Live Movie Maker, uploading the video to YouTube, and embedding the video in a Pearson LearningStudio course. Key steps include recording the video, editing and adding effects, publishing to YouTube, copying the HTML code from YouTube, and pasting it into the course content on LearningStudio. Following best practices for lighting, location and using notes can improve video quality.
I Pod In Education
The document discusses various ways to use iPods in an educational setting, including downloading educational videos and podcasts, converting PowerPoint presentations into formats viewable on iPods, and connecting iPods to televisions or projectors for classroom viewing. It provides step-by-step instructions for converting PowerPoints without or with embedded videos into formats that can be imported into iTunes and synced to iPods. It also discusses downloading and converting online media into QuickTime formats compatible with iPods.
Rip dvd to i tunes and then import dvd to itunes
This document discusses how to rip DVDs to iTunes by first converting DVD files to compatible formats using free or paid software. It explains that DVDs must be converted to formats like MP4, MOV or M4V before importing to iTunes. It provides steps to use free programs like MakeMKV, Handbrake and VLC Media Player or the paid Leawo DVD Ripper software to convert DVD files. It also outlines how to import the converted files into the iTunes library.
Filmora tutorial
Filmora is an all-in-one video editing software with a simple interface. It has both an easy mode for creating videos with themes and an advanced mode for fully customized editing. The document discusses how to import media, perform basic editing functions like trimming and splitting clips, and navigate Filmora's interface. Key points include importing video, images, and audio, recording directly in Filmora, filtering and sorting media, performing edits like rotations and crops, and joining multiple videos together.
Digitisation
The document outlines a 4 step process for digitizing video content:
1. Assemble the necessary equipment - a video camera, USB cable, computer and video editing software. Make sure the camera is fully charged.
2. Connect the camera to the computer using the USB cable. Plug in a keyboard and mouse.
3. Load the editing software and select the "All (for PC only)" connection option on the camera to generate thumbnails without skipping.
4. Click "Import from camera" and select the files to upload from the camera to the computer for editing. Once complete, the digitization process is finished.
Oct.16
The document provides an overview of an introductory course on movie making and uploading videos. It outlines the day's goals of using video cameras, editing and uploading a clip with Movie Maker. Homework includes watching a YouTube tutorial on Movie Maker and practicing with video cameras. The document then discusses digital video cameras, importing video into Movie Maker, and resources for basic editing and uploading finished videos to YouTube.
Differentiating Instruction using SMART Notebook Software
The document discusses ways to use a SMART Board and Notebook software to differentiate instruction. It covers using tools like the Lesson Activity Toolkit, video, recording features, online resources, and game templates to support different content, processing, assessment, and motivation levels. It also provides tutorials and examples for creating customized activities and embedding videos and online content into Notebook files. The goal is to explore how the software can help teachers meet the varied needs of learners.
FCP X Manual
This document provides a user guide for Final Cut Pro X (version 10.2.2) for members of Stoneham TV. It begins with instructions for logging into the shared storage system and connecting external drives. It then provides an overview of the Final Cut Pro X interface and walks through the process of creating a library, importing media, adding disclaimers, and creating a new project. It covers basic editing techniques like favoriting clips, rejecting clips, and deleting media. It also discusses exporting and sharing finished projects.
Introduction lightsworks
Lightworks is a non-linear video editing software that has been used by film professionals since the 1990s. While its interface is rooted in traditional film editing and can be overwhelming for beginners, it provides powerful tools for digital video editing. This tutorial introduces the Lightworks interface and covers how to set up a new project, including selecting the frame rate and output format to match your video files. It also explains the various tools in the Lightworks toolbar and how to customize project settings.
People on the move and Premier guide
The document provides instructions for completing an editing workshop assignment to create a 60-second film titled "People on the Move." Students are asked to storyboard ideas, capture footage around campus showing movement, and edit the footage together in Adobe Premier. The summary focuses on importing footage and audio, selecting clips, arranging clips on separate video and audio timelines, and basic editing techniques like cutting and transitions. The goal is to practice camerawork, storytelling, and editing skills.
Editing guide
1) To edit footage in Adobe Premier Pro CS6, you first need to import your footage from an SD card into a folder on your hard drive. Then open Premier Pro CS6 and start a new project, selecting the correct video, audio, and frame rate settings to match your footage.
2) Once your project is created, you can drag your footage from the media browser into the timeline to begin editing. You can cut clips, add transitions and effects, and overlay titles.
3) When you have finished editing, you render your project by setting export settings for video, audio, and file format (usually H.264 mp4). Then click export to convert your edited project into a shareable
Editing guide
1) To edit footage in Adobe Premier Pro CS6, you first need to import footage from an SD card into a folder on your hard drive. Then open Premier Pro CS6 and start a new project, selecting the correct video, audio, and frame rate settings to match your footage.
2) Once your project is created, you can drag your footage from the media browser into the timeline to begin editing. You can cut clips, add transitions and effects, and overlay titles.
3) When you have finished editing, you render your project by setting export settings for video, audio, and file format (usually H.264 mp4), then clicking export. This will create a video file of your edited
Getting started with_graphics
This document discusses using the Dev-C++ integrated development environment for C++ programming with graphics capabilities. It provides instructions on downloading and configuring Dev-C++, creating new projects, adding source files, compiling and running programs, and utilizing basic graphics functions for drawing shapes, text, and mouse input. The document also highlights some key features of Dev-C++ like setting compiler options, linking libraries, and using graphics.h for basic 2D graphics.
Premiere Pro Step by Step Guide
The document provides a 5-stage guide for using Adobe Premiere Pro to edit video projects. Stage 1 instructs the user to create project folders to organize assets and save the Premiere project. Stage 2 explains how to use Adobe Media Encoder to convert video footage to QuickTime format. Stage 3 gives basic editing instructions in Premiere Pro, such as importing clips, making selections, and adding clips to the timeline. Stage 4 covers adding transitions and effects. Stage 5 reviews how to export the finished project.
Movies At A Click Version 3
This document provides instructions for finding and integrating video clips and images into educational projects using various software programs like PowerPoint, Inspiration, and Timeliner. It discusses searching online databases and archives for content, downloading and saving files, and embedding, inserting, or hyperlinking the media into projects using the different software options. Steps are outlined for each program.
Similar to Camera connections (20)
2010 Creating Videocast Lectures for Online Courses
2010 Creating Videocast Lectures for Online Courses
Differentiating Instruction using SMART Notebook Software
Differentiating Instruction using SMART Notebook Software
Recently uploaded
Pengantar Penggunaan Flutter - Dart programming language1.pptx
Pengantar Penggunaan Flutter - Dart programming language1.pptx
The simplified electron and muon model, Oscillating Spacetime: The Foundation...
Discover the Simplified Electron and Muon Model: A New Wave-Based Approach to Understanding Particles delves into a groundbreaking theory that presents electrons and muons as rotating soliton waves within oscillating spacetime. Geared towards students, researchers, and science buffs, this book breaks down complex ideas into simple explanations. It covers topics such as electron waves, temporal dynamics, and the implications of this model on particle physics. With clear illustrations and easy-to-follow explanations, readers will gain a new outlook on the universe's fundamental nature.
Walmart Business+ and Spark Good for Nonprofits.pdf
"Learn about all the ways Walmart supports nonprofit organizations.
You will hear from Liz Willett, the Head of Nonprofits, and hear about what Walmart is doing to help nonprofits, including Walmart Business and Spark Good. Walmart Business+ is a new offer for nonprofits that offers discounts and also streamlines nonprofits order and expense tracking, saving time and money.
The webinar may also give some examples on how nonprofits can best leverage Walmart Business+.
The event will cover the following::
Walmart Business + (https://business.walmart.com/plus) is a new shopping experience for nonprofits, schools, and local business customers that connects an exclusive online shopping experience to stores. Benefits include free delivery and shipping, a 'Spend Analytics” feature, special discounts, deals and tax-exempt shopping.
Special TechSoup offer for a free 180 days membership, and up to $150 in discounts on eligible orders.
Spark Good (walmart.com/sparkgood) is a charitable platform that enables nonprofits to receive donations directly from customers and associates.
Answers about how you can do more with Walmart!"
How to Manage Your Lost Opportunities in Odoo 17 CRM
Odoo 17 CRM allows us to track why we lose sales opportunities with "Lost Reasons." This helps analyze our sales process and identify areas for improvement. Here's how to configure lost reasons in Odoo 17 CRM
Your Skill Boost Masterclass: Strategies for Effective Upskilling
Your Skill Boost Masterclass: Strategies for Effective UpskillingExcellence Foundation for South Sudan
Strategies for Effective Upskilling is a presentation by Chinwendu Peace in a Your Skill Boost Masterclass organisation by the Excellence Foundation for South Sudan on 08th and 09th June 2024 from 1 PM to 3 PM on each day.How to Make a Field Mandatory in Odoo 17
In Odoo, making a field required can be done through both Python code and XML views. When you set the required attribute to True in Python code, it makes the field required across all views where it's used. Conversely, when you set the required attribute in XML views, it makes the field required only in the context of that particular view.
DRUGS AND ITS classification slide share
Any substance (other than food) that is used to prevent, diagnose, treat, or relieve symptoms of a
disease or abnormal condition
clinical examination of hip joint (1).pdf
described clinical examination all orthopeadic conditions .
BBR 2024 Summer Sessions Interview Training
Qualitative research interview training by Professor Katrina Pritchard and Dr Helen Williams
Community pharmacy- Social and preventive pharmacy UNIT 5
Covered community pharmacy topic of the subject Social and preventive pharmacy for Diploma and Bachelor of pharmacy
Exploiting Artificial Intelligence for Empowering Researchers and Faculty, In...
Exploiting Artificial Intelligence for Empowering Researchers and Faculty, In...Dr. Vinod Kumar Kanvaria
Exploiting Artificial Intelligence for Empowering Researchers and Faculty,
International FDP on Fundamentals of Research in Social Sciences
at Integral University, Lucknow, 06.06.2024
By Dr. Vinod Kumar KanvariaHow to Setup Warehouse & Location in Odoo 17 Inventory
In this slide, we'll explore how to set up warehouses and locations in Odoo 17 Inventory. This will help us manage our stock effectively, track inventory levels, and streamline warehouse operations.
Recently uploaded (20)
Pengantar Penggunaan Flutter - Dart programming language1.pptx
Pengantar Penggunaan Flutter - Dart programming language1.pptx
The simplified electron and muon model, Oscillating Spacetime: The Foundation...
The simplified electron and muon model, Oscillating Spacetime: The Foundation...
Walmart Business+ and Spark Good for Nonprofits.pdf
Walmart Business+ and Spark Good for Nonprofits.pdf
How to Manage Your Lost Opportunities in Odoo 17 CRM
How to Manage Your Lost Opportunities in Odoo 17 CRM
Your Skill Boost Masterclass: Strategies for Effective Upskilling
Your Skill Boost Masterclass: Strategies for Effective Upskilling
Film vocab for eal 3 students: Australia the movie
Film vocab for eal 3 students: Australia the movie
Pride Month Slides 2024 David Douglas School District
Pride Month Slides 2024 David Douglas School District
Community pharmacy- Social and preventive pharmacy UNIT 5
Community pharmacy- Social and preventive pharmacy UNIT 5
Exploiting Artificial Intelligence for Empowering Researchers and Faculty, In...
Exploiting Artificial Intelligence for Empowering Researchers and Faculty, In...
How to Setup Warehouse & Location in Odoo 17 Inventory
How to Setup Warehouse & Location in Odoo 17 Inventory
Liberal Approach to the Study of Indian Politics.pdf
Liberal Approach to the Study of Indian Politics.pdf
Camera connections
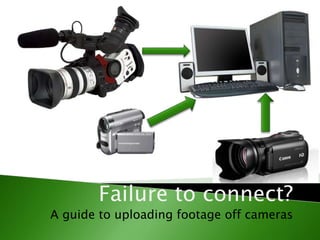
- 1. Failure to connect? A guide to uploading footage off cameras
- 3. So, the computer looks something like this The back of the computer looks something like this With one of these Right about here the large end of the firewire goes in there…
- 4. The small end of the firewire goes in the camera Look for a little metal socket shaped like this On this camera, it’s in behind a small panel on this side On this camera, it’s in the cradle that you charge it on (not on the camera) On this camera, it next to the power input down at the bottom back
- 5. From here the computer will sense a camera is connected and open a dialogue box for you to choose what to do next. Choose to open the Adobe Elements icon (usually purple) and open an existing project, or save a new project When Adobe is open go to ‘Add media’ and choose ‘DV Camcorder’
- 6. You can now control the camera from the computer; playing and fast-forwarding And you can capture the footage to the computer Make sure that the footage you take off the camera goes into the right drive With a DV Camcorder the footage comes off in ‘real time’ – this means that if you have 45 minutes of footage it will take 45 minutes for it to play through and save to the computer.
- 8. So, the computer looks something like this The front of the computer looks something like this And you know where the USB goes!
- 9. Copy the video files from the camera to your Media drive
- 10. Choose to open the Adobe Elements icon (usually purple) and open an existing project, or save a new project When Adobe is open go to ‘Add media’ and choose ‘Files or folders’ Choose the media folder that your footage is in and import to begin