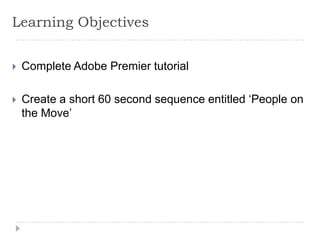
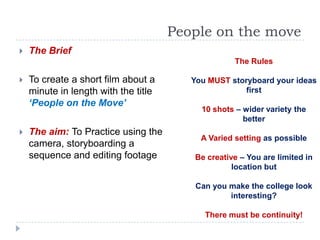
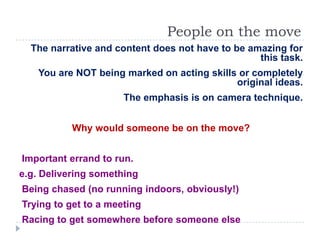
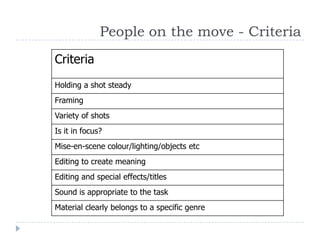
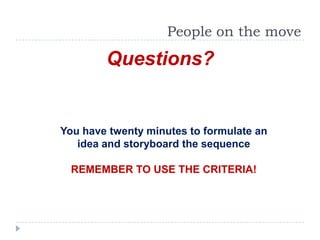
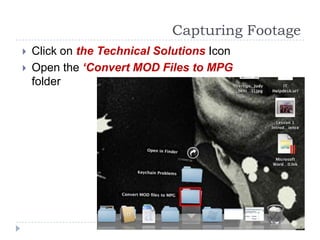
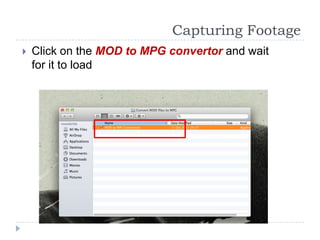
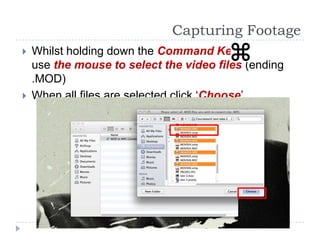
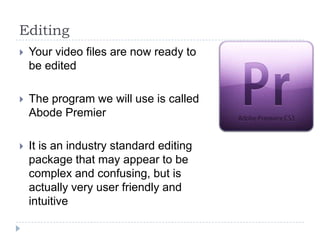
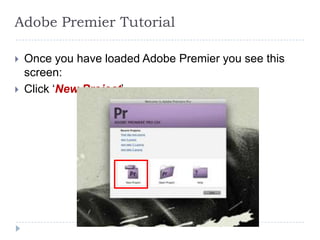
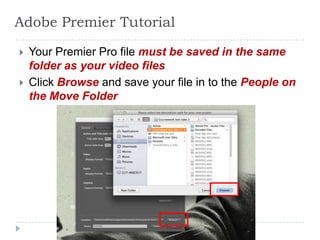
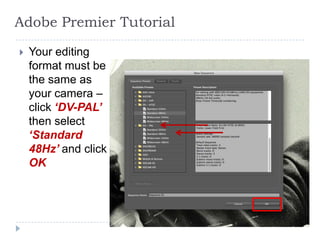
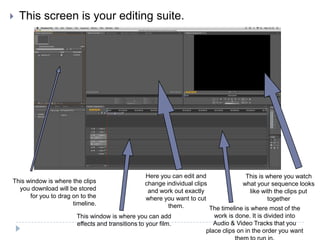
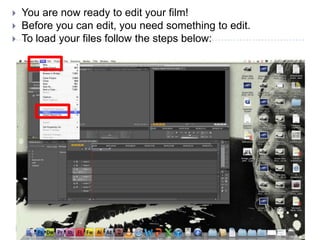
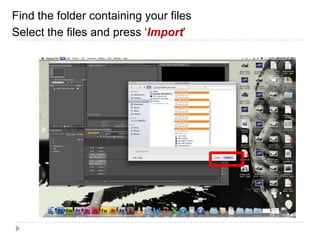
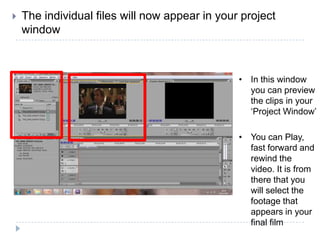
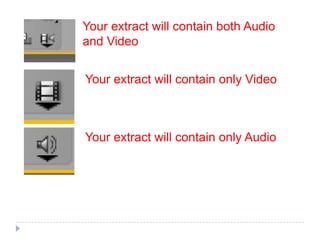
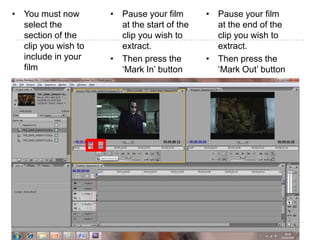
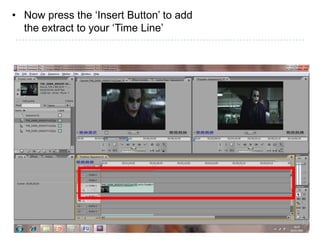
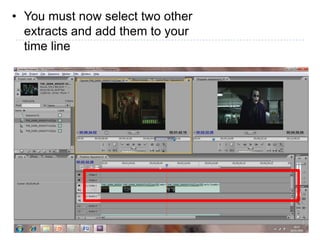
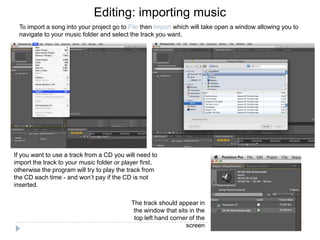
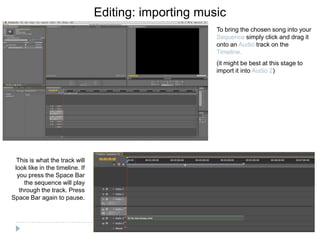
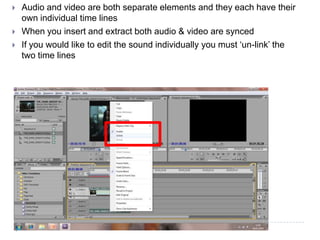
Film Studies

FM1 – Creative Project – Editing Workshop / People on
                                            the Move
Learning Objectives


   Complete Adobe Premier tutorial

   Create a short 60 second sequence entitled ‘People on
    the Move’
People on the move
   The Brief
                                                   The Rules

   To create a short film about a       You MUST storyboard your ideas
    minute in length with the title                   first
    ‘People on the Move’
                                           10 shots – wider variety the
                                                      better
   The aim: To Practice using the
                                           A Varied setting as possible
    camera, storyboarding a
    sequence and editing footage         Be creative – You are limited in
                                                   location but

                                          Can you make the college look
                                                  interesting?

                                            There must be continuity!
People on the move
  The narrative and content does not have to be amazing for
                                                  this task.
    You are NOT being marked on acting skills or completely
                                             original ideas.
                      The emphasis is on camera technique.


           Why would someone be on the move?


Important errand to run.
e.g. Delivering something
Being chased (no running indoors, obviously!)
Trying to get to a meeting
Racing to get somewhere before someone else
People on the move - Criteria
Criteria
Holding a shot steady
Framing
Variety of shots
Is it in focus?
Mise-en-scene colour/lighting/objects etc
Editing to create meaning
Editing and special effects/titles
Sound is appropriate to the task
Material clearly belongs to a specific genre
People on the move

        Questions?


You have twenty minutes to formulate an
   idea and storyboard the sequence

  REMEMBER TO USE THE CRITERIA!
Capturing Footage
   Plug your camera in at the mains and then connect the USB
    cable from the Mac to your camera
   Then click on the SD card icon (White drive icon)
   Then find your files in the SD card window
Capturing Footage
   Hold down the command Key           and highlight all
    of the files ending with the .MOD extension
Capturing Footage
   Right Click on the files and copy (COMMAND & C)
    all of the files


                                                  C
Capturing Footage
   Click on ‘Documents’ and then ‘open
    in finder’ and create a new folder called
    People on the Move

 Then paste all of the video files in
to the ‘People on the Move’ Folder
Capturing Footage
   Click on the Technical Solutions Icon
   Open the ‘Convert MOD Files to MPG
    folder
Capturing Footage
   Click on the MOD to MPG convertor and wait
    for it to load
Capturing Footage
   Use the finder to locate your ‘People on the
    Move’ folder
   Your video files should then appear
Capturing Footage
   Whilst holding down the Command Key
    use the mouse to select the video files (ending
    .MOD)
   When all files are selected click ‘Choose’
Editing
   Your video files are now ready to
    be edited

   The program we will use is called
    Abode Premier

   It is an industry standard editing
    package that may appear to be
    complex and confusing, but is
    actually very user friendly and
    intuitive
Adobe Premier
   Premier is permanently glued to your task bar
   Click this icon and wait for the program to load
Adobe Premier Tutorial

   Once you have loaded Adobe Premier you see this
    screen:
   Click ‘New Project’
Adobe Premier Tutorial

   Your Premier Pro file must be saved in the same
    folder as your video files
   Click Browse and save your file in to the People on
    the Move Folder
Adobe Premier Tutorial

   Your editing
    format must be
    the same as
    your camera –
    click ‘DV-PAL’
    then select
    ‘Standard
    48Hz’ and click
    OK
   This screen is your editing suite.


                                                  Here you can edit and                 This is where you watch
This window is where the clips                    change individual clips              what your sequence looks
  you download will be stored                      and work out exactly                   like with the clips put
      for you to drag on to the                   where you want to cut                          together
                      timeline.                            them.          The timeline is where most of the
                       This window is where you can add                     work is done. It is divided into
                       effects and transitions to your film.                Audio & Video Tracks that you
                                                                         place clips on in the order you want
   You are now ready to edit your film!
   Before you can edit, you need something to edit.
   To load your files follow the steps below:
Find the folder containing your files
Select the files and press ‘Import’
   The individual files will now appear in your project
    window


                                                • In this window
                                                  you can preview
                                                  the clips in your
                                                  ‘Project Window’

                                                • You can Play,
                                                  fast forward and
                                                  rewind the
                                                  video. It is from
                                                  there that you
                                                  will select the
                                                  footage that
                                                  appears in your
                                                  final film
Your extract will contain both Audio
and Video


Your extract will contain only Video


Your extract will contain only Audio
• You must now       • Pause your film       • Pause your film
  select the           at the start of the     at the end of the
  section of the       clip you wish to        clip you wish to
  clip you wish to     extract.                extract.
  include in your    • Then press the        • Then press the
  film                 ‘Mark In’ button        ‘Mark Out’ button
• Now press the ‘Insert Button’ to add
  the extract to your ‘Time Line’
• You must now select two other
  extracts and add them to your
  time line
Adobe Premier Tutorial
   So far we have learnt how to:
   Import a Video
   Select a piece of footage from our captured footage
   Add an extract to the video time line

   Now we must look at how to edit sound
Editing: importing music
  To import a song into your project go to File then Import which will take open a window allowing you to
  navigate to your music folder and select the track you want.


If you want to use a track from a CD you will need to
import the track to your music folder or player first,
otherwise the program will try to play the track from
the CD each time - and won’t pay if the CD is not
inserted.

                                            The track should appear in
                                             the window that sits in the
                                             top left hand corner of the
                                                                screen
Editing: importing music
                                                       To bring the chosen song into your
                                                       Sequence simply click and drag it
                                                       onto an Audio track on the
                                                       Timeline.
                                                       (it might be best at this stage to
                                                       import it into Audio 2)


  This is what the track will
 look like in the timeline. If
  you press the Space Bar
     the sequence will play
   through the track. Press
Space Bar again to pause.
   Audio and video are both separate elements and they each have their
    own individual time lines
   When you insert and extract both audio & video are synced
   If you would like to edit the sound individually you must ‘un-link’ the
    two time lines
   You may now manipulate the video and audio individually
   Use this tool if you would like to include a voice over
    narration, accompany the scene with music or add audio
    from another part of the film to your trailer

People on the move and Premier guide

  • 1.
    Film Studies FM1 –Creative Project – Editing Workshop / People on the Move
  • 2.
    Learning Objectives  Complete Adobe Premier tutorial  Create a short 60 second sequence entitled ‘People on the Move’
  • 3.
    People on themove  The Brief The Rules  To create a short film about a You MUST storyboard your ideas minute in length with the title first ‘People on the Move’ 10 shots – wider variety the better  The aim: To Practice using the A Varied setting as possible camera, storyboarding a sequence and editing footage Be creative – You are limited in location but Can you make the college look interesting? There must be continuity!
  • 4.
    People on themove The narrative and content does not have to be amazing for this task. You are NOT being marked on acting skills or completely original ideas. The emphasis is on camera technique. Why would someone be on the move? Important errand to run. e.g. Delivering something Being chased (no running indoors, obviously!) Trying to get to a meeting Racing to get somewhere before someone else
  • 5.
    People on themove - Criteria Criteria Holding a shot steady Framing Variety of shots Is it in focus? Mise-en-scene colour/lighting/objects etc Editing to create meaning Editing and special effects/titles Sound is appropriate to the task Material clearly belongs to a specific genre
  • 6.
    People on themove Questions? You have twenty minutes to formulate an idea and storyboard the sequence REMEMBER TO USE THE CRITERIA!
  • 7.
    Capturing Footage  Plug your camera in at the mains and then connect the USB cable from the Mac to your camera  Then click on the SD card icon (White drive icon)  Then find your files in the SD card window
  • 8.
    Capturing Footage  Hold down the command Key and highlight all of the files ending with the .MOD extension
  • 9.
    Capturing Footage  Right Click on the files and copy (COMMAND & C) all of the files C
  • 10.
    Capturing Footage  Click on ‘Documents’ and then ‘open in finder’ and create a new folder called People on the Move  Then paste all of the video files in to the ‘People on the Move’ Folder
  • 11.
    Capturing Footage  Click on the Technical Solutions Icon  Open the ‘Convert MOD Files to MPG folder
  • 12.
    Capturing Footage  Click on the MOD to MPG convertor and wait for it to load
  • 13.
    Capturing Footage  Use the finder to locate your ‘People on the Move’ folder  Your video files should then appear
  • 14.
    Capturing Footage  Whilst holding down the Command Key use the mouse to select the video files (ending .MOD)  When all files are selected click ‘Choose’
  • 15.
    Editing  Your video files are now ready to be edited  The program we will use is called Abode Premier  It is an industry standard editing package that may appear to be complex and confusing, but is actually very user friendly and intuitive
  • 16.
    Adobe Premier  Premier is permanently glued to your task bar  Click this icon and wait for the program to load
  • 17.
    Adobe Premier Tutorial  Once you have loaded Adobe Premier you see this screen:  Click ‘New Project’
  • 18.
    Adobe Premier Tutorial  Your Premier Pro file must be saved in the same folder as your video files  Click Browse and save your file in to the People on the Move Folder
  • 19.
    Adobe Premier Tutorial  Your editing format must be the same as your camera – click ‘DV-PAL’ then select ‘Standard 48Hz’ and click OK
  • 20.
    This screen is your editing suite. Here you can edit and This is where you watch This window is where the clips change individual clips what your sequence looks you download will be stored and work out exactly like with the clips put for you to drag on to the where you want to cut together timeline. them. The timeline is where most of the This window is where you can add work is done. It is divided into effects and transitions to your film. Audio & Video Tracks that you place clips on in the order you want
  • 21.
    You are now ready to edit your film!  Before you can edit, you need something to edit.  To load your files follow the steps below:
  • 22.
    Find the foldercontaining your files Select the files and press ‘Import’
  • 23.
    The individual files will now appear in your project window • In this window you can preview the clips in your ‘Project Window’ • You can Play, fast forward and rewind the video. It is from there that you will select the footage that appears in your final film
  • 24.
    Your extract willcontain both Audio and Video Your extract will contain only Video Your extract will contain only Audio
  • 25.
    • You mustnow • Pause your film • Pause your film select the at the start of the at the end of the section of the clip you wish to clip you wish to clip you wish to extract. extract. include in your • Then press the • Then press the film ‘Mark In’ button ‘Mark Out’ button
  • 26.
    • Now pressthe ‘Insert Button’ to add the extract to your ‘Time Line’
  • 27.
    • You mustnow select two other extracts and add them to your time line
  • 28.
    Adobe Premier Tutorial  So far we have learnt how to:  Import a Video  Select a piece of footage from our captured footage  Add an extract to the video time line  Now we must look at how to edit sound
  • 29.
    Editing: importing music To import a song into your project go to File then Import which will take open a window allowing you to navigate to your music folder and select the track you want. If you want to use a track from a CD you will need to import the track to your music folder or player first, otherwise the program will try to play the track from the CD each time - and won’t pay if the CD is not inserted. The track should appear in the window that sits in the top left hand corner of the screen
  • 30.
    Editing: importing music To bring the chosen song into your Sequence simply click and drag it onto an Audio track on the Timeline. (it might be best at this stage to import it into Audio 2) This is what the track will look like in the timeline. If you press the Space Bar the sequence will play through the track. Press Space Bar again to pause.
  • 31.
    Audio and video are both separate elements and they each have their own individual time lines  When you insert and extract both audio & video are synced  If you would like to edit the sound individually you must ‘un-link’ the two time lines
  • 32.
    You may now manipulate the video and audio individually  Use this tool if you would like to include a voice over narration, accompany the scene with music or add audio from another part of the film to your trailer

Editor's Notes

  • #23 Folder location must be on white board