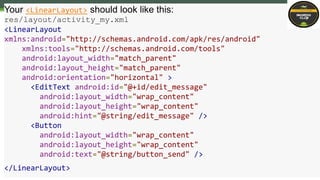
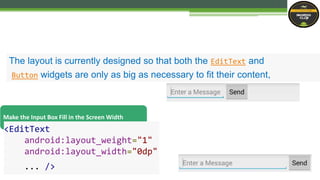
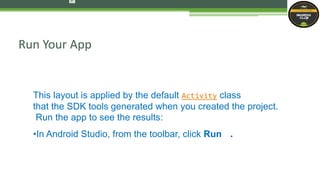
Building a Simple User Interface
Lesson 2
By
Kalluri Vinay Reddy
Android Club
www.facebookcom/vitccandroidclub
In this lesson, you create a
layout in XML that includes a text
field and a button.
• The graphical user interface for an Android app is built using a hierarchy
of View and ViewGroup objects. View objects are usually UI widgets
such as buttons or text fields. ViewGroup objects are invisible view
containers that define how the child views are laid out, such as in a grid
or a vertical list.
• Android provides an XML vocabulary that corresponds to the subclasses
of View and ViewGroup so you can define your UI in XML using a
hierarchy of UI elements.
• Layouts are subclasses of the ViewGroup. In this exercise, you'll work
with a LinearLayout.
• Illustration of how ViewGroup objects form branches in the layout and
contain other View objects.
In Android Studio, from the res/layout directory, open the activity_my.xml
file.
The BlankActivity template you chose when you created this project includes
the activity_my.xml file with a RelativeLayout root view and a TextView
child view.
In the Preview pane, click the Hide icon to close the Preview pane.
In Android Studio, when you open a layout file, you’re first shown the
Preview pane.
Create a Linear Layout
Delete the <TextView> element.
Change the <RelativeLayout> element to <LinearLayout>.
Add the android:orientation attribute and set it to "horizontal".
Remove the android:padding attributes and the tools:context attribute.
Clicking elements in this pane opens the WYSIWYG tools in the Design pane.
For this lesson, you’re going to work directly with the XML.
<LinearLayout
xmlns:android="http://schemas.android.com/apk/res/android"
xmlns:tools="http://schemas.android.com/tools"
android:layout_width="match_parent"
android:layout_height="match_parent"
android:orientation="horizontal" >
</LinearLayout>
The result looks like this:
res/layout/activity_my.xml
LinearLayout is a view group (a subclass of ViewGroup) that lays out child
views in either a vertical or horizontal orientation, as specified by the
android:orientation attribute. Each child of a LinearLayout appears on the
screen in the order in which it appears in the XML.
Two other attributes, android:layout_width and android:layout_height, are
required for all views in order to specify their size.
Because the LinearLayout is the root view in the layout, it should fill the
entire screen area that's available to the app by setting the width and
height to "match_parent". This value declares that the view should expand
its width or height to match the width or height of the parent view.
Add a Text Field
As with every View object, you must define certain XML attributes to
specify the EditText object's properties.
• In the activity_my.xml file, within the <LinearLayout> element,
• Define an <EditText> element with the id attribute set
to @+id/edit_message.
• Define the layout_width and layout_height attributes as wrap_content.
• Define a hint attribute as a string object named edit_message.
The <EditText> element should read as
follows:
res/layout/activity_my.xml
<EditText android:id="@+id/edit_message"
android:layout_width="wrap_content"
android:layout_height="wrap_content"
android:hint="@string/edit_message"/>
By default, your Android project includes a string resource file at res/values/strings.xml. Here, you'll add a new
string named "edit_message" and set the value to "Enter a message."
In Android Studio, from the res/values directory, open strings.xml.
Add a line for a string named "edit_message" with the value, "Enter a message".
Add a line for a string named "button_send" with the value, "Send".
You'll create the button that uses this string in the next section.
Remove the line for the "hello world" string.
Add String Resources
The result for strings.xml looks like this:
res/values/strings.xml
<?xml version="1.0" encoding="utf-8"?>
<resources>
<string name="app_name">My First App</string>
<string name="edit_message">Enter a message</string>
<string name="button_send">Send</string>
<string name="action_settings">Settings</string>
<string name="title_activity_main">MainActivity</string>
</resources>
• For text in the user interface, always specify each string as
a resource. String resources allow you to manage all UI text
in a single location, which makes the text easier to find and
update. Externalizing the strings also allows you to localize
your app to different languages by providing alternative
definitions for each string resource.
In Android Studio, from the res/layout directory, edit the activity_my.xml file.
• Within the <LinearLayout> element, define a <Button> element immediately
following the <EditText>element.
• Set the button's width and height attributes to "wrap_content" so the button
is only as big as necessary to fit the button's text label.
• Define the button's text label with the android:text attribute;
• set its value to the button_send string resource you defined in the previous
section.
Add a button
Your <LinearLayout> should look like this:
res/layout/activity_my.xml
<LinearLayout
xmlns:android="http://schemas.android.com/apk/res/android"
xmlns:tools="http://schemas.android.com/tools"
android:layout_width="match_parent"
android:layout_height="match_parent"
android:orientation="horizontal" >
<EditText android:id="@+id/edit_message"
android:layout_width="wrap_content"
android:layout_height="wrap_content"
android:hint="@string/edit_message" />
<Button
android:layout_width="wrap_content"
android:layout_height="wrap_content"
android:text="@string/button_send" />
</LinearLayout>
Note:
This button doesn't need the android:id attribute, because it won't be referenced
from the activity code.
The layout is currently designed so that both the EditText and
Button widgets are only as big as necessary to fit their content,
Make the Input Box Fill in the Screen Width
<EditText
android:layout_weight="1"
android:layout_width="0dp"
... />
Run Your App
This layout is applied by the default Activity class
that the SDK tools generated when you created the project.
Run the app to see the results:
•In Android Studio, from the toolbar, click Run .
S t a r t i n g A n o t h e r A c t i v i t y
Next Lesson:

Building a simple user interface lesson2

  • 1.
    Building a SimpleUser Interface Lesson 2 By Kalluri Vinay Reddy Android Club www.facebookcom/vitccandroidclub
  • 2.
    In this lesson,you create a layout in XML that includes a text field and a button.
  • 3.
    • The graphicaluser interface for an Android app is built using a hierarchy of View and ViewGroup objects. View objects are usually UI widgets such as buttons or text fields. ViewGroup objects are invisible view containers that define how the child views are laid out, such as in a grid or a vertical list. • Android provides an XML vocabulary that corresponds to the subclasses of View and ViewGroup so you can define your UI in XML using a hierarchy of UI elements.
  • 4.
    • Layouts aresubclasses of the ViewGroup. In this exercise, you'll work with a LinearLayout. • Illustration of how ViewGroup objects form branches in the layout and contain other View objects.
  • 5.
    In Android Studio,from the res/layout directory, open the activity_my.xml file. The BlankActivity template you chose when you created this project includes the activity_my.xml file with a RelativeLayout root view and a TextView child view. In the Preview pane, click the Hide icon to close the Preview pane. In Android Studio, when you open a layout file, you’re first shown the Preview pane. Create a Linear Layout
  • 6.
    Delete the <TextView>element. Change the <RelativeLayout> element to <LinearLayout>. Add the android:orientation attribute and set it to "horizontal". Remove the android:padding attributes and the tools:context attribute. Clicking elements in this pane opens the WYSIWYG tools in the Design pane. For this lesson, you’re going to work directly with the XML.
  • 7.
  • 8.
    LinearLayout is aview group (a subclass of ViewGroup) that lays out child views in either a vertical or horizontal orientation, as specified by the android:orientation attribute. Each child of a LinearLayout appears on the screen in the order in which it appears in the XML. Two other attributes, android:layout_width and android:layout_height, are required for all views in order to specify their size. Because the LinearLayout is the root view in the layout, it should fill the entire screen area that's available to the app by setting the width and height to "match_parent". This value declares that the view should expand its width or height to match the width or height of the parent view.
  • 9.
    Add a TextField As with every View object, you must define certain XML attributes to specify the EditText object's properties. • In the activity_my.xml file, within the <LinearLayout> element, • Define an <EditText> element with the id attribute set to @+id/edit_message. • Define the layout_width and layout_height attributes as wrap_content. • Define a hint attribute as a string object named edit_message.
  • 10.
    The <EditText> elementshould read as follows: res/layout/activity_my.xml <EditText android:id="@+id/edit_message" android:layout_width="wrap_content" android:layout_height="wrap_content" android:hint="@string/edit_message"/>
  • 11.
    By default, yourAndroid project includes a string resource file at res/values/strings.xml. Here, you'll add a new string named "edit_message" and set the value to "Enter a message." In Android Studio, from the res/values directory, open strings.xml. Add a line for a string named "edit_message" with the value, "Enter a message". Add a line for a string named "button_send" with the value, "Send". You'll create the button that uses this string in the next section. Remove the line for the "hello world" string. Add String Resources
  • 12.
    The result forstrings.xml looks like this: res/values/strings.xml <?xml version="1.0" encoding="utf-8"?> <resources> <string name="app_name">My First App</string> <string name="edit_message">Enter a message</string> <string name="button_send">Send</string> <string name="action_settings">Settings</string> <string name="title_activity_main">MainActivity</string> </resources>
  • 13.
    • For textin the user interface, always specify each string as a resource. String resources allow you to manage all UI text in a single location, which makes the text easier to find and update. Externalizing the strings also allows you to localize your app to different languages by providing alternative definitions for each string resource.
  • 14.
    In Android Studio,from the res/layout directory, edit the activity_my.xml file. • Within the <LinearLayout> element, define a <Button> element immediately following the <EditText>element. • Set the button's width and height attributes to "wrap_content" so the button is only as big as necessary to fit the button's text label. • Define the button's text label with the android:text attribute; • set its value to the button_send string resource you defined in the previous section. Add a button
  • 15.
    Your <LinearLayout> shouldlook like this: res/layout/activity_my.xml <LinearLayout xmlns:android="http://schemas.android.com/apk/res/android" xmlns:tools="http://schemas.android.com/tools" android:layout_width="match_parent" android:layout_height="match_parent" android:orientation="horizontal" > <EditText android:id="@+id/edit_message" android:layout_width="wrap_content" android:layout_height="wrap_content" android:hint="@string/edit_message" /> <Button android:layout_width="wrap_content" android:layout_height="wrap_content" android:text="@string/button_send" /> </LinearLayout>
  • 16.
    Note: This button doesn'tneed the android:id attribute, because it won't be referenced from the activity code.
  • 17.
    The layout iscurrently designed so that both the EditText and Button widgets are only as big as necessary to fit their content, Make the Input Box Fill in the Screen Width <EditText android:layout_weight="1" android:layout_width="0dp" ... />
  • 18.
    Run Your App Thislayout is applied by the default Activity class that the SDK tools generated when you created the project. Run the app to see the results: •In Android Studio, from the toolbar, click Run .
  • 19.
    S t ar t i n g A n o t h e r A c t i v i t y Next Lesson: