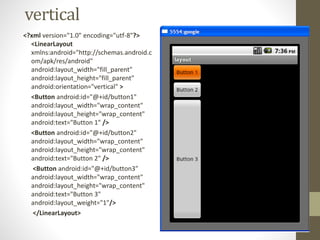
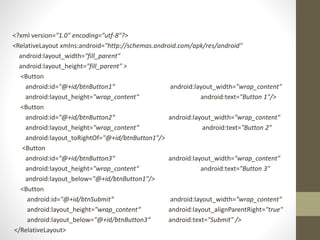
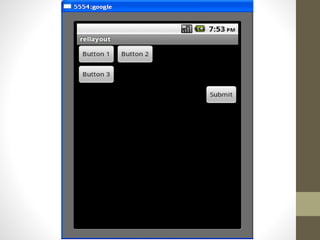
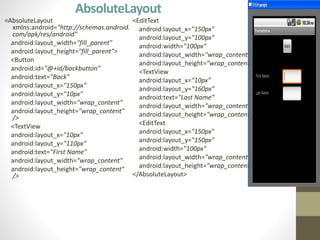
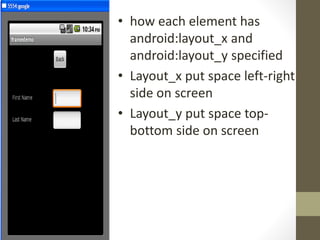
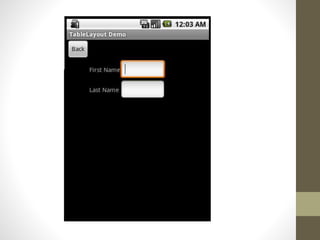
Android
Layout
LinearLayout
• Linear Layout is a common layout that arranges “component” in
vertical or horizontal order.
• Component is arrange via orientation attribute.
• For example
• FOR HORIZONTAL ARRANGEMENT
• android:orientation="horizontal“
• FOR VERTICAL ARRANGEMENT
• android:orientation=“vertical"
horizontal
<?xml version="1.0" encoding="utf-8"?>
<LinearLayout
xmlns:android="http://schemas.android.c
om/apk/res/android"
android:layout_width="fill_parent"
android:layout_height="fill_parent"
android:orientation="horizontal" >
<Button android:id="@+id/button1"
android:layout_width="wrap_content"
android:layout_height="wrap_content"
android:text="Button 1" />
<Button android:id="@+id/button2"
android:layout_width="wrap_content"
android:layout_height="wrap_content"
android:text="Button 2" />
<Button android:id="@+id/button3"
android:layout_width="wrap_content"
android:layout_height="wrap_content"
android:text="Button 3"
android:layout_weight="1"/>
</LinearLayout>
vertical
<?xml version="1.0" encoding="utf-8"?>
<LinearLayout
xmlns:android="http://schemas.android.c
om/apk/res/android"
android:layout_width="fill_parent"
android:layout_height="fill_parent"
android:orientation="vertical" >
<Button android:id="@+id/button1"
android:layout_width="wrap_content"
android:layout_height="wrap_content"
android:text="Button 1" />
<Button android:id="@+id/button2"
android:layout_width="wrap_content"
android:layout_height="wrap_content"
android:text="Button 2" />
<Button android:id="@+id/button3"
android:layout_width="wrap_content"
android:layout_height="wrap_content"
android:text="Button 3"
android:layout_weight="1"/>
</LinearLayout>
RelativeLayout
• RelativeLayout let you position your component base on the nearby
(relative or sibling) component’s position.
• It’s the most flexible layout, that allow you to position your component
to display in anywhere you want.
• in Relative Layout, you can use “above, below, left and right” to
arrange the component position
<?xml version="1.0" encoding="utf-8"?>
<RelativeLayout xmlns:android="http://schemas.android.com/apk/res/android"
android:layout_width="fill_parent"
android:layout_height="fill_parent" >
<Button
android:id="@+id/btnButton1“ android:layout_width="wrap_content"
android:layout_height="wrap_content“ android:text="Button 1"/>
<Button
android:id="@+id/btnButton2“ android:layout_width="wrap_content"
android:layout_height="wrap_content“ android:text="Button 2"
android:layout_toRightOf="@+id/btnButton1"/>
<Button
android:id="@+id/btnButton3“ android:layout_width="wrap_content"
android:layout_height="wrap_content“ android:text="Button 3"
android:layout_below="@+id/btnButton1"/>
<Button
android:id="@+id/btnSubmit“ android:layout_width="wrap_content"
android:layout_height="wrap_content“ android:layout_alignParentRight="true"
android:layout_below="@+id/btnButton3“ android:text="Submit" />
</RelativeLayout>
FrameLayout
•Frame Layout is designed to display a
single item at a time.
•You can have multiple elements
within a Frame Layout but each
element will be positioned based on
the top left of the screen.
<?xml version="1.0" encoding="utf-8"?>
<FrameLayout android:id="@+id/FrameLayout01"
android:layout_width="fill_parent"
android:layout_height="fill_parent"
xmlns:android="http://schemas.android.com/apk/res/android">
<ImageView android:id="@+id/ImageView01"
android:layout_width="fill_parent"
android:layout_height="fill_parent"
android:src="@drawable/icon"
android:scaleType="fitCenter"/>
<TextView android:text="welcome mca student"
android:id="@+id/TextView01"
android:layout_width="fill_parent"
android:layout_height="fill_parent"
android:textSize="20dp"
android:gravity="center"
android:textColor="#003456"/>
</FrameLayout>
• You can see I had both
the ImageView and
TextView fill the parent
in both horizontal and
vertical layout.
• If I had not set a
gravity then the text
would have appeared
at the top left of the
screen.
• You can see I had both the ImageView and TextView fill the parent
in both horizontal and vertical layout.
• If I had not set a gravity then the text would have appeared at the
top left of the screen.
AbsoluteLayout
• AbsoluteLayout is based on the simple idea of placing each
control at an absolute position.
• You specify the exact x and y coordinates on the screen for
each control.
• Consider what happens if a control needs to be added to the
UI. You would have to change the position of every single
element that is shifted by the new control.
AbsoluteLayout
<AbsoluteLayout
xmlns:android="http://schemas.android.
com/apk/res/android"
android:layout_width="fill_parent"
android:layout_height="fill_parent">
<Button
android:id="@+id/backbutton"
android:text="Back"
android:layout_x="150px"
android:layout_y="10px"
android:layout_width="wrap_content"
android:layout_height="wrap_content"
/>
<TextView
android:layout_x="10px"
android:layout_y="110px"
android:text="First Name"
android:layout_width="wrap_content"
android:layout_height="wrap_content"
/>
<EditText
android:layout_x="150px"
android:layout_y="100px"
android:width="100px"
android:layout_width="wrap_content"
android:layout_height="wrap_content" />
<TextView
android:layout_x="10px"
android:layout_y="160px"
android:text="Last Name"
android:layout_width="wrap_content"
android:layout_height="wrap_content" />
<EditText
android:layout_x="150px"
android:layout_y="150px"
android:width="100px"
android:layout_width="wrap_content"
android:layout_height="wrap_content" />
</AbsoluteLayout>
• how each element has
android:layout_x and
android:layout_y specified
• Layout_x put space left-right
side on screen
• Layout_y put space top-
bottom side on screen
TableLayout
• TableLayout organizes content into rows and columns.
• The rows are defined in the layout XML, and the columns are determined
automatically by Android.
• This is done by creating at least one column for each element.
• You can specify that an element should occupy more than one column using
android:layout_span.
<TableLayout
android:layout_width="fill_parent"
android:layout_height="fill_parent"
xmlns:android="http://schemas.android.com/
apk/res/android">
<TableRow>
<Button
android:id="@+id/backbutton"
android:text="Back"
android:layout_width="wrap_content"
android:layout_height="wrap_content" />
</TableRow>
<TableRow>
<TextView
android:text="First Name"
android:layout_width="wrap_content"
android:layout_height="wrap_content"
android:layout_column="1" />
<EditText
android:width="100px"
android:layout_width="wrap_content"
android:layout_height="wrap_content" />
</TableRow>
<TableRow>
<TextView
android:text="Last Name"
android:layout_width="wrap_content"
android:layout_height="wrap_content"
android:layout_column="1" />
<EditText
android:width="100px"
android:layout_width="wrap_content"
android:layout_height="wrap_content" />
</TableRow>
</TableLayout>
Android Layout

Android Layout