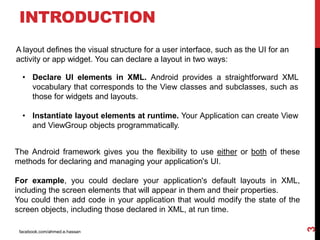
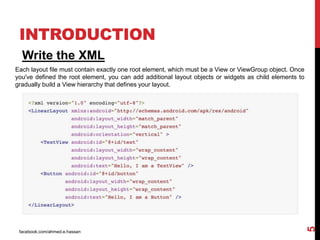
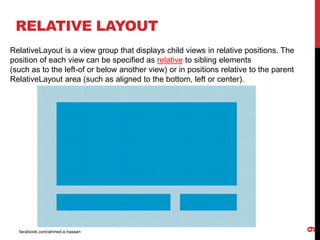
ANDROID
DEVELOPMENT
SESSION 3 – LAYOUT
AHMED EZZ EL - DIN
facebook.com/ahmed.e.hassan
1
SESSION CONTENT
• Introduction
• Linear Layout
• Relative Layout
• Table Layout
• Frame Layout
• List View
• Grid View
• Web View
facebook.com/ahmed.e.hassan
2
INTRODUCTION
facebook.com/ahmed.e.hassan
3
A layout defines the visual structure for a user interface, such as the UI for an
activity or app widget. You can declare a layout in two ways:
• Declare UI elements in XML. Android provides a straightforward XML
vocabulary that corresponds to the View classes and subclasses, such as
those for widgets and layouts.
• Instantiate layout elements at runtime. Your Application can create View
and ViewGroup objects programmatically.
The Android framework gives you the flexibility to use either or both of these
methods for declaring and managing your application's UI.
For example, you could declare your application's default layouts in XML,
including the screen elements that will appear in them and their properties.
You could then add code in your application that would modify the state of the
screen objects, including those declared in XML, at run time.
facebook.com/ahmed.e.hassan
4
INTRODUCTION
The advantage to declaring your UI in XML is that it enables you to better
separate the presentation of your application from the code that controls its
behavior.
For example, you can create XML layouts for different screen orientations,
different device screen sizes, and different languages. Additionally, declaring the
layout in XML makes it easier to visualize the structure of your UI, so it's easier to
debug problems.
facebook.com/ahmed.e.hassan
5
INTRODUCTION
Write the XML
Each layout file must contain exactly one root element, which must be a View or ViewGroup object. Once
you've defined the root element, you can add additional layout objects or widgets as child elements to
gradually build a View hierarchy that defines your layout.
facebook.com/ahmed.e.hassan
6
INTRODUCTIONINTRODUCTION
Write the XML
After you've declared your layout in XML, save the file with the .xml extension, in your
Android project's res/layout/ directory, so it will properly compile.
Load the XML Resource
LINEAR LAYOUT
facebook.com/ahmed.e.hassan
7
LinearLayout is a view group that aligns all children in a single direction, vertically or horizontally.
You can specify the layout direction with the android:orientation attribute.
facebook.com/ahmed.e.hassan
8
LINEAR LAYOUT
All children of a LinearLayout are stacked one after the other, so a vertical list will only have one
child per row, no matter how wide they are, and a horizontal list will only be one row high
(the height of the tallest child, plus padding).
A LinearLayout respects margins between children and
the gravity (right, center, or left alignment) of each child.
facebook.com/ahmed.e.hassan
9
RELATIVE LAYOUT
RelativeLayout is a view group that displays child views in relative positions. The
position of each view can be specified as relative to sibling elements
(such as to the left-of or below another view) or in positions relative to the parent
RelativeLayout area (such as aligned to the bottom, left or center).
facebook.com/ahmed.e.hassan
10
RELATIVE LAYOUT
A RelativeLayout is a very powerful utility for designing a user interface because it can eliminate
nested view groups and keep your layout hierarchy flat, which improves performance.
Positioning Views
RelativeLayout lets child views specify their position relative to the parent view or to each other
(specified by ID).
So you can align two elements by right border, or make one below another, centered in the screen,
centered left, and so on.
By default, all child views are drawn at the top-left of the layout, so you must define the position of each
view using the various layout properties
facebook.com/ahmed.e.hassan
11
RELATIVE LAYOUT
Positioning Views
Some of the many layout properties available to views in a RelativeLayout include:
android:layout_alignParentTop
If "true", makes the top edge of this view match the top edge of the parent.
android:layout_centerVertical
If "true", centers this child vertically within its parent.
android:layout_below
Positions the top edge of this view below the view specified with a resource ID.
android:layout_toRightOf
Positions the left edge of this view to the right of the view specified with a resource ID.
facebook.com/ahmed.e.hassan
12
TABLE LAYOUT
TableLayout is a ViewGroup that displays child View elements in rows and
columns.
facebook.com/ahmed.e.hassan
13
TABLE LAYOUT
TableLayout positions its children into rows and columns.
TableLayout containers do not display border lines for their rows, columns, or cells.
The table will have as many columns as the row with the most cells. A table can
leave cells empty, but cells cannot span columns, as they can in HTML.
TableRow objects are the child views of a TableLayout (each TableRow defines a
single row in the table). Each row has zero or more cells, each of which is defined
by any kind of other View.
facebook.com/ahmed.e.hassan
14
FRAME LAYOUT
Frame Layout is designed to block out an area on the screen to display a
single item.
Generally, FrameLayout should be used to hold a single child view, because
it can be difficult to organize child views in a way that's scalable to different
screen sizes without the children overlapping each other.
facebook.com/ahmed.e.hassan
15
ListView is a view group that displays a list of scrollable items.
The list items are automatically inserted to the list using an Adapter that pulls content from a source
such as an array or database query and converts each item result into a view that's placed into the list.
LIST VIEW
facebook.com/ahmed.e.hassan
16
An adapter actually bridges between UI components and the data source that fill data into UI
Component. Adapter can be used to supply the data to like spinner, list view, grid view etc.
LIST VIEW
The ListView and GridView are subclasses of AdapterView and they can be populated by
binding them to an Adapter, which retrieves data from an external source and creates a View
that represents each data entry.
facebook.com/ahmed.e.hassan
17
GRID VIEW
GridView is a ViewGroup that displays items in a two-dimensional, scrollable grid.
The grid items are automatically inserted to the layout using a ListAdapter.
facebook.com/ahmed.e.hassan
18
WEB VIEW
If you want to deliver a web application (or just a web page) as a part of a client
application, you can do it using WebView.
WebView class is an extension of Android's View class that allows you to display
web pages as a part of your activity layout.
is helpful is when you want to provide information in your application that you
might need to update, such as an end-user agreement or a user guide. Within
your Android application, you can create an Activity that contains a WebView,
then use that to display your document that's hosted online.
if your application provides data to the user that always requires an Internet
connection to retrieve data, such as email.

Android development session 3 - layout

  • 1.
    ANDROID DEVELOPMENT SESSION 3 –LAYOUT AHMED EZZ EL - DIN facebook.com/ahmed.e.hassan 1
  • 2.
    SESSION CONTENT • Introduction •Linear Layout • Relative Layout • Table Layout • Frame Layout • List View • Grid View • Web View facebook.com/ahmed.e.hassan 2
  • 3.
    INTRODUCTION facebook.com/ahmed.e.hassan 3 A layout definesthe visual structure for a user interface, such as the UI for an activity or app widget. You can declare a layout in two ways: • Declare UI elements in XML. Android provides a straightforward XML vocabulary that corresponds to the View classes and subclasses, such as those for widgets and layouts. • Instantiate layout elements at runtime. Your Application can create View and ViewGroup objects programmatically. The Android framework gives you the flexibility to use either or both of these methods for declaring and managing your application's UI. For example, you could declare your application's default layouts in XML, including the screen elements that will appear in them and their properties. You could then add code in your application that would modify the state of the screen objects, including those declared in XML, at run time.
  • 4.
    facebook.com/ahmed.e.hassan 4 INTRODUCTION The advantage todeclaring your UI in XML is that it enables you to better separate the presentation of your application from the code that controls its behavior. For example, you can create XML layouts for different screen orientations, different device screen sizes, and different languages. Additionally, declaring the layout in XML makes it easier to visualize the structure of your UI, so it's easier to debug problems.
  • 5.
    facebook.com/ahmed.e.hassan 5 INTRODUCTION Write the XML Eachlayout file must contain exactly one root element, which must be a View or ViewGroup object. Once you've defined the root element, you can add additional layout objects or widgets as child elements to gradually build a View hierarchy that defines your layout.
  • 6.
    facebook.com/ahmed.e.hassan 6 INTRODUCTIONINTRODUCTION Write the XML Afteryou've declared your layout in XML, save the file with the .xml extension, in your Android project's res/layout/ directory, so it will properly compile. Load the XML Resource
  • 7.
    LINEAR LAYOUT facebook.com/ahmed.e.hassan 7 LinearLayout isa view group that aligns all children in a single direction, vertically or horizontally. You can specify the layout direction with the android:orientation attribute.
  • 8.
    facebook.com/ahmed.e.hassan 8 LINEAR LAYOUT All childrenof a LinearLayout are stacked one after the other, so a vertical list will only have one child per row, no matter how wide they are, and a horizontal list will only be one row high (the height of the tallest child, plus padding). A LinearLayout respects margins between children and the gravity (right, center, or left alignment) of each child.
  • 9.
    facebook.com/ahmed.e.hassan 9 RELATIVE LAYOUT RelativeLayout isa view group that displays child views in relative positions. The position of each view can be specified as relative to sibling elements (such as to the left-of or below another view) or in positions relative to the parent RelativeLayout area (such as aligned to the bottom, left or center).
  • 10.
    facebook.com/ahmed.e.hassan 10 RELATIVE LAYOUT A RelativeLayoutis a very powerful utility for designing a user interface because it can eliminate nested view groups and keep your layout hierarchy flat, which improves performance. Positioning Views RelativeLayout lets child views specify their position relative to the parent view or to each other (specified by ID). So you can align two elements by right border, or make one below another, centered in the screen, centered left, and so on. By default, all child views are drawn at the top-left of the layout, so you must define the position of each view using the various layout properties
  • 11.
    facebook.com/ahmed.e.hassan 11 RELATIVE LAYOUT Positioning Views Someof the many layout properties available to views in a RelativeLayout include: android:layout_alignParentTop If "true", makes the top edge of this view match the top edge of the parent. android:layout_centerVertical If "true", centers this child vertically within its parent. android:layout_below Positions the top edge of this view below the view specified with a resource ID. android:layout_toRightOf Positions the left edge of this view to the right of the view specified with a resource ID.
  • 12.
    facebook.com/ahmed.e.hassan 12 TABLE LAYOUT TableLayout isa ViewGroup that displays child View elements in rows and columns.
  • 13.
    facebook.com/ahmed.e.hassan 13 TABLE LAYOUT TableLayout positionsits children into rows and columns. TableLayout containers do not display border lines for their rows, columns, or cells. The table will have as many columns as the row with the most cells. A table can leave cells empty, but cells cannot span columns, as they can in HTML. TableRow objects are the child views of a TableLayout (each TableRow defines a single row in the table). Each row has zero or more cells, each of which is defined by any kind of other View.
  • 14.
    facebook.com/ahmed.e.hassan 14 FRAME LAYOUT Frame Layoutis designed to block out an area on the screen to display a single item. Generally, FrameLayout should be used to hold a single child view, because it can be difficult to organize child views in a way that's scalable to different screen sizes without the children overlapping each other.
  • 15.
    facebook.com/ahmed.e.hassan 15 ListView is aview group that displays a list of scrollable items. The list items are automatically inserted to the list using an Adapter that pulls content from a source such as an array or database query and converts each item result into a view that's placed into the list. LIST VIEW
  • 16.
    facebook.com/ahmed.e.hassan 16 An adapter actuallybridges between UI components and the data source that fill data into UI Component. Adapter can be used to supply the data to like spinner, list view, grid view etc. LIST VIEW The ListView and GridView are subclasses of AdapterView and they can be populated by binding them to an Adapter, which retrieves data from an external source and creates a View that represents each data entry.
  • 17.
    facebook.com/ahmed.e.hassan 17 GRID VIEW GridView isa ViewGroup that displays items in a two-dimensional, scrollable grid. The grid items are automatically inserted to the layout using a ListAdapter.
  • 18.
    facebook.com/ahmed.e.hassan 18 WEB VIEW If youwant to deliver a web application (or just a web page) as a part of a client application, you can do it using WebView. WebView class is an extension of Android's View class that allows you to display web pages as a part of your activity layout. is helpful is when you want to provide information in your application that you might need to update, such as an end-user agreement or a user guide. Within your Android application, you can create an Activity that contains a WebView, then use that to display your document that's hosted online. if your application provides data to the user that always requires an Internet connection to retrieve data, such as email.