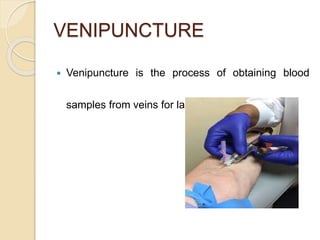
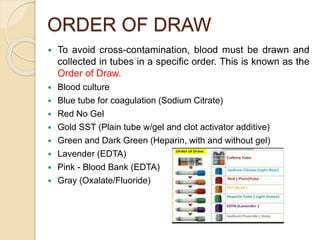
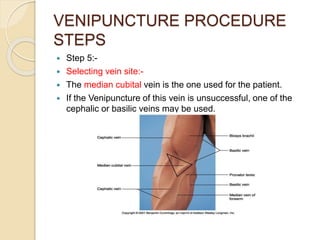
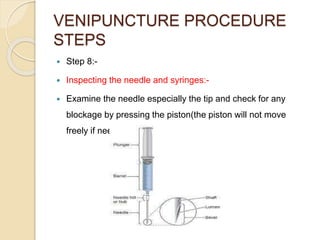
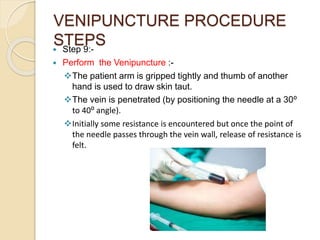
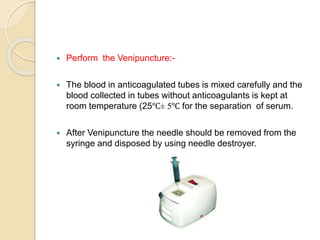
This document discusses the process of phlebotomy and blood specimen collection. Phlebotomy, also known as venipuncture, involves collecting a blood sample from veins using a needle. It describes the steps of the venipuncture procedure, which includes preparing materials, positioning the patient, selecting a vein, applying a tourniquet, cleansing the skin, inspecting needles/syringes, performing the puncture, and handling the collected blood samples appropriately based on testing requirements. Performing venipuncture properly is important for obtaining quality lab test results.
2. PHLEBOTOMY
The process of collecting a blood sample is called
phlebotomy
This procedure is also known as venipuncture
A person who performs phlebotomy is called a
phlebotomist, although doctors nurses, and
medical laboratory scientists.
3. BLOOD SPECIMEN COLLECTION AND
PROCESSING
The first step in acquiring a quality lab. Test result
for any patient is the specimen collection
procedure.
Blood specimen are obtained through capillary skin
puncture ( finger, toe, heel), arterial , venous
sampling.
5. VENIPUNCTURE PROCEDURE
STEPS
STEP 1:-
Preparation of specimen collection material:
Following material should be readily available in
the specimen collection section-
Disposable syringes and needles or vacutainer
systems.
Disposable lancets
Gauze pads or cotton
Tourniquet
70% (V/V) ethanol
Clean and dry wide mouth bottles
Blood collection tubes
6. ORDER OF DRAW
To avoid cross-contamination, blood must be drawn and
collected in tubes in a specific order. This is known as the
Order of Draw.
Blood culture
Blue tube for coagulation (Sodium Citrate)
Red No Gel
Gold SST (Plain tube w/gel and clot activator additive)
Green and Dark Green (Heparin, with and without gel)
Lavender (EDTA)
Pink - Blood Bank (EDTA)
Gray (Oxalate/Fluoride)
7. VENIPUNCTURE PROCEDURE
STEPS
Step 2:-
Patient preparation:
Following instruction is given to the patient
1. patient should be on balanced diet at least for 2 to 3 days
prior to the test.
2. The day before sample collection, the patient should not
drink intoxicating substance, esp. alcoholic drinks and eat
tobacco.
3. Patient should report to the lab. After fasting for12-16hrs.
Patient should not drink tea, or coffee or any other drinks
except one glassful of water.
8. SPECIMEN COLLECTION
The phlebotomist must be conversant with following OSHA
rules-
All human blood and certain body fluids are treated as
infectious for HIV, HBV, and other blood born pathogens.
Personal protective equipment (PPE) is specialized clothing
or equipment worn to provide protection from occupational
exposure. PPE includes gloves, gowns, laboratory coat, face
shields or mask etc.
9. VENIPUNCTURE
PROCEDURE STEPS
Step 3:-
Laboratory request form
The laboratory request form should provide the following
information:
Patient’s full name , age , sex
Identification number
List of required specific tests
Urgent tests (only those tests that are required for the
immediate care)
Name of the physician ordering the test.
10. VENIPUNCTURE PROCEDURE
STEPS
Step 4:-
Reassuring the patient:-
The technician must gain the patients confidence and assure
him that, although the Venipuncture will be slightly painful, it will
be of short duration.
Positioning the patient:-
The patient should be made comfortably in a chair and should
position his arm straight from the shoulder and it should bend
at the elbow.
If the patient want to lie down, let the patient lie comfortably
on the back.
11. VENIPUNCTURE PROCEDURE
STEPS
Step 5:-
Selecting vein site:-
The median cubital vein is the one used for the patient.
If the Venipuncture of this vein is unsuccessful, one of the
cephalic or basilic veins may be used.
12. VENIPUNCTURE PROCEDURE
STEPS
Following techniques are useful when encountering a patient
with difficult veins:
Look for a blood drawing site
Feel for a vein using the tip of the finger. Think of four
things when feeling for a vein, bounce, direction of vein,
size of needle, and depth.
Choose the vein that feels the fullest.
Try the other arm unless otherwise instructed.
Ask the patient to make the fit.
Apply a tourniquet.
Massage the arm from wrist to elbow.
13. VENIPUNCTURE PROCEDURE
STEPS
Step 6:-
Applying tourniquet:- A tourniquet will increase venous filling,
which makes the vein more prominent and easier to enter.
The tourniquet should never be left on the arm for more than
2 minutes because a tourniquet prevents the blood from
flowing freely and the balance of the fluid and blood elements
may get disrupted.
14. VENIPUNCTURE PROCEDURE
STEPS
Step 7:-
Cleansing the area:-
Once the vein to be used has been located, the technician
must cleanse the area thoroughly to prevent any
contamination.
Spirit or 70% ethanol is used for cleansing and the area is
allowed to dry to prevent possible hemolysis of the blood
specimen. If the skin is touched after it has been cleansed,
the procedure must be repeated
15. VENIPUNCTURE PROCEDURE
STEPS
Step 8:-
Inspecting the needle and syringes:-
Examine the needle especially the tip and check for any
blockage by pressing the piston(the piston will not move
freely if needle is blocked)
16. VENIPUNCTURE PROCEDURE
STEPS
Step 9:-
Perform the Venipuncture :-
The patient arm is gripped tightly and thumb of another
hand is used to draw skin taut.
The vein is penetrated (by positioning the needle at a 30⁰
to 40⁰ angle).
Initially some resistance is encountered but once the point of
the needle passes through the vein wall, release of resistance is
felt.
17. VENIPUNCTURE PROCEDURE
STEPS
Perform the Venipuncture :-
After the blood has been drawn , the patient should release the fist
and the tourniquet is also released
A cotton ball is held firmly over the Venipuncture site as soon
as the needle is removed. The patient may remove the cotton
ball after 10 -15 minutes.
After removing the needle the collected blood is dispensed in
the appropriate tubes.
18. Perform the Venipuncture:-
The blood in anticoagulated tubes is mixed carefully and the
blood collected in tubes without anticoagulants is kept at
room temperature (25℃± 5℃ for the separation of serum.
After Venipuncture the needle should be removed from the
syringe and disposed by using needle destroyer.