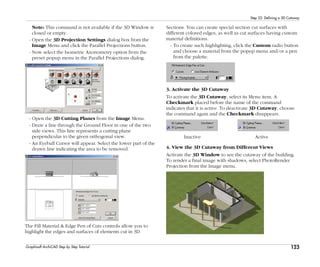
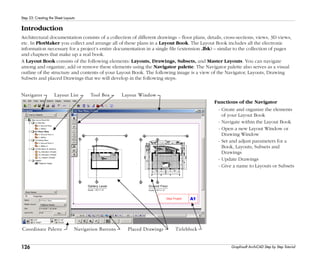
SlideShare a Scribd company logo
1
Contents
ArchiCAD Step by Step Tutorial
1
Contents
ArchiCAD Step by Step Tutorial
Step by Step Tutorial
by Thomas M. Simmons
2
Contents
ArchiCAD Step by Step Tutorial
Graphisoft
Visit the Graphisoft website at http://www.graphisoft.com for local distributor and product availability information.
Graphisoft ArchiCAD Step by Step Tutorial
Copyright © 1998-2003 by Thomas M. Simmons. All rights reserved. Reproduction, paraphrasing or translation without express prior written
permission of the author and Graphisoft is strictly prohibited.
Published by GRAPHISOFT R&D Rt.
Second edition - first printing.
Trademarks
ArchiCAD and ArchiFM are registered trademarks and PlotMaker, Virtual Building, StairMaker and GDL are trademarks of Graphisoft. All other
trademarks are the property of their respective holders.
3
Contents
ArchiCAD Step by Step Tutorial
3
Contents
ArchiCAD Step by Step Tutorial
About the Author
Thomas M. Simmons
President
ARCHVISTA
The Graphisoft ArchiCAD Step by Step Tutorial was developed by ARCHVISTA and used with the ArchiCAD training course at the
San Francisco Institute of Architects. This is the first edition of Step by Step produced for ArchiCAD 8.
The author, Thomas M. Simmons, spent seven years as an architect and served as the Director of Design Technology for
Esherick, Homsey, Dodge and Davis Architects, an award-winning and internationally acclaimed architecture firm, before
starting his company, ARCHVISTA. While at EHDD Architects, he was instrumental in integrating and managing ArchiCAD on a
variety of projects including single-family houses, commercial buildings, libraries and aquariums.
Simmons received a Master of Architecture degree from the University of California, Berkeley, and a Bachelor of Environmental
Design degree from Texas A & M University. He has been a speaker on a variety of subjects including Beginning to Advanced
ArchiCAD, Architectural Multimedia, QuickTime VR and Architectural Visualization.
ARCHVISTA has produced several notable projects for the architectural and ArchiCAD markets including the acclaimed NASA
Virtual Tours - 2002, the Lawrence Berkeley National Laboratory Building Technology Facility - 2001, the award-winning
Architectural Record, Record Houses CD-ROM - 1997 and 1998 and the award winning visualization of the American Hebrew
Academy with Aaron Green Architects - 1998.
ARCHVISTA is a leading consultant and reseller of ArchiCAD for the Northern California, Nevada and Oregon regions and can be
reached at www.archvista.com. ARCHVISTA is a member of the Virtual Building Group representing the largest base of
ArchiCAD users in the United States.
4
Contents
ArchiCAD Step by Step Tutorial
5
Contents
Graphisoft ArchiCAD Step by Step Tutorial
Contents
About the Author . . . . . . . . . . . . . . . . . . . . . . . . . . . . . . . . . . . 3
Introduction 7
Part One: Concepts and Tools 13
Step 1: The ArchiCAD Workplace . . . . . . . . . . . . . . . . . . . . . 13
Step 2: Understanding Objects and GDL . . . . . . . . . . . . . . . 21
Part Two: Project Setup 25
Step 3: Customizing the Drawing Environment . . . . . . . . . . 25
Step 4: Managing Project Information . . . . . . . . . . . . . . . . . . 29
Part Three: Creating the Virtual Building 37
Step 5: Establishing the Base Building Layout . . . . . . . . . . . 37
Step 6: Viewing the Building in 3D . . . . . . . . . . . . . . . . . . . . 45
Step 7: Working with Stories . . . . . . . . . . . . . . . . . . . . . . . . . 49
Step 8: Completing the Building Envelope . . . . . . . . . . . . . . 55
Step 9: Developing the Design . . . . . . . . . . . . . . . . . . . . . . . 59
Step 10: Working with Doors, Windows and Skylights . . . . 67
Step 11: Adding Internal Circulation . . . . . . . . . . . . . . . . . . . 75
Step 12: Defining Room Usage and Spaces . . . . . . . . . . . . . 79
Step 13: Adding Final Details . . . . . . . . . . . . . . . . . . . . . . . . 83
Step 14: Creating a Ceiling Plan . . . . . . . . . . . . . . . . . . . . . . 87
Step 15: Placing the Building on a Site . . . . . . . . . . . . . . . . . 91
Part Four: Measuring and Costing a Building 95
Step 16: Calculating Building Information . . . . . . . . . . . . . . 95
Step 17: Creating Building Schedules . . . . . . . . . . . . . . . . . . 99
Part Five: Presenting the Design to a Client 103
Step 18: Using Perspectives . . . . . . . . . . . . . . . . . . . . . . . . . 103
Step 19: Developing an Animation . . . . . . . . . . . . . . . . . . . 107
Step 20: Viewing Virtual Reality . . . . . . . . . . . . . . . . . . . . . 111
Step 21: Creating a Sun Study . . . . . . . . . . . . . . . . . . . . . . . 117
Step 22: Defining a 3D Cutaway . . . . . . . . . . . . . . . . . . . . . 121
Part Six: Producing and Publishing Drawings 125
Step 23: Creating the Sheet Layouts . . . . . . . . . . . . . . . . . . 125
Step 24: Placing, Positioning and Viewing Drawings . . . . . 129
Step 25: Publishing, Printing and Plotting . . . . . . . . . . . . . 133
Part Seven: Detailing, Management and Archiving 137
Step 26: Detailing a Project . . . . . . . . . . . . . . . . . . . . . . . . . 137
Step 27: Reviewing a Project . . . . . . . . . . . . . . . . . . . . . . . . 143
Step 28: Managing a Teamwork Project . . . . . . . . . . . . . . . 147
Step 29: Archiving a Project . . . . . . . . . . . . . . . . . . . . . . . . . 153
6
Contents
Graphisoft ArchiCAD Step by Step Tutorial
7
Introduction
Graphisoft ArchiCAD Step by Step Tutorial
Introduction
Welcome to Step by Step
The Step by Step Tutorial for ArchiCAD 8 is designed as a 16-
to 20-hour course that will guide you through a project. By
the end of this course, you should have a basic understanding
of ArchiCAD concepts, tools, drawing techniques and
modeling. The steps highlight the implementation of a
project, methods of design and the application of tools for
construction documents.
The intention of this course is to offer a consistent and
organized process for learning ArchiCAD based on an
architectural project.
Each step guides you through the concept or technique to be
learned, the information necessary to build the exercise, and
what to do for that step. The steps also contain diagrams of
the Toolbox and dialogs that provide quick references to
Tools used in that exercise.
The Concept of a Virtual Building
Architectural software is evolving rapidly from an “automator”
of two-dimensional drafting to a three-dimensional building
simulator. As a result of this evolution, the architect’s ability to
construct a “virtual building” on a desktop computer, to
simulate the building’s behavior both before it is built and
throughout its life cycle, will change the architect’s design
process, fee structure, and relationship with the client,
contractor and the community. In addition to transforming the
architect’s own practice, ownership of the 3D computer
model will carry important competitive advantages in
procuring all future work associated with the same building.
Traditional CAD vs. Virtual Building Technology
So what is the difference between traditional CAD drafting
and Virtual Building Technology? Traditional CAD is the world
of lines, arcs, circles and blocks. With traditional CAD, your
drawing is a 2D representation of how the building will be
built. It is very similar to hand drafting but automated with
computer technology.
With Virtual Building Technology, you construct a building
using building elements: floor slabs, walls, roofs, windows,
doors, stairs and other objects. A Virtual Building uses
intelligent objects to create building elements. With object
oriented CAD, each object in the system represents a building
element with a behavior and intelligence relevant to that
element. For example, the behavior of a door is different than
the behavior of the wood used to construct it. Because you
have the real model of a building, not just a 2D representation
of one, you can ask it building specific questions. For
instance, you can get detailed reports on egress analysis, heat
loss analysis, code compliance or cost takeoffs.
From the virtual model, buildings can be analyzed with
respect to building mass, overshadowing and visual
appearance. ArchiCAD can automatically generate plans,
elevations and sections, perspective views, animations and
virtual reality views.
Integrated Building Information
Architects and building professionals using integrated 3D
CAD software generate a wealth of valuable building
information that can be used for both the traditional
architectural practice as well as for many new fields and
services. Some of the opportunities that can utilize this
information are:
• Building master planning, design and development
• Creation of renderings, animations and virtual reality
scenes
• Production drawings, details and schedules
• Building marketing
• Management of building spaces and assets
8
Introduction
Graphisoft ArchiCAD Step by Step Tutorial
• Post-occupancy studies and simulation of design changes
• Analysis and visualization of product performance over
the building life cycle
• Content development for electronic building component
objects including product data and links to manufacturer
Websites
With ArchiCAD and its Virtual Building Technology,
architects, in partnership with owners, are in a prime position
to assert their central role not only in the initial design of
buildings, but also in their long-term programming,
maintenance and operation.
How Firms use ArchiCAD
As the new age of Virtual Building Technology unfolds,
architecture firms and the building industry must consider
how to effectively apply Virtual Building Technology to
design, production, collaboration and information analysis.
ArchiCAD offers a complete solution and, unlike other CAD
systems, has been built on the foundation of architecture.
With this in mind, there are a variety of architecture firms
using ArchiCAD and its Virtual Building Technology system.
The firms range in size from one-man firms to large
companies and specialize in a variety of projects including
housing, retail, commercial, schools and others. Here is what
several architects have to say about ArchiCAD and their use of
Virtual Building Technology:
House+House Architects (San Francisco, California)
“Part of ArchiCAD’s value lies in modeling and easy
perspectives; you do not need to put a lot of effort into it,”
Steven House said. “But it is worth it to take the extra step to
create views with a different flavor. The results can be very
powerful.”
House+House are very hands on with their projects, working
closely with builders, artisans and craftsmen to ensure that no
detail goes unconsidered. “We are very excited about our
explorations in ArchiCAD,” Steven said. “And the potential it
offers for us to communicate design ideas to our clients, our
builders and ourselves.”
STUDIOS Architecture (Washington, D.C.)
With a tight project timeline, the design team at STUDIOS
appreciated ArchiCAD’s ability to generate three-dimensional
models automatically from the floor plan and section views
allowing them to advance the construction documents, make
design studies and prepare client presentations at the same
time with relatively little additional work.
“Modeling in 3D gives you and your client a chance to look
at a design critically and react to it,” project architect Bill
Deegan said. Deegan also cites that STUDIOS could shave off
critical time by sending QuickTime VR scenes to the client by
e-mail and through an Intranet which links STUDIOS U.S.
offices in Washington, D.C., San Francisco and New York.
The Orcutt/Winslow Partnership (Phoenix, Arizona)
When Orcutt/Winslow began to fully embrace the Virtual
Building method of working, they had to rethink their billing
process. “The time spent on the project is greater up-front, but
the documents phase time and effort has been significantly
reduced”, Winslow said. ArchiCAD’s single, integrated
database allows them to start the input of specific materials
and systems at a much earlier point in the design phase. With
this method, they can show these details at any point, and
comfortably make modifications because any changes made
will be updated in all views. “Our schematic designs show a
much more complete three-dimensional presentation to the
client and allow us to evaluate the design in 3D more
thoroughly at early stages.”
“Office morale and profitability are both on the rise and we
are currently in the process of shifting our project phasing
percentages to take into account the Virtual Building
methodology,” added project manager Russ Sanders. “More
time is expended up front establishing the links from the
9
Introduction
Graphisoft ArchiCAD Step by Step Tutorial
primitive model to the layout sheets. Once this is done, the rest
of the project can be developed within the model. By the time
we have completed the design development phase, we are
actually about 60 percent complete with construction
documents.”
Rockefeller/Hricak Architects (Venice, California)
“We would like to think that the appearance of our work is a
direct result of how it gets built. Using ArchiCAD to build a
‘living’ model of the building helps us to focus on issues and
assist us in making design decisions as the project takes
shape.” The firm is concerned not just how buildings look, but
also how they function over time.
“We need to be able to predict how the building will look 10 to
20 years down the road, because that affects the way we design
it,” Hricak said. “If something is going to wear out in 20 years,
we need to understand how that element interacts with what is
around it. Obviously the structure is not going to wear out, but
windows will be repaired, and equipment will become obsolete.
ArchiCAD helps us be clear about the separation of systems
and get a sense of how the building will perform.”
How This Book and Step by Step
Interactive Work Together
This book (also available in Adobe Acrobat .pdf format on the
ArchiCAD 8 CD-ROM/ArchiCAD Documentation folder) is
divided into seven sections beginning with the introduction of
concepts, then moving through the construction of a Virtual
Building. The Step by Step Interactive acts as a virtual
assistant that answers questions with real-time movies of each
step. All you need to use the interactive is a standard web
browser.
Whenever you see this icon...
...it means there is a QuickTime movie demonstrating the step.
To View the Movies on Windows
Choose the Step by Step Interactive option of the Startup
dialog box of the ArchiCAD 8 CD-ROM or Browse this CD,
open the Step by Step Interactive folder on the ArchiCAD 8
CD-ROM and double-click the file called Step Interactive.htm.
This will open into your default web browser.
To View the Movies on MacOS
Open the Step by Step Interactive folder on the ArchiCAD 8
CD-ROM and double-click the file called Step Interactive.htm.
This will open into your default web browser.
To locate the corresponding movie for a step, use the
information under the CD-ROM icon.
P-1: Indicates the main section, Part 1: Concepts and Tools
S-4: Indicates the step, Step 4: Editing and Notation
M-C: Indicates the movie designation for Step 4, Movie C -
Multiply Exercise
1-4: Indicates the exercise numbers if the movie refers to
more than one exercise
To play the QuickTime movie, simply click the name of the
movie (the name in color with an underline), such as Movie C
- Multiply Exercise. The screen will jump to the movie and
begin playing it.
It is that simple!
10
Introduction
Graphisoft ArchiCAD Step by Step Tutorial
How to Install and Use the Step Files on
Windows
Insert the ArchiCAD 8 CD-ROM into your computer’s CD-
ROM drive. The main dialog box of the installation appears
on your screen, where you can choose from the options by
single-clicking on the appropriate caption:
• Install Step by Step Tutorial
If you have an installed ArchiCAD 8 on your hard drive and
you need only the Step Files, click Step by Step Tutorial
caption and follow the installation procedure. Once
completed, the requested items appear in the existing
ArchiCAD 8 folder. Double-click on them and discover your
new ArchiCAD tutorial files.
Library Manager
If you try to open a Step file and the Library Manager dialog
box appears, asking where the ArchiCAD Object Library is
located on your hard drive, you must:
1. locate the ArchiCAD folder,
2. open it and select the folder called ArchiCAD Library 8,
3. click the Add button in the center of the dialog box,
4. click the Done button.
How to Install and Use the Step Files on
MacOS
Insert the ArchiCAD 8 CD-ROM into your computer’s CD-
ROM drive. The contents of the CD-ROM will appear on your
screen.
11
Introduction
Graphisoft ArchiCAD Step by Step Tutorial
• Install Step by Step Tutorial
If you have an installed ArchiCAD 8 on your hard drive and
you need only the Step Files, click Step by Step Tutorial icon
in the Step by Step Tutorial folder.
A dialog box will ask for the location of your ArchiCAD
folder. Click the Select Folder button to browse your
computer for the requested folder. Click Continue and follow
the installation procedure.
Once completed, the requested items appear in the existing
ArchiCAD 8 folder. Double-click on them and discover your
new ArchiCAD tutorial files.
Library Manager
If you try to open a Step file and the Library Manager dialog
box appears, asking where the ArchiCAD Object Library is
located on your hard drive, you must:
1. locate the ArchiCAD folder,
2. open it and select the folder called ArchiCAD Library 8,
3. click the Add button in the center of the dialog box,
4. click the Done button.
Starting a Tutorial Exercise
When the ArchiCAD 8 version is open on screen, go to the
File Menu and Open the file Step-xx.pln located in the Step
Files folder.
12
Introduction
Graphisoft ArchiCAD Step by Step Tutorial
13
Step 1: The ArchiCAD Workplace
Graphisoft ArchiCAD Step by Step Tutorial
Part One: Concepts and Tools
Step 1: The ArchiCAD Workplace
Overview
Here you will learn the basic windows of the working environment and how to customize these windows to create your
personal workspace. ArchiCAD has three primary working environments; Floor Plan Window, Section/Elevation Window and
the 3D Window.
Additionally, this step will introduce you to the Tools and Palettes that are used to help you draw and construct building
elements, notes, graphics and views.
Process to Learn
• ArchiCAD Workplace
Floor Plan Window
Section/Elevation Window
3D Window
• Tools & Palettes
Toolbox
Info Box
Coordinate Box
Control Box
Starting the Step
To begin this step, double-click the file named Step-01.pln contained in the Step Files folder.
14
Step 1: The ArchiCAD Workplace
Graphisoft ArchiCAD Step by Step Tutorial
Introduction
This step introduces the visible elements of the ArchiCAD working environment. They will help you find your way around the
ArchiCAD workplace and understand the role each component plays in using ArchiCAD.
In many respects, the ArchiCAD workplace is similar to conventional design and drafting environments. We like to think that
ArchiCAD begins where your drafting table leaves off, providing you with actual construction elements designed to create a
virtual building.
The ArchiCAD workplace is designed to provide you with tools that look and feel comfortable, but have all the power and
precision available to a computerized system. Once you have started the program you will see the ArchiCAD Workplace on your
screen, complete with a Floor Plan worksheet, Menubar, Floating Palettes, and other Windows displaying various aspects of the
Virtual Building Project.
You can construct your model in ArchiCAD's main Windows displaying different project views:
- The Floor Plan Window is
the basic construction area
where most editing operations
take place.
- The 3D Window gives you
instant feedback on the
construction operations
performed in other views and
at the same time allows you to
directly edit your model in
either perspective or
axonometric view.
- Any number of Section/
Elevation Windows can be
defined by a dedicated Tool at
any moment, at any location.
15
Step 1: The ArchiCAD Workplace
Graphisoft ArchiCAD Step by Step Tutorial
What to Do
This step opens to the ground floor of a two-story building.
Here we can view the three components of ArchiCAD’s
workplace. These three workspaces are linked working
environments. The working environment allows an interactive
drawing process between the Floor Plan, Section/
Elevation and 3D Window. Elements are updated in all
views to reflect current changes to the model.
These three workspaces can be accessed through the Project
Map which is located in the Navigator. Since we do not need
the Customizable Info Box, close it by clicking the "X" button
in the top right corner as shown below.
The Floor Plan Window
The center of the ArchiCAD workplace is the Floor Plan
worksheet. This Window plays two roles at the same time:
- It displays a representation of the project as a traditional
architectural drawing.
- It is a 2D/3D modeling environment that is interactive with
the Sections/ Elevations and 3D workspace.
P-1, S-1, M-A
With the Floor Plan window open, we can view the plans for
both floors of this building. The model currently shows the
Ground Floor story. To move up a story, open the Stories
section of the Project Map by clicking the "+" symbol and
then double click the Gallery story.
The Floor Plan worksheet is like a sheet of drafting paper.
However, a traditional mechanical drafting board is limited by
the size of the paper you can fit on it, while the ArchiCAD
worksheet can be as big as you want it to be. You can pan
and zoom the Window within the full drawing space to obtain
the best view of the work you are doing.
16
Step 1: The ArchiCAD Workplace
Graphisoft ArchiCAD Step by Step Tutorial
The Section/Elevation Window
Using the Section/Elevation Tool in the Toolbox, you can
generate any number of sections or elevations of your project,
which will appear in separate Windows. To open a section or
elevation, open the Section/Elevation workspace in the
Project Map by clicking the "+" symbol and then double click
the Section or Elevation you wish to view.
The Section/Elevation Window is interactively linked to
both the Floor Plan and 3D Windows. Elements selected in
this Window are recognized as walls, beams, columns, slabs,
roofs, windows, doors, lights and library parts. These
elements are fully editable using the same editing tools as you
use in the Floor Plan workspace.
You can also add drawing elements to this Window using the
2D drafting tools, place objects and text blocks on the
section/elevation and even copy and paste parts of the
Window to the floor plan for completing detailed working
documents.
Section/Elevation views are saved with your project model
file. It is also possible to save them as separate files in a
variety of drawing formats using the Save As... command
under the File menu.
The 3D Worksheet Window
The 3D Window is used for three-dimensional visualization
of the architectural project and as a project editing
environment. To open the 3D Window, go to the preset views
in the Project Map by clicking the "+" symbol next to 3D and
then double click either the perspective or axonometric
view.
Either the complete project or just the parts you select in plan
view will be displayed in the 3D Window. Block, Wireframe,
Hidden line and Shaded views are available in all types of
parallel and perspective projections. The 3D Window serves
a variety of functions:
- In your design phase, the 3D Window will serve as a
source for visual feedback of your work.
- It is an interactive Window, so you can move freely about
in the 3D environment both in Parallel and Perspective
projections.
- The elements in this Window, as in the Floor Plan and
Section/Elevation Windows, are completely editable.
- For PhotoRenderings, the 3D Window sets the view that
will be used to produce a final photorendering.
- For output to other applications, a 3D file can be exported
from the 3D Window.
17
Step 1: The ArchiCAD Workplace
Graphisoft ArchiCAD Step by Step Tutorial
Tools & Palettes
Palettes can be customized to your preferences. Each Palette
can be shown or hidden separately from the Floating
Palettes hierarchical menu in the Window menu, and the
four main palettes (Toolbox, Info Box, Coordinate Box,
Control Box) can enabled or disabled together with the Show
Main Palettes Only command. The shapes of the main
palettes can be customized with Options/Customize.
1. The Toolbox
The Toolbox is where you start in ArchiCAD. The Toolbox is
divided into five basic parts: Selection Tools, 3D Tools,
Notation Tools, 2D Tools and Visualization Tools.
Column
Marquee
Window
Corner Window
Object
Stair
Roof
Arrow
Wall
Beam
Door
Skylight
Lamp
Slab
Mesh Linear Dimension
Level Dimension
Text
Zone
Line
Polyline
Radial Dimension
Angle Dimension
Label
Fill
Circle
Spline Figure
Hotspot Section/Elevation
Detail Camera & QTVR
• Review the Tool Settings Dialogs: Each Tool has a
settings dialog associated with it. To review the dialogs for
each Tool, double-click the Tool.
Note: that each tool has various settings for Floor Plan,
Section, Model and Properties. The Wall Settings dialog is
typical of the basic settings for each of the 3D Tool settings.
The Object Settings dialog (shown below) is similar for all
library parts, which include windows, doors, lamps, objects
and stairs. This dialog contains a library part browser and a
system explorer tree to the left.
18
Step 1: The ArchiCAD Workplace
Graphisoft ArchiCAD Step by Step Tutorial
2. Info Box
The Info Box displays the different control group parameters
of the currently active Tools on various panels. The items
displayed in the Info Box vary according to which ArchiCAD
Tool is currently selected.
The Info Box is a customizable palette. With this palette the
Infobox can be resized by the user manually by stretching the
bottom right corner of the palette. The bigger it is stretched,
the more information it shows.
• Review the Controls for Each Tool: In this exercise,
click each Tool in the Toolbox and observe how the Info
Box settings differ for each Tool selected.
P-1, S-1, M-B
3. Coordinate Box
The Coordinate Box shows you the precise location of the
ArchiCAD Cursor within both the Cartesian and the Polar
coordinates for your drawing. This allows the entering and
the viewing of very accurate numeric information through the
keyboard, in addition to or instead of the mouse.
• Cartesian and Polar Coordinates: Move the cursor to
the bottom right hand corner of the project so that the
cursor changes to a check mark. Notice that the all the
coordinates have a "0" value at this point. This point is
identified by an "X" on the screen and is called the
Project Origin.
You can toggle between Absolute and Relative coordinate
values during drafting or editing by clicking its Delta icons:
Absolute values show the horizontal, vertical, radial and
angular distance of the cursor from the Project Origin or a
User Origin but never from an Edit Origin.
Relative values show the horizontal, vertical, radial and
angular position of the cursor relative either to the Project
Origin, to a User Origin before any element is begun, or to an
Edit Origin once a drafting or editing process is under way.
• User Origin: Click the "X" button so that it is depressed
and click the upper left corner of the building. Notice that
the "X" has moved to this point and that the coordinates
have a "0" value at this new point. This is known as the
19
Step 1: The ArchiCAD Workplace
Graphisoft ArchiCAD Step by Step Tutorial
User Origin and this button allows you to relocate the
origin anywhere in the Project.
• Skewed Grid: Turn on the Background grid by selecting
Grid Display from the Options menu. To change the grid
angle, click this button so that it is depressed and then click
once on the screen to define the start point of the grid and a
second point to define the angle of the skewed grid.
• The Grid Switch icon next to this Skewed Grid button
allows you to toggle between the normal and skewed grids.
• Grid Snap: This icon allows you to activate either of the
grids or turn off the snap feature altogether.
• Gravity: This icon allows the user to place elements
relative to existing Slabs, Roofs or Meshes. The Gravity
option can be turned off by selecting the "X" option.
• Elevation: The Elevation (z coordinate) field displays and
allows you to edit the height or elevation of elements
while the Elevation pop-up menu allows you to choose
whether the Elevation coordinate field will display
absolute or relative values.
4. Control Box
The Control Box gives you the ability to constrain the
drawing angle and cancel or confirm the current drawing
operation. It also allows you to group or ungroup elements,
choose extension line settings, select offsetting commands,
and provides active Tool specific help in the Command
Prompt area during different drawing steps.
• Relative Construction Methods: These construction
methods constrain the cursor to a defined angle or
distance during drafting or editing.
• Cursor Snap Variants: This option controls the way the
current position of the cursor is projected.
• Suspend Groups: This switch allows you to choose
between editing grouped elements together or on their
own.
• Magic Wand Tool: This tool traces the contours of existing
elements in order to create new elements of other types.
• Special Snap Point: Using this control allows the user to
use special definition controls to automatically generate
temporary snap points on different parts of edges.
20
Step 1: The ArchiCAD Workplace
Graphisoft ArchiCAD Step by Step Tutorial
• Extended Control Box: The Prompt Box provides point-
by-point instructions during drafting or editing. To expand
the Control Box, click the button on the right side of the
palette.
Extended Control Box with Command Prompt
21
Step 2: Understanding Objects and GDL
Graphisoft ArchiCAD Step by Step Tutorial
Step 2: Understanding Objects and GDL
Overview
ArchiCAD is an object based program. This step introduces the concept of element types stored in outside files, including doors,
windows, lamps, labels, and general objects. These objects can be stored in an ArchiCAD Library, a project library or over the
Internet.
It also gives an overview of GDL (Graphic Description Language) and how it describes 3D solid objects like doors, windows,
furniture, structural elements, stairs, etc., and the 2D symbols representing them on the Floor Plan.
Process to Learn
• What are Objects
Types of Objects
Purpose of Objects
Object Parameters
Object Settings
• What is GDL
• The ArchiCAD Library
Starting the Step
Use your file from the previous step or open the file named Step-02.pln contained in the Step Files folder.
22
Step 2: Understanding Objects and GDL
Graphisoft ArchiCAD Step by Step Tutorial
Introduction
Library Parts are parametric prefabricated complex elements
created either by ArchiCAD or a third party application and
used as units in projects. When you start ArchiCAD for the
very first time, it searches for a Library under the name
ArchiCAD Library.
The icons in the Toolbox that reference ArchiCAD Libraries
are as follows:
What to Do
1. The Concept of Parametrics
An ArchiCAD innovation, parametric object definition allows
a single stored object (i.e. window, door, light, stair or truss)
to represent dozens of similar objects by simply changing
their height, thickness, material and other custom parameters.
Each object can also be re-saved under another name
allowing you to quickly build up your own specific library.
P-1, S-2, M-A, 1-2
To view an example of how parameters are used, double-
click on the Window Tool in the Toolbox. The dialog
contains various parameters that can create a window with
different forms, shapes, sizes and materials.
To make changes to the selected window, click in any of the
Parameters fields with your cursor and change the settings
(i.e., width, depth, length, height).
As you change the settings, view the preview window in top
view, side view, hidden line 3D view, shaded 3D view and as
a preview picture using the Display Mode buttons next to
the preview window.
You can choose between window objects using the thumbnail
previews in the browser at the left of the dialog or by
selecting a different window library from the system explorer
at the left of the dialog.
2. View an Object Library
To review the Object Library and how it is organized, double-
click the Object Tool in the Toolbox. The Object Settings
dialog will appear.
The Object Settings dialog (shown below) is similar for all
library part, which include windows, doors, lamps, objects
and stairs. The dialog contains a library part browser and a
23
Step 2: Understanding Objects and GDL
Graphisoft ArchiCAD Step by Step Tutorial
system explorer tree to the left. You can choose different
views of the object (top, side, 3D, etc.) by clicking the Display
Mode icons to the right of the object preview.
3. Review the Loaded Libraries
When ArchiCAD opens a project, it loads one or more
libraries from the local hard drive, network or the Internet. To
review which libraries are currently loaded, open Library
Manager from the File Menu.
• Local/LAN: The Local/LAN tab page allows you to
manage complete libraries and individual library parts
stored on local disks or on remote volumes connected to
your computer through a local area network.
To open the Library Manager, select the Library Manager
option from the File menu. Click on the Local/LAN tab and
the currently loaded ArchiCAD Libraries will appear in the
dialog.
• FTP and Web Objects:
- Using the FTP Sites tab page, you can add libraries and
single library parts stored on FTP servers.
- The Web Objects tab page allows you to download GDL
Objects from websites and add them to your local libraries.
Since you are currently working from your local hard drive,
the FTP Site and Web Object Settings will be empty since
no links have been established to an online site.
4. What is GDL
GDL (Graphic Description Language) is a parametric
programming language, similar to BASIC. It describes 3D solid
objects like doors, windows, furniture, structural elements,
stairs, etc., and the 2D symbols representing them on the floor
plan. These are called library parts.
Creating custom ArchiCAD objects does not require an
understanding of GDL. You can create custom library parts by
using the standard tools (Wall Tool for vertical elements, Slab
Tool for horizontal elements, Roof Tool for sloped elements,
etc.) and saving the custom design as a GDL Object by
24
Step 2: Understanding Objects and GDL
Graphisoft ArchiCAD Step by Step Tutorial
selecting "Save Selection As..." from the GDL Objects option
in the File menu as shown below.
If you need to add parameters such as material selection or
text input, you would then open the object and add GDL
parameters. You can learn more about this in the book Object
Making with ArchiCAD by David Nicholson-Cole. This book
is published by Graphisoft.
25
Step 3: Customizing the Drawing Environment
Graphisoft ArchiCAD Step by Step Tutorial
Part Two: Project Setup
Step 3: Customizing the Drawing Environment
Overview
We can customize options such as project grid, snap grid, line types, pens, colors, pen weight, fills, composites, materials and
zones as well as Drawing Preferences to meet specific project needs and drawing requirements. This step teaches you how to
customize these options to your drawing needs.
Process to Learn
• Grids & Background
• Pens & Colors
• Line Types
• Fill Types
• Composites
• Preferences
Starting the Step
Open the file named Step-03.pln contained in the Step Files folder.
26
Step 3: Customizing the Drawing Environment
Graphisoft ArchiCAD Step by Step Tutorial
Information
The document just opened will be used as the basis for much
of the remaining tutorial. Each step will build upon the model
to create a Virtual Building from which to derive plans,
sections, elevations, renderings, sun studies, virtual reality
scenes and more.
Using the controls in the Options Menu, you can customize
ArchiCAD to reflect your drawing standards and preferences.
We will use the following options in this exercise:
Grids & Background:
- The Grids & Background dialog allows you to define a
working grid configuration and establish a background
color for your workplace and grid lines.
Pens & Colors:
- ArchiCAD pen and color assignments are reviewed and
modified using the Pens & Colors… command. In
ArchiCAD, pens are simulated drawing instruments that
have a specific color and line weight.
Line Types:
- When you choose the Line Types command, a dialog box
appears allowing you to select, modify or delete the
standard line types (solid, dotted, dashed, etc.). You can
also define your own customized line or symbol line types.
Fill Types:
- Fills are geometric patterns that can display two faces:
bitmapped and vectorial, but only one of the two at one
time. You can set this option in the Display Options.
Composite Structures:
- Walls, Slabs and Roofs can have composite structures. In
ArchiCAD composite structures are composed of patterns
that represent the components that compose the
structure. These components can be assigned a size,
description and cost.
What to Do
1. Create a Project Grid
Open the Grids & Background dialog from the Options
menu. Set the Main Grid to 3' (914mm) and the Snap Grid to a
spacing of 1" (50mm).
2. Create a Custom Pen Color & Line Weight
Open the Pens & Colors... dialog from the Options menu.
Place your cursor on Pen #10 and double click the pen color
box or click the Edit Color button. The Edit Color dialog will
appear. Select the Yellow color and click OK.
27
Step 3: Customizing the Drawing Environment
Graphisoft ArchiCAD Step by Step Tutorial
With Pen #10 still selected, place your cursor in the Pen
Weight text box and change the Pen Weight to 0.50 mm.
When finished click OK. You have now set a custom color
and line weight.
3. Create a Custom Line Type
This new Line Type will be used as a property line in Step 15.
P-2, S-3, M-A
Open the Line Types... dialog from the Options Menu. Click
the New button, select the Dashed radio button and enter the
name Property Line. Click OK.
Select and drag the slider to the right to activate the three
columns as shown.
Now enter the numeric values as follows to create a property
line:
Column 1: Dash: .21 and Gap: .08
Column 2: Dash: .06 and Gap: .08
Column 3: Dash: .06 and Gap: .08
You can also manually change the line spacing by selecting
and dragging the flag.
When finished, click OK.
4. Create a Custom Fill Type
This new Fill Type will be used as a ceiling pattern in Step 14.
P-2, S-3, M-B
Open the Fill Types... dialog from the Options Menu. Select
the "Ceramic Tile" pattern from the popup menu at the top
of the dialog (the patterns are listed in alphabetical order).
Click the New... button, click Duplicate and type in the new
name "Ceiling Grid". Click OK.
Now set the size to represent a Ceiling Grid pattern under
Edit Vectorial Pattern. Type in 4' (1200mm) for the length
and 1' (300mm) for the height.
Finally, change the Bitmap pattern (the pattern that appears
as a preview of Fill patterns in the Tools dialogs) to represent
the new pattern. To do this, click your cursor in the Bitmap
28
Step 3: Customizing the Drawing Environment
Graphisoft ArchiCAD Step by Step Tutorial
Pattern box to turn the black dots ON. This will allow you to
create the pattern as shown below:
When finished click OK.
5. Create a Custom Composite Wall
This new Composite Structure will be used as a interior wall
type in Step 9.
P-2, S-3, M-C
Open the Composites... dialog from the Options Menu.
Select "Stud Partition" from the popup menu as shown below.
Click OK.
Click the Insert button to add a new skin to the wall.
With the outer skin selected as shown, click the popup fill
pattern option in the Edit Selected Skin portion of the dialog
and select the Gypsum fill pattern. To change the width of
the Gypsum, click in the size box and enter 5/8" (25mm).
Now click and highlight the Wood Stud component of the
wall and click the ADD button to add a skin to the opposite
side of the wall. Click in the size box and enter 5/8" (25mm)
to set the size of the Gypsum. Click OK.
Note: Both Fill Types and Composite Structures can be
shown with either Bitmap or Vectorial patterns in the
Display Options. Bitmap Patterns are faster to display but
cannot be scaled, zoomed or rotated, while Vectorial
Patterns are slower to display but can be scaled, zoomed
and rotated.
29
Step 4: Managing Project Information
Graphisoft ArchiCAD Step by Step Tutorial
Step 4: Managing Project Information
Overview
This step is the foundation that will manage plans, sections, elevations, details, 3D information and final drawings for your
Virtual Building. ArchiCAD manages this information by using Layers, Layer Combinations and the Navigator.
In this step we will discuss how to set up your ArchiCAD model so that you can both manage the information and produce the
drawings.
Process to Learn
• Layers
• Layer Combinations
• Project Standards
• Navigator Palette
• Setting up Drawings
• Link to PlotMaker
Starting the Step
Use your file from the previous step or open the file named Step-04.pln contained in the Step Files folder.
30
Step 4: Managing Project Information
Graphisoft ArchiCAD Step by Step Tutorial
Introduction
1. Layer Settings
ArchiCAD layers are used to organize the elements in your
drawing for selective displays and quantity calculations. The
Layer Settings command displays the Layer Settings dialog
box, which allows you to define the layer settings for your
project.
2. Display Options
The Display Options command opens a dialog box where you
can customize the way the various construction elements are
displayed on the Floor Plan worksheet. As an example, you
can use this option to toggle between showing the door
swing or displaying a header for the ceiling plan.
3. Navigator
The Navigator palette is used to give an overview of the
project structure, providing instant access to stories,
sections, elevations, detail drawings, and 3D views lists.
Additionally, it is used to manage view options for typical
drawing types such as an architectural floor plan, site plan,
ceiling plan and other project drawings.
What to Do
1. Create Layers
Open the Layer Settings dialog under the Options Menu.
P-2, S-4, M-A
This dialog contains building and notation layers provided by
ArchiCAD. To start this project we will add 3 new layers for
notation purposes. Using the Layer Settings dialog as shown,
create new layers by selecting New and typing the following
layer names:
Notes - Ceiling Plan
Notes - Floor Plan
Notes - Site Plan
2. Create Layer Combinations
Each Layer Combination is a "snapshot" of the state of all
Layers in the Project and can be called up at any time by
selecting its name from the Layers list. Layer Combinations
generally reflect the drawings that are to be produced (such
as a floor plan, ceiling plan and site plan).
P-2, S-4, M-B
31
Step 4: Managing Project Information
Graphisoft ArchiCAD Step by Step Tutorial
Before adding new Layer Combinations, delete the current
Layer Combinations. To do this, select the each name and
click the Delete button as shown below:
To add a layer combination, click the New button and type
the Layer Combination names:
Ceiling Plan
Floor Plan
Site Plan
Once all the Layer Combination names are entered we must
choose which layers are to be active and which are inactive
using the Show or Hide buttons. Let’s start by selecting the
"Ceiling Plan" Layer Combination:
Then, click the Select All button and click the Hide button.
Now deselect all the layers by clicking the Deselect All
button. We are now ready to select which layers should be
active for the Ceiling Plan. To do this, select each of the
following active layers and click the Show button.
- Active Layers for the Ceiling Plan Layer Combination:
• Beams
• Columns
• Exterior Walls
• Fills
• Floors
• Interior Walls
• Lamps
• Notes - Ceiling Plan
• Roofs
When finished, click the Update button next to the Ceiling
Plan Layer Combination to make these changes permanent.
Now that the Ceiling Plan Layer Combination is finished,
repeat the above steps for the Floor Plan and Site Plan Layer
Combinations. The following layers are the active layers:
- Active Layers for the Floor Plan Layer Combination:
• Beams
• Columns
• Detail Markers
• Dimensioning
• Elevations
32
Step 4: Managing Project Information
Graphisoft ArchiCAD Step by Step Tutorial
• Exterior Walls
• Floors
• Furniture & Equipment
• Interior Walls
• Mark-Up
• Notes - Floor Plan
• Roofs
• Sections
• Stairs
• Zones
- Active Layers for the Site Plan Layer Combination:
• Columns
• Exterior Walls
• Floors
• Interior Walls
• Level Dimensioning
• Notes - Site Plan
• Roof
• Site & Landscaping
• Stairs
• Terrain
After having created the above layer combinations you can
choose among them under Option/Layers.
3. Name the Current Story
In this step we will create a name for the current story. Select
the Story Settings dialog from the Stories option in the
Options menu. Click in the Name text box and type "Ground
Floor" and click OK.
4. Create View Sets using the Navigator
Now that the project layers and layer combinations are set, we
must link these layer combinations to View Sets.
P-2, S-4, M-C
Using the View Editor we will assign the drawing scale,
display options, layer combinations and drawing view. To edit
the View Sets, click the popup button on the upper left side of
the dialog and select the middle button to activate the View
Editor.
With the View Editor active, rename the "Untitled" View Set as
"Project Documents" by selecting Rename from the popup
commands at the right edge of the dialog.
Next, create new folders that reflect the Drawings to be
produced. To do this, click the New Folder button circled
below and click the folder to rename it as "Drawings". With
the Drawings folder highlighted, click the New Folder
button again and rename it as "Ceiling Plan".
33
Step 4: Managing Project Information
Graphisoft ArchiCAD Step by Step Tutorial
Highlight the Drawings folder and repeat this step to create
two additional folders named "Floor Plan" and "Site Plan"
as shown below.
To set the order of the folders simply click and drag the
folder as shown below:
5. Assign View Settings and Storing Options
The final step is to assign the scale, display options and layer
combination to each Drawing Type created.
P-2, S-4, M-D
To configure these Drawing Types, set the View Settings and
Storing Options as shown below:
• Assign the Floor Plan Settings/Options:
- Click and highlight "1. Ground Floor" (0. Ground Floor -
Metric) within the Stories section of the Project Map.
Assign the "Floor Plan" layer combination by clicking the
Layer Combination popup button in the View Settings &
Storing Options at the lower part of the Navigator palette.
- Now that we have changed the View Settings and Storing
Options for the Ground Floor, we must assign these
settings to the Floor Plan folder. To do this, drag and
drop the story "1. Ground Floor" (0. Ground Floor -
Metric) into the Floor Plan folder as shown below.
• Assign the Ceiling Plan Settings/Options:
- Click and highlight "1. Ground Floor" (0. Ground Floor -
Metric) within the Stories section of the Project Map.
Assign the "Ceiling Plan" layer combination by clicking the
Layer Combination popup button in the View Settings &
Storing Options at the lower part of the Navigator palette.
- Next, open the Display Options dialog from the Options
menu. Within the dialog, set the "Doors & Windows" view
option to "Reflected Ceiling", the "Construction Fills" view
option to "Empty" and the "Polygon Fills" view option to
"Vectorial Hatching". Click OK when finished.
34
Step 4: Managing Project Information
Graphisoft ArchiCAD Step by Step Tutorial
- Now that we have changed the View Settings and Storing
Options for the Ground Floor we must assign these
settings to the Ceiling Plan folder. To do this, drag and
drop the story "1. Ground Floor" (0. Ground Floor -
Metric) into the Ceiling Plan folder as shown below.
• Assign the Site Plan Settings/Options:
- Click and highlight "1. Ground Floor" (0. Ground Floor -
Metric) within the Stories section of the Project Map.
Assign the "Site Plan" layer combination by clicking the
Layer Combination popup button in the View Settings &
Storing Options at the lower part of the Navigator palette.
- Next, open the Display Options dialog from the Options
menu. Set the "Doors & Windows" view option to "Show
on Plan" and the "Construction Fills" view option to
"Uniform Solid". Click OK when finished.
- Now change the scale for the Site Plan by clicking the
Scale popup button in the View Settings & Storing Options
at the lower part of the Navigator palette. Change the scale
to 1"=20'-0" (1:200 mm).
- Now that we have changed the View Settings and Stored
Options for the Ground Floor, we must assign these
settings to the Site Plan folder. To do this, drag and drop
the story "1. Ground Floor" (0. Ground Floor - Metric) into
the Site Plan folder as shown below.
35
Step 4: Managing Project Information
Graphisoft ArchiCAD Step by Step Tutorial
6. Turn Off the View Editor
When you are finished with the above steps, restore the
Navigator to its original setup by turning off the View Editor.
To do this, click the popup button on the upper left side of
the dialog and select the left button to activate the Navigator.
36
Step 4: Managing Project Information
Graphisoft ArchiCAD Step by Step Tutorial
37
Step 5: Establishing the Base Building Layout
Graphisoft ArchiCAD Step by Step Tutorial
Part Three: Creating the Virtual Building
Step 5: Establishing the Base Building Layout
Overview
This step will teach you how to use the Slab Tool for creating a building slab and external paving. You will explore ways of
manipulating slab shapes and slab openings. You will also learn how to construct linear and curved walls using the Wall Tool
in both the Floor Plan Window and the 3D Window.
Process to Learn
• Creating a Slab
• Slab Materials
• Editing a Slab
• Creating Linear Walls
• Creating Curved Walls
• Wall Materials
• Working in the 3D Window
Starting the Step
Use your file from the previous step or open the file named Step-05.pln contained in the Step Files folder.
38
Step 5: Establishing the Base Building Layout
Graphisoft ArchiCAD Step by Step Tutorial
Introduction
When you create a Wall in ArchiCAD, you create the outline
and hatching of a Wall in 2D, and a solid Wall body in 3D.
Because Walls are such important elements of your Project,
they form special relationships with other ArchiCAD
elements:
* Other Walls: Automatic L and T intersections are formed
between Walls. Overlapping vertical edge segments for
tangential Walls.
* Columns: Automatic Wall-Column connections, optional
Wall wrapping around columns.
* Beams: When a Beam crosses a Wall, the element of lower
priority is cut in 3D.
* Doors and Windows: A Wall is the only placeholder of
these elements. They become part of the Wall.
* Slabs: Overlapping Wall and Slab edges are eliminated in
3D: facades will be clean on elevations and other 3D
views.
* Roofs: Walls can be trimmed to Roofs.
Slabs are the basic horizontal building blocks in ArchiCAD.
Slabs are drawn either on the Floor Plan or in the 3D Window,
allowing them to accommodate any design. Existing Slabs are
easily modified on the Floor Plan and in the 3D Window or
through the Slab Settings dialog box.
What to Do
1. Set the View Set to "Floor Plan" using the Navigator
To set the View Set to the Floor Plan, click the View Set tab in
the Navigator palette and double-click the Ground Floor in
the Floor Plan view set:
2. Construct a Floor Slab
The first step is to draw the ground floor slab of the building,
which will be 30 by 18 feet (10 by 6 meters) in plan. Use the
pre-set 3 square foot (1 meter square) planning grid to help
you construct the slab, by easily snapping to its intersection
points.
Hint: The different grid snap options can be switched on
and off using the control button on the Coordinate Box or
the menu items from the Options menu. When any of the
snap options is switched on, the cursor moves from one
grid intersection to another.
P-3, S-5, M-A
To draw the slab, do the following:
- Switch on the grid snap (select the third icon in the popup
palette from the grid snap options in the Coordinate Box).
- Select the Slab tool in the Toolbox.
- Select the rectangular geometry method from the Info Box.
- Click on the origin indicated by the black X on the Floor
Plan.
- Click a second time to finish the slab covering 10 grid
squares horizontally and 6 vertically.
39
Step 5: Establishing the Base Building Layout
Graphisoft ArchiCAD Step by Step Tutorial
Hint: To change the view of the plan, choose the Zoom
in/Zoom out/Pan or Fit in Window commands from the
Display menu and either double-click on the plan or draw
a marquee to define the extent of the magnification.
Alternatively, use the magnifying glass/palm icons from
the bottom of the window.
3. Create Linear Walls
At any time, you can see a three dimensional view of what is
on the Floor Plan by opening the 3D Window by using the
Window menu/3D Window command.
P-3, S-5, M-B
Now place walls around the sides of the slab here in the 3D
Window. Use the magic wand feature to trace the perimeter of
the slab and automatically place walls on it.
To place walls on the sides of the slab:
- Select the Wall tool in the Toolbox.
- Select the Magic Wand icon in the Control Box.
- Click on the front edge of the slab with the cursor (the
Magic Wand icon will change to a wand with a loop
indicating that you are snapping to a line).
- Click on one of the top corner points of the slab to finish
placing the walls.
Hint: The 3D Navigation Palette helps you navigate
around in the 3D window. The Editing-Motion buttons are
available depending on the type of the view (perspective/
axonometric); the Motion Mode buttons allow for
changing between the view types. To navigate in an
axonometric view select the fourth button under Editing-
Motion (as shown) and click outside the rectangle in the
3D Window. We will discuss more about 3D Navigation
and options in Step 06.
Go back to the Floor Plan (Window menu/Floor Plan).
Notice that the walls have appeared on the plan.
40
Step 5: Establishing the Base Building Layout
Graphisoft ArchiCAD Step by Step Tutorial
4. Construct Curved Walls
Now construct a curved block wall to the north of the
building for the entrance enclosure.
P-3, S-5, M-C
To do this, first change the wall type to a block wall:
- Double-click on the Wall tool in the Toolbox to bring up
the Wall Settings dialog box.
- Change the thickness of the wall from 1' to 1'-2" (250 to
300 mm).
- Change the “Face Brick” hatching type to “Masonry Block”
under “Floor Plan and Section Attributes” (the hatches are
listed in alphabetical order).
- Change the “White-Brick” material to “Stone Block” for the
internal and external sides and to “Stone Block Coping” for
the edges of the wall under “Model Attributes”.
- Click OK.
Place the curved wall shown in the picture below. The
curvature will be defined by 3 points, all of which will be grid
intersection points.
Hint: When drawing the line of the wall, after a first click a
heavy black line follows the cursor like a rubberband. This
"rubberband line" is the reference line for the wall. The
reference line is used to connect walls smoothly and helps
locate the walls with the cursor.
To draw the curved wall:
41
Step 5: Establishing the Base Building Layout
Graphisoft ArchiCAD Step by Step Tutorial
- Choose the relevant curved wall icon (2nd icon in the 2nd
row) from the geometry methods in the Info Box.
- Change the construction method as shown in the picture.
- Click on the grid intersection points in the order shown in
the picture (the third and the fourth clicks are on the same
point).
Hint: You can get instant step-by-step instructions of the
drafting and editing procedures in the maximized state of
the Control Box. Following them eases the drawing
procedure and reduces the number of errors.
It is easy to modify the length of this curved wall, for example
by stretching both ends of the wall:
- Switch off grid snap. (Select the first icon from the grid snap
options in the Coordinate Box as shown in the picture.)
- Select the wall (Select the Arrow tool and click on a
side or a corner of the wall to highlight it. The appearing
black dots around the wall confirm it has been selected.)
- Choose Edit menu and Stretch.
- Click on the hotspot (on the side of the wall’s reference
line) on the right end of the curved wall and make it
approximately half a grid longer as shown in the picture
(the cursor will change from an empty pencil symbol to a
black one when snapping to a hotspot).
- Repeat for the other end of the wall.
Hint: To select something on the floor plan, use the mouse
cursor. If the Arrow tool is active, simply click on one of the
element’s points. (To add/remove more elements to the
selection hold down the Shift button while selecting them.)
When another tool is active, press the Shift button to
activate the selection method.
5. Place Structural Columns
Next, place four columns to create a veranda on the south
side of the building.
P-3, S-5, M-D
The first and the last column will align with the two side walls
(place them on a grid intersection); they will be placed at
equal intervals and run parallel to the front wall. Place the first
column and then replicate it for the rest.
42
Step 5: Establishing the Base Building Layout
Graphisoft ArchiCAD Step by Step Tutorial
To place the first column:
- Switch on the grid snap.
- Select the Column tool in the Toolbox.
- Click on the grid intersection point two grid spaces below
the bottom left corner of the house (point no. 1).
Notice that the column has been placed on the grid
intersection point on the Floor Plan.
The next step is to replicate it parallel to the front wall:
- Switch off the grid snap.
- Select the column.
- Select the Multiply command from Edit/Multiply.
- Enter 3 as the number of copies, choose the Distribute
method and hit OK.
- Click on one of the selection dots on the right side of the
column and drag the rubber line horizontally, toward the
right end of the building.
- Hold down the Shift key. You can see you are now
constraining the horizontal direction, and the columns will
be placed parallel to the side of the building.
- Position the cursor over the bottom right corner of the
building (your cursor will change to a check mark
indicating, that it will snap to a hotspot) so that the last
copy will be aligned with the end of the building.
- Click to finish the Multiply command.
Hint: The mouse constraints help draw elements in
specific relationship to existing elements and pre-set
43
Step 5: Establishing the Base Building Layout
Graphisoft ArchiCAD Step by Step Tutorial
directions. They are similar to traditional rulers and
triangles.
Two Mouse Constraint mechanisms are available:
Coordinate Constraints are used to lock any of the
Coordinate Box parameters and
Angle Pairs are used to lock the cursor at a particular
drawing angle.
These techniques facilitate the use of all the 2D/3D
drafting tools.
Hint: The Intelligent Cursor helps you identify special
points (end, corner points, edges, etc.) and points of
geometric relationships of elements (perpendicular,
tangential, crossings) within the building and to show that
special tools (magic wand, eyedropper, etc.) are effective
at the moment.
Click outside the building to deselect the column and go to
the 3D Window to see the result in axonometry.
6. Create the External Paving
Now return to the Floor Plan to design the external paving
around the house.
P-3, S-5, M-E
It will be of a timber decking construction, so the next step is
to change the slab height, hatching type and materials. After
that, place a rectangular slab around the building; lastly cut a
hole into the slab for the footprint of the building.
To change the slab settings:
- Double click on the Slab tool in the Toolbox.
- Enter 6" (150 mm) as the thickness of the slab.
- Change the hatching type in the “Section Attributes” to
“Dot and Dashed”.
- Change the top and the side materials in the “Model
Attributes” to “Timber Boarding External” and the bottom
to “Surface Concrete”.
- Click OK.
44
Step 5: Establishing the Base Building Layout
Graphisoft ArchiCAD Step by Step Tutorial
To place the slab:
- Switch on the grid snap.
- Click to the grid intersection at point no. 1 to start drawing
the rectangular slab.
- Click to the grid intersection at point no. 2 to finish
drawing the slab.
To cut a hole in the slab:
- Select the slab.
- Make sure the Slab tool is active in the Toolbox.
- Click to the grid intersection at point no. 3 to start drawing
the rectangular hole of the slab.
- Click to the grid intersection at point no. 4 to finish
drawing the hole of the slab.
- Click outside the slab to deselect it.
Check the result in the 3D Window.
45
Step 6: Viewing the Building in 3D
Graphisoft ArchiCAD Step by Step Tutorial
Step 6: Viewing the Building in 3D
Overview
The underlying principle of ArchiCAD is that a building is created on the computer not as a set of lines, but as a Virtual
Building complete with 3D information. This step introduces how to view and edit the virtual model environment.
You begin the lesson using the two basic methods of the 3D Settings: parallel projections and perspective settings.
Process to Learn
• Navigator Palette
• Navigator 3D Preview
• 3D Projection Settings
• 3D Window
Navigating in 3D
• 3D View Types
Perspective View
Parallel Projections
Starting the Step
Use your file from the previous step or open the file named Step-06.pln contained in the Step Files folder.
46
Step 6: Viewing the Building in 3D
Graphisoft ArchiCAD Step by Step Tutorial
Introduction
3D Window: The 3D Window is used both for three-
dimensional visualization of an architectural project and for
refining the design directly in 3D. It is directly linked to the
Floor Plan Worksheet and to the Section/Elevation Windows.
You can display either the complete project or just the
selected parts.
• In the design phase, the 3D Window will serve as a source
of visual feedback for your work in 2D and for constructing
and modifying building components directly in 3D.
• In the production phase of your project, accurate 3D
images optimized for plotter output are also generated in
this Window.
3D Projections: The 3D Window can display two types of
three-dimensional views: Parallel Projection and Perspective.
To access these two view options, you can choose from
several methods:
• Navigator Palette & Preview
• 3D Projections Dialog
• 3D Navigation Palette
• Camera Tool
What to Do
1. Navigator Palette & Preview
The Navigator Preview provides 3D Perspective and 3D
Axonometric previews. In the 3D Perspective view you can
manipulate the camera directly. In the 3D Axonometric views,
a Small house popup button at the bottom of the palette lets
you choose from predefined projections.
P-3, S-6, M-A
• Select Generic Perspective: To set the 3D Window to a
perspective view, click the Project Map tab in the Navigator
palette, click 3D and double-click the Generic Perspective.
• Navigate Using the Navigator Preview Camera: In the
bottom left corner of the screen is the Navigator Preview
palette. Click the camera location point (#1) and drag
your cursor; the 3D Window will change views based
upon the position of the camera. Now select the camera
target point and drag your cursor (# 2). You can also
interactively change the zoom by selecting the slider (# 3).
• Select Generic Axonometry: To set the 3D Window to
an axonometric view, click the Project Map tab in the
Navigator palette, click 3D and double-click the Generic
Axonometry option.
• Navigate Using the Navigator Preview Camera: Select
the camera in the Navigator Preview. You can navigate the
3D window by moving the camera symbolizing the
47
Step 6: Viewing the Building in 3D
Graphisoft ArchiCAD Step by Step Tutorial
projection direction. At the bottom of the palette, the
popup button lets you choose from predefined
projections.
2. 3D Projection Settings
There are two main dialog boxes for 3D views: Parallel
Projection Settings and Perspective Settings. These dialog
boxes offer more options for defining custom views such as
sun position, sun location camera angle and target distance.
P-3, S-6, M-B
• Parallel Settings: Choose the 3D Projection Settings
dialog under the Image Menu. This dialog allows you to set
views based upon numeric entries and sun position as well
as from pre-set views. To change your viewpoint, drag the
camera around the house and click OK. To change the sun
position, drag the sun around the house and click OK. To
set a specific location for the sun, click the More Sun button.
• Perspective Settings: Open the 3D Projection Settings
dialog, under the Image Menu. Click the Perspective
button at the top of the dialog and use the Perspective
Settings dialog. To try different perspective views, drag
the end of the camera and/or the focal point to a different
position and click OK.
3. Interactive 3D Window
The 3D Window allows for interactive 3D motion. Interactive
navigation through your model is available in both Parallel
and Perspective modes. The following steps will guide you
through various options for determining position and
movement in the 3D virtual environment.
P-3, S-6, M-C
48
Step 6: Viewing the Building in 3D
Graphisoft ArchiCAD Step by Step Tutorial
• Navigate the 3D Window - Parallel Projections: Go to
the Image Menu, select 3D Projection Settings and
create a Parallel Projection.
Click on the Model Axis button and then select the Turn
button in the 3D Navigation Palette.
Place the Cursor on the 3D Window and click and drag the
mouse slowly to the right. Drag the mouse to the left. Now try
upward and downward. You are rotating the model about its
axes.
Click on the Target Lock button and then repeat the
different rolling procedures. Notice the difference in the way
the model rolls.
Click the Frontal View button and then click on a surface
you want to view in elevation. The view resets to the
elevation of that element.
• Navigate the 3D Window - Perspective Projections:
Go to the Image Menu, select 3D Projection Settings
and create a Perspective Projection.
Click on the Camera button and then on the Walk
button in the 3D Navigation Palette.
Place the Cursor on the 3D Window with the Cursor Arrow
facing up and drag the mouse slowly upward to walk
forward; drag the mouse down to walk backward, and to the
right or left to walk to the side.
Try using the Turn button and the Lateral Move Tool
. Notice the difference in movement.
Click on the Target Lock button and repeat the previous
Tool selections and maneuvers.
Select the View Cone Angle to slide the button right or left to
change the view cone angle, which affects the current zoom.
49
Step 7: Working with Stories
Graphisoft ArchiCAD Step by Step Tutorial
Step 7: Working with Stories
Overview
Stories provide a “physical” separation of elements according to their vertical level. Each story has a unique Floor Plan window
in which you place elements – just as architects use separate plans for stories of a building.
This exercise will demonstrate how stories are created in ArchiCAD and how elements are copied between stories.
Process to Learn
• Creating a New Story
• Copying Elements Between Stories
• Viewing 3D Vectorial Hatching
• Slab Settings
• Constructing the Slab
• Updating View Sets
Starting the Step
Use your file from the previous step or open the file named Step-07.pln contained in the Step Files folder.
50
Step 7: Working with Stories
Graphisoft ArchiCAD Step by Step Tutorial
Information
Choosing the Stories menu item opens a submenu with
commands that allow you to:
• Define the vertical structure of your design, story by story
• Navigate between stories by determining which story is
currently displayed
• Display a Ghost Story
• Move elements and items between them using a special
Cut/Copy and Paste function
All Story functions are controlled through the Stories
submenu or through the Project Map section of the
Navigator palette. The Stories and their elevation value
defined in the Story Settings dialog box are displayed at the
bottom of the submenu. The current Story is shown three
different ways within the project model:
• With a Checkmark in the submenu listing
• As the name appears in the title bar of the Floor Plan
Window
• Highlighted in the Project Map section of the Navigator
Palette
What to Do
The next step is to define the story structure for the
Showroom building.
P-3, S-7, M-A
Two stories are required; the ground floor which we have
worked on so far, and an upper Gallery. Open the Story
Settings dialog box to create the stories, define their heights
and copy and paste elements between them.
1. Create the Gallery Story
- Go back to the Floor Plan.
- Select Options/Stories/Story Settings to bring up the
Story Settings dialog box.
- Click to highlight “Ground Floor”.
- Click Insert above to create a story above it.
- Enter “Gallery” as the name for story no. 2 (metric 1) and
change its “Height to Next” value to 9'-6" (3000 mm).
The next step is to copy all the walls from the ground floor
and paste them into the gallery:
- Highlight the Ground Floor story and Click on the Copy
All button.
- Highlight the Gallery story.
- Unclick the column and the slab icon from the icons
below (so that they will not be included among the items
that will be pasted to the Gallery level).
- Click on Paste Selected Types and Click OK.
You are now on the Gallery story. As you can see, the walls
have been copied from the ground floor. (The name of the
story is written in the window’s title bar after the file name.)
2. Add the Gallery to the Project Documents View Set
Using the View Editor, as we did in Step 4, we will assign the
drawing scale, display options, layer combinations and
51
Step 7: Working with Stories
Graphisoft ArchiCAD Step by Step Tutorial
drawing view for the three drawing types: Ceiling Plan, Floor
Plan and Site Plan.
P-3, S-7, M-B
To edit the View Sets, click the popup button on the upper
left side of the Navigator dialog and select the middle button
to activate the View Editor.
• Assign the Ceiling Plan Settings/Options to the
Gallery:
- Select and double click the "1. Ground Floor" (0. Ground
Floor - Metric) in the Ceiling Plan section of the View Sets.
This will set the view to the Ceiling Plan layer
combination, scale and display options that were set in
Step 4.
- Now that we have set the View Settings and Stored
Options to the Ceiling Plan drawing type, drag and drop
the story "2. Gallery" (1. Gallery - Metric) into the Ceiling
Plan folder as shown below.
• Assign the Floor Plan Settings/Options to the
Gallery:
- Select and double click the "1. Ground Floor" (0. Ground
Floor - Metric) within the Floor Plan section of the View
Sets. This will set the view to the Floor Plan layer
combination, scale and display options that were set in
Step 4.
- Now that we have set the View Settings and Stored
Options to the Floor Plan drawing type, drag and drop the
story "2. Gallery" (1. Gallery - Metric) into the Floor Plan
folder as shown below.
3. Turn Off the View Editor
When you are finished with the above steps, restore the
Navigator to its original setup by turning off the View Editor.
To do this, click the popup button on the upper left side of
the dialog and select the left button to activate the Navigator.
52
Step 7: Working with Stories
Graphisoft ArchiCAD Step by Step Tutorial
4. Open the 3D Window again to check progress
Hint: If the view is not as shown below, go to the Image
menu and select the 3D Projections option. If Parallel
Projections is not active, click the Parallel Projections
button and select an Axonometric preset view.
The texture of the construction elements can be made visible
in the 3D window. To see how the building looks with the
mortar joints and the floor boarding:
- Select Image menu/ 3D Window Settings.
- Switch on the Vectorial 3D Hatching under the effects
menu item.
5. Construct the Slab
To construct the slab of the gallery, return to the Floor Plan. It
will be of a light timber joist construction, different from that
used for the ground floor slab, so first the settings for the Slab
tool need to be changed.
P-3, S-7, M-C
To change the slab settings:
- Double-click on the Slab tool in the Toolbox.
- Change the thickness of the slab to 8" (200 mm).
- Change the hatching type to “Empty fill” under “Section
Attributes”.
- Change the bottom and the side materials in the “Model
Attributes” to “Surface White” and the top material to
“Timber Boarding Internal”.
- Click OK.
Now everything is set for placing the gallery slab. The slab
will only span to half the depth of the building, leaving a void
so that one can look down from the gallery to the exhibition
space on the ground floor.
To place the slab:
- Switch off the grid snap.
- Select the Slab tool in the Toolbox.
- Click on the inside corner point of the top left wall corner
to start drawing the slab (point no. 1 in the picture).
- Move the cursor over the inside line of the east side wall to
bring up a snap point in the middle of the wall (above
point no. 2 the cursor will change from an empty pencil to
a pencil with a line inside it to indicate it is snapping to a
line).
53
Step 7: Working with Stories
Graphisoft ArchiCAD Step by Step Tutorial
- Click on the snap point in the middle of the wall to finish
the slab (at point no. 2 the cursor will change from a
pencil with a line inside it to a black pencil to indicate it is
snapping to a point).
Hint: Special snap points help you to find special points
on the drawings. These snap points can be predefined
divisions/distances of lines/arcs, center point of arcs, and
parallel and perpendicular locations from elements.
54
Step 7: Working with Stories
Graphisoft ArchiCAD Step by Step Tutorial
55
Step 8: Completing the Building Envelope
Graphisoft ArchiCAD Step by Step Tutorial
Step 8: Completing the Building Envelope
Overview
In this Step, you will use the Roof Tool to build a roof. This exercise will also demonstrate how to trim walls and columns to a
roof, and how to use the Ghost Story.
Process to Learn
• Roof Tool
• Using the Ghost Story Feature
• Constructing a Roof
Viewing a Roof in the 3D Window
• Trim Walls and Columns to Roof
Starting the Step
Use your file from the previous step or open the file named Step-08.pln contained in the Step Files folder.
56
Step 8: Completing the Building Envelope
Graphisoft ArchiCAD Step by Step Tutorial
Information
ArchiCAD's sophisticated Roof Tool has extremely flexible
characteristics. In addition to its normal use in creating roofs,
it can be used to create abstract 3D shapes. You can create
three basic roof types by using the Roof tool:
- Sloped Roofs
- Dome-Shaped Roofs
- Barrel-Vaulted Roofs
What to Do
This section explains how to put a roof over the building. It
will be a semi-pitched roof with sufficient headroom over the
floor of the gallery, and will have a wide overhang supported
by columns to create a south-facing veranda at the front.
1. Roof and Ghost Story Setup
To construct the roof on the gallery level it is necessary to see
the columns below on the ground floor.
P-3, S-8, M-A, 1-3
Contents of remote stories can be made visible on the active
story by using the “Ghost Story” feature. To switch on the
Ghost Story, select Options/Stories/Show Ghost Story. Now
the content of the Ground Floor is visible a light yellow color
on the plan of the Gallery. The elements of the Ghost story
cannot be edited, but they can be used as snap points in
constructing new elements.
Before starting, open the Roof Settings dialog box by
double-clicking on the Roof tool in the Toolbox.
The angle of the roof will be 20 degrees, its thickness 8” (200
mm) and its pivot line will be at 12'-6’ (3800 mm) above the
project 0 level (2'-7” (800 mm) from the Gallery level), as
shown in the picture. Click OK.
2. Roof Construction
To construct a roof, first define its pivot line (which is the
intersection line of the roof plane and the horizontal plane at
the height defined in the dialog). Then define from which side
of the pivot line the roof will slope upward (at the angle
57
Step 8: Completing the Building Envelope
Graphisoft ArchiCAD Step by Step Tutorial
defined in the dialog box) and lastly draw the outline of the
roof (which is its projection to the horizontal plane).
To start constructing the roof:
- Switch on the grid snap.
- Select the rectangular geometry method in the Info Box.
- Click on the external corner point of the bottom left wall
corner (point no. 1) to start the pivot line.
- Click on the external corner point of the bottom right wall
corner (point no. 2) to finish drawing the pivot line.
- Click above the pivot line with the eye icon (point no. 3 to
define the uphill slope direction of the roof.
- Click on the grid intersection point at point no. 4 to start
drawing the outline of the roof.
- Click on the grid intersection point at point no. 5 to finish
drawing the outline of the roof.
Look at the roof in the 3D Window.
3. Trim the Walls and Columns to the Roof
Now you can trim the walls and the columns to the roof:
- Select the roof in the 3D Window (click on it with the
Arrow tool).
- Select the Edit/Trim to Roof menu point.
- Click Trim in the dialog box.
The columns and walls have now been trimmed to the
underside of the roof. Finally, return to the Floor Plan.
58
Step 8: Completing the Building Envelope
Graphisoft ArchiCAD Step by Step Tutorial
59
Step 9: Developing the Design
Graphisoft ArchiCAD Step by Step Tutorial
Step 9: Developing the Design
Overview
Now that the building envelope is under way, we need to create sections and elevations of the building, and add interior walls,
create additional roofs and update the project View Sets.
Process to Learn
• Section/Elevation Tool
• Level Dimension Tool
• Update View Set
• Adding Interior Walls
• Creating a Flat Roof
Starting the Step
Use your file from the previous step or open the file named Step-09.pln contained in the Step Files folder.
60
Step 9: Developing the Design
Graphisoft ArchiCAD Step by Step Tutorial
Information
The Section/Elevation Tool is used to generate elevations
and sections from the model by placing standard section/
elevation symbols on the Floor Plan with optional
breakpoints, including markers with identifiers and a section
line.
Every section/elevation symbol is an active link to the
model, meaning that when you change an element in section
or elevation it will automatically update all other views.
What to Do
1. Cut a Cross Section Through the Building
Simply place the section/elevation line on the Floor Plan and
ArchiCAD will generate the sectional/elevational view of the
building.
P-3, S-9, M-A
Any modifications to the model in the Section/Elevation
Window will be updated automatically in all other views of
the building.
To place a section through the building:
- Switch on the grid snap (to help you quickly define the
section line location).
- Go down to the ground Floor Plan (Options/Stories/
Ground Floor).
- Select the Section tool in the Toolbox.
- Click to point 1 as shown to start drawing the section line
on the Floor Plan.
- Double-click on points 2-3 as shown to finish drawing the
section line.
- Click to the right of the section line (point 4 as shown)
with the eye icon to determine which direction the section
will face.
After placing the section, open the section window (Window/
Sections/Elevations/’A/1 Section’/Model), and ArchiCAD will
generate the section of the model automatically.
Finally, add the A/1 Section as a new drawing to the
Project Documents View Set. This will allow us to access the
section as a drawing in PlotMaker.
To do this, click the View Sets tab in the Navigator palette,
select the Drawings folder so that it is highlighted and choose
Create New Folder from the popup menu. Name the new
folder "Sections". This is where our project sections will be
stored. If you want to move the Sections folder so that it is
organized alphabetically, click to highlight the folder, then
drag it to the desired location.
61
Step 9: Developing the Design
Graphisoft ArchiCAD Step by Step Tutorial
With the section folder selected, choose "Save Current View"
from the popup menu. Use the defaults and click "Save".
2. Create the North and West Elevation
The elements can be shown with or without textures. Sun
shadows can be cast on them in the elevation windows.
To place the elevations:
- Double-click on the Section/Elevation tool in the
Toolbox to bring up the Section/Elevation Settings dialog
box.
- Enter “Elevation” to the Name field.
- Enter E/1 as the Reference ID.
- Check the Vectorial 3D Hatching and the Vectorial Sun
Shadows options under the Model Effects.
- Place the elevations as shown (ArchiCAD will number
them automatically).
- Switch off the grid snap.
62
Step 9: Developing the Design
Graphisoft ArchiCAD Step by Step Tutorial
Next, open the west elevation and place some elevation
dimensions on it.
- Open up E1 Elevation (Window/Sections/Elevations/’E/1
Elevation’/Model).
- Select the Dimension tool in the Toolbox.
- Select the height dimensioning icon from the popup menu
under the construction methods in the Info Box.
- Select the multiple height dimensioning icon from the
popup menu under the geometry methods in the Info Box.
- Click to the points (1-2-3) as shown in the picture to
dimension.
- Double-click anywhere (e.g. to points 4-5). The Hammer
cursor will come up.
- Click with the Hammer cursor to place the chain of
dimensions on the section (point 6).
Finally, add the E1 Elevation as a new drawing to the
Project Documents View Set. This will allow us to access the
section as a drawing in PlotMaker.
To do this, click the View Sets tab in the Navigator palette,
select the Drawings folder and choose Create New Folder
from the popup menu. Name the new folder "Elevations". If
you want to organize the Elevations alphabetically, click to
highlight the folder then drag it to the desired location.
With the Elevation folder selected, choose "Save Current
View". Use the defaults and click "Save".
63
Step 9: Developing the Design
Graphisoft ArchiCAD Step by Step Tutorial
Open the E2 Elevation for another view of the building and
repeat the same steps to save it to the View Set as shown
above.
3. Add Exterior and Interior Walls
For the entrance, draw the same type of wall as the external
walls.
P-3, S-9, M-B
In ArchiCAD you can easily pick up an element’s
characteristics and transfer them into the Toolbox (to start
drawing a new element with the same settings) or to other
elements in the project. Let’s pick up the settings of the
external walls:
- Select the Wall tool in the Toolbox.
- Hold down the Alt key (the cursor will change to an
Eyedropper tool) while clicking on a side of one of the
straight walls (a beep notifies the action).
Now the settings are correct for the brick wall, and only the
height value needs to be changed. Double-click on the Wall
tool in the Toolbox and change the height value to 8'-6"( 2700
mm).
Draw the front and the back wall of the entrance enclosure
with the help of the grid snap.
- Switch on the grid snap.
- Select the single wall geometry method and the
construction method as below.
- Click to the grid intersection point 1 to start drawing the
wall.
- Click to the grid intersection point 2 to finish the wall.
In the same way draw the back wall starting from point 3 and
finishing at point 4. Just make sure to choose the correct
construction method to place the wall with its reference line
on the outside.
Rebuild the floor plan view (Choose Window/ Rebuild) to get
a neat wall cross-section (optional).
Hint: The Redraw command (Display/Redraw) will
remove all temporary screen display graphics remaining
from transformations and deletions during construction.
The Rebuild command (Display/Rebuild) starts a more
thorough screen update - it will also refresh the wall
intersections and draw them correctly.
The next step is to draw some interior partitions. Open the
Wall Settings dialog box and select the composite wall, Stud
Partition, you created in Step 3.
64
Step 9: Developing the Design
Graphisoft ArchiCAD Step by Step Tutorial
Change the layer from “Exterior walls” to “Interior walls” and
set the material of the wall to "Surface-White".
Draw the partition in the middle of the space as shown.
Hint: ArchiCAD layers are used to organize the elements
in your project for selective displays and quantity
calculations. You can easily change the layer settings
(show/hide, lock/unlock layers and create different layer
combinations) from the Options/Layers/Layer Settings
pull-down menu.
Now draw the partition of the future toilet at 3 feet (1000 mm)
wide; enter the coordinate values manually:
- Switch off the grid snap.
- Position the cursor over the right corner point of the wall
junction as shown (point 1).
- Type in x from the keyboard (Note the x coordinate is
highlighted).
- Type in “3 +” (or “1000 +” in mm) from the keyboard and
hit the Enter key. Note you are now drawing a wall from
point 2 (3’ (1000 mm) to the right of point 1).
- Use the shift key to draw a vertical wall and click on the
internal side of the curved wall to finish the wall (point 3).
4. Create a Flat Roof
Go up to the floor plan of the Gallery and place a flat roof
over the entrance to finish the building envelope.
P-3, S-9, M-C
Open up the Slab Settings dialog box and set the thickness of
the slab to 1' (300 mm), the top material to “Timber boarding
External”, the side material to “White Brick” and the bottom
material to “Surface-White”.
To draw the slab over the entrance:
- Select the polygonal geometry method.
65
Step 9: Developing the Design
Graphisoft ArchiCAD Step by Step Tutorial
Click on the external corner points of the front and the back
wall (points 1, 2, 3, 4, 5) to place a rectangular slab as shown
in the picture.
Now modify the northern edge of the slab to align it with the
curved wall:
- Select the slab.
- Make sure the Slab tool is active in the Toolbox.
- Hold down the mouse button over the edge of the slab
(between points 2 and 3) and select the second icon as
shown from the pet palette (as shown).
- Pull the edge of the slab over the curve of the wall to align.
Now check the progress in the cross section. Open the
Section A/1 window (Window/Sections/Elevations/’A/1
Section’/Model). The curved wall will serve as a parapet wall
to the balcony so lower it to 4’ (1200 mm) height:
- Switch off the grid snap.
- Select the top part of the curved wall.
- Double-click the Wall tool in the Toolbox to bring up the
Wall Settings dialog box.
- Enter 4’ (1200 mm) as the height value instead of 9’6”
(3000 mm).
- Click OK.
Open the elevations to check how the modification affects the
facades. Notice how the elevations have been updated with
the dimensions.
66
Step 9: Developing the Design
Graphisoft ArchiCAD Step by Step Tutorial
67
Step 10: Working with Doors, Windows and Skylights
Graphisoft ArchiCAD Step by Step Tutorial
Step 10: Working with Doors, Windows and Skylights
Overview
In Step 10, you will learn about the Door and Window Tools, which create realistic architectural openings in wall elements by
inserting special library parts with editable parameters.
Additionally, we will place a Skylight into the roof. In ArchiCAD, Skylights are objects that recognize a roof element and
automatically cut the opening within the roof structure.
Process to Learn
• Parameters for Doors/Windows
• Using the ArchiCAD Library
• Placing a Door/Window
• Viewing a Door/Window
• Editing Doors/Windows
• Creating Dimensions
• Placing a Skylight
Starting the Step
Use your file from the previous step or open the file named Step-10.pln contained in the Step Files folder.
68
Step 10: Working with Doors, Windows and Skylights
Graphisoft ArchiCAD Step by Step Tutorial
Introduction
Both Windows and Doors are objects, meaning that they are
stored in libraries of objects that can be used on many
Projects. Library Parts comprise a 2D Symbol and a 3D
description in GDL (Geometric Description Language), as well
as some optional information such as an additional 2D
description, a user interface script or a component definition.
Windows and Doors can be added to an ArchiCAD Project
only by placing them into an existing wall. They cannot be
independently placed into a Project. Once a Window or Door
has been placed in a Wall, it becomes an integral part of that
wall and stays with the wall when it is moved or stretched.
Doors and Windows cut real, see-through openings into the
wall, so that 3D visualizations are more accurate and lifelike.
What to Do
It is time now to develop the design further by adding
openings into the building. ArchiCAD’s door and window
objects are parametric library parts; by changing their
parameters, their properties change. The parameters can be
modified in the Object Settings dialog box.
1. Add an Entrance Door
Now return to the Ground floor plan and start placing doors
to achieve the layout as shown below.
P-3, S-10, M-A, 1-2
Double-click the Door tool in the Toolbox to bring up
its settings dialog (select the Door/Window tool in the
Toolbox and hold down the mouse button to shift between
them). Choose D1 Sidelight Transom 8 from the library,
browse through the parameters and see what effect they will
have on the 2D and 3D representation. Click Cancel (to make
sure the settings are just as they were when you opened the
dialog box).
69
Step 10: Working with Doors, Windows and Skylights
Graphisoft ArchiCAD Step by Step Tutorial
Place the entrance door in the middle of the front wall of the
entrance enclosure:
- Select the Center Point geometry method.
- Hold the cursor over the external side of the front wall to
bring up a special snap point in the middle of it.
- Click on the snap point (point no. 1).
- Click above and to the right from the center point of the
door to define the opening direction (point no. 2).
2. Add Internal Doors
Select D1 from the door dialog box for the door opening into
the Exhibition space:
- Select the Corner Point geometry method.
- Click to place the door on the internal corner point of the
wall junction as shown (point no. 1).
- Click to the right of it to define the door position (point
no. 2).
- Click below and to the left of its center to define the
opening direction (point no 3).
Use the same door type for the restroom symmetrically on the
other side of the entrance enclosure. For the future toilet,
change the width to 2'-8" (750 mm) and its Door Panel to Style
1 (shown under the Frame, Panel, Shutter and Handle Types
in the dialog).
Place it by eye as shown in the picture above.
70
Step 10: Working with Doors, Windows and Skylights
Graphisoft ArchiCAD Step by Step Tutorial
3. Place Windows in a Curved Wall
Likewise place the windows into the curved wall of the
entrance enclosure.
P-3,S-10, M-B, 3-4
- Choose the Window tool in the Toolbox.
- Select “W1 Casement” in the dialog box.
- Select the Center Point geometry method.
- Click to point no. 1 by eye to start placing the window.
- Click above the wall (point no. 2) to define the window
opening direction.
Similarly place a window to the other two rooms of the
entrance enclosure by eye.
For the glazed walls of the exhibition space, we will use
sliding doors.
4. Insert a Sliding Door
Choose D2 Sliding Door in the door dialog, set the reveal
value to 4" (70 mm) and select the corner point geometry
method option to place a door on both sides of the bottom
left corner of the exhibition space:
- Click to the inside corner point of the bottom left wall
junction (point no. 1 in the picture).
- Click with the cursor (double eye shape) above the corner
(point no. 2 in the picture) to define the wall into which
the door will be placed.
- Click with the cursor (eye shape) outside the wall (point
no. 2 in the picture) to define its opening direction.
- To place the second sliding door, repeat the steps above
only this time click to the right at step no. 2 with the
double eye cursor.
Next, replicate the sliding door in the southern wall:
- Select the door (click one of the corner points of the door
with the arrow tool or by the shift key; point no. 1).
- Select Edit/Multiply from the pull down menus.
- Type in 2 as the number of copies, select the Distribute
method and Click OK.
71
Step 10: Working with Doors, Windows and Skylights
Graphisoft ArchiCAD Step by Step Tutorial
- Click on one of the selection dots on its right side (point
no. 2).
- Move the cursor on the inside corner point of the bottom
right wall junction (the cursor is in the shape of a
checkmark (point no. 3).
- Click to finish the Multiply command.
Place the last sliding door to the corner of the eastern wall.
Deselect the door and switch to the 3D Window to check the
progress of the building.
5. Create Dimensions
The next step is to check the dimensions of the walls and the
openings.
P-3, S-10, M-C
With the automatic dimensioning feature all the walls and the
openings of your building can be dimensioned with just a few
clicks. Simply select the items/points to be dimensioned and
ArchiCAD will do the rest:
- Go back to the Floor Plan.
- Select the Dimension tool in the Toolbox and make sure
the length dimensioning icon is selected in the Info Box.
- Select all the walls (select the Wall tool in the Toolbox
and choose Edit/Select All Walls).
- Select Tools/Automatic Dimensioning/Exterior
Dimensioning and enter the following values:
- Click OK.
- Click on the external side of the southern wall to define
the direction of the dimensions (point 1).
72
Step 10: Working with Doors, Windows and Skylights
Graphisoft ArchiCAD Step by Step Tutorial
- Click below the wall with the hammer icon to define the
distance of the first row of dimensions (point no.2).
Note that the rows of dimensions have been placed around
the four sides of the building. In ArchiCAD all dimensions are
associative, meaning if you change an element that was
dimensioned previously, after the modifications the
dimensions will follow the changes. View the resulting layout
in cross-section on Section A/1.
6. Edit Doors and Windows in Section and Elevation
Notice the door is a bit too wide; it’s better to align it with the
edge of the gallery slab.
P-3, S-10, M-D
- Select the sliding door.
- Select Edit menu/Stretch.
- Click on the top left corner of the door to start stretching it.
- Move the cursor out in the horizontal direction and hold
down the shift key to constrain the horizontal movement.
- Click on either corner points of the edge of the slab
(cursor is a shape of a checkmark as shown above).
Go back to the Floor Plan: Note that the dimensions have
been automatically updated on the plan following the
modification in the section window.
Select the sliding door on the other side and stretch it
similarly; this time, do it on the plan to align it with the
dashed line of the gallery slab.
The next steps is to design the openings of the gallery.
Switch off the Show Ghost Story option (deselect Options/
Stories/Show Ghost Story) and the grid display (deselect
Options/Grid Display), because from now on this won’t be
used.
73
Step 10: Working with Doors, Windows and Skylights
Graphisoft ArchiCAD Step by Step Tutorial
Place the same door as the entrance door (D1 Sidelight
Transom) for the door to the balcony, the “W1 Casement” as
square windows in the northern wall, and the “W Round Piv”
round windows to both sidewalls of the gallery (enter 2’ (600)
as the parapet height for the round window). Do not worry
about their exact location, just place them by eye.
Open the north elevation and modify some of the windows:
- Stretch the square window of the entrance room on the
North Elevation.
- Replicate the window above the balcony.
7. Inserting Skylights into the Roof
On the Gallery level we will insert a skylight into the roof.
P-3, S-10, M-E
To do this, select the Skylight Tool from the Tools palette as
shown.
Double click the Skylight Tool to open the settings dialog.
Choose the "Skylight Top Hung" object from the Object
Library.
At the bottom of the dialog set the layer to Roofs. Click OK.
Drag your cursor to the inside edge of the wall. Place the
skylight at the center of the wall using the Snap Point.
74
Step 10: Working with Doors, Windows and Skylights
Graphisoft ArchiCAD Step by Step Tutorial
The Skylight object will automatically cut a hole in the roof
and set its slope to the angle of the roof as shown in the
section cutaway below.
75
Step 11: Adding Internal Circulation
Graphisoft ArchiCAD Step by Step Tutorial
Step 11: Adding Internal Circulation
Overview
This step will teach you how to create a custom stair using the Stair Tool. The Stair Tool lets you easily design and construct all
kinds of stairs required for ArchiCAD projects by selecting from a set of predefined geometry types, or by drawing the main
geometry of the stair and editing parameters.
Process to Learn
• Stair Tool
Creating a Stair Object
Selecting the Stair Type
Setting Flight and Tread
Defining the Stair Structure
Selecting the Handrail
• Create a Slab Opening
Starting the Step
Use your file from the previous step or open the file named Step-11.pln contained in the Step Files folder.
Archi cad step_by_step

More Related Content

What's hot

Revit Basic Architecture Modeling
Revit Basic Architecture ModelingRevit Basic Architecture Modeling
Revit Basic Architecture Modeling
NI BT
 
Autocad
AutocadAutocad
Revit Structure Training
Revit Structure TrainingRevit Structure Training
Revit Structure Training
pinoy cadplus
 
Architectural drafting-Ar.Archana Sreedharan
Architectural drafting-Ar.Archana SreedharanArchitectural drafting-Ar.Archana Sreedharan
Architectural drafting-Ar.Archana Sreedharan
archsree
 
Project management for interior design
Project management for interior designProject management for interior design
Project management for interior design
KCS Designs
 
Architectural Drawing
Architectural DrawingArchitectural Drawing
Architectural Drawing
Lea Alberto
 
3D Modeling with Revit Structure
3D Modeling with Revit Structure3D Modeling with Revit Structure
3D Modeling with Revit Structure
Engr. Ananya Abduhu
 
Revit Architecture
Revit ArchitectureRevit Architecture
Revit Architectureniict
 
BIM (Building Information Modeling) Services | Revit Architecture | Revit Str...
BIM (Building Information Modeling) Services | Revit Architecture | Revit Str...BIM (Building Information Modeling) Services | Revit Architecture | Revit Str...
BIM (Building Information Modeling) Services | Revit Architecture | Revit Str...
Dalbir Dugal
 
Autocad ppt
Autocad pptAutocad ppt
Autocad ppt
SANJAYKUMAR3195
 
Architectural working drawing
Architectural working drawingArchitectural working drawing
Architectural working drawing
Sanjib Sengupta
 
User Interface
User InterfaceUser Interface
User Interface
Sarthak Kaura
 
What is 3ds MAX Architecture?
What is 3ds MAX Architecture?What is 3ds MAX Architecture?
What is 3ds MAX Architecture?
dhyanacademyengineer
 
Basic structure
Basic structureBasic structure
Basic structure
Sumaiya Islam
 
BIM
BIM BIM
BIM for Project Managers
BIM for Project ManagersBIM for Project Managers
BIM for Project Managers
Dekker/Perich/Sabatini
 
Introduction to Revit Software from Autodesk
Introduction to Revit Software from AutodeskIntroduction to Revit Software from Autodesk
Introduction to Revit Software from AutodeskThomas Tate
 
Architectural Design 1 Lectures by Dr. Yasser Mahgoub - Process
Architectural Design 1 Lectures by Dr. Yasser Mahgoub - ProcessArchitectural Design 1 Lectures by Dr. Yasser Mahgoub - Process
Architectural Design 1 Lectures by Dr. Yasser Mahgoub - Process
Galala University
 
Intro revit 9
Intro revit 9Intro revit 9
Intro revit 9
divislide
 
AUTOCAD PPT
AUTOCAD PPTAUTOCAD PPT
AUTOCAD PPT
Pavnesh Kumar
 

What's hot (20)

Revit Basic Architecture Modeling
Revit Basic Architecture ModelingRevit Basic Architecture Modeling
Revit Basic Architecture Modeling
 
Autocad
AutocadAutocad
Autocad
 
Revit Structure Training
Revit Structure TrainingRevit Structure Training
Revit Structure Training
 
Architectural drafting-Ar.Archana Sreedharan
Architectural drafting-Ar.Archana SreedharanArchitectural drafting-Ar.Archana Sreedharan
Architectural drafting-Ar.Archana Sreedharan
 
Project management for interior design
Project management for interior designProject management for interior design
Project management for interior design
 
Architectural Drawing
Architectural DrawingArchitectural Drawing
Architectural Drawing
 
3D Modeling with Revit Structure
3D Modeling with Revit Structure3D Modeling with Revit Structure
3D Modeling with Revit Structure
 
Revit Architecture
Revit ArchitectureRevit Architecture
Revit Architecture
 
BIM (Building Information Modeling) Services | Revit Architecture | Revit Str...
BIM (Building Information Modeling) Services | Revit Architecture | Revit Str...BIM (Building Information Modeling) Services | Revit Architecture | Revit Str...
BIM (Building Information Modeling) Services | Revit Architecture | Revit Str...
 
Autocad ppt
Autocad pptAutocad ppt
Autocad ppt
 
Architectural working drawing
Architectural working drawingArchitectural working drawing
Architectural working drawing
 
User Interface
User InterfaceUser Interface
User Interface
 
What is 3ds MAX Architecture?
What is 3ds MAX Architecture?What is 3ds MAX Architecture?
What is 3ds MAX Architecture?
 
Basic structure
Basic structureBasic structure
Basic structure
 
BIM
BIM BIM
BIM
 
BIM for Project Managers
BIM for Project ManagersBIM for Project Managers
BIM for Project Managers
 
Introduction to Revit Software from Autodesk
Introduction to Revit Software from AutodeskIntroduction to Revit Software from Autodesk
Introduction to Revit Software from Autodesk
 
Architectural Design 1 Lectures by Dr. Yasser Mahgoub - Process
Architectural Design 1 Lectures by Dr. Yasser Mahgoub - ProcessArchitectural Design 1 Lectures by Dr. Yasser Mahgoub - Process
Architectural Design 1 Lectures by Dr. Yasser Mahgoub - Process
 
Intro revit 9
Intro revit 9Intro revit 9
Intro revit 9
 
AUTOCAD PPT
AUTOCAD PPTAUTOCAD PPT
AUTOCAD PPT
 

Viewers also liked

ARCHICAD 20 - BIM Product of the Year
ARCHICAD 20 - BIM Product of the YearARCHICAD 20 - BIM Product of the Year
ARCHICAD 20 - BIM Product of the Year
Applecore Designs Limited
 
Archicad Photovoltaik Sun Study FH-Wels
Archicad Photovoltaik Sun Study FH-WelsArchicad Photovoltaik Sun Study FH-Wels
Archicad Photovoltaik Sun Study FH-Wels
Martin Tirol
 
ARCHICAD Bronze Badge
ARCHICAD Bronze BadgeARCHICAD Bronze Badge
ARCHICAD Bronze Badge
Applecore Designs Limited
 
Tutorial archi cad 7.0
Tutorial archi cad 7.0Tutorial archi cad 7.0
Tutorial archi cad 7.0imaduddin91
 
Revit architecture 2013 course
Revit architecture 2013 courseRevit architecture 2013 course
Revit architecture 2013 course
Sameer Nawab
 
Alphorm.com Support de la Formation ARCHICAD 19 - les fondamentaux
Alphorm.com Support de la Formation ARCHICAD 19 - les fondamentauxAlphorm.com Support de la Formation ARCHICAD 19 - les fondamentaux
Alphorm.com Support de la Formation ARCHICAD 19 - les fondamentaux
Alphorm
 
How to prepare your ARCHICAD Project for COBie 2 Documentation
How to prepare your ARCHICAD Project for COBie 2 DocumentationHow to prepare your ARCHICAD Project for COBie 2 Documentation
How to prepare your ARCHICAD Project for COBie 2 Documentation
Applecore Designs Limited
 

Viewers also liked (9)

Mudah belajar archicad 16
Mudah belajar archicad 16Mudah belajar archicad 16
Mudah belajar archicad 16
 
ARCHICAD 20 - BIM Product of the Year
ARCHICAD 20 - BIM Product of the YearARCHICAD 20 - BIM Product of the Year
ARCHICAD 20 - BIM Product of the Year
 
Archicad Photovoltaik Sun Study FH-Wels
Archicad Photovoltaik Sun Study FH-WelsArchicad Photovoltaik Sun Study FH-Wels
Archicad Photovoltaik Sun Study FH-Wels
 
ARCHICAD Bronze Badge
ARCHICAD Bronze BadgeARCHICAD Bronze Badge
ARCHICAD Bronze Badge
 
Tutorial archi cad 7.0
Tutorial archi cad 7.0Tutorial archi cad 7.0
Tutorial archi cad 7.0
 
Revit Architecture 2012
Revit Architecture 2012Revit Architecture 2012
Revit Architecture 2012
 
Revit architecture 2013 course
Revit architecture 2013 courseRevit architecture 2013 course
Revit architecture 2013 course
 
Alphorm.com Support de la Formation ARCHICAD 19 - les fondamentaux
Alphorm.com Support de la Formation ARCHICAD 19 - les fondamentauxAlphorm.com Support de la Formation ARCHICAD 19 - les fondamentaux
Alphorm.com Support de la Formation ARCHICAD 19 - les fondamentaux
 
How to prepare your ARCHICAD Project for COBie 2 Documentation
How to prepare your ARCHICAD Project for COBie 2 DocumentationHow to prepare your ARCHICAD Project for COBie 2 Documentation
How to prepare your ARCHICAD Project for COBie 2 Documentation
 

Similar to Archi cad step_by_step

(Manual) auto cad 2000 visual lisp tutorial (autocad)
(Manual) auto cad 2000 visual lisp tutorial (autocad)(Manual) auto cad 2000 visual lisp tutorial (autocad)
(Manual) auto cad 2000 visual lisp tutorial (autocad)Ketut Swandana
 
Autodesk revit structuretool for-modeling-concrete-reinforcement
Autodesk revit structuretool for-modeling-concrete-reinforcementAutodesk revit structuretool for-modeling-concrete-reinforcement
Autodesk revit structuretool for-modeling-concrete-reinforcement
An Nam Education
 
Revit guide
Revit guideRevit guide
Revit guide
ali lemssefer
 
Gsg architecture enu
Gsg architecture enuGsg architecture enu
Gsg architecture enu
RIZET RAHMAN
 
Getting started with revit architecture
Getting started with revit architectureGetting started with revit architecture
Getting started with revit architecture
simet
 
Green Intl Broucher for upcoming training outlines
Green Intl Broucher for upcoming training outlinesGreen Intl Broucher for upcoming training outlines
Green Intl Broucher for upcoming training outlines
shajiya shajju
 
Graphisoft vbe user_guide
Graphisoft vbe user_guideGraphisoft vbe user_guide
Graphisoft vbe user_guideVictor5201
 
Welcome to Archicad 21
Welcome to Archicad 21Welcome to Archicad 21
Welcome to Archicad 21
Rudrabhishek Infosystem Pvt. Ltd
 
Visualizing the engineering project lifecycle - Unite Copenhagen
Visualizing the engineering project lifecycle - Unite CopenhagenVisualizing the engineering project lifecycle - Unite Copenhagen
Visualizing the engineering project lifecycle - Unite Copenhagen
Unity Technologies
 
ARCHICAD 21 Brochure
ARCHICAD 21 BrochureARCHICAD 21 Brochure
ARCHICAD 21 Brochure
Applecore Designs Limited
 
It cad&cam report
It cad&cam reportIt cad&cam report
It cad&cam report
sandhya Arya
 
Introduction to Computer Graphics
Introduction to Computer GraphicsIntroduction to Computer Graphics
Introduction to Computer Graphics
Yatin Singh
 
AutoCAD is a 2D and 3D computer desi.pptx
AutoCAD is a 2D and 3D computer desi.pptxAutoCAD is a 2D and 3D computer desi.pptx
AutoCAD is a 2D and 3D computer desi.pptx
innocentvk155
 
Autocad Mep Gettingstarted
Autocad Mep GettingstartedAutocad Mep Gettingstarted
Autocad Mep Gettingstartedguestedb0170
 
The kubit Laser Scanning Portfolio: Improving Autodesk Workflows for FARO Use...
The kubit Laser Scanning Portfolio: Improving Autodesk Workflows for FARO Use...The kubit Laser Scanning Portfolio: Improving Autodesk Workflows for FARO Use...
The kubit Laser Scanning Portfolio: Improving Autodesk Workflows for FARO Use...
Melissa Tiffany
 
04_computational_design_digital_fabrication_intro to digitalfabrication_32sli...
04_computational_design_digital_fabrication_intro to digitalfabrication_32sli...04_computational_design_digital_fabrication_intro to digitalfabrication_32sli...
04_computational_design_digital_fabrication_intro to digitalfabrication_32sli...
Ayele Bedada
 
04 computational design and digital fabrication intro to digital fabrication
04 computational design and digital fabrication intro to digital fabrication04 computational design and digital fabrication intro to digital fabrication
04 computational design and digital fabrication intro to digital fabrication
Ayele Bedada
 
The Highest-Paying AutoCAD Careers & Job Roles - NetCom Learning
The Highest-Paying AutoCAD Careers & Job Roles - NetCom LearningThe Highest-Paying AutoCAD Careers & Job Roles - NetCom Learning
The Highest-Paying AutoCAD Careers & Job Roles - NetCom Learning
NetCom Learning
 

Similar to Archi cad step_by_step (20)

(Manual) auto cad 2000 visual lisp tutorial (autocad)
(Manual) auto cad 2000 visual lisp tutorial (autocad)(Manual) auto cad 2000 visual lisp tutorial (autocad)
(Manual) auto cad 2000 visual lisp tutorial (autocad)
 
Autodesk revit structuretool for-modeling-concrete-reinforcement
Autodesk revit structuretool for-modeling-concrete-reinforcementAutodesk revit structuretool for-modeling-concrete-reinforcement
Autodesk revit structuretool for-modeling-concrete-reinforcement
 
Revit guide
Revit guideRevit guide
Revit guide
 
Gsg architecture enu
Gsg architecture enuGsg architecture enu
Gsg architecture enu
 
Getting started with revit architecture
Getting started with revit architectureGetting started with revit architecture
Getting started with revit architecture
 
Green Intl Broucher for upcoming training outlines
Green Intl Broucher for upcoming training outlinesGreen Intl Broucher for upcoming training outlines
Green Intl Broucher for upcoming training outlines
 
Graphisoft vbe user_guide
Graphisoft vbe user_guideGraphisoft vbe user_guide
Graphisoft vbe user_guide
 
01 ac10 e guide
01 ac10 e guide01 ac10 e guide
01 ac10 e guide
 
Welcome to Archicad 21
Welcome to Archicad 21Welcome to Archicad 21
Welcome to Archicad 21
 
Visualizing the engineering project lifecycle - Unite Copenhagen
Visualizing the engineering project lifecycle - Unite CopenhagenVisualizing the engineering project lifecycle - Unite Copenhagen
Visualizing the engineering project lifecycle - Unite Copenhagen
 
ARCHICAD 21 Brochure
ARCHICAD 21 BrochureARCHICAD 21 Brochure
ARCHICAD 21 Brochure
 
It cad&cam report
It cad&cam reportIt cad&cam report
It cad&cam report
 
Introduction to Computer Graphics
Introduction to Computer GraphicsIntroduction to Computer Graphics
Introduction to Computer Graphics
 
AutoCAD is a 2D and 3D computer desi.pptx
AutoCAD is a 2D and 3D computer desi.pptxAutoCAD is a 2D and 3D computer desi.pptx
AutoCAD is a 2D and 3D computer desi.pptx
 
CADD ARABIA PRESENTATION
CADD ARABIA PRESENTATIONCADD ARABIA PRESENTATION
CADD ARABIA PRESENTATION
 
Autocad Mep Gettingstarted
Autocad Mep GettingstartedAutocad Mep Gettingstarted
Autocad Mep Gettingstarted
 
The kubit Laser Scanning Portfolio: Improving Autodesk Workflows for FARO Use...
The kubit Laser Scanning Portfolio: Improving Autodesk Workflows for FARO Use...The kubit Laser Scanning Portfolio: Improving Autodesk Workflows for FARO Use...
The kubit Laser Scanning Portfolio: Improving Autodesk Workflows for FARO Use...
 
04_computational_design_digital_fabrication_intro to digitalfabrication_32sli...
04_computational_design_digital_fabrication_intro to digitalfabrication_32sli...04_computational_design_digital_fabrication_intro to digitalfabrication_32sli...
04_computational_design_digital_fabrication_intro to digitalfabrication_32sli...
 
04 computational design and digital fabrication intro to digital fabrication
04 computational design and digital fabrication intro to digital fabrication04 computational design and digital fabrication intro to digital fabrication
04 computational design and digital fabrication intro to digital fabrication
 
The Highest-Paying AutoCAD Careers & Job Roles - NetCom Learning
The Highest-Paying AutoCAD Careers & Job Roles - NetCom LearningThe Highest-Paying AutoCAD Careers & Job Roles - NetCom Learning
The Highest-Paying AutoCAD Careers & Job Roles - NetCom Learning
 

More from imaduddin91

07 a80102 groundwaterdevelopmentandmanagement
07 a80102 groundwaterdevelopmentandmanagement07 a80102 groundwaterdevelopmentandmanagement
07 a80102 groundwaterdevelopmentandmanagementimaduddin91
 
Remotesensingandgisapplications
RemotesensingandgisapplicationsRemotesensingandgisapplications
Remotesensingandgisapplicationsimaduddin91
 
R05410107 advancedfoundationengineering
R05410107 advancedfoundationengineeringR05410107 advancedfoundationengineering
R05410107 advancedfoundationengineeringimaduddin91
 
07 a80101 advanced structural design
07 a80101 advanced structural design07 a80101 advanced structural design
07 a80101 advanced structural designimaduddin91
 
07 a70401 remotesensingandgisapplications
07 a70401 remotesensingandgisapplications07 a70401 remotesensingandgisapplications
07 a70401 remotesensingandgisapplicationsimaduddin91
 
07 a70102 finite element methods in civil engineering
07 a70102 finite element methods in civil engineering07 a70102 finite element methods in civil engineering
07 a70102 finite element methods in civil engineeringimaduddin91
 
R05410103 remotesensingandgisapplications
R05410103 remotesensingandgisapplicationsR05410103 remotesensingandgisapplications
R05410103 remotesensingandgisapplicationsimaduddin91
 
R05410102 finiteelementmethodsincivilengineering
R05410102 finiteelementmethodsincivilengineeringR05410102 finiteelementmethodsincivilengineering
R05410102 finiteelementmethodsincivilengineeringimaduddin91
 
07 a60105 estimatingandcosting
07 a60105 estimatingandcosting07 a60105 estimatingandcosting
07 a60105 estimatingandcostingimaduddin91
 
07 a82101 advanced structural design
07 a82101  advanced structural design07 a82101  advanced structural design
07 a82101 advanced structural designimaduddin91
 
07 a80106 pavementanalysisanddesign
07 a80106 pavementanalysisanddesign07 a80106 pavementanalysisanddesign
07 a80106 pavementanalysisanddesignimaduddin91
 
07 a80104 watershedmanagement
07 a80104 watershedmanagement07 a80104 watershedmanagement
07 a80104 watershedmanagementimaduddin91
 
07 a80102 groundwaterdevelopmentandmanagement
07 a80102 groundwaterdevelopmentandmanagement07 a80102 groundwaterdevelopmentandmanagement
07 a80102 groundwaterdevelopmentandmanagementimaduddin91
 
07 a70110 remotesensingandgisapplications
07 a70110 remotesensingandgisapplications07 a70110 remotesensingandgisapplications
07 a70110 remotesensingandgisapplicationsimaduddin91
 
07 a70107 waterresourcessystemplanningandmanagement
07 a70107 waterresourcessystemplanningandmanagement07 a70107 waterresourcessystemplanningandmanagement
07 a70107 waterresourcessystemplanningandmanagementimaduddin91
 
07 a70102 finite element methods in civil engineering
07 a70102  finite element methods in civil engineering07 a70102  finite element methods in civil engineering
07 a70102 finite element methods in civil engineeringimaduddin91
 
07 a60105 estimatingandcosting
07 a60105 estimatingandcosting07 a60105 estimatingandcosting
07 a60105 estimatingandcostingimaduddin91
 
Statistical metods
Statistical metodsStatistical metods
Statistical metodsimaduddin91
 
Sas language reference concepts
Sas language reference  conceptsSas language reference  concepts
Sas language reference conceptsimaduddin91
 

More from imaduddin91 (20)

07 a80102 groundwaterdevelopmentandmanagement
07 a80102 groundwaterdevelopmentandmanagement07 a80102 groundwaterdevelopmentandmanagement
07 a80102 groundwaterdevelopmentandmanagement
 
Remotesensingandgisapplications
RemotesensingandgisapplicationsRemotesensingandgisapplications
Remotesensingandgisapplications
 
R05410107 advancedfoundationengineering
R05410107 advancedfoundationengineeringR05410107 advancedfoundationengineering
R05410107 advancedfoundationengineering
 
07 a80101 advanced structural design
07 a80101 advanced structural design07 a80101 advanced structural design
07 a80101 advanced structural design
 
07 a70401 remotesensingandgisapplications
07 a70401 remotesensingandgisapplications07 a70401 remotesensingandgisapplications
07 a70401 remotesensingandgisapplications
 
07 a70102 finite element methods in civil engineering
07 a70102 finite element methods in civil engineering07 a70102 finite element methods in civil engineering
07 a70102 finite element methods in civil engineering
 
R05410103 remotesensingandgisapplications
R05410103 remotesensingandgisapplicationsR05410103 remotesensingandgisapplications
R05410103 remotesensingandgisapplications
 
R05410102 finiteelementmethodsincivilengineering
R05410102 finiteelementmethodsincivilengineeringR05410102 finiteelementmethodsincivilengineering
R05410102 finiteelementmethodsincivilengineering
 
07 a60105 estimatingandcosting
07 a60105 estimatingandcosting07 a60105 estimatingandcosting
07 a60105 estimatingandcosting
 
07 a82101 advanced structural design
07 a82101  advanced structural design07 a82101  advanced structural design
07 a82101 advanced structural design
 
07 a80106 pavementanalysisanddesign
07 a80106 pavementanalysisanddesign07 a80106 pavementanalysisanddesign
07 a80106 pavementanalysisanddesign
 
07 a80104 watershedmanagement
07 a80104 watershedmanagement07 a80104 watershedmanagement
07 a80104 watershedmanagement
 
07 a80102 groundwaterdevelopmentandmanagement
07 a80102 groundwaterdevelopmentandmanagement07 a80102 groundwaterdevelopmentandmanagement
07 a80102 groundwaterdevelopmentandmanagement
 
07 a70110 remotesensingandgisapplications
07 a70110 remotesensingandgisapplications07 a70110 remotesensingandgisapplications
07 a70110 remotesensingandgisapplications
 
07 a70107 waterresourcessystemplanningandmanagement
07 a70107 waterresourcessystemplanningandmanagement07 a70107 waterresourcessystemplanningandmanagement
07 a70107 waterresourcessystemplanningandmanagement
 
07 a70102 finite element methods in civil engineering
07 a70102  finite element methods in civil engineering07 a70102  finite element methods in civil engineering
07 a70102 finite element methods in civil engineering
 
07 a60105 estimatingandcosting
07 a60105 estimatingandcosting07 a60105 estimatingandcosting
07 a60105 estimatingandcosting
 
Statistical metods
Statistical metodsStatistical metods
Statistical metods
 
Sas cheat
Sas cheatSas cheat
Sas cheat
 
Sas language reference concepts
Sas language reference  conceptsSas language reference  concepts
Sas language reference concepts
 

Archi cad step_by_step

  • 1. 1 Contents ArchiCAD Step by Step Tutorial 1 Contents ArchiCAD Step by Step Tutorial Step by Step Tutorial by Thomas M. Simmons
  • 2. 2 Contents ArchiCAD Step by Step Tutorial Graphisoft Visit the Graphisoft website at http://www.graphisoft.com for local distributor and product availability information. Graphisoft ArchiCAD Step by Step Tutorial Copyright © 1998-2003 by Thomas M. Simmons. All rights reserved. Reproduction, paraphrasing or translation without express prior written permission of the author and Graphisoft is strictly prohibited. Published by GRAPHISOFT R&D Rt. Second edition - first printing. Trademarks ArchiCAD and ArchiFM are registered trademarks and PlotMaker, Virtual Building, StairMaker and GDL are trademarks of Graphisoft. All other trademarks are the property of their respective holders.
  • 3. 3 Contents ArchiCAD Step by Step Tutorial 3 Contents ArchiCAD Step by Step Tutorial About the Author Thomas M. Simmons President ARCHVISTA The Graphisoft ArchiCAD Step by Step Tutorial was developed by ARCHVISTA and used with the ArchiCAD training course at the San Francisco Institute of Architects. This is the first edition of Step by Step produced for ArchiCAD 8. The author, Thomas M. Simmons, spent seven years as an architect and served as the Director of Design Technology for Esherick, Homsey, Dodge and Davis Architects, an award-winning and internationally acclaimed architecture firm, before starting his company, ARCHVISTA. While at EHDD Architects, he was instrumental in integrating and managing ArchiCAD on a variety of projects including single-family houses, commercial buildings, libraries and aquariums. Simmons received a Master of Architecture degree from the University of California, Berkeley, and a Bachelor of Environmental Design degree from Texas A & M University. He has been a speaker on a variety of subjects including Beginning to Advanced ArchiCAD, Architectural Multimedia, QuickTime VR and Architectural Visualization. ARCHVISTA has produced several notable projects for the architectural and ArchiCAD markets including the acclaimed NASA Virtual Tours - 2002, the Lawrence Berkeley National Laboratory Building Technology Facility - 2001, the award-winning Architectural Record, Record Houses CD-ROM - 1997 and 1998 and the award winning visualization of the American Hebrew Academy with Aaron Green Architects - 1998. ARCHVISTA is a leading consultant and reseller of ArchiCAD for the Northern California, Nevada and Oregon regions and can be reached at www.archvista.com. ARCHVISTA is a member of the Virtual Building Group representing the largest base of ArchiCAD users in the United States.
  • 5. 5 Contents Graphisoft ArchiCAD Step by Step Tutorial Contents About the Author . . . . . . . . . . . . . . . . . . . . . . . . . . . . . . . . . . . 3 Introduction 7 Part One: Concepts and Tools 13 Step 1: The ArchiCAD Workplace . . . . . . . . . . . . . . . . . . . . . 13 Step 2: Understanding Objects and GDL . . . . . . . . . . . . . . . 21 Part Two: Project Setup 25 Step 3: Customizing the Drawing Environment . . . . . . . . . . 25 Step 4: Managing Project Information . . . . . . . . . . . . . . . . . . 29 Part Three: Creating the Virtual Building 37 Step 5: Establishing the Base Building Layout . . . . . . . . . . . 37 Step 6: Viewing the Building in 3D . . . . . . . . . . . . . . . . . . . . 45 Step 7: Working with Stories . . . . . . . . . . . . . . . . . . . . . . . . . 49 Step 8: Completing the Building Envelope . . . . . . . . . . . . . . 55 Step 9: Developing the Design . . . . . . . . . . . . . . . . . . . . . . . 59 Step 10: Working with Doors, Windows and Skylights . . . . 67 Step 11: Adding Internal Circulation . . . . . . . . . . . . . . . . . . . 75 Step 12: Defining Room Usage and Spaces . . . . . . . . . . . . . 79 Step 13: Adding Final Details . . . . . . . . . . . . . . . . . . . . . . . . 83 Step 14: Creating a Ceiling Plan . . . . . . . . . . . . . . . . . . . . . . 87 Step 15: Placing the Building on a Site . . . . . . . . . . . . . . . . . 91 Part Four: Measuring and Costing a Building 95 Step 16: Calculating Building Information . . . . . . . . . . . . . . 95 Step 17: Creating Building Schedules . . . . . . . . . . . . . . . . . . 99 Part Five: Presenting the Design to a Client 103 Step 18: Using Perspectives . . . . . . . . . . . . . . . . . . . . . . . . . 103 Step 19: Developing an Animation . . . . . . . . . . . . . . . . . . . 107 Step 20: Viewing Virtual Reality . . . . . . . . . . . . . . . . . . . . . 111 Step 21: Creating a Sun Study . . . . . . . . . . . . . . . . . . . . . . . 117 Step 22: Defining a 3D Cutaway . . . . . . . . . . . . . . . . . . . . . 121 Part Six: Producing and Publishing Drawings 125 Step 23: Creating the Sheet Layouts . . . . . . . . . . . . . . . . . . 125 Step 24: Placing, Positioning and Viewing Drawings . . . . . 129 Step 25: Publishing, Printing and Plotting . . . . . . . . . . . . . 133 Part Seven: Detailing, Management and Archiving 137 Step 26: Detailing a Project . . . . . . . . . . . . . . . . . . . . . . . . . 137 Step 27: Reviewing a Project . . . . . . . . . . . . . . . . . . . . . . . . 143 Step 28: Managing a Teamwork Project . . . . . . . . . . . . . . . 147 Step 29: Archiving a Project . . . . . . . . . . . . . . . . . . . . . . . . . 153
  • 7. 7 Introduction Graphisoft ArchiCAD Step by Step Tutorial Introduction Welcome to Step by Step The Step by Step Tutorial for ArchiCAD 8 is designed as a 16- to 20-hour course that will guide you through a project. By the end of this course, you should have a basic understanding of ArchiCAD concepts, tools, drawing techniques and modeling. The steps highlight the implementation of a project, methods of design and the application of tools for construction documents. The intention of this course is to offer a consistent and organized process for learning ArchiCAD based on an architectural project. Each step guides you through the concept or technique to be learned, the information necessary to build the exercise, and what to do for that step. The steps also contain diagrams of the Toolbox and dialogs that provide quick references to Tools used in that exercise. The Concept of a Virtual Building Architectural software is evolving rapidly from an “automator” of two-dimensional drafting to a three-dimensional building simulator. As a result of this evolution, the architect’s ability to construct a “virtual building” on a desktop computer, to simulate the building’s behavior both before it is built and throughout its life cycle, will change the architect’s design process, fee structure, and relationship with the client, contractor and the community. In addition to transforming the architect’s own practice, ownership of the 3D computer model will carry important competitive advantages in procuring all future work associated with the same building. Traditional CAD vs. Virtual Building Technology So what is the difference between traditional CAD drafting and Virtual Building Technology? Traditional CAD is the world of lines, arcs, circles and blocks. With traditional CAD, your drawing is a 2D representation of how the building will be built. It is very similar to hand drafting but automated with computer technology. With Virtual Building Technology, you construct a building using building elements: floor slabs, walls, roofs, windows, doors, stairs and other objects. A Virtual Building uses intelligent objects to create building elements. With object oriented CAD, each object in the system represents a building element with a behavior and intelligence relevant to that element. For example, the behavior of a door is different than the behavior of the wood used to construct it. Because you have the real model of a building, not just a 2D representation of one, you can ask it building specific questions. For instance, you can get detailed reports on egress analysis, heat loss analysis, code compliance or cost takeoffs. From the virtual model, buildings can be analyzed with respect to building mass, overshadowing and visual appearance. ArchiCAD can automatically generate plans, elevations and sections, perspective views, animations and virtual reality views. Integrated Building Information Architects and building professionals using integrated 3D CAD software generate a wealth of valuable building information that can be used for both the traditional architectural practice as well as for many new fields and services. Some of the opportunities that can utilize this information are: • Building master planning, design and development • Creation of renderings, animations and virtual reality scenes • Production drawings, details and schedules • Building marketing • Management of building spaces and assets
  • 8. 8 Introduction Graphisoft ArchiCAD Step by Step Tutorial • Post-occupancy studies and simulation of design changes • Analysis and visualization of product performance over the building life cycle • Content development for electronic building component objects including product data and links to manufacturer Websites With ArchiCAD and its Virtual Building Technology, architects, in partnership with owners, are in a prime position to assert their central role not only in the initial design of buildings, but also in their long-term programming, maintenance and operation. How Firms use ArchiCAD As the new age of Virtual Building Technology unfolds, architecture firms and the building industry must consider how to effectively apply Virtual Building Technology to design, production, collaboration and information analysis. ArchiCAD offers a complete solution and, unlike other CAD systems, has been built on the foundation of architecture. With this in mind, there are a variety of architecture firms using ArchiCAD and its Virtual Building Technology system. The firms range in size from one-man firms to large companies and specialize in a variety of projects including housing, retail, commercial, schools and others. Here is what several architects have to say about ArchiCAD and their use of Virtual Building Technology: House+House Architects (San Francisco, California) “Part of ArchiCAD’s value lies in modeling and easy perspectives; you do not need to put a lot of effort into it,” Steven House said. “But it is worth it to take the extra step to create views with a different flavor. The results can be very powerful.” House+House are very hands on with their projects, working closely with builders, artisans and craftsmen to ensure that no detail goes unconsidered. “We are very excited about our explorations in ArchiCAD,” Steven said. “And the potential it offers for us to communicate design ideas to our clients, our builders and ourselves.” STUDIOS Architecture (Washington, D.C.) With a tight project timeline, the design team at STUDIOS appreciated ArchiCAD’s ability to generate three-dimensional models automatically from the floor plan and section views allowing them to advance the construction documents, make design studies and prepare client presentations at the same time with relatively little additional work. “Modeling in 3D gives you and your client a chance to look at a design critically and react to it,” project architect Bill Deegan said. Deegan also cites that STUDIOS could shave off critical time by sending QuickTime VR scenes to the client by e-mail and through an Intranet which links STUDIOS U.S. offices in Washington, D.C., San Francisco and New York. The Orcutt/Winslow Partnership (Phoenix, Arizona) When Orcutt/Winslow began to fully embrace the Virtual Building method of working, they had to rethink their billing process. “The time spent on the project is greater up-front, but the documents phase time and effort has been significantly reduced”, Winslow said. ArchiCAD’s single, integrated database allows them to start the input of specific materials and systems at a much earlier point in the design phase. With this method, they can show these details at any point, and comfortably make modifications because any changes made will be updated in all views. “Our schematic designs show a much more complete three-dimensional presentation to the client and allow us to evaluate the design in 3D more thoroughly at early stages.” “Office morale and profitability are both on the rise and we are currently in the process of shifting our project phasing percentages to take into account the Virtual Building methodology,” added project manager Russ Sanders. “More time is expended up front establishing the links from the
  • 9. 9 Introduction Graphisoft ArchiCAD Step by Step Tutorial primitive model to the layout sheets. Once this is done, the rest of the project can be developed within the model. By the time we have completed the design development phase, we are actually about 60 percent complete with construction documents.” Rockefeller/Hricak Architects (Venice, California) “We would like to think that the appearance of our work is a direct result of how it gets built. Using ArchiCAD to build a ‘living’ model of the building helps us to focus on issues and assist us in making design decisions as the project takes shape.” The firm is concerned not just how buildings look, but also how they function over time. “We need to be able to predict how the building will look 10 to 20 years down the road, because that affects the way we design it,” Hricak said. “If something is going to wear out in 20 years, we need to understand how that element interacts with what is around it. Obviously the structure is not going to wear out, but windows will be repaired, and equipment will become obsolete. ArchiCAD helps us be clear about the separation of systems and get a sense of how the building will perform.” How This Book and Step by Step Interactive Work Together This book (also available in Adobe Acrobat .pdf format on the ArchiCAD 8 CD-ROM/ArchiCAD Documentation folder) is divided into seven sections beginning with the introduction of concepts, then moving through the construction of a Virtual Building. The Step by Step Interactive acts as a virtual assistant that answers questions with real-time movies of each step. All you need to use the interactive is a standard web browser. Whenever you see this icon... ...it means there is a QuickTime movie demonstrating the step. To View the Movies on Windows Choose the Step by Step Interactive option of the Startup dialog box of the ArchiCAD 8 CD-ROM or Browse this CD, open the Step by Step Interactive folder on the ArchiCAD 8 CD-ROM and double-click the file called Step Interactive.htm. This will open into your default web browser. To View the Movies on MacOS Open the Step by Step Interactive folder on the ArchiCAD 8 CD-ROM and double-click the file called Step Interactive.htm. This will open into your default web browser. To locate the corresponding movie for a step, use the information under the CD-ROM icon. P-1: Indicates the main section, Part 1: Concepts and Tools S-4: Indicates the step, Step 4: Editing and Notation M-C: Indicates the movie designation for Step 4, Movie C - Multiply Exercise 1-4: Indicates the exercise numbers if the movie refers to more than one exercise To play the QuickTime movie, simply click the name of the movie (the name in color with an underline), such as Movie C - Multiply Exercise. The screen will jump to the movie and begin playing it. It is that simple!
  • 10. 10 Introduction Graphisoft ArchiCAD Step by Step Tutorial How to Install and Use the Step Files on Windows Insert the ArchiCAD 8 CD-ROM into your computer’s CD- ROM drive. The main dialog box of the installation appears on your screen, where you can choose from the options by single-clicking on the appropriate caption: • Install Step by Step Tutorial If you have an installed ArchiCAD 8 on your hard drive and you need only the Step Files, click Step by Step Tutorial caption and follow the installation procedure. Once completed, the requested items appear in the existing ArchiCAD 8 folder. Double-click on them and discover your new ArchiCAD tutorial files. Library Manager If you try to open a Step file and the Library Manager dialog box appears, asking where the ArchiCAD Object Library is located on your hard drive, you must: 1. locate the ArchiCAD folder, 2. open it and select the folder called ArchiCAD Library 8, 3. click the Add button in the center of the dialog box, 4. click the Done button. How to Install and Use the Step Files on MacOS Insert the ArchiCAD 8 CD-ROM into your computer’s CD- ROM drive. The contents of the CD-ROM will appear on your screen.
  • 11. 11 Introduction Graphisoft ArchiCAD Step by Step Tutorial • Install Step by Step Tutorial If you have an installed ArchiCAD 8 on your hard drive and you need only the Step Files, click Step by Step Tutorial icon in the Step by Step Tutorial folder. A dialog box will ask for the location of your ArchiCAD folder. Click the Select Folder button to browse your computer for the requested folder. Click Continue and follow the installation procedure. Once completed, the requested items appear in the existing ArchiCAD 8 folder. Double-click on them and discover your new ArchiCAD tutorial files. Library Manager If you try to open a Step file and the Library Manager dialog box appears, asking where the ArchiCAD Object Library is located on your hard drive, you must: 1. locate the ArchiCAD folder, 2. open it and select the folder called ArchiCAD Library 8, 3. click the Add button in the center of the dialog box, 4. click the Done button. Starting a Tutorial Exercise When the ArchiCAD 8 version is open on screen, go to the File Menu and Open the file Step-xx.pln located in the Step Files folder.
  • 13. 13 Step 1: The ArchiCAD Workplace Graphisoft ArchiCAD Step by Step Tutorial Part One: Concepts and Tools Step 1: The ArchiCAD Workplace Overview Here you will learn the basic windows of the working environment and how to customize these windows to create your personal workspace. ArchiCAD has three primary working environments; Floor Plan Window, Section/Elevation Window and the 3D Window. Additionally, this step will introduce you to the Tools and Palettes that are used to help you draw and construct building elements, notes, graphics and views. Process to Learn • ArchiCAD Workplace Floor Plan Window Section/Elevation Window 3D Window • Tools & Palettes Toolbox Info Box Coordinate Box Control Box Starting the Step To begin this step, double-click the file named Step-01.pln contained in the Step Files folder.
  • 14. 14 Step 1: The ArchiCAD Workplace Graphisoft ArchiCAD Step by Step Tutorial Introduction This step introduces the visible elements of the ArchiCAD working environment. They will help you find your way around the ArchiCAD workplace and understand the role each component plays in using ArchiCAD. In many respects, the ArchiCAD workplace is similar to conventional design and drafting environments. We like to think that ArchiCAD begins where your drafting table leaves off, providing you with actual construction elements designed to create a virtual building. The ArchiCAD workplace is designed to provide you with tools that look and feel comfortable, but have all the power and precision available to a computerized system. Once you have started the program you will see the ArchiCAD Workplace on your screen, complete with a Floor Plan worksheet, Menubar, Floating Palettes, and other Windows displaying various aspects of the Virtual Building Project. You can construct your model in ArchiCAD's main Windows displaying different project views: - The Floor Plan Window is the basic construction area where most editing operations take place. - The 3D Window gives you instant feedback on the construction operations performed in other views and at the same time allows you to directly edit your model in either perspective or axonometric view. - Any number of Section/ Elevation Windows can be defined by a dedicated Tool at any moment, at any location.
  • 15. 15 Step 1: The ArchiCAD Workplace Graphisoft ArchiCAD Step by Step Tutorial What to Do This step opens to the ground floor of a two-story building. Here we can view the three components of ArchiCAD’s workplace. These three workspaces are linked working environments. The working environment allows an interactive drawing process between the Floor Plan, Section/ Elevation and 3D Window. Elements are updated in all views to reflect current changes to the model. These three workspaces can be accessed through the Project Map which is located in the Navigator. Since we do not need the Customizable Info Box, close it by clicking the "X" button in the top right corner as shown below. The Floor Plan Window The center of the ArchiCAD workplace is the Floor Plan worksheet. This Window plays two roles at the same time: - It displays a representation of the project as a traditional architectural drawing. - It is a 2D/3D modeling environment that is interactive with the Sections/ Elevations and 3D workspace. P-1, S-1, M-A With the Floor Plan window open, we can view the plans for both floors of this building. The model currently shows the Ground Floor story. To move up a story, open the Stories section of the Project Map by clicking the "+" symbol and then double click the Gallery story. The Floor Plan worksheet is like a sheet of drafting paper. However, a traditional mechanical drafting board is limited by the size of the paper you can fit on it, while the ArchiCAD worksheet can be as big as you want it to be. You can pan and zoom the Window within the full drawing space to obtain the best view of the work you are doing.
  • 16. 16 Step 1: The ArchiCAD Workplace Graphisoft ArchiCAD Step by Step Tutorial The Section/Elevation Window Using the Section/Elevation Tool in the Toolbox, you can generate any number of sections or elevations of your project, which will appear in separate Windows. To open a section or elevation, open the Section/Elevation workspace in the Project Map by clicking the "+" symbol and then double click the Section or Elevation you wish to view. The Section/Elevation Window is interactively linked to both the Floor Plan and 3D Windows. Elements selected in this Window are recognized as walls, beams, columns, slabs, roofs, windows, doors, lights and library parts. These elements are fully editable using the same editing tools as you use in the Floor Plan workspace. You can also add drawing elements to this Window using the 2D drafting tools, place objects and text blocks on the section/elevation and even copy and paste parts of the Window to the floor plan for completing detailed working documents. Section/Elevation views are saved with your project model file. It is also possible to save them as separate files in a variety of drawing formats using the Save As... command under the File menu. The 3D Worksheet Window The 3D Window is used for three-dimensional visualization of the architectural project and as a project editing environment. To open the 3D Window, go to the preset views in the Project Map by clicking the "+" symbol next to 3D and then double click either the perspective or axonometric view. Either the complete project or just the parts you select in plan view will be displayed in the 3D Window. Block, Wireframe, Hidden line and Shaded views are available in all types of parallel and perspective projections. The 3D Window serves a variety of functions: - In your design phase, the 3D Window will serve as a source for visual feedback of your work. - It is an interactive Window, so you can move freely about in the 3D environment both in Parallel and Perspective projections. - The elements in this Window, as in the Floor Plan and Section/Elevation Windows, are completely editable. - For PhotoRenderings, the 3D Window sets the view that will be used to produce a final photorendering. - For output to other applications, a 3D file can be exported from the 3D Window.
  • 17. 17 Step 1: The ArchiCAD Workplace Graphisoft ArchiCAD Step by Step Tutorial Tools & Palettes Palettes can be customized to your preferences. Each Palette can be shown or hidden separately from the Floating Palettes hierarchical menu in the Window menu, and the four main palettes (Toolbox, Info Box, Coordinate Box, Control Box) can enabled or disabled together with the Show Main Palettes Only command. The shapes of the main palettes can be customized with Options/Customize. 1. The Toolbox The Toolbox is where you start in ArchiCAD. The Toolbox is divided into five basic parts: Selection Tools, 3D Tools, Notation Tools, 2D Tools and Visualization Tools. Column Marquee Window Corner Window Object Stair Roof Arrow Wall Beam Door Skylight Lamp Slab Mesh Linear Dimension Level Dimension Text Zone Line Polyline Radial Dimension Angle Dimension Label Fill Circle Spline Figure Hotspot Section/Elevation Detail Camera & QTVR • Review the Tool Settings Dialogs: Each Tool has a settings dialog associated with it. To review the dialogs for each Tool, double-click the Tool. Note: that each tool has various settings for Floor Plan, Section, Model and Properties. The Wall Settings dialog is typical of the basic settings for each of the 3D Tool settings. The Object Settings dialog (shown below) is similar for all library parts, which include windows, doors, lamps, objects and stairs. This dialog contains a library part browser and a system explorer tree to the left.
  • 18. 18 Step 1: The ArchiCAD Workplace Graphisoft ArchiCAD Step by Step Tutorial 2. Info Box The Info Box displays the different control group parameters of the currently active Tools on various panels. The items displayed in the Info Box vary according to which ArchiCAD Tool is currently selected. The Info Box is a customizable palette. With this palette the Infobox can be resized by the user manually by stretching the bottom right corner of the palette. The bigger it is stretched, the more information it shows. • Review the Controls for Each Tool: In this exercise, click each Tool in the Toolbox and observe how the Info Box settings differ for each Tool selected. P-1, S-1, M-B 3. Coordinate Box The Coordinate Box shows you the precise location of the ArchiCAD Cursor within both the Cartesian and the Polar coordinates for your drawing. This allows the entering and the viewing of very accurate numeric information through the keyboard, in addition to or instead of the mouse. • Cartesian and Polar Coordinates: Move the cursor to the bottom right hand corner of the project so that the cursor changes to a check mark. Notice that the all the coordinates have a "0" value at this point. This point is identified by an "X" on the screen and is called the Project Origin. You can toggle between Absolute and Relative coordinate values during drafting or editing by clicking its Delta icons: Absolute values show the horizontal, vertical, radial and angular distance of the cursor from the Project Origin or a User Origin but never from an Edit Origin. Relative values show the horizontal, vertical, radial and angular position of the cursor relative either to the Project Origin, to a User Origin before any element is begun, or to an Edit Origin once a drafting or editing process is under way. • User Origin: Click the "X" button so that it is depressed and click the upper left corner of the building. Notice that the "X" has moved to this point and that the coordinates have a "0" value at this new point. This is known as the
  • 19. 19 Step 1: The ArchiCAD Workplace Graphisoft ArchiCAD Step by Step Tutorial User Origin and this button allows you to relocate the origin anywhere in the Project. • Skewed Grid: Turn on the Background grid by selecting Grid Display from the Options menu. To change the grid angle, click this button so that it is depressed and then click once on the screen to define the start point of the grid and a second point to define the angle of the skewed grid. • The Grid Switch icon next to this Skewed Grid button allows you to toggle between the normal and skewed grids. • Grid Snap: This icon allows you to activate either of the grids or turn off the snap feature altogether. • Gravity: This icon allows the user to place elements relative to existing Slabs, Roofs or Meshes. The Gravity option can be turned off by selecting the "X" option. • Elevation: The Elevation (z coordinate) field displays and allows you to edit the height or elevation of elements while the Elevation pop-up menu allows you to choose whether the Elevation coordinate field will display absolute or relative values. 4. Control Box The Control Box gives you the ability to constrain the drawing angle and cancel or confirm the current drawing operation. It also allows you to group or ungroup elements, choose extension line settings, select offsetting commands, and provides active Tool specific help in the Command Prompt area during different drawing steps. • Relative Construction Methods: These construction methods constrain the cursor to a defined angle or distance during drafting or editing. • Cursor Snap Variants: This option controls the way the current position of the cursor is projected. • Suspend Groups: This switch allows you to choose between editing grouped elements together or on their own. • Magic Wand Tool: This tool traces the contours of existing elements in order to create new elements of other types. • Special Snap Point: Using this control allows the user to use special definition controls to automatically generate temporary snap points on different parts of edges.
  • 20. 20 Step 1: The ArchiCAD Workplace Graphisoft ArchiCAD Step by Step Tutorial • Extended Control Box: The Prompt Box provides point- by-point instructions during drafting or editing. To expand the Control Box, click the button on the right side of the palette. Extended Control Box with Command Prompt
  • 21. 21 Step 2: Understanding Objects and GDL Graphisoft ArchiCAD Step by Step Tutorial Step 2: Understanding Objects and GDL Overview ArchiCAD is an object based program. This step introduces the concept of element types stored in outside files, including doors, windows, lamps, labels, and general objects. These objects can be stored in an ArchiCAD Library, a project library or over the Internet. It also gives an overview of GDL (Graphic Description Language) and how it describes 3D solid objects like doors, windows, furniture, structural elements, stairs, etc., and the 2D symbols representing them on the Floor Plan. Process to Learn • What are Objects Types of Objects Purpose of Objects Object Parameters Object Settings • What is GDL • The ArchiCAD Library Starting the Step Use your file from the previous step or open the file named Step-02.pln contained in the Step Files folder.
  • 22. 22 Step 2: Understanding Objects and GDL Graphisoft ArchiCAD Step by Step Tutorial Introduction Library Parts are parametric prefabricated complex elements created either by ArchiCAD or a third party application and used as units in projects. When you start ArchiCAD for the very first time, it searches for a Library under the name ArchiCAD Library. The icons in the Toolbox that reference ArchiCAD Libraries are as follows: What to Do 1. The Concept of Parametrics An ArchiCAD innovation, parametric object definition allows a single stored object (i.e. window, door, light, stair or truss) to represent dozens of similar objects by simply changing their height, thickness, material and other custom parameters. Each object can also be re-saved under another name allowing you to quickly build up your own specific library. P-1, S-2, M-A, 1-2 To view an example of how parameters are used, double- click on the Window Tool in the Toolbox. The dialog contains various parameters that can create a window with different forms, shapes, sizes and materials. To make changes to the selected window, click in any of the Parameters fields with your cursor and change the settings (i.e., width, depth, length, height). As you change the settings, view the preview window in top view, side view, hidden line 3D view, shaded 3D view and as a preview picture using the Display Mode buttons next to the preview window. You can choose between window objects using the thumbnail previews in the browser at the left of the dialog or by selecting a different window library from the system explorer at the left of the dialog. 2. View an Object Library To review the Object Library and how it is organized, double- click the Object Tool in the Toolbox. The Object Settings dialog will appear. The Object Settings dialog (shown below) is similar for all library part, which include windows, doors, lamps, objects and stairs. The dialog contains a library part browser and a
  • 23. 23 Step 2: Understanding Objects and GDL Graphisoft ArchiCAD Step by Step Tutorial system explorer tree to the left. You can choose different views of the object (top, side, 3D, etc.) by clicking the Display Mode icons to the right of the object preview. 3. Review the Loaded Libraries When ArchiCAD opens a project, it loads one or more libraries from the local hard drive, network or the Internet. To review which libraries are currently loaded, open Library Manager from the File Menu. • Local/LAN: The Local/LAN tab page allows you to manage complete libraries and individual library parts stored on local disks or on remote volumes connected to your computer through a local area network. To open the Library Manager, select the Library Manager option from the File menu. Click on the Local/LAN tab and the currently loaded ArchiCAD Libraries will appear in the dialog. • FTP and Web Objects: - Using the FTP Sites tab page, you can add libraries and single library parts stored on FTP servers. - The Web Objects tab page allows you to download GDL Objects from websites and add them to your local libraries. Since you are currently working from your local hard drive, the FTP Site and Web Object Settings will be empty since no links have been established to an online site. 4. What is GDL GDL (Graphic Description Language) is a parametric programming language, similar to BASIC. It describes 3D solid objects like doors, windows, furniture, structural elements, stairs, etc., and the 2D symbols representing them on the floor plan. These are called library parts. Creating custom ArchiCAD objects does not require an understanding of GDL. You can create custom library parts by using the standard tools (Wall Tool for vertical elements, Slab Tool for horizontal elements, Roof Tool for sloped elements, etc.) and saving the custom design as a GDL Object by
  • 24. 24 Step 2: Understanding Objects and GDL Graphisoft ArchiCAD Step by Step Tutorial selecting "Save Selection As..." from the GDL Objects option in the File menu as shown below. If you need to add parameters such as material selection or text input, you would then open the object and add GDL parameters. You can learn more about this in the book Object Making with ArchiCAD by David Nicholson-Cole. This book is published by Graphisoft.
  • 25. 25 Step 3: Customizing the Drawing Environment Graphisoft ArchiCAD Step by Step Tutorial Part Two: Project Setup Step 3: Customizing the Drawing Environment Overview We can customize options such as project grid, snap grid, line types, pens, colors, pen weight, fills, composites, materials and zones as well as Drawing Preferences to meet specific project needs and drawing requirements. This step teaches you how to customize these options to your drawing needs. Process to Learn • Grids & Background • Pens & Colors • Line Types • Fill Types • Composites • Preferences Starting the Step Open the file named Step-03.pln contained in the Step Files folder.
  • 26. 26 Step 3: Customizing the Drawing Environment Graphisoft ArchiCAD Step by Step Tutorial Information The document just opened will be used as the basis for much of the remaining tutorial. Each step will build upon the model to create a Virtual Building from which to derive plans, sections, elevations, renderings, sun studies, virtual reality scenes and more. Using the controls in the Options Menu, you can customize ArchiCAD to reflect your drawing standards and preferences. We will use the following options in this exercise: Grids & Background: - The Grids & Background dialog allows you to define a working grid configuration and establish a background color for your workplace and grid lines. Pens & Colors: - ArchiCAD pen and color assignments are reviewed and modified using the Pens & Colors… command. In ArchiCAD, pens are simulated drawing instruments that have a specific color and line weight. Line Types: - When you choose the Line Types command, a dialog box appears allowing you to select, modify or delete the standard line types (solid, dotted, dashed, etc.). You can also define your own customized line or symbol line types. Fill Types: - Fills are geometric patterns that can display two faces: bitmapped and vectorial, but only one of the two at one time. You can set this option in the Display Options. Composite Structures: - Walls, Slabs and Roofs can have composite structures. In ArchiCAD composite structures are composed of patterns that represent the components that compose the structure. These components can be assigned a size, description and cost. What to Do 1. Create a Project Grid Open the Grids & Background dialog from the Options menu. Set the Main Grid to 3' (914mm) and the Snap Grid to a spacing of 1" (50mm). 2. Create a Custom Pen Color & Line Weight Open the Pens & Colors... dialog from the Options menu. Place your cursor on Pen #10 and double click the pen color box or click the Edit Color button. The Edit Color dialog will appear. Select the Yellow color and click OK.
  • 27. 27 Step 3: Customizing the Drawing Environment Graphisoft ArchiCAD Step by Step Tutorial With Pen #10 still selected, place your cursor in the Pen Weight text box and change the Pen Weight to 0.50 mm. When finished click OK. You have now set a custom color and line weight. 3. Create a Custom Line Type This new Line Type will be used as a property line in Step 15. P-2, S-3, M-A Open the Line Types... dialog from the Options Menu. Click the New button, select the Dashed radio button and enter the name Property Line. Click OK. Select and drag the slider to the right to activate the three columns as shown. Now enter the numeric values as follows to create a property line: Column 1: Dash: .21 and Gap: .08 Column 2: Dash: .06 and Gap: .08 Column 3: Dash: .06 and Gap: .08 You can also manually change the line spacing by selecting and dragging the flag. When finished, click OK. 4. Create a Custom Fill Type This new Fill Type will be used as a ceiling pattern in Step 14. P-2, S-3, M-B Open the Fill Types... dialog from the Options Menu. Select the "Ceramic Tile" pattern from the popup menu at the top of the dialog (the patterns are listed in alphabetical order). Click the New... button, click Duplicate and type in the new name "Ceiling Grid". Click OK. Now set the size to represent a Ceiling Grid pattern under Edit Vectorial Pattern. Type in 4' (1200mm) for the length and 1' (300mm) for the height. Finally, change the Bitmap pattern (the pattern that appears as a preview of Fill patterns in the Tools dialogs) to represent the new pattern. To do this, click your cursor in the Bitmap
  • 28. 28 Step 3: Customizing the Drawing Environment Graphisoft ArchiCAD Step by Step Tutorial Pattern box to turn the black dots ON. This will allow you to create the pattern as shown below: When finished click OK. 5. Create a Custom Composite Wall This new Composite Structure will be used as a interior wall type in Step 9. P-2, S-3, M-C Open the Composites... dialog from the Options Menu. Select "Stud Partition" from the popup menu as shown below. Click OK. Click the Insert button to add a new skin to the wall. With the outer skin selected as shown, click the popup fill pattern option in the Edit Selected Skin portion of the dialog and select the Gypsum fill pattern. To change the width of the Gypsum, click in the size box and enter 5/8" (25mm). Now click and highlight the Wood Stud component of the wall and click the ADD button to add a skin to the opposite side of the wall. Click in the size box and enter 5/8" (25mm) to set the size of the Gypsum. Click OK. Note: Both Fill Types and Composite Structures can be shown with either Bitmap or Vectorial patterns in the Display Options. Bitmap Patterns are faster to display but cannot be scaled, zoomed or rotated, while Vectorial Patterns are slower to display but can be scaled, zoomed and rotated.
  • 29. 29 Step 4: Managing Project Information Graphisoft ArchiCAD Step by Step Tutorial Step 4: Managing Project Information Overview This step is the foundation that will manage plans, sections, elevations, details, 3D information and final drawings for your Virtual Building. ArchiCAD manages this information by using Layers, Layer Combinations and the Navigator. In this step we will discuss how to set up your ArchiCAD model so that you can both manage the information and produce the drawings. Process to Learn • Layers • Layer Combinations • Project Standards • Navigator Palette • Setting up Drawings • Link to PlotMaker Starting the Step Use your file from the previous step or open the file named Step-04.pln contained in the Step Files folder.
  • 30. 30 Step 4: Managing Project Information Graphisoft ArchiCAD Step by Step Tutorial Introduction 1. Layer Settings ArchiCAD layers are used to organize the elements in your drawing for selective displays and quantity calculations. The Layer Settings command displays the Layer Settings dialog box, which allows you to define the layer settings for your project. 2. Display Options The Display Options command opens a dialog box where you can customize the way the various construction elements are displayed on the Floor Plan worksheet. As an example, you can use this option to toggle between showing the door swing or displaying a header for the ceiling plan. 3. Navigator The Navigator palette is used to give an overview of the project structure, providing instant access to stories, sections, elevations, detail drawings, and 3D views lists. Additionally, it is used to manage view options for typical drawing types such as an architectural floor plan, site plan, ceiling plan and other project drawings. What to Do 1. Create Layers Open the Layer Settings dialog under the Options Menu. P-2, S-4, M-A This dialog contains building and notation layers provided by ArchiCAD. To start this project we will add 3 new layers for notation purposes. Using the Layer Settings dialog as shown, create new layers by selecting New and typing the following layer names: Notes - Ceiling Plan Notes - Floor Plan Notes - Site Plan 2. Create Layer Combinations Each Layer Combination is a "snapshot" of the state of all Layers in the Project and can be called up at any time by selecting its name from the Layers list. Layer Combinations generally reflect the drawings that are to be produced (such as a floor plan, ceiling plan and site plan). P-2, S-4, M-B
  • 31. 31 Step 4: Managing Project Information Graphisoft ArchiCAD Step by Step Tutorial Before adding new Layer Combinations, delete the current Layer Combinations. To do this, select the each name and click the Delete button as shown below: To add a layer combination, click the New button and type the Layer Combination names: Ceiling Plan Floor Plan Site Plan Once all the Layer Combination names are entered we must choose which layers are to be active and which are inactive using the Show or Hide buttons. Let’s start by selecting the "Ceiling Plan" Layer Combination: Then, click the Select All button and click the Hide button. Now deselect all the layers by clicking the Deselect All button. We are now ready to select which layers should be active for the Ceiling Plan. To do this, select each of the following active layers and click the Show button. - Active Layers for the Ceiling Plan Layer Combination: • Beams • Columns • Exterior Walls • Fills • Floors • Interior Walls • Lamps • Notes - Ceiling Plan • Roofs When finished, click the Update button next to the Ceiling Plan Layer Combination to make these changes permanent. Now that the Ceiling Plan Layer Combination is finished, repeat the above steps for the Floor Plan and Site Plan Layer Combinations. The following layers are the active layers: - Active Layers for the Floor Plan Layer Combination: • Beams • Columns • Detail Markers • Dimensioning • Elevations
  • 32. 32 Step 4: Managing Project Information Graphisoft ArchiCAD Step by Step Tutorial • Exterior Walls • Floors • Furniture & Equipment • Interior Walls • Mark-Up • Notes - Floor Plan • Roofs • Sections • Stairs • Zones - Active Layers for the Site Plan Layer Combination: • Columns • Exterior Walls • Floors • Interior Walls • Level Dimensioning • Notes - Site Plan • Roof • Site & Landscaping • Stairs • Terrain After having created the above layer combinations you can choose among them under Option/Layers. 3. Name the Current Story In this step we will create a name for the current story. Select the Story Settings dialog from the Stories option in the Options menu. Click in the Name text box and type "Ground Floor" and click OK. 4. Create View Sets using the Navigator Now that the project layers and layer combinations are set, we must link these layer combinations to View Sets. P-2, S-4, M-C Using the View Editor we will assign the drawing scale, display options, layer combinations and drawing view. To edit the View Sets, click the popup button on the upper left side of the dialog and select the middle button to activate the View Editor. With the View Editor active, rename the "Untitled" View Set as "Project Documents" by selecting Rename from the popup commands at the right edge of the dialog. Next, create new folders that reflect the Drawings to be produced. To do this, click the New Folder button circled below and click the folder to rename it as "Drawings". With the Drawings folder highlighted, click the New Folder button again and rename it as "Ceiling Plan".
  • 33. 33 Step 4: Managing Project Information Graphisoft ArchiCAD Step by Step Tutorial Highlight the Drawings folder and repeat this step to create two additional folders named "Floor Plan" and "Site Plan" as shown below. To set the order of the folders simply click and drag the folder as shown below: 5. Assign View Settings and Storing Options The final step is to assign the scale, display options and layer combination to each Drawing Type created. P-2, S-4, M-D To configure these Drawing Types, set the View Settings and Storing Options as shown below: • Assign the Floor Plan Settings/Options: - Click and highlight "1. Ground Floor" (0. Ground Floor - Metric) within the Stories section of the Project Map. Assign the "Floor Plan" layer combination by clicking the Layer Combination popup button in the View Settings & Storing Options at the lower part of the Navigator palette. - Now that we have changed the View Settings and Storing Options for the Ground Floor, we must assign these settings to the Floor Plan folder. To do this, drag and drop the story "1. Ground Floor" (0. Ground Floor - Metric) into the Floor Plan folder as shown below. • Assign the Ceiling Plan Settings/Options: - Click and highlight "1. Ground Floor" (0. Ground Floor - Metric) within the Stories section of the Project Map. Assign the "Ceiling Plan" layer combination by clicking the Layer Combination popup button in the View Settings & Storing Options at the lower part of the Navigator palette. - Next, open the Display Options dialog from the Options menu. Within the dialog, set the "Doors & Windows" view option to "Reflected Ceiling", the "Construction Fills" view option to "Empty" and the "Polygon Fills" view option to "Vectorial Hatching". Click OK when finished.
  • 34. 34 Step 4: Managing Project Information Graphisoft ArchiCAD Step by Step Tutorial - Now that we have changed the View Settings and Storing Options for the Ground Floor we must assign these settings to the Ceiling Plan folder. To do this, drag and drop the story "1. Ground Floor" (0. Ground Floor - Metric) into the Ceiling Plan folder as shown below. • Assign the Site Plan Settings/Options: - Click and highlight "1. Ground Floor" (0. Ground Floor - Metric) within the Stories section of the Project Map. Assign the "Site Plan" layer combination by clicking the Layer Combination popup button in the View Settings & Storing Options at the lower part of the Navigator palette. - Next, open the Display Options dialog from the Options menu. Set the "Doors & Windows" view option to "Show on Plan" and the "Construction Fills" view option to "Uniform Solid". Click OK when finished. - Now change the scale for the Site Plan by clicking the Scale popup button in the View Settings & Storing Options at the lower part of the Navigator palette. Change the scale to 1"=20'-0" (1:200 mm). - Now that we have changed the View Settings and Stored Options for the Ground Floor, we must assign these settings to the Site Plan folder. To do this, drag and drop the story "1. Ground Floor" (0. Ground Floor - Metric) into the Site Plan folder as shown below.
  • 35. 35 Step 4: Managing Project Information Graphisoft ArchiCAD Step by Step Tutorial 6. Turn Off the View Editor When you are finished with the above steps, restore the Navigator to its original setup by turning off the View Editor. To do this, click the popup button on the upper left side of the dialog and select the left button to activate the Navigator.
  • 36. 36 Step 4: Managing Project Information Graphisoft ArchiCAD Step by Step Tutorial
  • 37. 37 Step 5: Establishing the Base Building Layout Graphisoft ArchiCAD Step by Step Tutorial Part Three: Creating the Virtual Building Step 5: Establishing the Base Building Layout Overview This step will teach you how to use the Slab Tool for creating a building slab and external paving. You will explore ways of manipulating slab shapes and slab openings. You will also learn how to construct linear and curved walls using the Wall Tool in both the Floor Plan Window and the 3D Window. Process to Learn • Creating a Slab • Slab Materials • Editing a Slab • Creating Linear Walls • Creating Curved Walls • Wall Materials • Working in the 3D Window Starting the Step Use your file from the previous step or open the file named Step-05.pln contained in the Step Files folder.
  • 38. 38 Step 5: Establishing the Base Building Layout Graphisoft ArchiCAD Step by Step Tutorial Introduction When you create a Wall in ArchiCAD, you create the outline and hatching of a Wall in 2D, and a solid Wall body in 3D. Because Walls are such important elements of your Project, they form special relationships with other ArchiCAD elements: * Other Walls: Automatic L and T intersections are formed between Walls. Overlapping vertical edge segments for tangential Walls. * Columns: Automatic Wall-Column connections, optional Wall wrapping around columns. * Beams: When a Beam crosses a Wall, the element of lower priority is cut in 3D. * Doors and Windows: A Wall is the only placeholder of these elements. They become part of the Wall. * Slabs: Overlapping Wall and Slab edges are eliminated in 3D: facades will be clean on elevations and other 3D views. * Roofs: Walls can be trimmed to Roofs. Slabs are the basic horizontal building blocks in ArchiCAD. Slabs are drawn either on the Floor Plan or in the 3D Window, allowing them to accommodate any design. Existing Slabs are easily modified on the Floor Plan and in the 3D Window or through the Slab Settings dialog box. What to Do 1. Set the View Set to "Floor Plan" using the Navigator To set the View Set to the Floor Plan, click the View Set tab in the Navigator palette and double-click the Ground Floor in the Floor Plan view set: 2. Construct a Floor Slab The first step is to draw the ground floor slab of the building, which will be 30 by 18 feet (10 by 6 meters) in plan. Use the pre-set 3 square foot (1 meter square) planning grid to help you construct the slab, by easily snapping to its intersection points. Hint: The different grid snap options can be switched on and off using the control button on the Coordinate Box or the menu items from the Options menu. When any of the snap options is switched on, the cursor moves from one grid intersection to another. P-3, S-5, M-A To draw the slab, do the following: - Switch on the grid snap (select the third icon in the popup palette from the grid snap options in the Coordinate Box). - Select the Slab tool in the Toolbox. - Select the rectangular geometry method from the Info Box. - Click on the origin indicated by the black X on the Floor Plan. - Click a second time to finish the slab covering 10 grid squares horizontally and 6 vertically.
  • 39. 39 Step 5: Establishing the Base Building Layout Graphisoft ArchiCAD Step by Step Tutorial Hint: To change the view of the plan, choose the Zoom in/Zoom out/Pan or Fit in Window commands from the Display menu and either double-click on the plan or draw a marquee to define the extent of the magnification. Alternatively, use the magnifying glass/palm icons from the bottom of the window. 3. Create Linear Walls At any time, you can see a three dimensional view of what is on the Floor Plan by opening the 3D Window by using the Window menu/3D Window command. P-3, S-5, M-B Now place walls around the sides of the slab here in the 3D Window. Use the magic wand feature to trace the perimeter of the slab and automatically place walls on it. To place walls on the sides of the slab: - Select the Wall tool in the Toolbox. - Select the Magic Wand icon in the Control Box. - Click on the front edge of the slab with the cursor (the Magic Wand icon will change to a wand with a loop indicating that you are snapping to a line). - Click on one of the top corner points of the slab to finish placing the walls. Hint: The 3D Navigation Palette helps you navigate around in the 3D window. The Editing-Motion buttons are available depending on the type of the view (perspective/ axonometric); the Motion Mode buttons allow for changing between the view types. To navigate in an axonometric view select the fourth button under Editing- Motion (as shown) and click outside the rectangle in the 3D Window. We will discuss more about 3D Navigation and options in Step 06. Go back to the Floor Plan (Window menu/Floor Plan). Notice that the walls have appeared on the plan.
  • 40. 40 Step 5: Establishing the Base Building Layout Graphisoft ArchiCAD Step by Step Tutorial 4. Construct Curved Walls Now construct a curved block wall to the north of the building for the entrance enclosure. P-3, S-5, M-C To do this, first change the wall type to a block wall: - Double-click on the Wall tool in the Toolbox to bring up the Wall Settings dialog box. - Change the thickness of the wall from 1' to 1'-2" (250 to 300 mm). - Change the “Face Brick” hatching type to “Masonry Block” under “Floor Plan and Section Attributes” (the hatches are listed in alphabetical order). - Change the “White-Brick” material to “Stone Block” for the internal and external sides and to “Stone Block Coping” for the edges of the wall under “Model Attributes”. - Click OK. Place the curved wall shown in the picture below. The curvature will be defined by 3 points, all of which will be grid intersection points. Hint: When drawing the line of the wall, after a first click a heavy black line follows the cursor like a rubberband. This "rubberband line" is the reference line for the wall. The reference line is used to connect walls smoothly and helps locate the walls with the cursor. To draw the curved wall:
  • 41. 41 Step 5: Establishing the Base Building Layout Graphisoft ArchiCAD Step by Step Tutorial - Choose the relevant curved wall icon (2nd icon in the 2nd row) from the geometry methods in the Info Box. - Change the construction method as shown in the picture. - Click on the grid intersection points in the order shown in the picture (the third and the fourth clicks are on the same point). Hint: You can get instant step-by-step instructions of the drafting and editing procedures in the maximized state of the Control Box. Following them eases the drawing procedure and reduces the number of errors. It is easy to modify the length of this curved wall, for example by stretching both ends of the wall: - Switch off grid snap. (Select the first icon from the grid snap options in the Coordinate Box as shown in the picture.) - Select the wall (Select the Arrow tool and click on a side or a corner of the wall to highlight it. The appearing black dots around the wall confirm it has been selected.) - Choose Edit menu and Stretch. - Click on the hotspot (on the side of the wall’s reference line) on the right end of the curved wall and make it approximately half a grid longer as shown in the picture (the cursor will change from an empty pencil symbol to a black one when snapping to a hotspot). - Repeat for the other end of the wall. Hint: To select something on the floor plan, use the mouse cursor. If the Arrow tool is active, simply click on one of the element’s points. (To add/remove more elements to the selection hold down the Shift button while selecting them.) When another tool is active, press the Shift button to activate the selection method. 5. Place Structural Columns Next, place four columns to create a veranda on the south side of the building. P-3, S-5, M-D The first and the last column will align with the two side walls (place them on a grid intersection); they will be placed at equal intervals and run parallel to the front wall. Place the first column and then replicate it for the rest.
  • 42. 42 Step 5: Establishing the Base Building Layout Graphisoft ArchiCAD Step by Step Tutorial To place the first column: - Switch on the grid snap. - Select the Column tool in the Toolbox. - Click on the grid intersection point two grid spaces below the bottom left corner of the house (point no. 1). Notice that the column has been placed on the grid intersection point on the Floor Plan. The next step is to replicate it parallel to the front wall: - Switch off the grid snap. - Select the column. - Select the Multiply command from Edit/Multiply. - Enter 3 as the number of copies, choose the Distribute method and hit OK. - Click on one of the selection dots on the right side of the column and drag the rubber line horizontally, toward the right end of the building. - Hold down the Shift key. You can see you are now constraining the horizontal direction, and the columns will be placed parallel to the side of the building. - Position the cursor over the bottom right corner of the building (your cursor will change to a check mark indicating, that it will snap to a hotspot) so that the last copy will be aligned with the end of the building. - Click to finish the Multiply command. Hint: The mouse constraints help draw elements in specific relationship to existing elements and pre-set
  • 43. 43 Step 5: Establishing the Base Building Layout Graphisoft ArchiCAD Step by Step Tutorial directions. They are similar to traditional rulers and triangles. Two Mouse Constraint mechanisms are available: Coordinate Constraints are used to lock any of the Coordinate Box parameters and Angle Pairs are used to lock the cursor at a particular drawing angle. These techniques facilitate the use of all the 2D/3D drafting tools. Hint: The Intelligent Cursor helps you identify special points (end, corner points, edges, etc.) and points of geometric relationships of elements (perpendicular, tangential, crossings) within the building and to show that special tools (magic wand, eyedropper, etc.) are effective at the moment. Click outside the building to deselect the column and go to the 3D Window to see the result in axonometry. 6. Create the External Paving Now return to the Floor Plan to design the external paving around the house. P-3, S-5, M-E It will be of a timber decking construction, so the next step is to change the slab height, hatching type and materials. After that, place a rectangular slab around the building; lastly cut a hole into the slab for the footprint of the building. To change the slab settings: - Double click on the Slab tool in the Toolbox. - Enter 6" (150 mm) as the thickness of the slab. - Change the hatching type in the “Section Attributes” to “Dot and Dashed”. - Change the top and the side materials in the “Model Attributes” to “Timber Boarding External” and the bottom to “Surface Concrete”. - Click OK.
  • 44. 44 Step 5: Establishing the Base Building Layout Graphisoft ArchiCAD Step by Step Tutorial To place the slab: - Switch on the grid snap. - Click to the grid intersection at point no. 1 to start drawing the rectangular slab. - Click to the grid intersection at point no. 2 to finish drawing the slab. To cut a hole in the slab: - Select the slab. - Make sure the Slab tool is active in the Toolbox. - Click to the grid intersection at point no. 3 to start drawing the rectangular hole of the slab. - Click to the grid intersection at point no. 4 to finish drawing the hole of the slab. - Click outside the slab to deselect it. Check the result in the 3D Window.
  • 45. 45 Step 6: Viewing the Building in 3D Graphisoft ArchiCAD Step by Step Tutorial Step 6: Viewing the Building in 3D Overview The underlying principle of ArchiCAD is that a building is created on the computer not as a set of lines, but as a Virtual Building complete with 3D information. This step introduces how to view and edit the virtual model environment. You begin the lesson using the two basic methods of the 3D Settings: parallel projections and perspective settings. Process to Learn • Navigator Palette • Navigator 3D Preview • 3D Projection Settings • 3D Window Navigating in 3D • 3D View Types Perspective View Parallel Projections Starting the Step Use your file from the previous step or open the file named Step-06.pln contained in the Step Files folder.
  • 46. 46 Step 6: Viewing the Building in 3D Graphisoft ArchiCAD Step by Step Tutorial Introduction 3D Window: The 3D Window is used both for three- dimensional visualization of an architectural project and for refining the design directly in 3D. It is directly linked to the Floor Plan Worksheet and to the Section/Elevation Windows. You can display either the complete project or just the selected parts. • In the design phase, the 3D Window will serve as a source of visual feedback for your work in 2D and for constructing and modifying building components directly in 3D. • In the production phase of your project, accurate 3D images optimized for plotter output are also generated in this Window. 3D Projections: The 3D Window can display two types of three-dimensional views: Parallel Projection and Perspective. To access these two view options, you can choose from several methods: • Navigator Palette & Preview • 3D Projections Dialog • 3D Navigation Palette • Camera Tool What to Do 1. Navigator Palette & Preview The Navigator Preview provides 3D Perspective and 3D Axonometric previews. In the 3D Perspective view you can manipulate the camera directly. In the 3D Axonometric views, a Small house popup button at the bottom of the palette lets you choose from predefined projections. P-3, S-6, M-A • Select Generic Perspective: To set the 3D Window to a perspective view, click the Project Map tab in the Navigator palette, click 3D and double-click the Generic Perspective. • Navigate Using the Navigator Preview Camera: In the bottom left corner of the screen is the Navigator Preview palette. Click the camera location point (#1) and drag your cursor; the 3D Window will change views based upon the position of the camera. Now select the camera target point and drag your cursor (# 2). You can also interactively change the zoom by selecting the slider (# 3). • Select Generic Axonometry: To set the 3D Window to an axonometric view, click the Project Map tab in the Navigator palette, click 3D and double-click the Generic Axonometry option. • Navigate Using the Navigator Preview Camera: Select the camera in the Navigator Preview. You can navigate the 3D window by moving the camera symbolizing the
  • 47. 47 Step 6: Viewing the Building in 3D Graphisoft ArchiCAD Step by Step Tutorial projection direction. At the bottom of the palette, the popup button lets you choose from predefined projections. 2. 3D Projection Settings There are two main dialog boxes for 3D views: Parallel Projection Settings and Perspective Settings. These dialog boxes offer more options for defining custom views such as sun position, sun location camera angle and target distance. P-3, S-6, M-B • Parallel Settings: Choose the 3D Projection Settings dialog under the Image Menu. This dialog allows you to set views based upon numeric entries and sun position as well as from pre-set views. To change your viewpoint, drag the camera around the house and click OK. To change the sun position, drag the sun around the house and click OK. To set a specific location for the sun, click the More Sun button. • Perspective Settings: Open the 3D Projection Settings dialog, under the Image Menu. Click the Perspective button at the top of the dialog and use the Perspective Settings dialog. To try different perspective views, drag the end of the camera and/or the focal point to a different position and click OK. 3. Interactive 3D Window The 3D Window allows for interactive 3D motion. Interactive navigation through your model is available in both Parallel and Perspective modes. The following steps will guide you through various options for determining position and movement in the 3D virtual environment. P-3, S-6, M-C
  • 48. 48 Step 6: Viewing the Building in 3D Graphisoft ArchiCAD Step by Step Tutorial • Navigate the 3D Window - Parallel Projections: Go to the Image Menu, select 3D Projection Settings and create a Parallel Projection. Click on the Model Axis button and then select the Turn button in the 3D Navigation Palette. Place the Cursor on the 3D Window and click and drag the mouse slowly to the right. Drag the mouse to the left. Now try upward and downward. You are rotating the model about its axes. Click on the Target Lock button and then repeat the different rolling procedures. Notice the difference in the way the model rolls. Click the Frontal View button and then click on a surface you want to view in elevation. The view resets to the elevation of that element. • Navigate the 3D Window - Perspective Projections: Go to the Image Menu, select 3D Projection Settings and create a Perspective Projection. Click on the Camera button and then on the Walk button in the 3D Navigation Palette. Place the Cursor on the 3D Window with the Cursor Arrow facing up and drag the mouse slowly upward to walk forward; drag the mouse down to walk backward, and to the right or left to walk to the side. Try using the Turn button and the Lateral Move Tool . Notice the difference in movement. Click on the Target Lock button and repeat the previous Tool selections and maneuvers. Select the View Cone Angle to slide the button right or left to change the view cone angle, which affects the current zoom.
  • 49. 49 Step 7: Working with Stories Graphisoft ArchiCAD Step by Step Tutorial Step 7: Working with Stories Overview Stories provide a “physical” separation of elements according to their vertical level. Each story has a unique Floor Plan window in which you place elements – just as architects use separate plans for stories of a building. This exercise will demonstrate how stories are created in ArchiCAD and how elements are copied between stories. Process to Learn • Creating a New Story • Copying Elements Between Stories • Viewing 3D Vectorial Hatching • Slab Settings • Constructing the Slab • Updating View Sets Starting the Step Use your file from the previous step or open the file named Step-07.pln contained in the Step Files folder.
  • 50. 50 Step 7: Working with Stories Graphisoft ArchiCAD Step by Step Tutorial Information Choosing the Stories menu item opens a submenu with commands that allow you to: • Define the vertical structure of your design, story by story • Navigate between stories by determining which story is currently displayed • Display a Ghost Story • Move elements and items between them using a special Cut/Copy and Paste function All Story functions are controlled through the Stories submenu or through the Project Map section of the Navigator palette. The Stories and their elevation value defined in the Story Settings dialog box are displayed at the bottom of the submenu. The current Story is shown three different ways within the project model: • With a Checkmark in the submenu listing • As the name appears in the title bar of the Floor Plan Window • Highlighted in the Project Map section of the Navigator Palette What to Do The next step is to define the story structure for the Showroom building. P-3, S-7, M-A Two stories are required; the ground floor which we have worked on so far, and an upper Gallery. Open the Story Settings dialog box to create the stories, define their heights and copy and paste elements between them. 1. Create the Gallery Story - Go back to the Floor Plan. - Select Options/Stories/Story Settings to bring up the Story Settings dialog box. - Click to highlight “Ground Floor”. - Click Insert above to create a story above it. - Enter “Gallery” as the name for story no. 2 (metric 1) and change its “Height to Next” value to 9'-6" (3000 mm). The next step is to copy all the walls from the ground floor and paste them into the gallery: - Highlight the Ground Floor story and Click on the Copy All button. - Highlight the Gallery story. - Unclick the column and the slab icon from the icons below (so that they will not be included among the items that will be pasted to the Gallery level). - Click on Paste Selected Types and Click OK. You are now on the Gallery story. As you can see, the walls have been copied from the ground floor. (The name of the story is written in the window’s title bar after the file name.) 2. Add the Gallery to the Project Documents View Set Using the View Editor, as we did in Step 4, we will assign the drawing scale, display options, layer combinations and
  • 51. 51 Step 7: Working with Stories Graphisoft ArchiCAD Step by Step Tutorial drawing view for the three drawing types: Ceiling Plan, Floor Plan and Site Plan. P-3, S-7, M-B To edit the View Sets, click the popup button on the upper left side of the Navigator dialog and select the middle button to activate the View Editor. • Assign the Ceiling Plan Settings/Options to the Gallery: - Select and double click the "1. Ground Floor" (0. Ground Floor - Metric) in the Ceiling Plan section of the View Sets. This will set the view to the Ceiling Plan layer combination, scale and display options that were set in Step 4. - Now that we have set the View Settings and Stored Options to the Ceiling Plan drawing type, drag and drop the story "2. Gallery" (1. Gallery - Metric) into the Ceiling Plan folder as shown below. • Assign the Floor Plan Settings/Options to the Gallery: - Select and double click the "1. Ground Floor" (0. Ground Floor - Metric) within the Floor Plan section of the View Sets. This will set the view to the Floor Plan layer combination, scale and display options that were set in Step 4. - Now that we have set the View Settings and Stored Options to the Floor Plan drawing type, drag and drop the story "2. Gallery" (1. Gallery - Metric) into the Floor Plan folder as shown below. 3. Turn Off the View Editor When you are finished with the above steps, restore the Navigator to its original setup by turning off the View Editor. To do this, click the popup button on the upper left side of the dialog and select the left button to activate the Navigator.
  • 52. 52 Step 7: Working with Stories Graphisoft ArchiCAD Step by Step Tutorial 4. Open the 3D Window again to check progress Hint: If the view is not as shown below, go to the Image menu and select the 3D Projections option. If Parallel Projections is not active, click the Parallel Projections button and select an Axonometric preset view. The texture of the construction elements can be made visible in the 3D window. To see how the building looks with the mortar joints and the floor boarding: - Select Image menu/ 3D Window Settings. - Switch on the Vectorial 3D Hatching under the effects menu item. 5. Construct the Slab To construct the slab of the gallery, return to the Floor Plan. It will be of a light timber joist construction, different from that used for the ground floor slab, so first the settings for the Slab tool need to be changed. P-3, S-7, M-C To change the slab settings: - Double-click on the Slab tool in the Toolbox. - Change the thickness of the slab to 8" (200 mm). - Change the hatching type to “Empty fill” under “Section Attributes”. - Change the bottom and the side materials in the “Model Attributes” to “Surface White” and the top material to “Timber Boarding Internal”. - Click OK. Now everything is set for placing the gallery slab. The slab will only span to half the depth of the building, leaving a void so that one can look down from the gallery to the exhibition space on the ground floor. To place the slab: - Switch off the grid snap. - Select the Slab tool in the Toolbox. - Click on the inside corner point of the top left wall corner to start drawing the slab (point no. 1 in the picture). - Move the cursor over the inside line of the east side wall to bring up a snap point in the middle of the wall (above point no. 2 the cursor will change from an empty pencil to a pencil with a line inside it to indicate it is snapping to a line).
  • 53. 53 Step 7: Working with Stories Graphisoft ArchiCAD Step by Step Tutorial - Click on the snap point in the middle of the wall to finish the slab (at point no. 2 the cursor will change from a pencil with a line inside it to a black pencil to indicate it is snapping to a point). Hint: Special snap points help you to find special points on the drawings. These snap points can be predefined divisions/distances of lines/arcs, center point of arcs, and parallel and perpendicular locations from elements.
  • 54. 54 Step 7: Working with Stories Graphisoft ArchiCAD Step by Step Tutorial
  • 55. 55 Step 8: Completing the Building Envelope Graphisoft ArchiCAD Step by Step Tutorial Step 8: Completing the Building Envelope Overview In this Step, you will use the Roof Tool to build a roof. This exercise will also demonstrate how to trim walls and columns to a roof, and how to use the Ghost Story. Process to Learn • Roof Tool • Using the Ghost Story Feature • Constructing a Roof Viewing a Roof in the 3D Window • Trim Walls and Columns to Roof Starting the Step Use your file from the previous step or open the file named Step-08.pln contained in the Step Files folder.
  • 56. 56 Step 8: Completing the Building Envelope Graphisoft ArchiCAD Step by Step Tutorial Information ArchiCAD's sophisticated Roof Tool has extremely flexible characteristics. In addition to its normal use in creating roofs, it can be used to create abstract 3D shapes. You can create three basic roof types by using the Roof tool: - Sloped Roofs - Dome-Shaped Roofs - Barrel-Vaulted Roofs What to Do This section explains how to put a roof over the building. It will be a semi-pitched roof with sufficient headroom over the floor of the gallery, and will have a wide overhang supported by columns to create a south-facing veranda at the front. 1. Roof and Ghost Story Setup To construct the roof on the gallery level it is necessary to see the columns below on the ground floor. P-3, S-8, M-A, 1-3 Contents of remote stories can be made visible on the active story by using the “Ghost Story” feature. To switch on the Ghost Story, select Options/Stories/Show Ghost Story. Now the content of the Ground Floor is visible a light yellow color on the plan of the Gallery. The elements of the Ghost story cannot be edited, but they can be used as snap points in constructing new elements. Before starting, open the Roof Settings dialog box by double-clicking on the Roof tool in the Toolbox. The angle of the roof will be 20 degrees, its thickness 8” (200 mm) and its pivot line will be at 12'-6’ (3800 mm) above the project 0 level (2'-7” (800 mm) from the Gallery level), as shown in the picture. Click OK. 2. Roof Construction To construct a roof, first define its pivot line (which is the intersection line of the roof plane and the horizontal plane at the height defined in the dialog). Then define from which side of the pivot line the roof will slope upward (at the angle
  • 57. 57 Step 8: Completing the Building Envelope Graphisoft ArchiCAD Step by Step Tutorial defined in the dialog box) and lastly draw the outline of the roof (which is its projection to the horizontal plane). To start constructing the roof: - Switch on the grid snap. - Select the rectangular geometry method in the Info Box. - Click on the external corner point of the bottom left wall corner (point no. 1) to start the pivot line. - Click on the external corner point of the bottom right wall corner (point no. 2) to finish drawing the pivot line. - Click above the pivot line with the eye icon (point no. 3 to define the uphill slope direction of the roof. - Click on the grid intersection point at point no. 4 to start drawing the outline of the roof. - Click on the grid intersection point at point no. 5 to finish drawing the outline of the roof. Look at the roof in the 3D Window. 3. Trim the Walls and Columns to the Roof Now you can trim the walls and the columns to the roof: - Select the roof in the 3D Window (click on it with the Arrow tool). - Select the Edit/Trim to Roof menu point. - Click Trim in the dialog box. The columns and walls have now been trimmed to the underside of the roof. Finally, return to the Floor Plan.
  • 58. 58 Step 8: Completing the Building Envelope Graphisoft ArchiCAD Step by Step Tutorial
  • 59. 59 Step 9: Developing the Design Graphisoft ArchiCAD Step by Step Tutorial Step 9: Developing the Design Overview Now that the building envelope is under way, we need to create sections and elevations of the building, and add interior walls, create additional roofs and update the project View Sets. Process to Learn • Section/Elevation Tool • Level Dimension Tool • Update View Set • Adding Interior Walls • Creating a Flat Roof Starting the Step Use your file from the previous step or open the file named Step-09.pln contained in the Step Files folder.
  • 60. 60 Step 9: Developing the Design Graphisoft ArchiCAD Step by Step Tutorial Information The Section/Elevation Tool is used to generate elevations and sections from the model by placing standard section/ elevation symbols on the Floor Plan with optional breakpoints, including markers with identifiers and a section line. Every section/elevation symbol is an active link to the model, meaning that when you change an element in section or elevation it will automatically update all other views. What to Do 1. Cut a Cross Section Through the Building Simply place the section/elevation line on the Floor Plan and ArchiCAD will generate the sectional/elevational view of the building. P-3, S-9, M-A Any modifications to the model in the Section/Elevation Window will be updated automatically in all other views of the building. To place a section through the building: - Switch on the grid snap (to help you quickly define the section line location). - Go down to the ground Floor Plan (Options/Stories/ Ground Floor). - Select the Section tool in the Toolbox. - Click to point 1 as shown to start drawing the section line on the Floor Plan. - Double-click on points 2-3 as shown to finish drawing the section line. - Click to the right of the section line (point 4 as shown) with the eye icon to determine which direction the section will face. After placing the section, open the section window (Window/ Sections/Elevations/’A/1 Section’/Model), and ArchiCAD will generate the section of the model automatically. Finally, add the A/1 Section as a new drawing to the Project Documents View Set. This will allow us to access the section as a drawing in PlotMaker. To do this, click the View Sets tab in the Navigator palette, select the Drawings folder so that it is highlighted and choose Create New Folder from the popup menu. Name the new folder "Sections". This is where our project sections will be stored. If you want to move the Sections folder so that it is organized alphabetically, click to highlight the folder, then drag it to the desired location.
  • 61. 61 Step 9: Developing the Design Graphisoft ArchiCAD Step by Step Tutorial With the section folder selected, choose "Save Current View" from the popup menu. Use the defaults and click "Save". 2. Create the North and West Elevation The elements can be shown with or without textures. Sun shadows can be cast on them in the elevation windows. To place the elevations: - Double-click on the Section/Elevation tool in the Toolbox to bring up the Section/Elevation Settings dialog box. - Enter “Elevation” to the Name field. - Enter E/1 as the Reference ID. - Check the Vectorial 3D Hatching and the Vectorial Sun Shadows options under the Model Effects. - Place the elevations as shown (ArchiCAD will number them automatically). - Switch off the grid snap.
  • 62. 62 Step 9: Developing the Design Graphisoft ArchiCAD Step by Step Tutorial Next, open the west elevation and place some elevation dimensions on it. - Open up E1 Elevation (Window/Sections/Elevations/’E/1 Elevation’/Model). - Select the Dimension tool in the Toolbox. - Select the height dimensioning icon from the popup menu under the construction methods in the Info Box. - Select the multiple height dimensioning icon from the popup menu under the geometry methods in the Info Box. - Click to the points (1-2-3) as shown in the picture to dimension. - Double-click anywhere (e.g. to points 4-5). The Hammer cursor will come up. - Click with the Hammer cursor to place the chain of dimensions on the section (point 6). Finally, add the E1 Elevation as a new drawing to the Project Documents View Set. This will allow us to access the section as a drawing in PlotMaker. To do this, click the View Sets tab in the Navigator palette, select the Drawings folder and choose Create New Folder from the popup menu. Name the new folder "Elevations". If you want to organize the Elevations alphabetically, click to highlight the folder then drag it to the desired location. With the Elevation folder selected, choose "Save Current View". Use the defaults and click "Save".
  • 63. 63 Step 9: Developing the Design Graphisoft ArchiCAD Step by Step Tutorial Open the E2 Elevation for another view of the building and repeat the same steps to save it to the View Set as shown above. 3. Add Exterior and Interior Walls For the entrance, draw the same type of wall as the external walls. P-3, S-9, M-B In ArchiCAD you can easily pick up an element’s characteristics and transfer them into the Toolbox (to start drawing a new element with the same settings) or to other elements in the project. Let’s pick up the settings of the external walls: - Select the Wall tool in the Toolbox. - Hold down the Alt key (the cursor will change to an Eyedropper tool) while clicking on a side of one of the straight walls (a beep notifies the action). Now the settings are correct for the brick wall, and only the height value needs to be changed. Double-click on the Wall tool in the Toolbox and change the height value to 8'-6"( 2700 mm). Draw the front and the back wall of the entrance enclosure with the help of the grid snap. - Switch on the grid snap. - Select the single wall geometry method and the construction method as below. - Click to the grid intersection point 1 to start drawing the wall. - Click to the grid intersection point 2 to finish the wall. In the same way draw the back wall starting from point 3 and finishing at point 4. Just make sure to choose the correct construction method to place the wall with its reference line on the outside. Rebuild the floor plan view (Choose Window/ Rebuild) to get a neat wall cross-section (optional). Hint: The Redraw command (Display/Redraw) will remove all temporary screen display graphics remaining from transformations and deletions during construction. The Rebuild command (Display/Rebuild) starts a more thorough screen update - it will also refresh the wall intersections and draw them correctly. The next step is to draw some interior partitions. Open the Wall Settings dialog box and select the composite wall, Stud Partition, you created in Step 3.
  • 64. 64 Step 9: Developing the Design Graphisoft ArchiCAD Step by Step Tutorial Change the layer from “Exterior walls” to “Interior walls” and set the material of the wall to "Surface-White". Draw the partition in the middle of the space as shown. Hint: ArchiCAD layers are used to organize the elements in your project for selective displays and quantity calculations. You can easily change the layer settings (show/hide, lock/unlock layers and create different layer combinations) from the Options/Layers/Layer Settings pull-down menu. Now draw the partition of the future toilet at 3 feet (1000 mm) wide; enter the coordinate values manually: - Switch off the grid snap. - Position the cursor over the right corner point of the wall junction as shown (point 1). - Type in x from the keyboard (Note the x coordinate is highlighted). - Type in “3 +” (or “1000 +” in mm) from the keyboard and hit the Enter key. Note you are now drawing a wall from point 2 (3’ (1000 mm) to the right of point 1). - Use the shift key to draw a vertical wall and click on the internal side of the curved wall to finish the wall (point 3). 4. Create a Flat Roof Go up to the floor plan of the Gallery and place a flat roof over the entrance to finish the building envelope. P-3, S-9, M-C Open up the Slab Settings dialog box and set the thickness of the slab to 1' (300 mm), the top material to “Timber boarding External”, the side material to “White Brick” and the bottom material to “Surface-White”. To draw the slab over the entrance: - Select the polygonal geometry method.
  • 65. 65 Step 9: Developing the Design Graphisoft ArchiCAD Step by Step Tutorial Click on the external corner points of the front and the back wall (points 1, 2, 3, 4, 5) to place a rectangular slab as shown in the picture. Now modify the northern edge of the slab to align it with the curved wall: - Select the slab. - Make sure the Slab tool is active in the Toolbox. - Hold down the mouse button over the edge of the slab (between points 2 and 3) and select the second icon as shown from the pet palette (as shown). - Pull the edge of the slab over the curve of the wall to align. Now check the progress in the cross section. Open the Section A/1 window (Window/Sections/Elevations/’A/1 Section’/Model). The curved wall will serve as a parapet wall to the balcony so lower it to 4’ (1200 mm) height: - Switch off the grid snap. - Select the top part of the curved wall. - Double-click the Wall tool in the Toolbox to bring up the Wall Settings dialog box. - Enter 4’ (1200 mm) as the height value instead of 9’6” (3000 mm). - Click OK. Open the elevations to check how the modification affects the facades. Notice how the elevations have been updated with the dimensions.
  • 66. 66 Step 9: Developing the Design Graphisoft ArchiCAD Step by Step Tutorial
  • 67. 67 Step 10: Working with Doors, Windows and Skylights Graphisoft ArchiCAD Step by Step Tutorial Step 10: Working with Doors, Windows and Skylights Overview In Step 10, you will learn about the Door and Window Tools, which create realistic architectural openings in wall elements by inserting special library parts with editable parameters. Additionally, we will place a Skylight into the roof. In ArchiCAD, Skylights are objects that recognize a roof element and automatically cut the opening within the roof structure. Process to Learn • Parameters for Doors/Windows • Using the ArchiCAD Library • Placing a Door/Window • Viewing a Door/Window • Editing Doors/Windows • Creating Dimensions • Placing a Skylight Starting the Step Use your file from the previous step or open the file named Step-10.pln contained in the Step Files folder.
  • 68. 68 Step 10: Working with Doors, Windows and Skylights Graphisoft ArchiCAD Step by Step Tutorial Introduction Both Windows and Doors are objects, meaning that they are stored in libraries of objects that can be used on many Projects. Library Parts comprise a 2D Symbol and a 3D description in GDL (Geometric Description Language), as well as some optional information such as an additional 2D description, a user interface script or a component definition. Windows and Doors can be added to an ArchiCAD Project only by placing them into an existing wall. They cannot be independently placed into a Project. Once a Window or Door has been placed in a Wall, it becomes an integral part of that wall and stays with the wall when it is moved or stretched. Doors and Windows cut real, see-through openings into the wall, so that 3D visualizations are more accurate and lifelike. What to Do It is time now to develop the design further by adding openings into the building. ArchiCAD’s door and window objects are parametric library parts; by changing their parameters, their properties change. The parameters can be modified in the Object Settings dialog box. 1. Add an Entrance Door Now return to the Ground floor plan and start placing doors to achieve the layout as shown below. P-3, S-10, M-A, 1-2 Double-click the Door tool in the Toolbox to bring up its settings dialog (select the Door/Window tool in the Toolbox and hold down the mouse button to shift between them). Choose D1 Sidelight Transom 8 from the library, browse through the parameters and see what effect they will have on the 2D and 3D representation. Click Cancel (to make sure the settings are just as they were when you opened the dialog box).
  • 69. 69 Step 10: Working with Doors, Windows and Skylights Graphisoft ArchiCAD Step by Step Tutorial Place the entrance door in the middle of the front wall of the entrance enclosure: - Select the Center Point geometry method. - Hold the cursor over the external side of the front wall to bring up a special snap point in the middle of it. - Click on the snap point (point no. 1). - Click above and to the right from the center point of the door to define the opening direction (point no. 2). 2. Add Internal Doors Select D1 from the door dialog box for the door opening into the Exhibition space: - Select the Corner Point geometry method. - Click to place the door on the internal corner point of the wall junction as shown (point no. 1). - Click to the right of it to define the door position (point no. 2). - Click below and to the left of its center to define the opening direction (point no 3). Use the same door type for the restroom symmetrically on the other side of the entrance enclosure. For the future toilet, change the width to 2'-8" (750 mm) and its Door Panel to Style 1 (shown under the Frame, Panel, Shutter and Handle Types in the dialog). Place it by eye as shown in the picture above.
  • 70. 70 Step 10: Working with Doors, Windows and Skylights Graphisoft ArchiCAD Step by Step Tutorial 3. Place Windows in a Curved Wall Likewise place the windows into the curved wall of the entrance enclosure. P-3,S-10, M-B, 3-4 - Choose the Window tool in the Toolbox. - Select “W1 Casement” in the dialog box. - Select the Center Point geometry method. - Click to point no. 1 by eye to start placing the window. - Click above the wall (point no. 2) to define the window opening direction. Similarly place a window to the other two rooms of the entrance enclosure by eye. For the glazed walls of the exhibition space, we will use sliding doors. 4. Insert a Sliding Door Choose D2 Sliding Door in the door dialog, set the reveal value to 4" (70 mm) and select the corner point geometry method option to place a door on both sides of the bottom left corner of the exhibition space: - Click to the inside corner point of the bottom left wall junction (point no. 1 in the picture). - Click with the cursor (double eye shape) above the corner (point no. 2 in the picture) to define the wall into which the door will be placed. - Click with the cursor (eye shape) outside the wall (point no. 2 in the picture) to define its opening direction. - To place the second sliding door, repeat the steps above only this time click to the right at step no. 2 with the double eye cursor. Next, replicate the sliding door in the southern wall: - Select the door (click one of the corner points of the door with the arrow tool or by the shift key; point no. 1). - Select Edit/Multiply from the pull down menus. - Type in 2 as the number of copies, select the Distribute method and Click OK.
  • 71. 71 Step 10: Working with Doors, Windows and Skylights Graphisoft ArchiCAD Step by Step Tutorial - Click on one of the selection dots on its right side (point no. 2). - Move the cursor on the inside corner point of the bottom right wall junction (the cursor is in the shape of a checkmark (point no. 3). - Click to finish the Multiply command. Place the last sliding door to the corner of the eastern wall. Deselect the door and switch to the 3D Window to check the progress of the building. 5. Create Dimensions The next step is to check the dimensions of the walls and the openings. P-3, S-10, M-C With the automatic dimensioning feature all the walls and the openings of your building can be dimensioned with just a few clicks. Simply select the items/points to be dimensioned and ArchiCAD will do the rest: - Go back to the Floor Plan. - Select the Dimension tool in the Toolbox and make sure the length dimensioning icon is selected in the Info Box. - Select all the walls (select the Wall tool in the Toolbox and choose Edit/Select All Walls). - Select Tools/Automatic Dimensioning/Exterior Dimensioning and enter the following values: - Click OK. - Click on the external side of the southern wall to define the direction of the dimensions (point 1).
  • 72. 72 Step 10: Working with Doors, Windows and Skylights Graphisoft ArchiCAD Step by Step Tutorial - Click below the wall with the hammer icon to define the distance of the first row of dimensions (point no.2). Note that the rows of dimensions have been placed around the four sides of the building. In ArchiCAD all dimensions are associative, meaning if you change an element that was dimensioned previously, after the modifications the dimensions will follow the changes. View the resulting layout in cross-section on Section A/1. 6. Edit Doors and Windows in Section and Elevation Notice the door is a bit too wide; it’s better to align it with the edge of the gallery slab. P-3, S-10, M-D - Select the sliding door. - Select Edit menu/Stretch. - Click on the top left corner of the door to start stretching it. - Move the cursor out in the horizontal direction and hold down the shift key to constrain the horizontal movement. - Click on either corner points of the edge of the slab (cursor is a shape of a checkmark as shown above). Go back to the Floor Plan: Note that the dimensions have been automatically updated on the plan following the modification in the section window. Select the sliding door on the other side and stretch it similarly; this time, do it on the plan to align it with the dashed line of the gallery slab. The next steps is to design the openings of the gallery. Switch off the Show Ghost Story option (deselect Options/ Stories/Show Ghost Story) and the grid display (deselect Options/Grid Display), because from now on this won’t be used.
  • 73. 73 Step 10: Working with Doors, Windows and Skylights Graphisoft ArchiCAD Step by Step Tutorial Place the same door as the entrance door (D1 Sidelight Transom) for the door to the balcony, the “W1 Casement” as square windows in the northern wall, and the “W Round Piv” round windows to both sidewalls of the gallery (enter 2’ (600) as the parapet height for the round window). Do not worry about their exact location, just place them by eye. Open the north elevation and modify some of the windows: - Stretch the square window of the entrance room on the North Elevation. - Replicate the window above the balcony. 7. Inserting Skylights into the Roof On the Gallery level we will insert a skylight into the roof. P-3, S-10, M-E To do this, select the Skylight Tool from the Tools palette as shown. Double click the Skylight Tool to open the settings dialog. Choose the "Skylight Top Hung" object from the Object Library. At the bottom of the dialog set the layer to Roofs. Click OK. Drag your cursor to the inside edge of the wall. Place the skylight at the center of the wall using the Snap Point.
  • 74. 74 Step 10: Working with Doors, Windows and Skylights Graphisoft ArchiCAD Step by Step Tutorial The Skylight object will automatically cut a hole in the roof and set its slope to the angle of the roof as shown in the section cutaway below.
  • 75. 75 Step 11: Adding Internal Circulation Graphisoft ArchiCAD Step by Step Tutorial Step 11: Adding Internal Circulation Overview This step will teach you how to create a custom stair using the Stair Tool. The Stair Tool lets you easily design and construct all kinds of stairs required for ArchiCAD projects by selecting from a set of predefined geometry types, or by drawing the main geometry of the stair and editing parameters. Process to Learn • Stair Tool Creating a Stair Object Selecting the Stair Type Setting Flight and Tread Defining the Stair Structure Selecting the Handrail • Create a Slab Opening Starting the Step Use your file from the previous step or open the file named Step-11.pln contained in the Step Files folder.