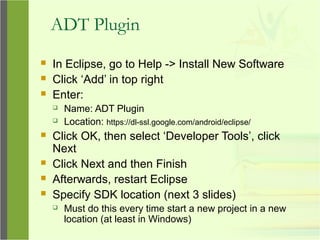
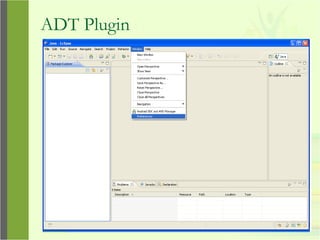
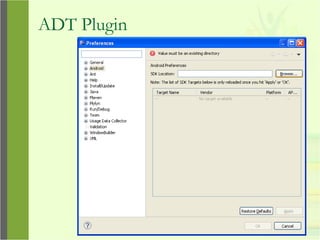
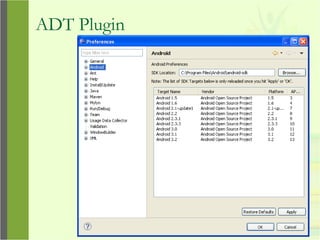
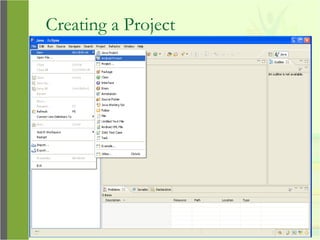
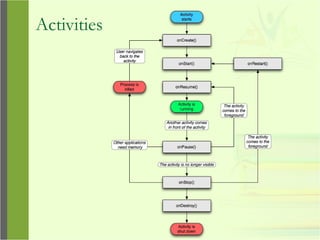
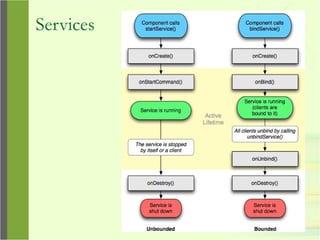
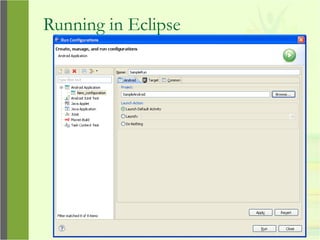
Android
References
 This tutorial is a brief overview of some
major concepts…Android is much richer
and more complex
 Developer’s Guide
 http://developer.android.com/guide/index.html
 API Reference
 http://developer.android.com/reference/packages.html
Tools
 Phone
 Eclipse ( http://www.eclipse.org/downloads/ )
 Android Plugin (ADT)
 Android SDK
( http://developer.android.com/sdk/index.html )
 Install everything except Additional SDK
Platforms, unless you want to
 Windows Users: may need to install
Motorola Driver directly
( http://www.motorola.com/Support/US-EN/Support-
Homepage/Software_and_Drivers/USB-and-PC-Charging-
Drivers )
Android SDK
 Once installed open the SDK Manager
 Install the desired packages
 Create an Android Virtual Device
(AVD)
SDK Manager
AVD
ADT Plugin
 In Eclipse, go to Help -> Install New Software
 Click ‘Add’ in top right
 Enter:
 Name: ADT Plugin
 Location: https://dl-ssl.google.com/android/eclipse/
 Click OK, then select ‘Developer Tools’, click
Next
 Click Next and then Finish
 Afterwards, restart Eclipse
 Specify SDK location (next 3 slides)
 Must do this every time start a new project in a new
location (at least in Windows)
ADT Plugin
ADT Plugin
ADT Plugin
Creating a Project
Creating a Project
Need
the
items
circled
Then
click
Finish
Project Components
 src – your source code
 gen – auto-generated code (usually just
R.java)
 Included libraries
 Resources
 Drawables (like .png images)
 Layouts
 Values (like strings)
 Manifest file
XML
 Used to define some of the resources
 Layouts (UI)
 Strings
 Manifest file
 Shouldn’t usually have to edit it directly,
Eclipse can do that for you
 Preferred way of creating UIs
 Separates the description of the layout from
any actual code that controls it
 Can easily take a UI from one platform to
another
R Class
 Auto-generated: you shouldn’t edit it
 Contains IDs of the project resources
 Enforces good software engineering
 Use findViewById and Resources object to
get access to the resources
 Ex. Button b =
(Button)findViewById(R.id.button1)
 Ex. getResources().getString(R.string.hello));
Layouts
 Eclipse has a great UI creator
 Generates the XML for you
 Composed of View objects
 Can be specified for portrait and
landscape mode
 Use same file name, so can make completely
different UIs for the orientations without
modifying any code
Layouts
Layouts
 Click ‘Create’ to make layout modifications
 When in portrait mode can select ‘Portrait’ to
make a res sub folder for portrait layouts
 Likewise for Landscape layouts while in landscape
mode
 Will create folders titled ‘layout-port’ and ‘layout-land’
 Note: these ‘port’ and ‘land’ folders are examples
of ‘alternate layouts’, see here for more info
 http://developer.android.com/guide/topics/resources/providing-resources.html
 Avoid errors by making sure components have
the same id in both orientations, and that you’ve
tested each orientation thoroughly
Layouts
Strings
 In res/values
 strings.xml
 Application wide available strings
 Promotes good software engineering
 UI components made in the UI editor
should have text defined in strings.xml
 Strings are just one kind of ‘Value’ there
are many others
Manifest File
 Contains characteristics about your application
 When have more than one Activity in app, NEED
to specify it in manifest file
 Go to graphical view of the manifest file
 Add an Activity in the bottom right
 Browse for the name of the activity
 Need to specify Services and other components
too
 Also important to define permissions and external
libraries, like Google Maps API
Manifest File – Adding an Activity
Activities
 The basis of android applications
 A single Activity defines a single viewable
screen
 the actions, not the layout
 Can have multiple per application
 Each is a separate entity
 They have a structured life cycle
 Different events in their life happen either via
the user touching buttons or programmatically
Activities
Services
 Run in the background
 Can continue even if Activity that started it dies
 Should be used if something needs to be done while the user is
not interacting with application
 Otherwise, a thread is probably more applicable
 Should create a new thread in the service to do work in, since the
service runs in the main thread
 Can be bound to an application
 In which case will terminate when all applications bound to it
unbind
 Allows multiple applications to communicate with it via a common
interface
 Needs to be declared in manifest file
 Like Activities, has a structured life cycle
Services
Running in Eclipse
 Similar to launching a regular Java app, use
the launch configurations
 Specify an Android Application and create a
new one
 Specify activity to be run
 Can select a manual option, so each time
program is run, you are asked whether you
want to use the actual phone or the
emulator
 Otherwise, it should be smart and use whichever
one is available
Running in Eclipse
Running in Eclipse
Running in Eclipse
USB Debugging
 Should be enabled on phone to use
developer features
 In the main apps screen select Settings ->
Applications -> Development -> USB
debugging (it needs to be checked)
Android Debug Bridge
 Used for a wide variety of developer tasks
 Read from the log file
 Show what android devices are available
 Install android applications (.apk files)
 In the ‘platform-tools’ directory of the main
android sdk directory
 Recommend putting this directory and the ‘tools’
directory on the system path
 adb.exe
Debugging
 Instead of using traditional System.out.println, use the Log
class
 Imported with android.util.Log
 Multiple types of output (debug, warning, error, …)
 Log.d(<tag>,<string>)
 Can be read using logcat.
 Print out the whole log, which auto-updates
 adb logcat
 Erase log
 adb logcat –c
 Filter output via tags
 adb logcat <tag>:<msg type> *:S
 can have multiple <tag>:<msg type> filters
 <msg type> corresponds to debug, warning, error, etc.
 If use Log.d(), then <msg type> = D
 Reference
 http://developer.android.com/guide/developing/debugging/debugging-
log.html
Acknowledgements
 Android Developer’s Website
 Activity and Service life-cycle flow charts
 Tons of other Android info
 Google Maps API external library
 http://code.google.com/android/add-ons/google-apis/maps-overview.html
 MightyPocket
 http://www.mightypocket.com/2010/08/android-screenshots-screen-capture-screen-cast/
 Numerous Forums & other developer sites, including:
 http://www.javacodegeeks.com/2011/02/android-google-maps-tutorial.html
 http://efreedom.com/Question/1-6070968/Google-Maps-Api-Directions
 http://www.mail-archive.com/android-developers@googlegroups.com/msg28487.html
 http://android.bigresource.com/ threads
 http://groups.google.com/group/android-developers threads
 Many http://stackoverflow.com threads
 http://www.anddev.org/google_driving_directions_-_mapview_overlayed-t826.html
 Zainan Victor Zhou – for advice and his own tutorial

Industrial Training in Android Application

  • 1.
  • 2.
    References  This tutorialis a brief overview of some major concepts…Android is much richer and more complex  Developer’s Guide  http://developer.android.com/guide/index.html  API Reference  http://developer.android.com/reference/packages.html
  • 3.
    Tools  Phone  Eclipse( http://www.eclipse.org/downloads/ )  Android Plugin (ADT)  Android SDK ( http://developer.android.com/sdk/index.html )  Install everything except Additional SDK Platforms, unless you want to  Windows Users: may need to install Motorola Driver directly ( http://www.motorola.com/Support/US-EN/Support- Homepage/Software_and_Drivers/USB-and-PC-Charging- Drivers )
  • 4.
    Android SDK  Onceinstalled open the SDK Manager  Install the desired packages  Create an Android Virtual Device (AVD)
  • 5.
  • 6.
  • 7.
    ADT Plugin  InEclipse, go to Help -> Install New Software  Click ‘Add’ in top right  Enter:  Name: ADT Plugin  Location: https://dl-ssl.google.com/android/eclipse/  Click OK, then select ‘Developer Tools’, click Next  Click Next and then Finish  Afterwards, restart Eclipse  Specify SDK location (next 3 slides)  Must do this every time start a new project in a new location (at least in Windows)
  • 8.
  • 9.
  • 10.
  • 11.
  • 12.
  • 13.
    Project Components  src– your source code  gen – auto-generated code (usually just R.java)  Included libraries  Resources  Drawables (like .png images)  Layouts  Values (like strings)  Manifest file
  • 14.
    XML  Used todefine some of the resources  Layouts (UI)  Strings  Manifest file  Shouldn’t usually have to edit it directly, Eclipse can do that for you  Preferred way of creating UIs  Separates the description of the layout from any actual code that controls it  Can easily take a UI from one platform to another
  • 15.
    R Class  Auto-generated:you shouldn’t edit it  Contains IDs of the project resources  Enforces good software engineering  Use findViewById and Resources object to get access to the resources  Ex. Button b = (Button)findViewById(R.id.button1)  Ex. getResources().getString(R.string.hello));
  • 16.
    Layouts  Eclipse hasa great UI creator  Generates the XML for you  Composed of View objects  Can be specified for portrait and landscape mode  Use same file name, so can make completely different UIs for the orientations without modifying any code
  • 17.
  • 18.
    Layouts  Click ‘Create’to make layout modifications  When in portrait mode can select ‘Portrait’ to make a res sub folder for portrait layouts  Likewise for Landscape layouts while in landscape mode  Will create folders titled ‘layout-port’ and ‘layout-land’  Note: these ‘port’ and ‘land’ folders are examples of ‘alternate layouts’, see here for more info  http://developer.android.com/guide/topics/resources/providing-resources.html  Avoid errors by making sure components have the same id in both orientations, and that you’ve tested each orientation thoroughly
  • 19.
  • 20.
    Strings  In res/values strings.xml  Application wide available strings  Promotes good software engineering  UI components made in the UI editor should have text defined in strings.xml  Strings are just one kind of ‘Value’ there are many others
  • 21.
    Manifest File  Containscharacteristics about your application  When have more than one Activity in app, NEED to specify it in manifest file  Go to graphical view of the manifest file  Add an Activity in the bottom right  Browse for the name of the activity  Need to specify Services and other components too  Also important to define permissions and external libraries, like Google Maps API
  • 22.
    Manifest File –Adding an Activity
  • 23.
    Activities  The basisof android applications  A single Activity defines a single viewable screen  the actions, not the layout  Can have multiple per application  Each is a separate entity  They have a structured life cycle  Different events in their life happen either via the user touching buttons or programmatically
  • 24.
  • 25.
    Services  Run inthe background  Can continue even if Activity that started it dies  Should be used if something needs to be done while the user is not interacting with application  Otherwise, a thread is probably more applicable  Should create a new thread in the service to do work in, since the service runs in the main thread  Can be bound to an application  In which case will terminate when all applications bound to it unbind  Allows multiple applications to communicate with it via a common interface  Needs to be declared in manifest file  Like Activities, has a structured life cycle
  • 26.
  • 27.
    Running in Eclipse Similar to launching a regular Java app, use the launch configurations  Specify an Android Application and create a new one  Specify activity to be run  Can select a manual option, so each time program is run, you are asked whether you want to use the actual phone or the emulator  Otherwise, it should be smart and use whichever one is available
  • 28.
  • 29.
  • 30.
  • 31.
    USB Debugging  Shouldbe enabled on phone to use developer features  In the main apps screen select Settings -> Applications -> Development -> USB debugging (it needs to be checked)
  • 32.
    Android Debug Bridge Used for a wide variety of developer tasks  Read from the log file  Show what android devices are available  Install android applications (.apk files)  In the ‘platform-tools’ directory of the main android sdk directory  Recommend putting this directory and the ‘tools’ directory on the system path  adb.exe
  • 33.
    Debugging  Instead ofusing traditional System.out.println, use the Log class  Imported with android.util.Log  Multiple types of output (debug, warning, error, …)  Log.d(<tag>,<string>)  Can be read using logcat.  Print out the whole log, which auto-updates  adb logcat  Erase log  adb logcat –c  Filter output via tags  adb logcat <tag>:<msg type> *:S  can have multiple <tag>:<msg type> filters  <msg type> corresponds to debug, warning, error, etc.  If use Log.d(), then <msg type> = D  Reference  http://developer.android.com/guide/developing/debugging/debugging- log.html
  • 34.
    Acknowledgements  Android Developer’sWebsite  Activity and Service life-cycle flow charts  Tons of other Android info  Google Maps API external library  http://code.google.com/android/add-ons/google-apis/maps-overview.html  MightyPocket  http://www.mightypocket.com/2010/08/android-screenshots-screen-capture-screen-cast/  Numerous Forums & other developer sites, including:  http://www.javacodegeeks.com/2011/02/android-google-maps-tutorial.html  http://efreedom.com/Question/1-6070968/Google-Maps-Api-Directions  http://www.mail-archive.com/android-developers@googlegroups.com/msg28487.html  http://android.bigresource.com/ threads  http://groups.google.com/group/android-developers threads  Many http://stackoverflow.com threads  http://www.anddev.org/google_driving_directions_-_mapview_overlayed-t826.html  Zainan Victor Zhou – for advice and his own tutorial