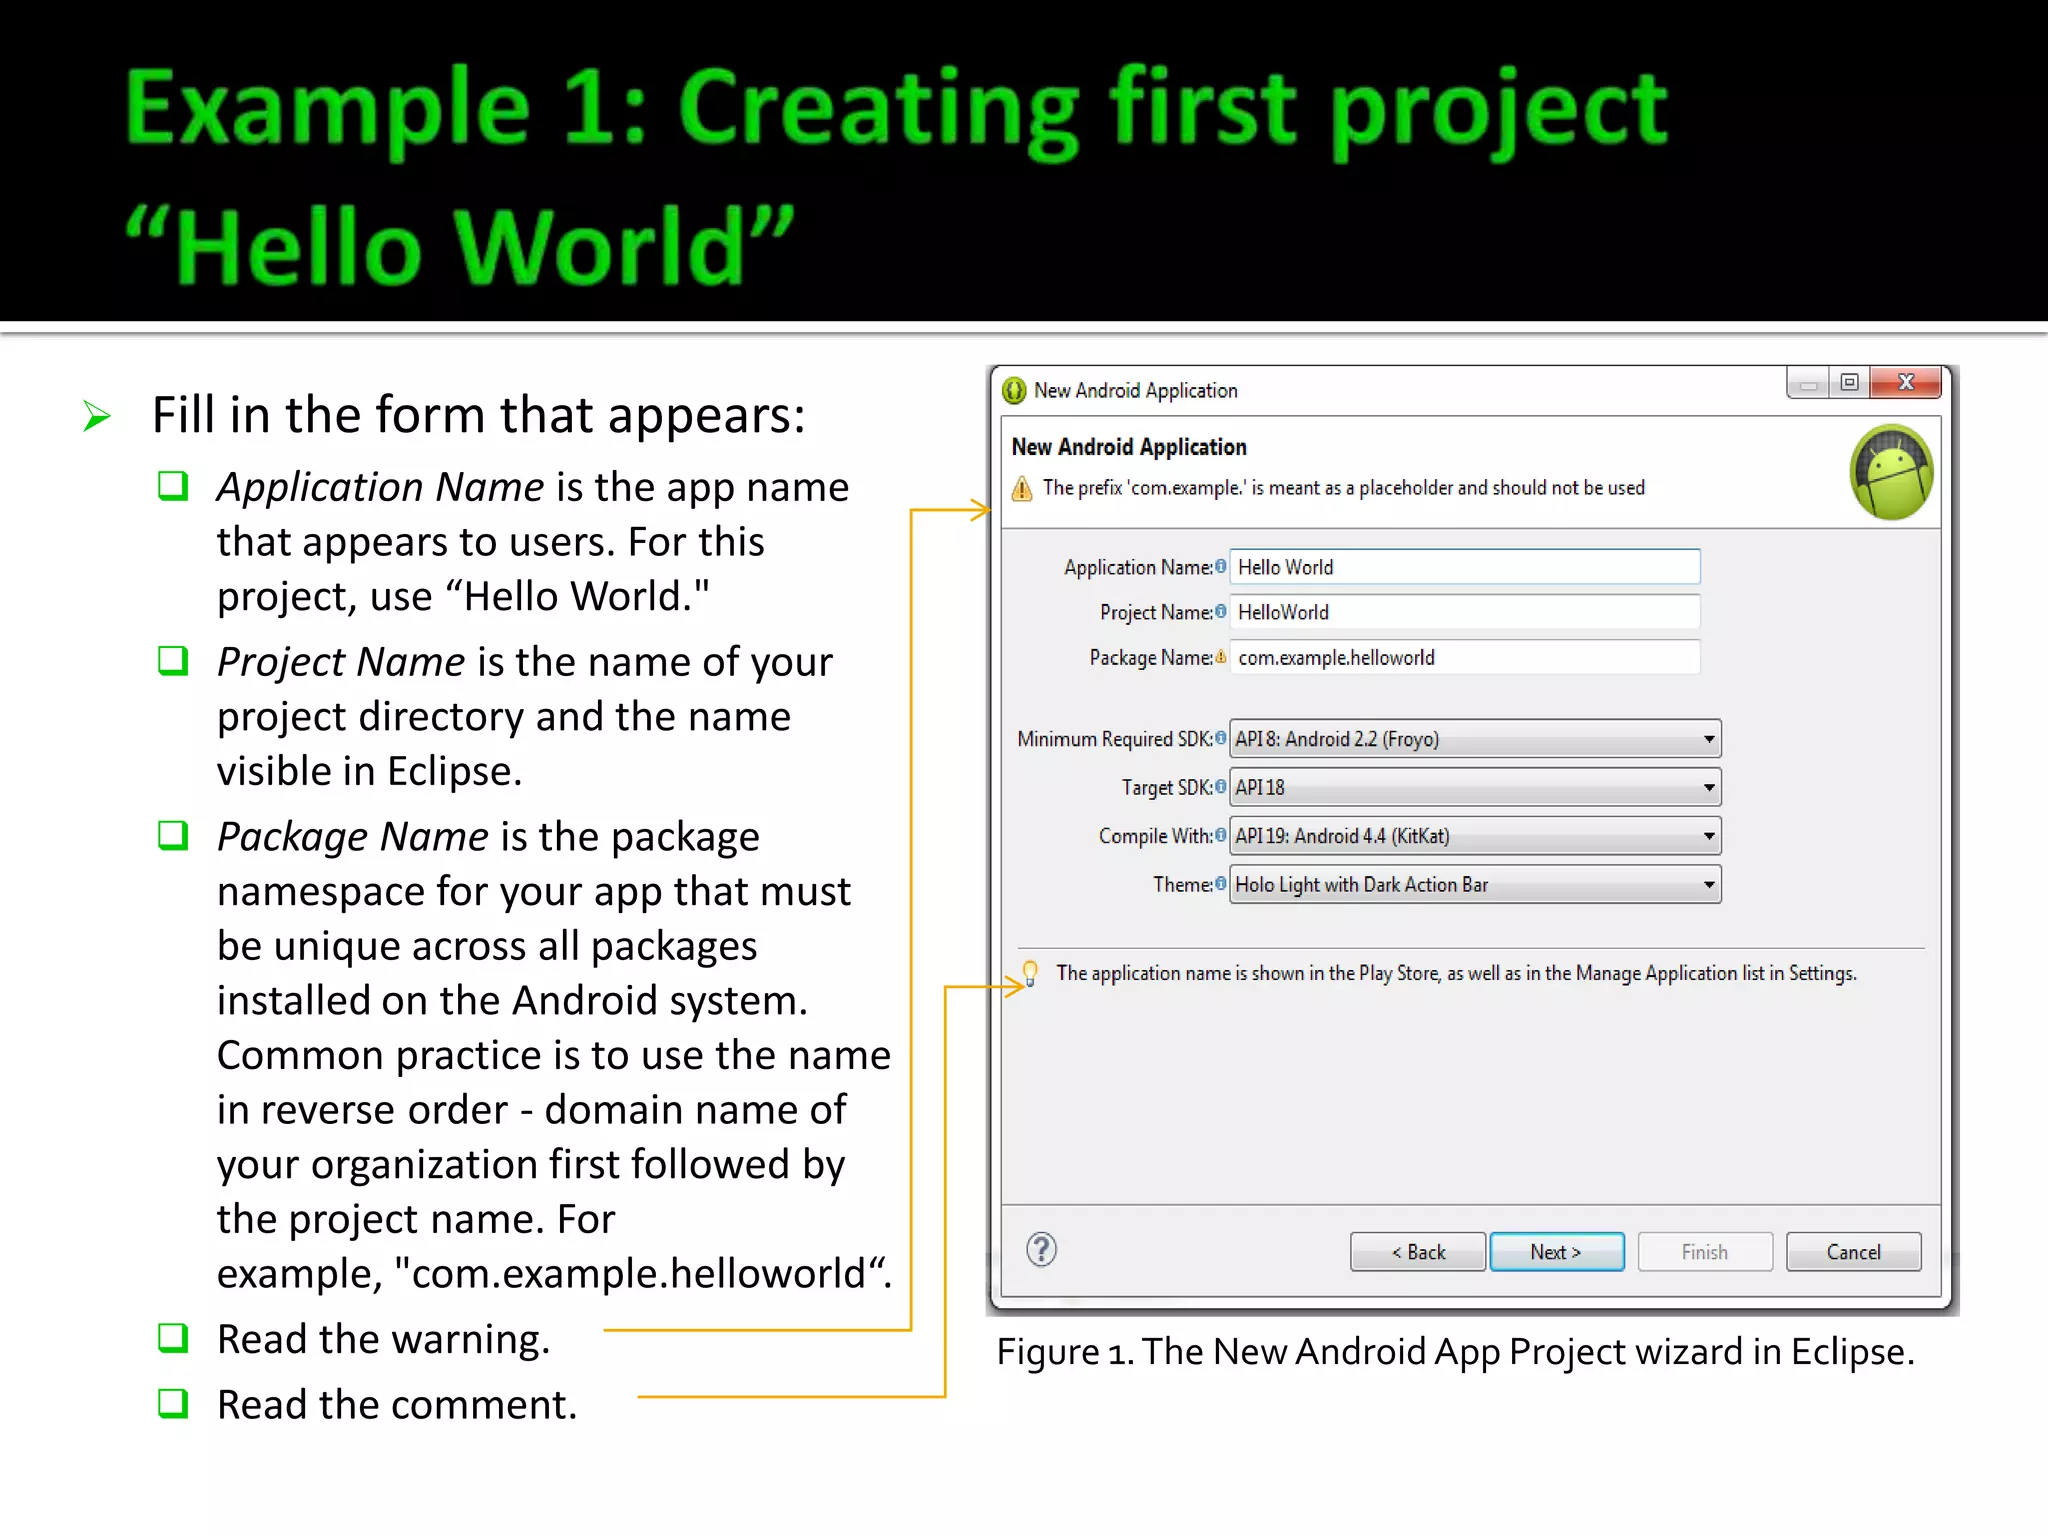
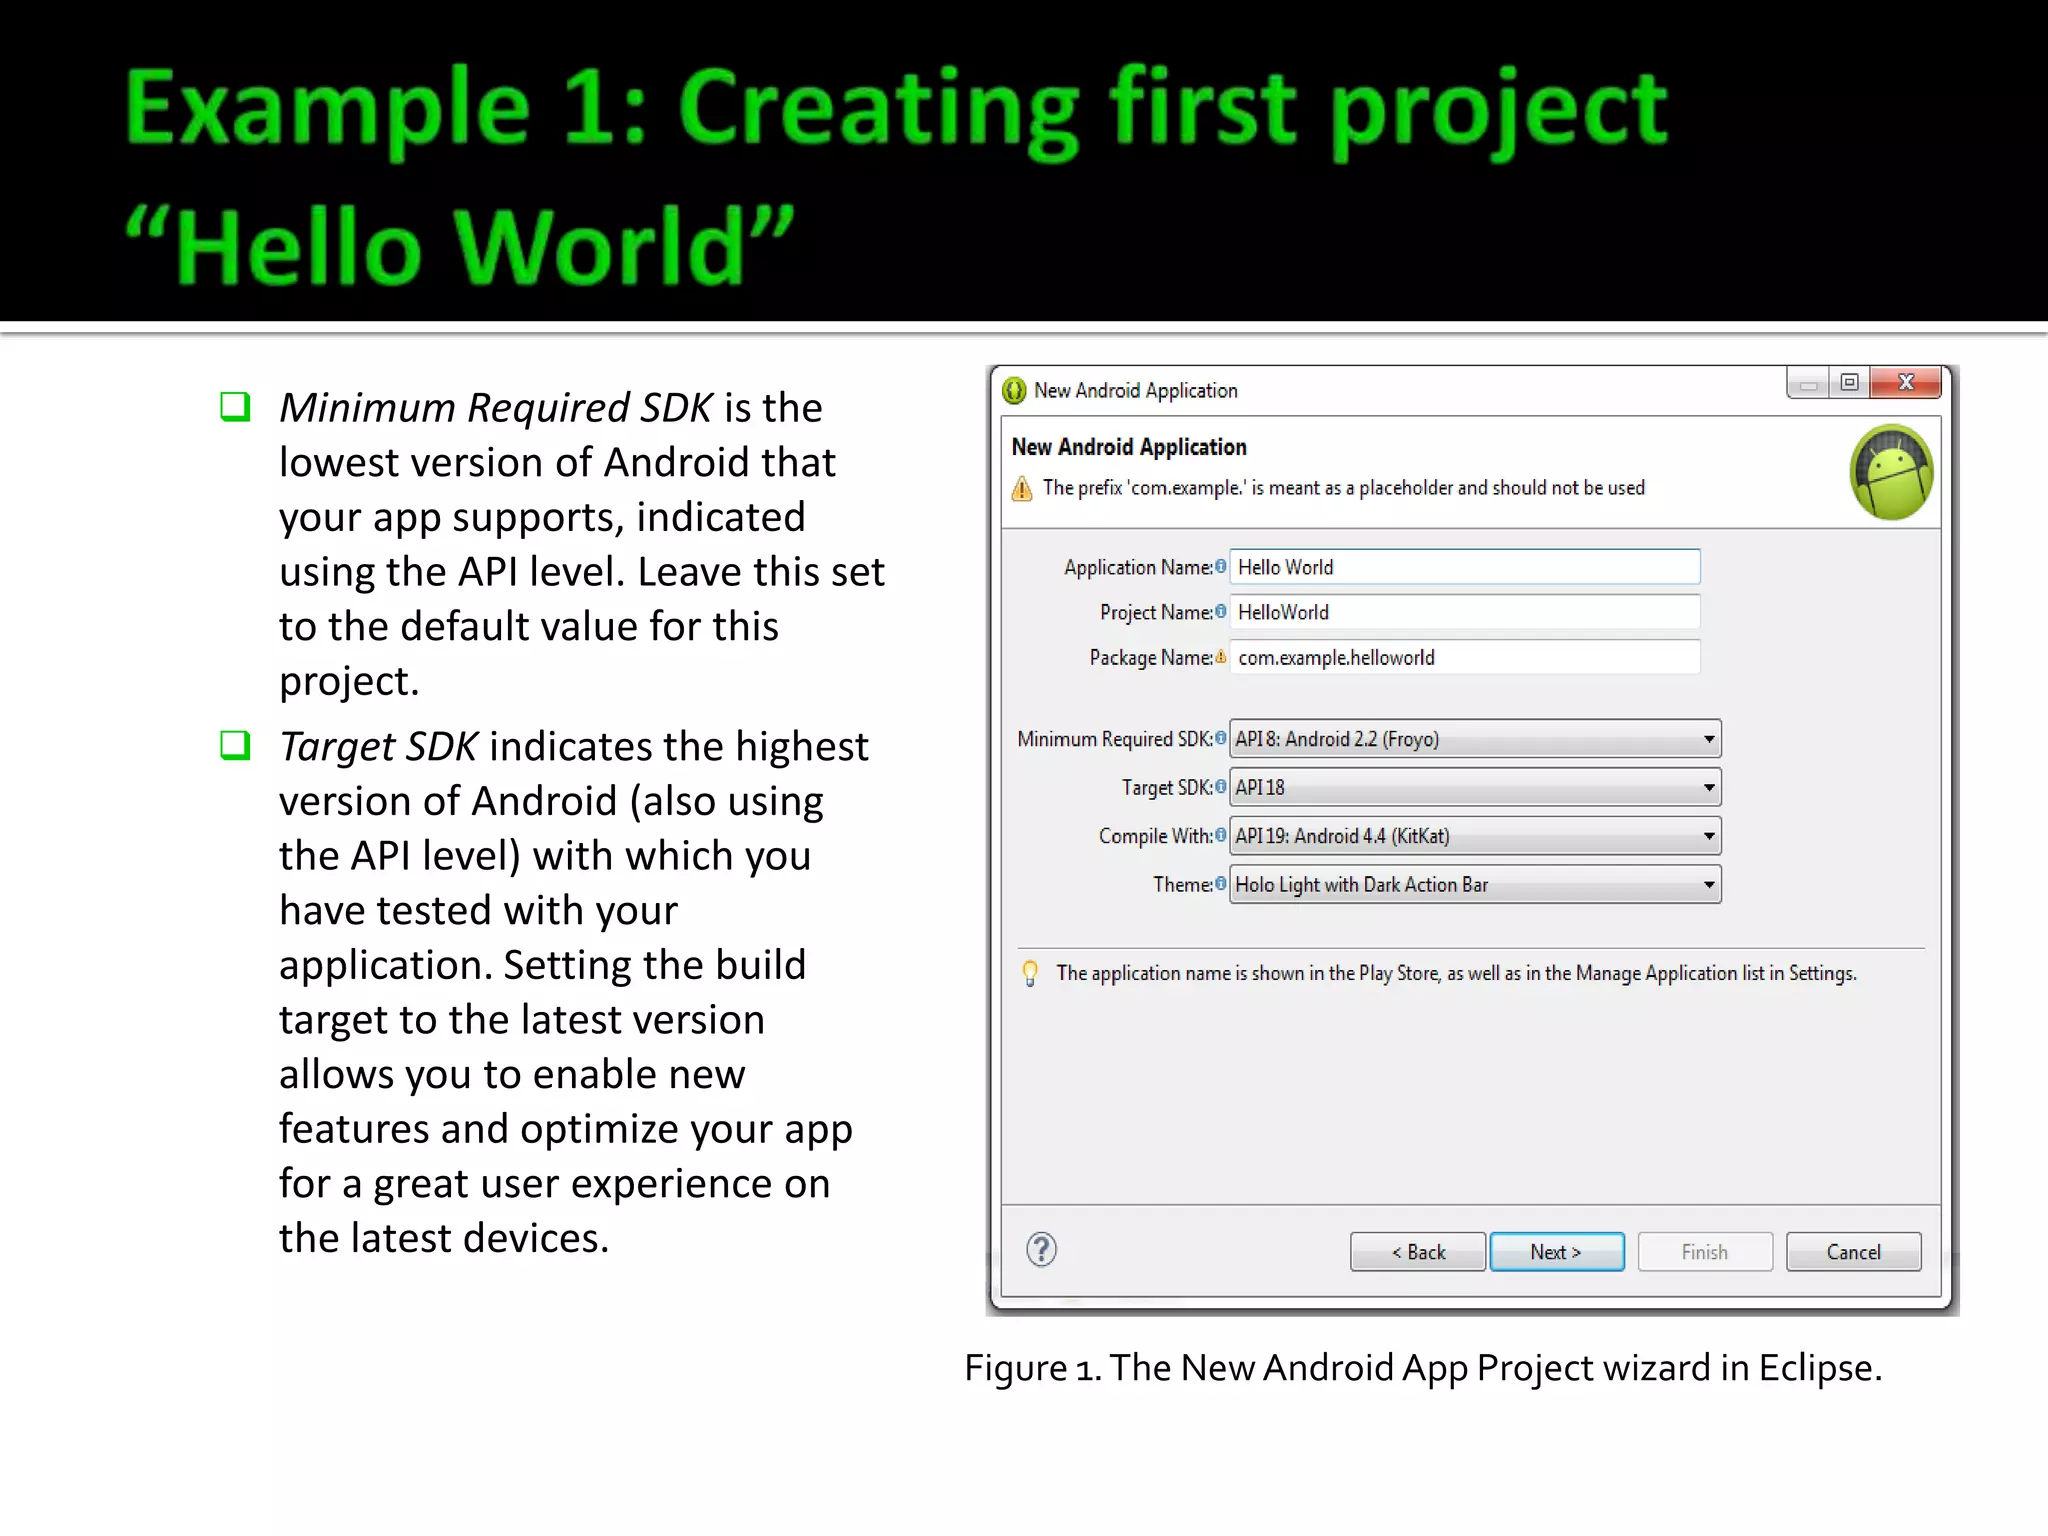
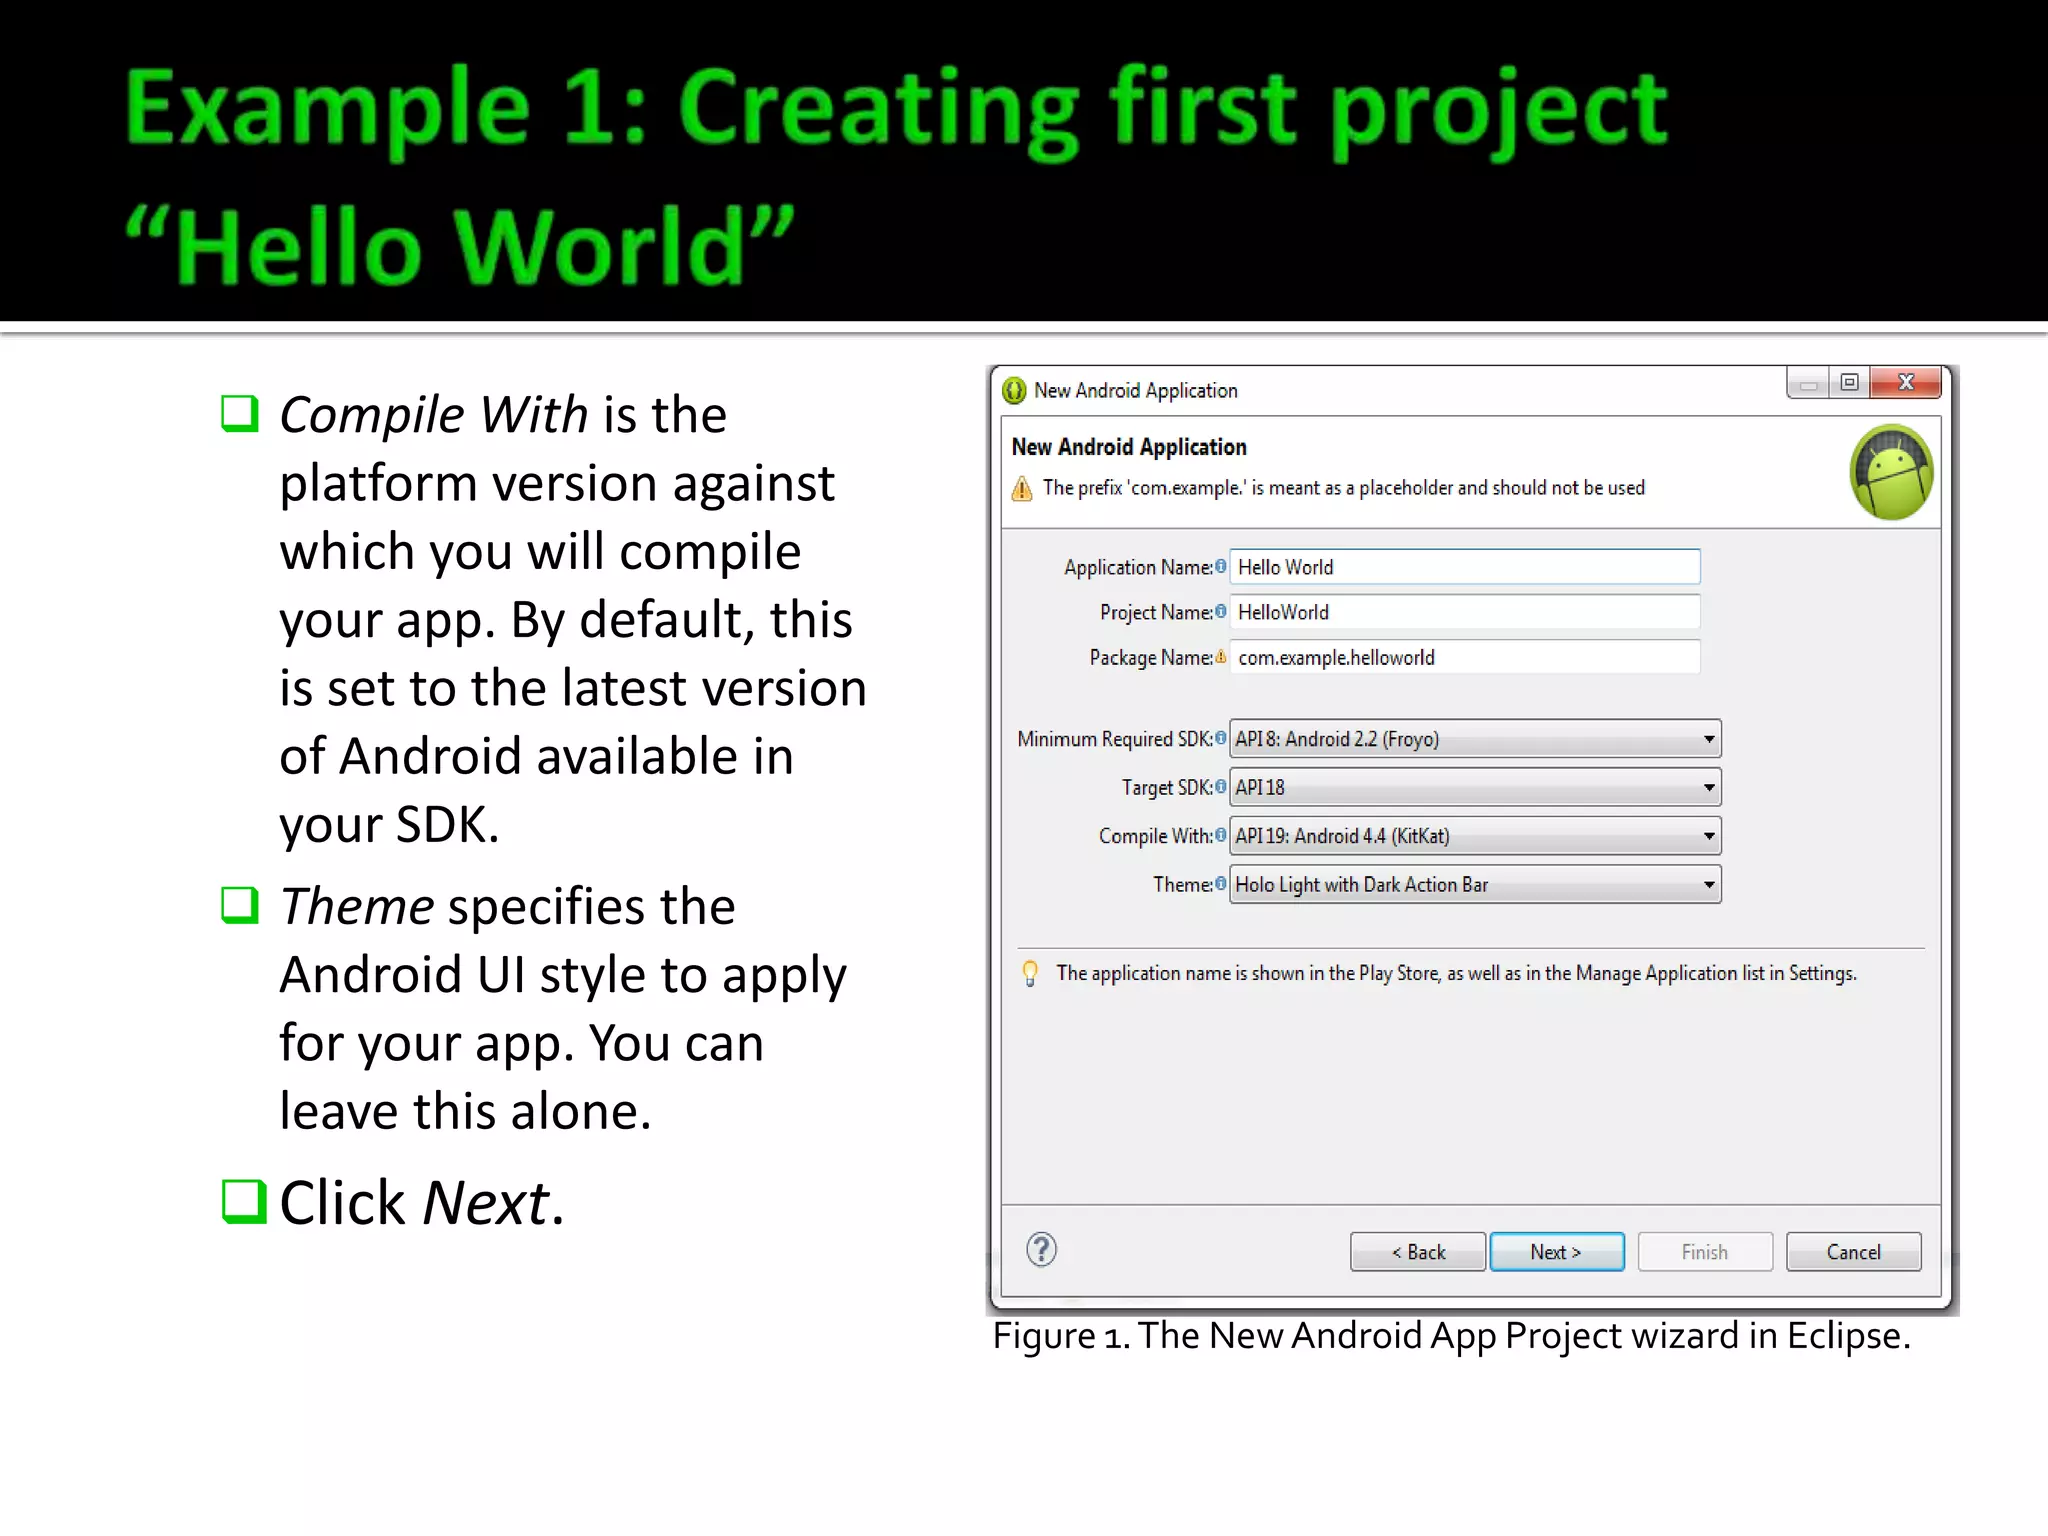
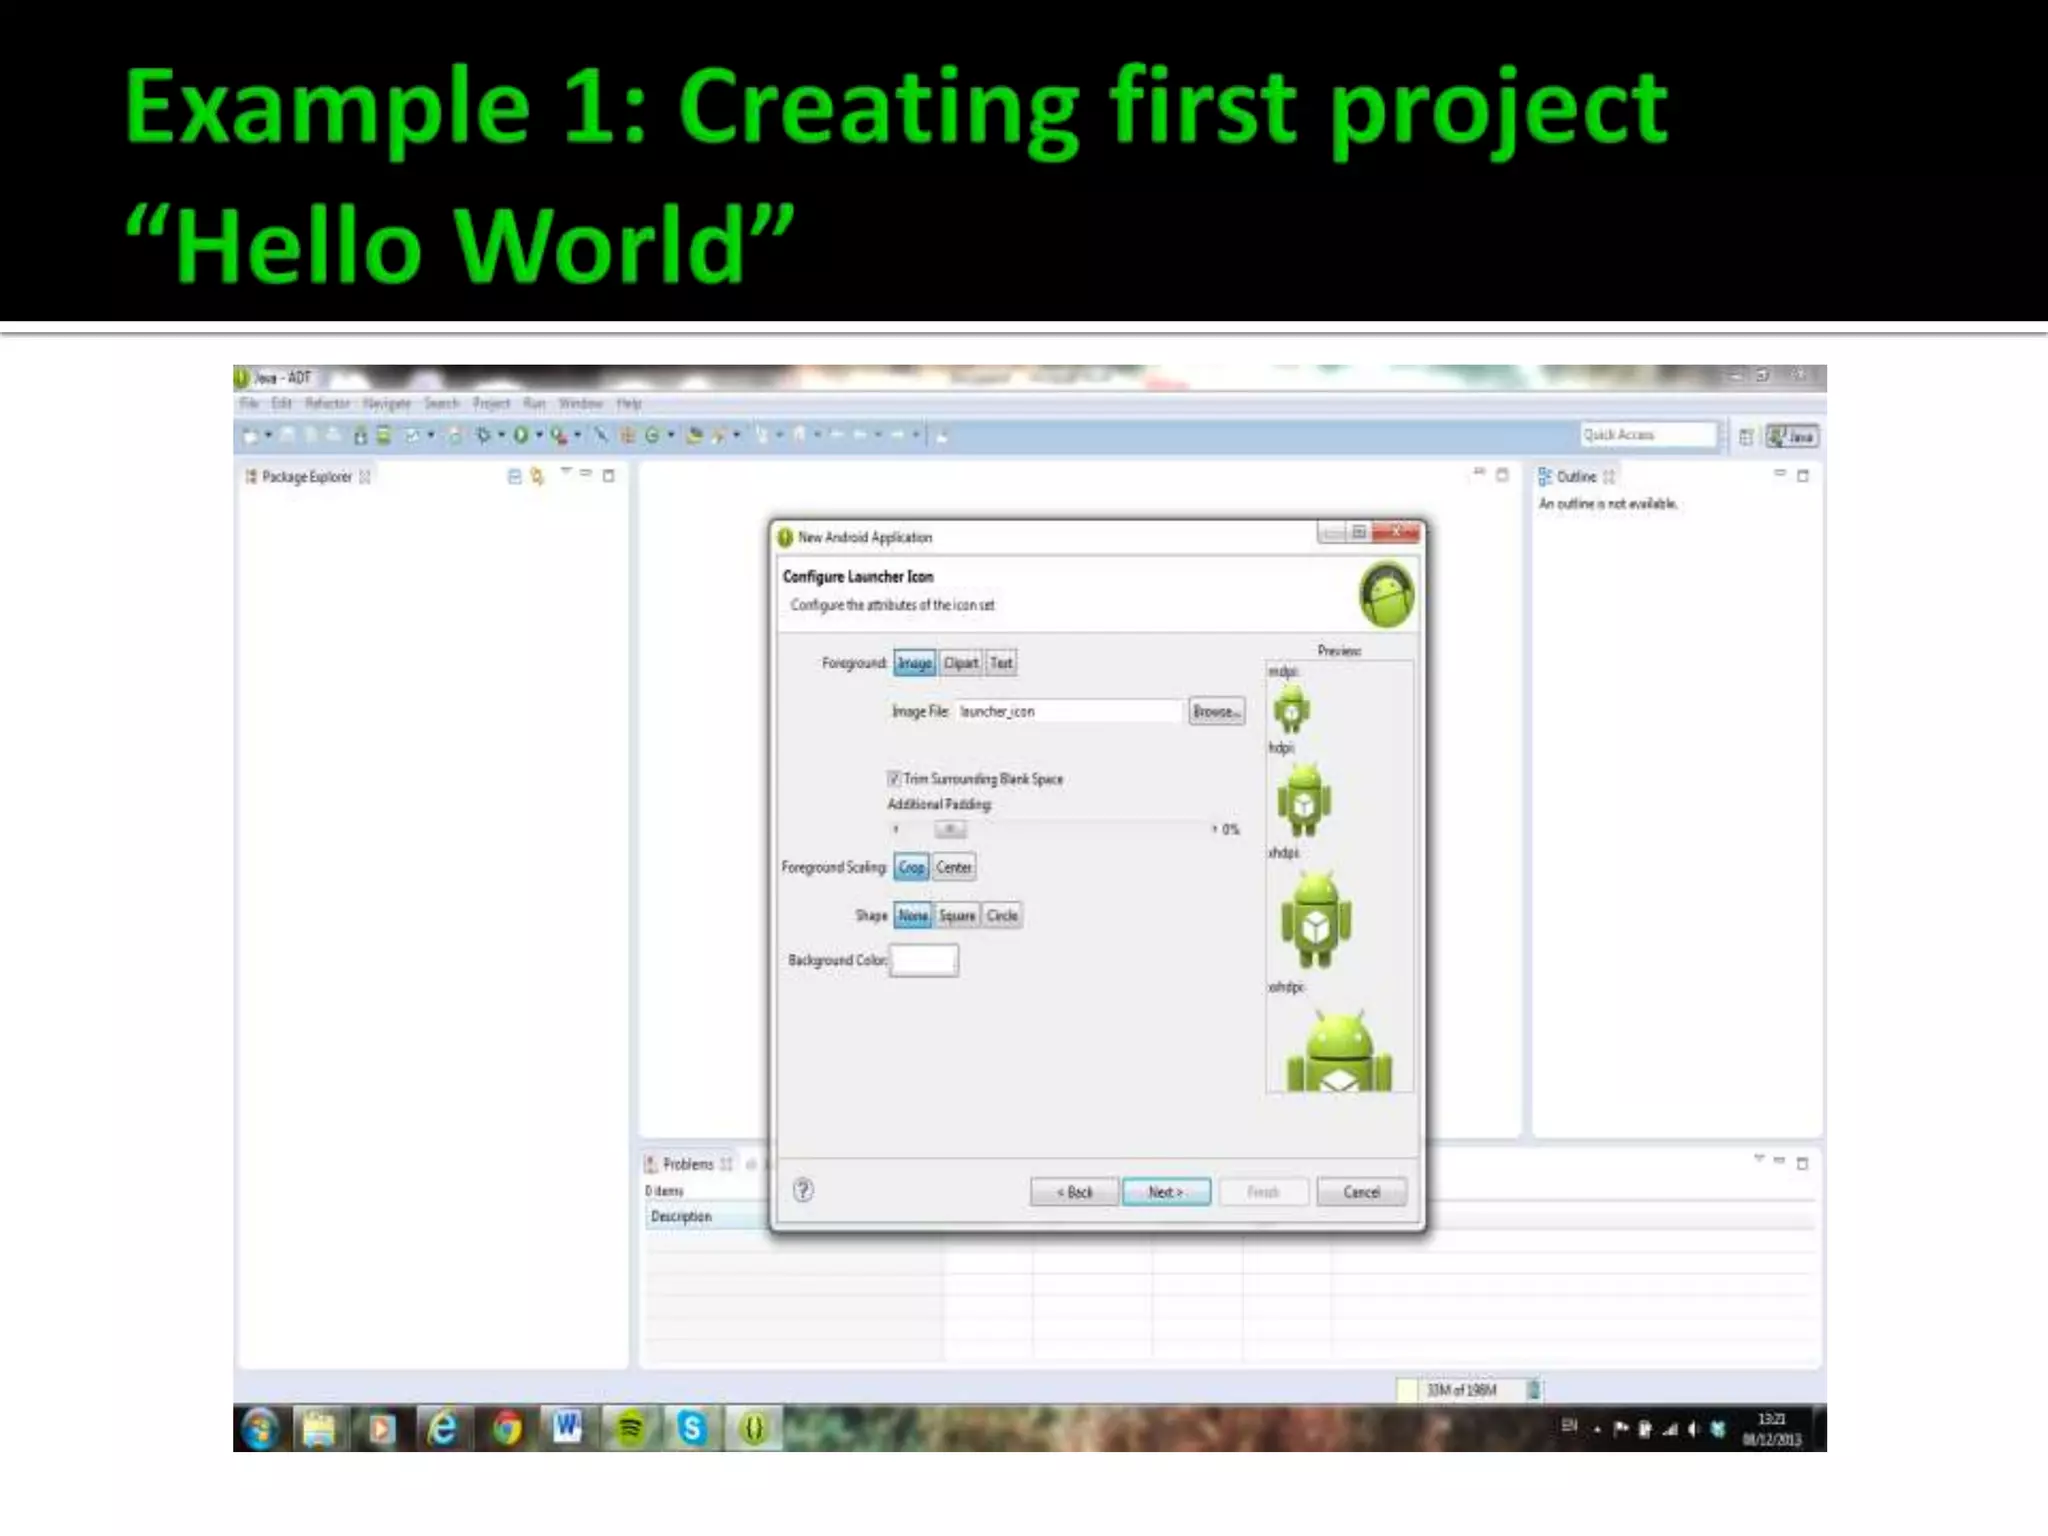
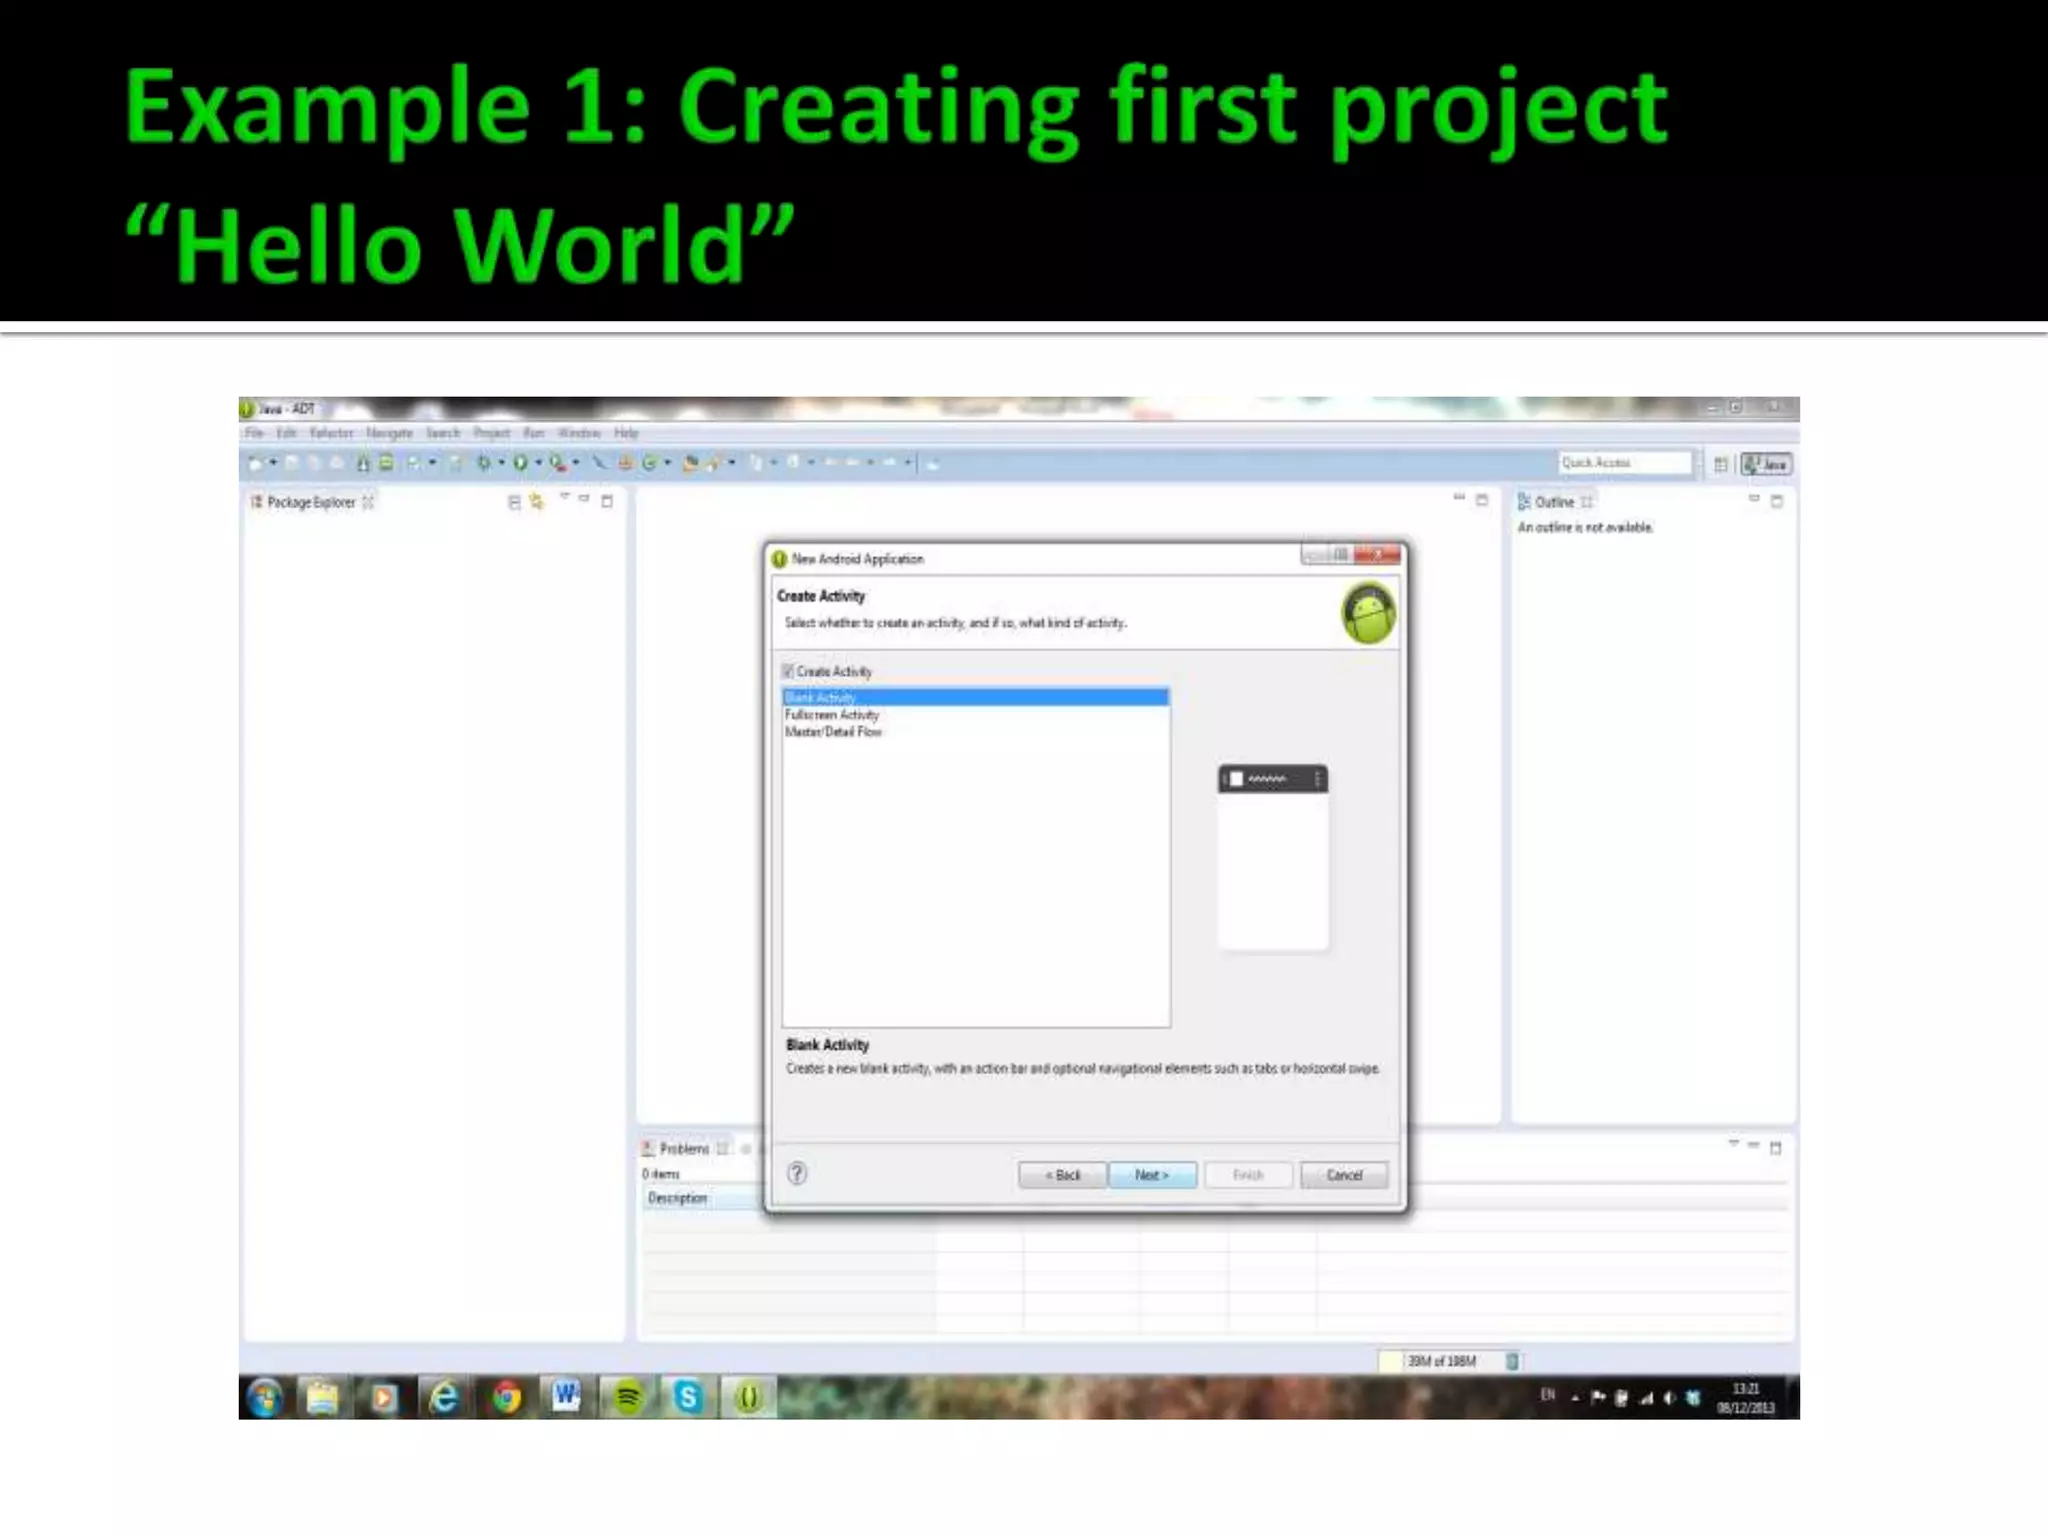
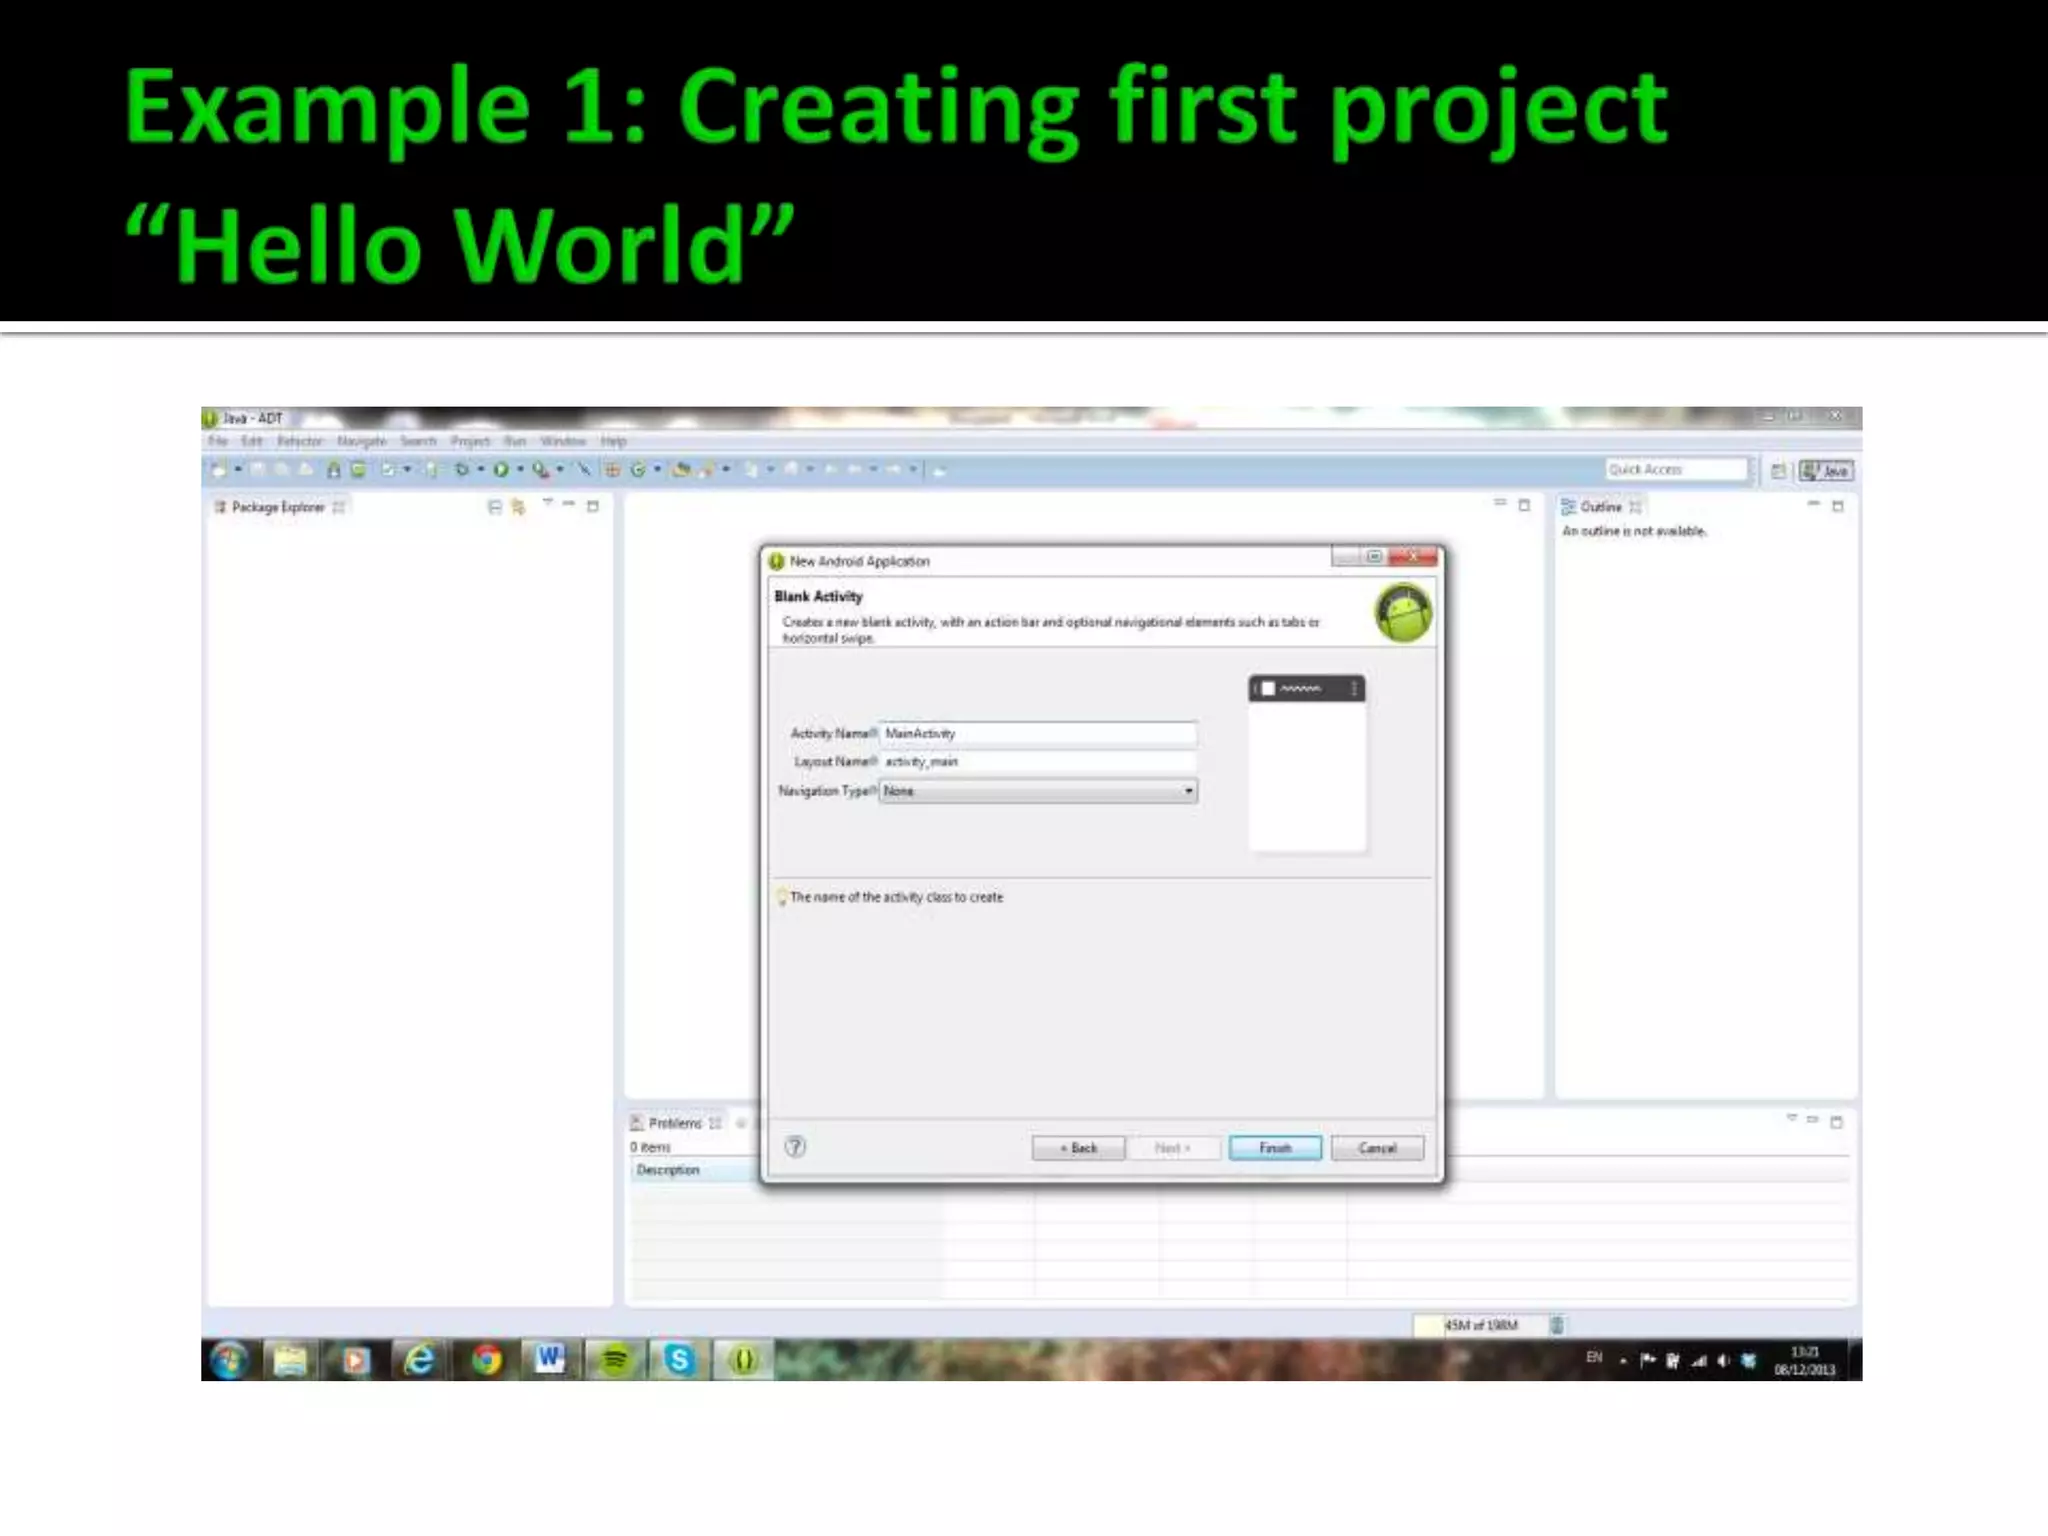
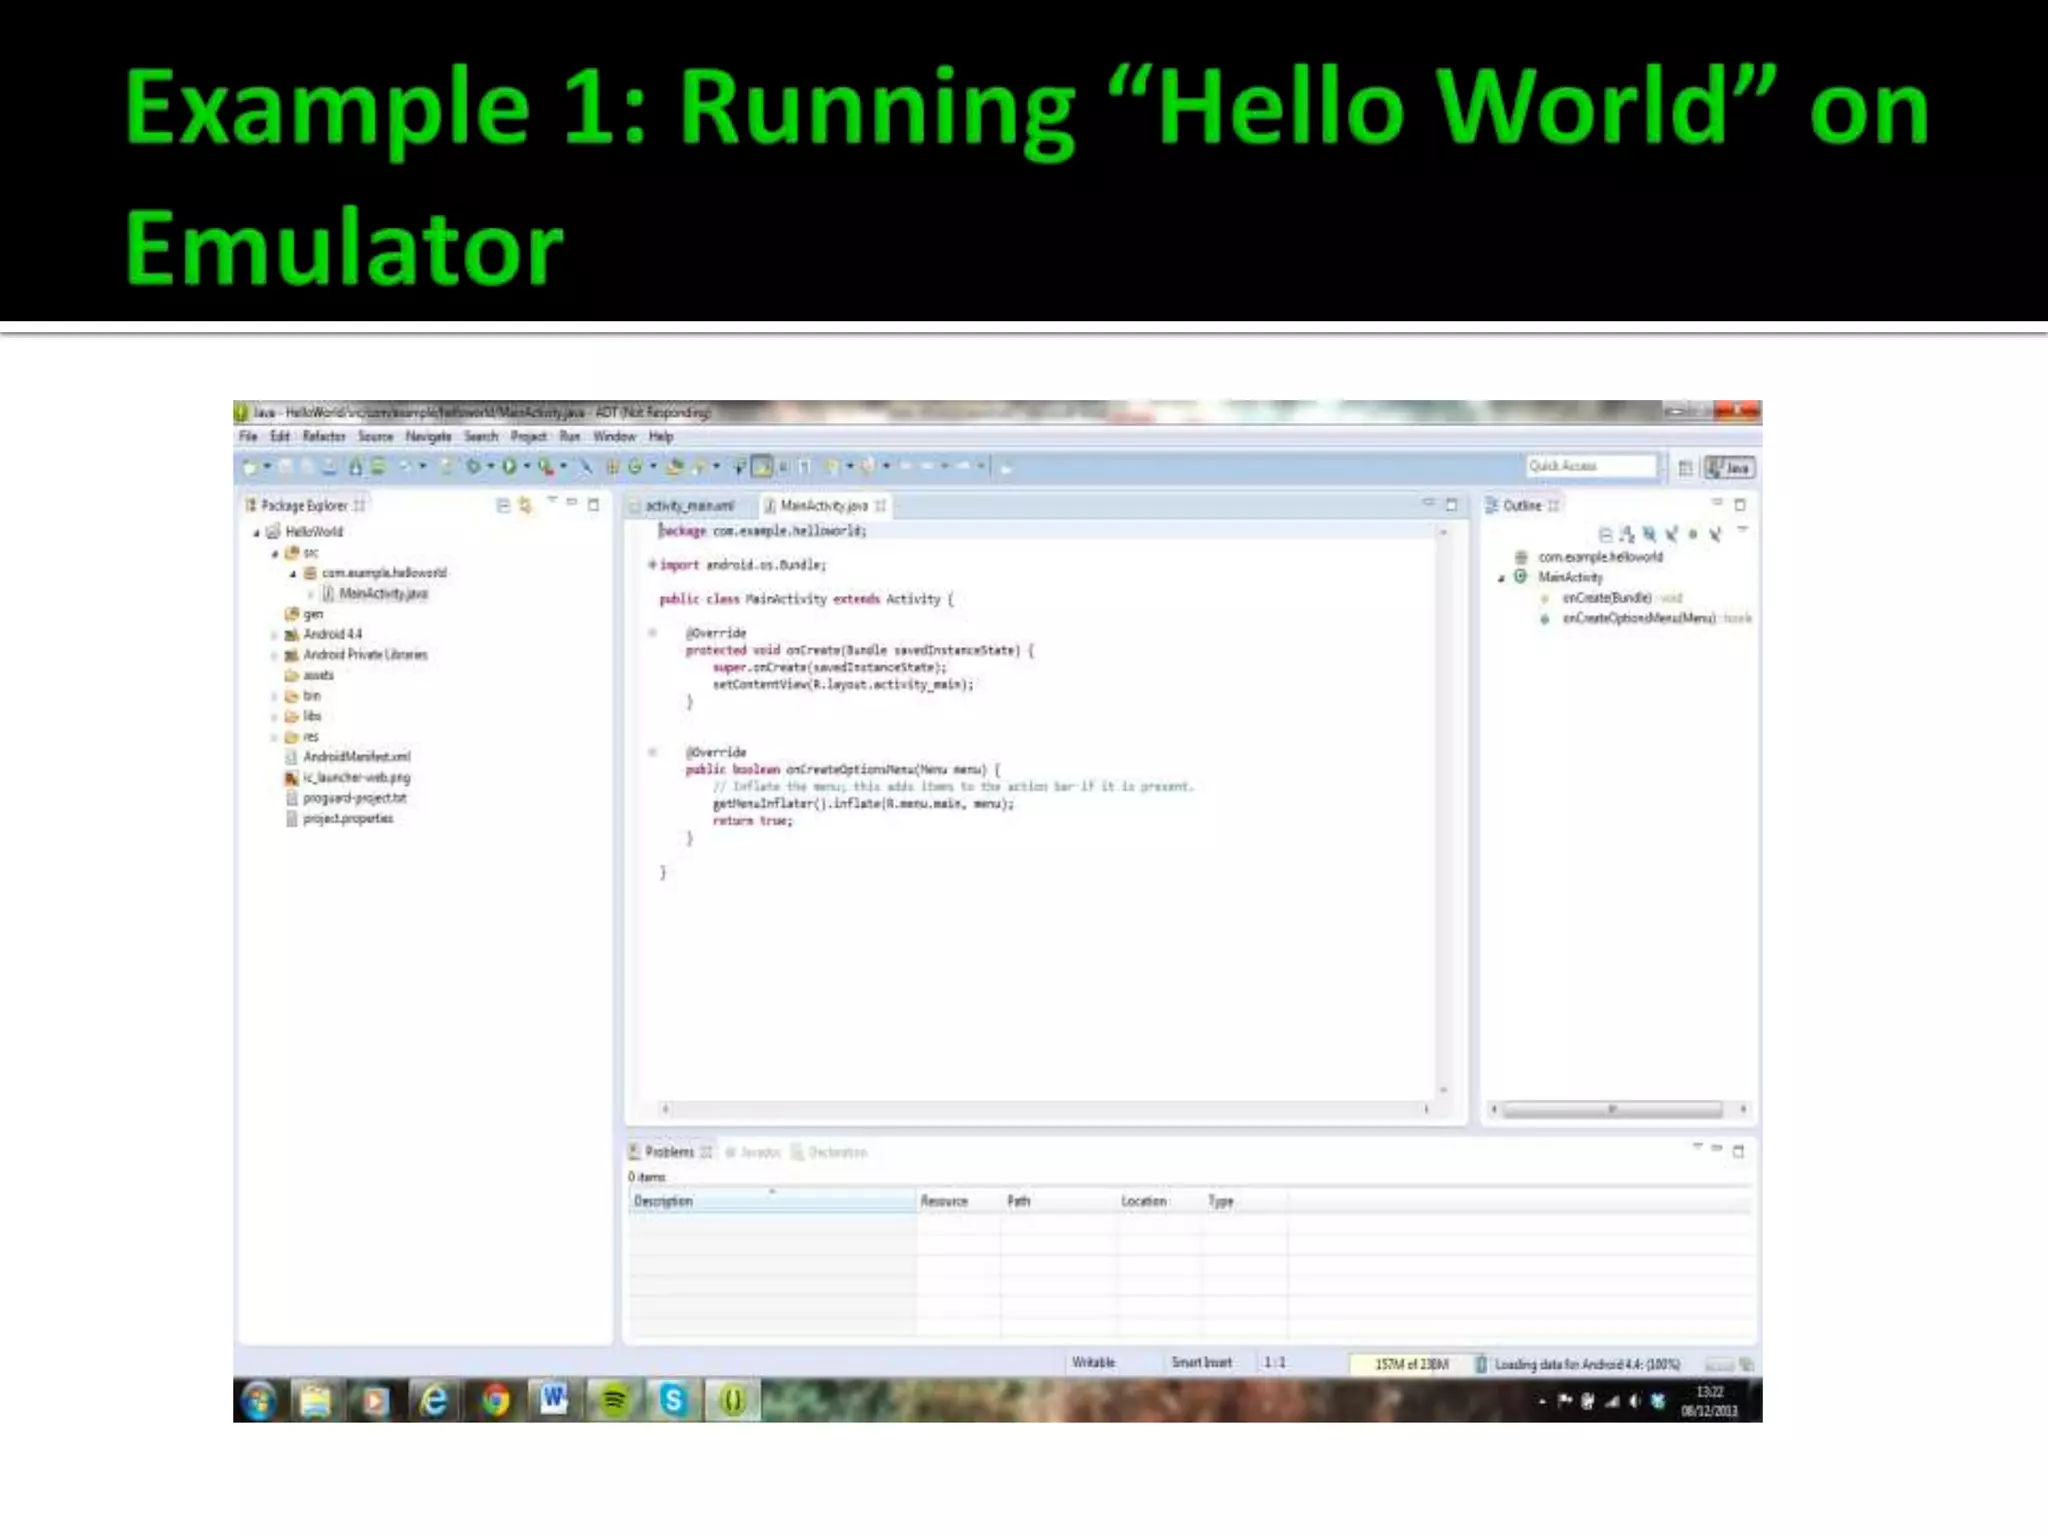
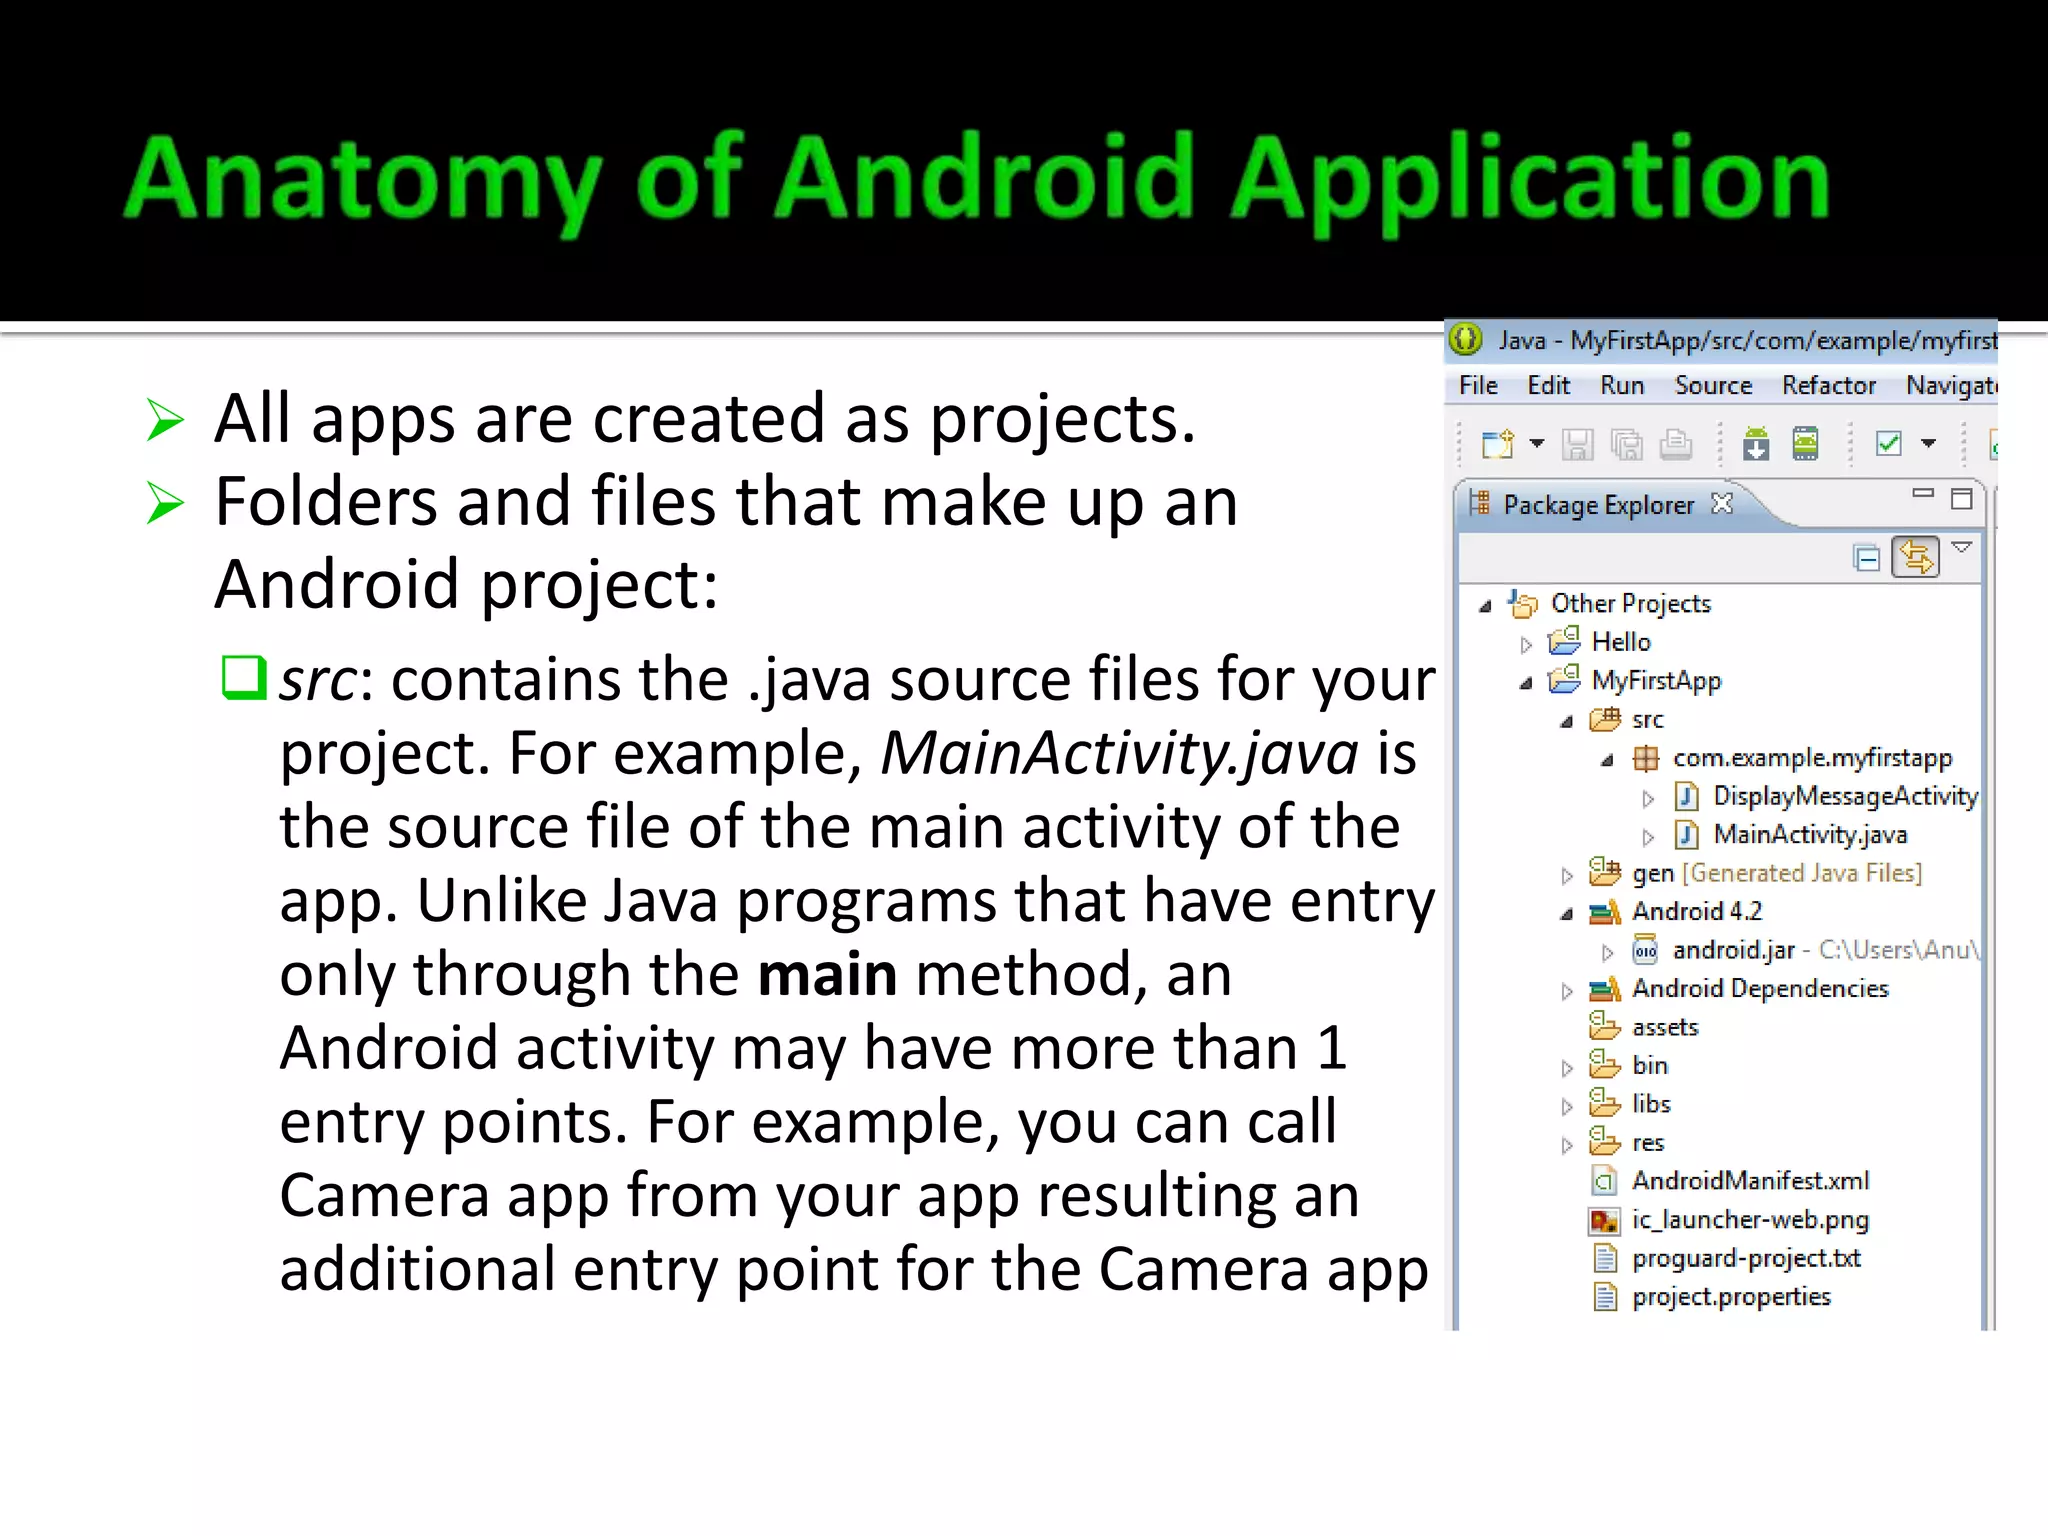
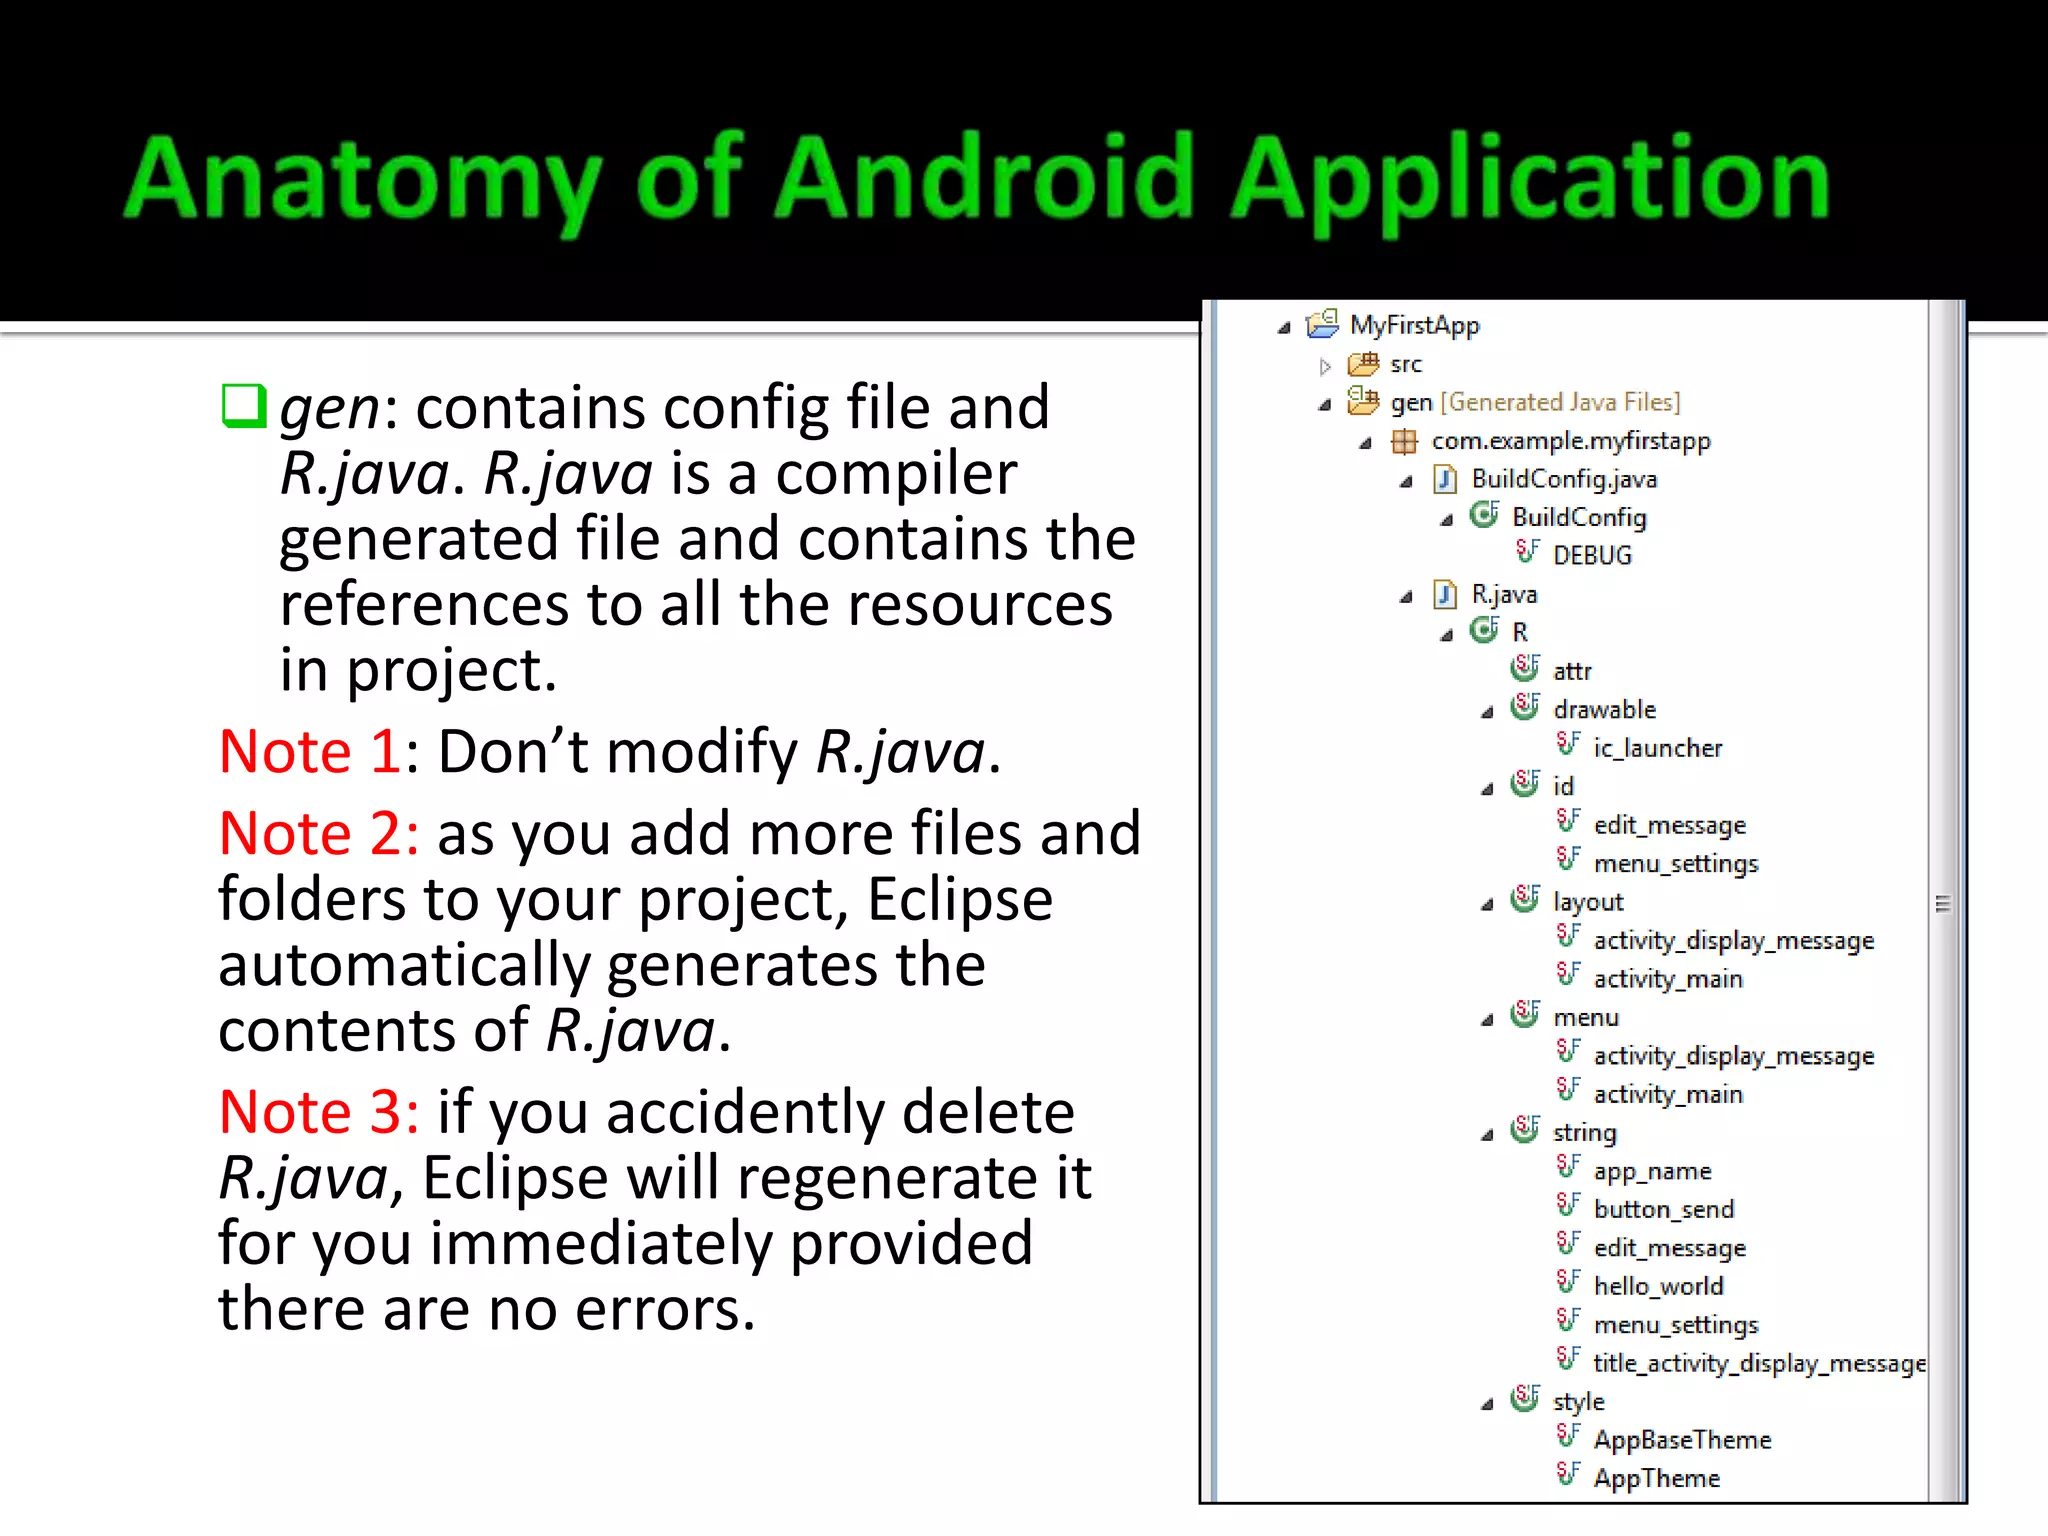
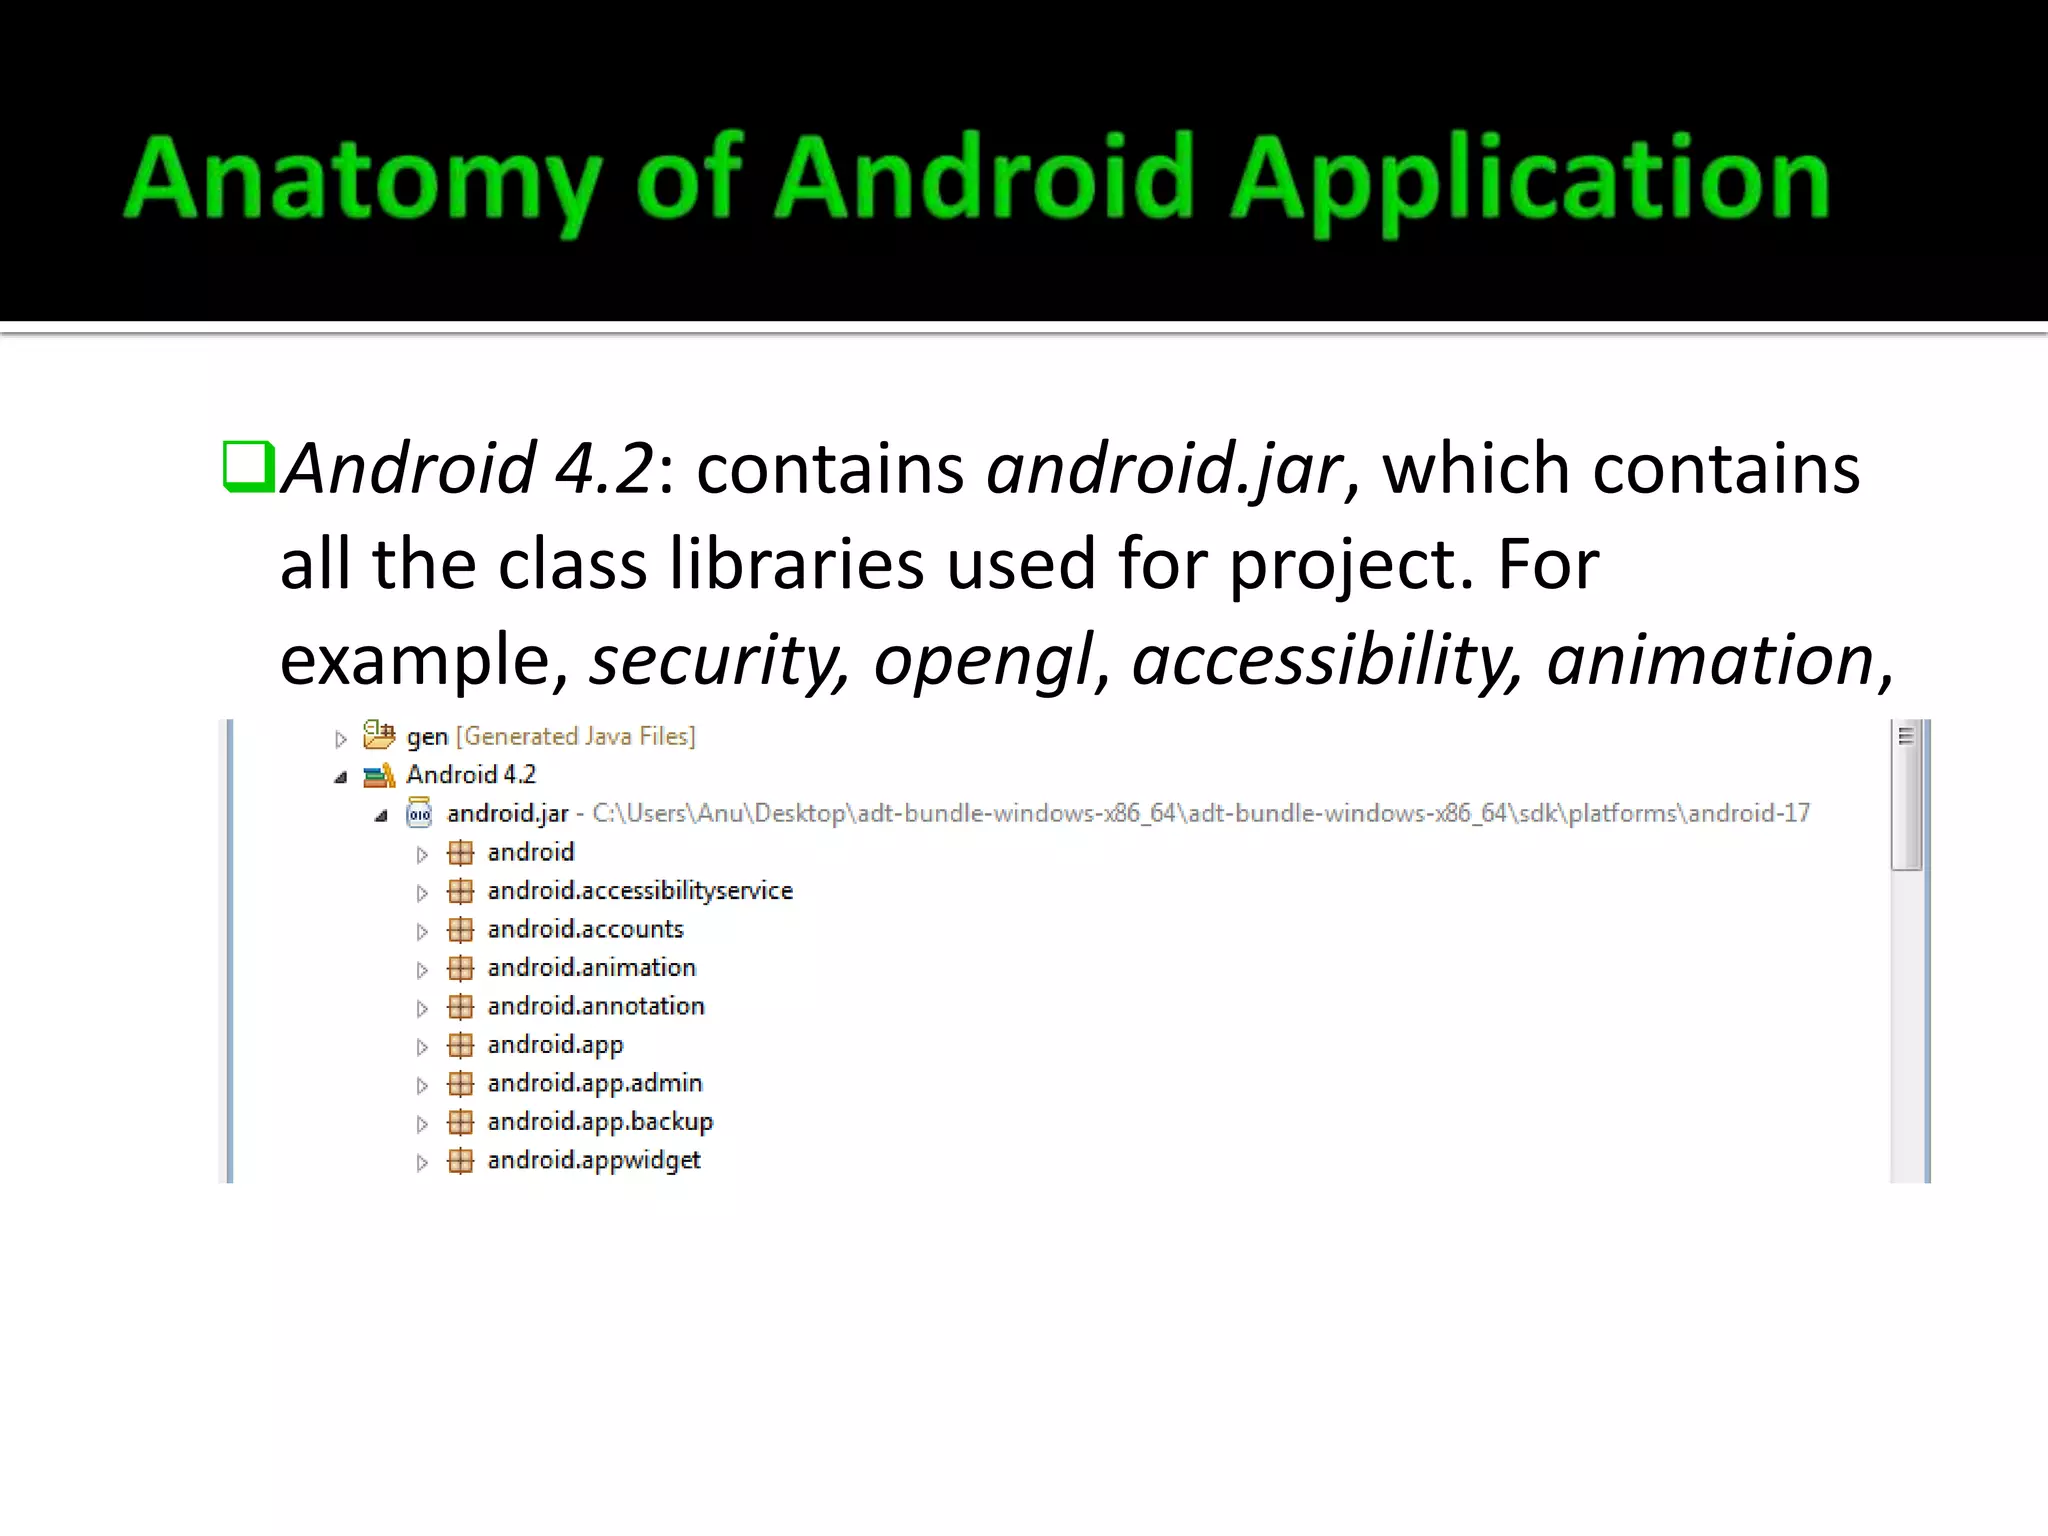
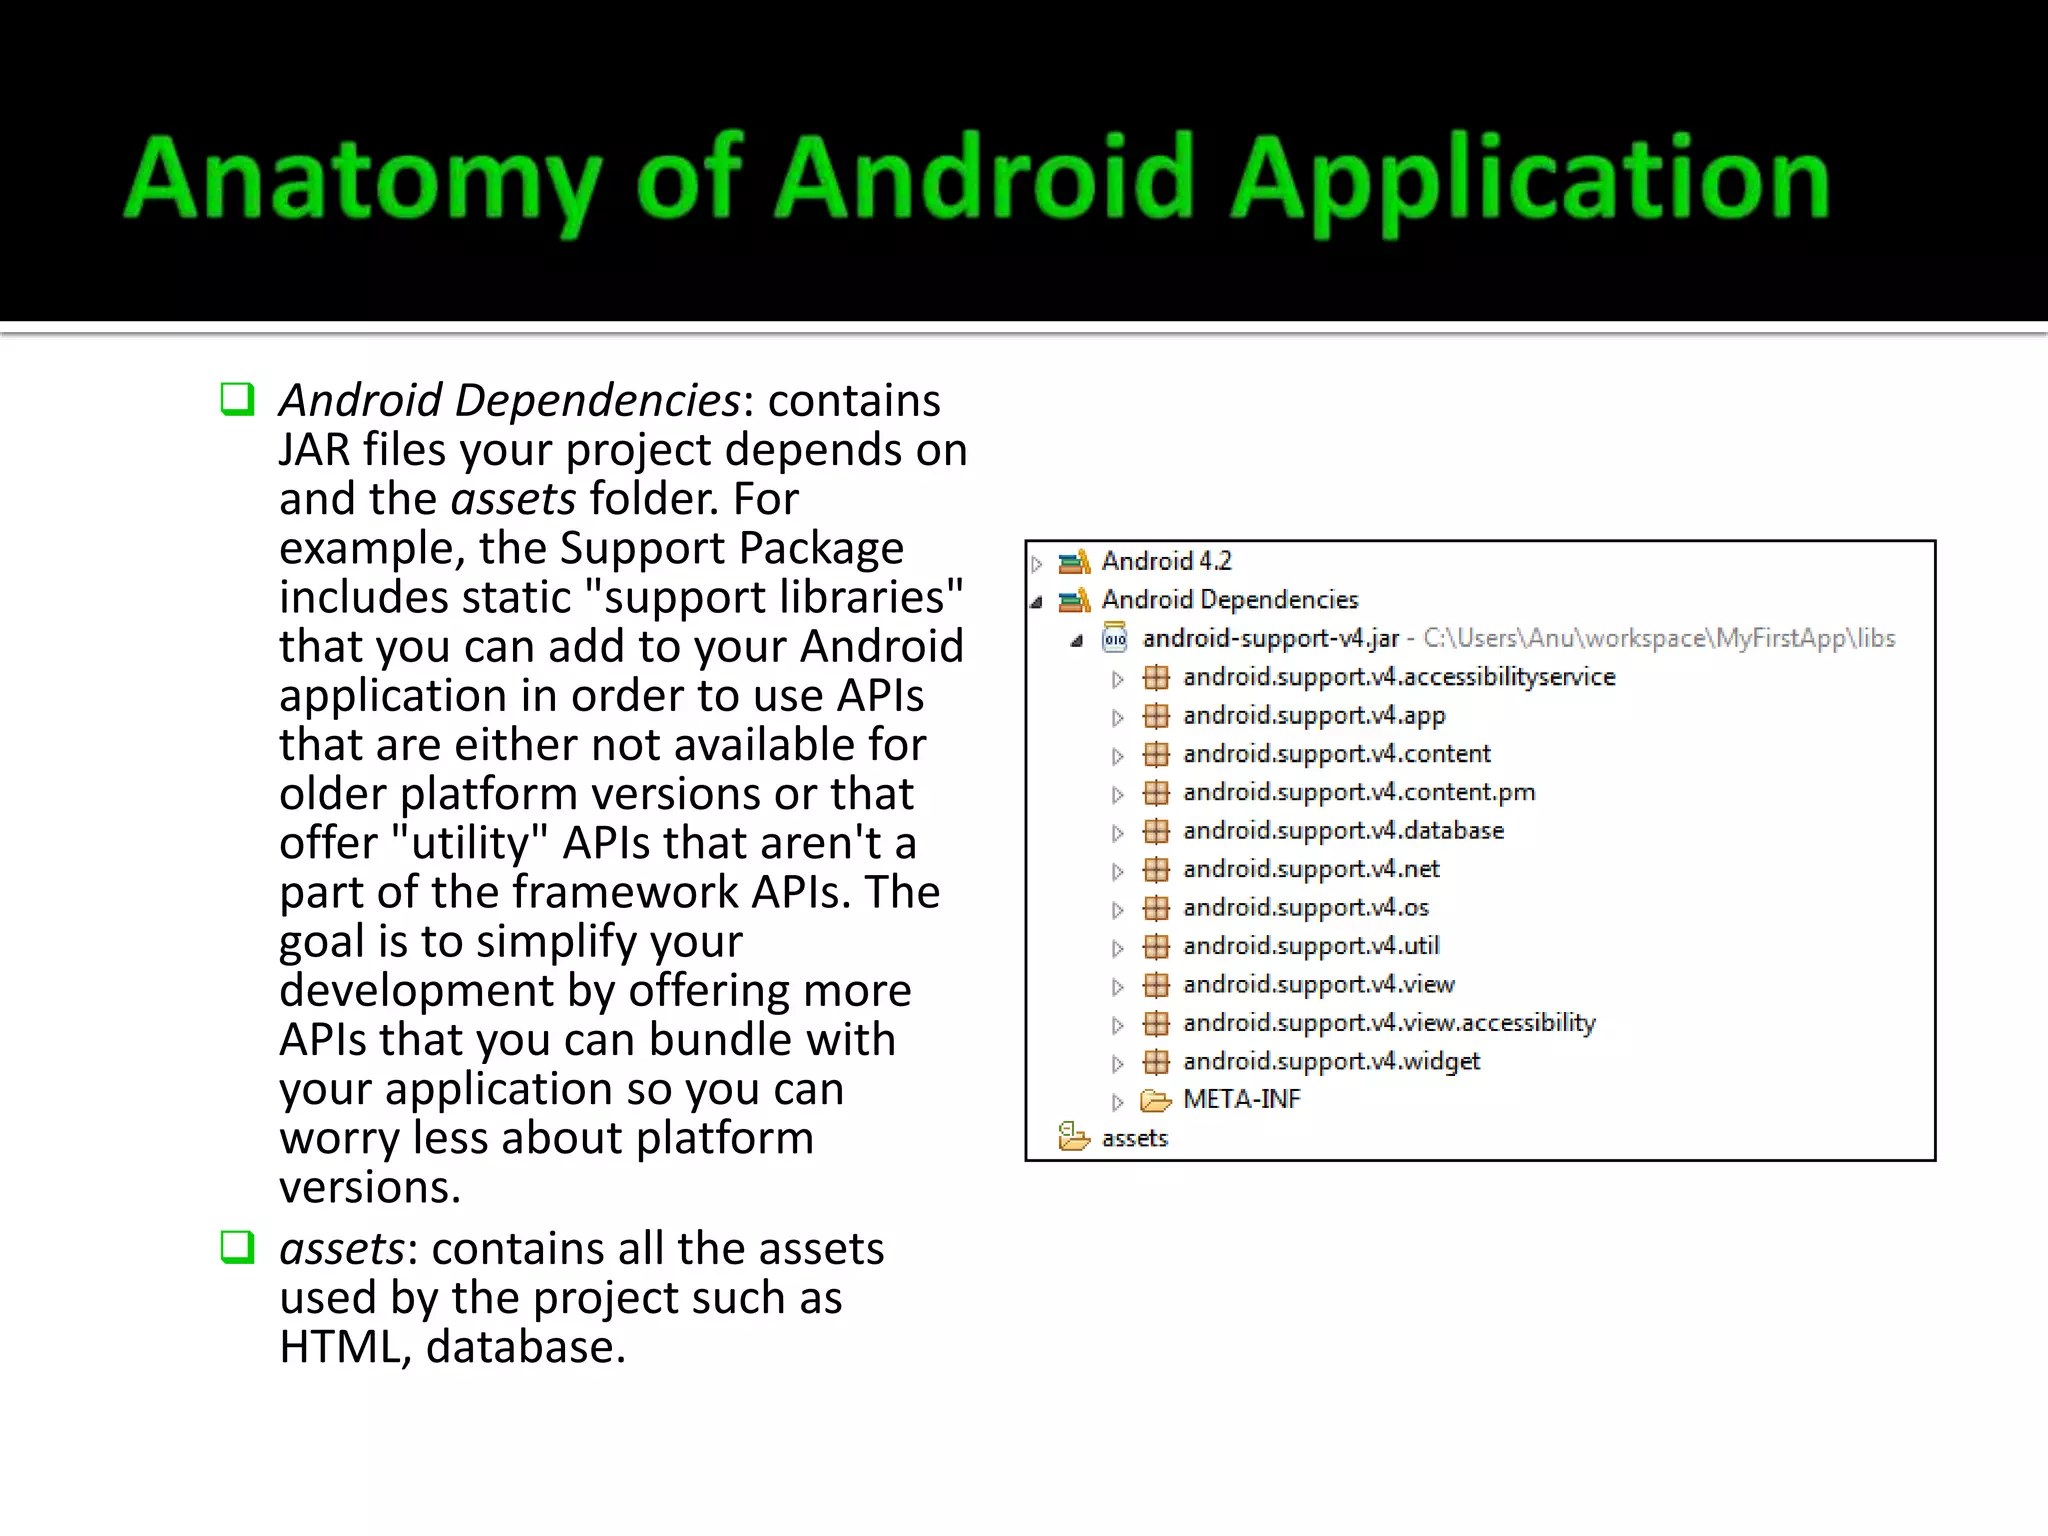
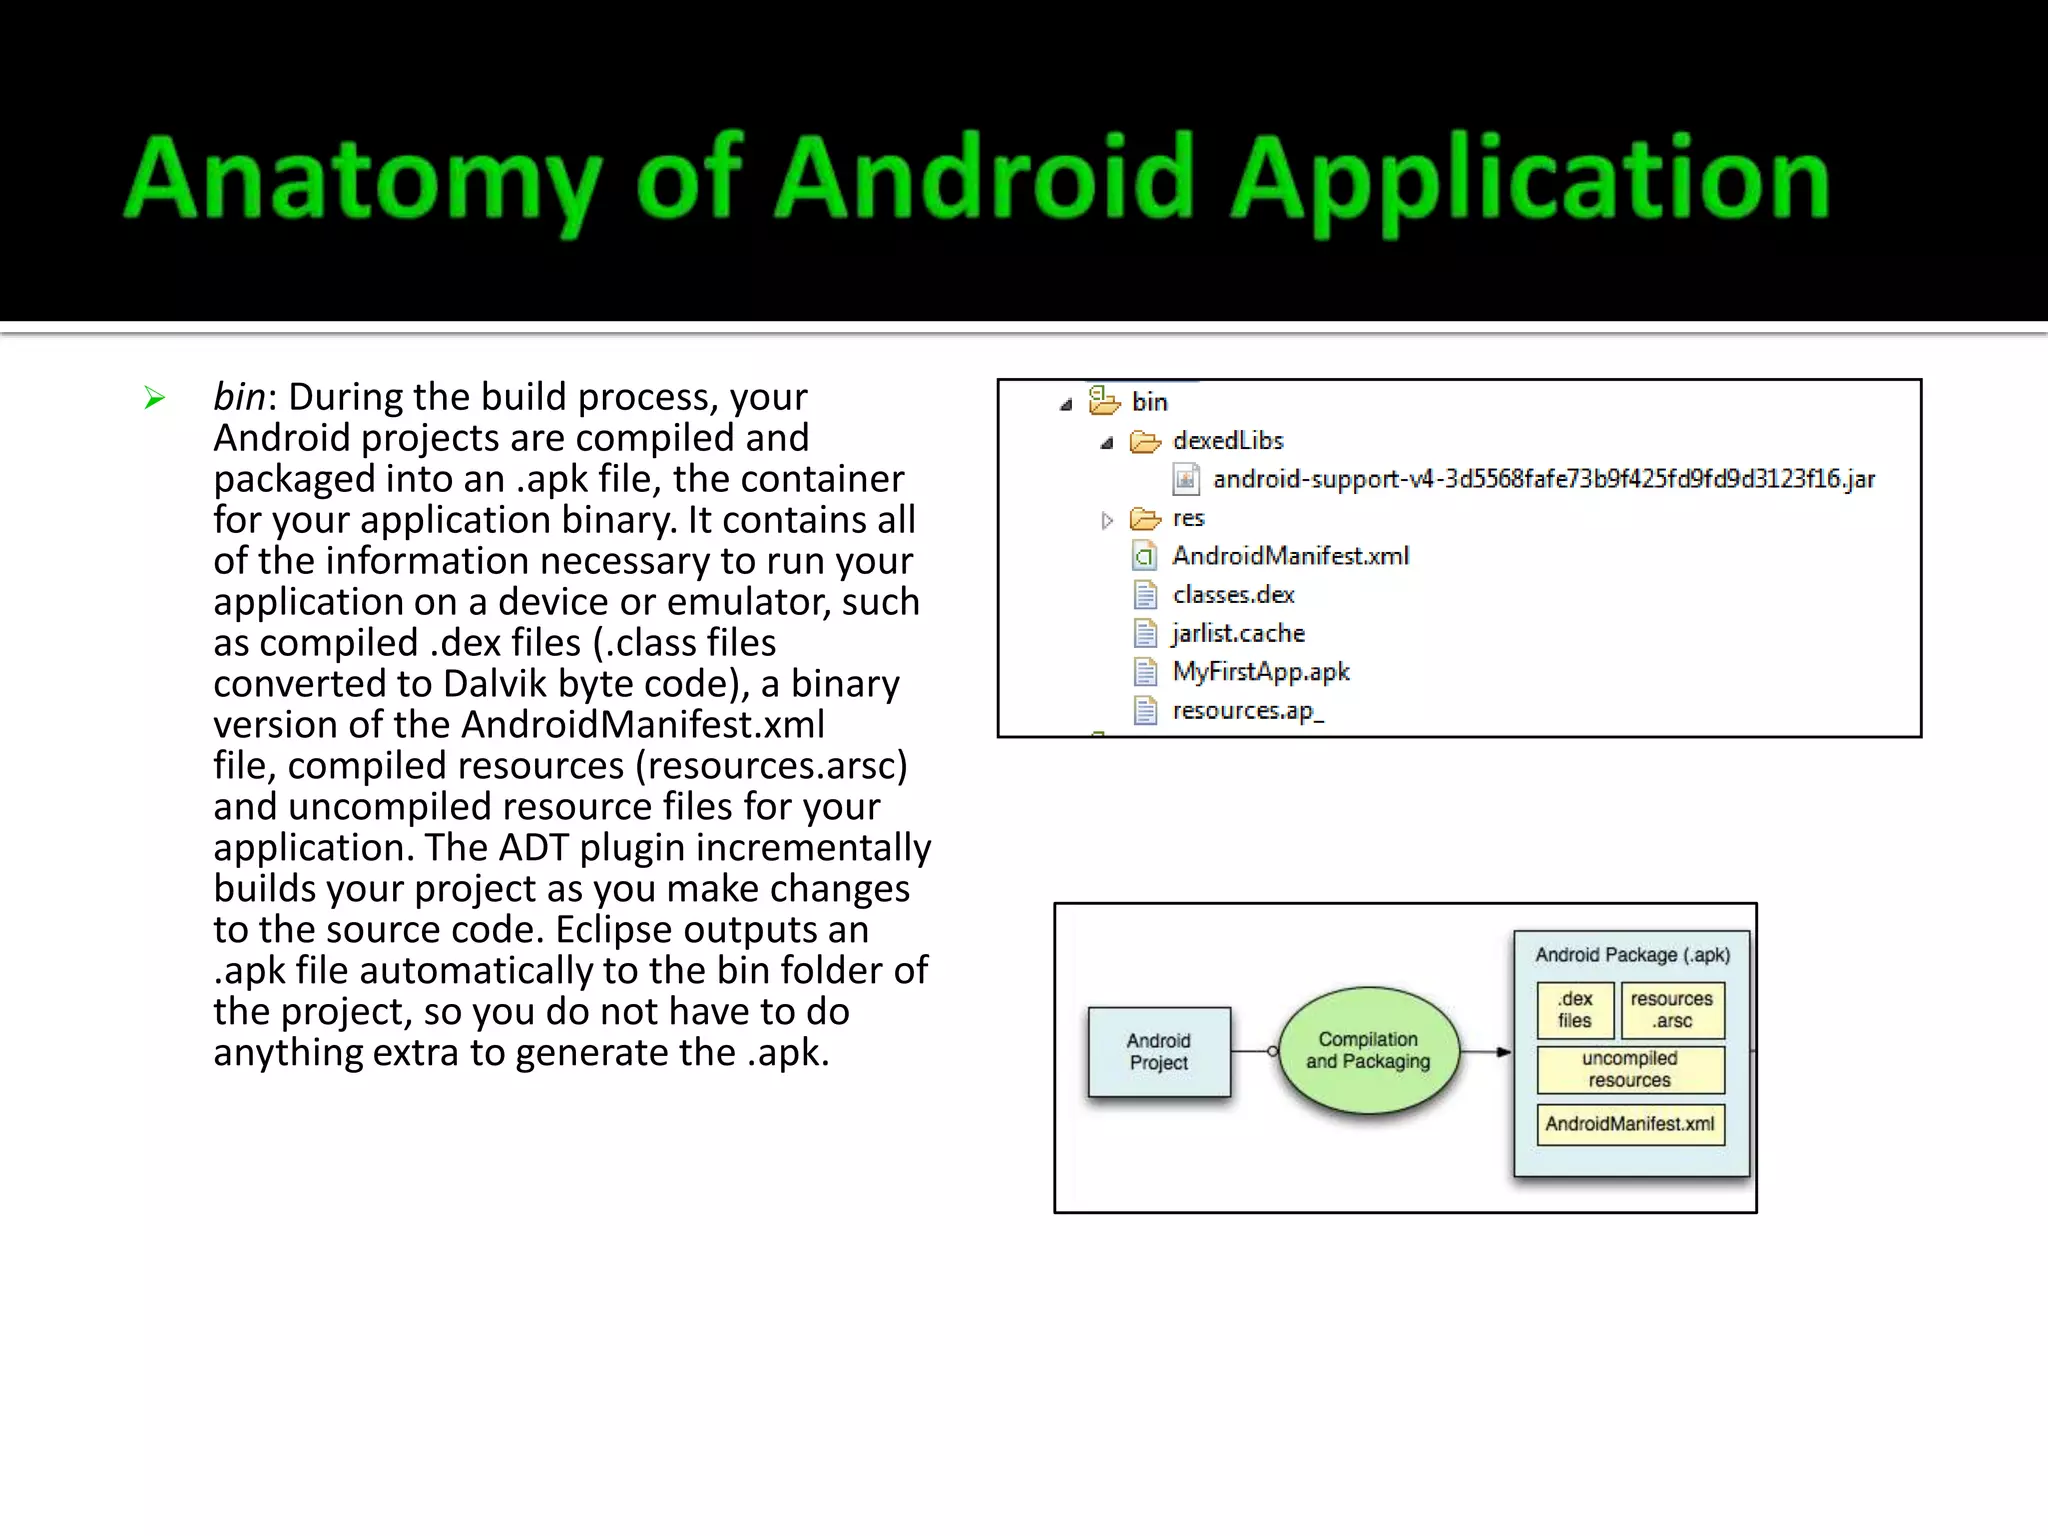
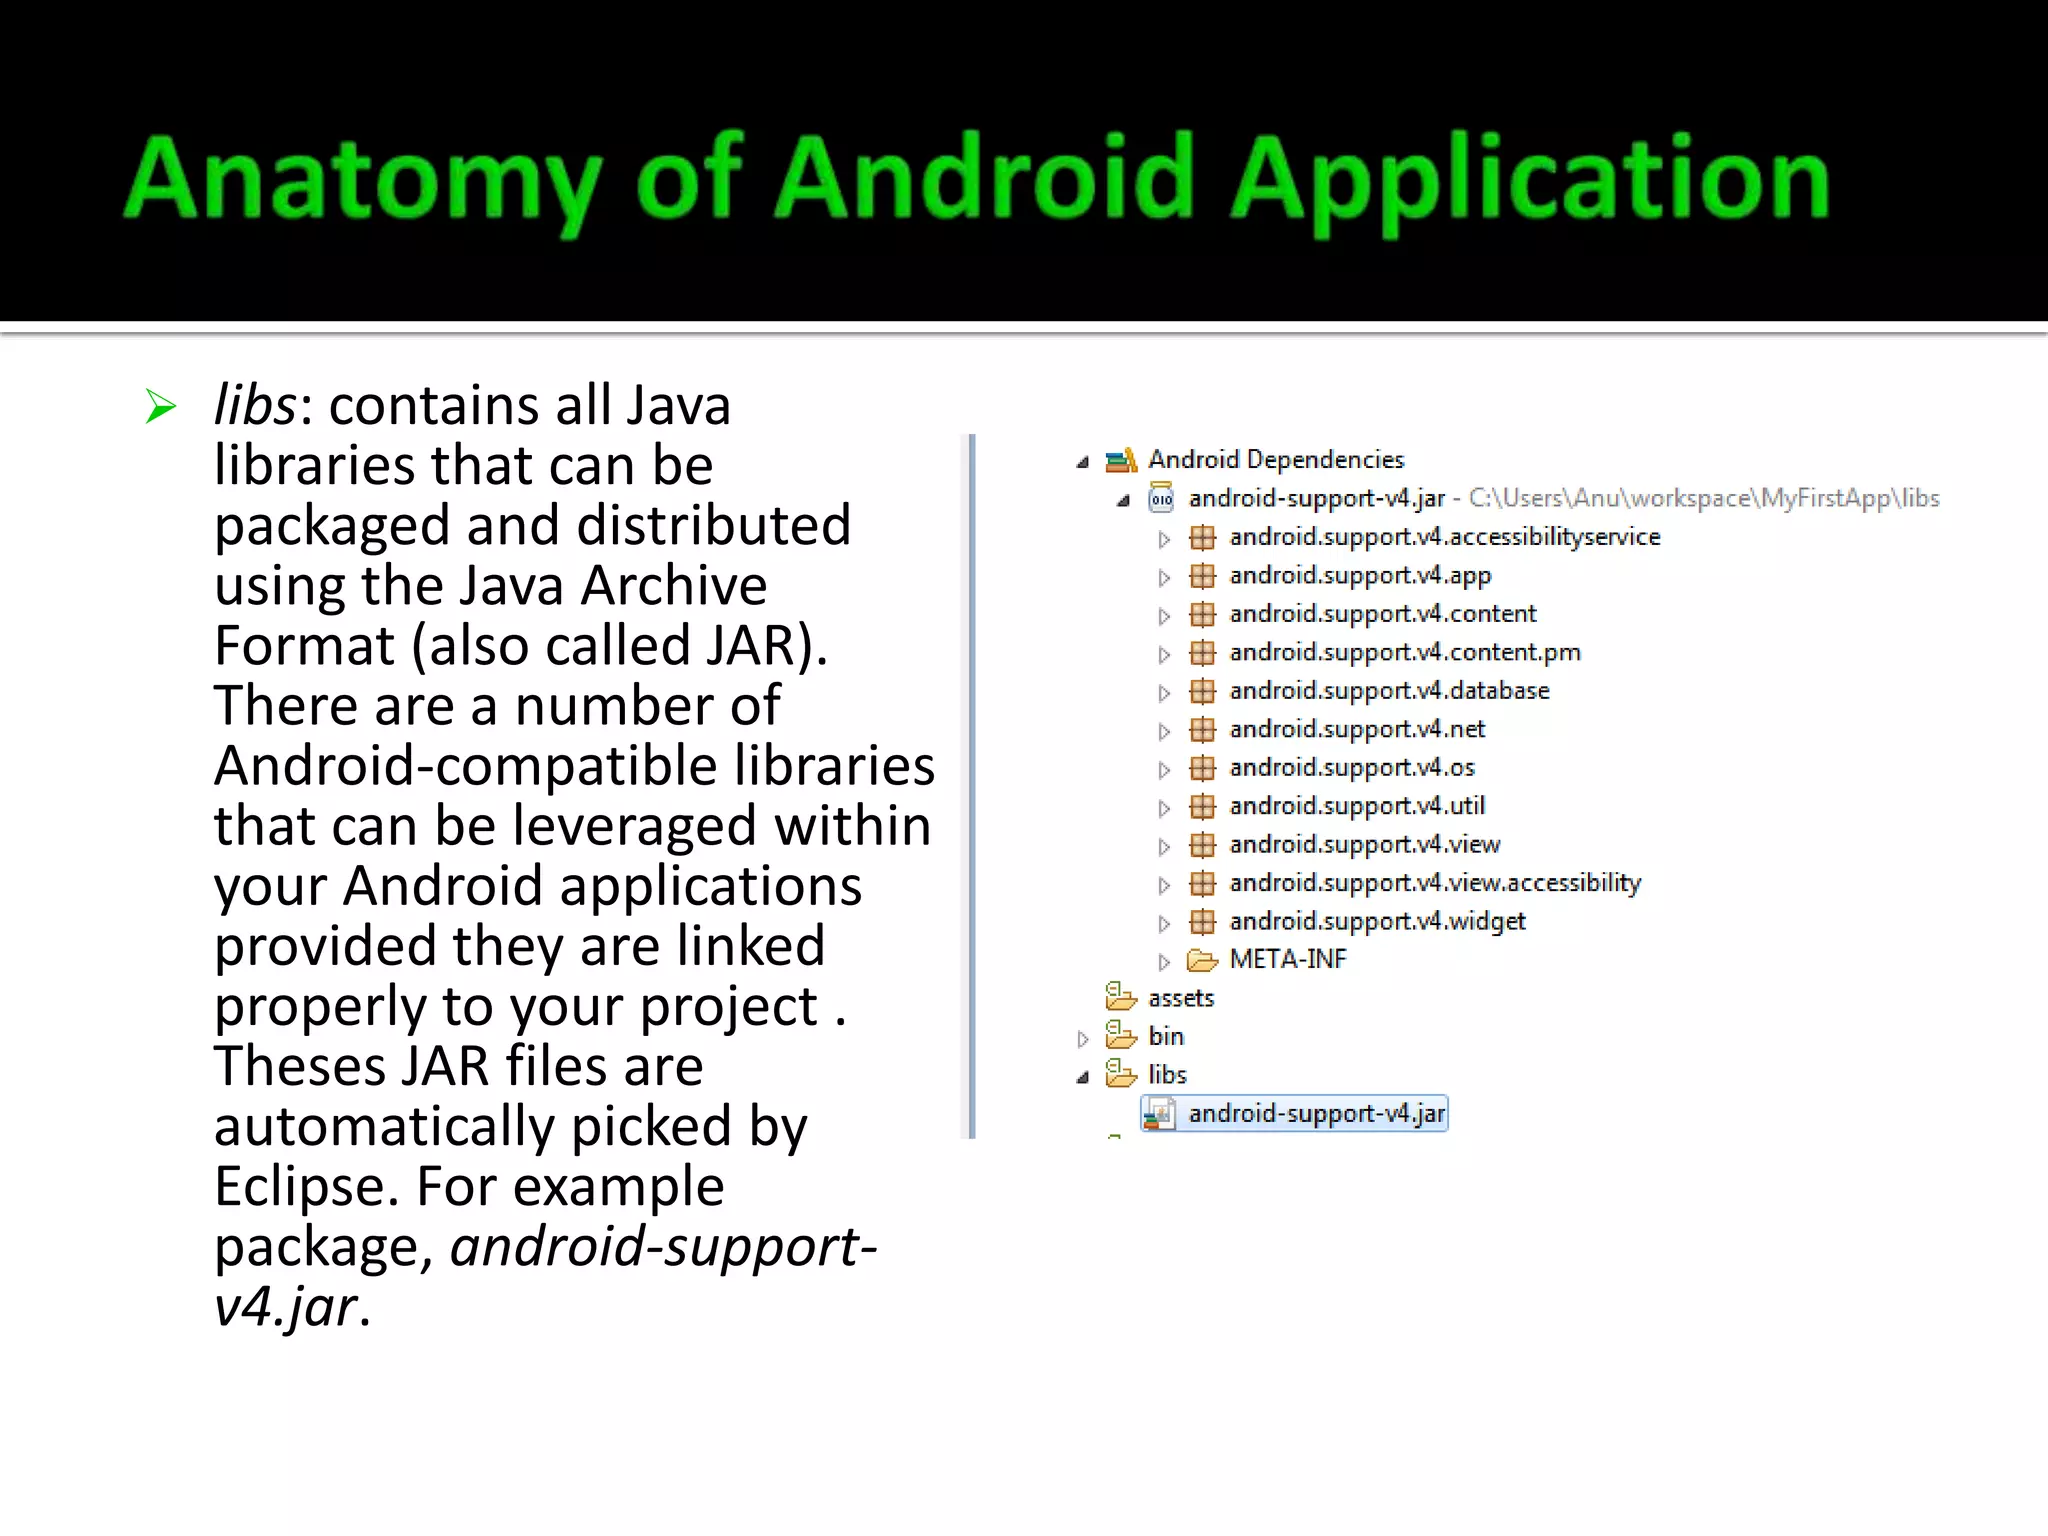
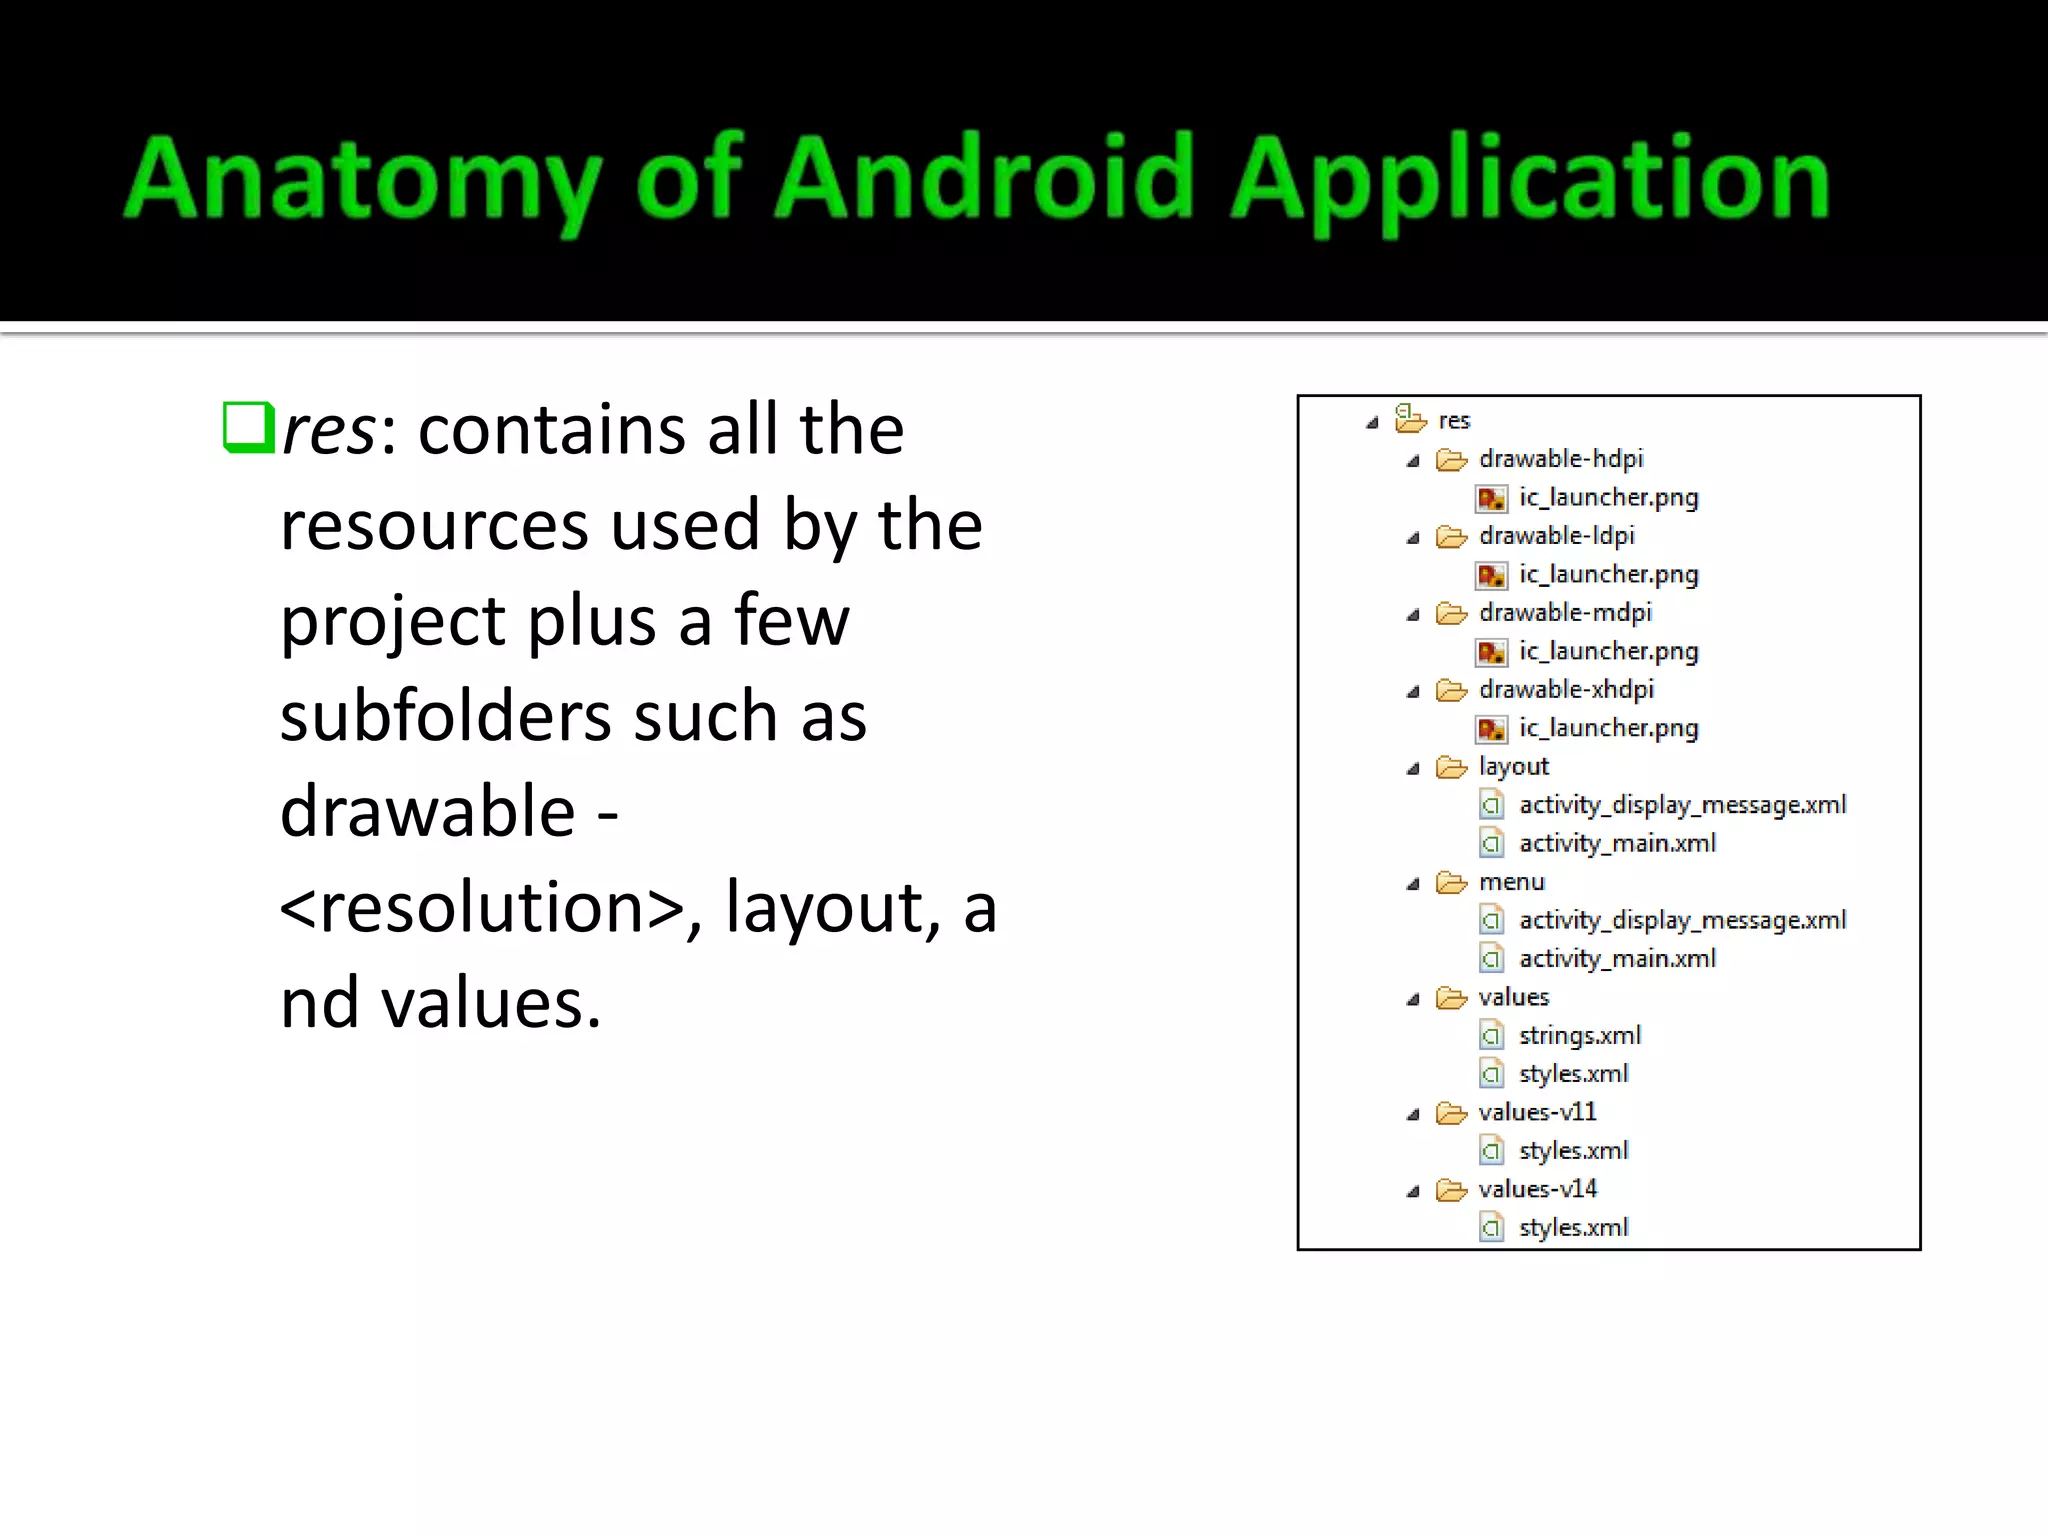
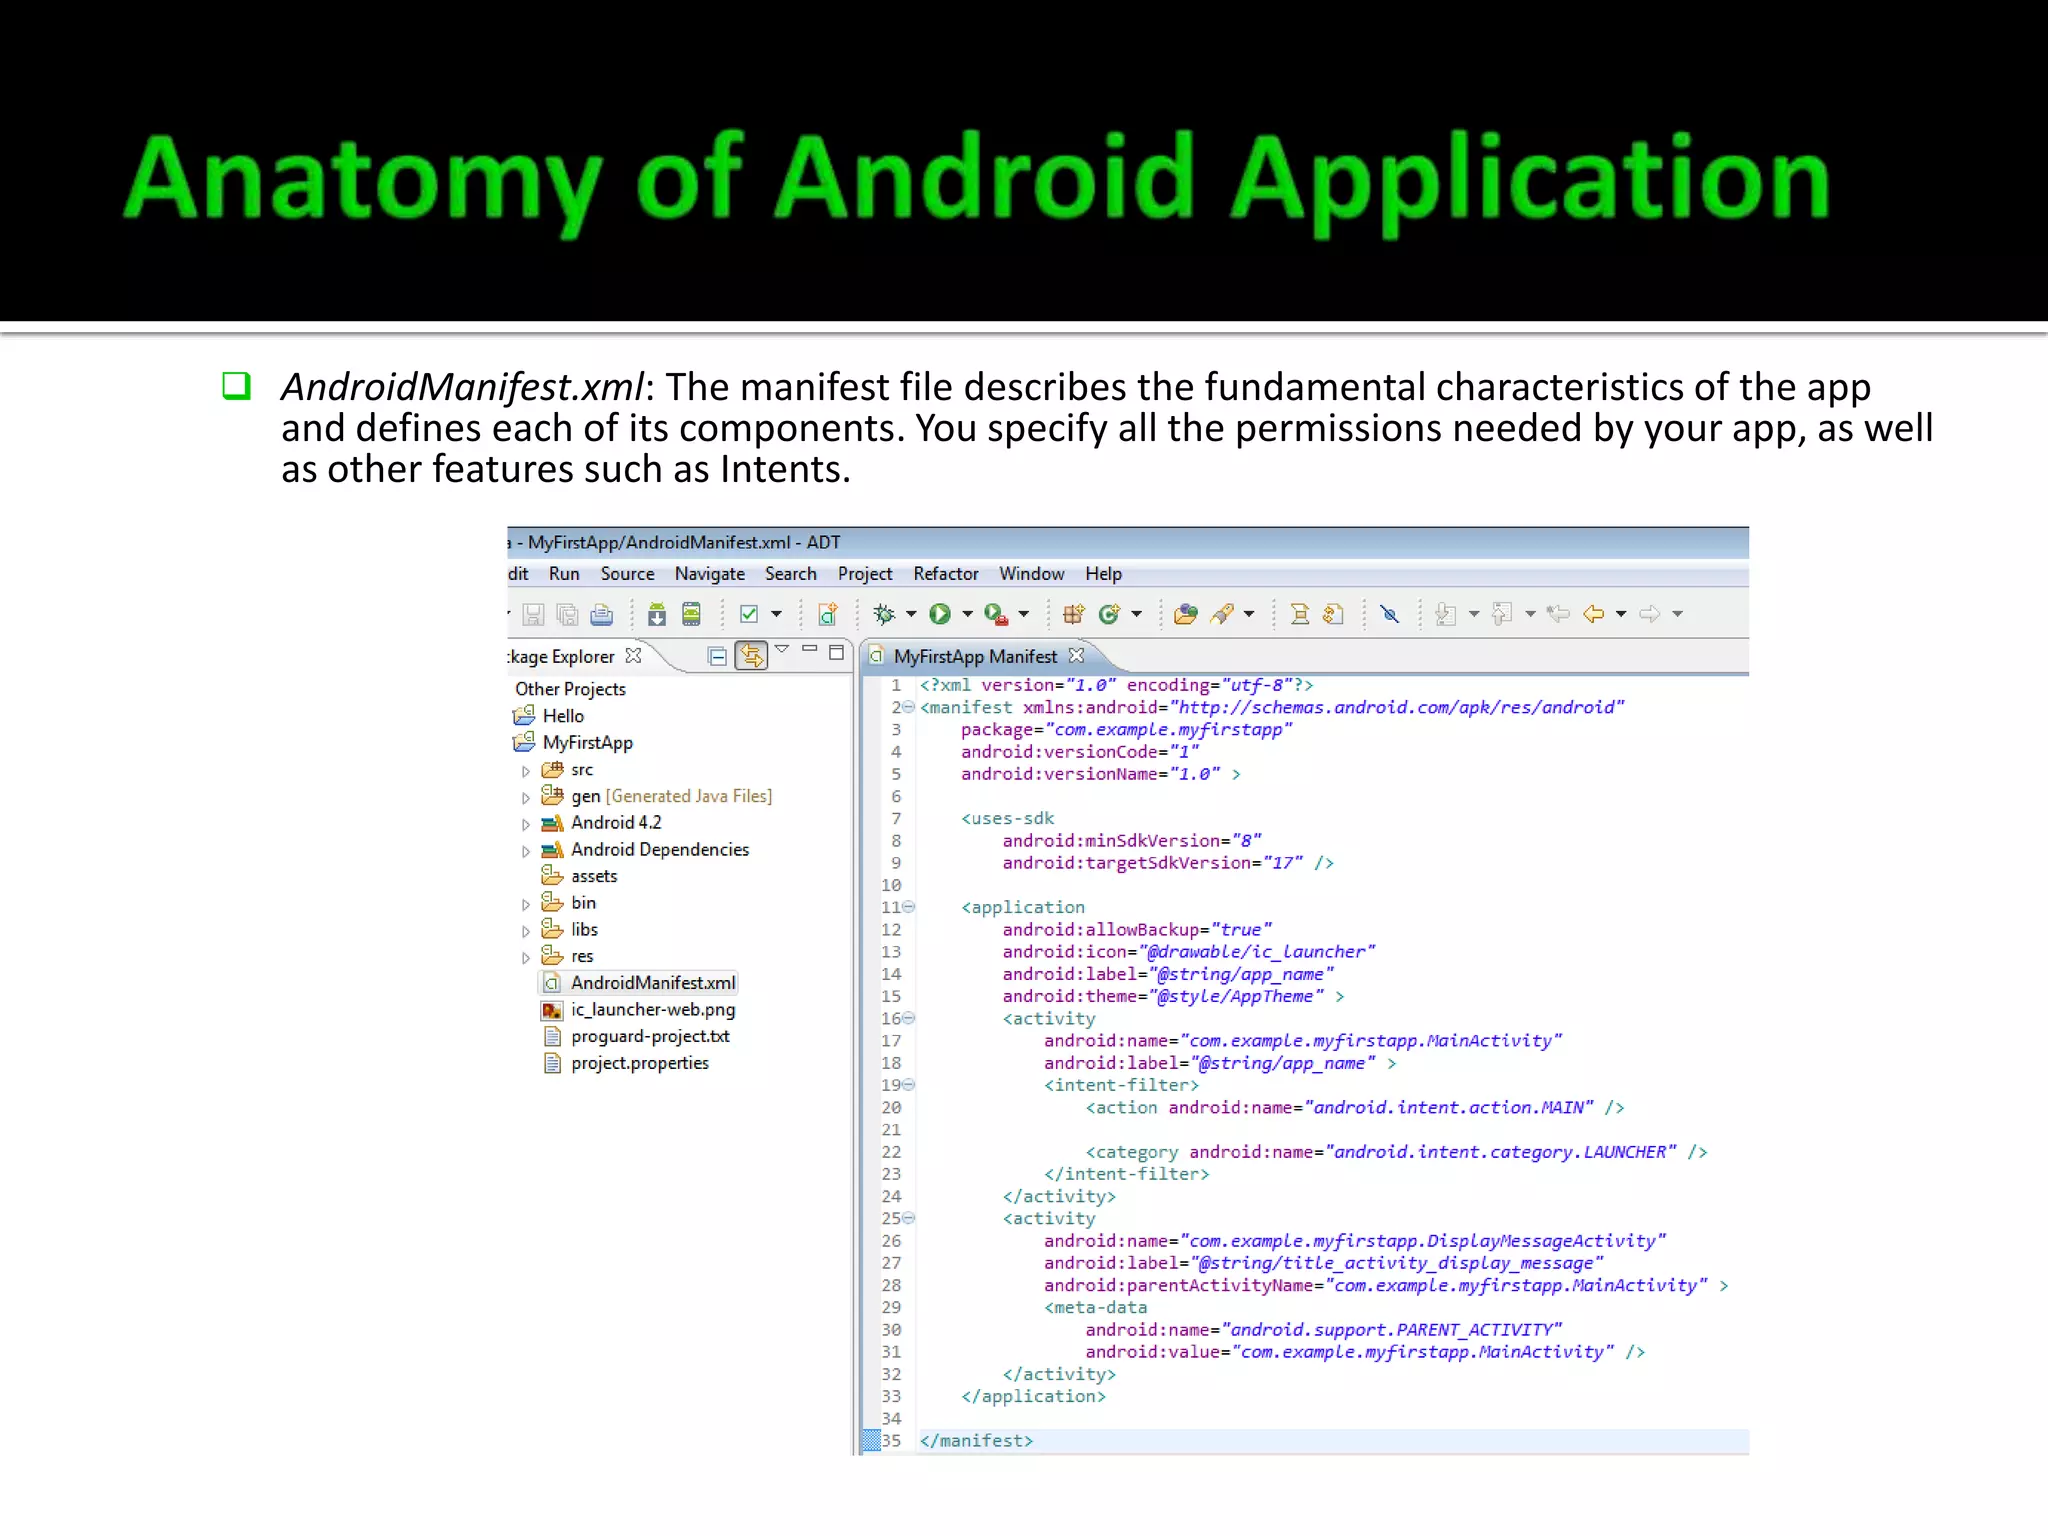
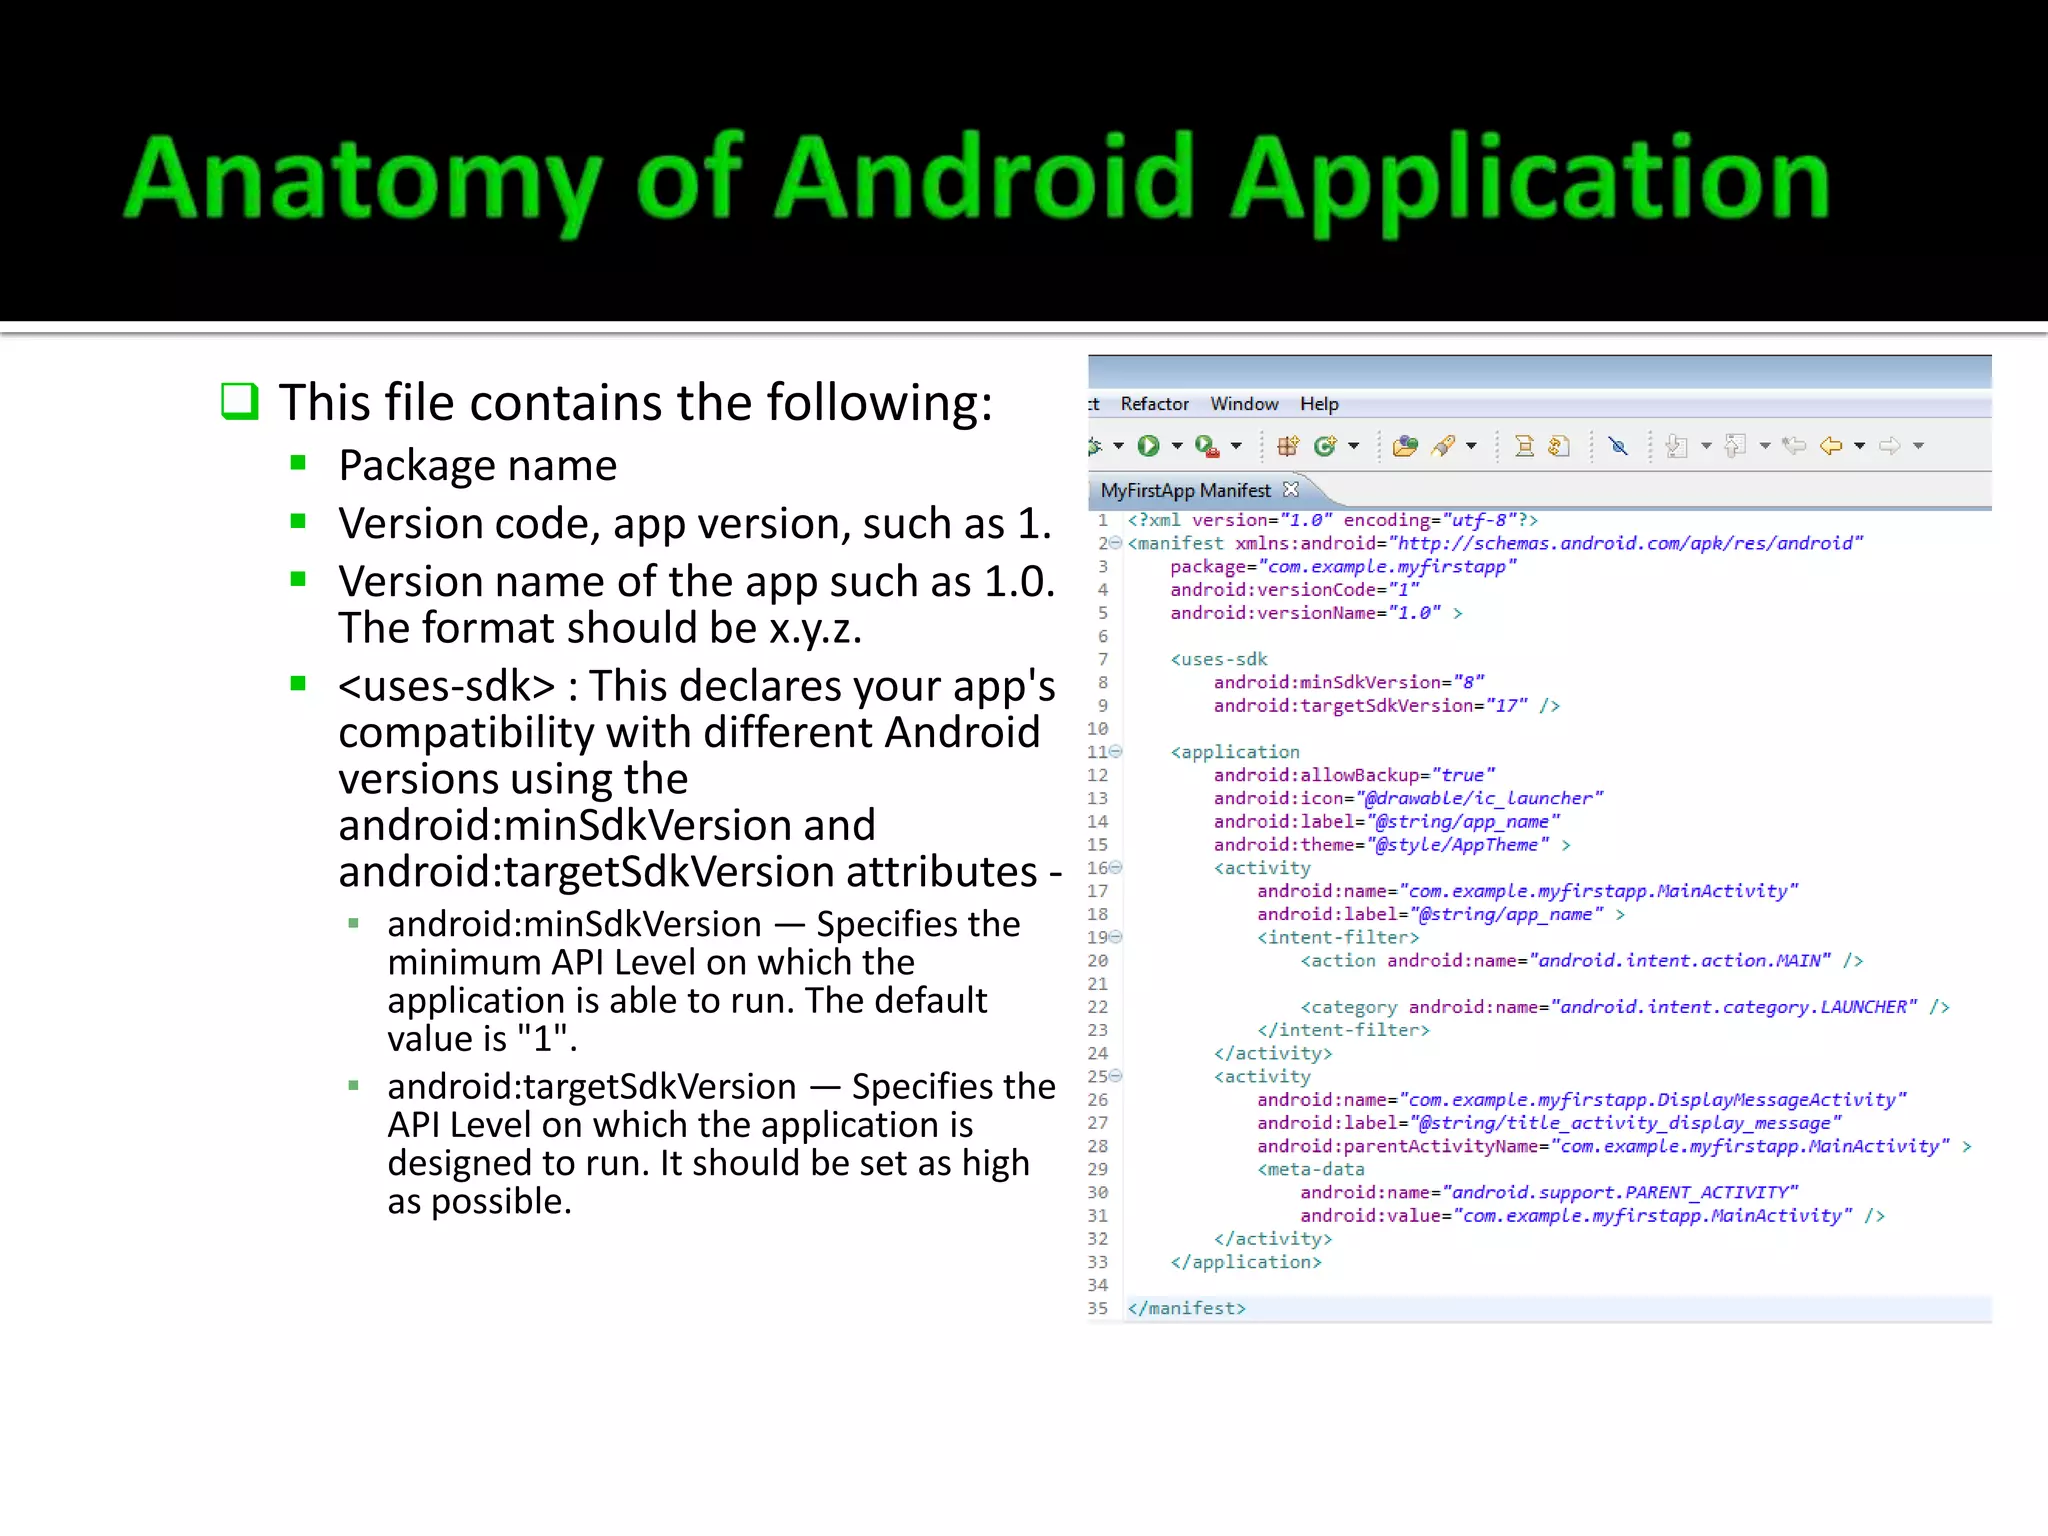
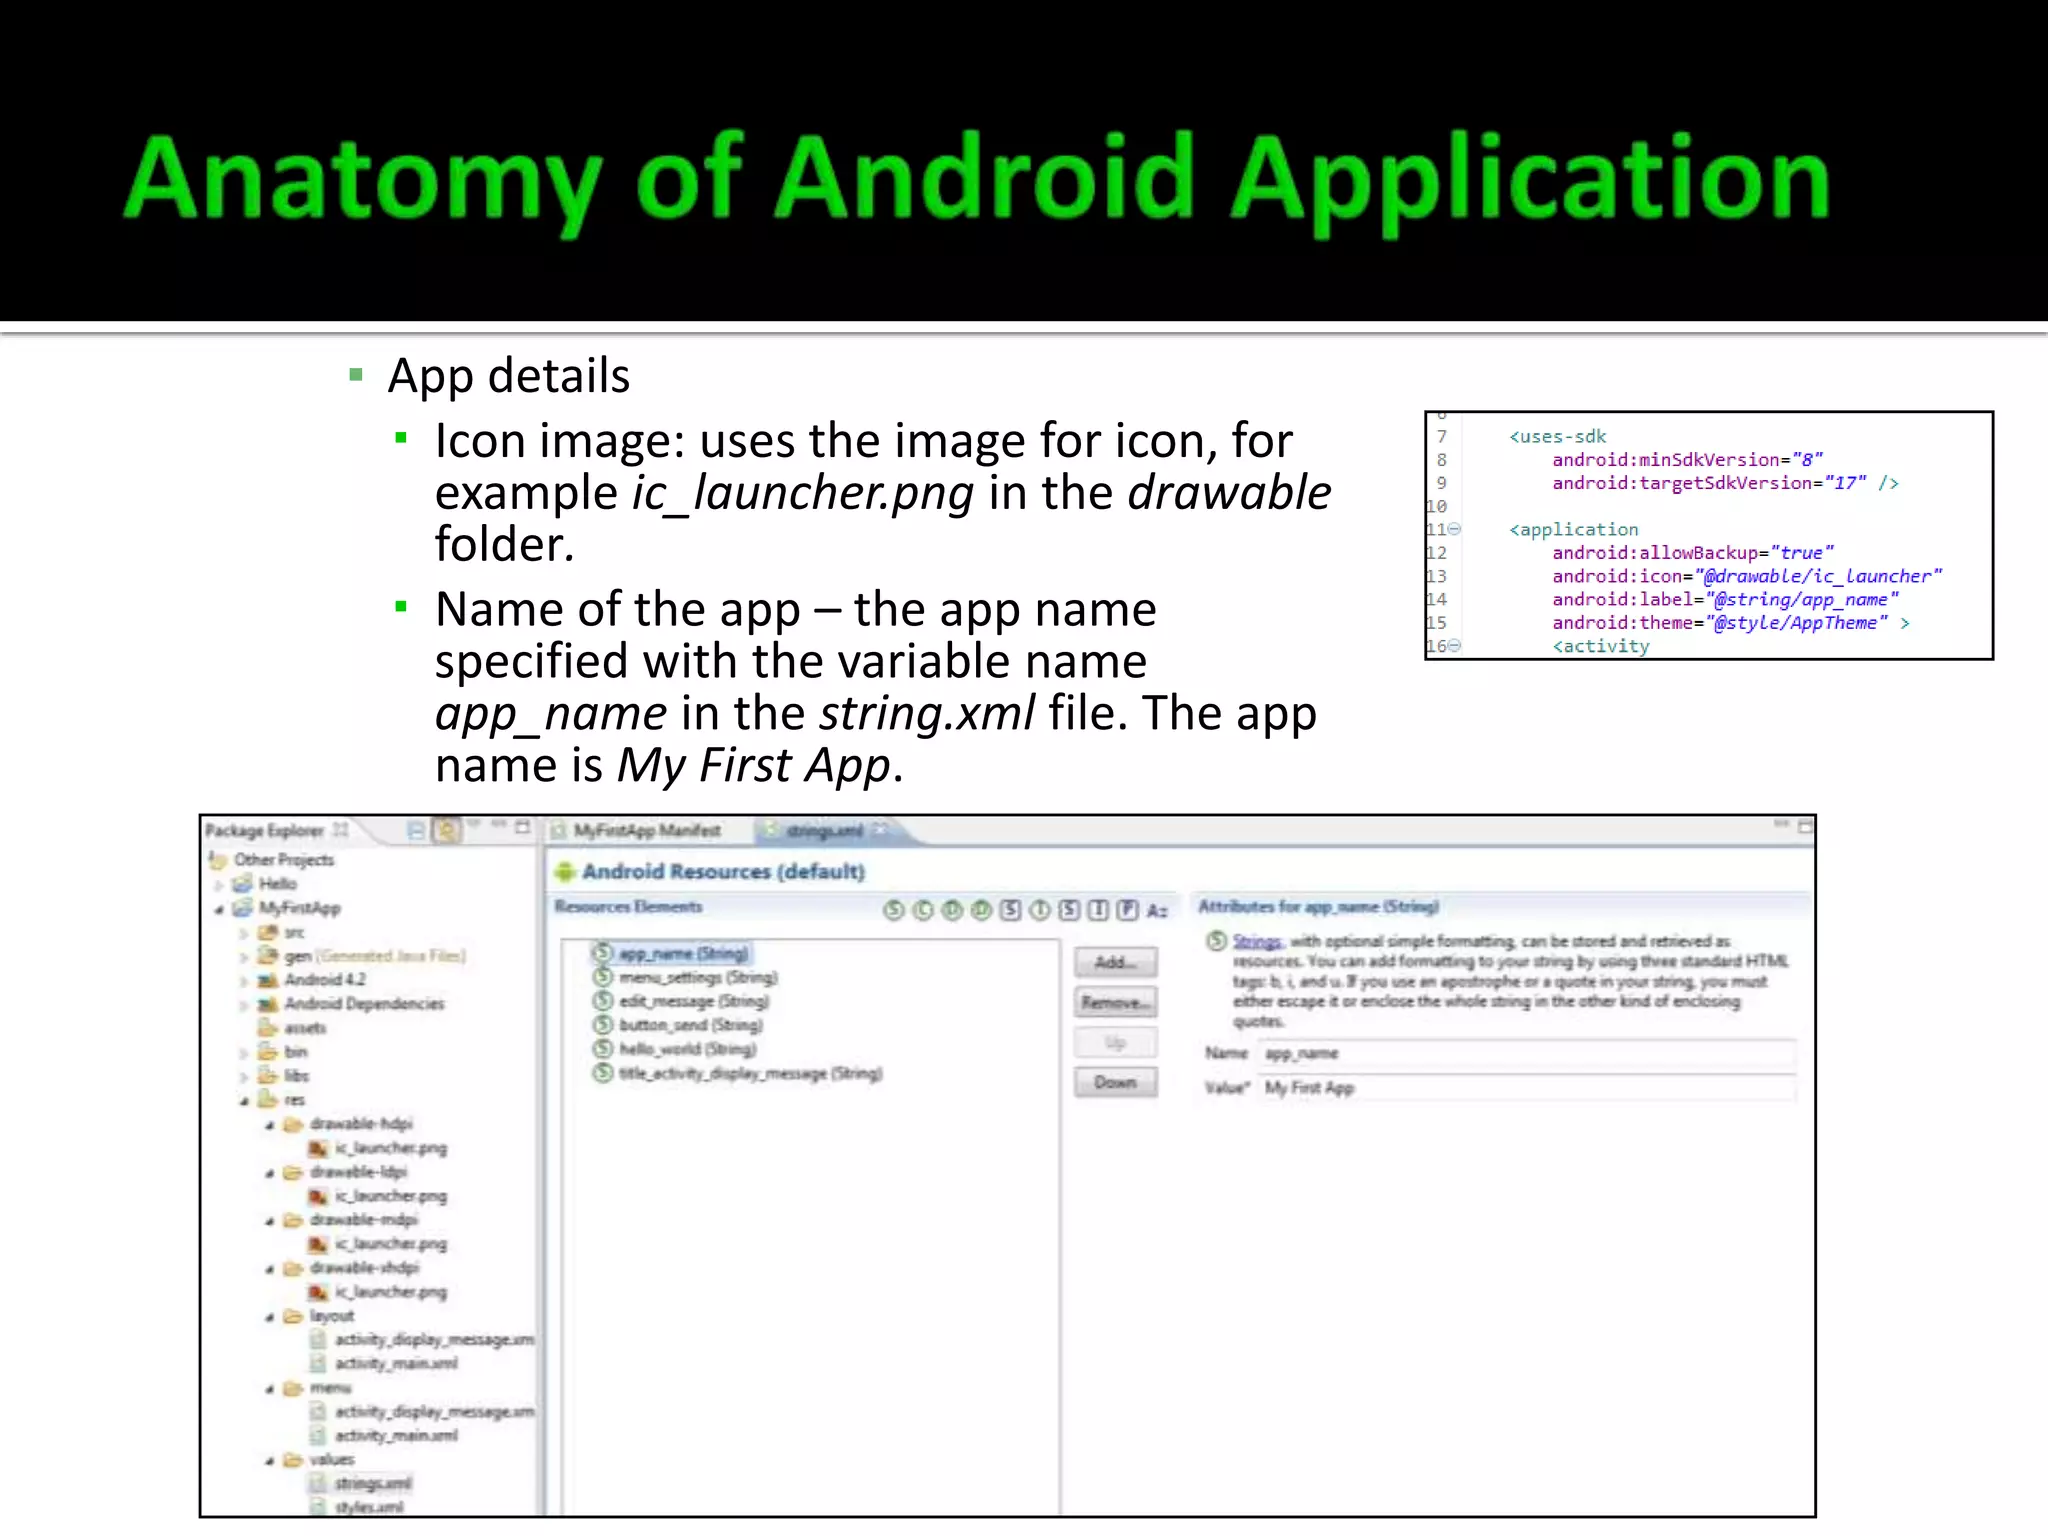
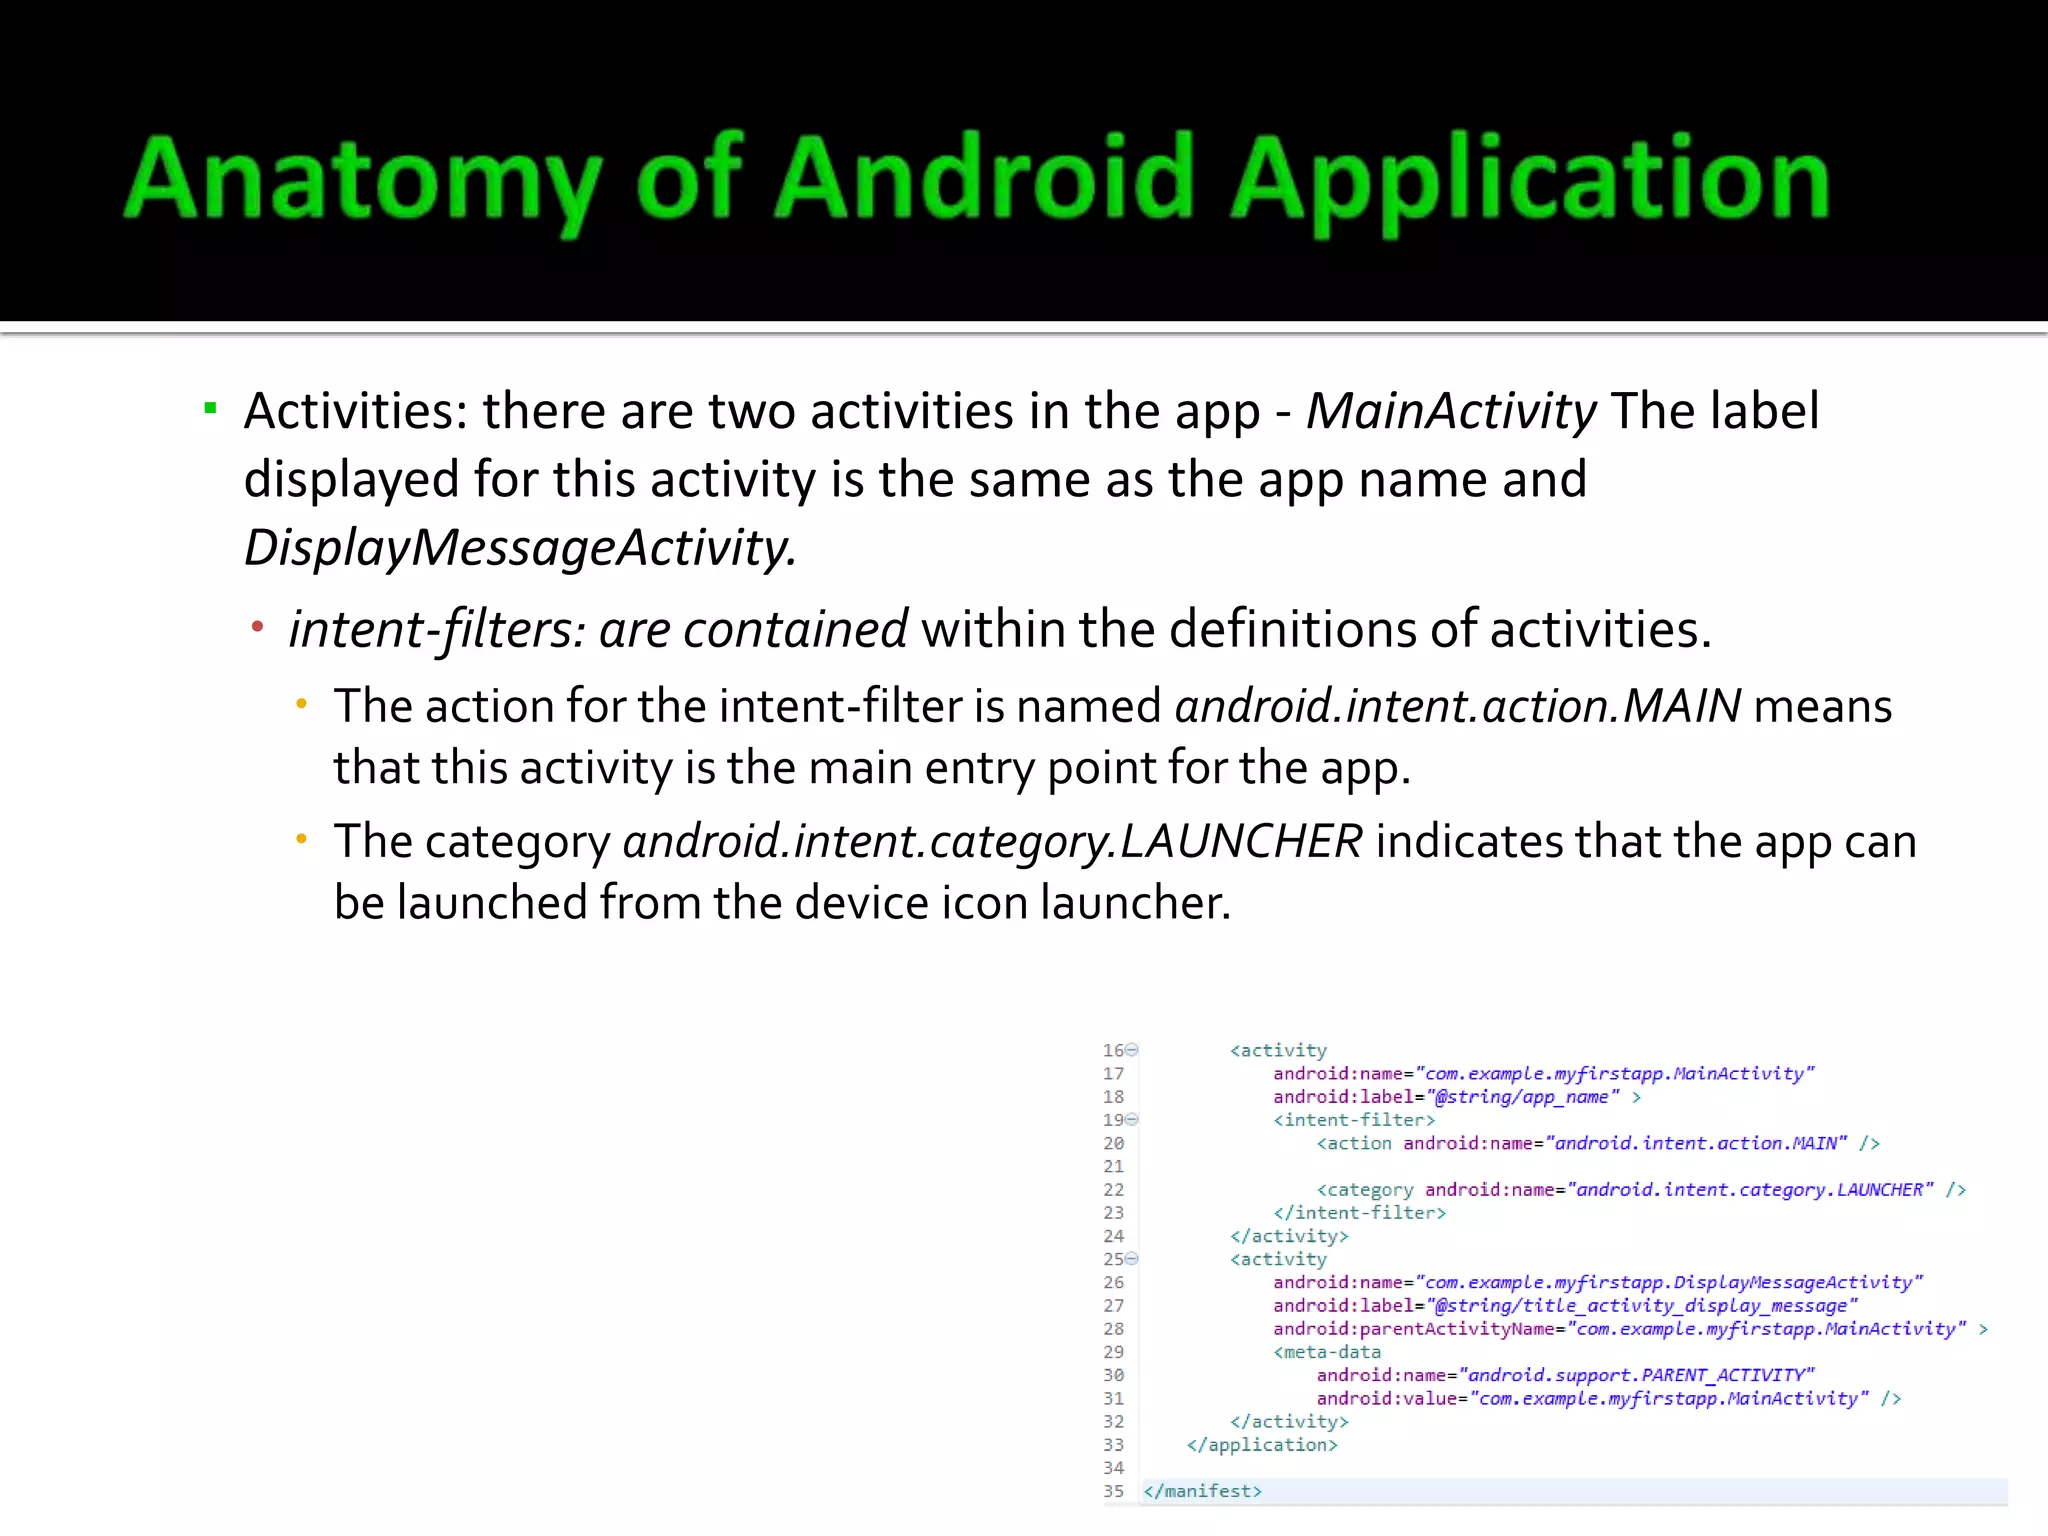
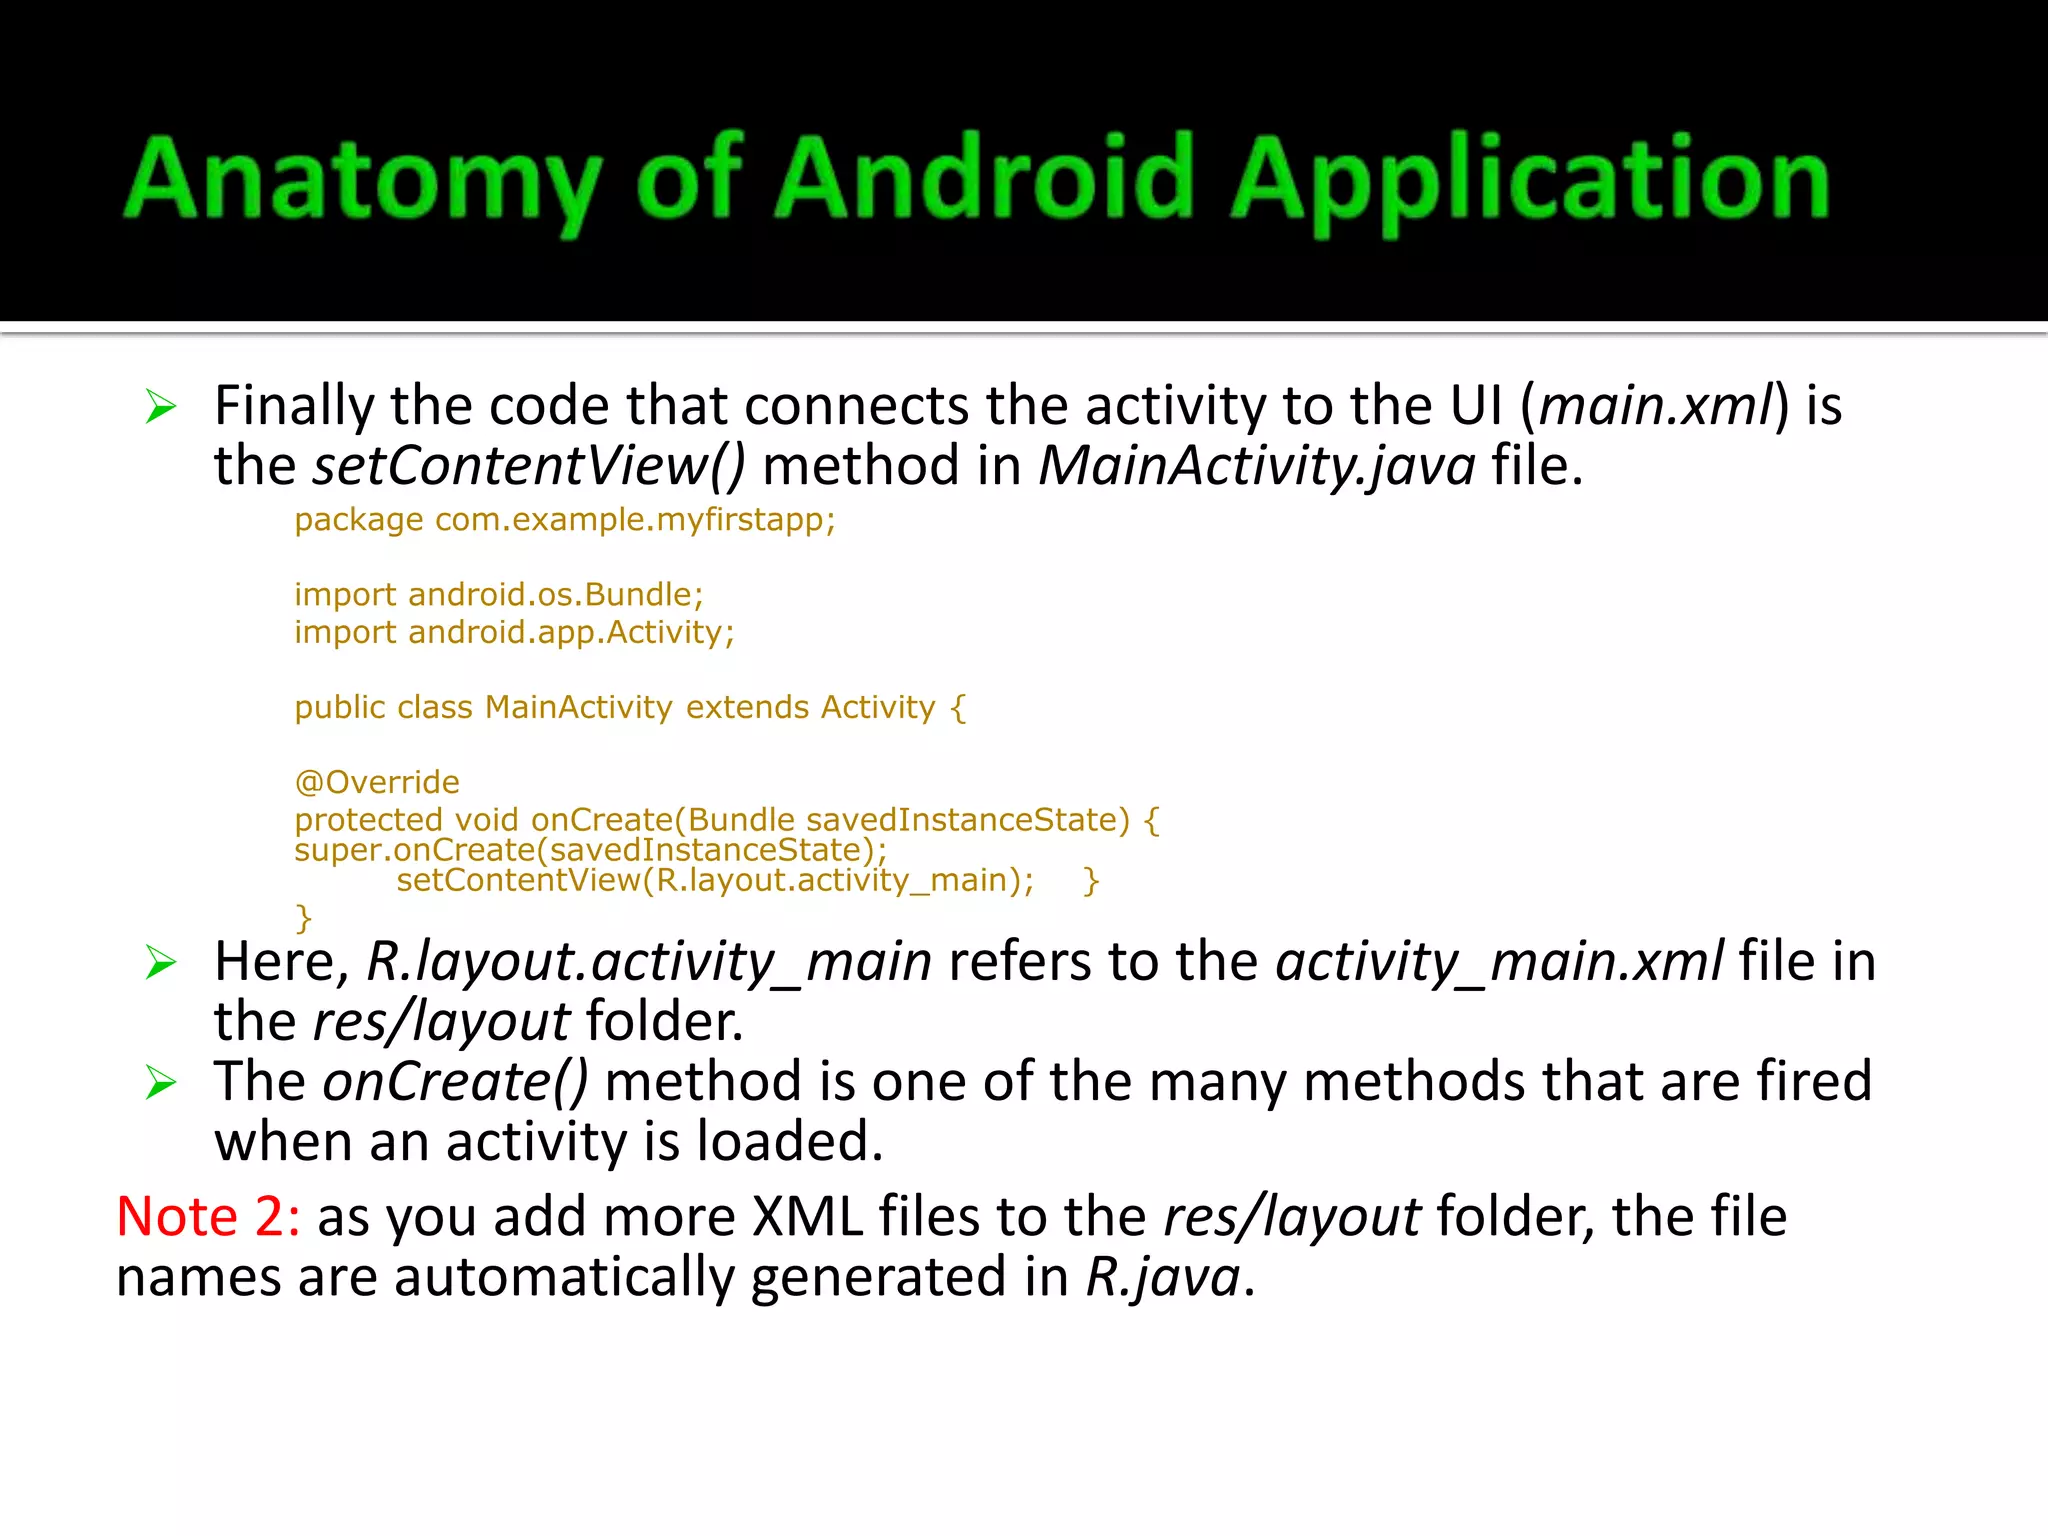
2. Why Android
Introduction – What is Android
Introduction – More about Android
Android Devices
Android versions
Android Architecture
Example 1 – Running “Hello World” on Emulator and device
1.
2.
3.
4.
5.
6.
7.
i.
ii.
iii.
8.
Creating first project “Hello World”
Running “Hello World” on Emulator
Running “Hello World” on real device
Anatomy of Android Application
Note: All the names and examples are for illustration purpose
only and should be replaced according to your environment.
3. The most recent data from IDC shows that for
Q3 of 2013 Android made up 81 percent of
devices shipped with Samsung making 53
percent of the profit for the quarter
Apple’s iOS scraped by with a sad and distant
second place figure of only 12.9 percent with
56 percent of the profit in the mobile device
market
HTC, LG, Motorola, Nokia, and BlackBerry lost
money
4. Apple leads Android in enterprise
adoption, and in retail shopping use by
consumers
The volume of apps available in the Google
Play app store has caught up to Apple, and
Android is winning in app downloads as well.
Google reportedly comprises 75 percent of all
app downloads, compared to only 18 percent
for Apple.
5. Android is a mobile operating system based
on modified version of Linux
Open and free under Apache License
• Developers have access to the source code
• Vendors (Samsung, Motorola, Sony Ericsson) can
add propriety extensions
• Same program runs on different devices running
Android
6. No fixed hardware and software as
manufactures can customise freely
• Storage – uses SQLite for database
• Connectivity – Android provides rich APIs to let
your app connect and interact with other devices
over Bluetooth, NFC, Wi-Fi P2P, USB, and SIP, in
addition to standard network connections.
7. • Web browser – based on open-source WebKit with
Chrome V8 JavaScript engine
• Media – supports
H.264, AAC and HE-AAC (in 3GP or MP4 container)
MP3, MIDI, Ogg Vorbis
Wav - compatible with Windows, Macintosh, and Linux
operating systems
JPEG, PNG, GIF, BMP
8. • Hardware support – Accelerometer
Sensor, Camera, Digital Compass, Proximity
Sensor, and GPS
• Multi-touch – supports multi-touch screens
• Multi-tasking – supports multi-tasking apps
• Tethering – supports Internet connections sharing
such as wired/wireless hotspot
11. Linux Kernel (layer
1): contains all lowlevel device drivers
for Android
hardware
components
Libraries (layer 2):
contains code for
the main features
provided by Android
OS. For example
SQLite library for
database support
and WebKit library
for web browsing
feature
12.
Android runtime (layer 2):
contains core libraries to
enable developers to write
codes in Java. Also includes
Dalvik virtual
machine, designed
specifically for Android and
optimised for battery
powered mobile devices
with limited memory and
CPU. All apps are compiled
into Dalvik exe
Application Framework:
exposes various capabilities
of Android OS to enable
developers to include them
in their apps such as camera
Applications: contains apps
that come with the device
such as
Phone, Contacts, Browser
and all the 3rd party apps
that you install.
13. Launch Eclipse
Click New in the
toolbar.
In the window that
appears, open the
Android folder if it is
not already open
, select Android
Application
Project, and click
Next as shown in
Figure 1.
Figure 1. The New Android App Project wizard in Eclipse.
14.
Fill in the form that appears:
Application Name is the app name
that appears to users. For this
project, use “Hello World."
Project Name is the name of your
project directory and the name
visible in Eclipse.
Package Name is the package
namespace for your app that must
be unique across all packages
installed on the Android system.
Common practice is to use the name
in reverse order - domain name of
your organization first followed by
the project name. For
example, "com.example.helloworld“.
Read the warning.
Read the comment.
Figure 1. The New Android App Project wizard in Eclipse.
15. Minimum Required SDK is the
lowest version of Android that
your app supports, indicated
using the API level. Leave this set
to the default value for this
project.
Target SDK indicates the highest
version of Android (also using
the API level) with which you
have tested with your
application. Setting the build
target to the latest version
allows you to enable new
features and optimize your app
for a great user experience on
the latest devices.
Figure 1. The New Android App Project wizard in Eclipse.
16. Compile With is the
platform version against
which you will compile
your app. By default, this
is set to the latest version
of Android available in
your SDK.
Theme specifies the
Android UI style to apply
for your app. You can
leave this alone.
Click Next.
Figure 1. The New Android App Project wizard in Eclipse.
17. On the next screen to configure the
project, leave the default selections and click
Next.
The next screen can help you create a
launcher icon for your app. Click Next.
Select BlankActivity as your activity template
and click Next.
Leave all the details for the activity in their
default state and click Finish.
18.
19.
20.
21.
22.
23.
24.
An Android Virtual Device (AVD) is a device configuration for the Android
emulator that allows you to model different devices.
Follow the steps below to create an AVD:
Launch the Android Virtual Device Manager – Window Android Virtual
Device Manager .
25. In the Android Virtual Device Manager panel, click
New.
Fill in the details for the AVD. Give it a name, a
platform target, an SD card size, and a skin (HVGA is
default).
Click Ok.
Select the new AVD from the Android Virtual Device
Manager and click Start.
Starting Android Emulator window starts the emulator,
AVD2 in this case.
Close the Starting Android Emulator window after the
emulator shows up.
26.
27.
28.
29.
30.
31.
32. Once the AVD is created, select the Project
name and click Run As… from the toolbar.
37. Plug in your device to your development machine with
a USB cable.
Install the appropriate USB driver for your device.
Enable USB debugging on your device.
On most devices running Android 3.2 or older, you can find
the option under Settings Applications Development.
On Android 4.0 and newer, it's in Settings Developer
options.
On Android 4.2 and newer, Developer options is hidden by
default. To make it available, go to Settings About phone
and tap Build number seven times. Return to the previous
screen to find Developer options.
38. Run the app from
Eclipse:
Right click the project
and select Run As Run
Configurations…
39. Select Launch
on all
compatible
devices/AVD’s
Select Active
devices from the
dropdown
Click Run
40.
All apps are created as projects.
Folders and files that make up an
Android project:
src: contains the .java source files for your
project. For example, MainActivity.java is
the source file of the main activity of the
app. Unlike Java programs that have entry
only through the main method, an
Android activity may have more than 1
entry points. For example, you can call
Camera app from your app resulting an
additional entry point for the Camera app
41. gen: contains config file and
R.java. R.java is a compiler
generated file and contains the
references to all the resources
in project.
Note 1: Don’t modify R.java.
Note 2: as you add more files and
folders to your project, Eclipse
automatically generates the
contents of R.java.
Note 3: if you accidently delete
R.java, Eclipse will regenerate it
for you immediately provided
there are no errors.
42. Android 4.2: contains android.jar, which contains
all the class libraries used for project. For
example, security, opengl, accessibility, animation,
etc.
43. Android Dependencies: contains
JAR files your project depends on
and the assets folder. For
example, the Support Package
includes static "support libraries"
that you can add to your Android
application in order to use APIs
that are either not available for
older platform versions or that
offer "utility" APIs that aren't a
part of the framework APIs. The
goal is to simplify your
development by offering more
APIs that you can bundle with
your application so you can
worry less about platform
versions.
assets: contains all the assets
used by the project such as
HTML, database.
44.
bin: During the build process, your
Android projects are compiled and
packaged into an .apk file, the container
for your application binary. It contains all
of the information necessary to run your
application on a device or emulator, such
as compiled .dex files (.class files
converted to Dalvik byte code), a binary
version of the AndroidManifest.xml
file, compiled resources (resources.arsc)
and uncompiled resource files for your
application. The ADT plugin incrementally
builds your project as you make changes
to the source code. Eclipse outputs an
.apk file automatically to the bin folder of
the project, so you do not have to do
anything extra to generate the .apk.
45.
libs: contains all Java
libraries that can be
packaged and distributed
using the Java Archive
Format (also called JAR).
There are a number of
Android-compatible libraries
that can be leveraged within
your Android applications
provided they are linked
properly to your project .
Theses JAR files are
automatically picked by
Eclipse. For example
package, android-supportv4.jar.
46. res: contains all the
resources used by the
project plus a few
subfolders such as
drawable <resolution>, layout, a
nd values.
47. AndroidManifest.xml: The manifest file describes the fundamental characteristics of the app
and defines each of its components. You specify all the permissions needed by your app, as well
as other features such as Intents.
48. This file contains the following:
Package name
Version code, app version, such as 1.
Version name of the app such as 1.0.
The format should be x.y.z.
<uses-sdk> : This declares your app's
compatibility with different Android
versions using the
android:minSdkVersion and
android:targetSdkVersion attributes ▪ android:minSdkVersion — Specifies the
minimum API Level on which the
application is able to run. The default
value is "1".
▪ android:targetSdkVersion — Specifies the
API Level on which the application is
designed to run. It should be set as high
as possible.
49. ▪ App details
Icon image: uses the image for icon, for
example ic_launcher.png in the drawable
folder.
Name of the app – the app name
specified with the variable name
app_name in the string.xml file. The app
name is My First App.
50. Activities: there are two activities in the app - MainActivity The label
displayed for this activity is the same as the app name and
DisplayMessageActivity.
intent-filters: are contained within the definitions of activities.
The action for the intent-filter is named android.intent.action.MAIN means
that this activity is the main entry point for the app.
The category android.intent.category.LAUNCHER indicates that the app can
be launched from the device icon launcher.
51.
Finally the code that connects the activity to the UI (main.xml) is
the setContentView() method in MainActivity.java file.
package com.example.myfirstapp;
import android.os.Bundle;
import android.app.Activity;
public class MainActivity extends Activity {
@Override
protected void onCreate(Bundle savedInstanceState) {
super.onCreate(savedInstanceState);
setContentView(R.layout.activity_main); }
}
Here, R.layout.activity_main refers to the activity_main.xml file in
the res/layout folder.
The onCreate() method is one of the many methods that are fired
when an activity is loaded.
Note 2: as you add more XML files to the res/layout folder, the file
names are automatically generated in R.java.
API Level is an integer value that uniquely identifies the framework API revision offered by a version of the Android platform.The Android platform provides a framework API that applications can use to interact with the underlying Android system.The framework API consists of:A core set of packages and classesA set of XML elements and attributes for declaring a manifest fileA set of XML elements and attributes for declaring and accessing resourcesA set of IntentsA set of permissions that applications can request, as well as permission enforcements included in the system