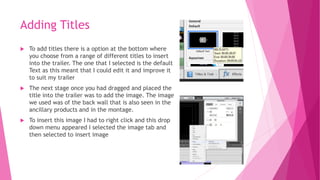
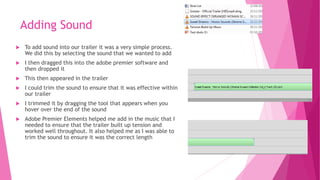
How did I use Adobe
Premier?
By Amy-Jane Wilson
Adding Titles
 To add titles there is a option at the bottom where
you choose from a range of different titles to insert
into the trailer. The one that I selected is the default
Text as this meant that I could edit it and improve it
to suit my trailer
 The next stage once you had dragged and placed the
title into the trailer was to add the image. The image
we used was of the back wall that is also seen in the
ancillary products and in the montage.
 To insert this image I had to right click and this drop
down menu appeared I selected the image tab and
then selected to insert image
 Here is a image of the picture that I inserted into
our titles. This clearly fills up the landscape of the
trailer.
 The text on our title screens I was not able to use
the fonts on the software as they did not suit my
trailers genre so I used font space to find a font
that would go onto my title screens
 I applied the text onto the title screens by saving
it as a image and then applying it onto our trailer
the same way I did the main background image
 Using the select tool I was able to change the size of the font and make it
large enough to see on the trailer
 This shows that this technology helped me add in title screens that were
effective through being able to add in my own images.
Adding Sound
 To add sound into our trailer it was a very simple process.
We did this by selecting the sound that we wanted to add
 I then dragged this into the adobe premier software and
then dropped it
 This then appeared in the trailer
 I could trim the sound to ensure that it was effective within
our trailer
 I trimmed it by dragging the tool that appears when you
hover over the end of the sound
 Adobe Premier Elements helped me add in the music that I
needed to ensure that the trailer built up tension and
worked well throughout. It also helped me as I was able to
trim the sound to ensure it was the correct length

Adobe Premier

  • 1.
    How did Iuse Adobe Premier? By Amy-Jane Wilson
  • 2.
    Adding Titles  Toadd titles there is a option at the bottom where you choose from a range of different titles to insert into the trailer. The one that I selected is the default Text as this meant that I could edit it and improve it to suit my trailer  The next stage once you had dragged and placed the title into the trailer was to add the image. The image we used was of the back wall that is also seen in the ancillary products and in the montage.  To insert this image I had to right click and this drop down menu appeared I selected the image tab and then selected to insert image
  • 3.
     Here isa image of the picture that I inserted into our titles. This clearly fills up the landscape of the trailer.  The text on our title screens I was not able to use the fonts on the software as they did not suit my trailers genre so I used font space to find a font that would go onto my title screens  I applied the text onto the title screens by saving it as a image and then applying it onto our trailer the same way I did the main background image
  • 4.
     Using theselect tool I was able to change the size of the font and make it large enough to see on the trailer  This shows that this technology helped me add in title screens that were effective through being able to add in my own images.
  • 5.
    Adding Sound  Toadd sound into our trailer it was a very simple process. We did this by selecting the sound that we wanted to add  I then dragged this into the adobe premier software and then dropped it  This then appeared in the trailer  I could trim the sound to ensure that it was effective within our trailer  I trimmed it by dragging the tool that appears when you hover over the end of the sound  Adobe Premier Elements helped me add in the music that I needed to ensure that the trailer built up tension and worked well throughout. It also helped me as I was able to trim the sound to ensure it was the correct length