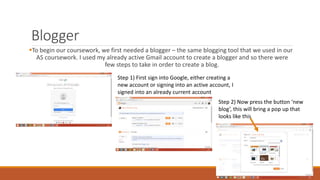
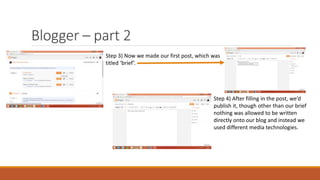
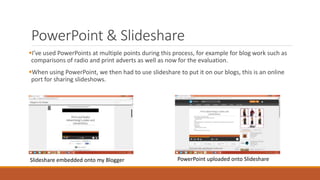
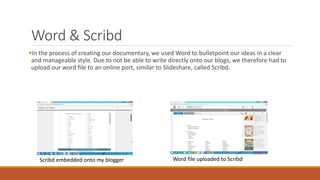
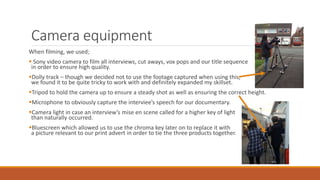
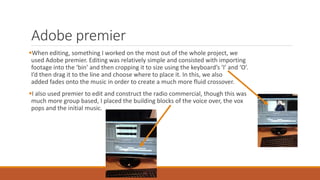
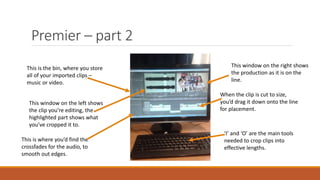
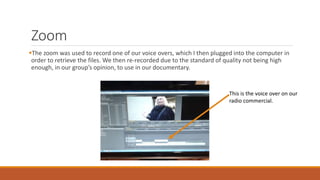
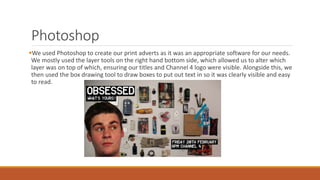
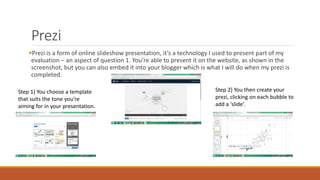
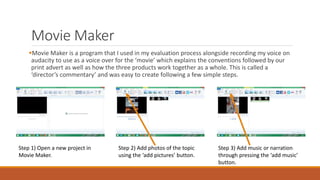
Megan Matthews used various new media technologies at different stages of her coursework. She used Blogger to create an online blog, uploading documents like PowerPoint presentations to Slideshare and Word documents to Scribd. When filming, she used a Sony video camera, microphone, tripod, and other equipment. For editing, she used Adobe Premier and Audacity. Photoshop was used to create print ads. A Prezi online presentation and Movie Maker were also utilized.
A Critique of the Proposed National Education Policy Reform
Question 4 - powerpoint
1. Q4 – How did you use new
media technologies in the
construction and research,
planning and evaluation stages?
BY Megan Matthews.
2. Blogger
To begin our coursework, we first needed a blogger – the same blogging tool that we used in our
AS coursework. I used my already active Gmail account to create a blogger and so there were
few steps to take in order to create a blog.
Step 1) First sign into Google, either creating a
new account or signing into an active account, I
signed into an already current account
Step 2) Now press the button ‘new
blog’, this will bring a pop up that
looks like this
3. Blogger – part 2
Step 3) Now we made our first post, which was
titled ‘brief’.
Step 4) After filling in the post, we’d
publish it, though other than our brief
nothing was allowed to be written
directly onto our blog and instead we
used different media technologies.
4. PowerPoint & Slideshare
I’ve used PowerPoints at multiple points during this process, for example for blog work such as
comparisons of radio and print adverts as well as now for the evaluation.
When using PowerPoint, we then had to use slideshare to put it on our blogs, this is an online
port for sharing slideshows.
Slideshare embedded onto my Blogger PowerPoint uploaded onto Slideshare
5. Word & Scribd
In the process of creating our documentary, we used Word to bulletpoint our ideas in a clear
and manageable style. Due to not be able to write directly onto our blogs, we therefore had to
upload our word file to an online port, similar to Slideshare, called Scribd.
Scribd embedded onto my blogger Word file uploaded to Scribd
6. Camera equipment
When filming, we used;
Sony video camera to film all interviews, cut aways, vox pops and our title sequence
in order to ensure high quality.
Dolly track – though we decided not to use the footage captured when using this,
we found it to be quite tricky to work with and definitely expanded my skillset.
Tripod to hold the camera up to ensure a steady shot as well as ensuring the correct height.
Microphone to obviously capture the interviee’s speech for our documentary.
Camera light in case an interview’s mise en scene called for a higher key of light
than naturally occurred.
Bluescreen which allowed us to use the chroma key later on to replace it with
a picture relevant to our print advert in order to tie the three products together.
7. Adobe premier
When editing, something I worked on the most out of the whole project, we
used Adobe premier. Editing was relatively simple and consisted with importing
footage into the ‘bin’ and then cropping it to size using the keyboard’s ‘I’ and ‘O’.
I’d then drag it to the line and choose where to place it. In this, we also
added fades onto the music in order to create a much more fluid crossover.
I also used premier to edit and construct the radio commercial, though this was
much more group based, I placed the building blocks of the voice over, the vox
pops and the initial music.
8. Premier – part 2
This is the bin, where you store
all of your imported clips –
music or video.
‘I’ and ‘O’ are the main tools
needed to crop clips into
effective lengths.
This window on the right shows
the production as it is on the
line.
When the clip is cut to size,
you’d drag it down onto the line
for placement.
This window on the left shows
the clip you’re editing, the
highlighted part shows what
you’ve cropped it to.
This is where you’d find the
crossfades for the audio, to
smooth out edges.
9. Zoom
The zoom was used to record one of our voice overs, which I then plugged into the computer in
order to retrieve the files. We then re-recorded due to the standard of quality not being high
enough, in our group’s opinion, to use in our documentary.
This is the voice over on our
radio commercial.
10. Audacity
I used this to record my voice over for my director’s commentary, so I first wrote a script using
traditional styling of spacing each sentence apart, on word, and then I recorded it. I later
imported it into movie maker to create my director’s commentary.
11. Photoshop
We used Photoshop to create our print adverts as it was an appropriate software for our needs.
We mostly used the layer tools on the right hand bottom side, which allowed us to alter which
layer was on top of which, ensuring our titles and Channel 4 logo were visible. Alongside this, we
then used the box drawing tool to draw boxes to put out text in so it was clearly visible and easy
to read.
12. Prezi
Prezi is a form of online slideshow presentation, it’s a technology I used to present part of my
evaluation – an aspect of question 1. You’re able to present it on the website, as shown in the
screenshot, but you can also embed it into your blogger which is what I will do when my prezi is
completed.
Step 1) You choose a template
that suits the tone you’re
aiming for in your presentation.
Step 2) You then create your
prezi, clicking on each bubble to
add a ‘slide’.
13. Movie Maker
Movie Maker is a program that I used in my evaluation process alongside recording my voice on
audacity to use as a voice over for the ‘movie’ which explains the conventions followed by our
print advert as well as how the three products work together as a whole. This is called a
‘director’s commentary’ and was easy to create following a few simple steps.
Step 1) Open a new project in
Movie Maker.
Step 2) Add photos of the topic
using the ‘add pictures’ button.
Step 3) Add music or narration
through pressing the ‘add music’
button.