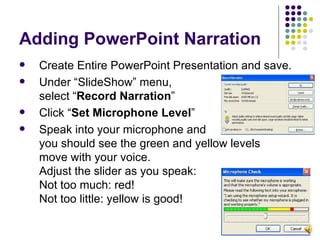
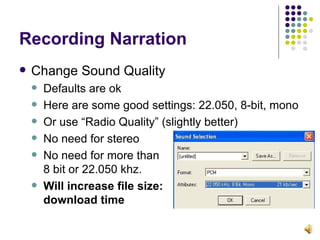
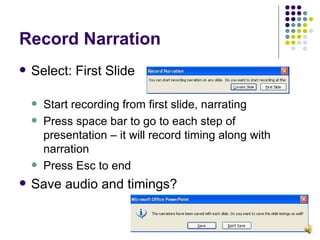
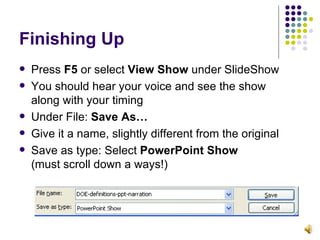
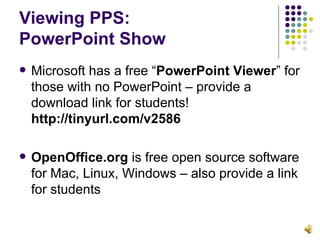
PowerPoint: Text Only?? Text only can work in the classroom – because the instructor “presents” Online – it needs narration! Most PowerPoint presentations that may be used to present in the classroom are devoid of meaning in asynchronous online uses. Adding narration is easy! Section 508 laws governing “accessibility”: How material can be presented for access to all students Audio + text = more accessible!
Adding PowerPoint Narration Create Entire PowerPoint Presentation and save. Under “SlideShow” menu,  select “ Record Narration ” Click “ Set Microphone Level ”  Speak into your microphone and  you should see the green and yellow levels  move with your voice. Adjust the slider as you speak:  Not too much: red! Not too little: yellow is good!
Recording Narration Change Sound Quality Defaults are ok Here are some good settings: 22.050, 8-bit, mono Or use “Radio Quality” (slightly better) No need for stereo No need for more than 8 bit or 22.050 khz. Will increase file size:  download time
Record Narration Select: First Slide  Start recording from first slide, narrating Press space bar to go to each step of presentation – it will record timing along with narration Press Esc to end Save audio and timings?
Finishing Up Press  F5  or select  View Show  under SlideShow You should hear your voice and see the show  along with your timing Under File:  Save As… Give it a name, slightly different from the original Save as type: Select  PowerPoint Show   (must scroll down a ways!)
Viewing PPS:  PowerPoint Show Microsoft has a free “ PowerPoint Viewer ” for those with no PowerPoint – provide a download link for students! http://tinyurl.com/v2586 OpenOffice.org  is free open source software for Mac, Linux, Windows – also provide a link for students
Distributing Upload the .pps (PowerPoint Show) file to WebCT, your personal web space, a wiki, a blog, or even email it to students (watch the file size!) Other ideas: Have STUDENTS add audio to your presentation for a portfolio project Students “remix” and rework presentations for their own purposes and projects – adding images, narration, charts Students create presentations with audio to share and compare, or even to generate content for your online course: best one gets used next year!
The End Thanks for viewing! Need more help? Search PPT help for “narration”   Need an assignment to put this to use? Follow all steps and record audio narration for 1 presentation, saving and uploading it to your course.  Use WebCT Quizzes/Surveys tool to create a 5 question self-check (for students to check understanding) and a 5 question survey (to get feedback from students on working with the PPS slideshow.) In your self-check, use a few different types of answers, not just true/false or multiple choice.

Adding Audio Narration to PowerPoint

  • 1.
    PowerPoint: Text Only??Text only can work in the classroom – because the instructor “presents” Online – it needs narration! Most PowerPoint presentations that may be used to present in the classroom are devoid of meaning in asynchronous online uses. Adding narration is easy! Section 508 laws governing “accessibility”: How material can be presented for access to all students Audio + text = more accessible!
  • 2.
    Adding PowerPoint NarrationCreate Entire PowerPoint Presentation and save. Under “SlideShow” menu, select “ Record Narration ” Click “ Set Microphone Level ” Speak into your microphone and you should see the green and yellow levels move with your voice. Adjust the slider as you speak: Not too much: red! Not too little: yellow is good!
  • 3.
    Recording Narration ChangeSound Quality Defaults are ok Here are some good settings: 22.050, 8-bit, mono Or use “Radio Quality” (slightly better) No need for stereo No need for more than 8 bit or 22.050 khz. Will increase file size: download time
  • 4.
    Record Narration Select:First Slide Start recording from first slide, narrating Press space bar to go to each step of presentation – it will record timing along with narration Press Esc to end Save audio and timings?
  • 5.
    Finishing Up Press F5 or select View Show under SlideShow You should hear your voice and see the show along with your timing Under File: Save As… Give it a name, slightly different from the original Save as type: Select PowerPoint Show (must scroll down a ways!)
  • 6.
    Viewing PPS: PowerPoint Show Microsoft has a free “ PowerPoint Viewer ” for those with no PowerPoint – provide a download link for students! http://tinyurl.com/v2586 OpenOffice.org is free open source software for Mac, Linux, Windows – also provide a link for students
  • 7.
    Distributing Upload the.pps (PowerPoint Show) file to WebCT, your personal web space, a wiki, a blog, or even email it to students (watch the file size!) Other ideas: Have STUDENTS add audio to your presentation for a portfolio project Students “remix” and rework presentations for their own purposes and projects – adding images, narration, charts Students create presentations with audio to share and compare, or even to generate content for your online course: best one gets used next year!
  • 8.
    The End Thanksfor viewing! Need more help? Search PPT help for “narration” Need an assignment to put this to use? Follow all steps and record audio narration for 1 presentation, saving and uploading it to your course. Use WebCT Quizzes/Surveys tool to create a 5 question self-check (for students to check understanding) and a 5 question survey (to get feedback from students on working with the PPS slideshow.) In your self-check, use a few different types of answers, not just true/false or multiple choice.