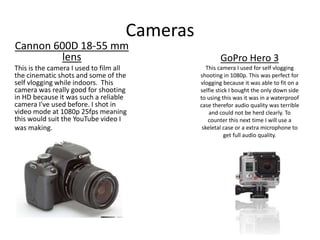
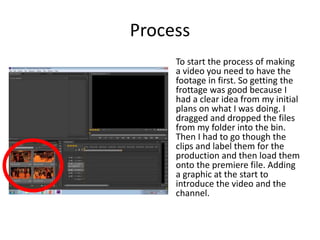
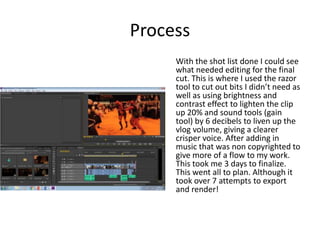
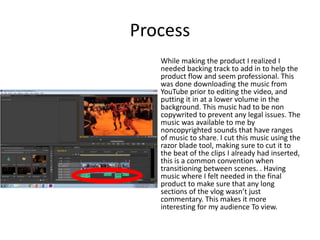
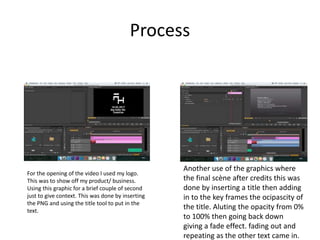
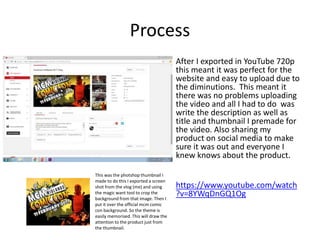
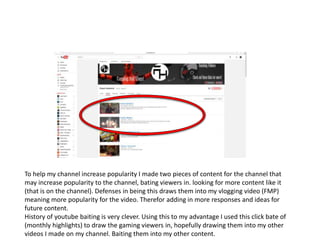
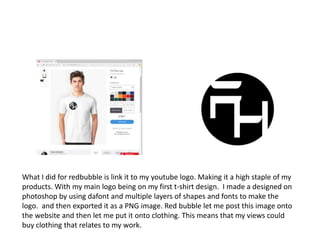
Production Reflection
Fraser Hardwick
Cameras
Cannon 600D 18-55 mm
lens
This is the camera I used to film all
the cinematic shots and some of the
self vlogging while indoors. This
camera was really good for shooting
in HD because it was such a reliable
camera I've used before. I shot in
video mode at 1080p 25fps meaning
this would suit the YouTube video I
was making.
GoPro Hero 3
This camera I used for self vlogging
shooting in 1080p. This was perfect for
vlogging because it was able to fit on a
selfie stick I bought the only down side
to using this was it was in a waterproof
case therefor audio quality was terrible
and could not be herd clearly. To
counter this next time I will use a
skeletal case or a extra microphone to
get full audio quality.
Process
To start the process of making
a video you need to have the
footage in first. So getting the
frottage was good because I
had a clear idea from my initial
plans on what I was doing. I
dragged and dropped the files
from my folder into the bin.
Then I had to go though the
clips and label them for the
production and then load them
onto the premiere file. Adding
a graphic at the start to
introduce the video and the
channel.
Process
After getting all the clips in I had to
arrange them in sequence this meant
watch though the whole thing and
rearrange the clips into the labels I
gave them. This took a whole day to
do that put me behind with the
production. This was done by
dragging them out of the bin area and
into the sequence slide. As well as if I
used most of the slips they where not
edited or cut. So a lot of unwanted
content was in the vlog. Therefor
while going though making notes on
what to use and not. I used no
transactions throughout the whole
sequence because I thought cuts
would be better for vlogging with
short action cuts. Therefor not
drawing away interest. These are the
conventions for raw vlogging.
Process
This list help me choose
my shots and helped me
see the timeframe of my
vlog before the editing
began. This meant that I
had a good overview on
how and what I should
edit as well as how many
shots I didn’t use. I also
numbered them in what
order they should go in
to save time in
production.
Process
With the shot list done I could see
what needed editing for the final
cut. This is where I used the razor
tool to cut out bits I didn’t need as
well as using brightness and
contrast effect to lighten the clip
up 20% and sound tools (gain
tool) by 6 decibels to liven up the
vlog volume, giving a clearer
crisper voice. After adding in
music that was non copyrighted to
give more of a flow to my work.
This took me 3 days to finalize.
This went all to plan. Although it
took over 7 attempts to export
and render!
Process
While making the product I realized I
needed backing track to add in to help the
product flow and seem professional. This
was done downloading the music from
YouTube prior to editing the video, and
putting it in at a lower volume in the
background. This music had to be non
copywrited to prevent any legal issues. The
music was available to me by
noncopyrighted sounds that have ranges
of music to share. I cut this music using the
razor blade tool, making sure to cut it to
the beat of the clips I already had inserted,
this is a common convention when
transitioning between scenes. . Having
music where I felt needed in the final
product to make sure that any long
sections of the vlog wasn’t just
commentary. This makes it more
interesting for my audience To view.
Process
For the opening of the video I used my logo.
This was to show off my product/ business.
Using this graphic for a brief couple of second
just to give context. This was done by inserting
the PNG and using the title tool to put in the
text.
Another use of the graphics where
the final scène after credits this was
done by inserting a title then adding
in to the key frames the ocipascity of
the title. Aluting the opacity from 0%
to 100% then going back down
giving a fade effect. fading out and
repeating as the other text came in.
Process
After I exported in YouTube 720p
this meant it was perfect for the
website and easy to upload due to
the diminutions. This meant it
there was no problems uploading
the video and all I had to do was
write the description as well as
title and thumbnail I premade for
the video. Also sharing my
product on social media to make
sure it was out and everyone I
knew knows about the product.
https://www.youtube.com/watch
?v=8YWqDnGQ1Og
This was the photshop thumbnail I
made to do this I exported a screen
shot from the vlog (me) and using
the magic want tool to crop the
background from that image. Then I
put it over the official mcm comic
con background. So the theme is
easily memorised. This will draw the
attention to the product just from
the thumbnail.
To help my channel increase popularity I made two pieces of content for the channel that
may increase popularity to the channel, bating viewers in. looking for more content like it
(that is on the channel). Defenses in being this draws them into my vlogging video (FMP)
meaning more popularity for the video. Therefor adding in more responses and ideas for
future content.
History of youtube baiting is very clever. Using this to my advantage I used this click bate of
(monthly highlights) to draw the gaming viewers in, hopefully drawing them into my other
videos I made on my channel. Baiting them into my other content.
What I did for redbubble is link it to my youtube logo. Making it a high staple of my
products. With my main logo being on my first t-shirt design. I made a designed on
photoshop by using dafont and multiple layers of shapes and fonts to make the
logo. and then exported it as a PNG image. Red bubble let me post this image onto
the website and then let me put it onto clothing. This means that my views could
buy clothing that relates to my work.

6. fmp production reflection

  • 1.
  • 2.
    Cameras Cannon 600D 18-55mm lens This is the camera I used to film all the cinematic shots and some of the self vlogging while indoors. This camera was really good for shooting in HD because it was such a reliable camera I've used before. I shot in video mode at 1080p 25fps meaning this would suit the YouTube video I was making. GoPro Hero 3 This camera I used for self vlogging shooting in 1080p. This was perfect for vlogging because it was able to fit on a selfie stick I bought the only down side to using this was it was in a waterproof case therefor audio quality was terrible and could not be herd clearly. To counter this next time I will use a skeletal case or a extra microphone to get full audio quality.
  • 3.
    Process To start theprocess of making a video you need to have the footage in first. So getting the frottage was good because I had a clear idea from my initial plans on what I was doing. I dragged and dropped the files from my folder into the bin. Then I had to go though the clips and label them for the production and then load them onto the premiere file. Adding a graphic at the start to introduce the video and the channel.
  • 4.
    Process After getting allthe clips in I had to arrange them in sequence this meant watch though the whole thing and rearrange the clips into the labels I gave them. This took a whole day to do that put me behind with the production. This was done by dragging them out of the bin area and into the sequence slide. As well as if I used most of the slips they where not edited or cut. So a lot of unwanted content was in the vlog. Therefor while going though making notes on what to use and not. I used no transactions throughout the whole sequence because I thought cuts would be better for vlogging with short action cuts. Therefor not drawing away interest. These are the conventions for raw vlogging.
  • 5.
    Process This list helpme choose my shots and helped me see the timeframe of my vlog before the editing began. This meant that I had a good overview on how and what I should edit as well as how many shots I didn’t use. I also numbered them in what order they should go in to save time in production.
  • 6.
    Process With the shotlist done I could see what needed editing for the final cut. This is where I used the razor tool to cut out bits I didn’t need as well as using brightness and contrast effect to lighten the clip up 20% and sound tools (gain tool) by 6 decibels to liven up the vlog volume, giving a clearer crisper voice. After adding in music that was non copyrighted to give more of a flow to my work. This took me 3 days to finalize. This went all to plan. Although it took over 7 attempts to export and render!
  • 7.
    Process While making theproduct I realized I needed backing track to add in to help the product flow and seem professional. This was done downloading the music from YouTube prior to editing the video, and putting it in at a lower volume in the background. This music had to be non copywrited to prevent any legal issues. The music was available to me by noncopyrighted sounds that have ranges of music to share. I cut this music using the razor blade tool, making sure to cut it to the beat of the clips I already had inserted, this is a common convention when transitioning between scenes. . Having music where I felt needed in the final product to make sure that any long sections of the vlog wasn’t just commentary. This makes it more interesting for my audience To view.
  • 8.
    Process For the openingof the video I used my logo. This was to show off my product/ business. Using this graphic for a brief couple of second just to give context. This was done by inserting the PNG and using the title tool to put in the text. Another use of the graphics where the final scène after credits this was done by inserting a title then adding in to the key frames the ocipascity of the title. Aluting the opacity from 0% to 100% then going back down giving a fade effect. fading out and repeating as the other text came in.
  • 9.
    Process After I exportedin YouTube 720p this meant it was perfect for the website and easy to upload due to the diminutions. This meant it there was no problems uploading the video and all I had to do was write the description as well as title and thumbnail I premade for the video. Also sharing my product on social media to make sure it was out and everyone I knew knows about the product. https://www.youtube.com/watch ?v=8YWqDnGQ1Og This was the photshop thumbnail I made to do this I exported a screen shot from the vlog (me) and using the magic want tool to crop the background from that image. Then I put it over the official mcm comic con background. So the theme is easily memorised. This will draw the attention to the product just from the thumbnail.
  • 10.
    To help mychannel increase popularity I made two pieces of content for the channel that may increase popularity to the channel, bating viewers in. looking for more content like it (that is on the channel). Defenses in being this draws them into my vlogging video (FMP) meaning more popularity for the video. Therefor adding in more responses and ideas for future content. History of youtube baiting is very clever. Using this to my advantage I used this click bate of (monthly highlights) to draw the gaming viewers in, hopefully drawing them into my other videos I made on my channel. Baiting them into my other content.
  • 11.
    What I didfor redbubble is link it to my youtube logo. Making it a high staple of my products. With my main logo being on my first t-shirt design. I made a designed on photoshop by using dafont and multiple layers of shapes and fonts to make the logo. and then exported it as a PNG image. Red bubble let me post this image onto the website and then let me put it onto clothing. This means that my views could buy clothing that relates to my work.

Editor's Notes

  • #4 Discuss the tools and processes used in your production. Log your thoughts and feelings about your work.
  • #5 Discuss the tools and processes used in your production. Log your thoughts and feelings about your work.
  • #6 Discuss the tools and processes used in your production. Log your thoughts and feelings about your work.
  • #7 Discuss the tools and processes used in your production. Log your thoughts and feelings about your work.
  • #10 Discuss the tools and processes used in your production. Log your thoughts and feelings about your work.