

Recommended
More Related Content
What's hot
What's hot (20)
Similar to FAA Risk Management
Similar to FAA Risk Management (20)
More from Mohamed Tayfour
More from Mohamed Tayfour (20)
Recently uploaded
Recently uploaded (20)
FAA Risk Management
- 1. 8-1 Introduction When introducing system safety to instructor pilots, the discussion invariably turns to the loss of traditional stick and rudder skills. The fear is that emphasis on items such as risk management, aeronautical decision-making (ADM), single-pilot resource management (SRM), and situational awareness detracts from the training that is so necessary in developing safe pilots. Also, because the Federal Aviation Administration’s (FAA) current practical test standards (PTS) place so much emphasis on stick-and-rudder performance, there is concern that a shifting focus would leave flight students unprepared for that all-too-important check ride. Risk Management Training Chapter 8
- 2. 8-2 System Safety Flight Training Instructors must understand that system safety flight training occurs in three phases. First, there are the traditional stick- and-rudder maneuvers. In order to apply the critical thinking skills that are to follow, pilots must first have a high degree of confidence in their ability to fly the aircraft. Next, the tenets of system safety are introduced into the training environment. In the manner outlined previously, students begin to learn how best to identify hazards, fully recognize all the risks with that hazard and manage or mitigate those risks, and use all available resources to make each flight as safe as possible. This can be accomplished through scenarios that emphasize the skill sets being taught. In the third phase, the student is introduced to more complex scenarios demanding focus on several safety-of-flight issues. A traditional stick-and-rudder maneuver, such as a short- field landing, can be used to illustrate how ADM and risk management can be incorporated into instruction. In phase I, the initial focus is on developing the stick-and-rudder skills required to execute this operation safely. These include power and airspeed management, aircraft configuration, placement in the pattern, wind correction, determining the proper aim point and sight picture, etc. By emphasizing these points through repetition and practice, a student will eventually acquire the skills needed to execute a short-field landing. Phase II introduces the many factors that come into play when performing a short-field landing, which include runway conditions, no-flap landings, airport obstructions, and rejected landings. The introduction of such items does not need to increase training times. In fact, all of the hazards or considerations referenced in the short-field landing lesson plan may be discussed in detail during the ground portion of the instructional program. For example, if training has been conducted at an airport which enjoys an obstruction free 6,000-foot runway, consider the implications of operating the same aircraft out of a 1,800 foot strip with an obstruction off the departure end. Add to that additional considerations, such as operating the aircraft at close to its maximum gross weight under conditions of high density altitude. Now, a single training scenario has several layers of complexity. The ensuing discussion proves a valuable training exercise, and it comes with little additional ground training and no added flight training. Finally, phase III takes the previously discussed hazards, risks, and considerations and incorporates them into a complex scenario. This forces a student to consider not only a specific lesson item (in this case, short-field landings), but also requires that it be viewed in the greater context of the overall flight. For example, on a cross-country flight, the student is presented with a realistic distraction, perhaps the illness of a passenger. This forces a diversion to an alternate for which the student has not planned. The new destination airport has two runways, the longest of which is closed due to construction. The remaining runway is short, but while less-than-ideal, should prove suitable for landing. However, upon entering the pattern, the student finds the electrically driven flaps will not extend. The student must now consider whether to press on and attempt the landing or proceed to a secondary alternate. If he or she decides to go forward and attempt the landing, this will prove an excellent time to test the requisite stick- and-rudder skills. If the student decides to proceed to a second alternate, this opens new training opportunities. Proceeding further tests cross-country skills, such as navigation, communication, management of a passenger in distress, as well as the other tasks associated with simply flying the aircraft. The outlined methodology simply takes a series of seemingly unrelated tasks and scripts them into a training exercise requiring both mechanical and cognitive skills for successful completion. In addition, system safety may be applied to important safety lessons with less quantifiable performance standards. For example, controlled flight into terrain (CFIT) is an issue of concern to all pilots. In general aviation (GA), CFIT normally results from a combination of factors including weather, unfamiliar environment, nonstandard procedures, breakdown or loss of communications, loss of situational awareness, lack of perception of hazards, and lack of sound risk management techniques. Collectively, these conditions are difficult to replicate in most flight training environments. However, the subject may still be covered effectively during ground school and cross-country flight operations by using system safety methodology. Because CFIT is always the final “link” in the accident chain, it must be taught within the context of other flight operations; operations that increase the likelihood of a CFIT accident. This not only helps illustrate how easily these accidents can occur, it also highlights the conditions under which such accidents most often take place.
- 3. 8-3 Visual Flight Rules VFR (green sky symbol) Marginal Visual Flight Rules MVFR (blue sky symbol) Instrument Flight Rules IFR (red sky symbol) Low Instrument Flight Rules LIFR (magenta sky symbol) Category Ceiling Visibility and/or and/or and/or and Greater than 3,000 feet AGL 1,000 to 3,000 feet AGL 500 to below 1,000 feet AGL below 500 feet AGL Greater than 5 miles 3 to 5 miles 1 mile to less than 3 miles less than 1 mile Figure 8-1. The regulations define weather flight conditions for visual flight rules (VFR) and instrument flight rules (IFR) in terms of specific values for ceiling and visibility. Other sources of risk management training available to the pilot are the various pilot organizations, such as the Airplane OwnersandPilotsAssociation(AOPA),ExperimentalAircraft Association (EAA), and numerous aircraft associations. All these organizations have variations of pilot experiences and solutions to situations in their publications. AOPA’s Air Safety Foundation provides live seminars throughout the country and online training at the AOPA website: www. aopa.org. Setting Personal Minimums One of the most important concepts that safe pilots understand is the difference between what is “legal” in terms of the regulations, and what is “smart” or “safe” in terms of pilot experience and proficiency. By establishing personal minimums, pilots can take a big step in managing risk. In the article, “Getting the Maximum from Personal Minimums,” (May/June 2006 FAA Aviation News), the FAA General Aviation and Commercial Division, AFS-800, discusses six steps for establishing personal minimums. Step 1—Review Weather Minimums Most people think of personal minimums primarily in terms of weather conditions, so begin with a quick review of weather definitions. The regulations define weather flight conditions for visual flight rules (VFR) and instrument flight rules (IFR) in terms of specific values for ceiling and visibility. [Figure 8-1] IFR is defined as a ceiling less than 1,000 feet above ground level (AGL) and/or visibility less than three miles. Low instrument flight rules (LIFR) is a subcategory of IFR. VFR has ceiling greater than 3,000 feet AGL and visibility greater than five miles. Marginal visual flight rules (MVFR) is a subcategory of VFR. Step 2—Assess Experience and Comfort Level At first glance, this part of the process might look a bit complicated. It might take a few minutes to review, record, and summarize your personal experience, but you will find the finished product is well worth your time. First, think back through your flight training and complete the Certification Training, an Experience Summary chart in Figure 8-2. The Certification, Training, and Experience Summary is adapted from the FAA’s Personal and Weather Risk Assessment Guide (October 2003). It can be found at www.faa.gov. Next, think through your recent flying experiences and make a note of the lowest weather conditions that you have comfortably experienced as a pilot in your VFR and, if applicable, IFR flying in the last 6–12 months. You might want to use the charts in Figures 8-3 through 8-5 as guides for this assessment, but do not think that you need to fill in every square. In fact, you may not have, or even need, an entry for every category. Suppose that most of your flying takes place in a part of the country where clear skies and visibilities of 30 plus miles are normal. Your entry might specify the lowest VFR ceiling as 7,000, and the lowest visibility as 15 miles. You may have never experienced MVFR conditions at all, so you would leave those boxes blank. For example, in a part of the country where normal summer flying often involves hazy conditions over relatively flat terrain, pilots who know the local terrain could regularly operate in hazy daytime MVFR conditions (e.g., 2,500 and four miles), and would use the MVFR column to record these values.
- 4. 8-4 Figure 8-4. Experience and comfort level assessment for IFR and LIFR. Experience and “Comfort Level” Assessment IFR & LIFR Weather Condition Ceiling Day Night Visibility Day Night IFR 500–999 800 999 1–3 miles 1 mile 3 miles LIFR < 500 — — < 1 mile — — Figure 8-3. Experience and comfort level assessment for VFR and MVFR. Experience and “Comfort Level” Assessment VFR & MVFR Weather Condition Ceiling Day Night Visibility Day Night VFR > 3,000 — 5,000 > 5 miles — 8 miles MVFR 1,000–3,000 2,500 — 3–5 miles 4 miles — Certificate level (e.g., private, commercial, ATP) Ratings (e.g., instrument, multiengine) Endorsements (e.g., complex, high performance, high altitude) Total flying time Years of flying experience Flight review (e.g., certificate, rating, wings) Instrument Proficiency Check Time since checkout in airplane 1 Time since checkout in airplane 2 Time since checkout in airplane 3 Variation in equipment (e.g., GPS navigators, autopilot) Hours Hours in this airplane (or identical model) Landings Night hours Night landings Hours flown in high density altitude Hours flown in mountainous terrain Crosswind landings IFR hours IMC hours (actual conditions) Approaches (actual or simulated) Experience Recent Experience (last 12 months) Training Summary Certification Level Certification, Training, and Experience Summary Figure 8-2. Certification, training, and experience summary. Even in your home airspace, you should not consider flying down to VFR minimums at night—much less in the range of conditions defined as MVFR. For night VFR, anything less than a ceiling of at least 5,000, and visibility of at least seven to eight miles should raise a red flag. Figure 8-3 shows how your entries would look in the Experience & Comfort Level Assessment VFR & MFR chart. If you fly IFR, the next part of the exercise shown in Figure 8-4 is to record the lowest IFR conditions that you have comfortably, recently, and regularly experienced in your flying career. Again, be honest in your assessment. Although you may have successfully flown in low IFR (LIFR) conditions-–down to a 300 foot ceiling and ¾ mile visibility—it does not mean you were “comfortable” in these conditions. Therefore, leave the LIFR boxes blank with entries for known “comfort level” in instrument meteorological conditions (IMC), as shown in Figure 8-4. If entries are combined into a single chart, the summary of your personal known “comfort level” for VFR, MVFR, IFR, and LIFR weather conditions would appear as shown in Figure 8-5.
- 5. 8-5 Figure 8-5. Experience and comfort level assessment for combined VFR and IFR. Experience and “Comfort Level” Assessment Combined VFR & IFR Weather Condition Ceiling Day Night Visibility Day Night VFR MVFR IFR LIFR 2,500 5,000 4 miles 8 miles 800 999 1 mile 3 miles Figure 8-6. Experience and comfort level assessment for wind and turbulence. Experience and “Comfort Level” Assessment Wind & Turbulence Surface wind speed Surface wind gusts Crosswind component Turbulence 15 knots 8 knots 7 10 knots 5 knots 7 SE ME Make/ Model Figure 8-7. Experience and comfort level assessment for performance factors. Experience and “Comfort Level” Assessment Performance Factors Shortest runway Highest terrain Highest density altitude Performance 4,500 3,000 3,000 2,500 6,000 3,000 SE ME Make/ Model Figure 8-8. Baseline personal minimums. Baseline Personal Minimums Weather Condition Ceiling Day Night Visibility Day Night VFR MVFR IFR LIFR 2,500 5,000 4 miles 8 miles 800 999 1 mile 3 miles Surface wind speed Surface wind gusts Crosswind component Turbulence SE ME Make/ Model 15 knots 8 knots 7 10 knots 5 knots 7 Shortest runway Highest terrain Highest density altitude Performance SE ME Make/ Model 4,500 3,000 3,000 2,500 6,000 3,000 Step 3—Consider Other Conditions Ceiling and visibility are the most obvious conditions to consider in setting personal minimums, but it is also a good idea to have personal minimums for wind and turbulence. As with ceiling and visibility, the goal in this step is to record the most challenging wind conditions you have comfortably experienced in the last 6–12 months—not necessarily the most challenging wind conditions you have managed to survive without bending an airplane. As shown in Figure 8-6, you can record these values for category and class, for specific make and model, or perhaps both. In addition to winds, your “comfort level” inventory should also include factors related to aircraft performance. There are many variables, but start by completing the chart with reference to the aircraft and terrain most typical for the kind of flying you do most. [Figure 8-7] Remember that you want to establish a safety buffer, so be honest with yourself. If you have never operated to/from a runway shorter than 5,000 feet, the “shortest runway” box should say 5,000 feet. We will talk more about safe ways to extend personal minimums a bit later. Step 4—Assemble and Evaluate Now you have some useful numbers to use in establishing baseline personal minimums. Combining these numbers, the Baseline Personal Minimums chart in Figure 8-8 shows how the whole picture might look.
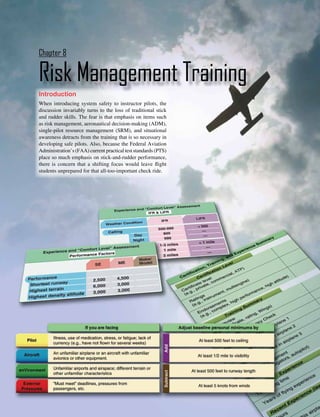
- 6. 8-6 Pilot Aircraft enVironment External Pressures Illness, use of medication, stress, or fatigue; lack of currency (e.g., have not flown for several weeks) An unfamiliar airplane or an aircraft with unfamiliar avionics or other equipment Unfamiliar airports and airspace; different terrain or other unfamiliar characteristics “Must meet” deadlines, pressures from passengers, etc. If you are facing Adjust baseline personal minimums by Add Subtract At least 500 feet to ceiling At least 1/2 mile to visibility At least 500 feet to runway length At least 5 knots from winds Figure 8-9. Examples of baseline personal mimimums. Step 5—Adjust for Specific Conditions Any flight you make involves almost infinite combinations of pilot skill, experience, condition, and proficiency; aircraft equipment and performance; environmental conditions; and external influences. Both individually and in combination, these factors can compress the safety buffer provided by your baseline personal minimums. Consequently, you need a practical way to adjust your baseline personal minimums to accommodate specific conditions. Note that the suggested adjustment factors are just that—a suggestion. If your flying experience is limited or if you do not fly very often, you might want to double these values. In addition, if your situation involves more than one special condition from the chart above, you will probably want to add the adjustment factor for each one. For example, suppose you are planning a night cross-country to an unfamiliar airport, departing after a full workday. If you decide to make this trip—or you might decide that it is safest to wait until the next day—the chart in Figure 8-9 suggests that you should at least raise your baseline personal minimums by adding 1,000 feet to your ceiling value; one mile to visibility, and 1,000 feet to required runway length. How about adjustments in the other direction? Some pilots fear that establishing personal minimums is a once and-for-all exercise. With time and experience, though, you can modify personal minimums to match growing skill and judgment. When you have comfortably flown to your baseline personal minimums for several months, you might want to sit down and assess whether and how to push the envelope safely. If, for instance, your personal minimums call for daytime visibility of at least five miles, and you have developed some solid experience flying in those conditions, you might consider lowering the visibility value to four miles for your next flight. There are two important cautions: 1. Never adjust personal minimums to a lower value for a specific flight. The time to consider adjustments is when you are not under any pressure to fly, and when you have the time and objectivity to think honestly about your skill, performance, and comfort level during last the few flights. Changing personal minimums “on the fly” defeats the purpose of having them in the first place. 2. Keep all other variables constant. For example, if your goal is to lower your baseline personal minimums for visibility, don’t try to lower the ceiling, wind, or other values at the same time. In addition, you never want to push the baseline if there are special conditions (e.g., unfamiliar aircraft, pilot fatigue) present for this flight. You might find it helpful to talk through both your newly established personal minimums and any “push-the-envelope” plans with a well-qualified flight instructor. Step 6—Stick to the Plan! Once you have done all the thinking required to establish baseline personal minimums, all you need to do next is stick to the plan. As most pilots know, that task is a lot harder than it sounds, especially when the flight is for a trip that you really want to make, or when you are staring into the faces of your disappointed passengers. Here’s where personal minimums can be an especially valuable tool. Professional pilots live by the numbers, and so should you. Pre-established hard numbers can make it a lot easier to make a smart no go or divert decision than a vague sense that you can “probably” deal with the conditions that you are facing at any given time. In addition, a written set of personal minimums can also make it easier to explain tough decisions to passengers who are, after all, trusting their lives to your aeronautical skill and judgment.
- 7. 8-7 Chapter Summary General aviation pilots enjoy a level of responsibility and freedom unique in aviation. Unlike the air carrier, corporate, and military communities, most GA pilots are free to fly when and where they choose. They are unencumbered by the strict regulatory structure that governs many other flight operations. However, the GA pilot is not supported by a staff of dispatchers and meteorologists, or governed by rigid operational guidelines designed to reduce risk. Pilots should not be lulled into a false sense of security simply because they are in compliance with the regulations. Judgment and aeronautical decision-making serve as the bridge between regulatory compliance and safety. Deciding if or when to undertake any flight lies solely with the pilot in command (PIC). GA pilots should remember that FAA regulations designed to prevent accidents and incidents come out AFTER the accident or incident. A copy of the charts used in this chapter can be found in Appendix B. Pilots are encouraged to make a copy of this appendix, complete applicable charts, and use them prior to each flight.
- 8. 8-8