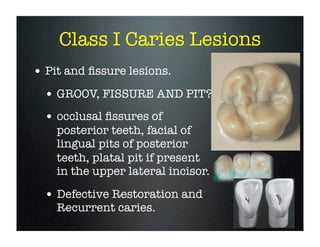
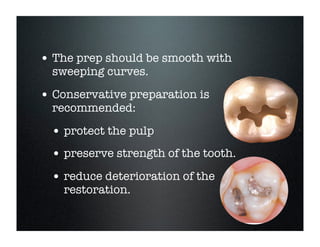
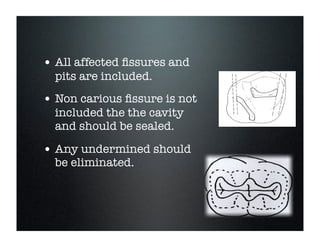
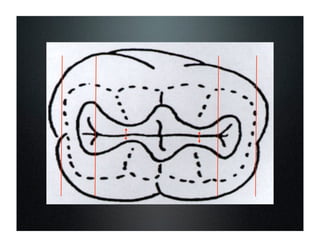
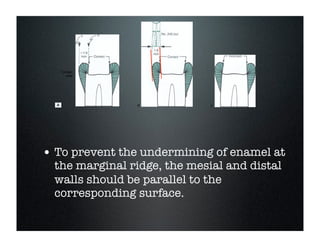
Amalgam Cavity
Preparation
Class I
Preclinical Operative Dentistry
DC, DU
Amalgam
• Amalgam: alloy, 50% mercury.
• Amalgamation.
• Dental Amalgam alloy: in dentistry

the metal powder before combining it
with mercury.
Amalgam Restorations
• Advantages
• strong, durable,
economical.

• easy to use.
• self sealing ability
• wear resistance

similar to tooth st.

• low microleakage.

• Disadvantages
• metallic color.
• does not bond to

tooth st. rely in
mechanical
retention

• mercury safety

hazard for dental
staff.
Class I Caries Lesions
• Pit and fissure lesions.

CHAPTER

17

Classes I, II, and VI Amalgam Restorations

• GROOV, FISSURE AND PIT?
• occlusal fissures of

posterior teeth, facial of
lingual pits of posterior
teeth, platal pit if present
in the upper lateral incisor.

FIG 17-14 Mandibular molar. A, Carious (or at risk for caries) facial pit. B, Position bur perpendicular to tooth surface for entry. C, Outline of restoration.

• Defective Restoration and

FIG 17-15 Carious (or at risk for caries) lingual pit and fissure
and restoration on maxillary lateral incisor.

Recurrent caries.
• Simple Occlusal Cavity
CHAPTER

17

Classes I, II, and VI Amalgam Restorations

• Compound Occlusal Cavity
• Occluso-Buccal
• Occluso-Palatal / lingual
• Complex Occlusal Cavity
• Buccal Pit

FIG 17-14 Mandibular molar. A, Carious (or at risk for caries) facial pit. B, Position bur perpendicular to tooth surface for entry. C, Outline of restoration.

• Anterior Palatal Pit

FIG 17-15 Carious (or at risk for caries) lingual pit and fissure
and restoration on maxillary lateral incisor.
G. V. Black
• G.V. Black Steps of cavity
preparation:

1. Establish an
outline form.

5. Removal of
remaining caries.

2. Obtain a
resistance form.

6. finishing of the
walls and margins.

3. Obtain retention
form.

7. Cleansing of the
cavity.

4. Obtain
Convenience form.
• “The complete divorcement of dental

practice from studies of the pathology
of dental caries, that existed in the
past, is an anomaly in science that
should not continue. It has the
apparent tendency plainly to make
dentists mechanics only”
G.V. Black
1836-1915
Cavity Preparation
• OUTLINE FORM:
• Two guidelines:
• carious tooth structure should
be eliminated.

• margins should be placed in a
sound tooth structure.
• The prep should be smooth with
sweeping curves.

• Conservative preparation is
recommended:

• protect the pulp
• preserve strength of the tooth.
• reduce deterioration of the
restoration.
• All affected fissures and
pits are included.

• Non carious fissure is not
included the the cavity
and should be sealed.

• Any undermined should
be eliminated.
Contact
area

B

C

FIG . 17-5 Direction of mesial and distal walls is influenced by remaining thickness of marginal
ridge as measured from mesial or distal margin (a) to proximal surface (i.e., imaginary projection of proximal surface) (b). A, Mesial and distal walls should converge occlusally when distance from a to b is greater than 1.6 mm. B, However, when operator judges that extension will
l eave only 1.6-mm thickness (two diameters of No. 245 bur) of marginal ridge (i.e., premolars)
as illustrated here and in Fig. 17-4, B and C, the mesial and distal walls must diverge occlusally
to conserve ridge-supporting dentin. C, Extending mesial or distal wall to two-diameter limit
without diverging wall occlusally will undermine marginal-ridge enamel.

• To prevent the undermining of enamel at
the marginal ridge, the mesial and distal
walls should be parallel to the
corresponding surface.
Obtaining Resistance
• Two consideration in resistance form:
• the restoration must have adequate

thickness and have a marginal design
that will allow it to bear the forces
without fracture or deform.

• the remaining tooth st. must be left in
such a state that it will resist the
forces of mastication.
• Resistance form is provided by:
• Sufficient area of relatively flat

pulpal floor, to resist forces directed
in the long axis of the tooth.

• Minimal extension of external wall.
• Strong, ideal enamel margins.
• Sufficient depth.
• The resistance form here consists chiefly of

a pulpal wall parallel to the occlusal plane
(perpendicular to the long axis of the tooth)
with dentin walls at right angles to it., i.e.
Boxing the preparation.
Modified box- Mortise
preparation
refers to those aspects of cavity
preparation which ensure that the
restoration is not dislodged from the
prepared cavity.
Retention Form
Box Form

A

Modified box or mortise
preparation

B

Convergence to occlusal surface
(small undercut to prevent
occlusal displacement)
• Ideal depth is 1.5 mm when
smooth and finished
CONTROL THE DEPTH OF
YOUR PREPARATION.

• Using the 330 bur, or 245
bur.
Convenience Form
Final Tooth Preparation
• Removal of remaining defected
enamel and infected dentin.

• Pulpal protection.
• Finishing external walls.
• Cleaning and Inspection.
Removal of Remaining
Carious Dentin
• extension of the cavity should ensure,

all caries is removed from the peripheral
DEJ.

• In small size cavities, the carious dentin
should have been removed during
making the cavity extensions.
• In moderate/deep cavities removal
of carious dentin should not affect
the resistance form, the periphery
wouldn’t need further extension.
FIG
17-12 Removal of dentinal caries is accomplished with round burs (A) or
tors (B). C and D, Resistance form may be improved with flat floor peripheral to
or areas.

• Best less visible than on the pulpal floor. A caries-detecting
is removed using discoid-spoon
The removal of carious

solution may
helpful
excaexcavator beexplorerslow-speedmore re- fect resistance form becaus
or a in determining adequateroundfurther extension. In additi
vation. A sharp
or hand instrument is
liable than a rotating appropriate of rejudging
carbide bur ofbur inHowever,the adequacy size. tance form if the restoratio
moval of infected dentin.
these instruments
ripheral to the excavated
should be used judiciously in areas of possible pulpal
exposure.

should be at the previously
depth of 1.5 to 2 mm and in
al of dentinal caries is accomplished with round burs (A) or spoon excavaResistance form may be improved with flat floor peripheral to excavated area

• Bur size 245 can be use to establish

flat seatremoval of carious dentin should not further af- of
around the circumstances
The
fect resistance form site the periphery will not need
the excavation because if the flat seat is
further extension. In addition, it should not
not obtained spontaneously.affect resistance form if the restoration will rest on a flat floor pe-

oor. A caries-detecting
mining adequate excainstrument is more reng the adequacy of rever, these instruments
eas of possible pulpal

ripheral to the excavated area or areas. The flat floor
should be at the previously described initial pulpal floor
depth of 1.5 to 2 mm and in sound enamel or dentin (see
Cleansing of the Cavity
• The prepared cavity should be free
from all debris.

• No disinfectant should be used to
clean the cavity.

• Don’t desiccate it.
Compound Class I
Amalgam Preparation
• When the Caries is

FIG
17-18 Maxillary first molar. A, Outline necess
nected by fissure. B, Preparation outline extended
connecting deep fissure in oblique ridge. C, Prepara
i nclude distal oblique and lingual fissures.

extended into the lingual or
palatal fissure.

FIG
17-18 Maxillary first molar. A, Outline necessary to include mesial and central pits connected by fissure. B, Preparation outline extended from outline in (A) to include distal pit and
connecting deep fissure in oblique ridge. C, Preparation outline extended from outline in (B) to
i nclude distal oblique and lingual fissures.

• The outline is extended to

the primer and adhesive, and immediately condensing
the amalgam, which permits the adhesive to interlock
mechanically with the amalgam. The specific technique
for use of amalgam adhesives is described later.
Placing a Matrix. Generally, matrices will not be necessary for a conservative Class I amalgam restoration
except as specified in later sections.
Inserting the Amalgam. To promote mercury hygiene and minimize mercury exposure in the dental office, precautions should be taken to protect the patient
FIG . 17-19 Mandibular second premolar. A, Typical occlusal
and the dental staff." When removing an amalgam
FIG . 17-19 Mandibular second premolar. A, Typical occlusal outline. B, Extension through lingual ridge enamel is necesrestoration, a rubber dam should be in place and airoutline. B, Extension through lingual ridge enamel is necessary when enameloplasty does not eliminate lingual be
water spray and high-volume evacuation should fissure.

include the affected fissure.

sary when enameloplasty does not eliminate lingual fissure.

the
the
mec
for

P

essa
exce

In

gien
fice
and
rest
wat
angle. A 100-degree cavosurface angle on the
e will result in an 80-degree marginal amalgam

dentin with an acid-resistant layer of resin-reinforced
dentin called the hybrid layer. This is a multistepped pro-

xamples of Class I amaleparation outline forms.
l outline form in the
econd premolar. B, Ocoutline form in the maxlar. C, Occlusofacial outthe mandibular first

• Enameloplasty should be performed
when defect is minimal.

• when the defect extend to one half of the
distance from the groove and the cusp
tip, caping of the cusp may be indicated.
ll occlusal pits and fissures. B, Dimenburs compared.

bur should be rotating when it is applied to the
h and should not stop rotating until it is removed
m the tooth. As the bur enters the pit, the proper
h of 1.5 mm (one half the length of the cutting
on of the bur) should be established. The 1.5 mm
al depth is measured at the central fissure (see
17-3, D and E). Depending of the cuspal incline, the
h of the prepared external walls will be 1.5 to 2 mm
Fig. 17-3, D and E). The desired pulpal depth is usu-
#*=,(9& #7) -,8*&'(%,-) >,(/"+
• ?:",. =,.. %*..*=& #7) -*+#*'( *% #7)
2'--,.4."+/',. &'(%,-)

Buccal/
palatal Pit

• Shape varies (oval - round - oblong)
depending on the caries extension.

• Walls continually joined & slightly

convergent towards the cavosurface
margin.

• Axial wall follows the contour of the
buccal/lingual surface.
Any Question?

amalgam cavity preparation class i

  • 1.
  • 2.
    Amalgam • Amalgam: alloy,50% mercury. • Amalgamation. • Dental Amalgam alloy: in dentistry the metal powder before combining it with mercury.
  • 3.
    Amalgam Restorations • Advantages •strong, durable, economical. • easy to use. • self sealing ability • wear resistance similar to tooth st. • low microleakage. • Disadvantages • metallic color. • does not bond to tooth st. rely in mechanical retention • mercury safety hazard for dental staff.
  • 4.
    Class I CariesLesions • Pit and fissure lesions. CHAPTER 17 Classes I, II, and VI Amalgam Restorations • GROOV, FISSURE AND PIT? • occlusal fissures of posterior teeth, facial of lingual pits of posterior teeth, platal pit if present in the upper lateral incisor. FIG 17-14 Mandibular molar. A, Carious (or at risk for caries) facial pit. B, Position bur perpendicular to tooth surface for entry. C, Outline of restoration. • Defective Restoration and FIG 17-15 Carious (or at risk for caries) lingual pit and fissure and restoration on maxillary lateral incisor. Recurrent caries.
  • 7.
    • Simple OcclusalCavity CHAPTER 17 Classes I, II, and VI Amalgam Restorations • Compound Occlusal Cavity • Occluso-Buccal • Occluso-Palatal / lingual • Complex Occlusal Cavity • Buccal Pit FIG 17-14 Mandibular molar. A, Carious (or at risk for caries) facial pit. B, Position bur perpendicular to tooth surface for entry. C, Outline of restoration. • Anterior Palatal Pit FIG 17-15 Carious (or at risk for caries) lingual pit and fissure and restoration on maxillary lateral incisor.
  • 8.
    G. V. Black •G.V. Black Steps of cavity preparation: 1. Establish an outline form. 5. Removal of remaining caries. 2. Obtain a resistance form. 6. finishing of the walls and margins. 3. Obtain retention form. 7. Cleansing of the cavity. 4. Obtain Convenience form.
  • 9.
    • “The completedivorcement of dental practice from studies of the pathology of dental caries, that existed in the past, is an anomaly in science that should not continue. It has the apparent tendency plainly to make dentists mechanics only” G.V. Black 1836-1915
  • 10.
    Cavity Preparation • OUTLINEFORM: • Two guidelines: • carious tooth structure should be eliminated. • margins should be placed in a sound tooth structure.
  • 11.
    • The prepshould be smooth with sweeping curves. • Conservative preparation is recommended: • protect the pulp • preserve strength of the tooth. • reduce deterioration of the restoration.
  • 12.
    • All affectedfissures and pits are included. • Non carious fissure is not included the the cavity and should be sealed. • Any undermined should be eliminated.
  • 14.
    Contact area B C FIG . 17-5Direction of mesial and distal walls is influenced by remaining thickness of marginal ridge as measured from mesial or distal margin (a) to proximal surface (i.e., imaginary projection of proximal surface) (b). A, Mesial and distal walls should converge occlusally when distance from a to b is greater than 1.6 mm. B, However, when operator judges that extension will l eave only 1.6-mm thickness (two diameters of No. 245 bur) of marginal ridge (i.e., premolars) as illustrated here and in Fig. 17-4, B and C, the mesial and distal walls must diverge occlusally to conserve ridge-supporting dentin. C, Extending mesial or distal wall to two-diameter limit without diverging wall occlusally will undermine marginal-ridge enamel. • To prevent the undermining of enamel at the marginal ridge, the mesial and distal walls should be parallel to the corresponding surface.
  • 17.
    Obtaining Resistance • Twoconsideration in resistance form: • the restoration must have adequate thickness and have a marginal design that will allow it to bear the forces without fracture or deform. • the remaining tooth st. must be left in such a state that it will resist the forces of mastication.
  • 18.
    • Resistance formis provided by: • Sufficient area of relatively flat pulpal floor, to resist forces directed in the long axis of the tooth. • Minimal extension of external wall. • Strong, ideal enamel margins. • Sufficient depth.
  • 19.
    • The resistanceform here consists chiefly of a pulpal wall parallel to the occlusal plane (perpendicular to the long axis of the tooth) with dentin walls at right angles to it., i.e. Boxing the preparation.
  • 20.
    Modified box- Mortise preparation refersto those aspects of cavity preparation which ensure that the restoration is not dislodged from the prepared cavity.
  • 22.
    Retention Form Box Form A Modifiedbox or mortise preparation B Convergence to occlusal surface (small undercut to prevent occlusal displacement)
  • 23.
    • Ideal depthis 1.5 mm when smooth and finished CONTROL THE DEPTH OF YOUR PREPARATION. • Using the 330 bur, or 245 bur.
  • 24.
  • 25.
    Final Tooth Preparation •Removal of remaining defected enamel and infected dentin. • Pulpal protection. • Finishing external walls. • Cleaning and Inspection.
  • 26.
    Removal of Remaining CariousDentin • extension of the cavity should ensure, all caries is removed from the peripheral DEJ. • In small size cavities, the carious dentin should have been removed during making the cavity extensions.
  • 27.
    • In moderate/deepcavities removal of carious dentin should not affect the resistance form, the periphery wouldn’t need further extension.
  • 28.
    FIG 17-12 Removal ofdentinal caries is accomplished with round burs (A) or tors (B). C and D, Resistance form may be improved with flat floor peripheral to or areas. • Best less visible than on the pulpal floor. A caries-detecting is removed using discoid-spoon The removal of carious solution may helpful excaexcavator beexplorerslow-speedmore re- fect resistance form becaus or a in determining adequateroundfurther extension. In additi vation. A sharp or hand instrument is liable than a rotating appropriate of rejudging carbide bur ofbur inHowever,the adequacy size. tance form if the restoratio moval of infected dentin. these instruments ripheral to the excavated should be used judiciously in areas of possible pulpal exposure. should be at the previously depth of 1.5 to 2 mm and in
  • 29.
    al of dentinalcaries is accomplished with round burs (A) or spoon excavaResistance form may be improved with flat floor peripheral to excavated area • Bur size 245 can be use to establish flat seatremoval of carious dentin should not further af- of around the circumstances The fect resistance form site the periphery will not need the excavation because if the flat seat is further extension. In addition, it should not not obtained spontaneously.affect resistance form if the restoration will rest on a flat floor pe- oor. A caries-detecting mining adequate excainstrument is more reng the adequacy of rever, these instruments eas of possible pulpal ripheral to the excavated area or areas. The flat floor should be at the previously described initial pulpal floor depth of 1.5 to 2 mm and in sound enamel or dentin (see
  • 30.
    Cleansing of theCavity • The prepared cavity should be free from all debris. • No disinfectant should be used to clean the cavity. • Don’t desiccate it.
  • 31.
    Compound Class I AmalgamPreparation • When the Caries is FIG 17-18 Maxillary first molar. A, Outline necess nected by fissure. B, Preparation outline extended connecting deep fissure in oblique ridge. C, Prepara i nclude distal oblique and lingual fissures. extended into the lingual or palatal fissure. FIG 17-18 Maxillary first molar. A, Outline necessary to include mesial and central pits connected by fissure. B, Preparation outline extended from outline in (A) to include distal pit and connecting deep fissure in oblique ridge. C, Preparation outline extended from outline in (B) to i nclude distal oblique and lingual fissures. • The outline is extended to the primer and adhesive, and immediately condensing the amalgam, which permits the adhesive to interlock mechanically with the amalgam. The specific technique for use of amalgam adhesives is described later. Placing a Matrix. Generally, matrices will not be necessary for a conservative Class I amalgam restoration except as specified in later sections. Inserting the Amalgam. To promote mercury hygiene and minimize mercury exposure in the dental office, precautions should be taken to protect the patient FIG . 17-19 Mandibular second premolar. A, Typical occlusal and the dental staff." When removing an amalgam FIG . 17-19 Mandibular second premolar. A, Typical occlusal outline. B, Extension through lingual ridge enamel is necesrestoration, a rubber dam should be in place and airoutline. B, Extension through lingual ridge enamel is necessary when enameloplasty does not eliminate lingual be water spray and high-volume evacuation should fissure. include the affected fissure. sary when enameloplasty does not eliminate lingual fissure. the the mec for P essa exce In gien fice and rest wat
  • 32.
    angle. A 100-degreecavosurface angle on the e will result in an 80-degree marginal amalgam dentin with an acid-resistant layer of resin-reinforced dentin called the hybrid layer. This is a multistepped pro- xamples of Class I amaleparation outline forms. l outline form in the econd premolar. B, Ocoutline form in the maxlar. C, Occlusofacial outthe mandibular first • Enameloplasty should be performed when defect is minimal. • when the defect extend to one half of the distance from the groove and the cusp tip, caping of the cusp may be indicated.
  • 33.
    ll occlusal pitsand fissures. B, Dimenburs compared. bur should be rotating when it is applied to the h and should not stop rotating until it is removed m the tooth. As the bur enters the pit, the proper h of 1.5 mm (one half the length of the cutting on of the bur) should be established. The 1.5 mm al depth is measured at the central fissure (see 17-3, D and E). Depending of the cuspal incline, the h of the prepared external walls will be 1.5 to 2 mm Fig. 17-3, D and E). The desired pulpal depth is usu-
  • 34.
    #*=,(9& #7) -,8*&'(%,-)>,(/"+ • ?:",. =,.. %*..*=& #7) -*+#*'( *% #7) 2'--,.4."+/',. &'(%,-) Buccal/ palatal Pit • Shape varies (oval - round - oblong) depending on the caries extension. • Walls continually joined & slightly convergent towards the cavosurface margin. • Axial wall follows the contour of the buccal/lingual surface.
  • 35.