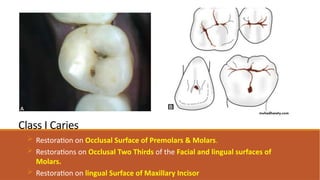
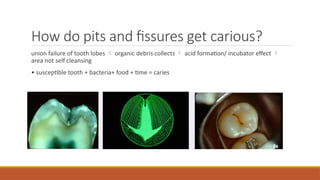
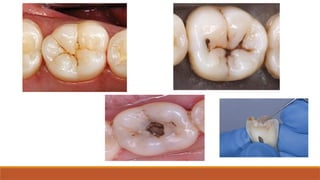
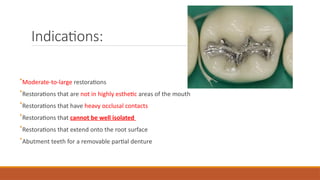
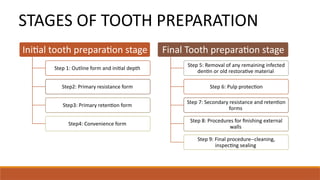
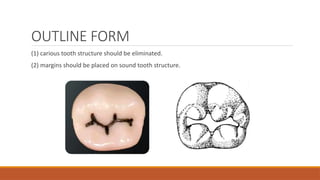
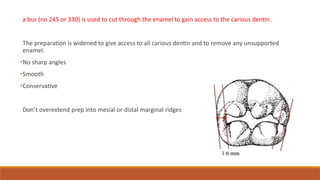
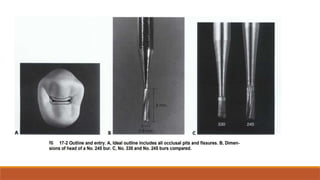
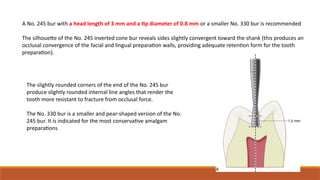
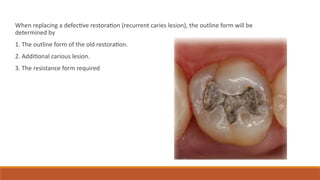
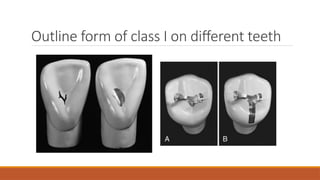
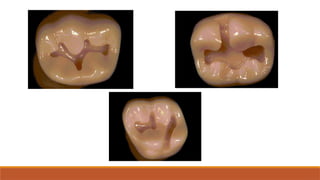
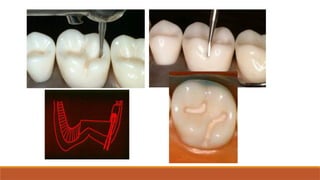
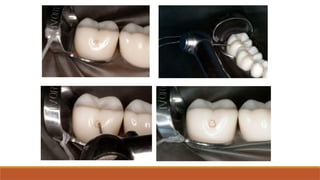
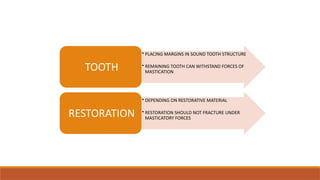
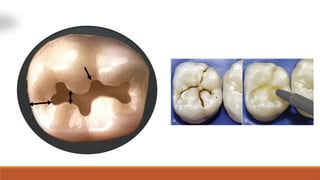
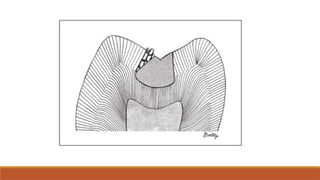
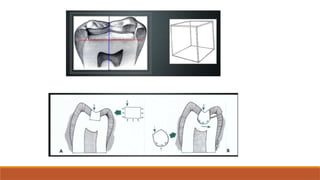
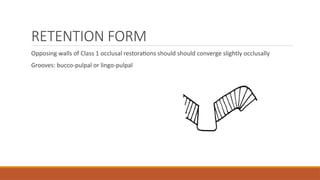
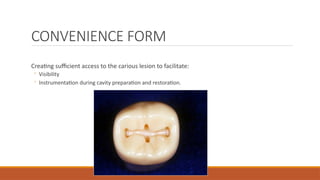
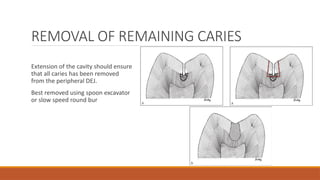
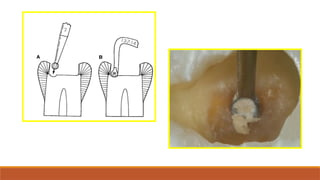
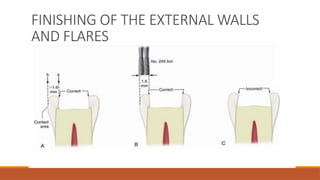
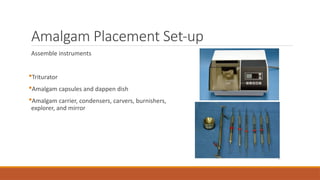
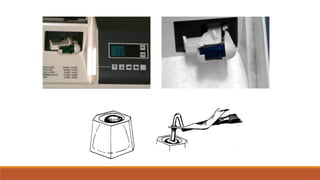
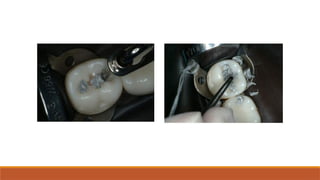
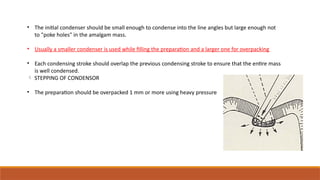
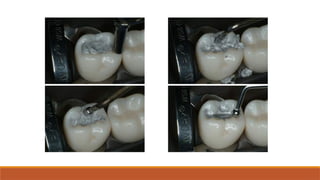
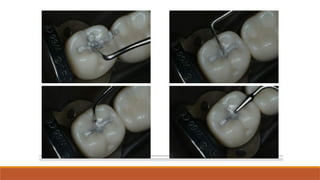
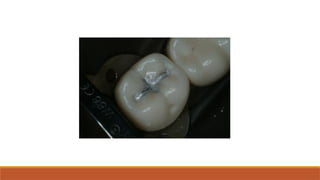
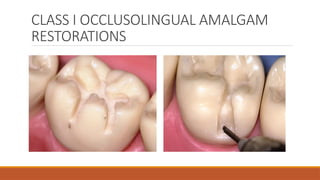
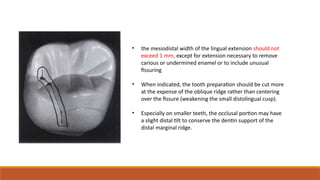
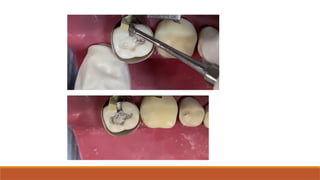
Class I cavity
preparation for
Amalgam
DR BEVERLEY THEMUDO
Class I Caries
 Restoration on Occlusal Surface of Premolars & Molars.
 Restorations on Occlusal Two Thirds of the Facial and lingual surfaces of
Molars.
 Restoration on lingual Surface of Maxillary Incisor
How do pits and fissures get carious?
union failure of tooth lobes  organic debris collects  acid formation/ incubator effect 
area not self cleansing
• susceptible tooth + bacteria+ food + time = caries
WHY AMALGAM?
Strength
Longevity
Ease of use
Clinically proven success
In addition, amalgam is the only restorative material with an interfacial seal that improves over
time.
Indications:
‫٭‬Moderate-to-large restorations
‫٭‬Restorations that are not in highly esthetic areas of the mouth
‫٭‬Restorations that have heavy occlusal contacts
‫٭‬Restorations that cannot be well isolated
‫٭‬Restorations that extend onto the root surface
‫٭‬Abutment teeth for a removable partial denture
CONTRAINDICATIONS
Esthetically prominent areas of posterior teeth
Small-to-moderate Classes I and II restorations that can be well isolated
Small Class VI restoration
The objectives of treatment
remove any enamel that has been undermined by the
caries process
create a strong restoration that mimics the original
sound tooth structure and allows little or no marginal
leakage
preserve as much sound tooth structure as possible.
eliminate caries
Initial tooth preparation stage
Step 1: Outline form and initial depth
Step2: Primary resistance form
Step3: Primary retention form
Step4: Convenience form
Final Tooth preparation stage
Step 5: Removal of any remaining infected
dentin or old restorative material
Step 6: Pulp protection
Step 7: Secondary resistance and retention
forms
Step 8: Procedures for finishing external
walls
Step 9: Final procedure--cleaning,
inspecting sealing
STAGES OF TOOTH PREPARATION
OUTLINE FORM
(1) carious tooth structure should be eliminated.
(2) margins should be placed on sound tooth structure.
a bur (no 245 or 330) is used to cut through the enamel to gain access to the carious dentin.
The preparation is widened to give access to all carious dentin and to remove any unsupported
enamel.
•No sharp angles
•Smooth
•Conservative
Don’t overextend prep into mesial or distal marginal ridges
A No. 245 bur with a head length of 3 mm and a tip diameter of 0.8 mm or a smaller No. 330 bur is recommended
The silhouette of the No. 245 inverted cone bur reveals sides slightly convergent toward the shank (this produces an
occlusal convergence of the facial and lingual preparation walls, providing adequate retention form for the tooth
preparation).
The slightly rounded corners of the end of the No. 245 bur
produce slightly rounded internal line angles that render the
tooth more resistant to fracture from occlusal force.
The No. 330 bur is a smaller and pear-shaped version of the No.
245 bur. It is indicated for the most conservative amalgam
preparations
When replacing a defective restoration (recurrent caries lesion), the outline form will be
determined by
1. The outline form of the old restoration.
2. Additional carious lesion.
3. The resistance form required
Outline form of class I on different teeth
RESISTANCE FORM
RESISTANCE
TOOTH
RESTORATIV
E
• PLACING MARGINS IN SOUND TOOTH STRUCTURE
• REMAINING TOOTH CAN WITHSTAND FORCES OF
MASTICATION
TOOTH
• DEPENDING ON RESTORATIVE MATERIAL
• RESTORATION SHOULD NOT FRACTURE UNDER
MASTICATORY FORCES
RESTORATION
Resistance of tooth
1. Keeping the facial and lingual margin extensions as minimal as possible between the central
groove and the cusp tips
2. Extending the outline to include fissures, thereby placing the margins on relatively smooth,
sound tooth structure
3. Minimally extending into the marginal ridges (only enough to include the defect) without
removing dentinal support
4. Eliminating a weak wall of enamel by joining two outlines that come close together (i.e.,
less than 0.5 mm apart)
5. Extending the outline form to include enamel undermined by caries.
Resistance of restorative
Adequate thickness for the restorative material
Margins should be approximately 90 degrees.
Flat pulpal floor (resist forces directed in the long axis of the tooth
Rounding of internal line angles
RETENTION FORM
Opposing walls of Class 1 occlusal restorations should should converge slightly occlusally
Grooves: bucco-pulpal or lingo-pulpal
CONVENIENCE FORM
Creating sufficient access to the carious lesion to facilitate:
◦ Visibility
◦ Instrumentation during cavity preparation and restoration.
REMOVAL OF REMAINING CARIES
Extension of the cavity should ensure
that all caries has been removed
from the peripheral DEJ.
Best removed using spoon excavator
or slow speed round bur
FINISHING OF THE EXTERNAL WALLS
AND FLARES
Pulp Protection
! Cavity sealers
! Varnish
! Adhesive Sealers
! Cavity liners
! Cavity bases
Amalgam Placement Set-up
Assemble instruments
Triturator
Amalgam capsules and dappen dish
Amalgam carrier, condensers, carvers, burnishers,
explorer, and mirror
• The initial condenser should be small enough to condense into the line angles but large enough not
to "poke holes" in the amalgam mass.
• Usually a smaller condenser is used while filling the preparation and a larger one for overpacking
• Each condensing stroke should overlap the previous condensing stroke to ensure that the entire mass
is well condensed.
 STEPPING OF CONDENSOR
• The preparation should be overpacked 1 mm or more using heavy pressure
Precarve burnishing is a form of condensation.
As stated previously, tooth preparations should be overfilled with amalgam.
To ensure that the marginal amalgam is well condensed before carving, the overpacked
amalgam should be burnished immediately with a large burnisher
Precarve burnishing produces denser amalgam at the margins of occlusal preparations
• Part of the edge of the carving blade should rest on the unprepared tooth surface adjacent to the
preparation margin
• Using this surface as a guide helps to prevent overcarving the amalgam at the margins and to
produce a continuity of surface contour across the margins.
• Deep occlusal grooves should not be carved into the restoration, because these may thin the
amalgam at the margins, invite chipping, and weaken the restoration
• The thin portion of amalgam extending beyond the margin is referred to as flash.
CLASS I OCCLUSOLINGUAL AMALGAM
RESTORATIONS
• the mesiodistal width of the lingual extension should not
exceed 1 mm, except for extension necessary to remove
carious or undermined enamel or to include unusual
fissuring
• When indicated, the tooth preparation should be cut more
at the expense of the oblique ridge rather than centering
over the fissure (weakening the small distolingual cusp).
• Especially on smaller teeth, the occlusal portion may have
a slight distal tilt to conserve the dentin support of the
distal marginal ridge.
the lingual surface is prepared with the bur's long axis parallel with the lingual surface
The tip of the bur should be located at the gingival extent of the lingual fissure.
AVOID "roll out" onto the lingual surface, because this could "round over" or damage the cavosurface
margin.
The facial inclination of the bur must be altered as the cutting
progresses to establish the axial wall of the lingual portion at a
uniform depth.
The axial wall should follow the contour of the lingual surface
of the tooth. An axial depth of 0.5 mm inside the DEJ is
indicated if retentive locks are required; an axial depth of 0.2
inside the DEJ is permissible if retentive locks are not required.
• The No. 245 bur may be used with its long axis
perpendicular to the axial wall to accentuate (i.e., refine)
the mesioaxial and distoaxial line angles.
• This will also result in the mesial and distal walls converging
lingually because of the shape of the bur.
A matrix is helpful to prevent "land-sliding" during condensation and to ensure marginal adaptation and
strength of the restoration.
QUESTIONS?

Class I cavity preparation for Amalgam.pptx

  • 1.
    Class I cavity preparationfor Amalgam DR BEVERLEY THEMUDO
  • 2.
    Class I Caries Restoration on Occlusal Surface of Premolars & Molars.  Restorations on Occlusal Two Thirds of the Facial and lingual surfaces of Molars.  Restoration on lingual Surface of Maxillary Incisor
  • 3.
    How do pitsand fissures get carious? union failure of tooth lobes  organic debris collects  acid formation/ incubator effect  area not self cleansing • susceptible tooth + bacteria+ food + time = caries
  • 5.
    WHY AMALGAM? Strength Longevity Ease ofuse Clinically proven success In addition, amalgam is the only restorative material with an interfacial seal that improves over time.
  • 6.
    Indications: ‫٭‬Moderate-to-large restorations ‫٭‬Restorations thatare not in highly esthetic areas of the mouth ‫٭‬Restorations that have heavy occlusal contacts ‫٭‬Restorations that cannot be well isolated ‫٭‬Restorations that extend onto the root surface ‫٭‬Abutment teeth for a removable partial denture
  • 7.
    CONTRAINDICATIONS Esthetically prominent areasof posterior teeth Small-to-moderate Classes I and II restorations that can be well isolated Small Class VI restoration
  • 8.
    The objectives oftreatment remove any enamel that has been undermined by the caries process create a strong restoration that mimics the original sound tooth structure and allows little or no marginal leakage preserve as much sound tooth structure as possible. eliminate caries
  • 9.
    Initial tooth preparationstage Step 1: Outline form and initial depth Step2: Primary resistance form Step3: Primary retention form Step4: Convenience form Final Tooth preparation stage Step 5: Removal of any remaining infected dentin or old restorative material Step 6: Pulp protection Step 7: Secondary resistance and retention forms Step 8: Procedures for finishing external walls Step 9: Final procedure--cleaning, inspecting sealing STAGES OF TOOTH PREPARATION
  • 10.
    OUTLINE FORM (1) carioustooth structure should be eliminated. (2) margins should be placed on sound tooth structure.
  • 11.
    a bur (no245 or 330) is used to cut through the enamel to gain access to the carious dentin. The preparation is widened to give access to all carious dentin and to remove any unsupported enamel. •No sharp angles •Smooth •Conservative Don’t overextend prep into mesial or distal marginal ridges
  • 13.
    A No. 245bur with a head length of 3 mm and a tip diameter of 0.8 mm or a smaller No. 330 bur is recommended The silhouette of the No. 245 inverted cone bur reveals sides slightly convergent toward the shank (this produces an occlusal convergence of the facial and lingual preparation walls, providing adequate retention form for the tooth preparation). The slightly rounded corners of the end of the No. 245 bur produce slightly rounded internal line angles that render the tooth more resistant to fracture from occlusal force. The No. 330 bur is a smaller and pear-shaped version of the No. 245 bur. It is indicated for the most conservative amalgam preparations
  • 14.
    When replacing adefective restoration (recurrent caries lesion), the outline form will be determined by 1. The outline form of the old restoration. 2. Additional carious lesion. 3. The resistance form required
  • 15.
    Outline form ofclass I on different teeth
  • 21.
  • 22.
    • PLACING MARGINSIN SOUND TOOTH STRUCTURE • REMAINING TOOTH CAN WITHSTAND FORCES OF MASTICATION TOOTH • DEPENDING ON RESTORATIVE MATERIAL • RESTORATION SHOULD NOT FRACTURE UNDER MASTICATORY FORCES RESTORATION
  • 23.
    Resistance of tooth 1.Keeping the facial and lingual margin extensions as minimal as possible between the central groove and the cusp tips 2. Extending the outline to include fissures, thereby placing the margins on relatively smooth, sound tooth structure 3. Minimally extending into the marginal ridges (only enough to include the defect) without removing dentinal support 4. Eliminating a weak wall of enamel by joining two outlines that come close together (i.e., less than 0.5 mm apart) 5. Extending the outline form to include enamel undermined by caries.
  • 26.
    Resistance of restorative Adequatethickness for the restorative material Margins should be approximately 90 degrees. Flat pulpal floor (resist forces directed in the long axis of the tooth Rounding of internal line angles
  • 28.
    RETENTION FORM Opposing wallsof Class 1 occlusal restorations should should converge slightly occlusally Grooves: bucco-pulpal or lingo-pulpal
  • 30.
    CONVENIENCE FORM Creating sufficientaccess to the carious lesion to facilitate: ◦ Visibility ◦ Instrumentation during cavity preparation and restoration.
  • 31.
    REMOVAL OF REMAININGCARIES Extension of the cavity should ensure that all caries has been removed from the peripheral DEJ. Best removed using spoon excavator or slow speed round bur
  • 33.
    FINISHING OF THEEXTERNAL WALLS AND FLARES
  • 34.
    Pulp Protection ! Cavitysealers ! Varnish ! Adhesive Sealers ! Cavity liners ! Cavity bases
  • 35.
    Amalgam Placement Set-up Assembleinstruments Triturator Amalgam capsules and dappen dish Amalgam carrier, condensers, carvers, burnishers, explorer, and mirror
  • 38.
    • The initialcondenser should be small enough to condense into the line angles but large enough not to "poke holes" in the amalgam mass. • Usually a smaller condenser is used while filling the preparation and a larger one for overpacking • Each condensing stroke should overlap the previous condensing stroke to ensure that the entire mass is well condensed.  STEPPING OF CONDENSOR • The preparation should be overpacked 1 mm or more using heavy pressure
  • 40.
    Precarve burnishing isa form of condensation. As stated previously, tooth preparations should be overfilled with amalgam. To ensure that the marginal amalgam is well condensed before carving, the overpacked amalgam should be burnished immediately with a large burnisher Precarve burnishing produces denser amalgam at the margins of occlusal preparations
  • 42.
    • Part ofthe edge of the carving blade should rest on the unprepared tooth surface adjacent to the preparation margin • Using this surface as a guide helps to prevent overcarving the amalgam at the margins and to produce a continuity of surface contour across the margins. • Deep occlusal grooves should not be carved into the restoration, because these may thin the amalgam at the margins, invite chipping, and weaken the restoration • The thin portion of amalgam extending beyond the margin is referred to as flash.
  • 44.
    CLASS I OCCLUSOLINGUALAMALGAM RESTORATIONS
  • 45.
    • the mesiodistalwidth of the lingual extension should not exceed 1 mm, except for extension necessary to remove carious or undermined enamel or to include unusual fissuring • When indicated, the tooth preparation should be cut more at the expense of the oblique ridge rather than centering over the fissure (weakening the small distolingual cusp). • Especially on smaller teeth, the occlusal portion may have a slight distal tilt to conserve the dentin support of the distal marginal ridge.
  • 46.
    the lingual surfaceis prepared with the bur's long axis parallel with the lingual surface The tip of the bur should be located at the gingival extent of the lingual fissure. AVOID "roll out" onto the lingual surface, because this could "round over" or damage the cavosurface margin. The facial inclination of the bur must be altered as the cutting progresses to establish the axial wall of the lingual portion at a uniform depth. The axial wall should follow the contour of the lingual surface of the tooth. An axial depth of 0.5 mm inside the DEJ is indicated if retentive locks are required; an axial depth of 0.2 inside the DEJ is permissible if retentive locks are not required.
  • 47.
    • The No.245 bur may be used with its long axis perpendicular to the axial wall to accentuate (i.e., refine) the mesioaxial and distoaxial line angles. • This will also result in the mesial and distal walls converging lingually because of the shape of the bur.
  • 48.
    A matrix ishelpful to prevent "land-sliding" during condensation and to ensure marginal adaptation and strength of the restoration.
  • 52.