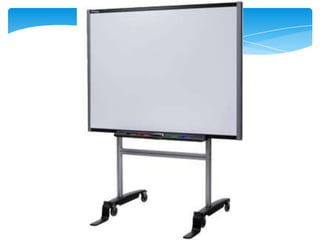
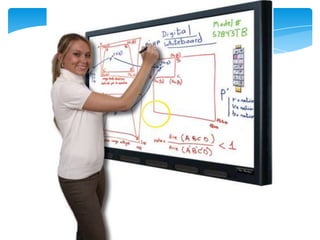
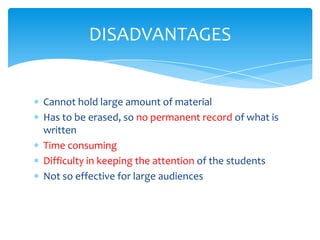
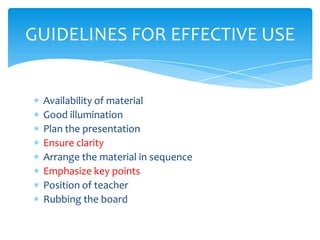
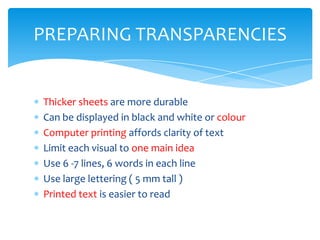
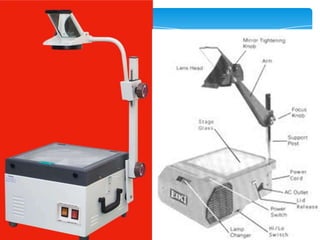
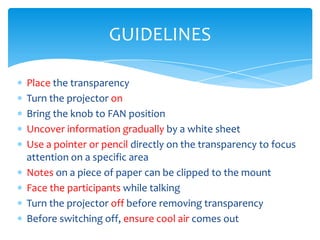
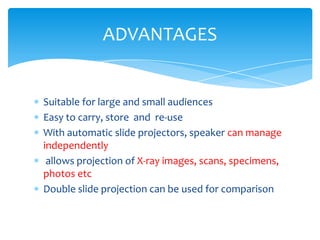
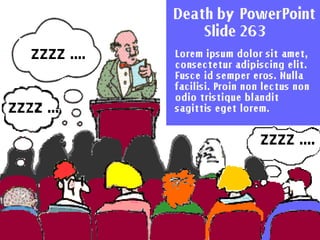
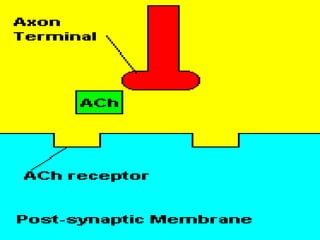
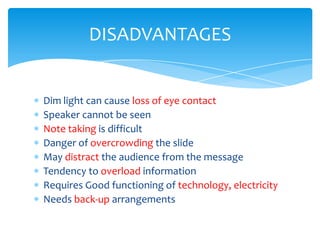
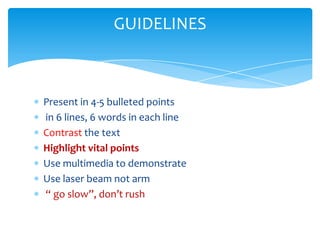
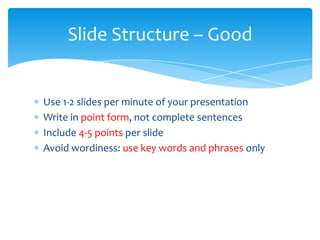
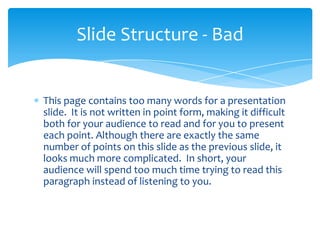
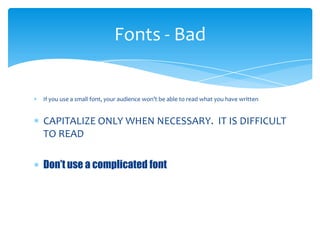
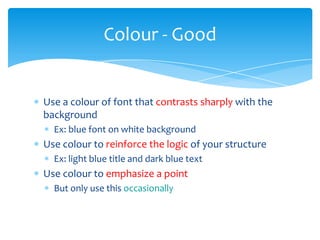
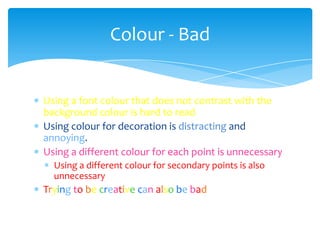
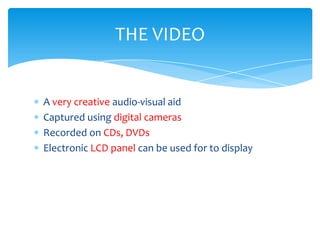
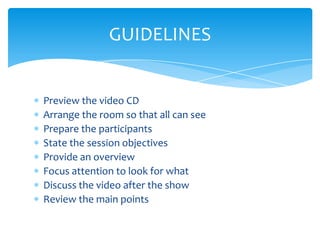
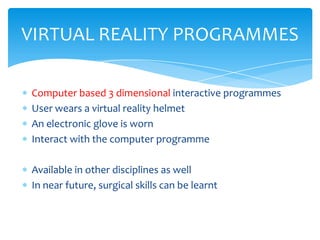
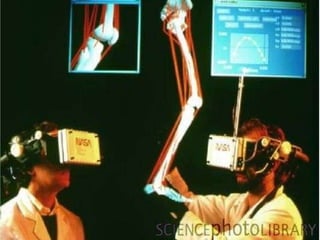
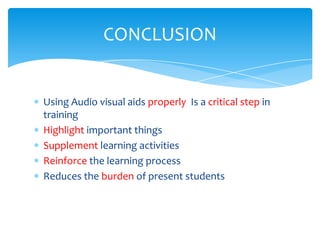
TEACHING–LEARNING MEDIA
   (AUDIOVISUAL AIDS)
    Dr. V.SATHYANARAYANAN M.D.,
    PROFESSOR OF PHARMACOLOGY
             SRM MCH & RC
LEARNING OBJECTIVES


To list various audio visual aids
To know the merits and demerits of each
To know the do’s and don’ts when using them
To select appropriate teaching aid
To express enthusiasm about making efforts for the
preparation process
TEACHING


  Is an art
  Requires 3 things
1) Expertise at the subject
2) Grasp of the language
3) Skills to communicate
TEACHING


4th important thing required is


    CHOOSING THE
        APPROPRIATE
              TEACHING AID
AUDIOVISUAL AIDS


The writing board
The flip chart
Transparencies on Overhead Projector
The Slide Projector
The Power Point Presentation
The video on LCD panel
Virtual Reality Shows
THE WRITING BOARD


Most commonly used
Black board or White board
ADVANTAGES


Easy to use
Inexpensive
Quickly cleaned and reused
Reliable aid
Convenient to list items and draw diagrams
Allows step by step build up
Students can keep pace with the teacher
DISADVANTAGES


Cannot hold large amount of material
Has to be erased, so no permanent record of what is
written
Time consuming
Difficulty in keeping the attention of the students
Not so effective for large audiences
GUIDELINES FOR EFFECTIVE USE


 Availability of material
 Good illumination
 Plan the presentation
 Ensure clarity
 Arrange the material in sequence
 Emphasize key points
 Position of teacher
 Rubbing the board
THE FLIP CHART


Large chart with a pad of paper on a tripod or stand
ADVANTAGES


The notes, diagrams or flow charts can be prepared in
advance
Revealed at the appropriate points of the teaching
session
Pages can be removed and taped on the walls for
future reference.
Can be preserved for display even after the class
DISADVANTAGES


Not effective larger audiences
The chart cannot hold large amount of material
Writing at the same time during session is time
consuming
Difficult to talk at the same time
Sometimes writing is illegible
GUIDELINES FOR EFFECTIVE USE


 Availability of materials
 Good illumination
 Plan the presentation
 Ensure clarity
 Position of teacher
 Displaying material on flip charts
TRANSPARENCIES AND PROJECTOR


 A transparency  Plastic film containing written or
 drawn material preferably in horizontal format
 With Overhead projector, previously prepared
 transparencies are projected
 Magnification 5 times
 Letters – 5-7 mm in height
ADVANTAGES


Simple
Can be used with the classroom lights on
Image can be projected high
Easily available and inexpensive
Can be prepared quickly and in advance
Allows more time for discussion
Allows step-wise presentation of material
Overlay can be done
 can be Preserved for future use
DISADVANTAGES


Speaker has to be careful not to block the view of the
screen
Can go out of focus if it is moved on the stage
Crowding can happen
PREPARING TRANSPARENCIES


Thicker sheets are more durable
Can be displayed in black and white or colour
Computer printing affords clarity of text
Limit each visual to one main idea
Use 6 -7 lines, 6 words in each line
Use large lettering ( 5 mm tall )
Printed text is easier to read
GUIDELINES


Check the on/off switch
Check if the extra bulb is working
Familiarise with focusing and adjusting
Screen for projection placed on a higher level than
the speaker
GUIDELINES


 place the projector 2 meters from the screen
Rotate nob to FAN position, pre-heating for ½ min then
to desired intensity of light
Move lens mirror frame to project ( 45 degrees inclined )
To focus, move the mirror assembly up or down
GUIDELINES

Place the transparency
Turn the projector on
Bring the knob to FAN position
Uncover information gradually by a white sheet
Use a pointer or pencil directly on the transparency to focus
attention on a specific area
Notes on a piece of paper can be clipped to the mount
Face the participants while talking
Turn the projector off before removing transparency
Before switching off, ensure cool air comes out
THE SLIDE PROJECTOR


Uses 35 mm photographic slides for projection
ADVANTAGES


Suitable for large and small audiences
Easy to carry, store and re-use
With automatic slide projectors, speaker can manage
independently
 allows projection of X-ray images, scans, specimens,
photos etc
Double slide projection can be used for comparison
DISADVANTAGES


Need to darken the hall for slide projection
Loss of eye contact
Excessive numbers will result in loss of
communication
THE POWER POINT PRESENTATION


 Used widely as computers are available
 Offers tremendous multimedia capabilities
 Great impact can be created by proper use
 Use humour, anecdotes, stories to illustrate your
 presentation
I like whiskey. I always did, and that is
          why I never drink it.
ADVANTAGES


Can keep the attention on the topic
Slide lay out, colour, font can be modified and
updated
Text, graphics, photographs, figures, X-rays, charts,
diagrams can all be presented
Animation can be given for cues or emphasis
Video clips can be incorporated
WILDLIFE
DISADVANTAGES


Dim light can cause loss of eye contact
Speaker cannot be seen
Note taking is difficult
Danger of overcrowding the slide
May distract the audience from the message
Tendency to overload information
Requires Good functioning of technology, electricity
Needs back-up arrangements
GUIDELINES


Present in 4-5 bulleted points
in 6 lines, 6 words in each line
Contrast the text
Highlight vital points
Use multimedia to demonstrate
Use laser beam not arm
“ go slow”, don’t rush
Slide Structure – Good


Use 1-2 slides per minute of your presentation
Write in point form, not complete sentences
Include 4-5 points per slide
Avoid wordiness: use key words and phrases only
Slide Structure - Bad


This page contains too many words for a presentation
slide. It is not written in point form, making it difficult
both for your audience to read and for you to present
each point. Although there are exactly the same
number of points on this slide as the previous slide, it
looks much more complicated. In short, your
audience will spend too much time trying to read this
paragraph instead of listening to you.
Fonts - Bad


If you use a small font, your audience won’t be able to read what you have written


CAPITALIZE ONLY WHEN NECESSARY. IT IS DIFFICULT
TO READ

Don’t use a complicated font
Colour - Good


Use a colour of font that contrasts sharply with the
background
  Ex: blue font on white background
Use colour to reinforce the logic of your structure
  Ex: light blue title and dark blue text
Use colour to emphasize a point
  But only use this occasionally
Colour - Bad


Using a font colour that does not contrast with the
background colour is hard to read
Using colour for decoration is distracting and
annoying.
Using a different colour for each point is unnecessary
  Using a different colour for secondary points is also
  unnecessary
Trying to be creative can also be bad
Background – Bad


Avoid backgrounds that are distracting or difficult to
read from
Always be consistent with the background that you
use
Graphs - Good
                Items Sold in First Quarter of 2002

100
90
80
70
60
                                                       Blue Balls
50
                                                       Red Balls
40
30
20
10
 0
      January         February     March       April
Graphs - Bad
100

                                      90
 90


 80


 70


 60


                                                                                Blue Balls
 50
                                                                                Red Balls

                               38.6
 40
                                                   34.6
               30.6                                                      31.6
 30                   27.4

      20.4                                                20.4
 20


 10


  0
         January         February          March                 April
SMART TIPS


Go blank
Add speaker notes
Navigate
THE VIDEO


A very creative audio-visual aid
Captured using digital cameras
Recorded on CDs, DVDs
Electronic LCD panel can be used for to display
ADVANTAGES


Can capture events the eye alone cannot see
Individual steps can be shown
Make the participants to watch step by step
Animation can be used to show an abstract concept
DISADVANTAGES


Key steps may be omitted or rearranged
Commercially prepared video may be out-dated
Students may be distracted
GUIDELINES


Preview the video CD
Arrange the room so that all can see
Prepare the participants
State the session objectives
Provide an overview
Focus attention to look for what
Discuss the video after the show
Review the main points
VIRTUAL REALITY PROGRAMMES

Computer based 3 dimensional interactive programmes
User wears a virtual reality helmet
An electronic glove is worn
Interact with the computer programme

Available in other disciplines as well
In near future, surgical skills can be learnt
CONCLUSION


Using Audio visual aids properly Is a critical step in
training
Highlight important things
Supplement learning activities
Reinforce the learning process
Reduces the burden of present students
Teaching – learning media in medical education

Teaching – learning media in medical education

  • 1.
    TEACHING–LEARNING MEDIA (AUDIOVISUAL AIDS) Dr. V.SATHYANARAYANAN M.D., PROFESSOR OF PHARMACOLOGY SRM MCH & RC
  • 3.
    LEARNING OBJECTIVES To listvarious audio visual aids To know the merits and demerits of each To know the do’s and don’ts when using them To select appropriate teaching aid To express enthusiasm about making efforts for the preparation process
  • 4.
    TEACHING Isan art Requires 3 things 1) Expertise at the subject 2) Grasp of the language 3) Skills to communicate
  • 9.
    TEACHING 4th important thingrequired is CHOOSING THE APPROPRIATE TEACHING AID
  • 10.
    AUDIOVISUAL AIDS The writingboard The flip chart Transparencies on Overhead Projector The Slide Projector The Power Point Presentation The video on LCD panel Virtual Reality Shows
  • 11.
    THE WRITING BOARD Mostcommonly used Black board or White board
  • 15.
    ADVANTAGES Easy to use Inexpensive Quicklycleaned and reused Reliable aid Convenient to list items and draw diagrams Allows step by step build up Students can keep pace with the teacher
  • 22.
    DISADVANTAGES Cannot hold largeamount of material Has to be erased, so no permanent record of what is written Time consuming Difficulty in keeping the attention of the students Not so effective for large audiences
  • 28.
    GUIDELINES FOR EFFECTIVEUSE Availability of material Good illumination Plan the presentation Ensure clarity Arrange the material in sequence Emphasize key points Position of teacher Rubbing the board
  • 29.
    THE FLIP CHART Largechart with a pad of paper on a tripod or stand
  • 33.
    ADVANTAGES The notes, diagramsor flow charts can be prepared in advance Revealed at the appropriate points of the teaching session Pages can be removed and taped on the walls for future reference. Can be preserved for display even after the class
  • 38.
    DISADVANTAGES Not effective largeraudiences The chart cannot hold large amount of material Writing at the same time during session is time consuming Difficult to talk at the same time Sometimes writing is illegible
  • 44.
    GUIDELINES FOR EFFECTIVEUSE Availability of materials Good illumination Plan the presentation Ensure clarity Position of teacher Displaying material on flip charts
  • 45.
    TRANSPARENCIES AND PROJECTOR A transparency  Plastic film containing written or drawn material preferably in horizontal format With Overhead projector, previously prepared transparencies are projected Magnification 5 times Letters – 5-7 mm in height
  • 48.
    ADVANTAGES Simple Can be usedwith the classroom lights on Image can be projected high Easily available and inexpensive Can be prepared quickly and in advance Allows more time for discussion Allows step-wise presentation of material Overlay can be done can be Preserved for future use
  • 55.
    DISADVANTAGES Speaker has tobe careful not to block the view of the screen Can go out of focus if it is moved on the stage Crowding can happen
  • 59.
    PREPARING TRANSPARENCIES Thicker sheetsare more durable Can be displayed in black and white or colour Computer printing affords clarity of text Limit each visual to one main idea Use 6 -7 lines, 6 words in each line Use large lettering ( 5 mm tall ) Printed text is easier to read
  • 62.
    GUIDELINES Check the on/offswitch Check if the extra bulb is working Familiarise with focusing and adjusting Screen for projection placed on a higher level than the speaker
  • 64.
    GUIDELINES place theprojector 2 meters from the screen Rotate nob to FAN position, pre-heating for ½ min then to desired intensity of light Move lens mirror frame to project ( 45 degrees inclined ) To focus, move the mirror assembly up or down
  • 65.
    GUIDELINES Place the transparency Turnthe projector on Bring the knob to FAN position Uncover information gradually by a white sheet Use a pointer or pencil directly on the transparency to focus attention on a specific area Notes on a piece of paper can be clipped to the mount Face the participants while talking Turn the projector off before removing transparency Before switching off, ensure cool air comes out
  • 66.
    THE SLIDE PROJECTOR Uses35 mm photographic slides for projection
  • 69.
    ADVANTAGES Suitable for largeand small audiences Easy to carry, store and re-use With automatic slide projectors, speaker can manage independently allows projection of X-ray images, scans, specimens, photos etc Double slide projection can be used for comparison
  • 71.
    DISADVANTAGES Need to darkenthe hall for slide projection Loss of eye contact Excessive numbers will result in loss of communication
  • 75.
    THE POWER POINTPRESENTATION Used widely as computers are available Offers tremendous multimedia capabilities Great impact can be created by proper use Use humour, anecdotes, stories to illustrate your presentation
  • 77.
    I like whiskey.I always did, and that is why I never drink it.
  • 81.
    ADVANTAGES Can keep theattention on the topic Slide lay out, colour, font can be modified and updated Text, graphics, photographs, figures, X-rays, charts, diagrams can all be presented Animation can be given for cues or emphasis Video clips can be incorporated
  • 91.
  • 92.
    DISADVANTAGES Dim light cancause loss of eye contact Speaker cannot be seen Note taking is difficult Danger of overcrowding the slide May distract the audience from the message Tendency to overload information Requires Good functioning of technology, electricity Needs back-up arrangements
  • 97.
    GUIDELINES Present in 4-5bulleted points in 6 lines, 6 words in each line Contrast the text Highlight vital points Use multimedia to demonstrate Use laser beam not arm “ go slow”, don’t rush
  • 98.
    Slide Structure –Good Use 1-2 slides per minute of your presentation Write in point form, not complete sentences Include 4-5 points per slide Avoid wordiness: use key words and phrases only
  • 99.
    Slide Structure -Bad This page contains too many words for a presentation slide. It is not written in point form, making it difficult both for your audience to read and for you to present each point. Although there are exactly the same number of points on this slide as the previous slide, it looks much more complicated. In short, your audience will spend too much time trying to read this paragraph instead of listening to you.
  • 100.
    Fonts - Bad Ifyou use a small font, your audience won’t be able to read what you have written CAPITALIZE ONLY WHEN NECESSARY. IT IS DIFFICULT TO READ Don’t use a complicated font
  • 101.
    Colour - Good Usea colour of font that contrasts sharply with the background Ex: blue font on white background Use colour to reinforce the logic of your structure Ex: light blue title and dark blue text Use colour to emphasize a point But only use this occasionally
  • 102.
    Colour - Bad Usinga font colour that does not contrast with the background colour is hard to read Using colour for decoration is distracting and annoying. Using a different colour for each point is unnecessary Using a different colour for secondary points is also unnecessary Trying to be creative can also be bad
  • 104.
    Background – Bad Avoidbackgrounds that are distracting or difficult to read from Always be consistent with the background that you use
  • 105.
    Graphs - Good Items Sold in First Quarter of 2002 100 90 80 70 60 Blue Balls 50 Red Balls 40 30 20 10 0 January February March April
  • 106.
    Graphs - Bad 100 90 90 80 70 60 Blue Balls 50 Red Balls 38.6 40 34.6 30.6 31.6 30 27.4 20.4 20.4 20 10 0 January February March April
  • 107.
    SMART TIPS Go blank Addspeaker notes Navigate
  • 109.
    THE VIDEO A verycreative audio-visual aid Captured using digital cameras Recorded on CDs, DVDs Electronic LCD panel can be used for to display
  • 113.
    ADVANTAGES Can capture eventsthe eye alone cannot see Individual steps can be shown Make the participants to watch step by step Animation can be used to show an abstract concept
  • 117.
    DISADVANTAGES Key steps maybe omitted or rearranged Commercially prepared video may be out-dated Students may be distracted
  • 121.
    GUIDELINES Preview the videoCD Arrange the room so that all can see Prepare the participants State the session objectives Provide an overview Focus attention to look for what Discuss the video after the show Review the main points
  • 122.
    VIRTUAL REALITY PROGRAMMES Computerbased 3 dimensional interactive programmes User wears a virtual reality helmet An electronic glove is worn Interact with the computer programme Available in other disciplines as well In near future, surgical skills can be learnt
  • 127.
    CONCLUSION Using Audio visualaids properly Is a critical step in training Highlight important things Supplement learning activities Reinforce the learning process Reduces the burden of present students

Editor's Notes

  • #127 Applications of virtual reality systems in medical education. Here, two doctors use a system developed at NASA's Ames Research Centre in Menlo Park, California, to study the anatomy of the human leg. They both wear a headset equipped with 3-D video displays to view the computer-generated graphical images - one is shown between the two doctors, other views are on background screens. Physical exploration of the leg anatomy is afforded by using the dataglove, a black rubber glove with woven optical fibre sensors, which relays data on their physical hand movements back to the computer.