1. Editing
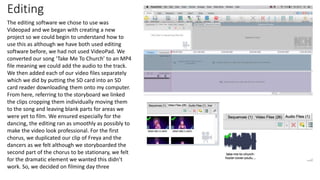
The editing software we chose to use was
Videopad and we began with creating a new
project so we could begin to understand how to
use this as although we have both used editing
software before, we had not used VideoPad. We
converted our song ‘Take Me To Church’ to an MP4
file meaning we could add the audio to the track.
We then added each of our video files separately
which we did by putting the SD card into an SD
card reader downloading them onto my computer.
From here, referring to the storyboard we linked
the clips cropping them individually moving them
to the song and leaving blank parts for areas we
were yet to film. We ensured especially for the
dancing, the editing ran as smoothly as possibly to
make the video look professional. For the first
chorus, we duplicated our clip of Freya and the
dancers as we felt although we storyboarded the
second part of the chorus to be stationary, we felt
for the dramatic element we wanted this didn’t
work. So, we decided on filming day three
2. to re film certain parts of the dance of the first chorus to
break the clip up and build dramatic tension. When we
inserted the clips, we only wanted to hear the audio of the
song meaning we had to delete the background audio from
the clips. To do this, we unlinked the audio from the video
meaning we could delete the audio without deleting the
rest of the clip. We then moved the song along due to the
fact the audio from the clip moved it so it meant we had
the correct audio to work with the clip. We realized after
filming day three we forgot to film one part of our clip so
we added test clarifying why this shot isn’t here clearly
showing why it is blank. Then we simply moved the clips
around to make the lip syncing as effective as possible
whilst making the dancing transitions look smooth and
professional. This did result in some of the clips being
slighter longer or shorter than the duration time on
storyboard. For some of our clips, we both discussed
possible transitions in our clips but only decided to have
one fading to black at the end as through our research, we
have discovered this is a very typical end to a music video
so it reinstates the professional element giving our music
video a more realistic approach and will appeal to our
target audience as indie artists are also typical of this
transition.
3. Overall, we are happy with the outcome of the video, we exported the
video as a wmv file with the YouTube 4K resolution with the auto frame
rate to ensure the playback is as high a quality as possible. We then
uploaded this onto YouTube and embedded the code onto our blogs. We
feel the lip synching of the video is very accurate but we are considering
booking the Hall to re film any parts we received feedback on. We can tell
the quality of the video does vary in certain parts of the video so we will
definitely be re filming parts along with the part we missed for sure. Our
lighting and certain shots worked well in our video so we will ensure we
recreate these to achieve the same effect however, we can see the
brightness of the lighting can make the dancers look lost at certain points
when we do a wide shot so we will position the spotlight carefully so we
can see the dancers clearly whilst maintaining the professional element in
our video. We have realized in the making of this video the importance of
the storyboard which we have used and developed and changed certain
shots and although this helped us a lot for our draft video, we are going to
start breaking clips up (such as more close ups) to gain the dramatic and
tense element we wanted which aren’t included in our storyboard.