
Recommended
More Related Content
What's hot
What's hot (20)
Viewers also liked
Viewers also liked (17)
Similar to Editing screenshots
Similar to Editing screenshots (20)
More from EstelleLouise97
More from EstelleLouise97 (18)
Recently uploaded
Recently uploaded (20)
Editing screenshots
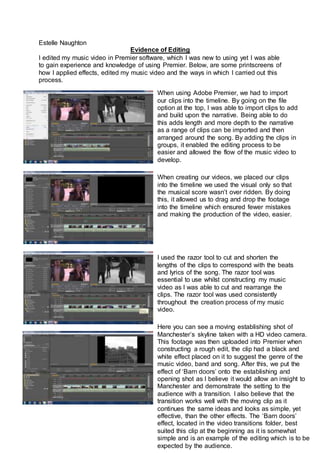
- 1. Estelle Naughton Evidence of Editing I edited my music video in Premier software, which I was new to using yet I was able to gain experience and knowledge of using Premier. Below, are some printscreens of how I applied effects, edited my music video and the ways in which I carried out this process. When using Adobe Premier, we had to import our clips into the timeline. By going on the file option at the top, I was able to import clips to add and build upon the narrative. Being able to do this adds length and more depth to the narrative as a range of clips can be imported and then arranged around the song. By adding the clips in groups, it enabled the editing process to be easier and allowed the flow of the music video to develop. When creating our videos, we placed our clips into the timeline we used the visual only so that the musical score wasn’t over ridden. By doing this, it allowed us to drag and drop the footage into the timeline which ensured fewer mistakes and making the production of the video, easier. I used the razor tool to cut and shorten the lengths of the clips to correspond with the beats and lyrics of the song. The razor tool was essential to use whilst constructing my music video as I was able to cut and rearrange the clips. The razor tool was used consistently throughout the creation process of my music video. Here you can see a moving establishing shot of Manchester’s skyline taken with a HD video camera. This footage was then uploaded into Premier when constructing a rough edit, the clip had a black and white effect placed on it to suggest the genre of the music video, band and song. After this, we put the effect of ‘Barn doors’ onto the establishing and opening shot as I believe it would allow an insight to Manchester and demonstrate the setting to the audience with a transition. I also believe that the transition works well with the moving clip as it continues the same ideas and looks as simple, yet effective, than the other effects. The ‘Barn doors’ effect, located in the video transitions folder, best suited this clip at the beginning as it is somewhat simple and is an example of the editing which is to be expected by the audience.
- 2. The consistent piece of editing throughout our music video is the black and white effect placed on all imagery and clips used throughout the video which indicate and demonstrate the genre of the video, song and band. Before applying any effects to any piece of footage, I looked through all the editing effects available on the software, I knew I wanted to use a black and white effect throughout the video, and by looking through the editing effects before looking for the one I wanted, it allowed easier access and knowledge of where the effects were for later usage. I found the black and white effect within the sub folder of video effects, to which I then applied to each individual clip as I went along the editing process and constructing my music video to see if the clip looked okay in black and white, if not, I was able to find an alternative clip. One locating the black and white effect, I dragged it onto the timeline at the bottom showing the continuous edit which then transformed the clip from colour into black and white. I continued to do this for every piece of footage, to display continuity and keep the narrative consistency. On the left you can see the original clip without any editing effects placed on it, and despite losing the vibrancy of the colours when putting a black and white effect on the clip, I believe the vividness of the colours are still able to come through within the narrative when the clip is in black and white. The additive dissolve was used briefly in one clip at the beginning of the music video, this was to foreshadow the events displayed later on in the narrative and using the same clip. This effect was located in the video transitions file, in the sub folder dissolve and I dragged the additive dissolve onto the clip on the timeline. This enabled a quick turnaround in the events of narrative, allowing a preview of the ending of the narrative. By marking in and out the clips we was able to watch the overall clip and then adapt the length and amount of the clip we wanted to use, this reduced the change of cutting the wrong clip.
- 3. As you can see, I have used a multitude of editing techniques whilst producing my music video to enhance the quality and ensure the video can live up the its full potential. By slowing down the footage used as shown, I was able to add a depth to the narrative of the music video. It allowed a slower, more mellow feel to the video when clips were slowed down which corresponded to the song. On the flipside, I was able to speed clips up to ensure a level of diversity to the music video when compared with the slowed down shots. This corresponds with the tempo of the song and allowed a different feeling to the narrative. At the end of the video, we produced credits to say thank you to the main actors who were involved and then included the production team. We used still titles instead of rolling titles as it represented out video and the overall narrative and were still within the beats of the song. The still titles show the stationed and expected part of their relationship and then reinforce the shock of the ending of the narrative, which is foreshadowed in the beginning.