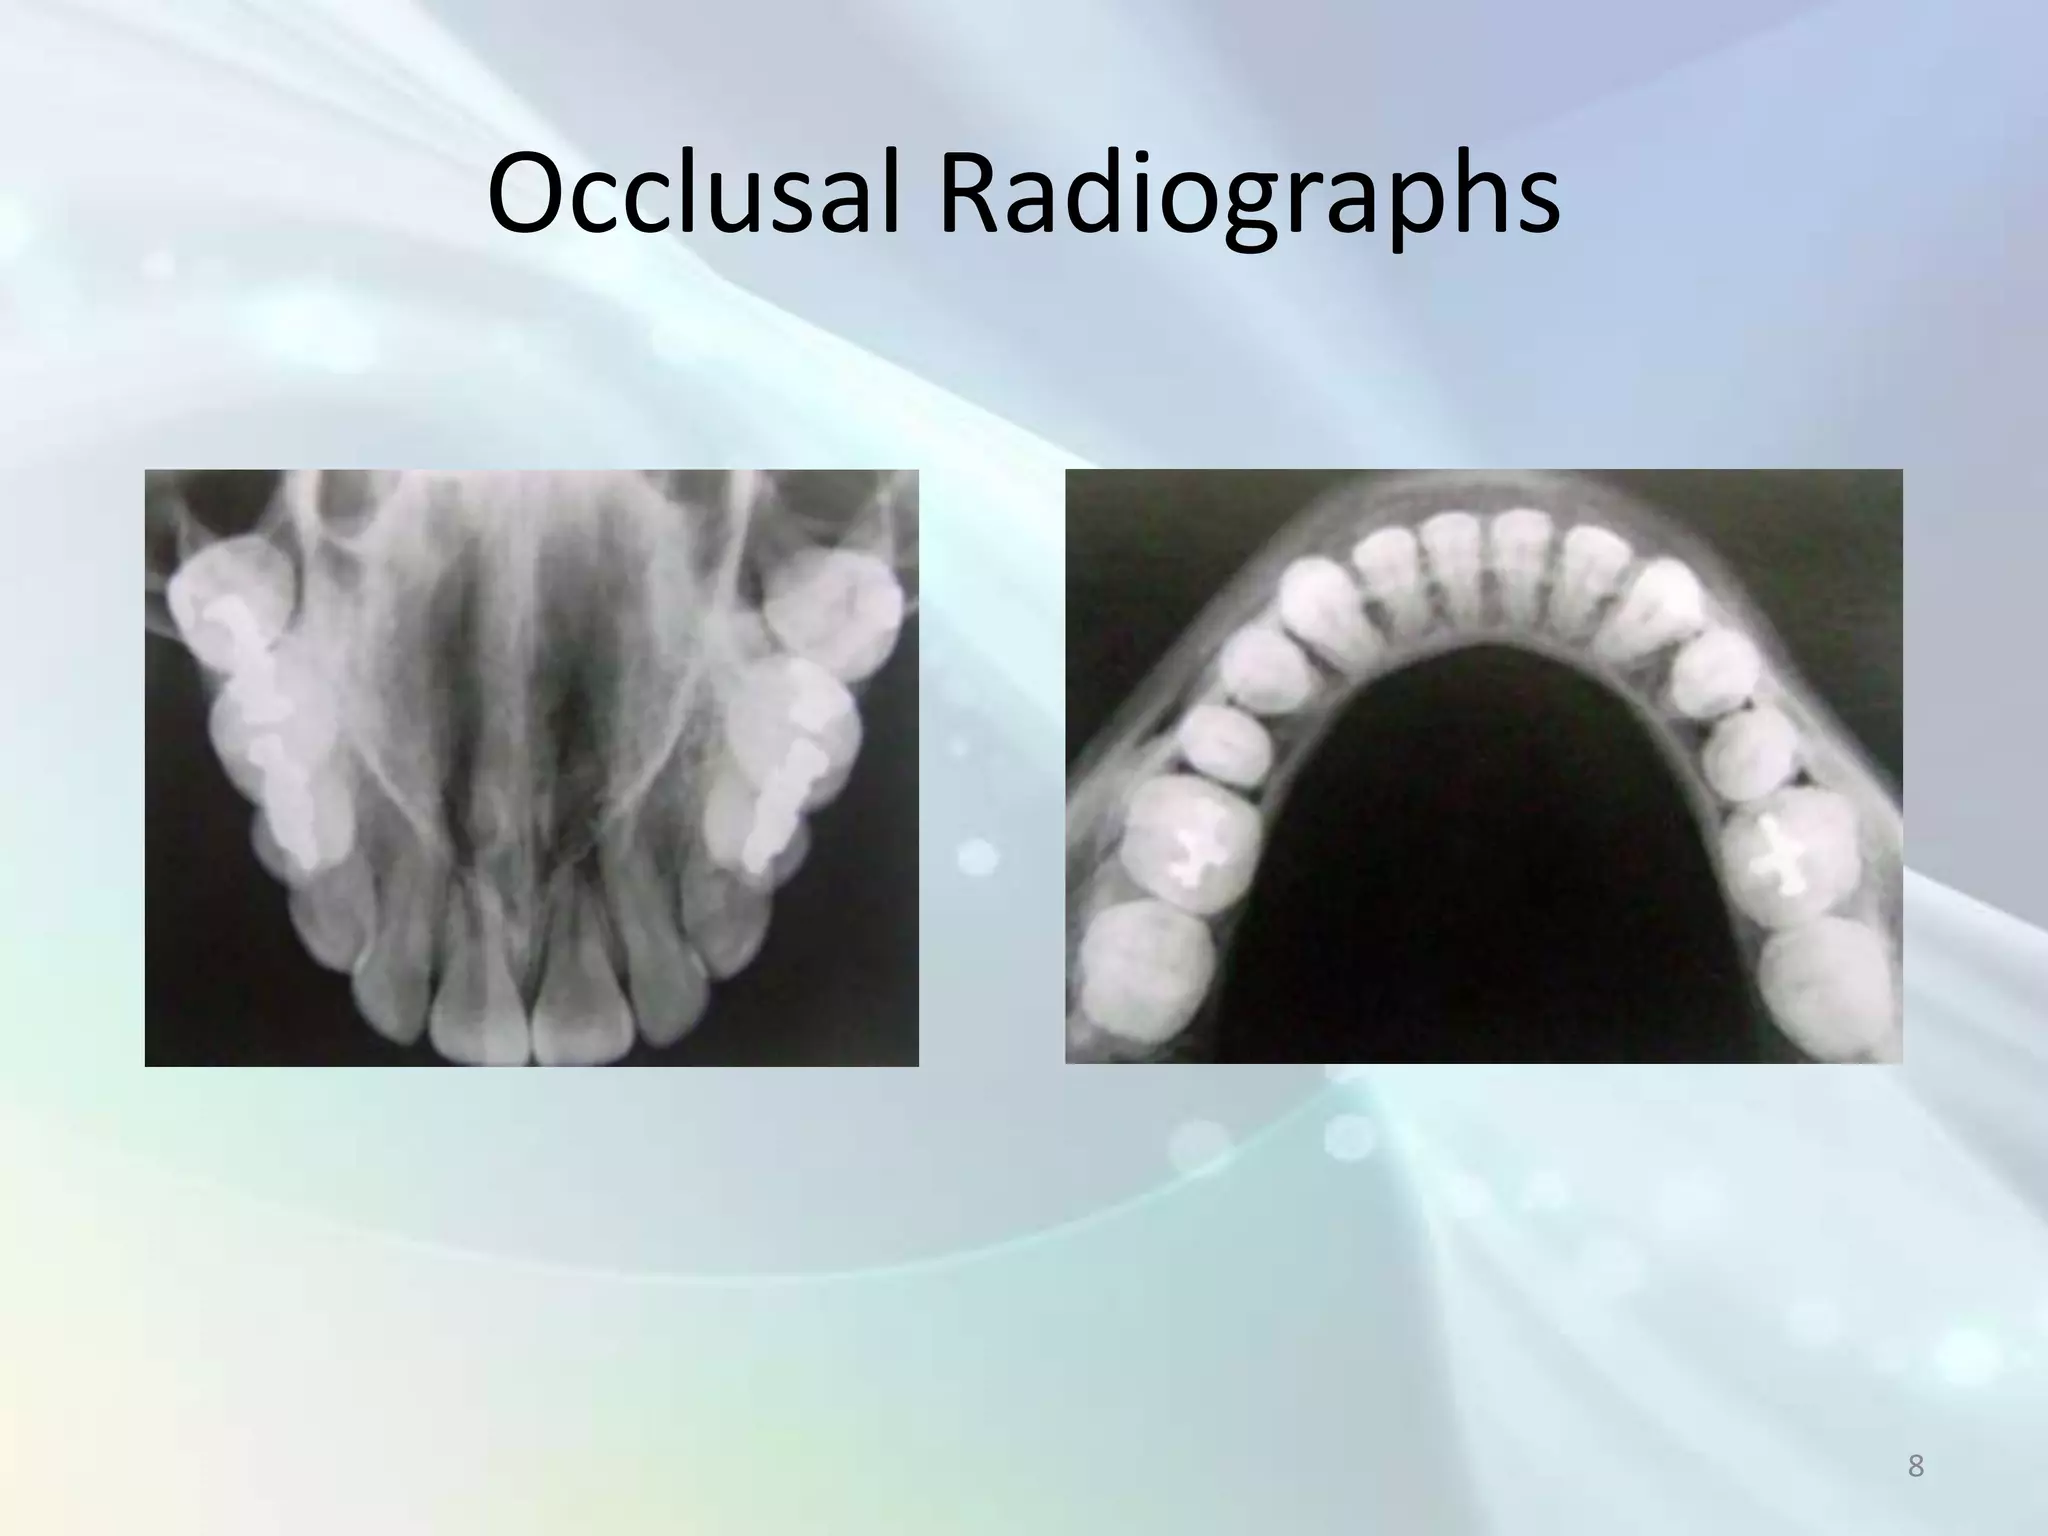
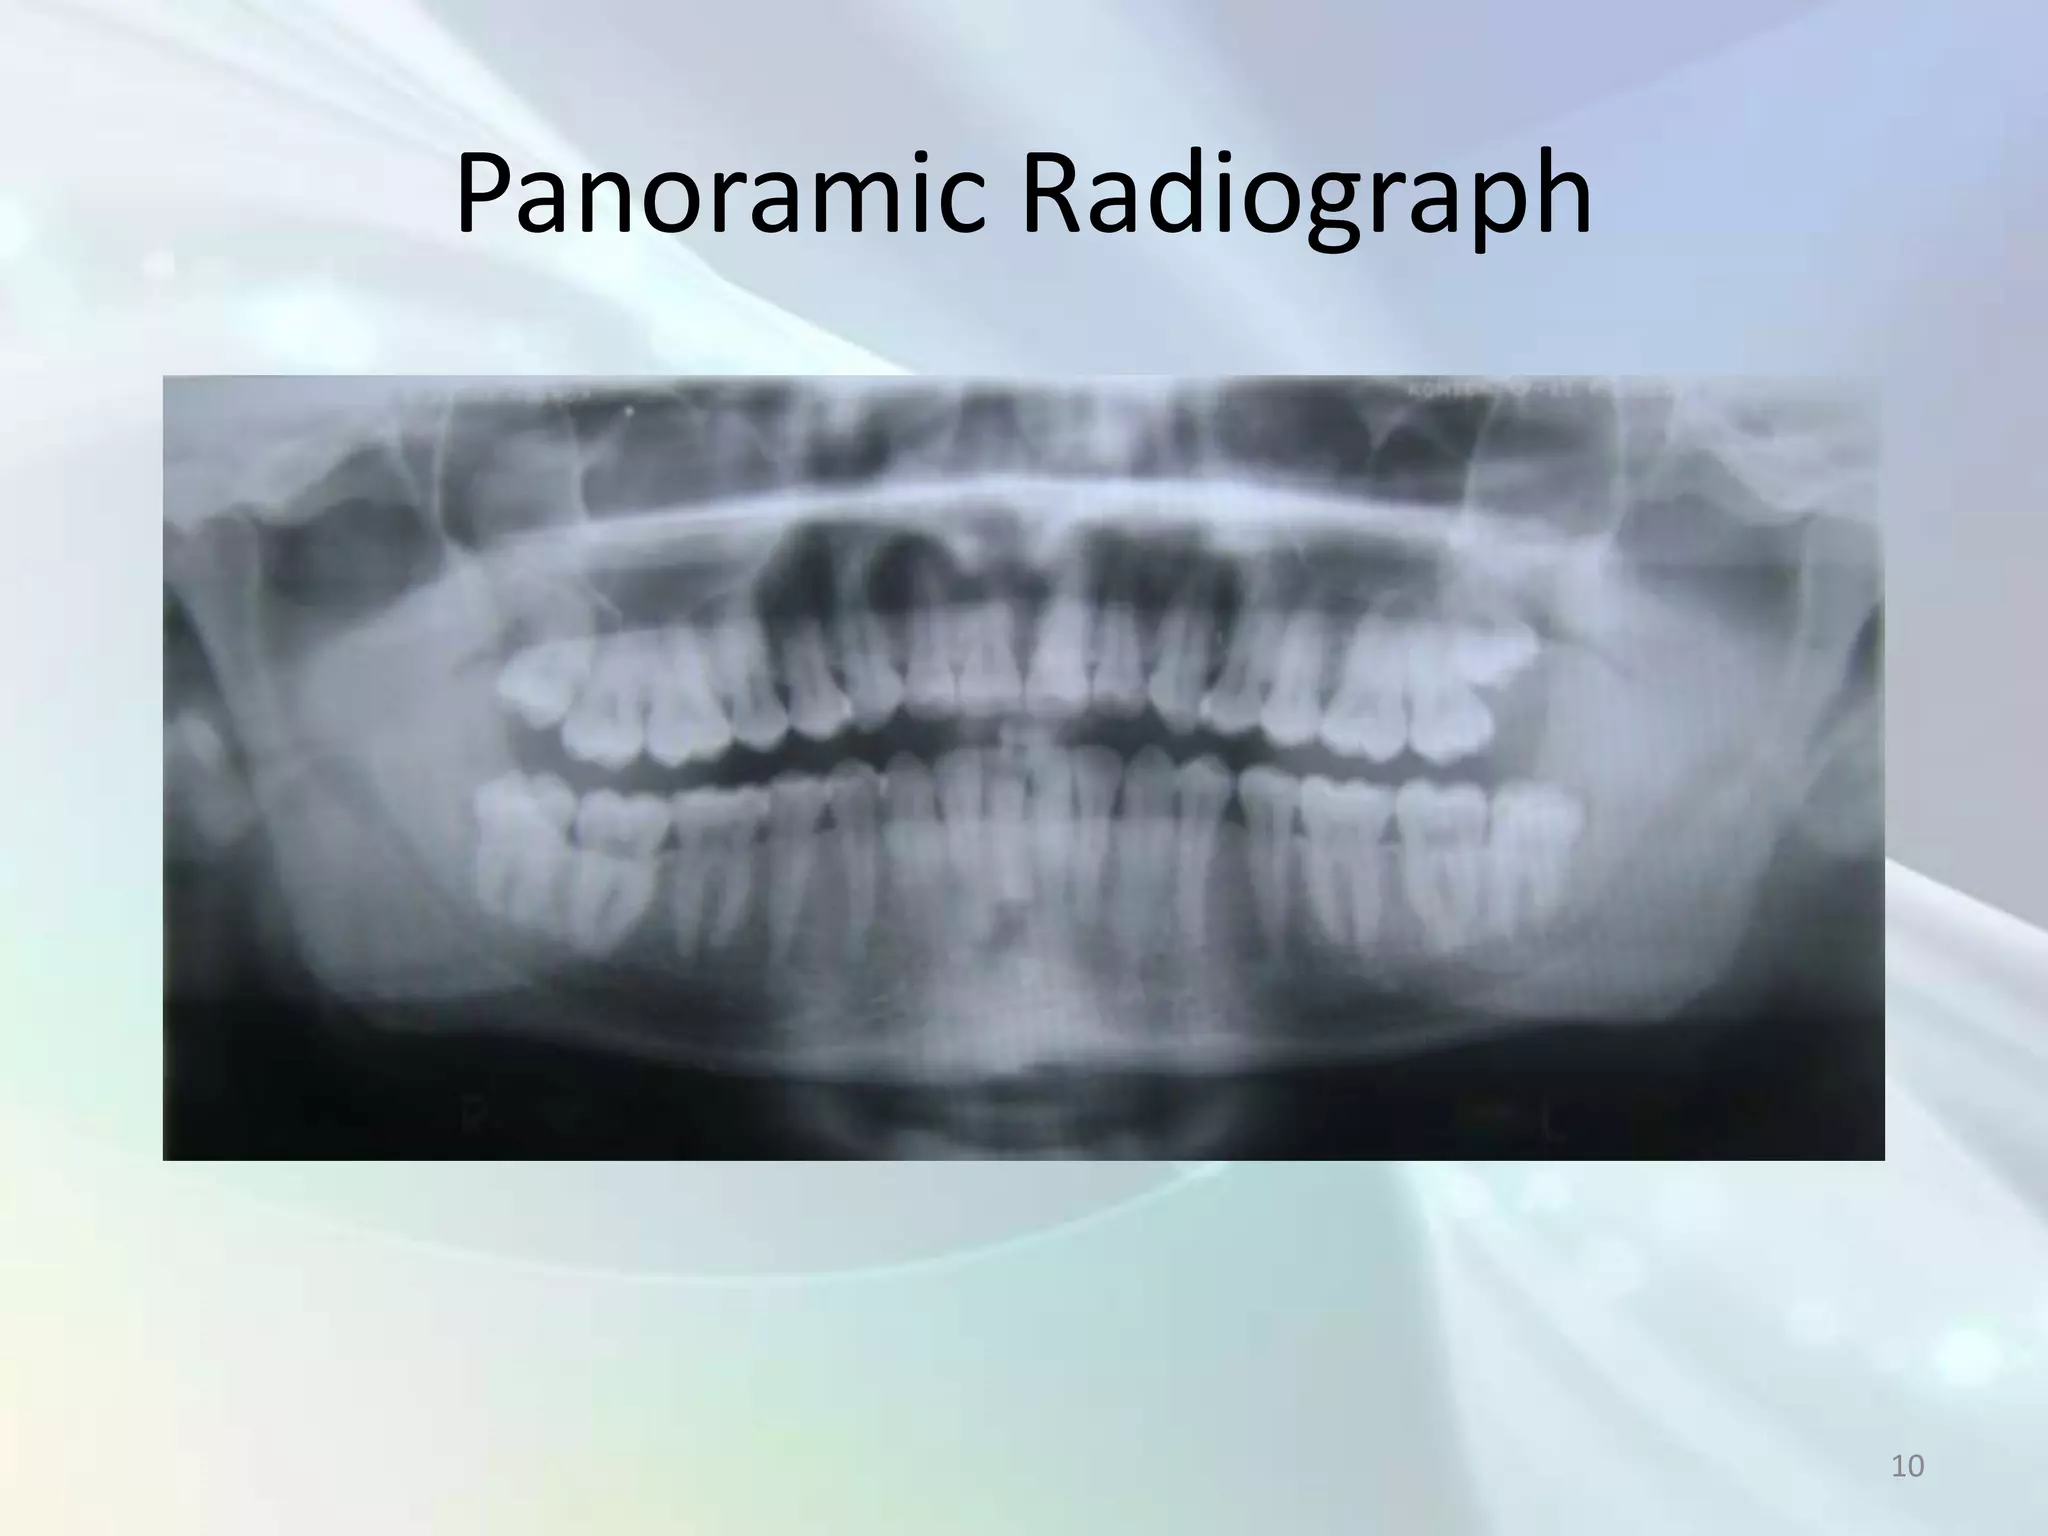
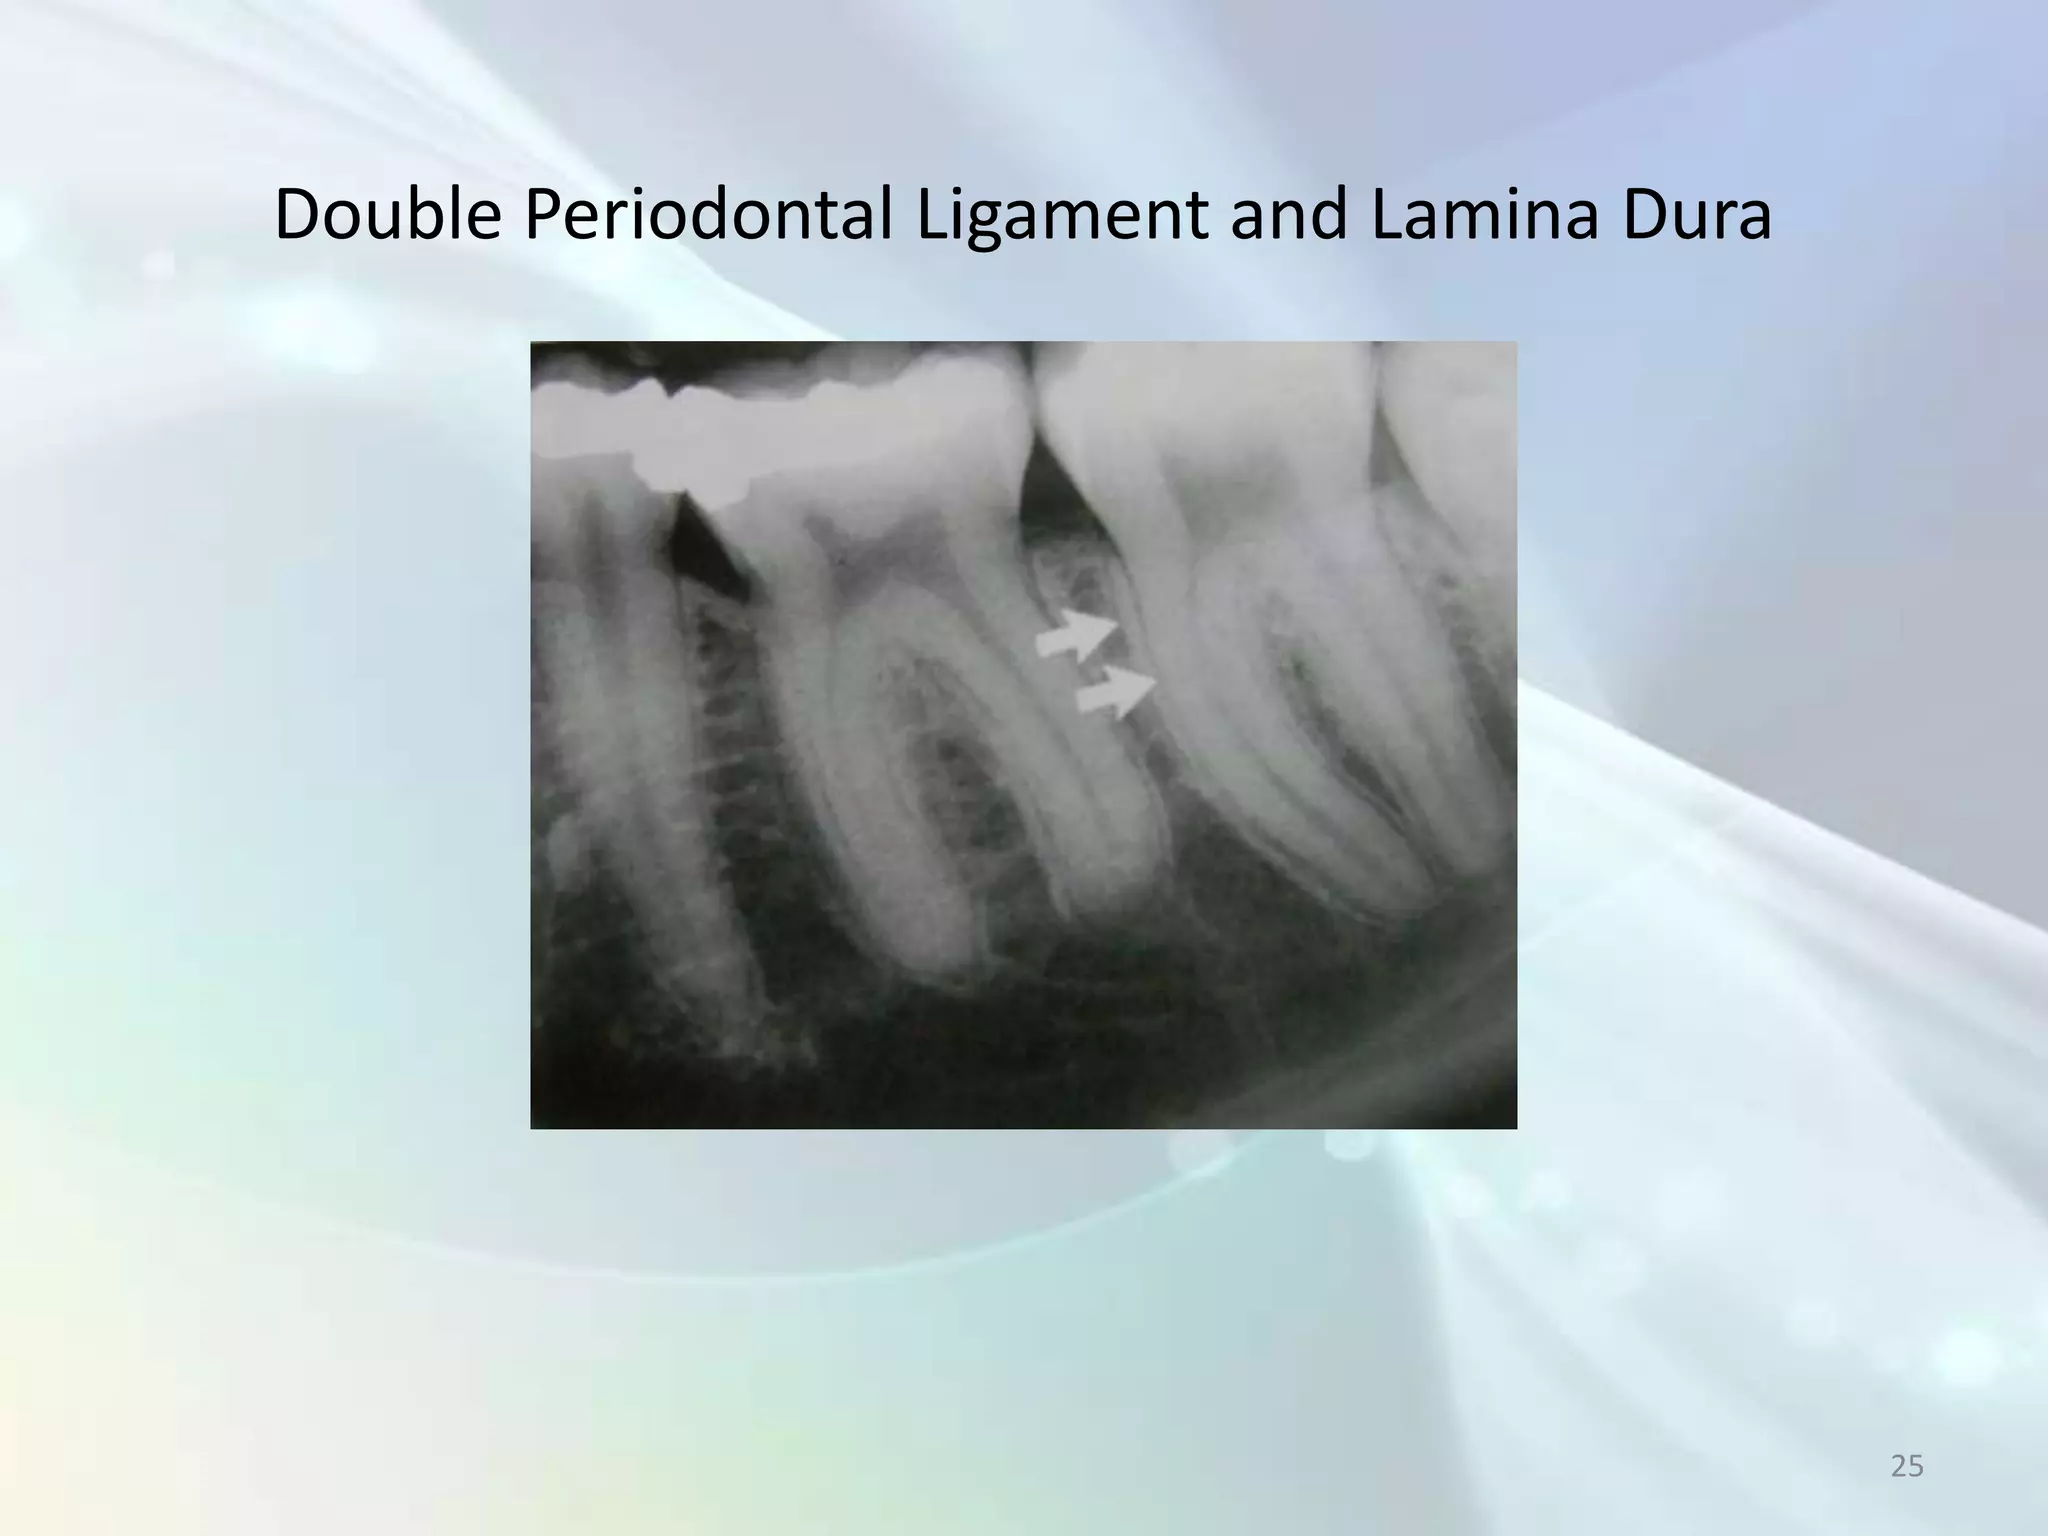
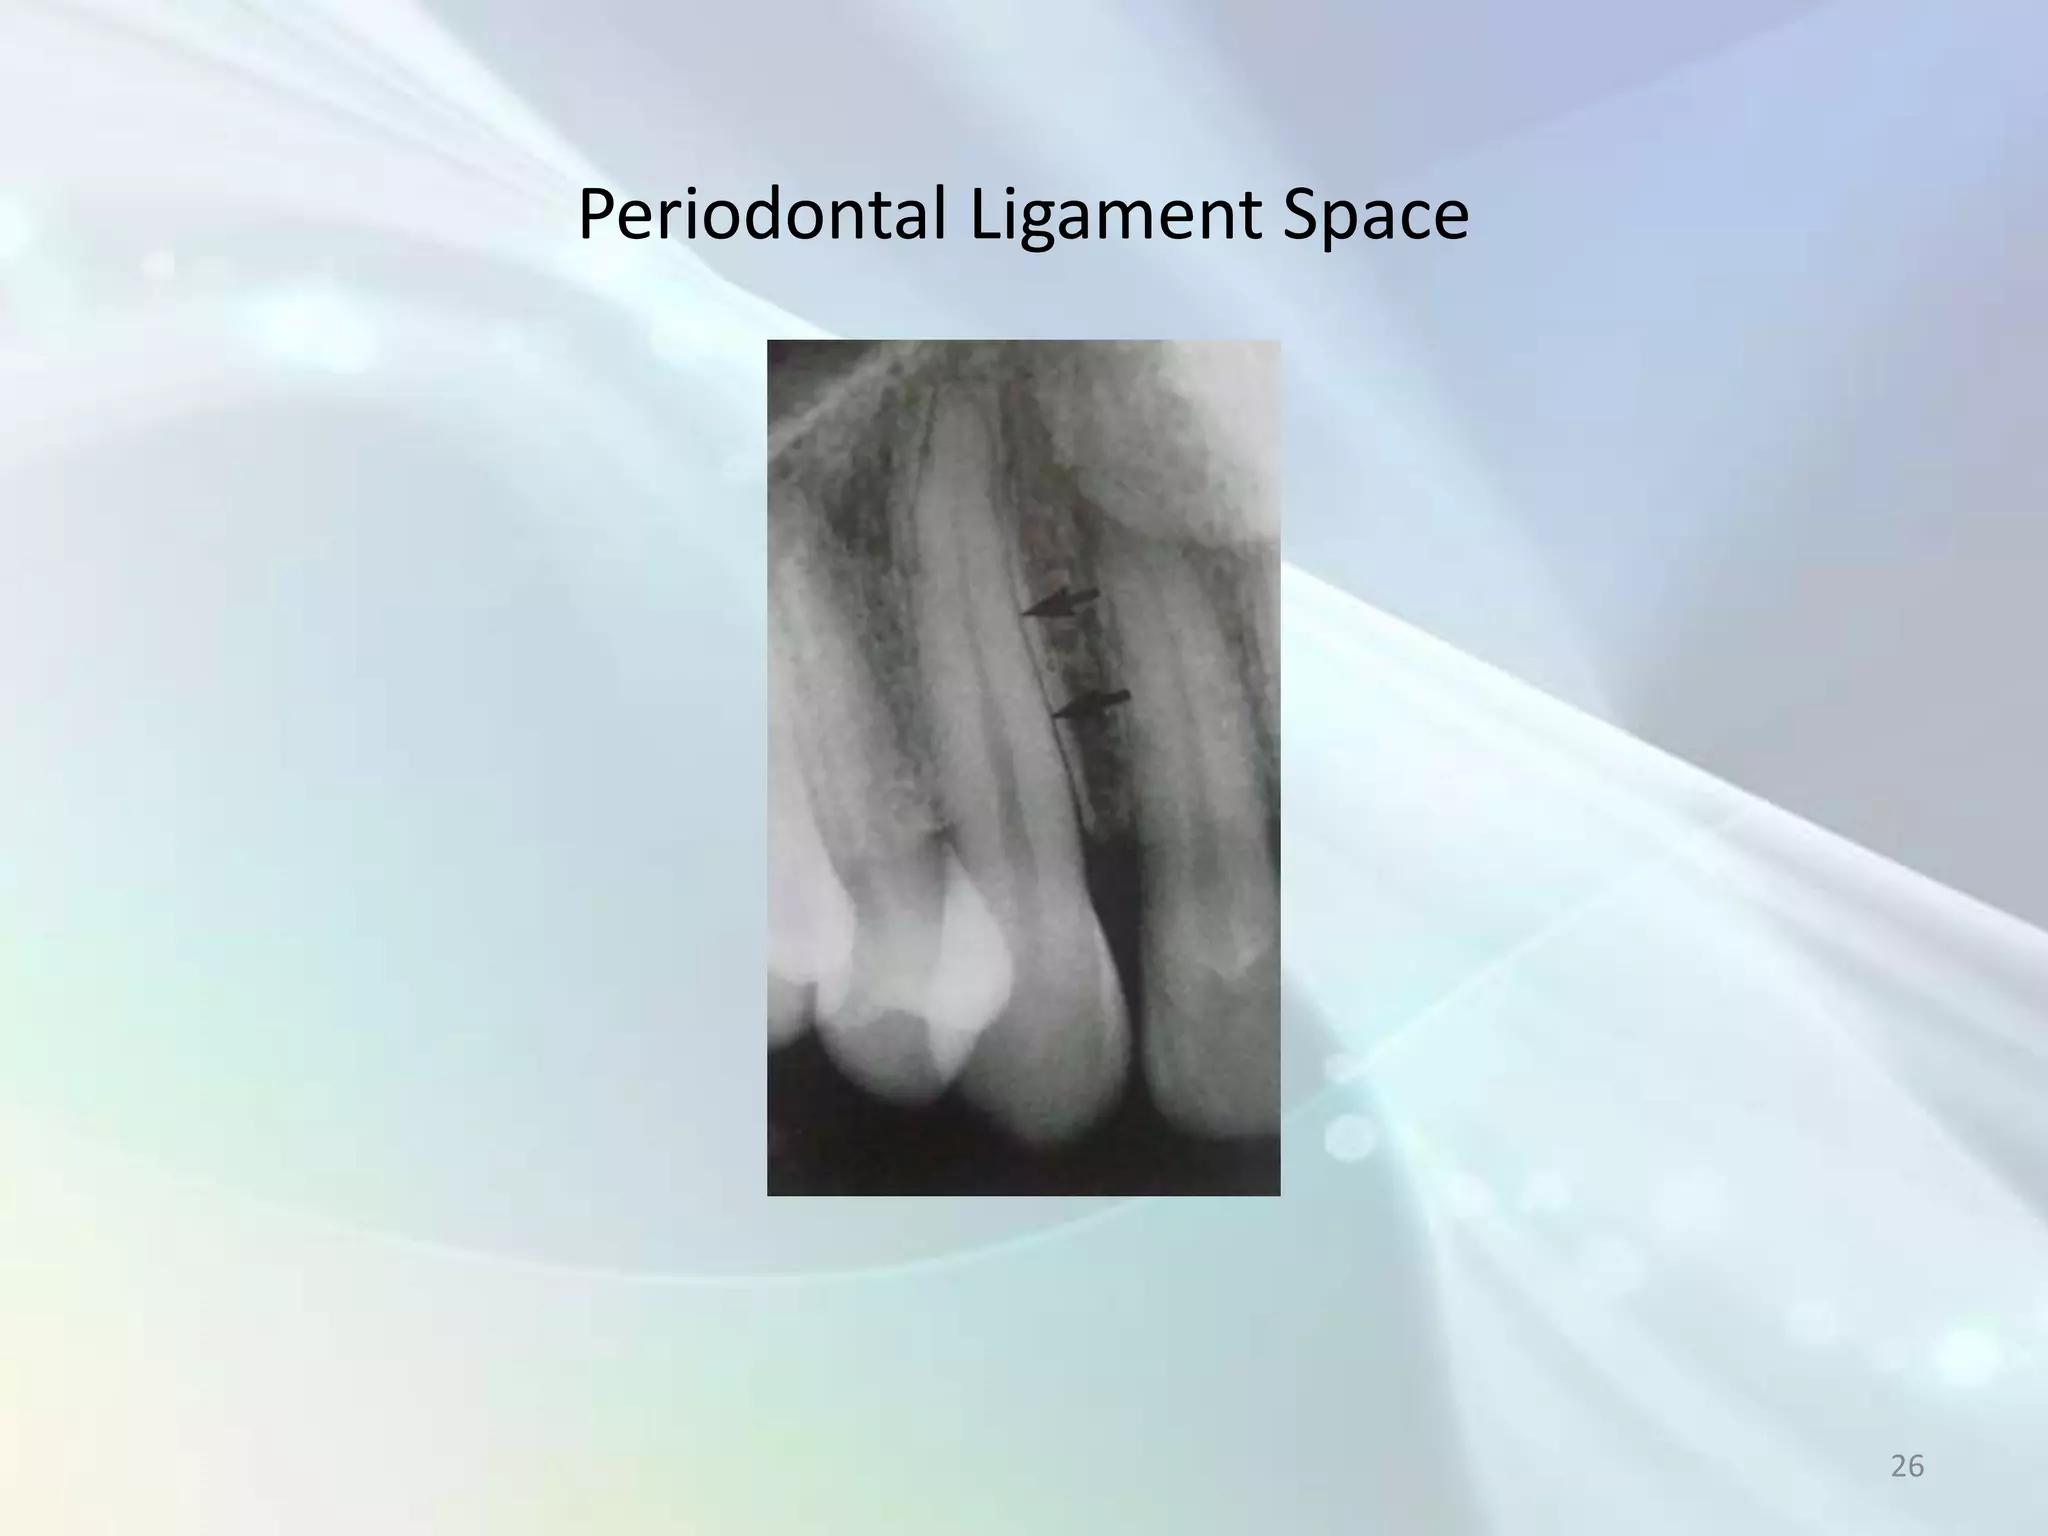
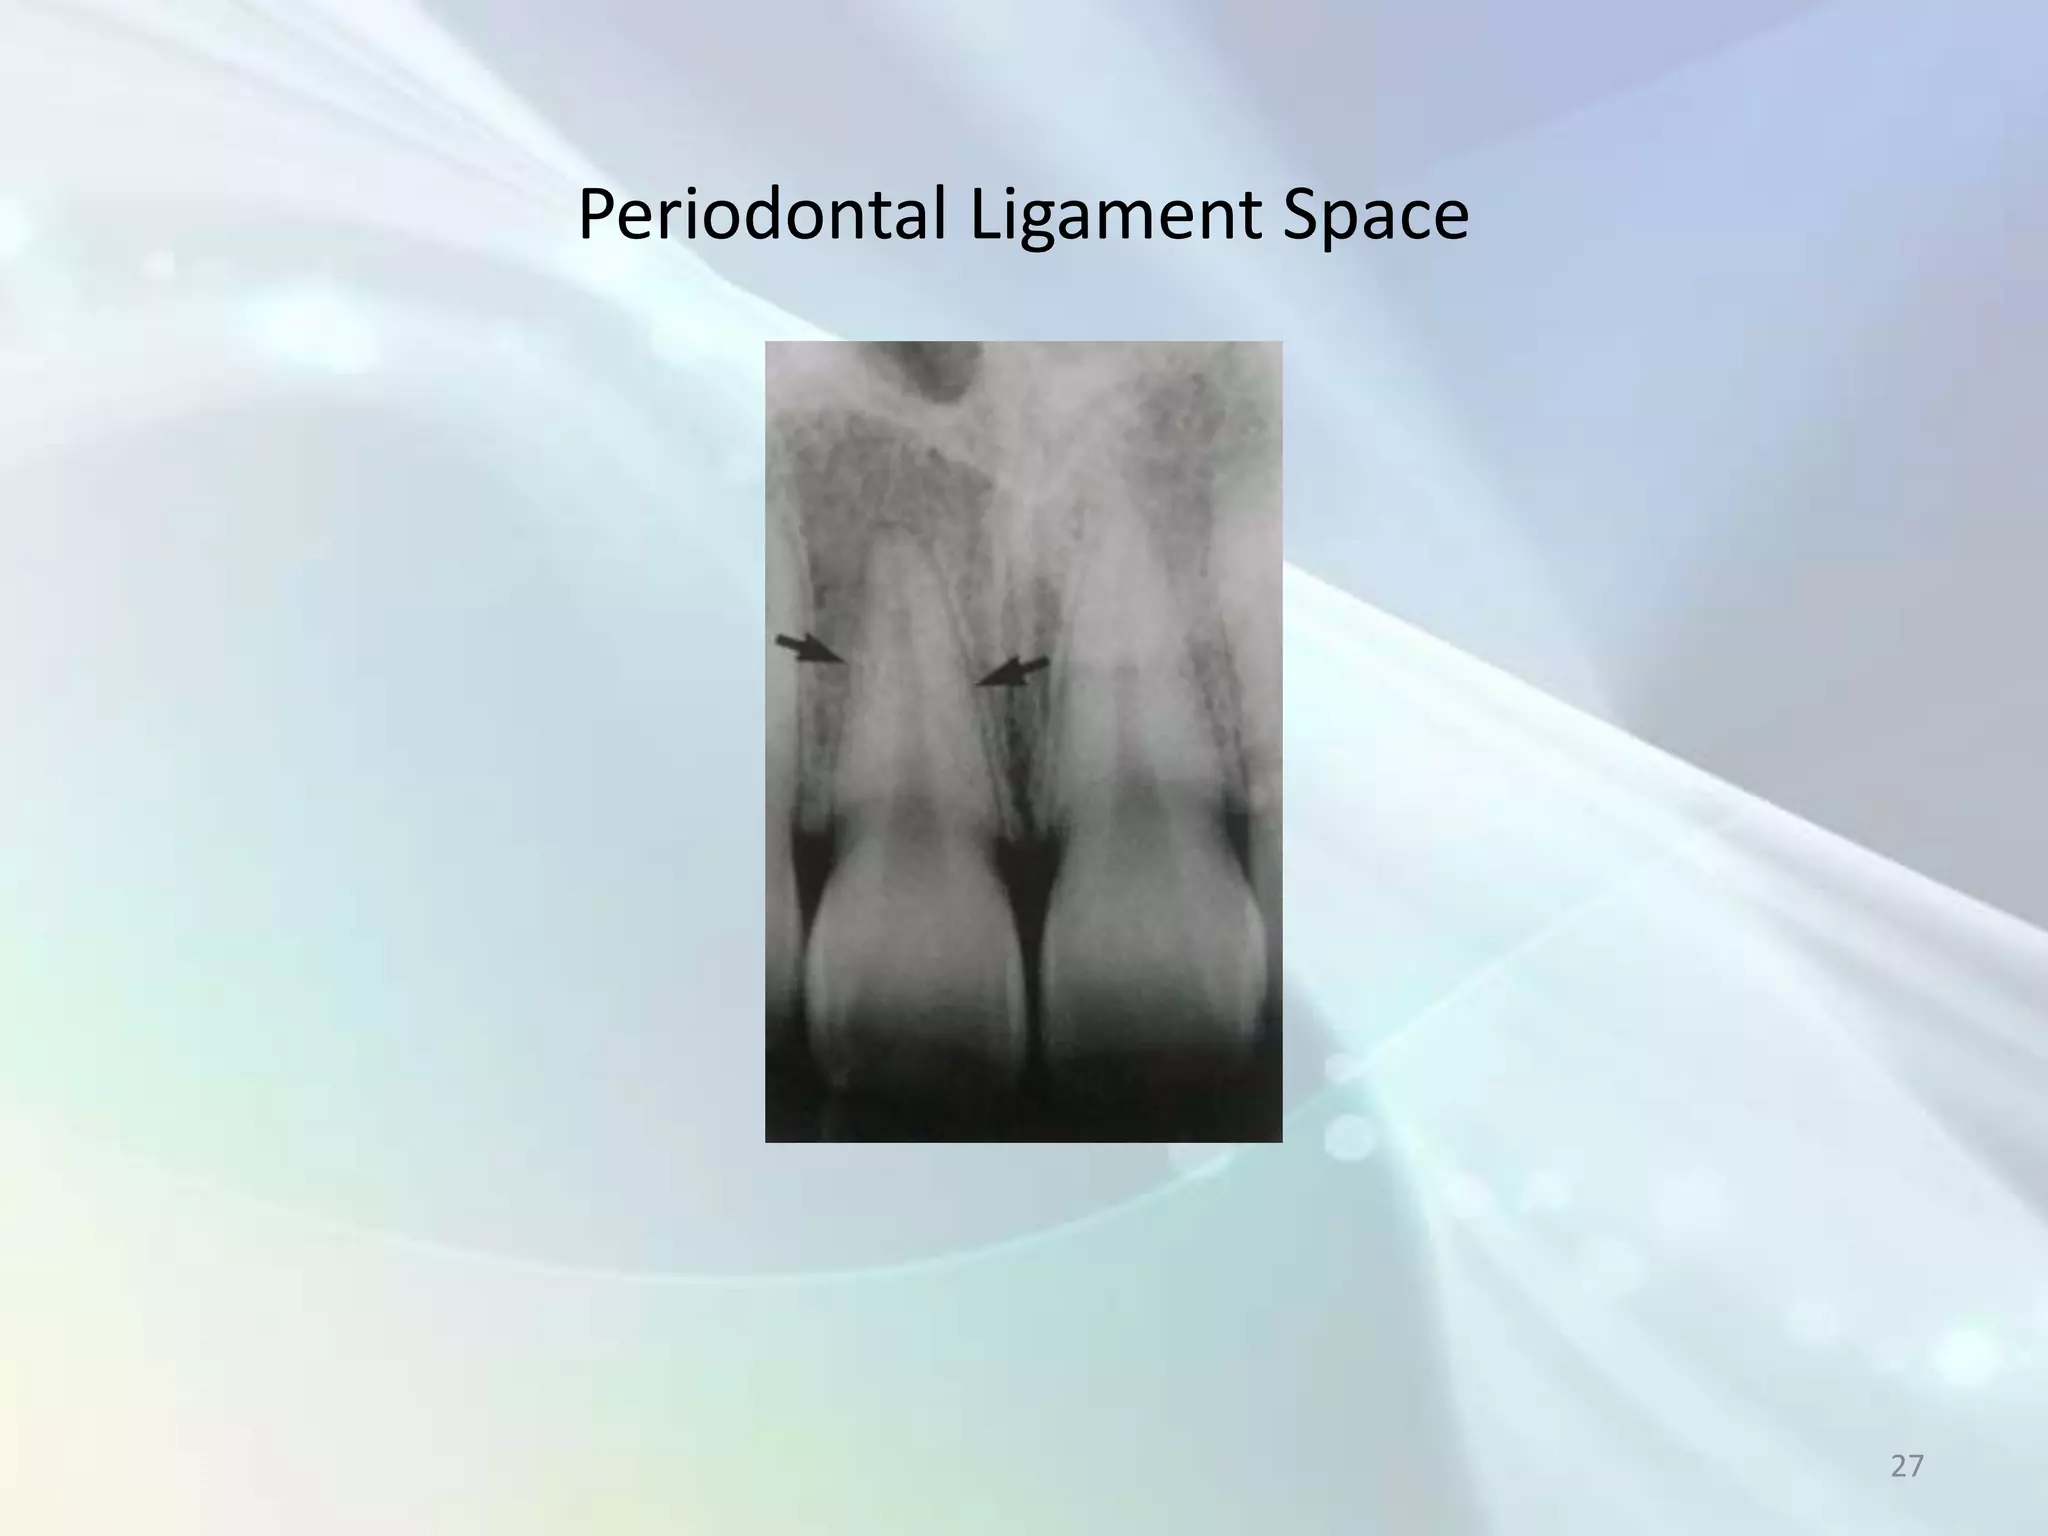
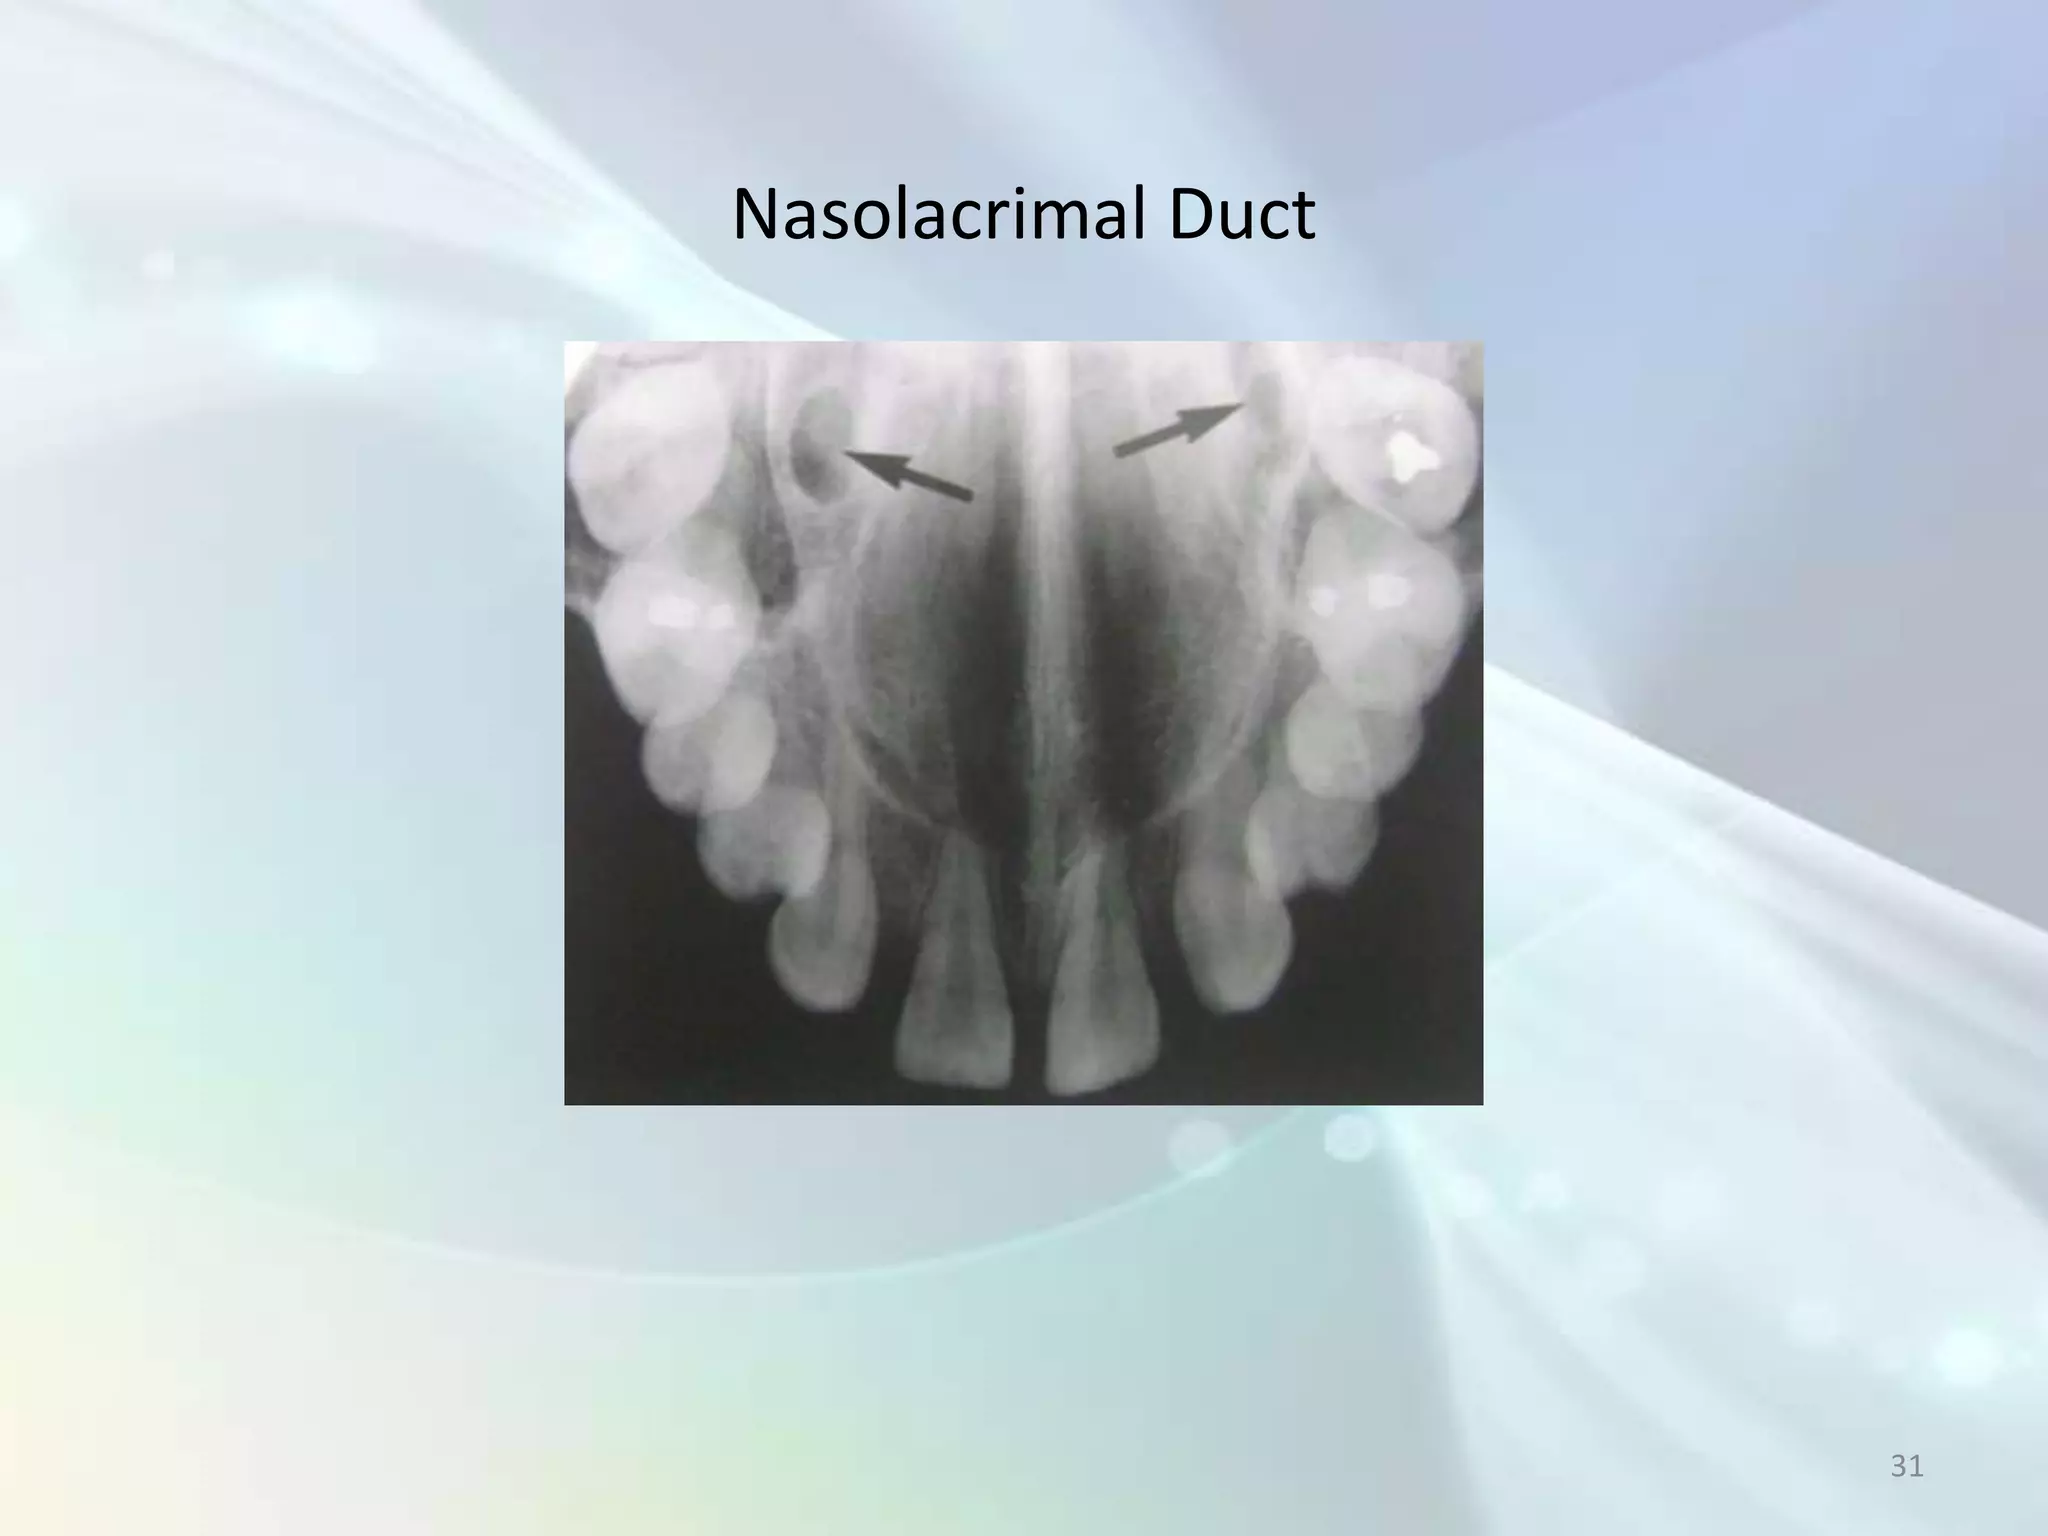
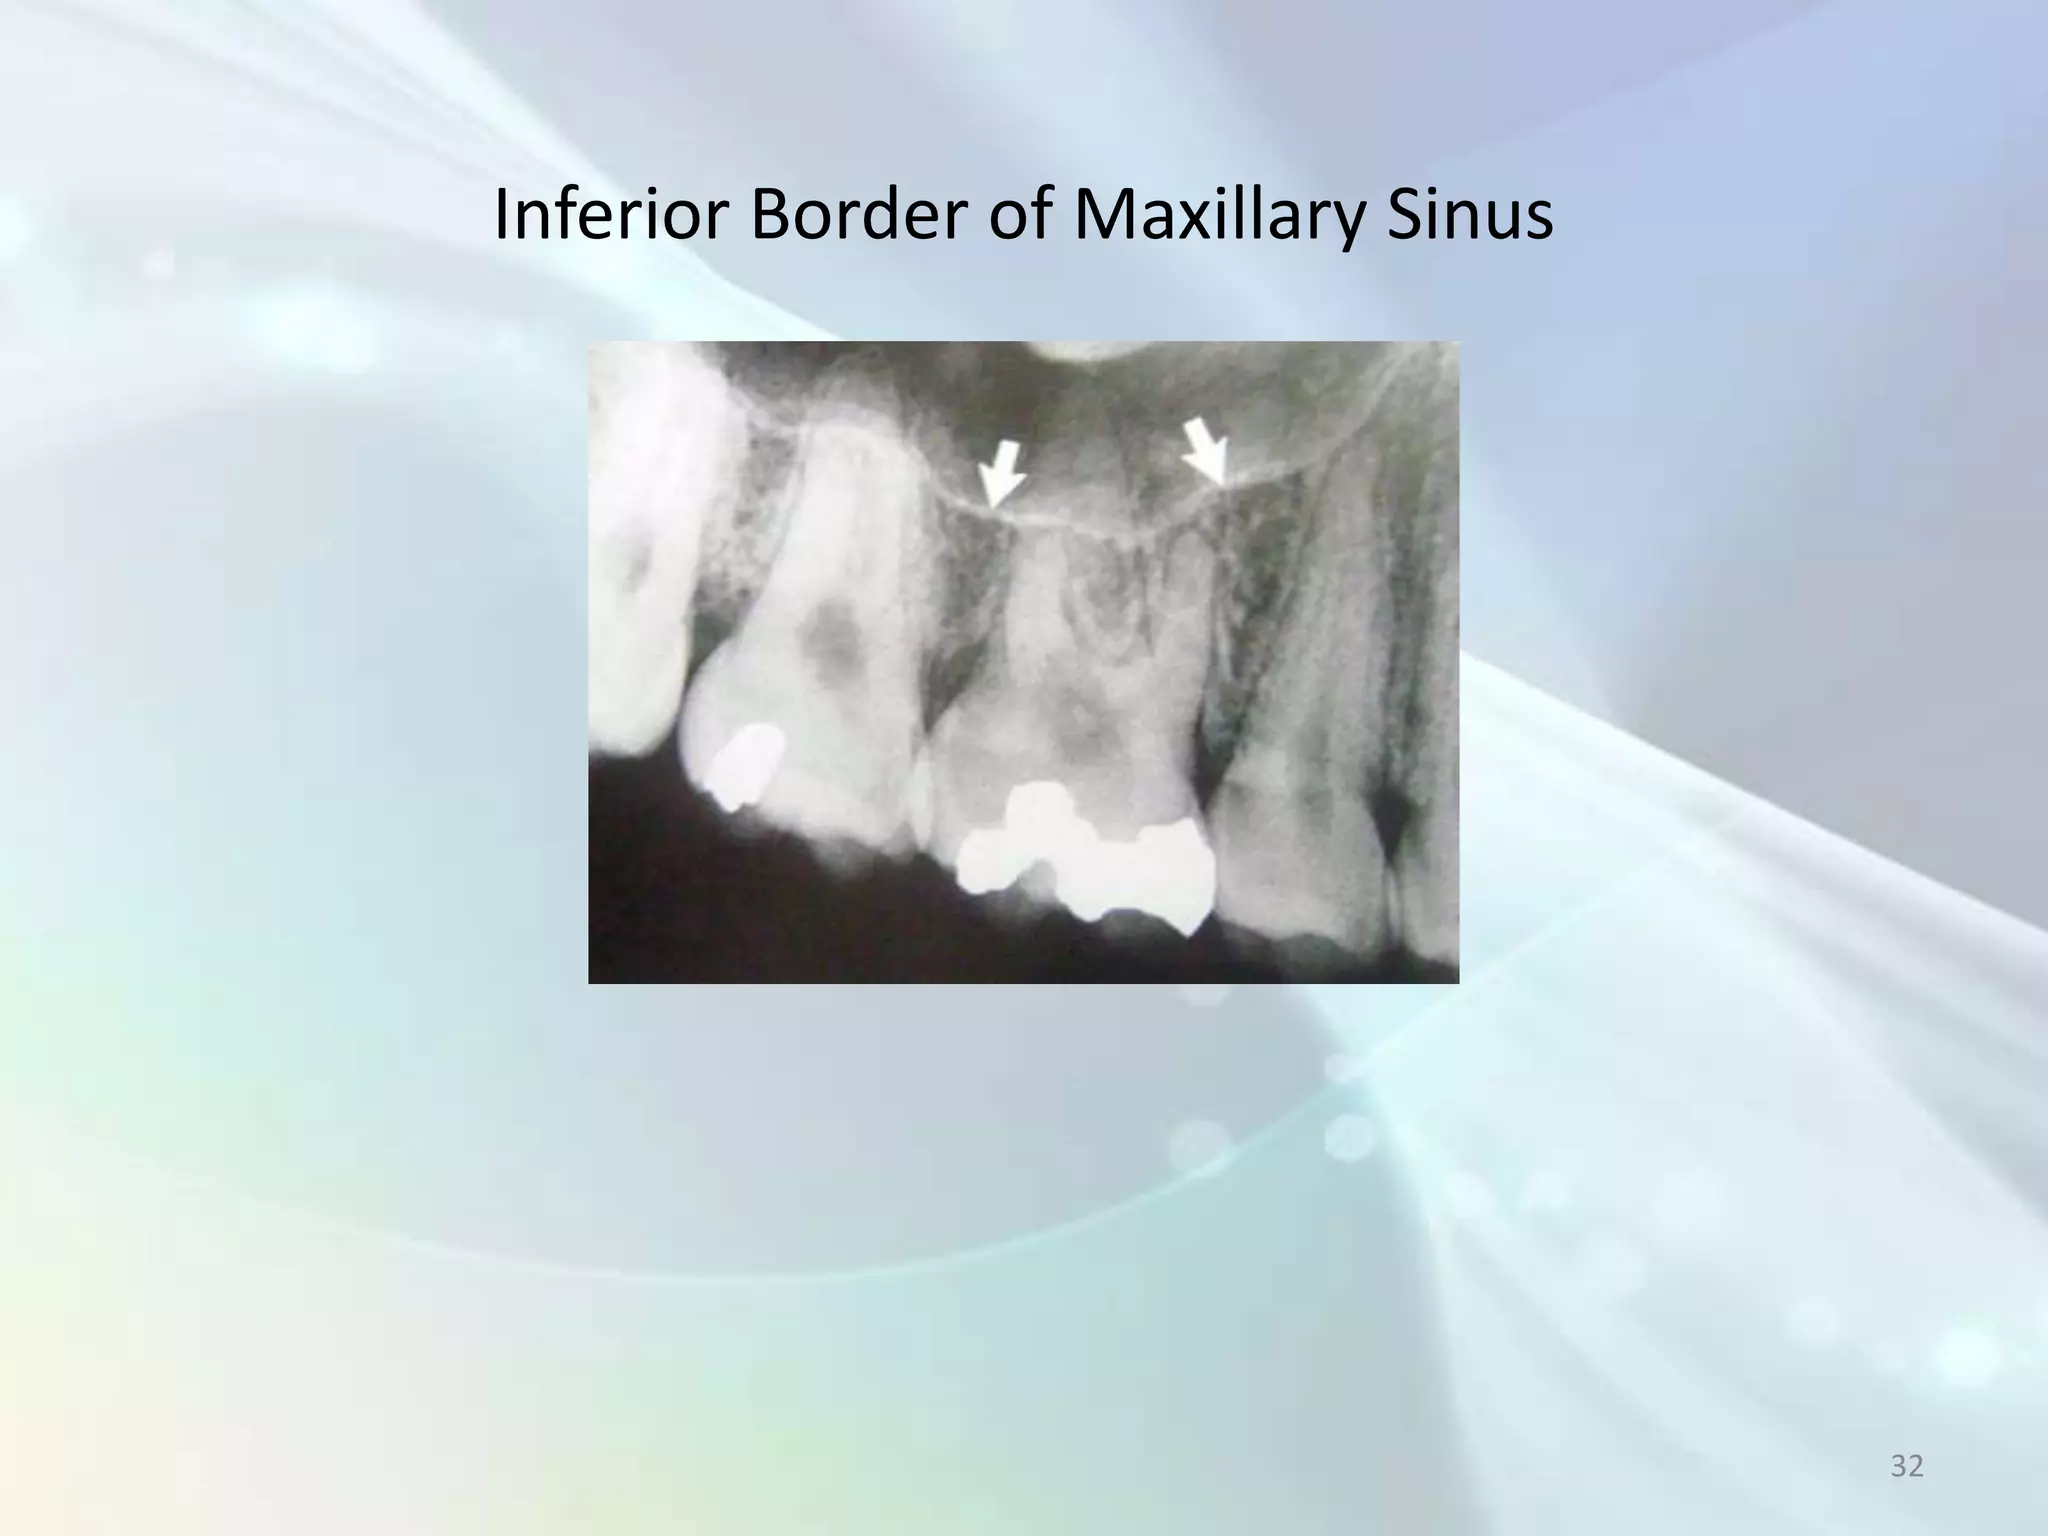
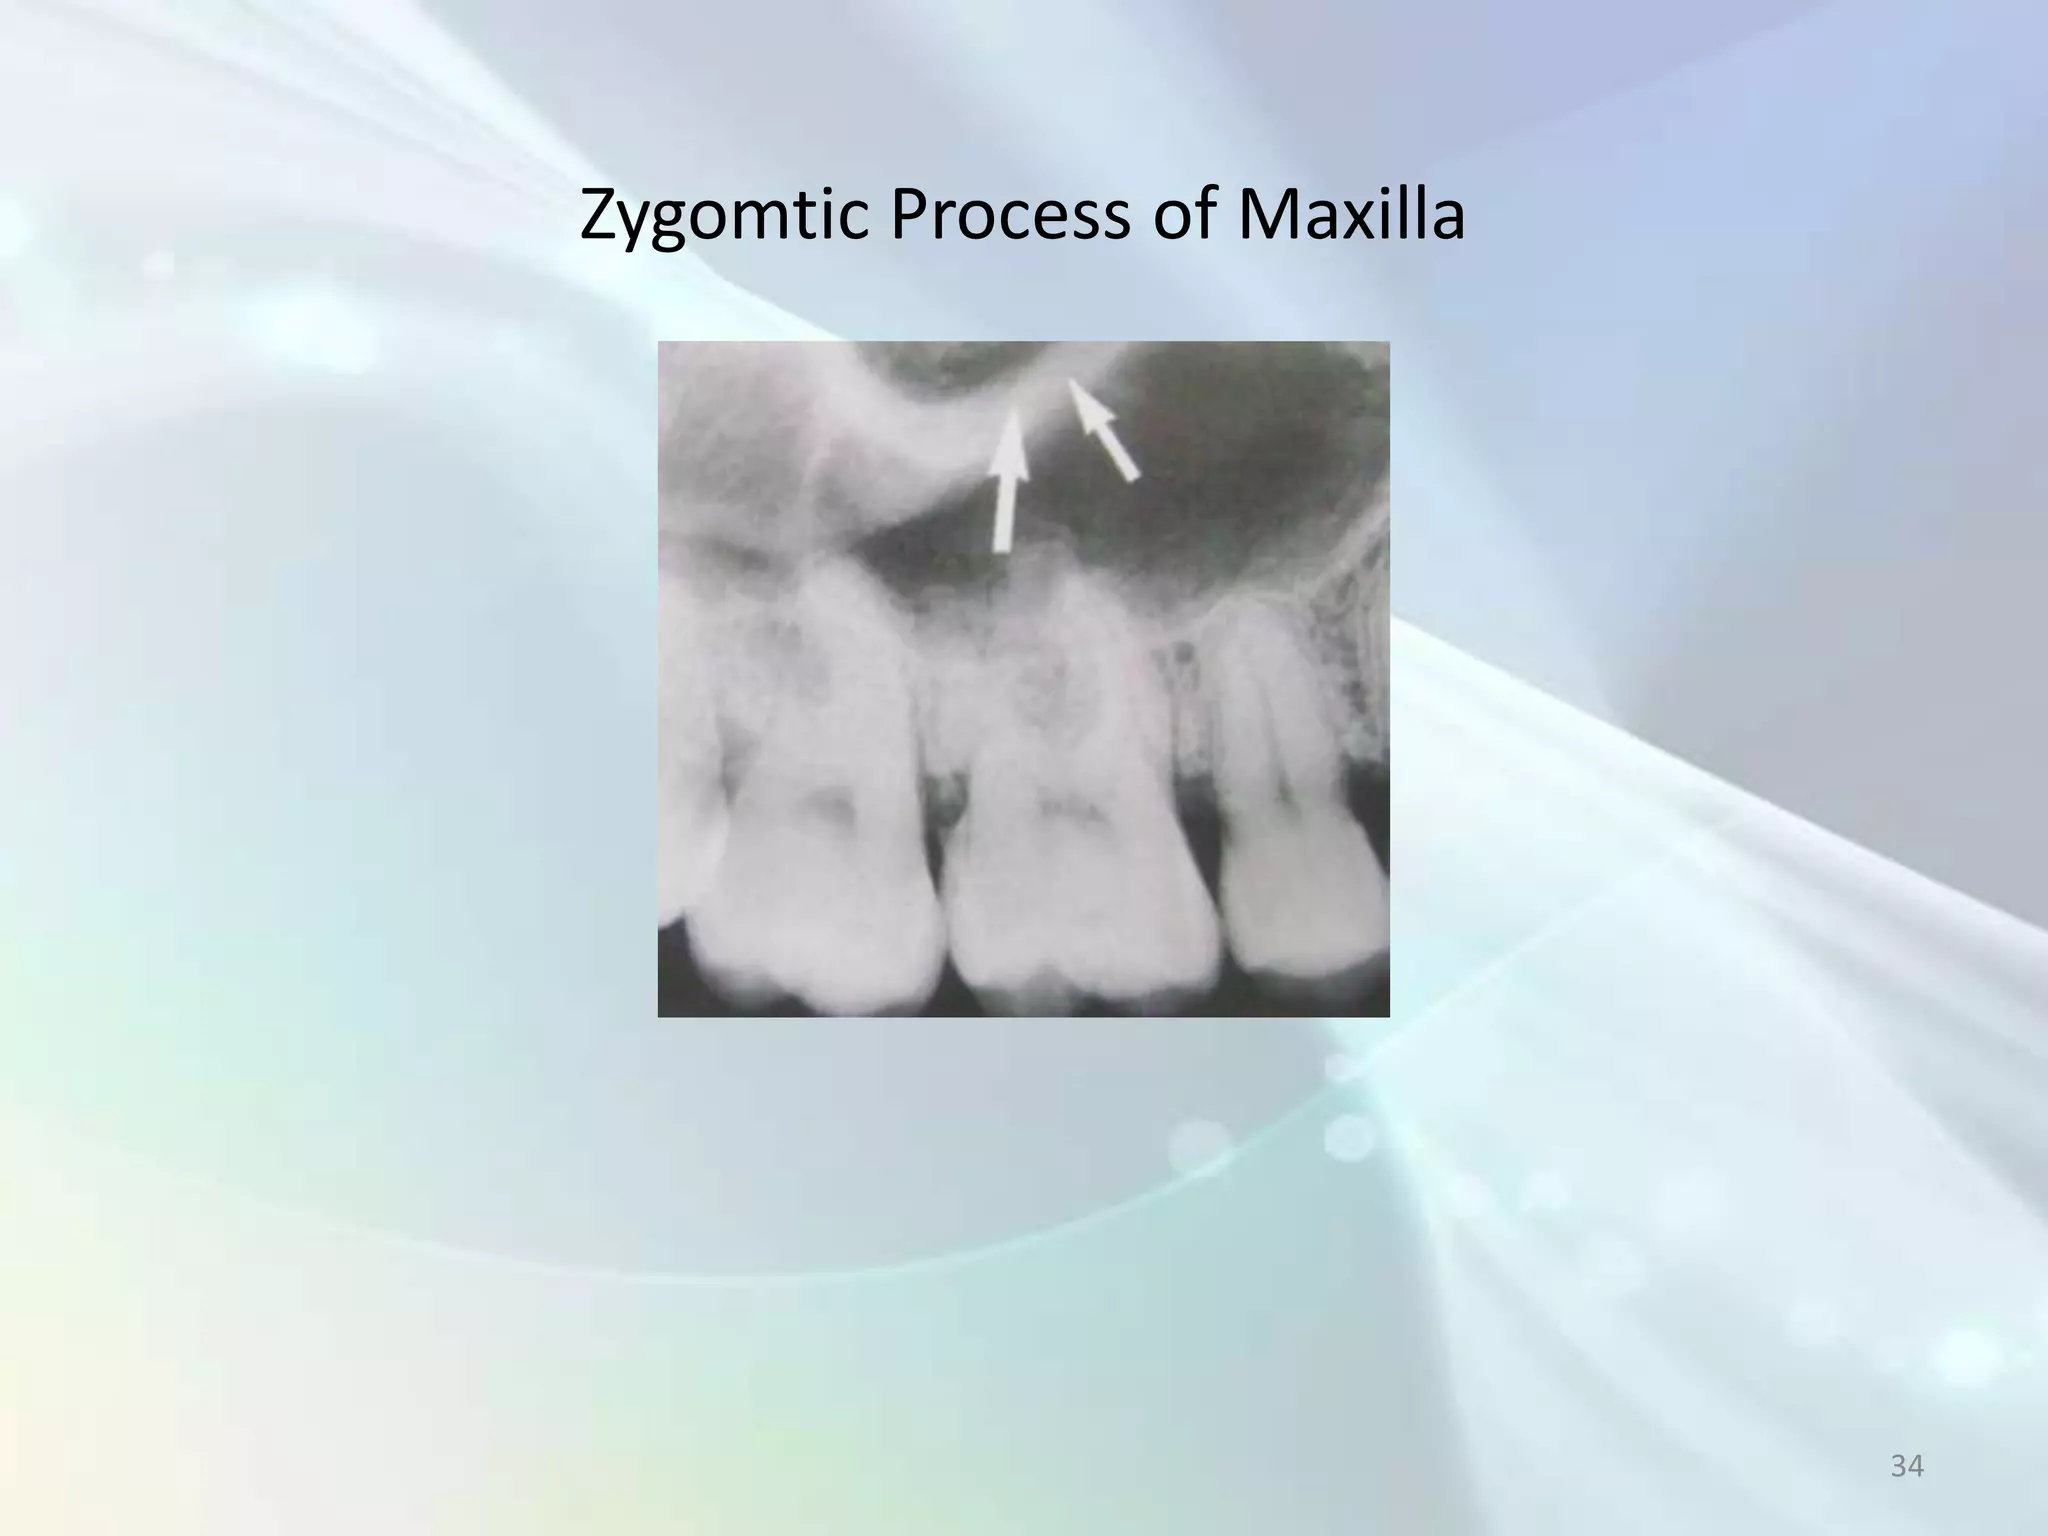
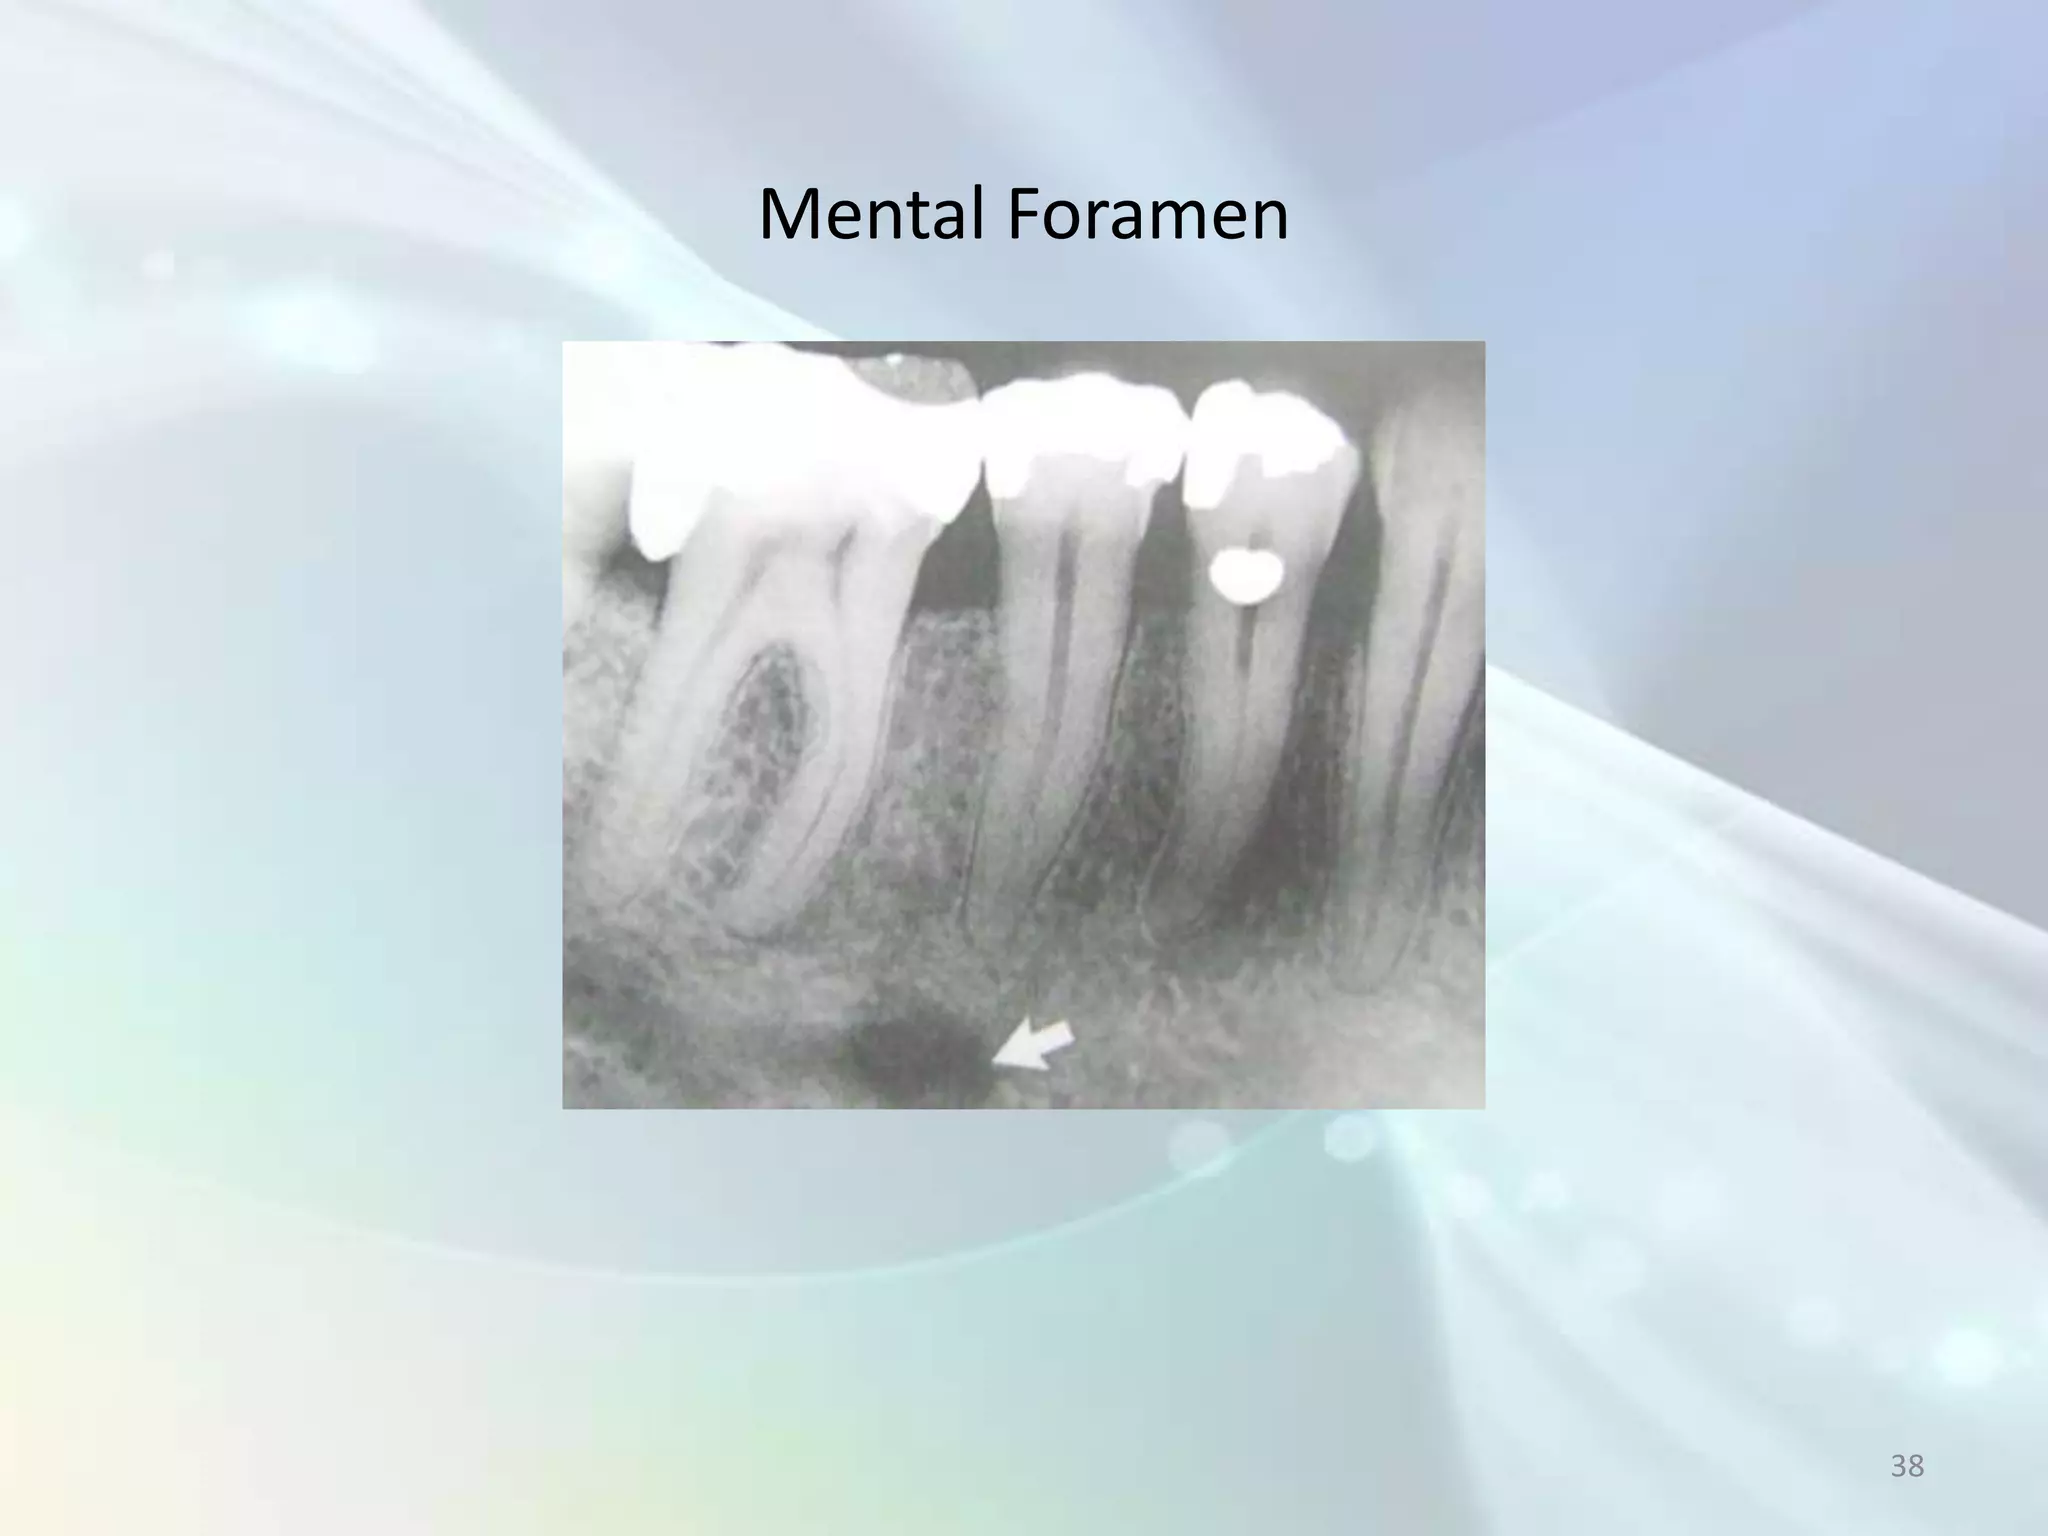
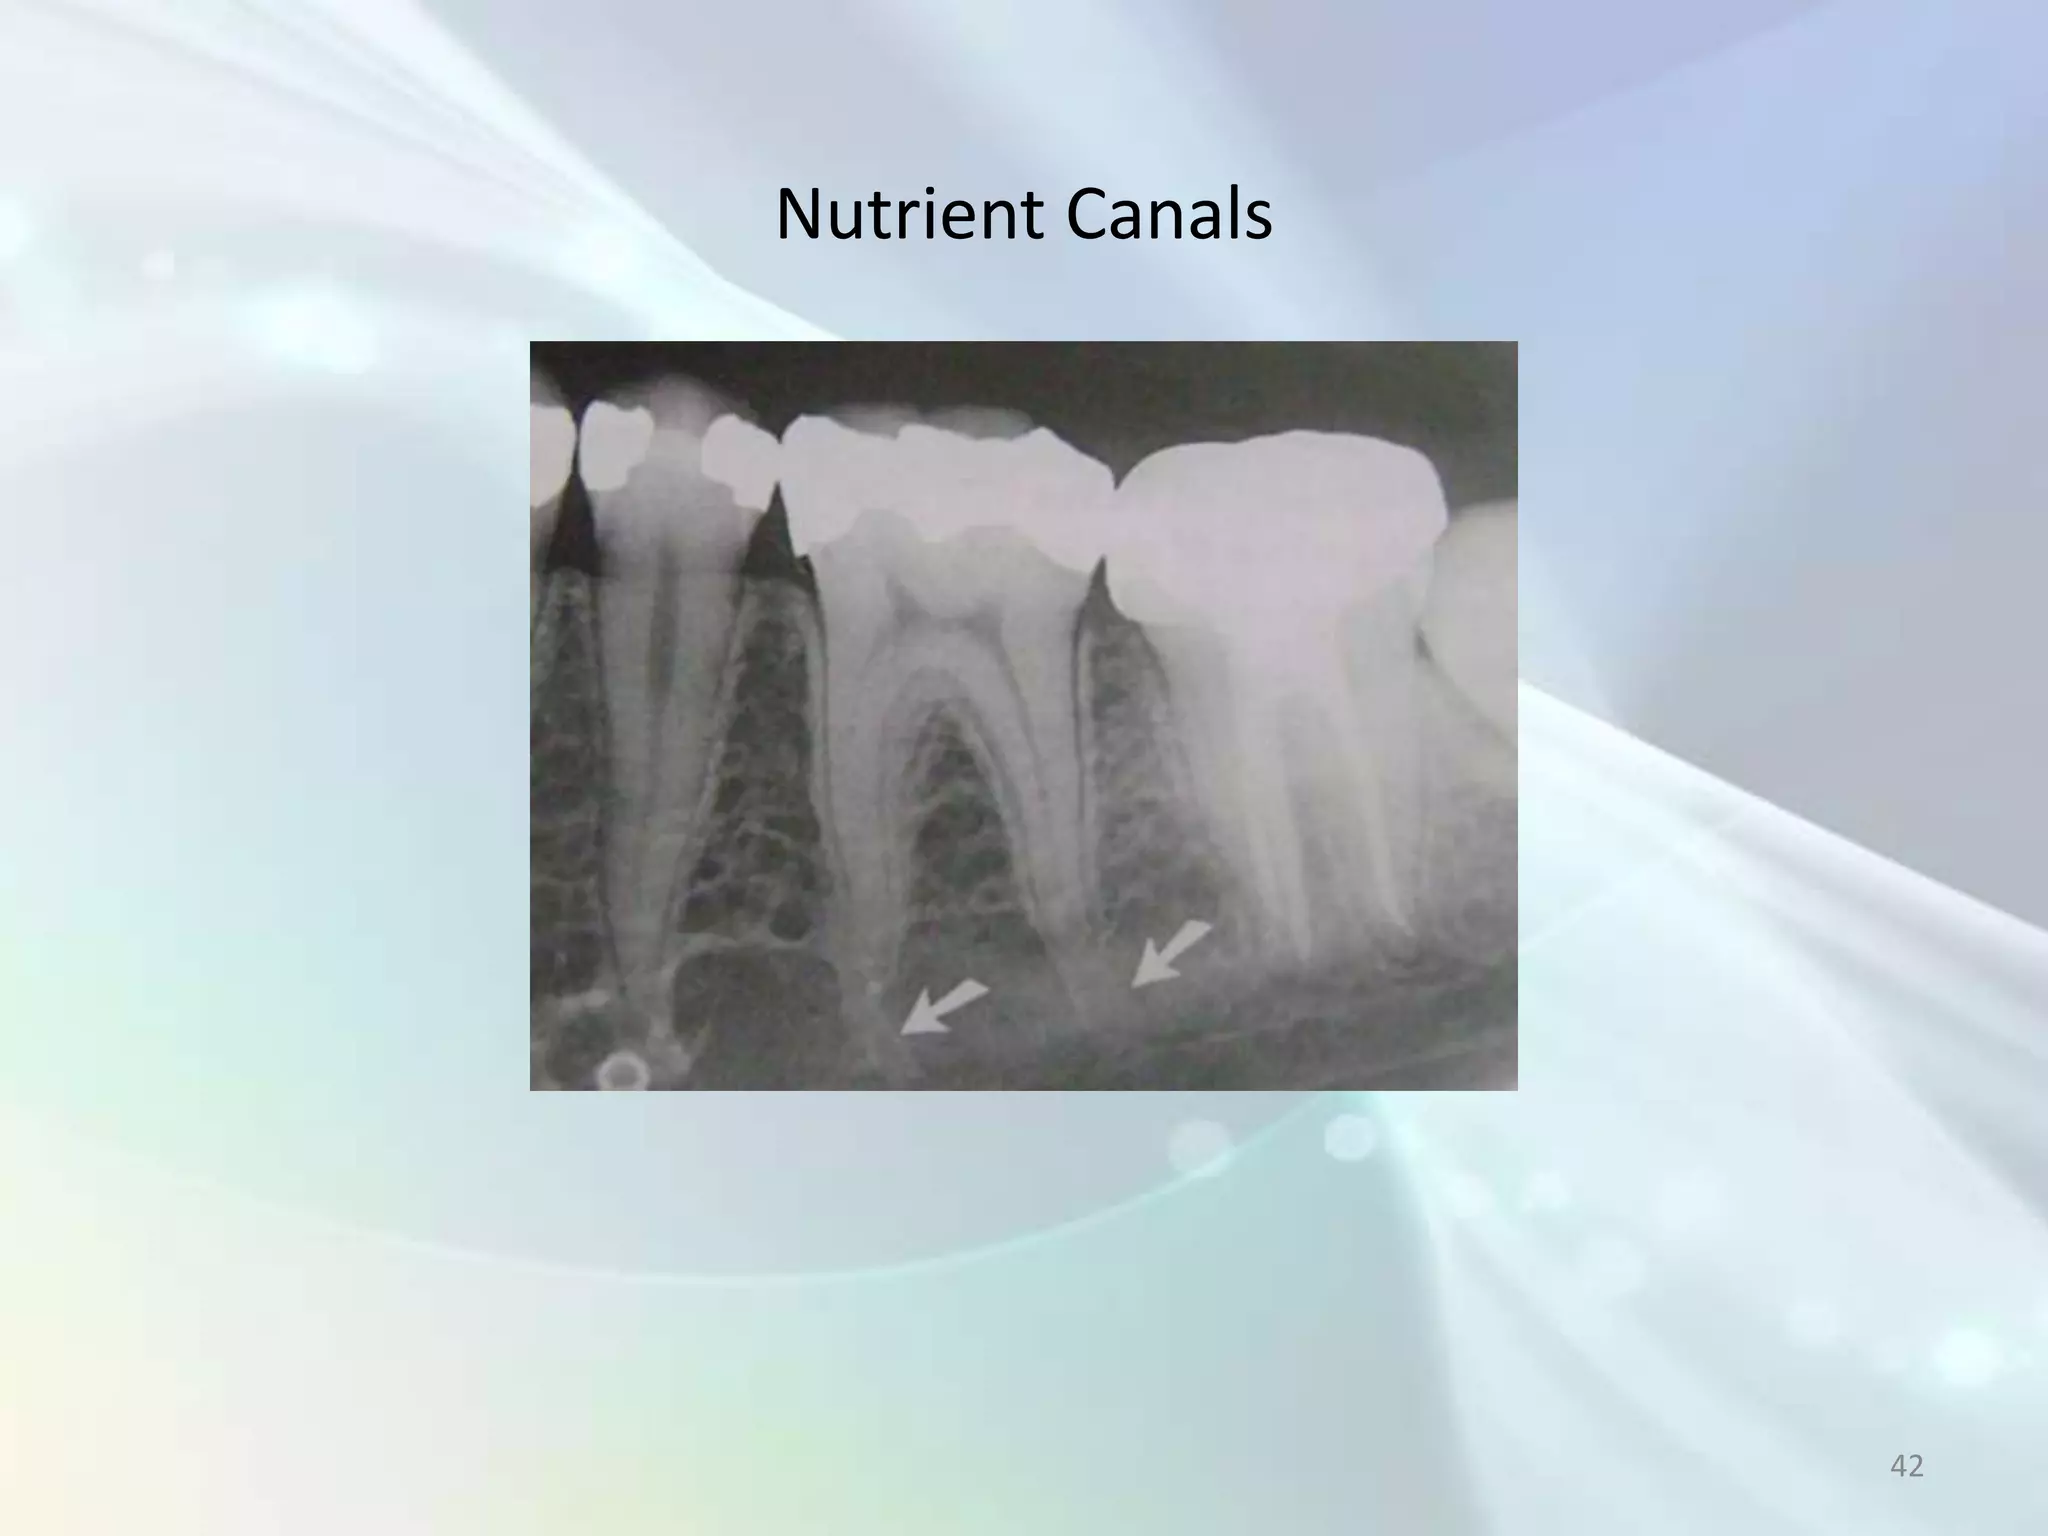
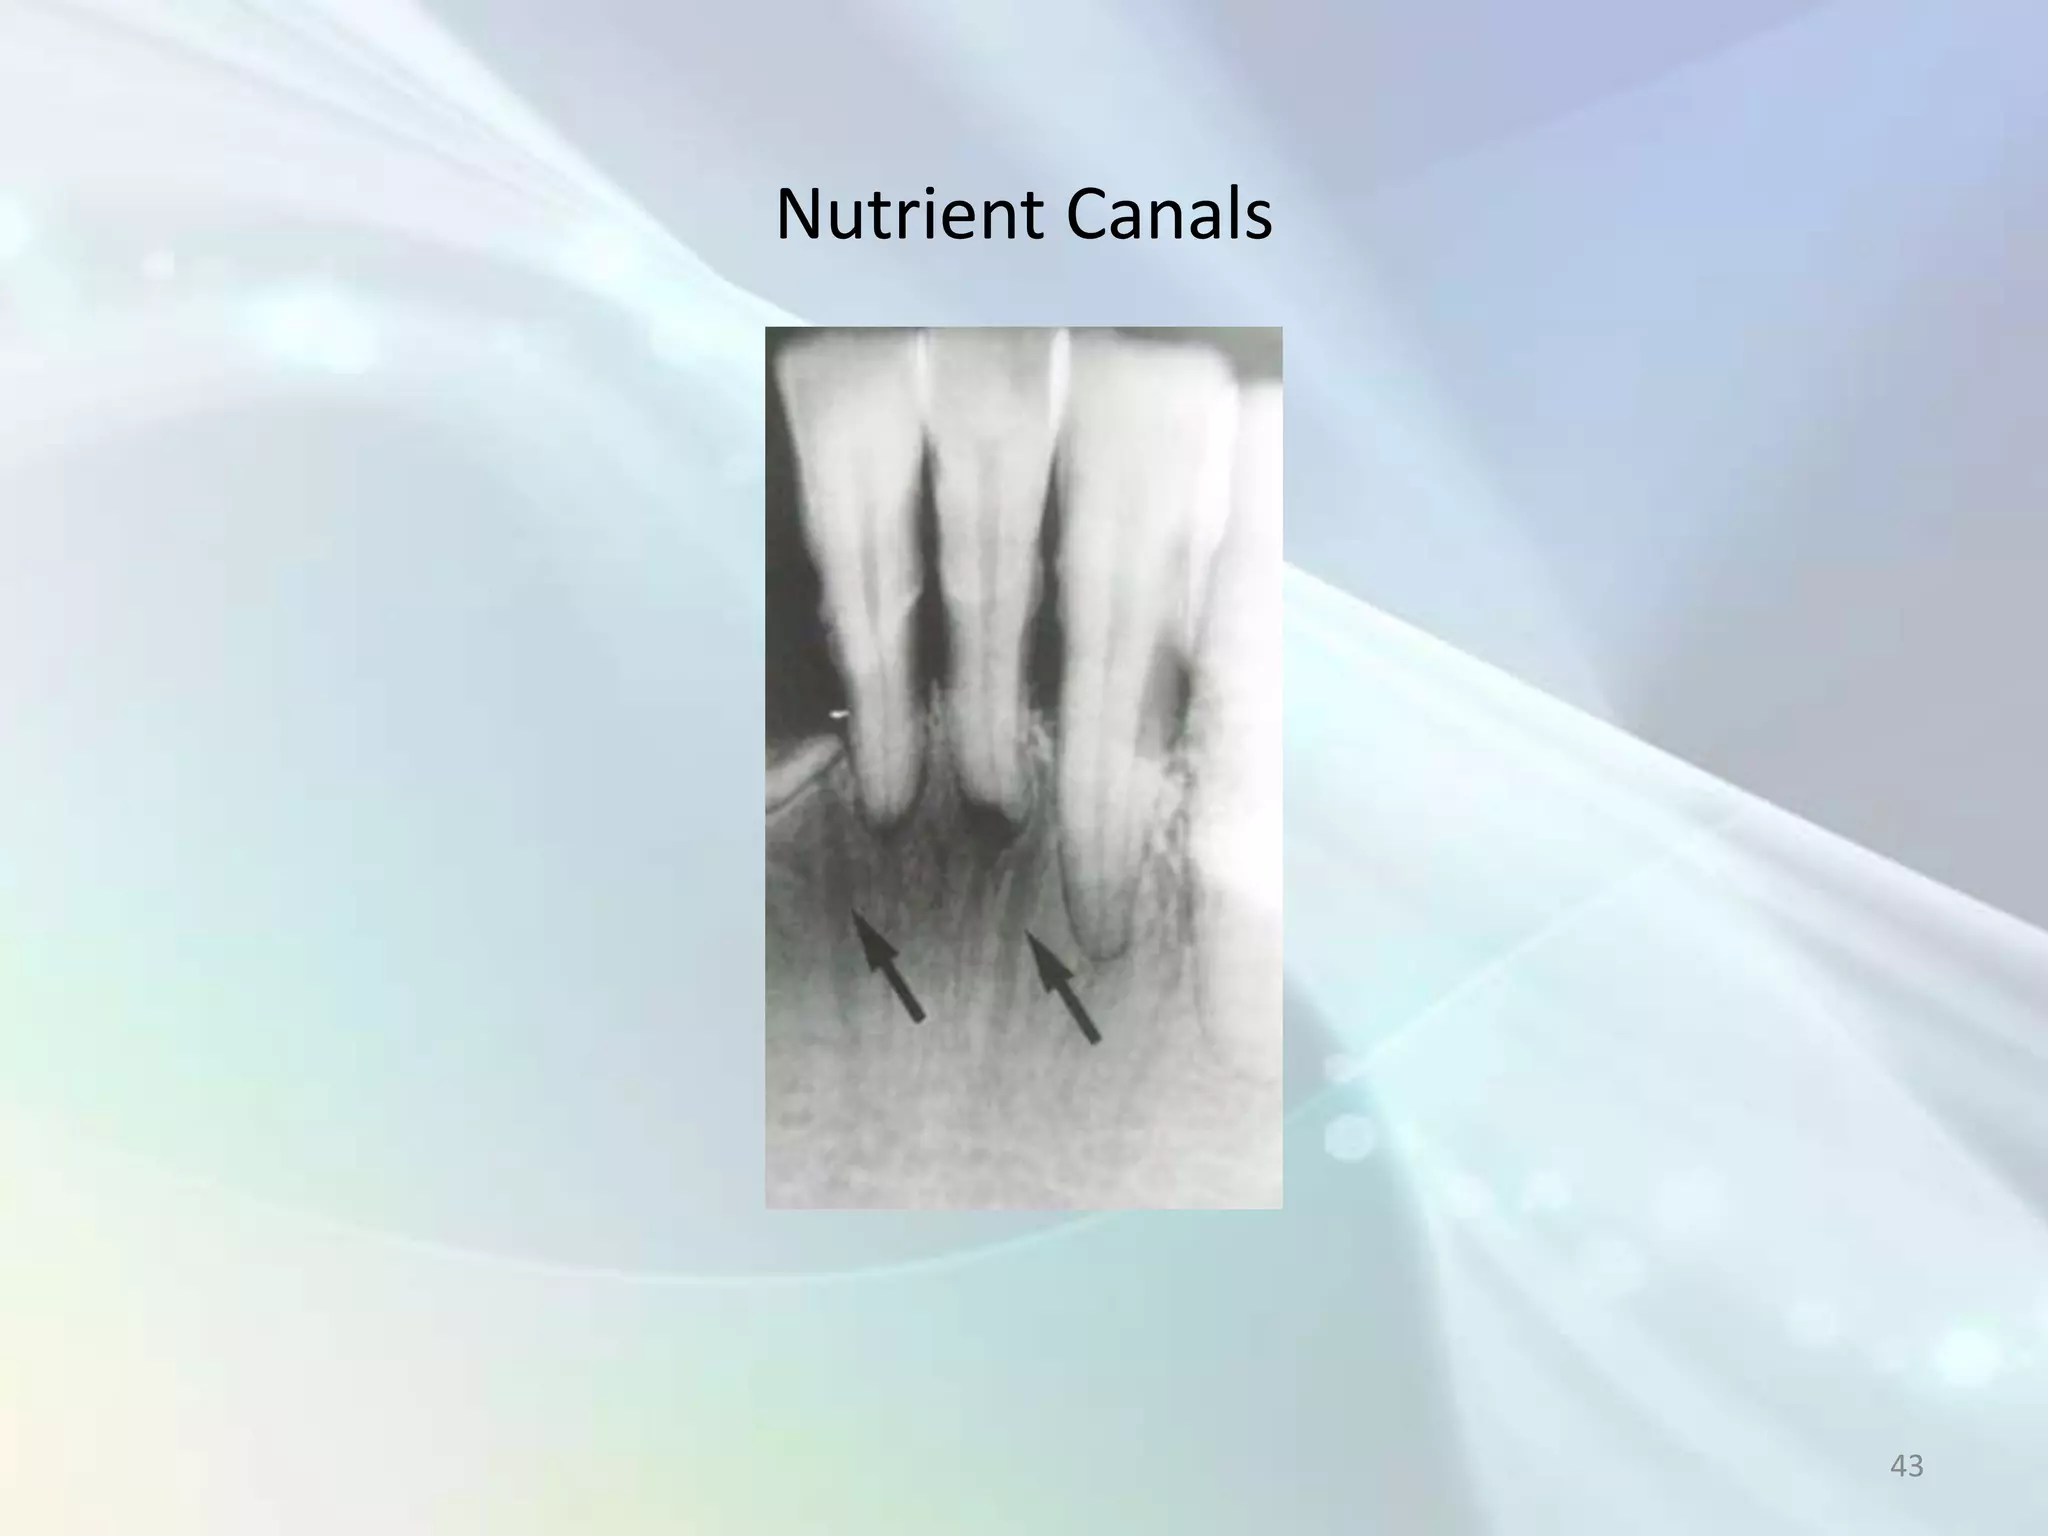
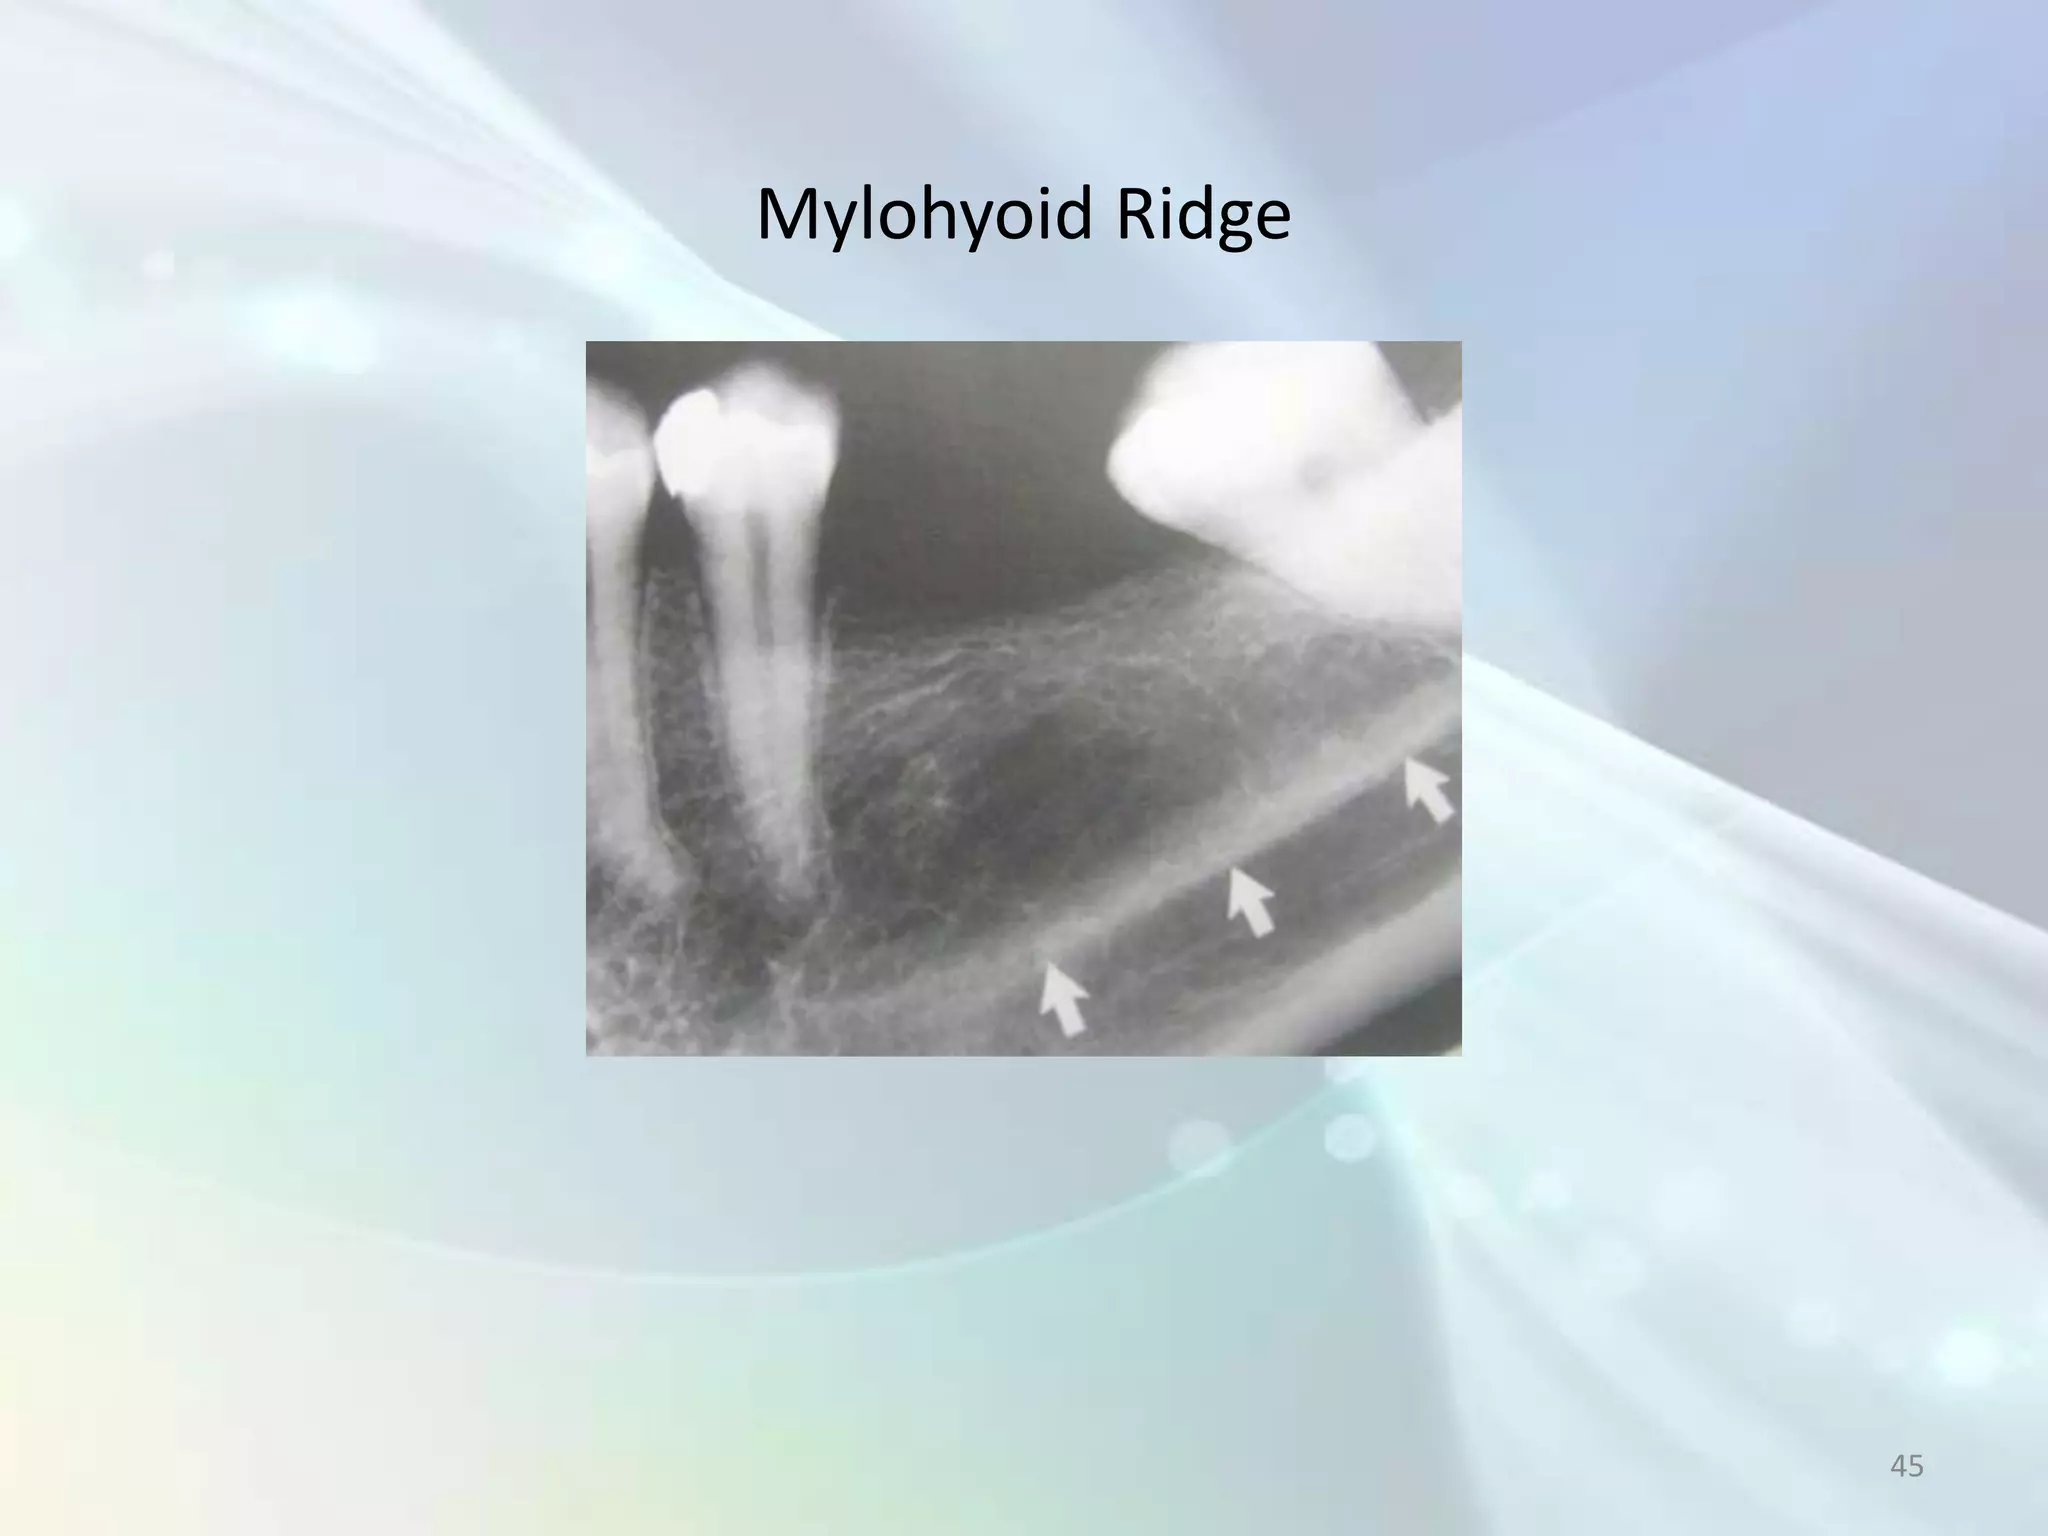
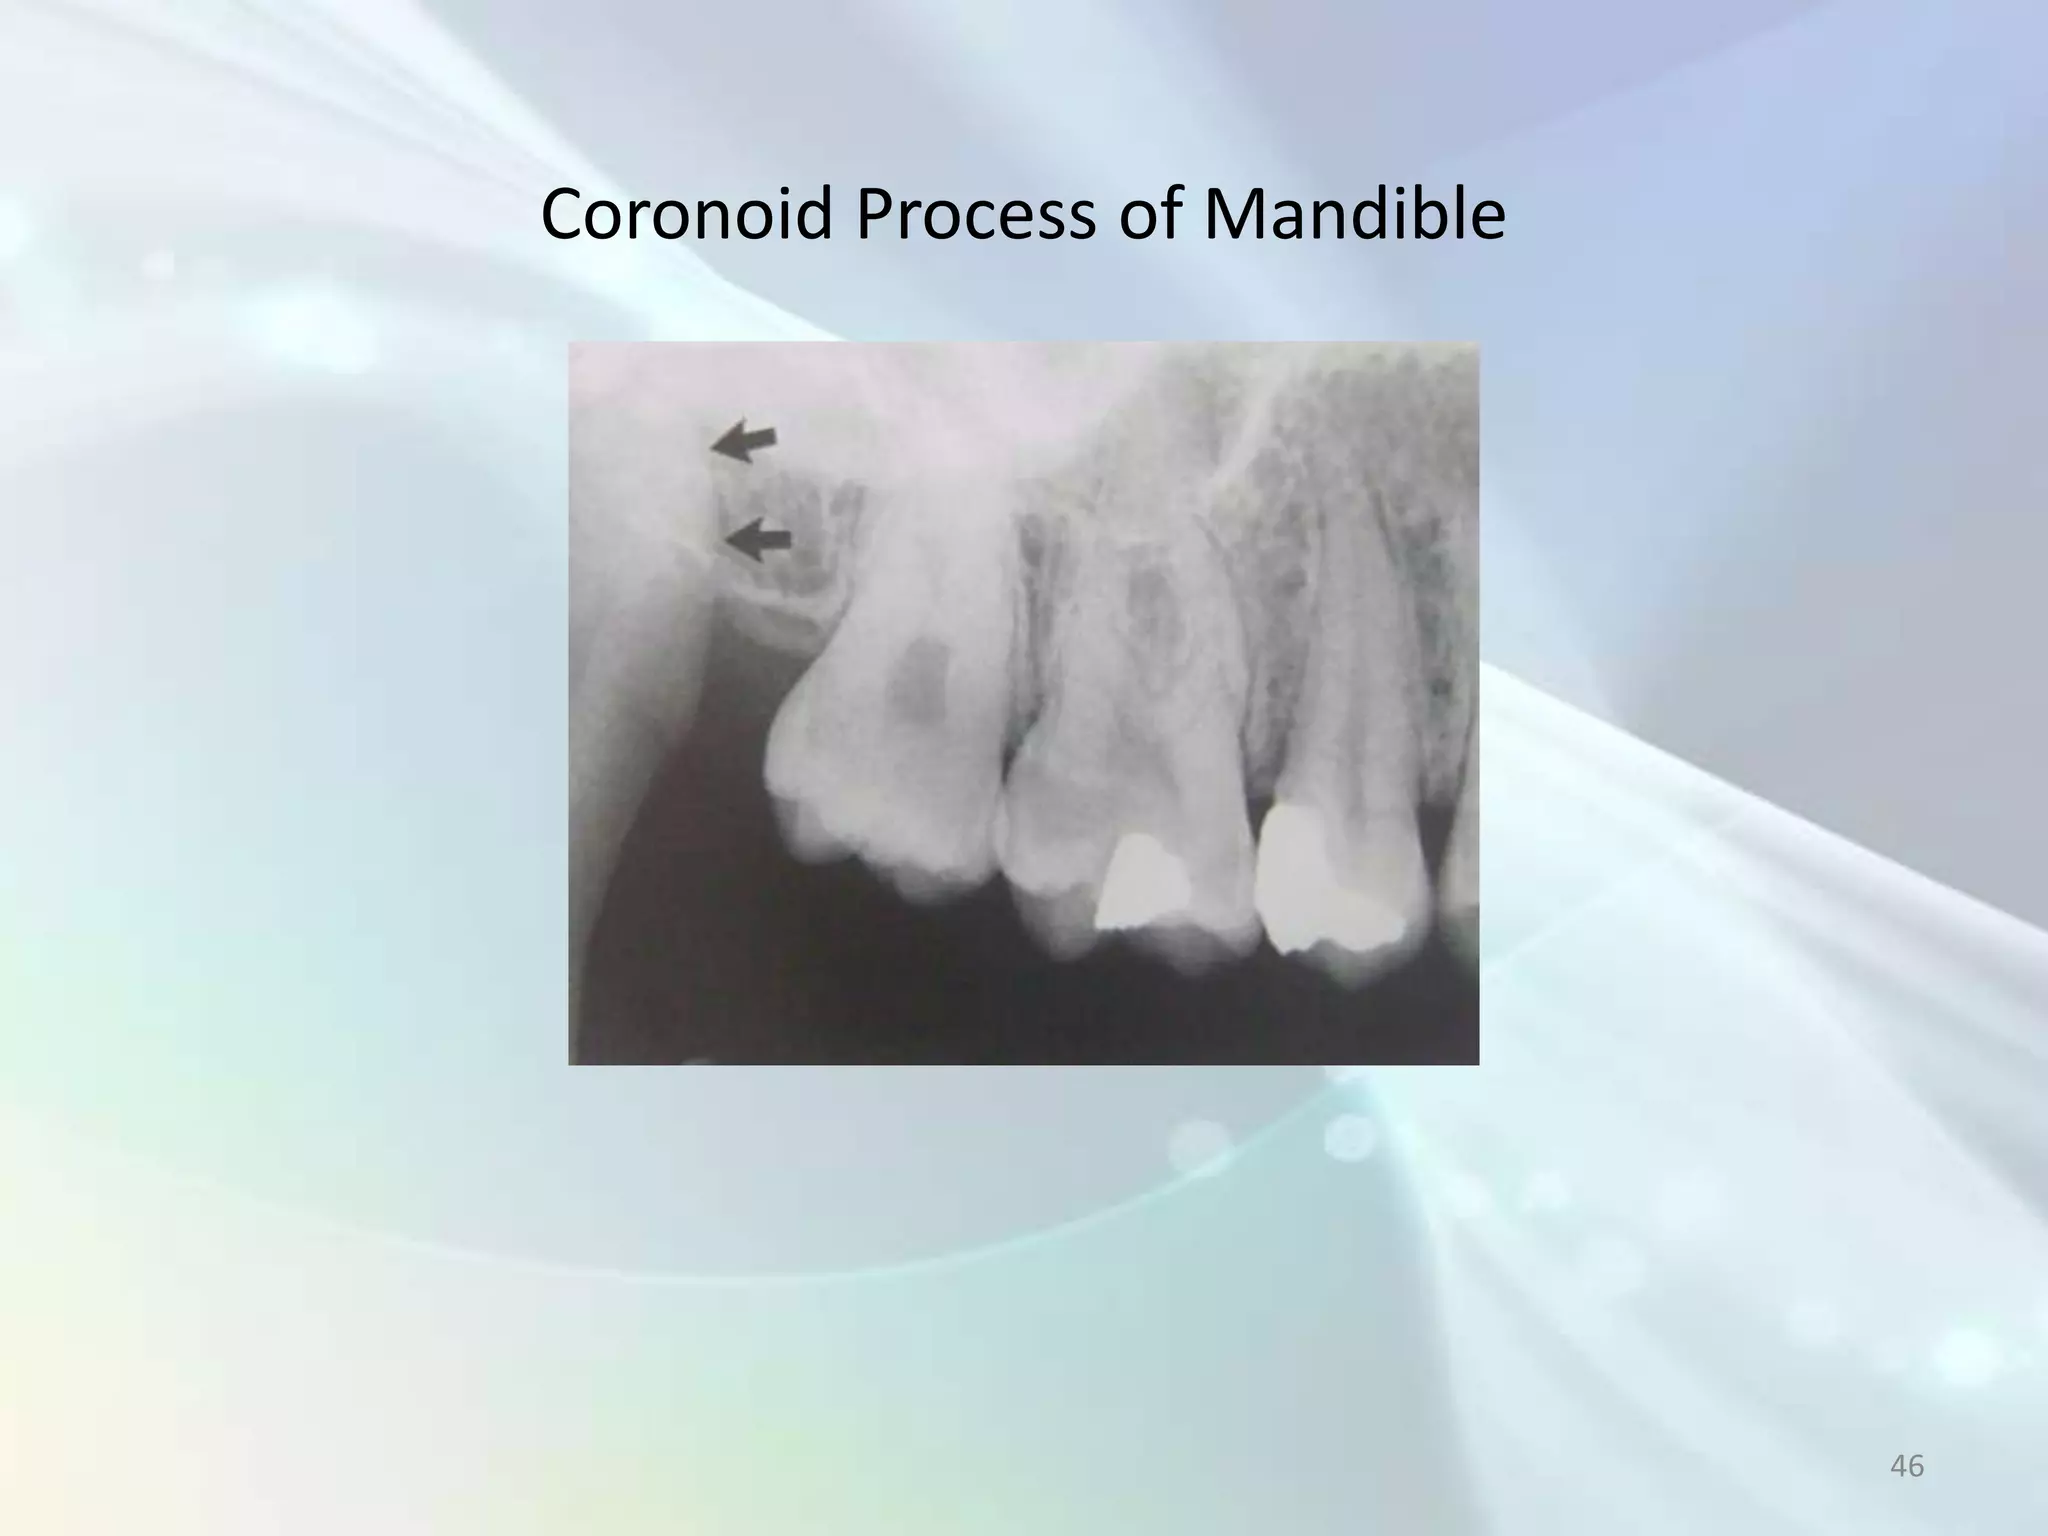
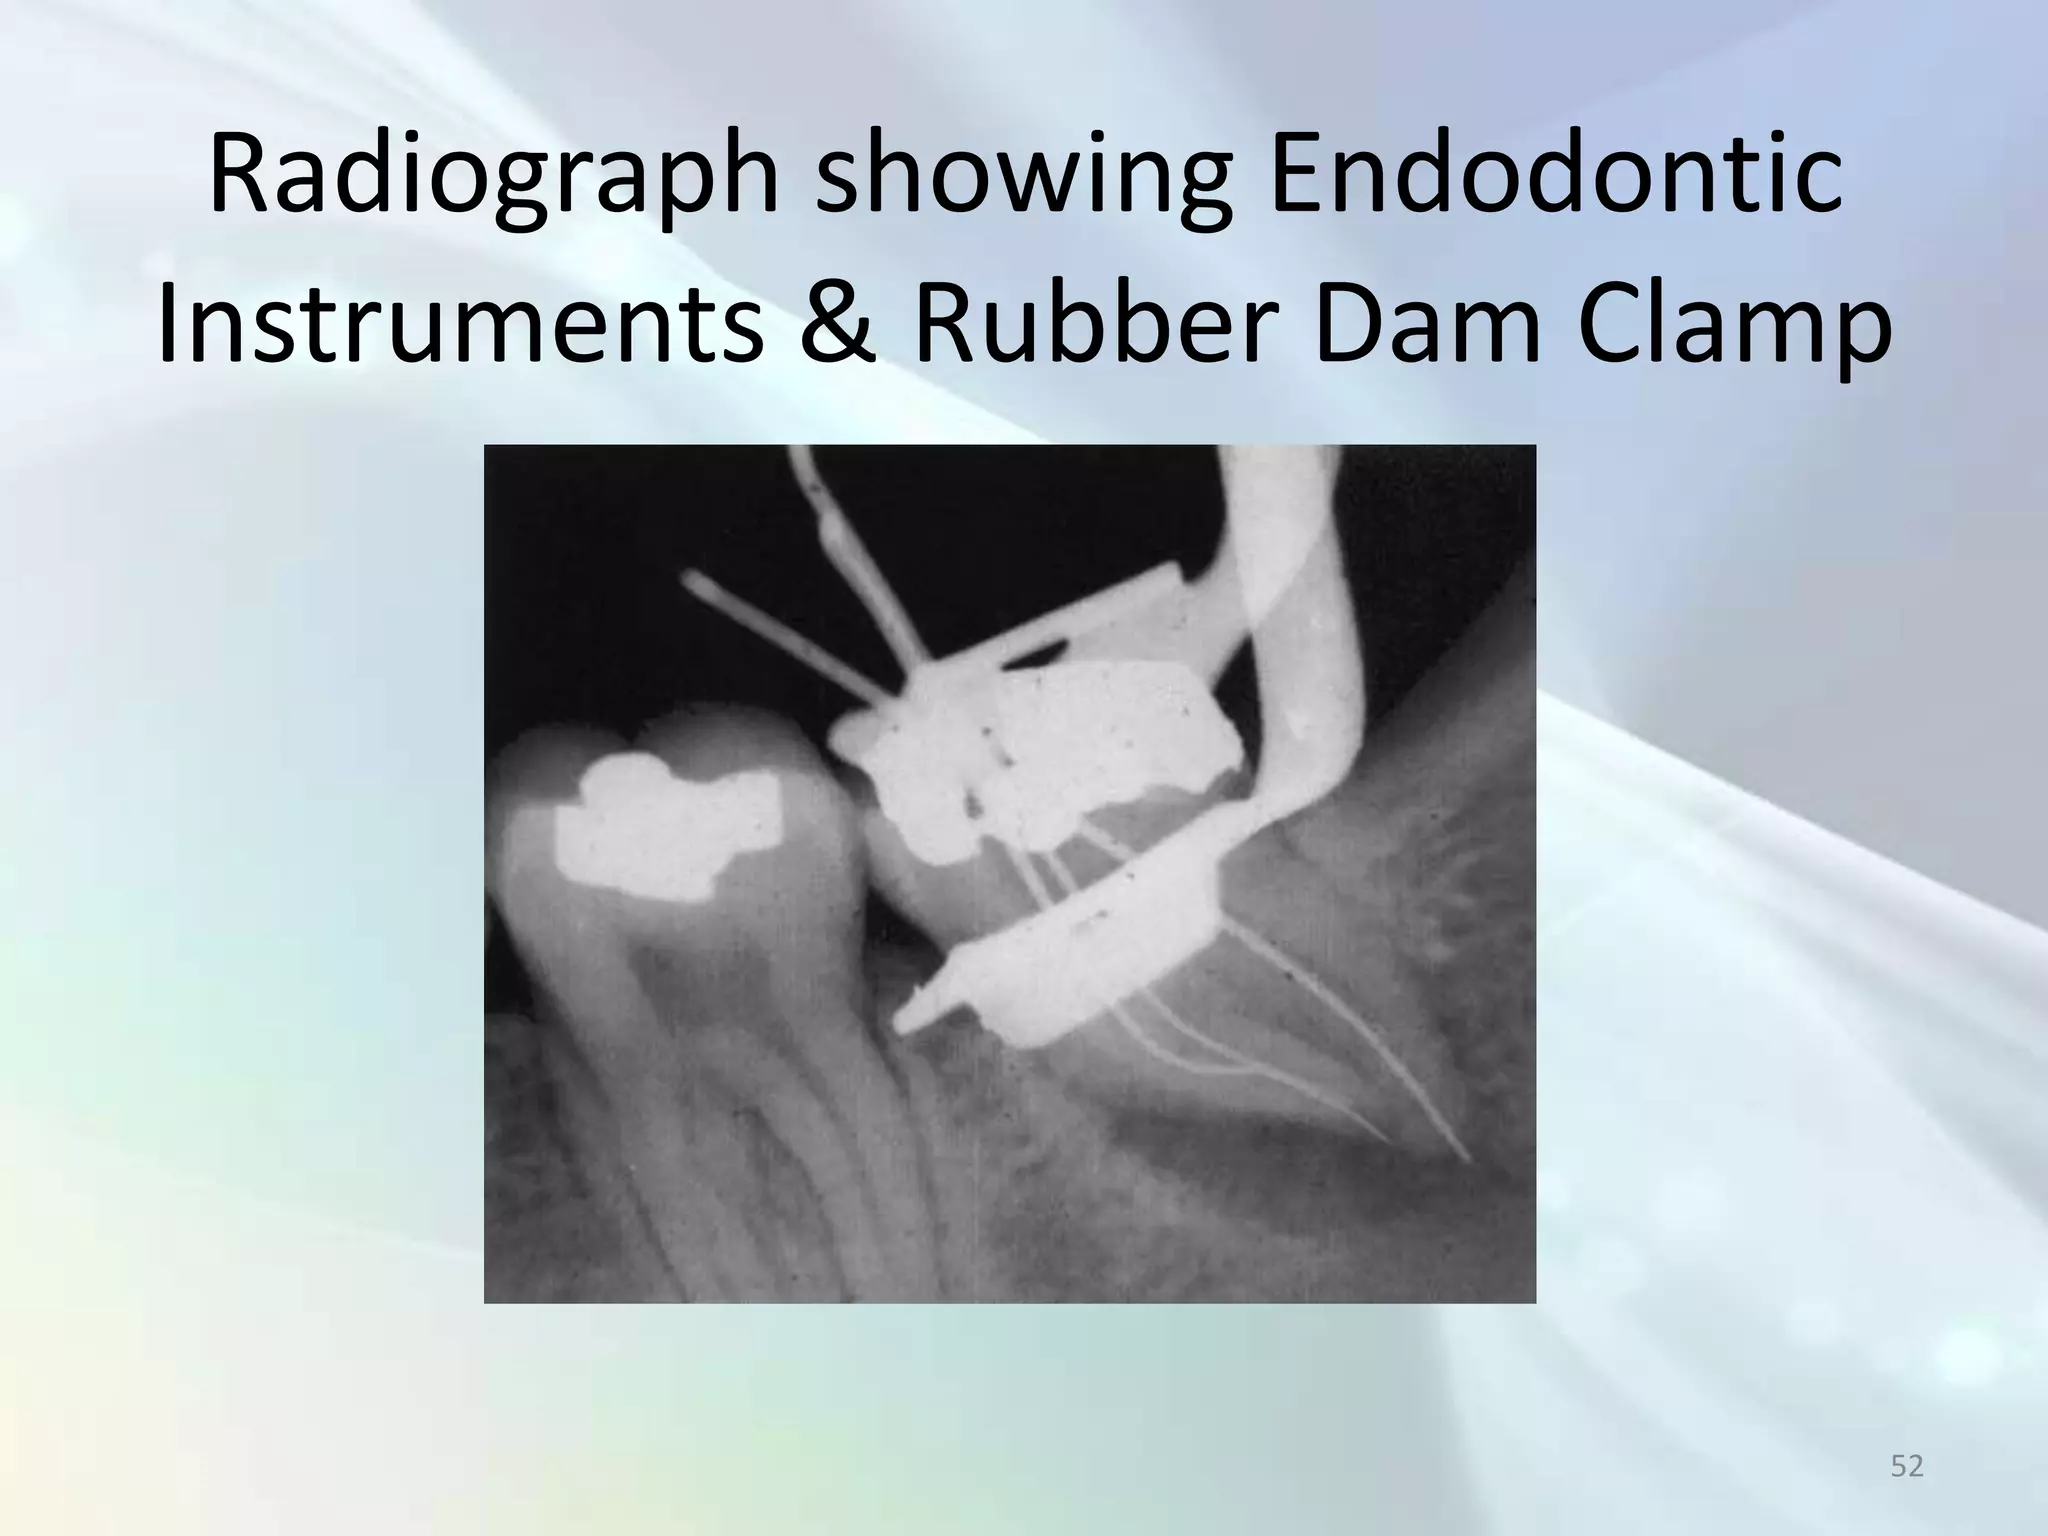
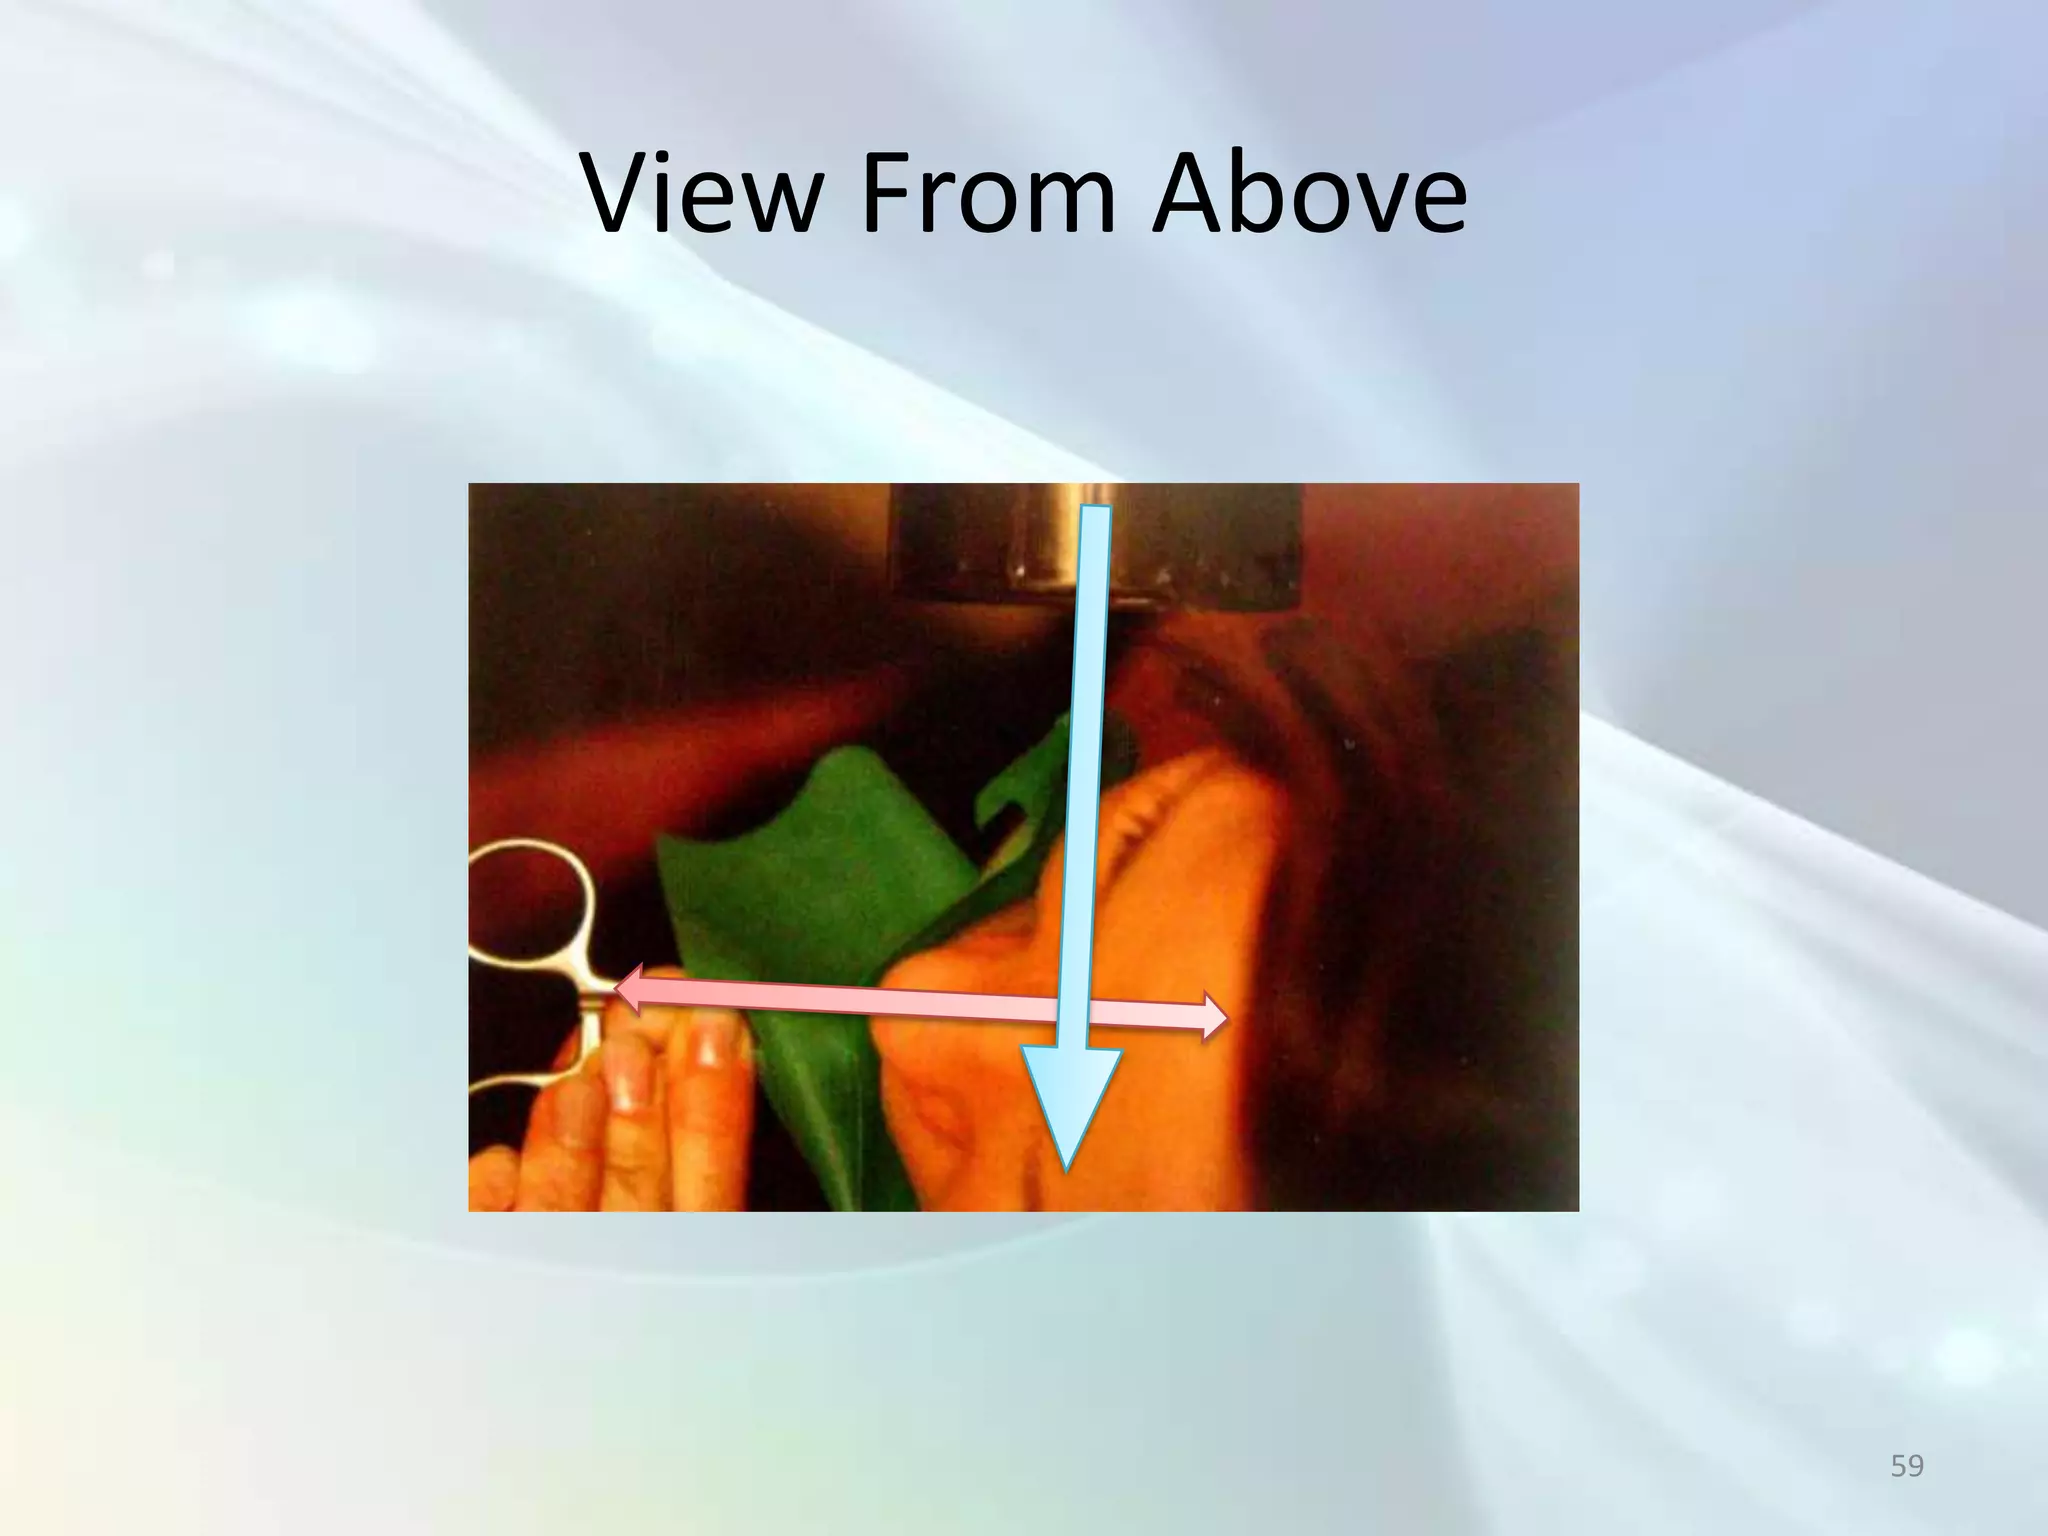
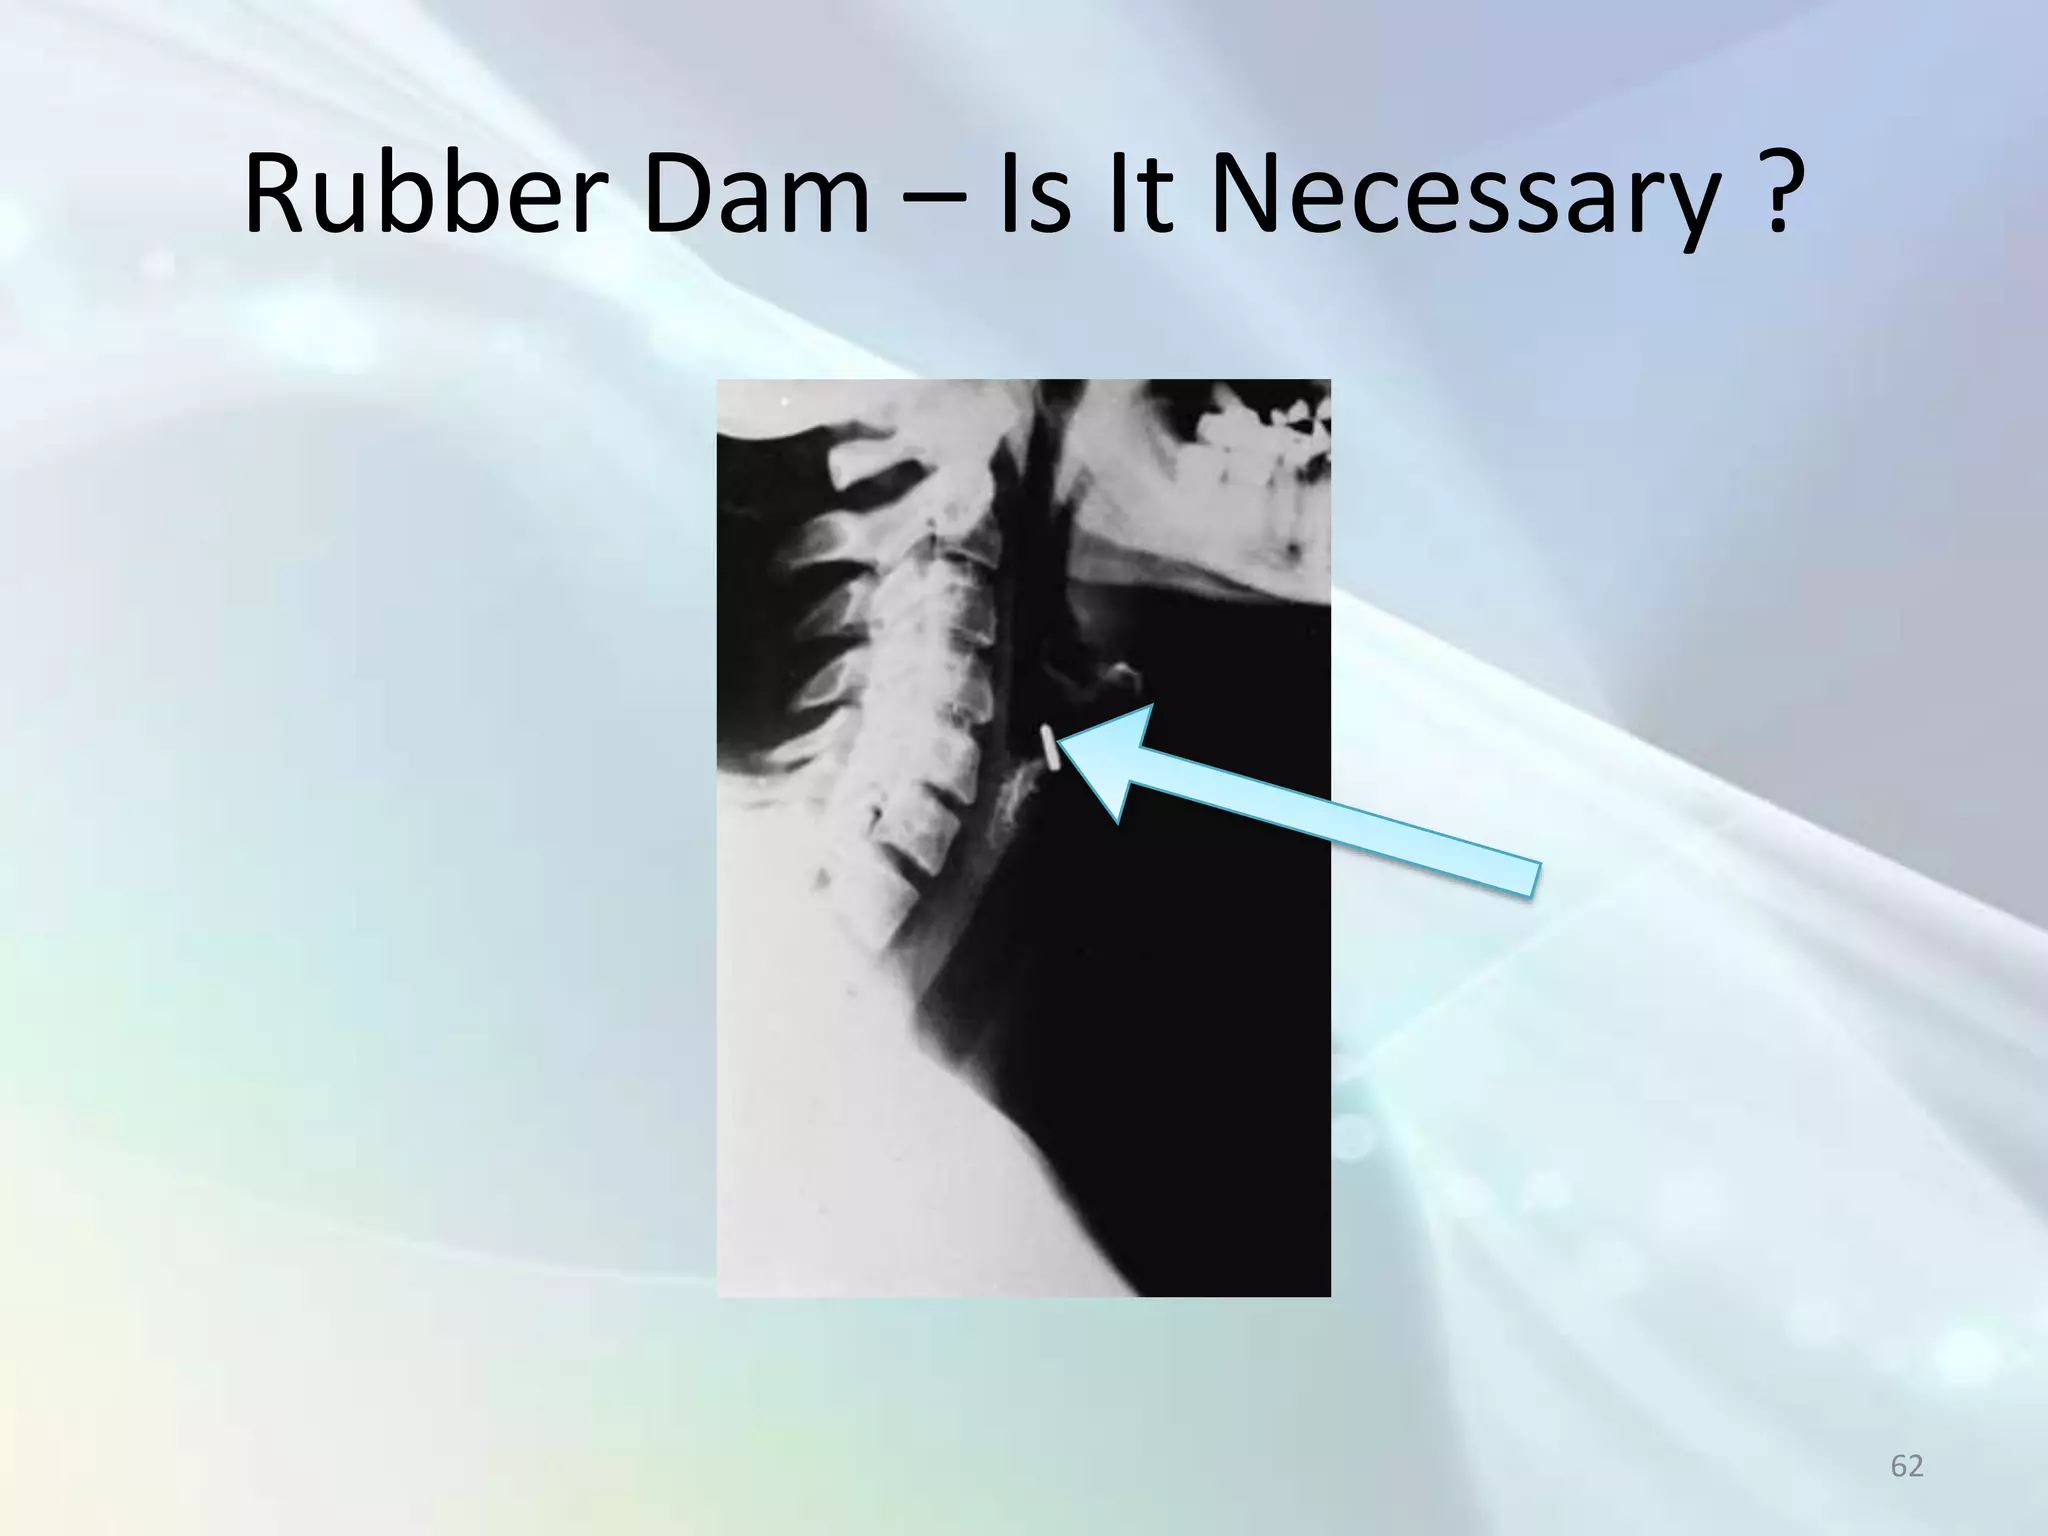
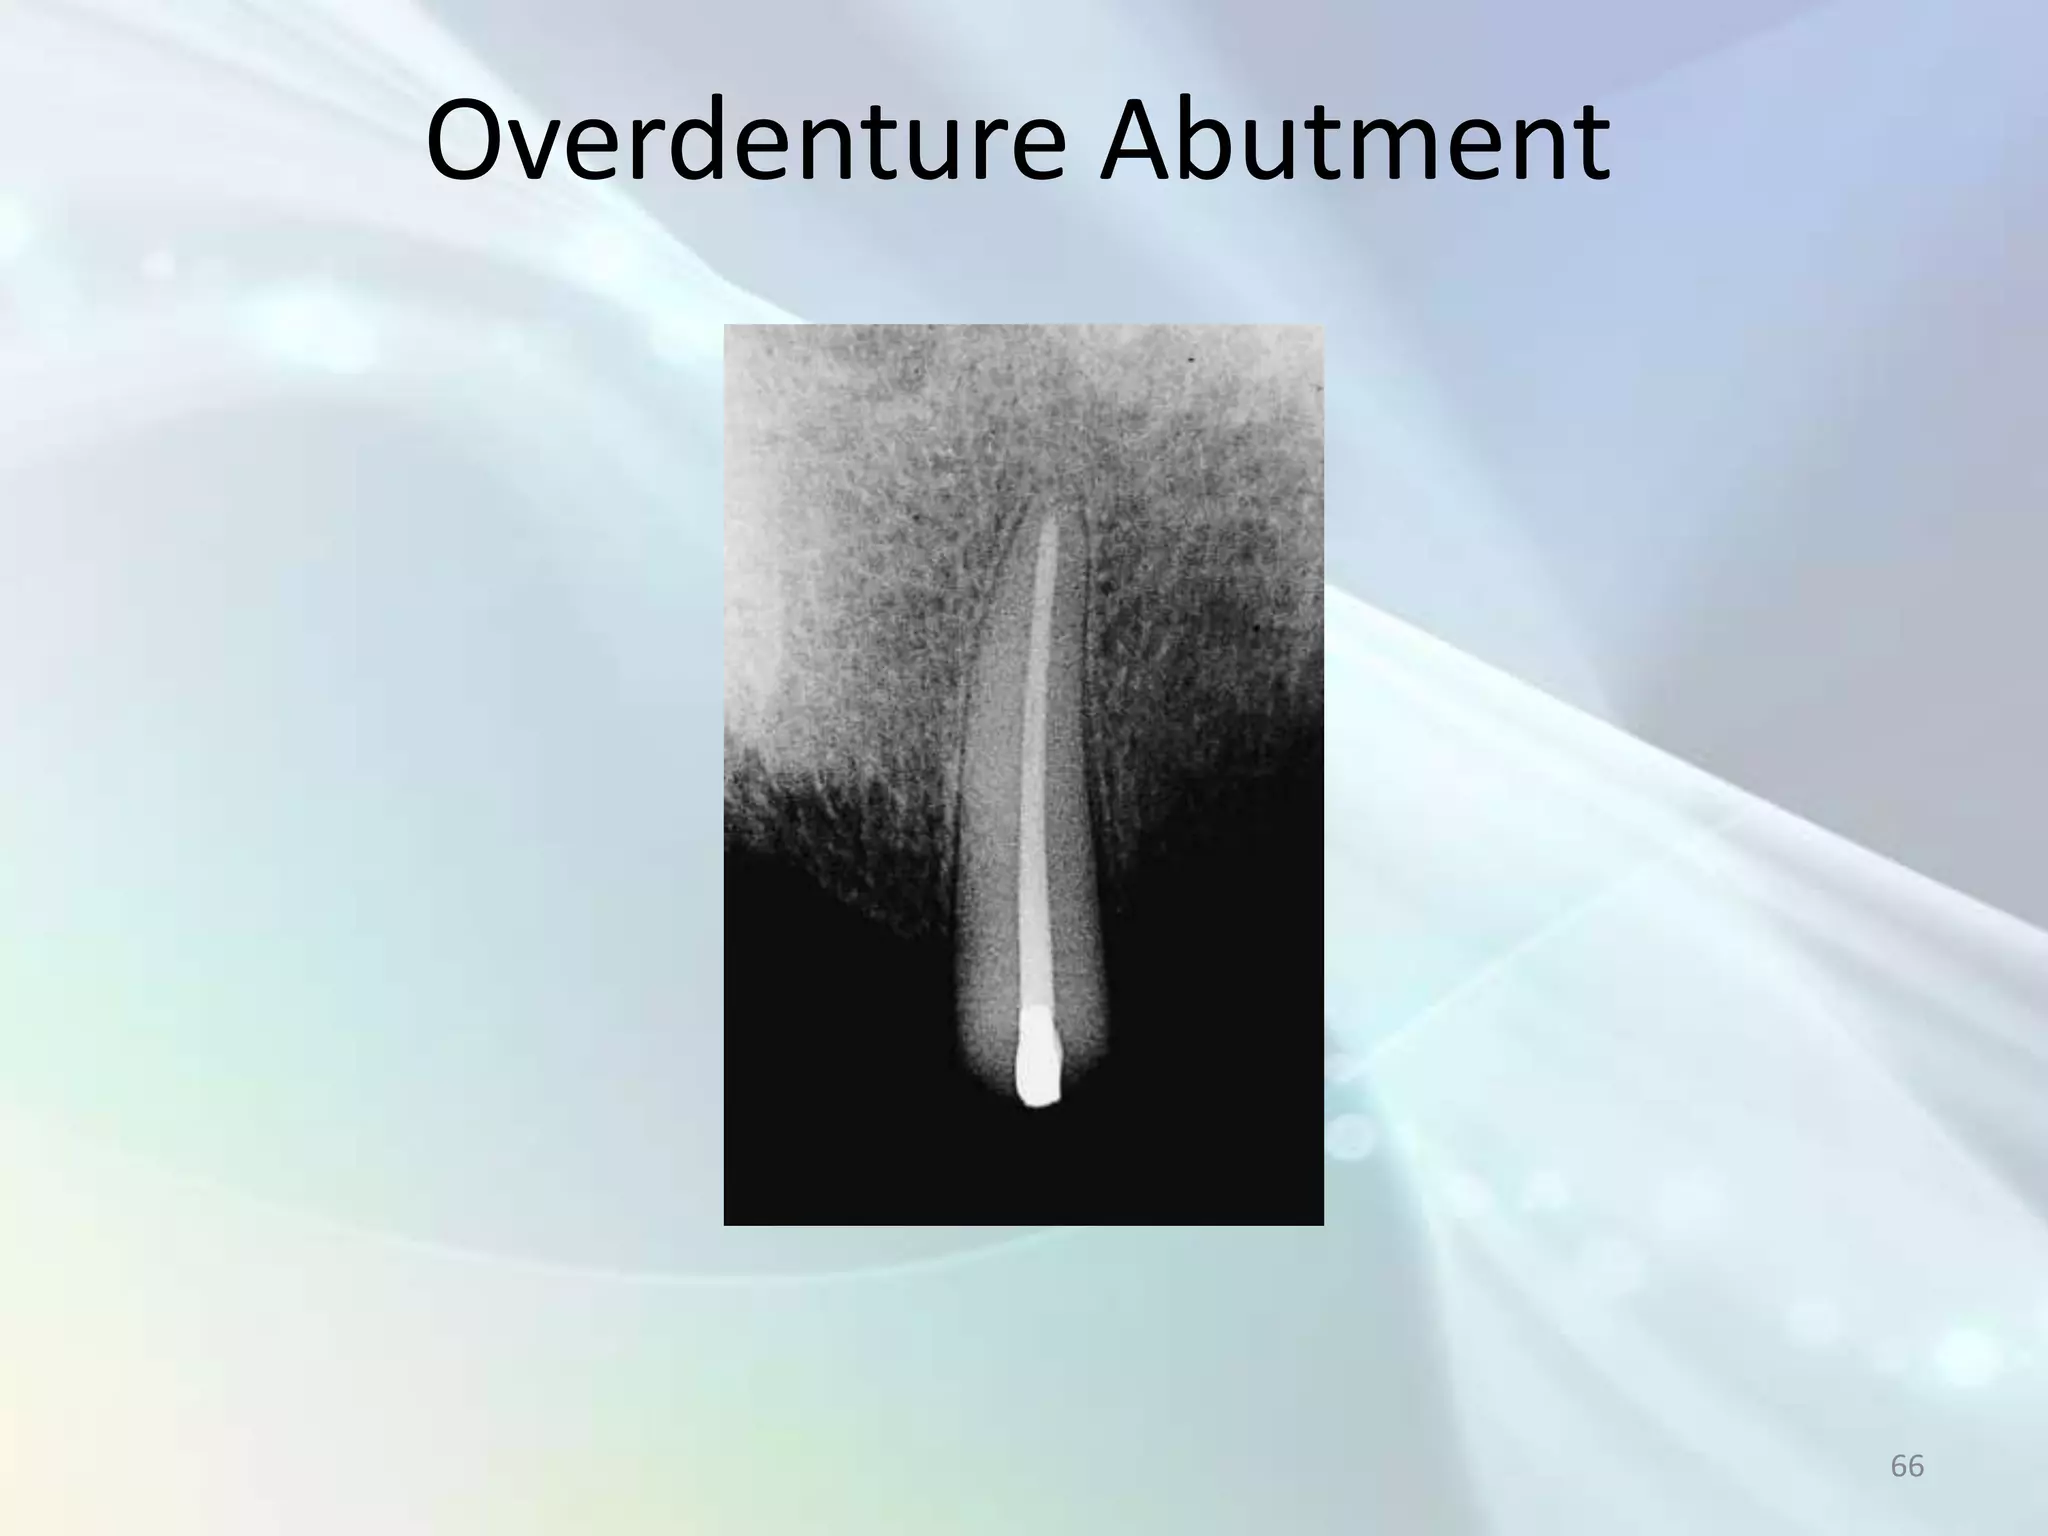
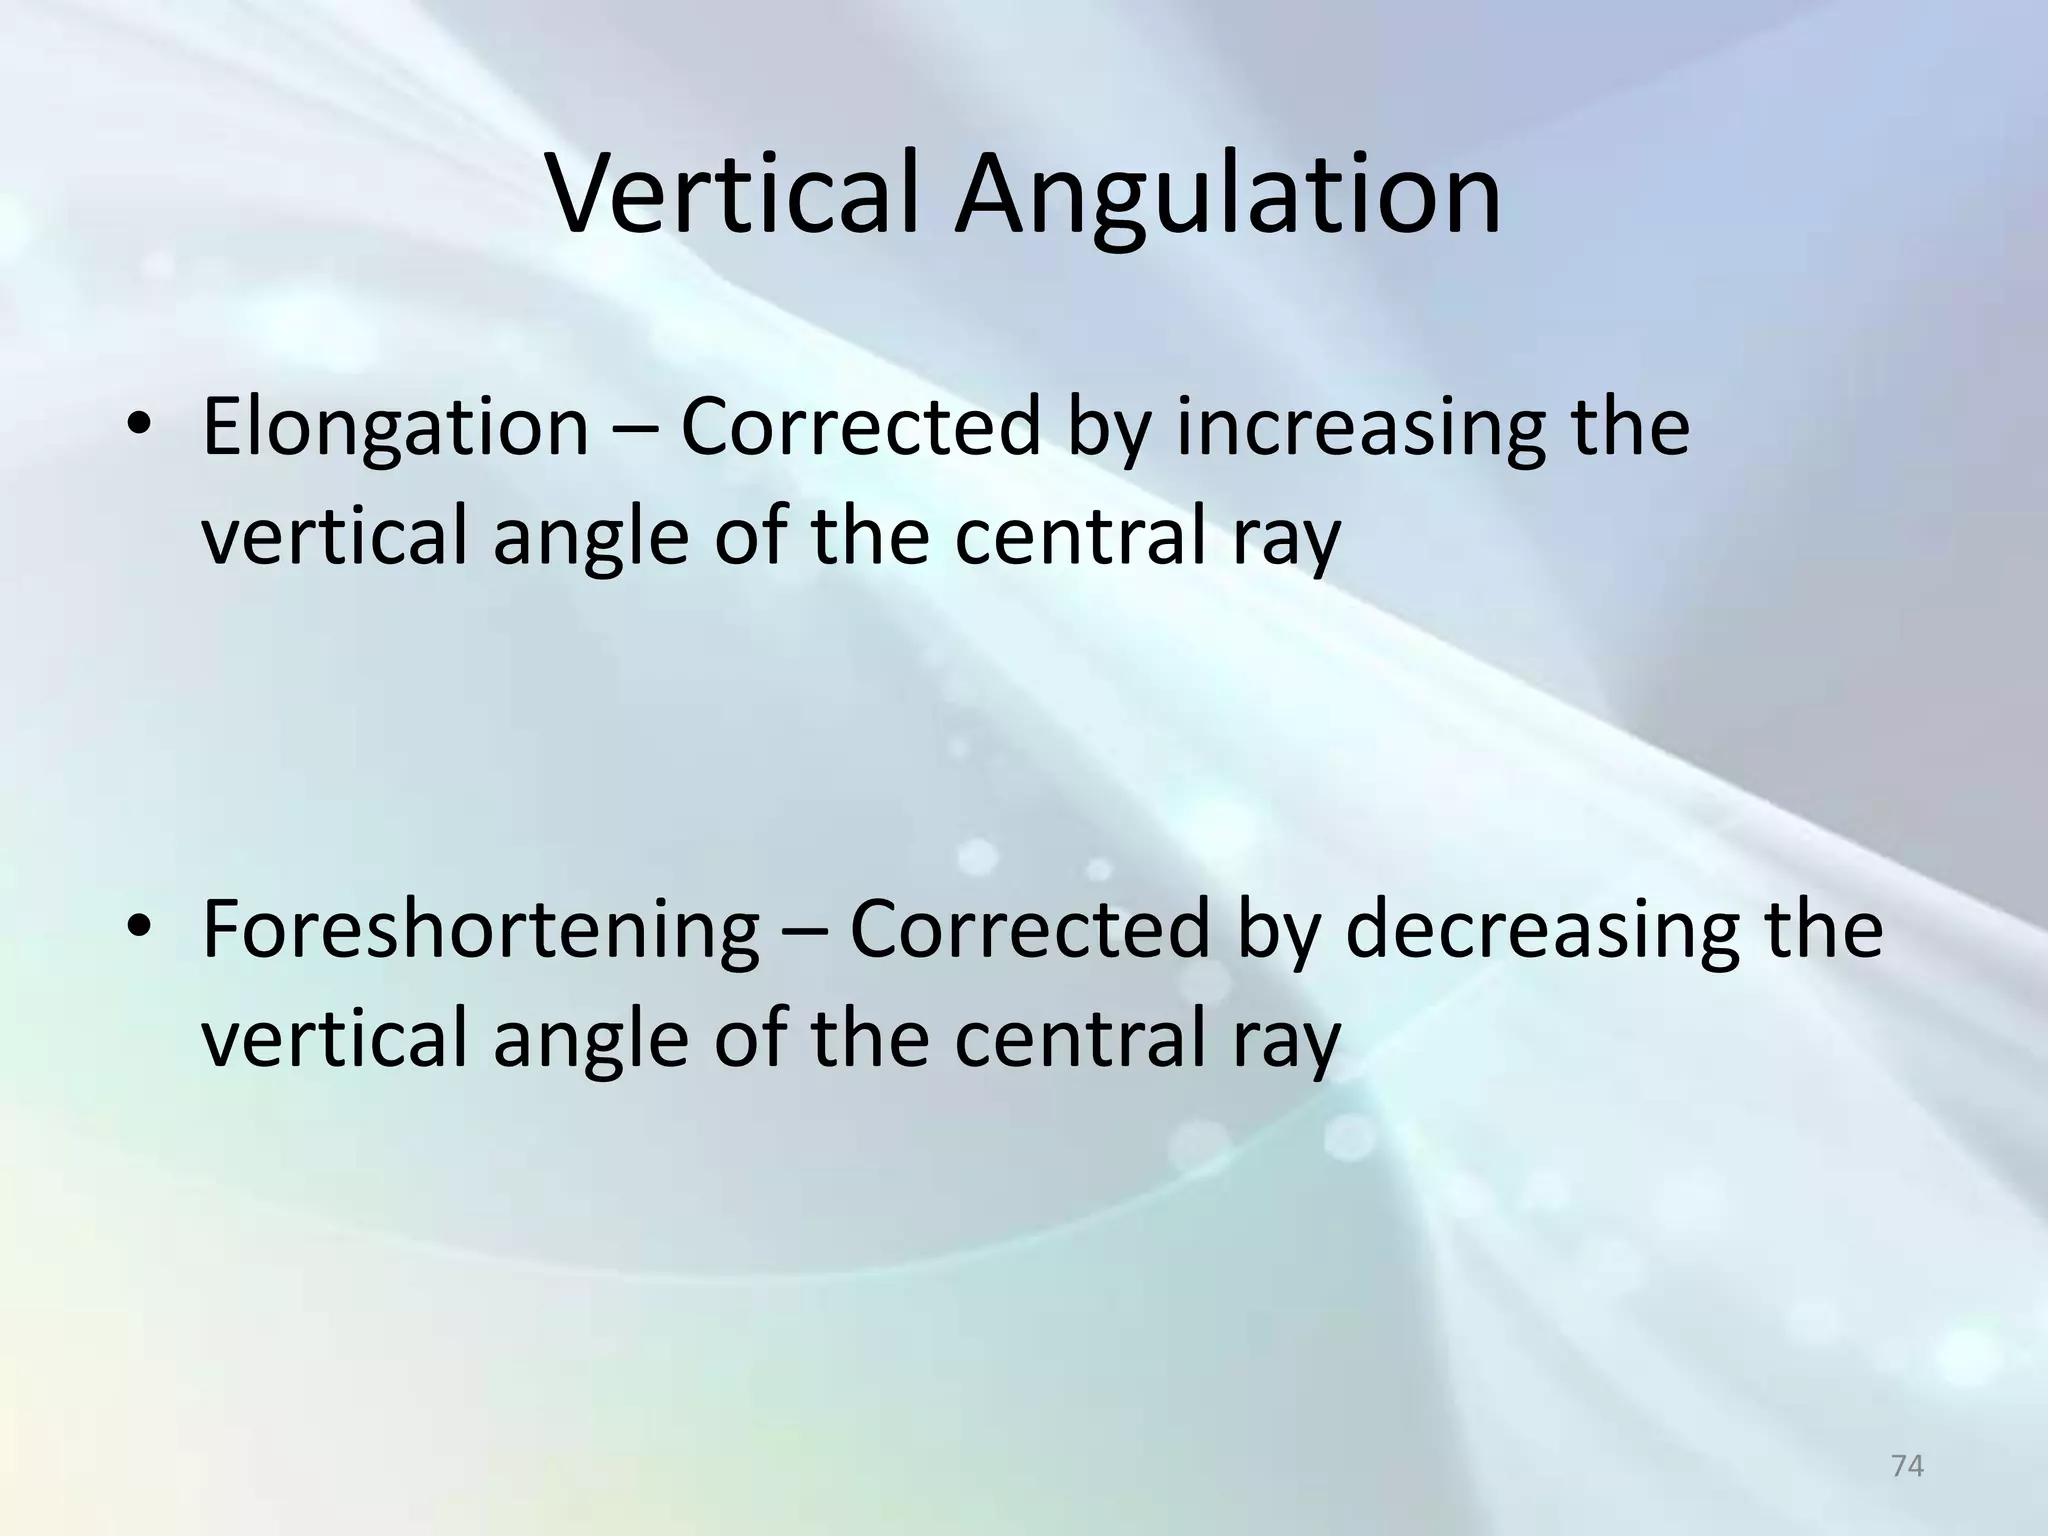
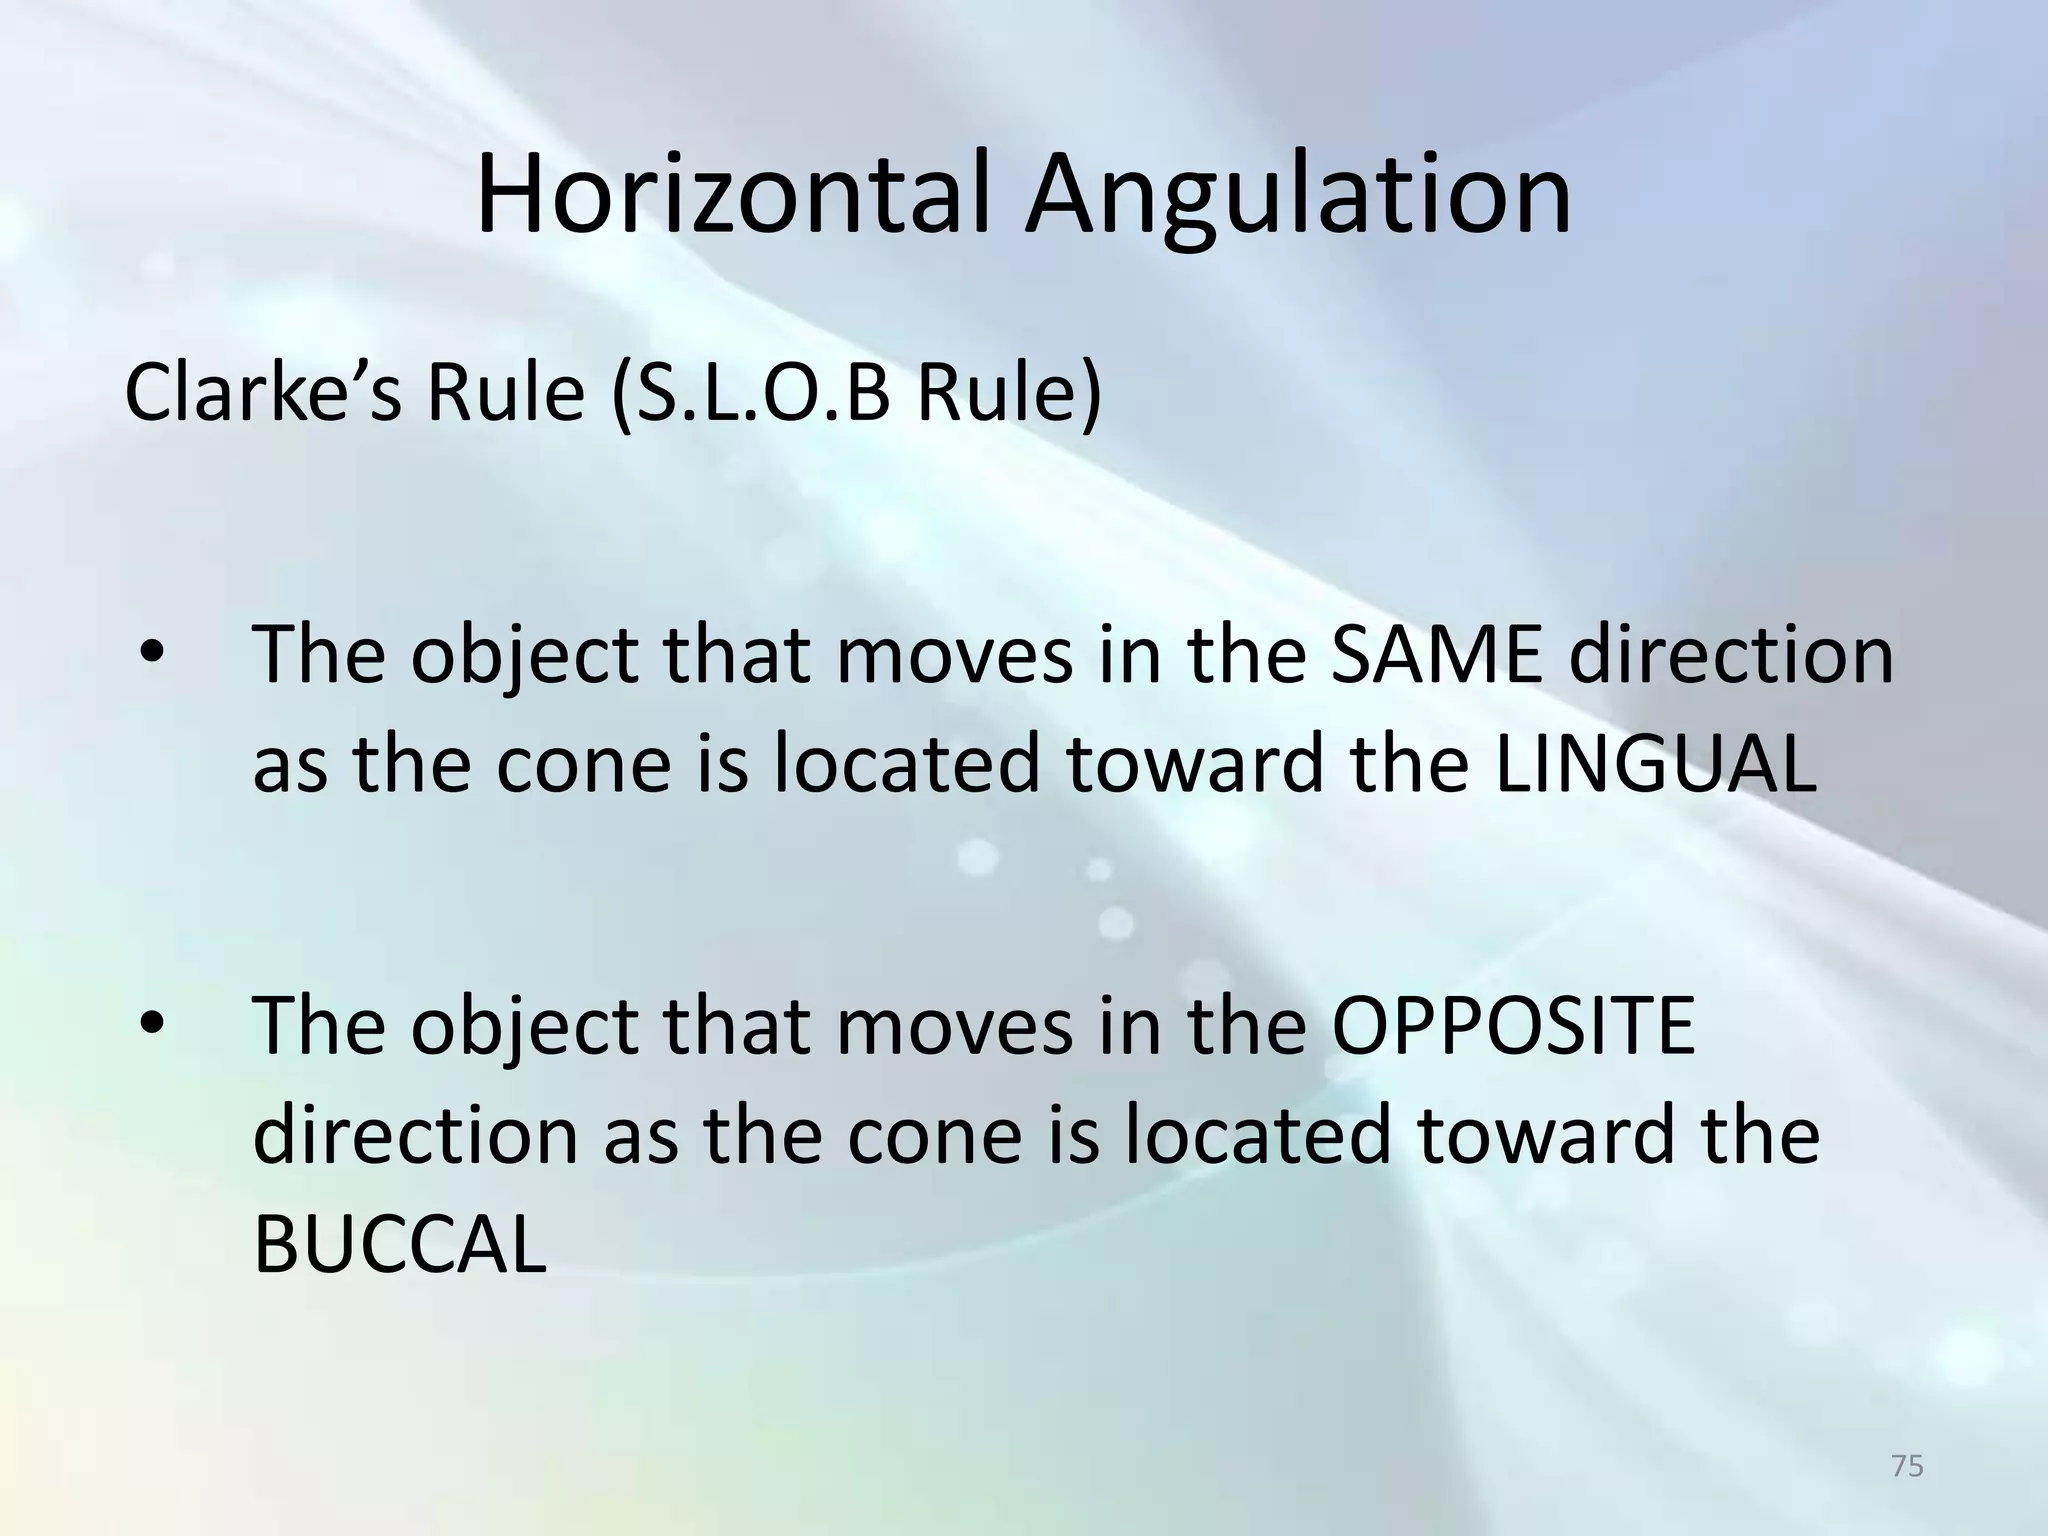
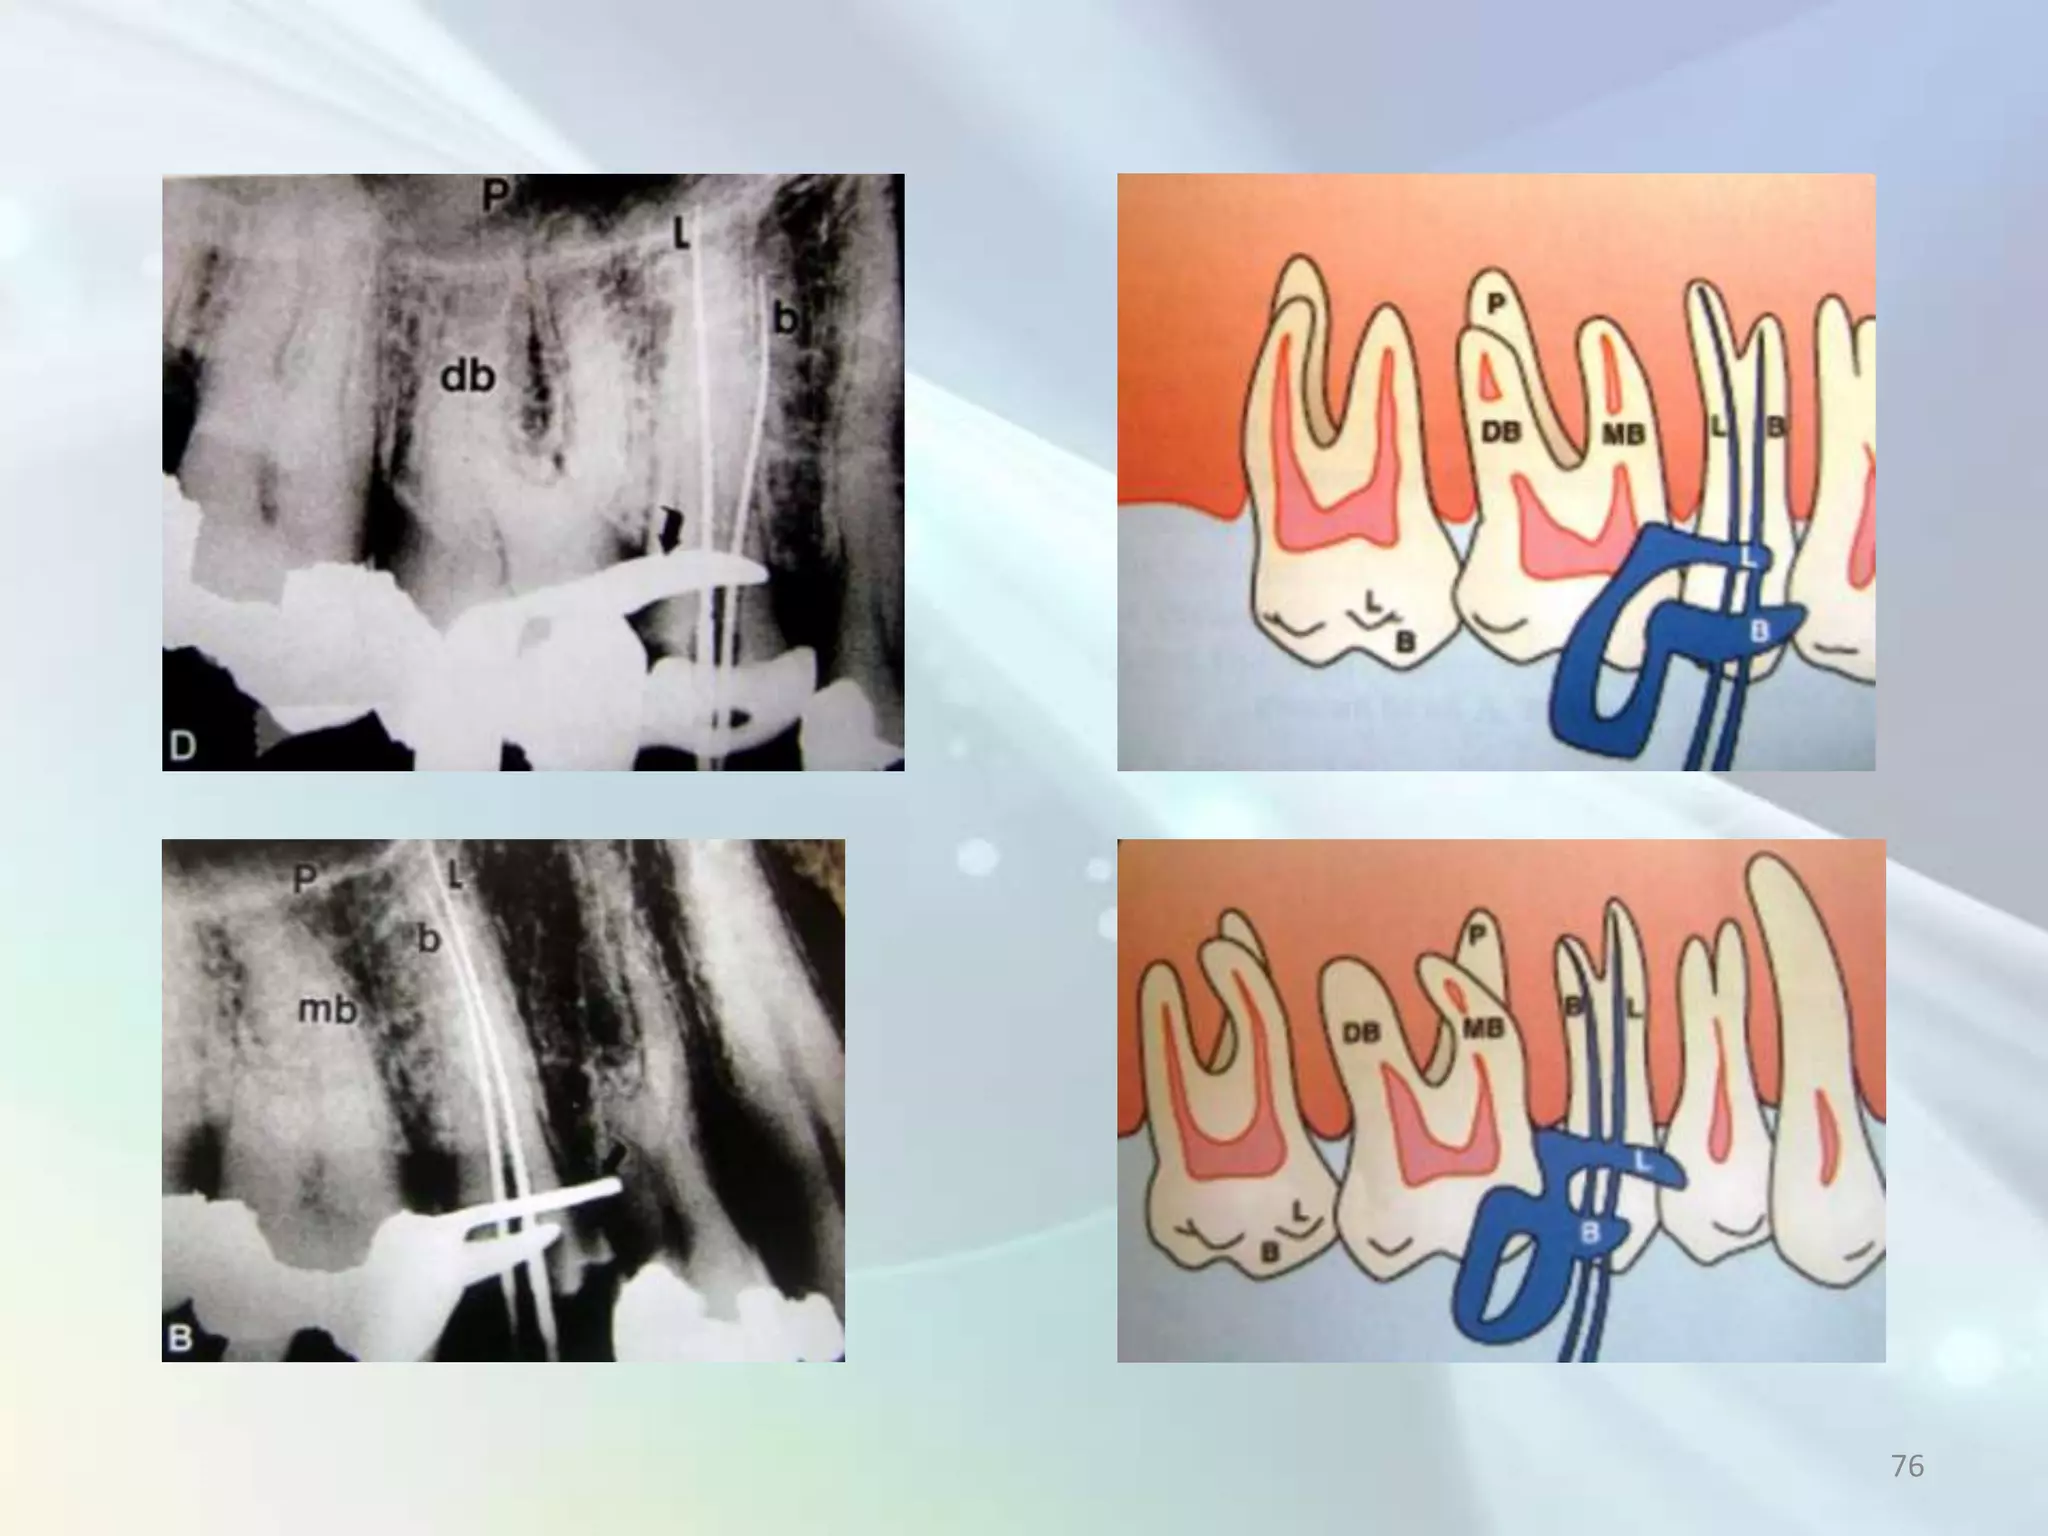
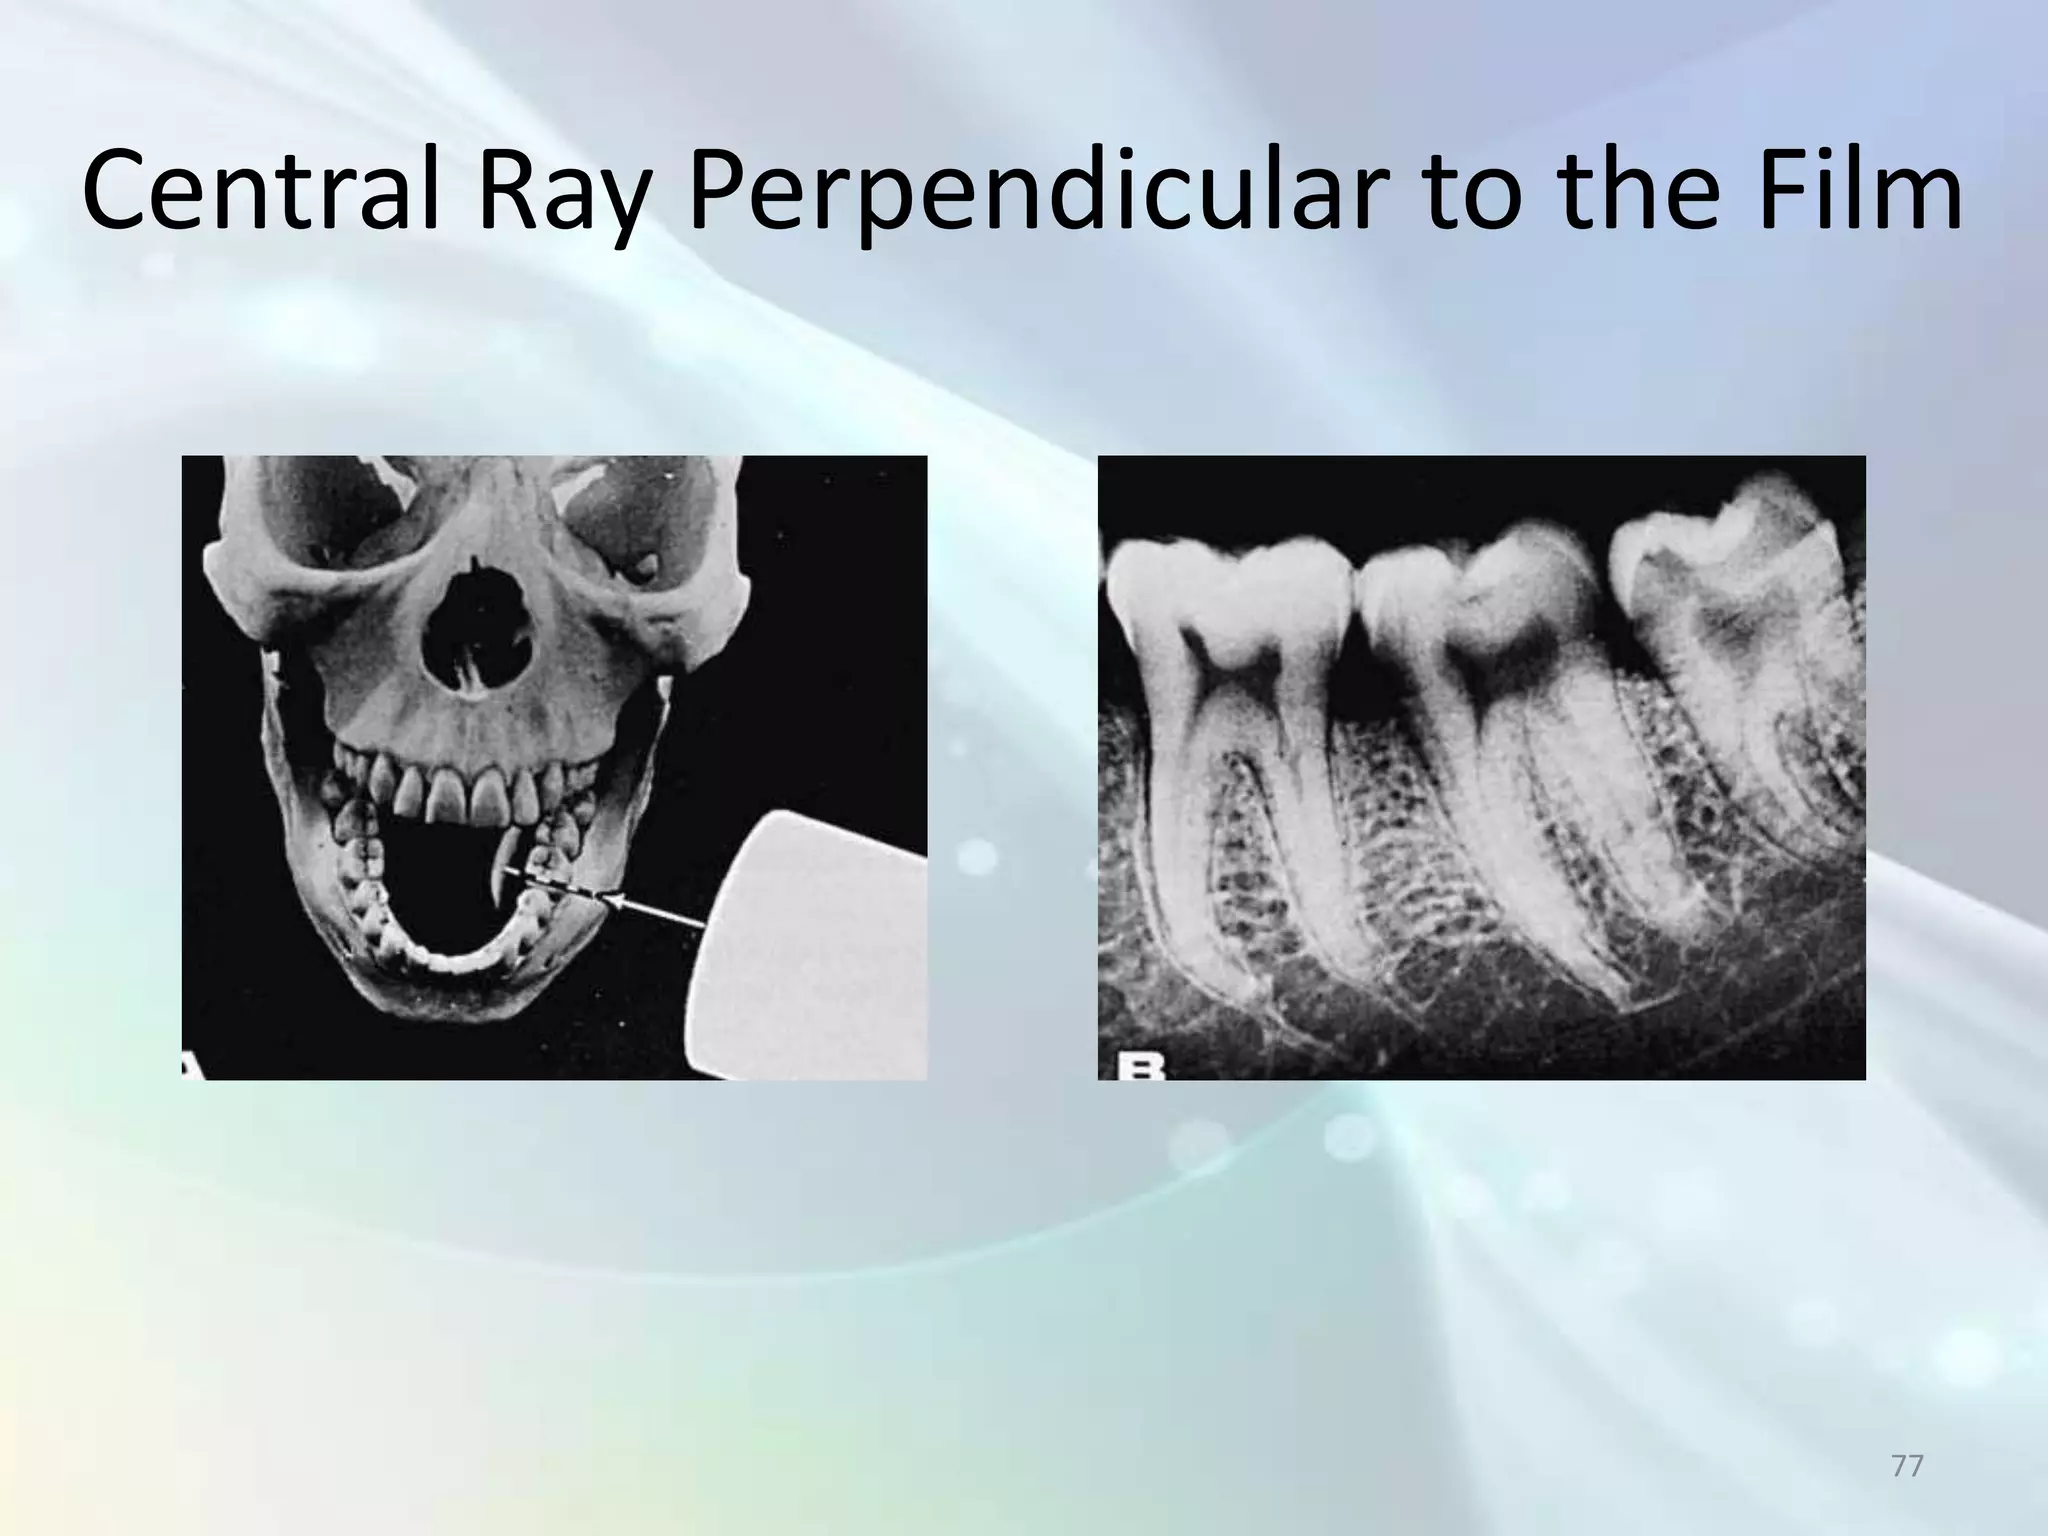
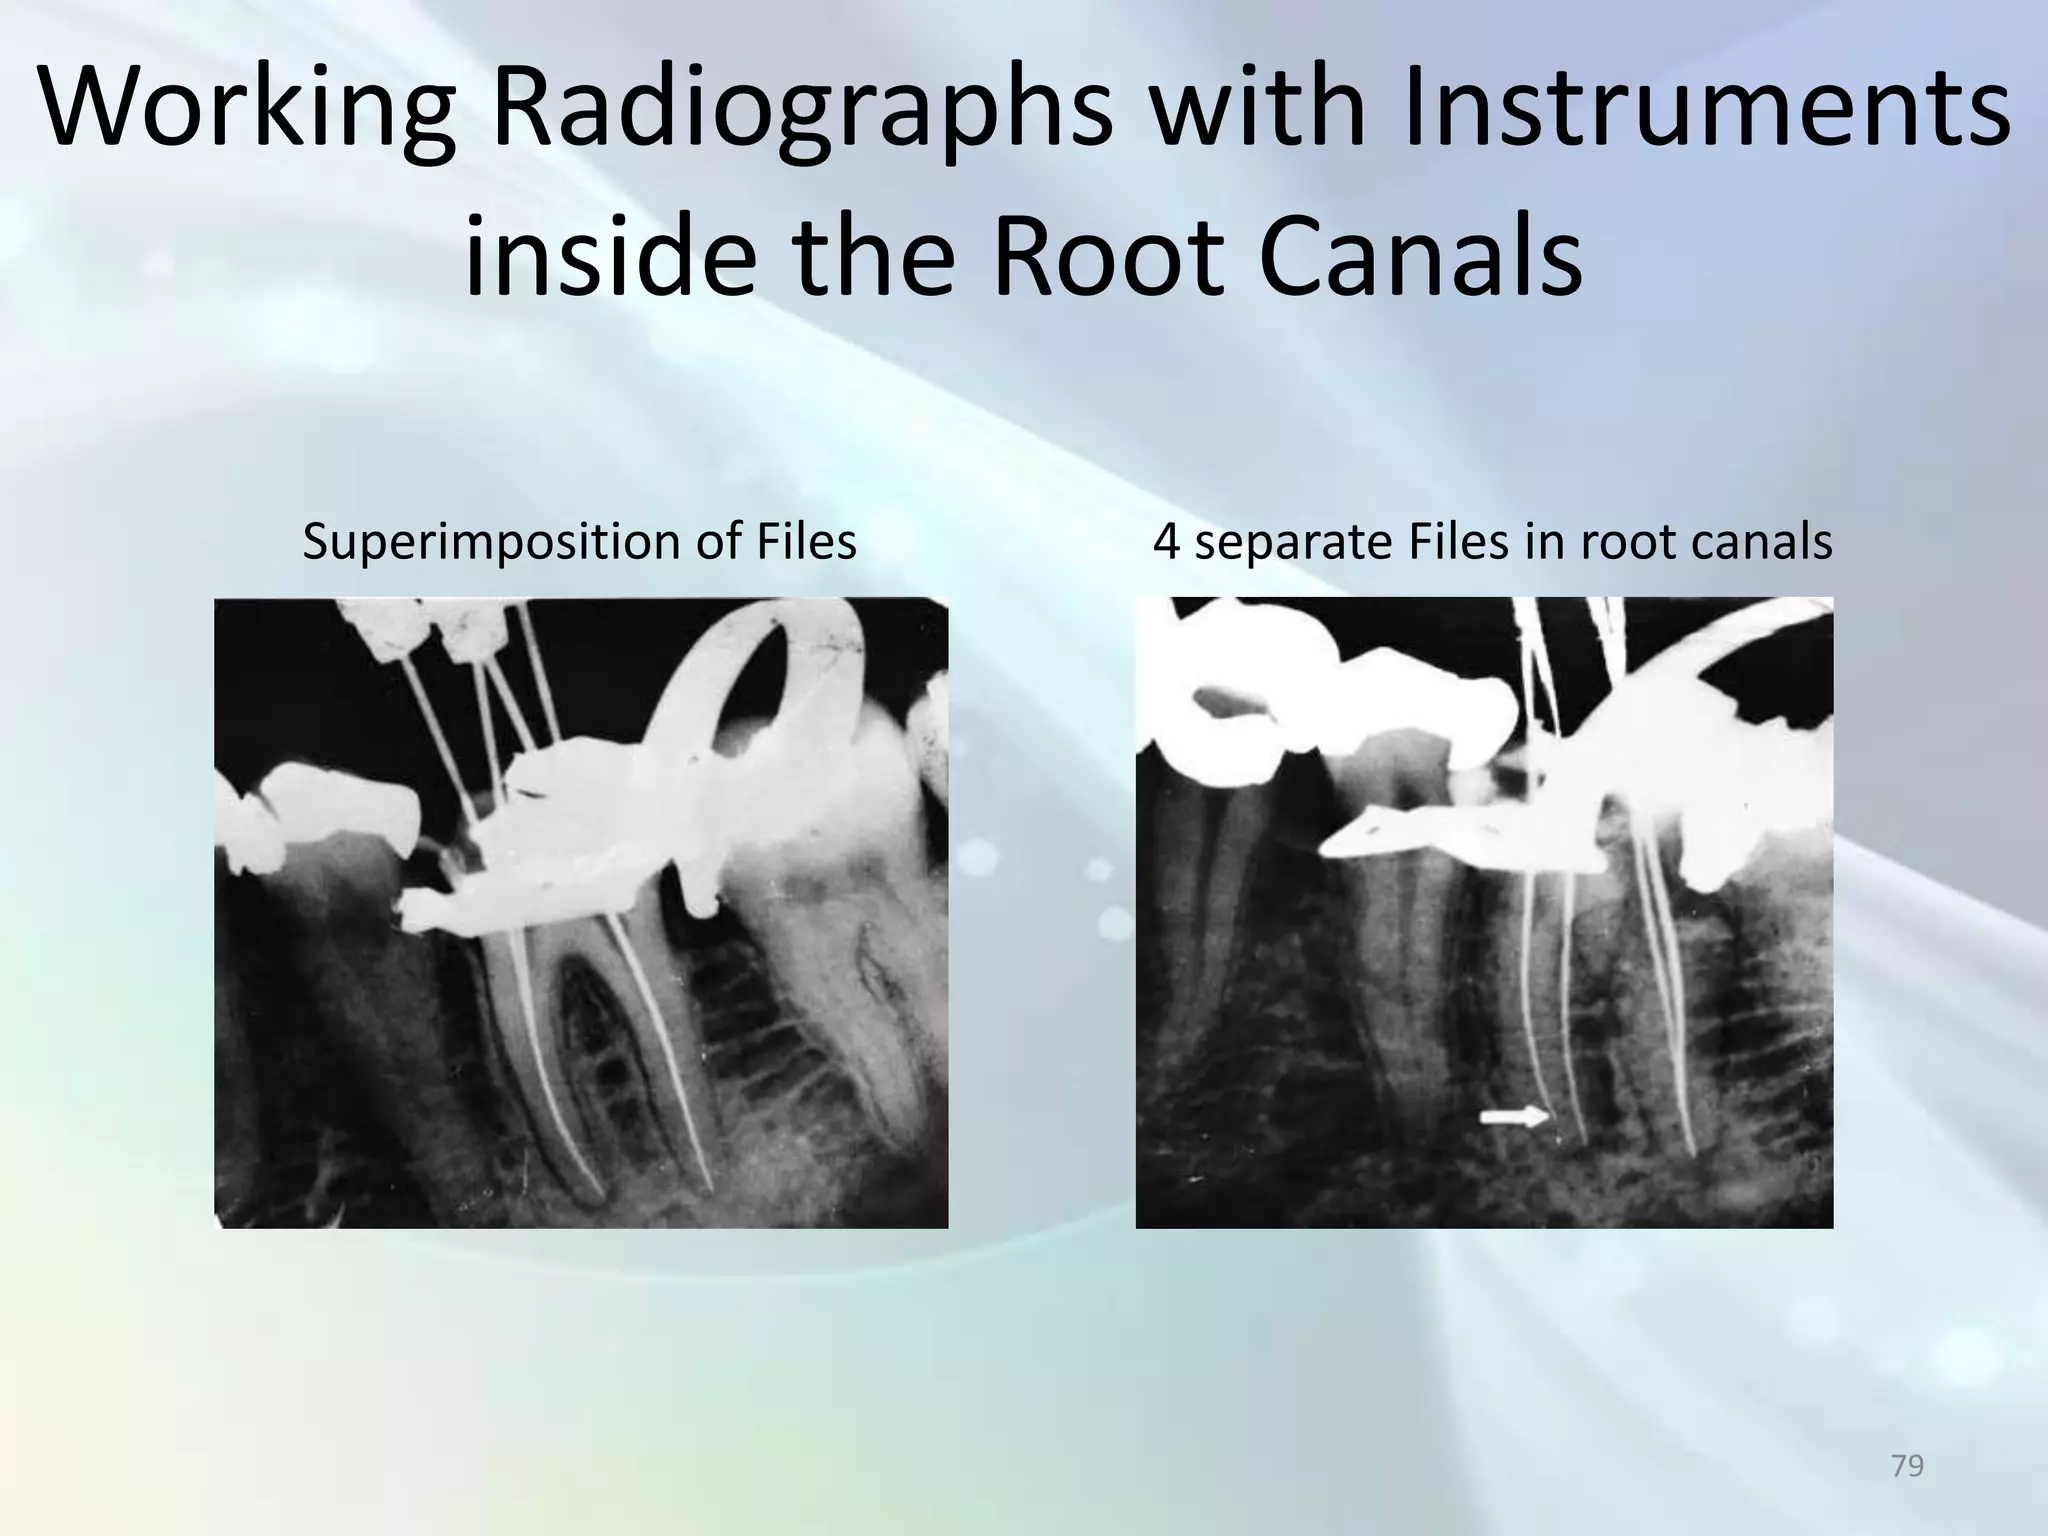
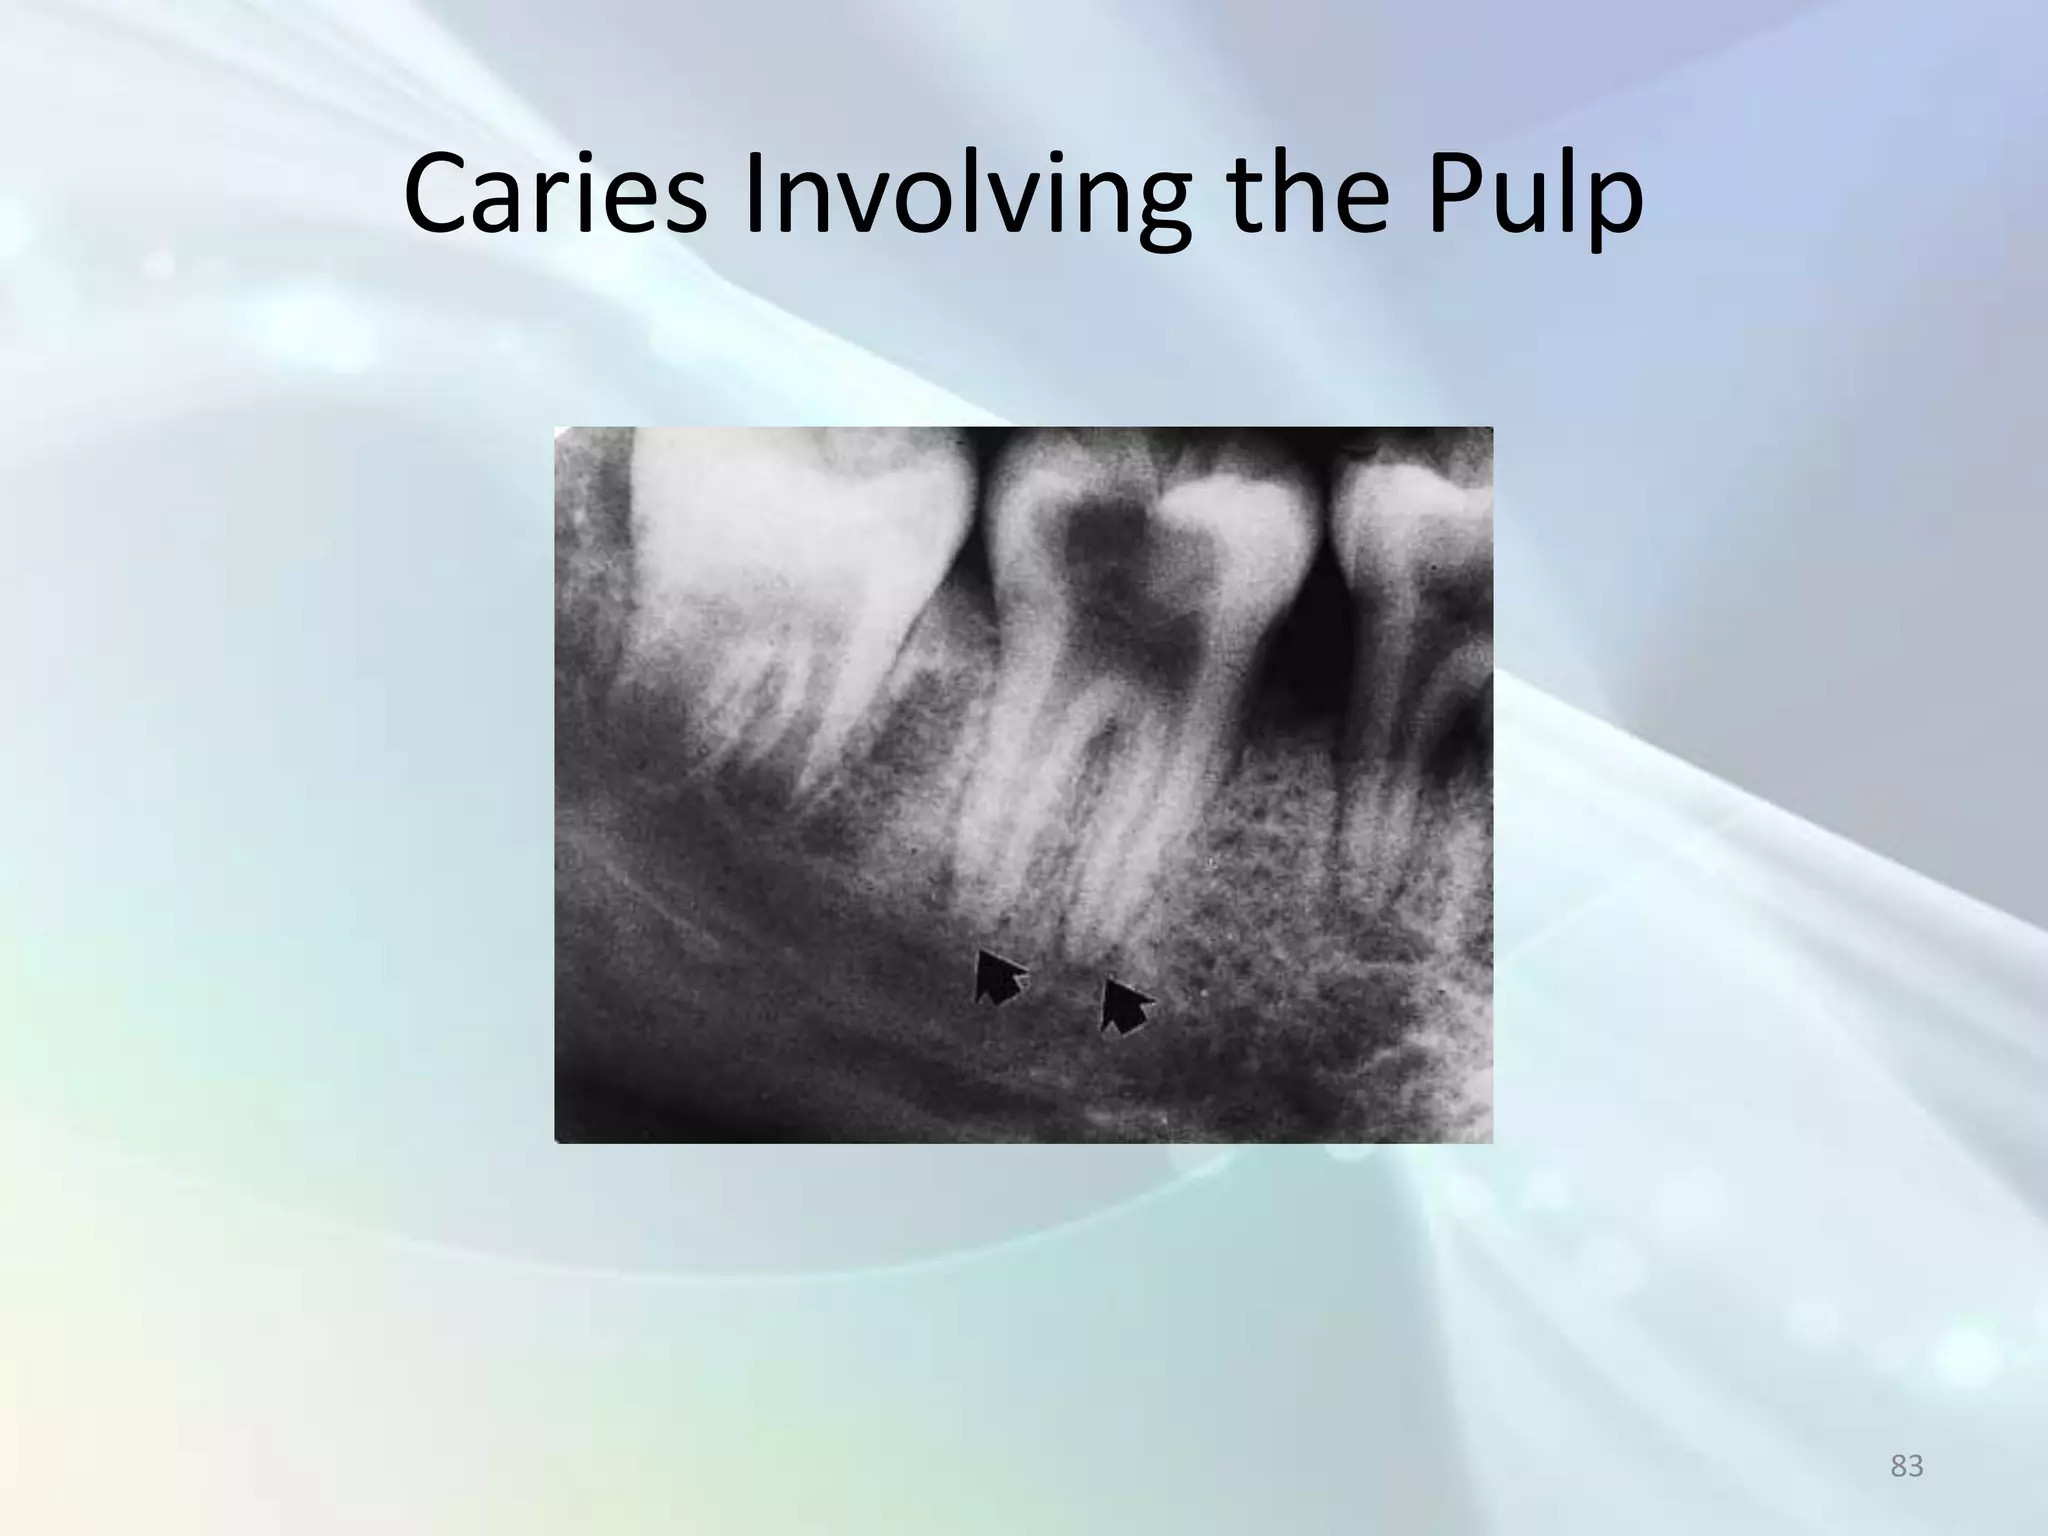
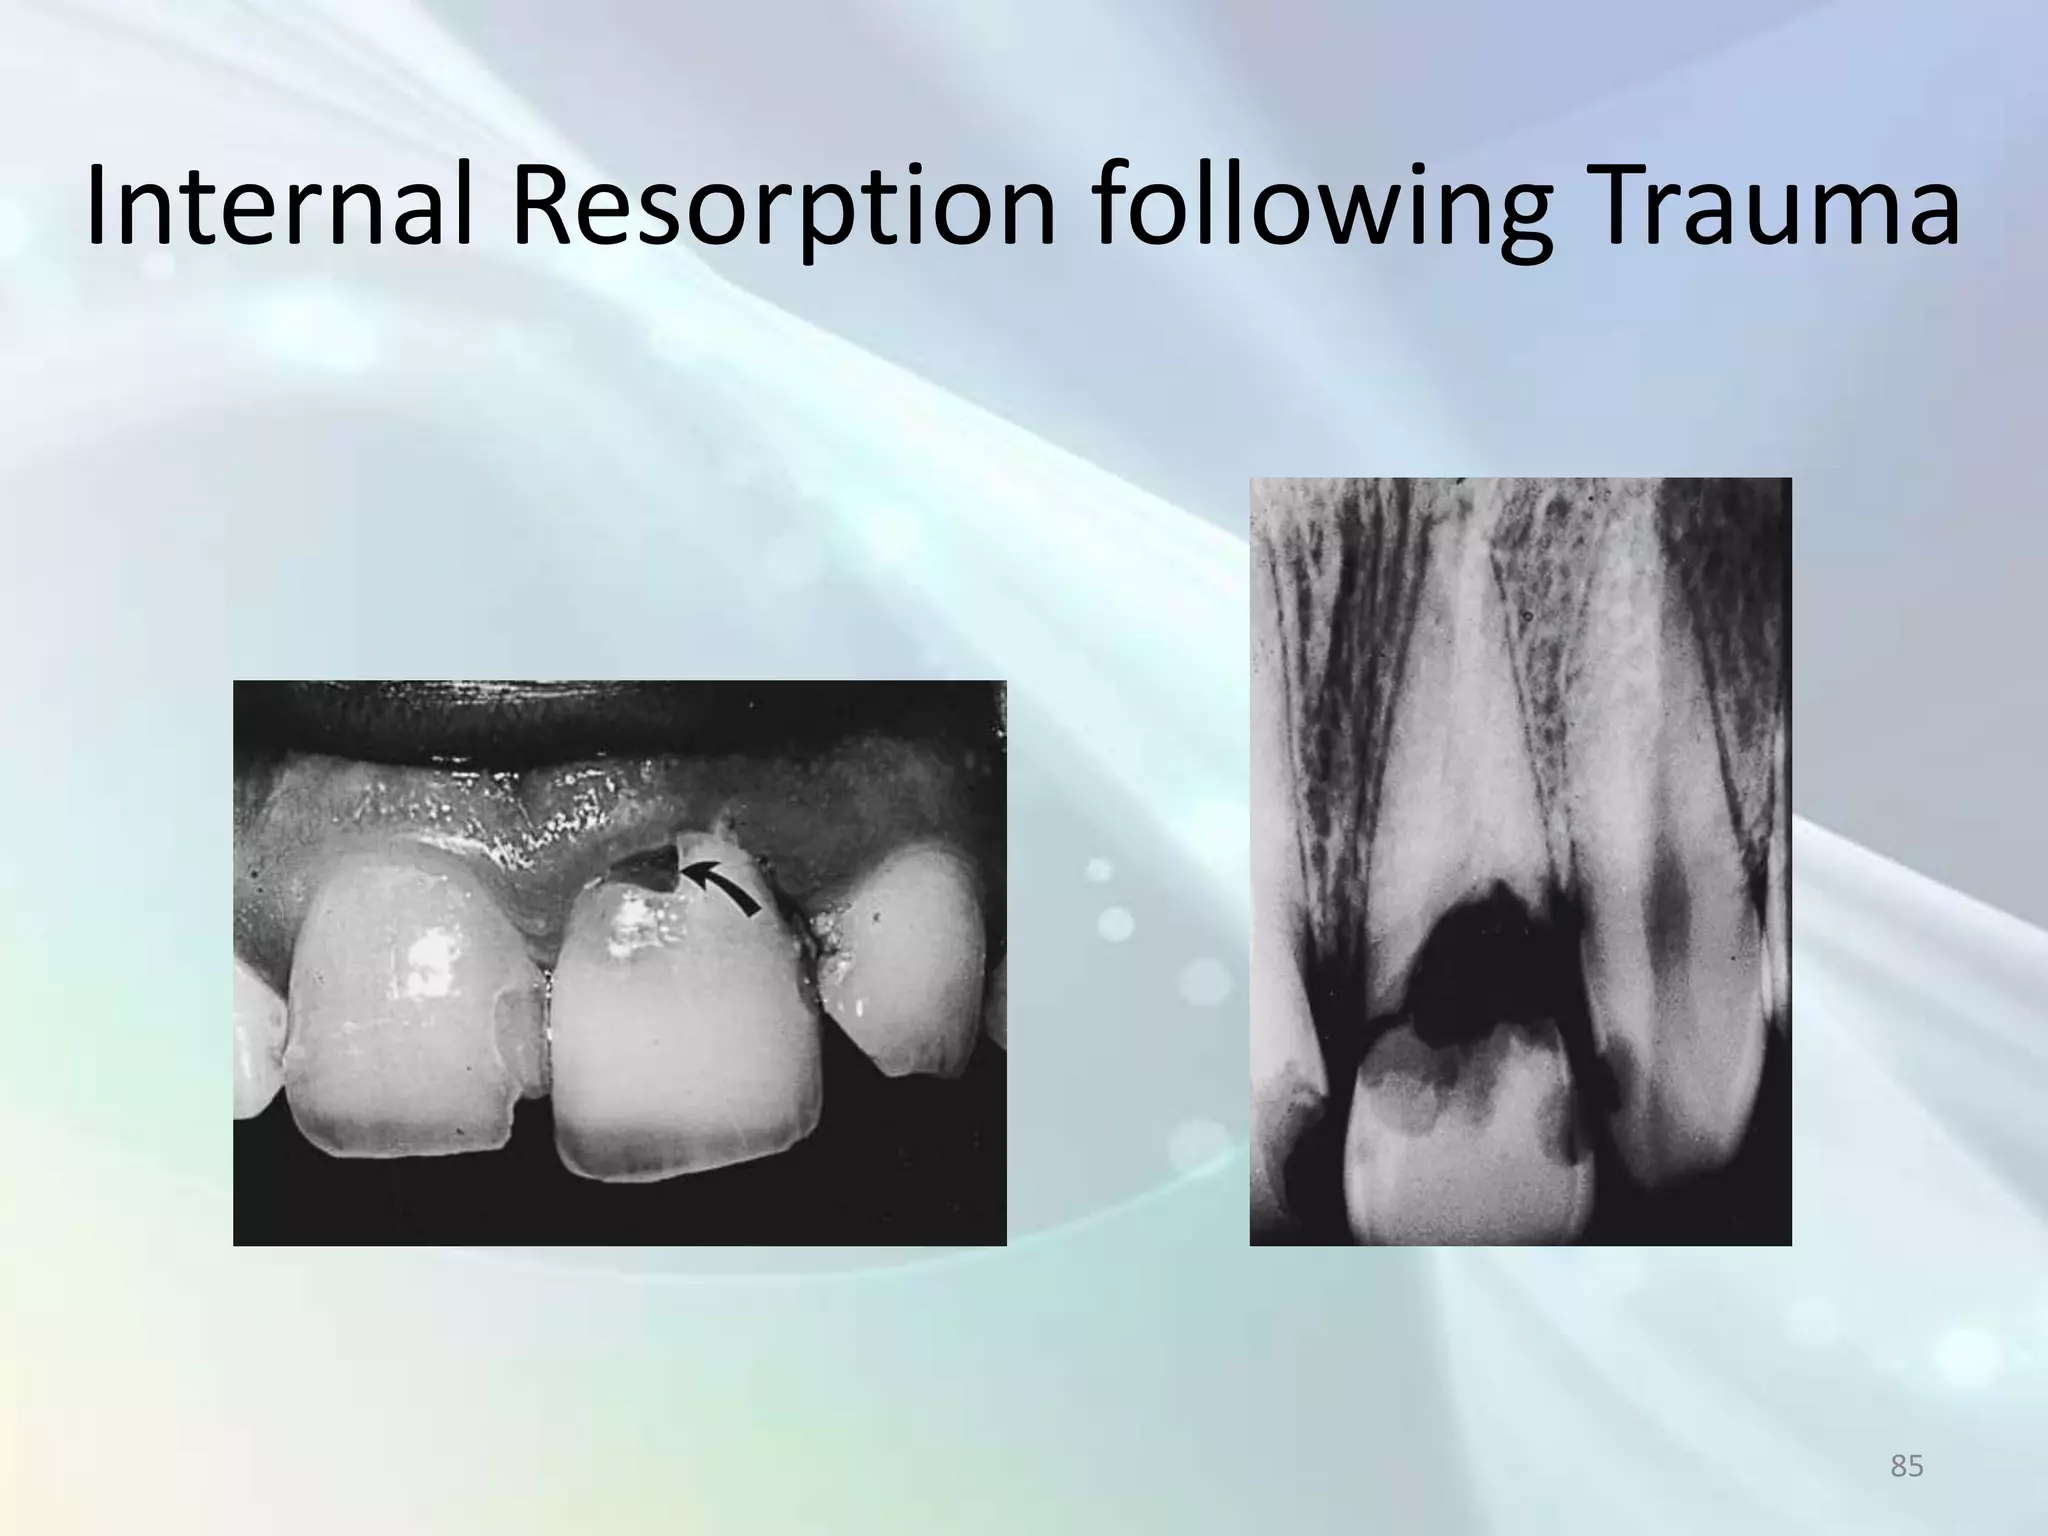
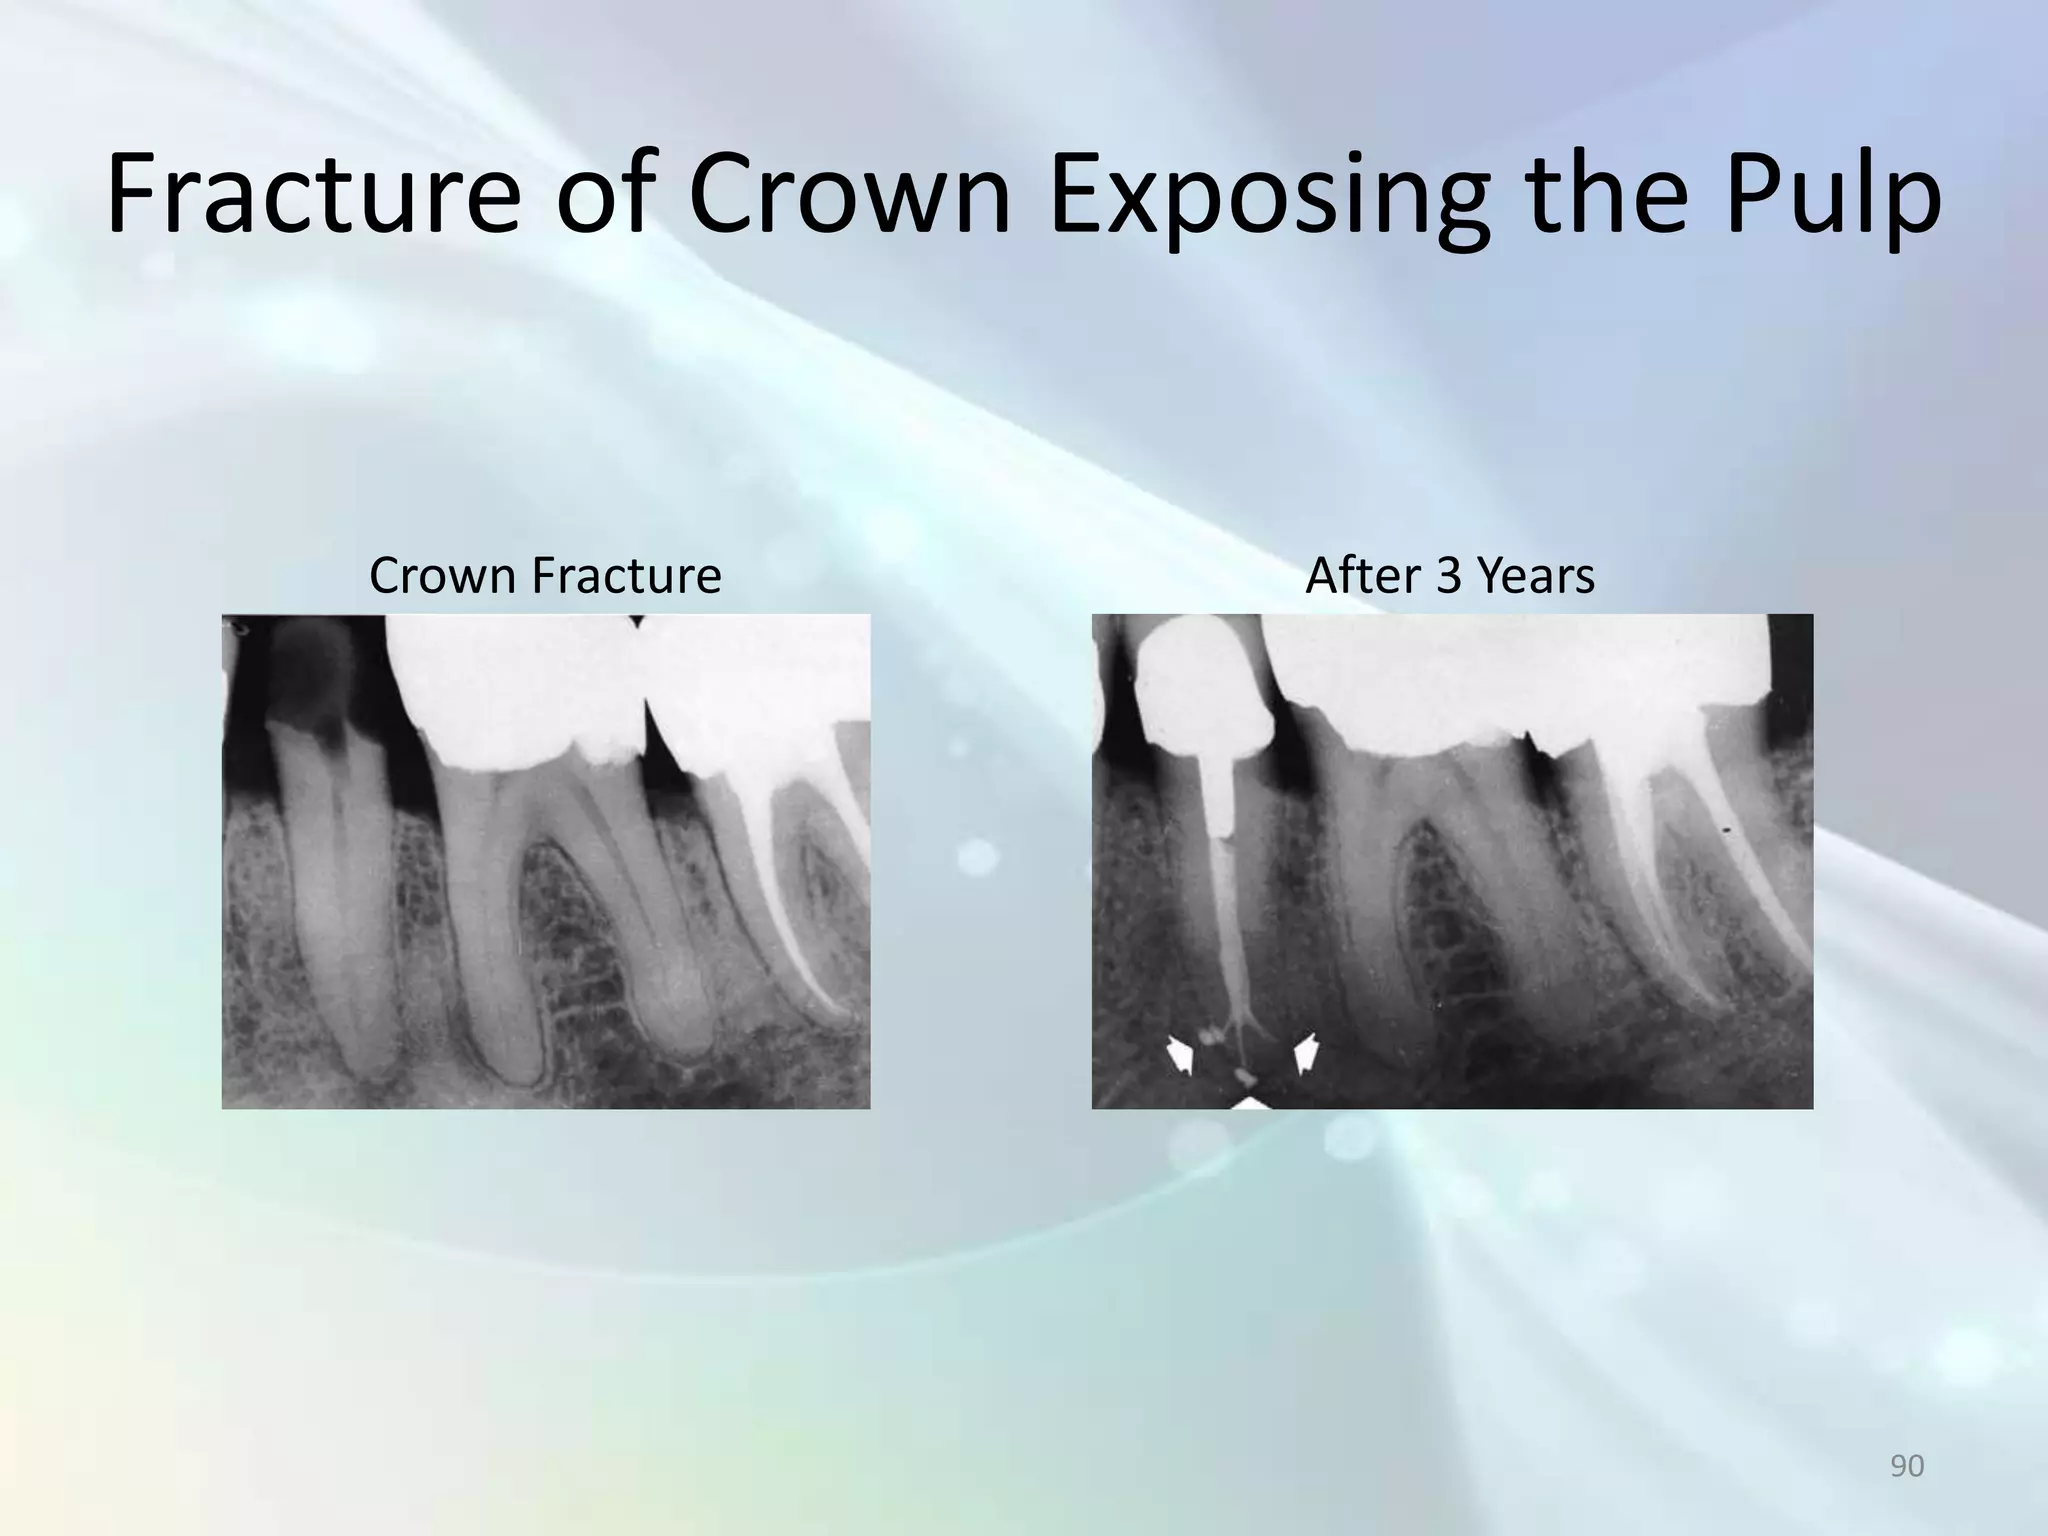
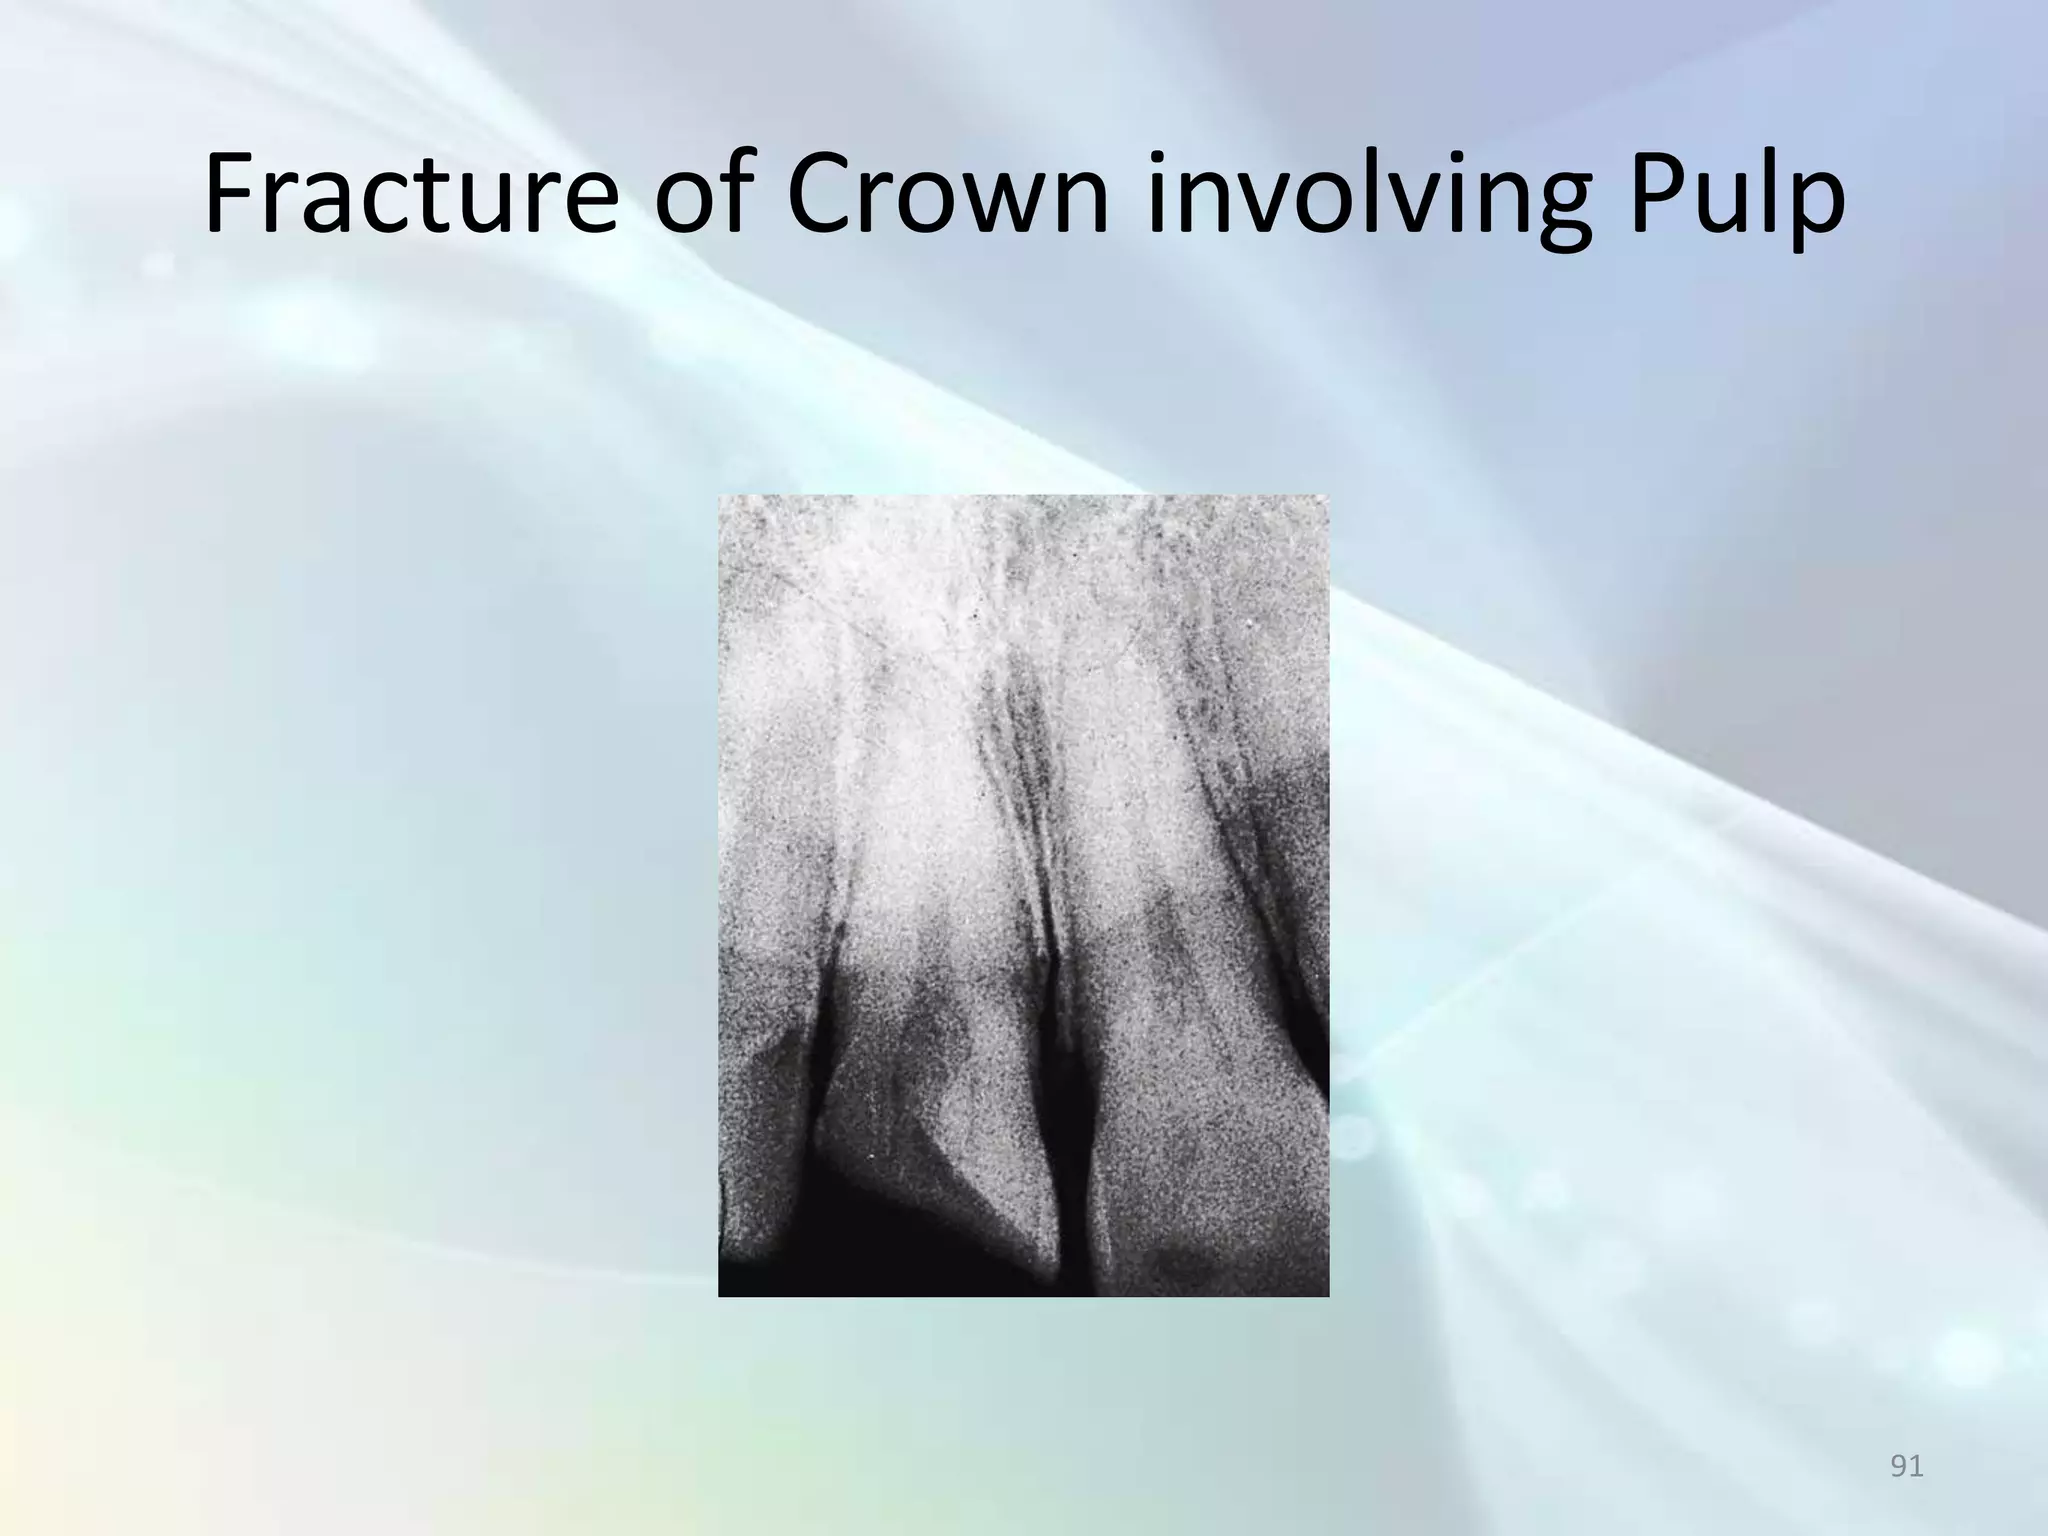
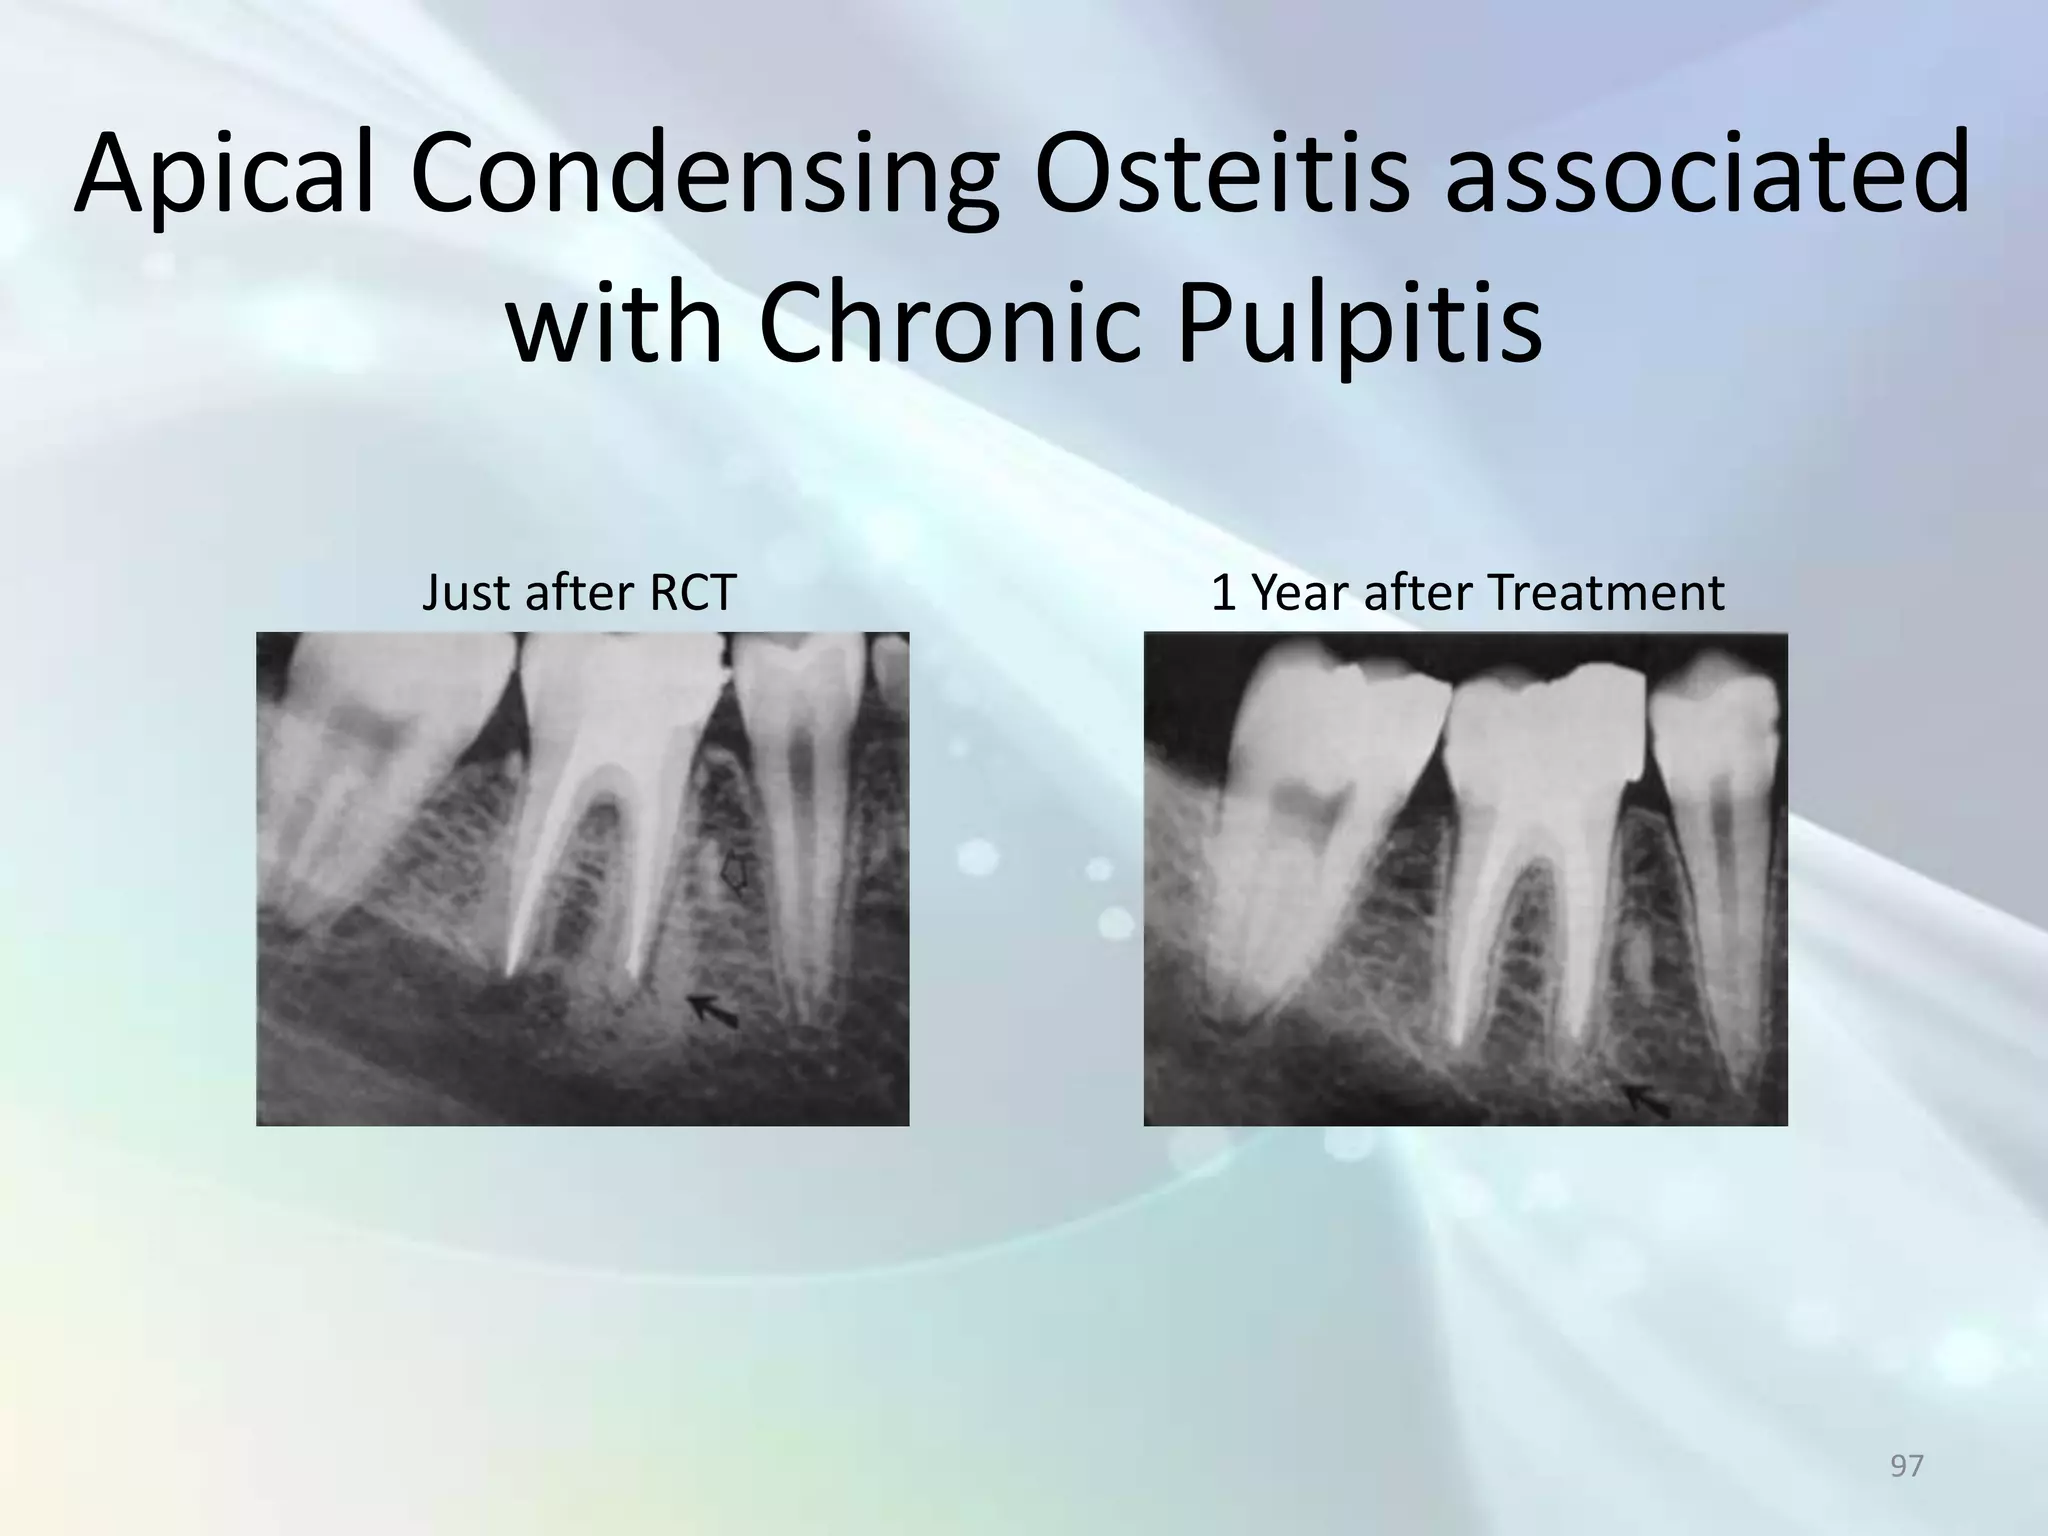
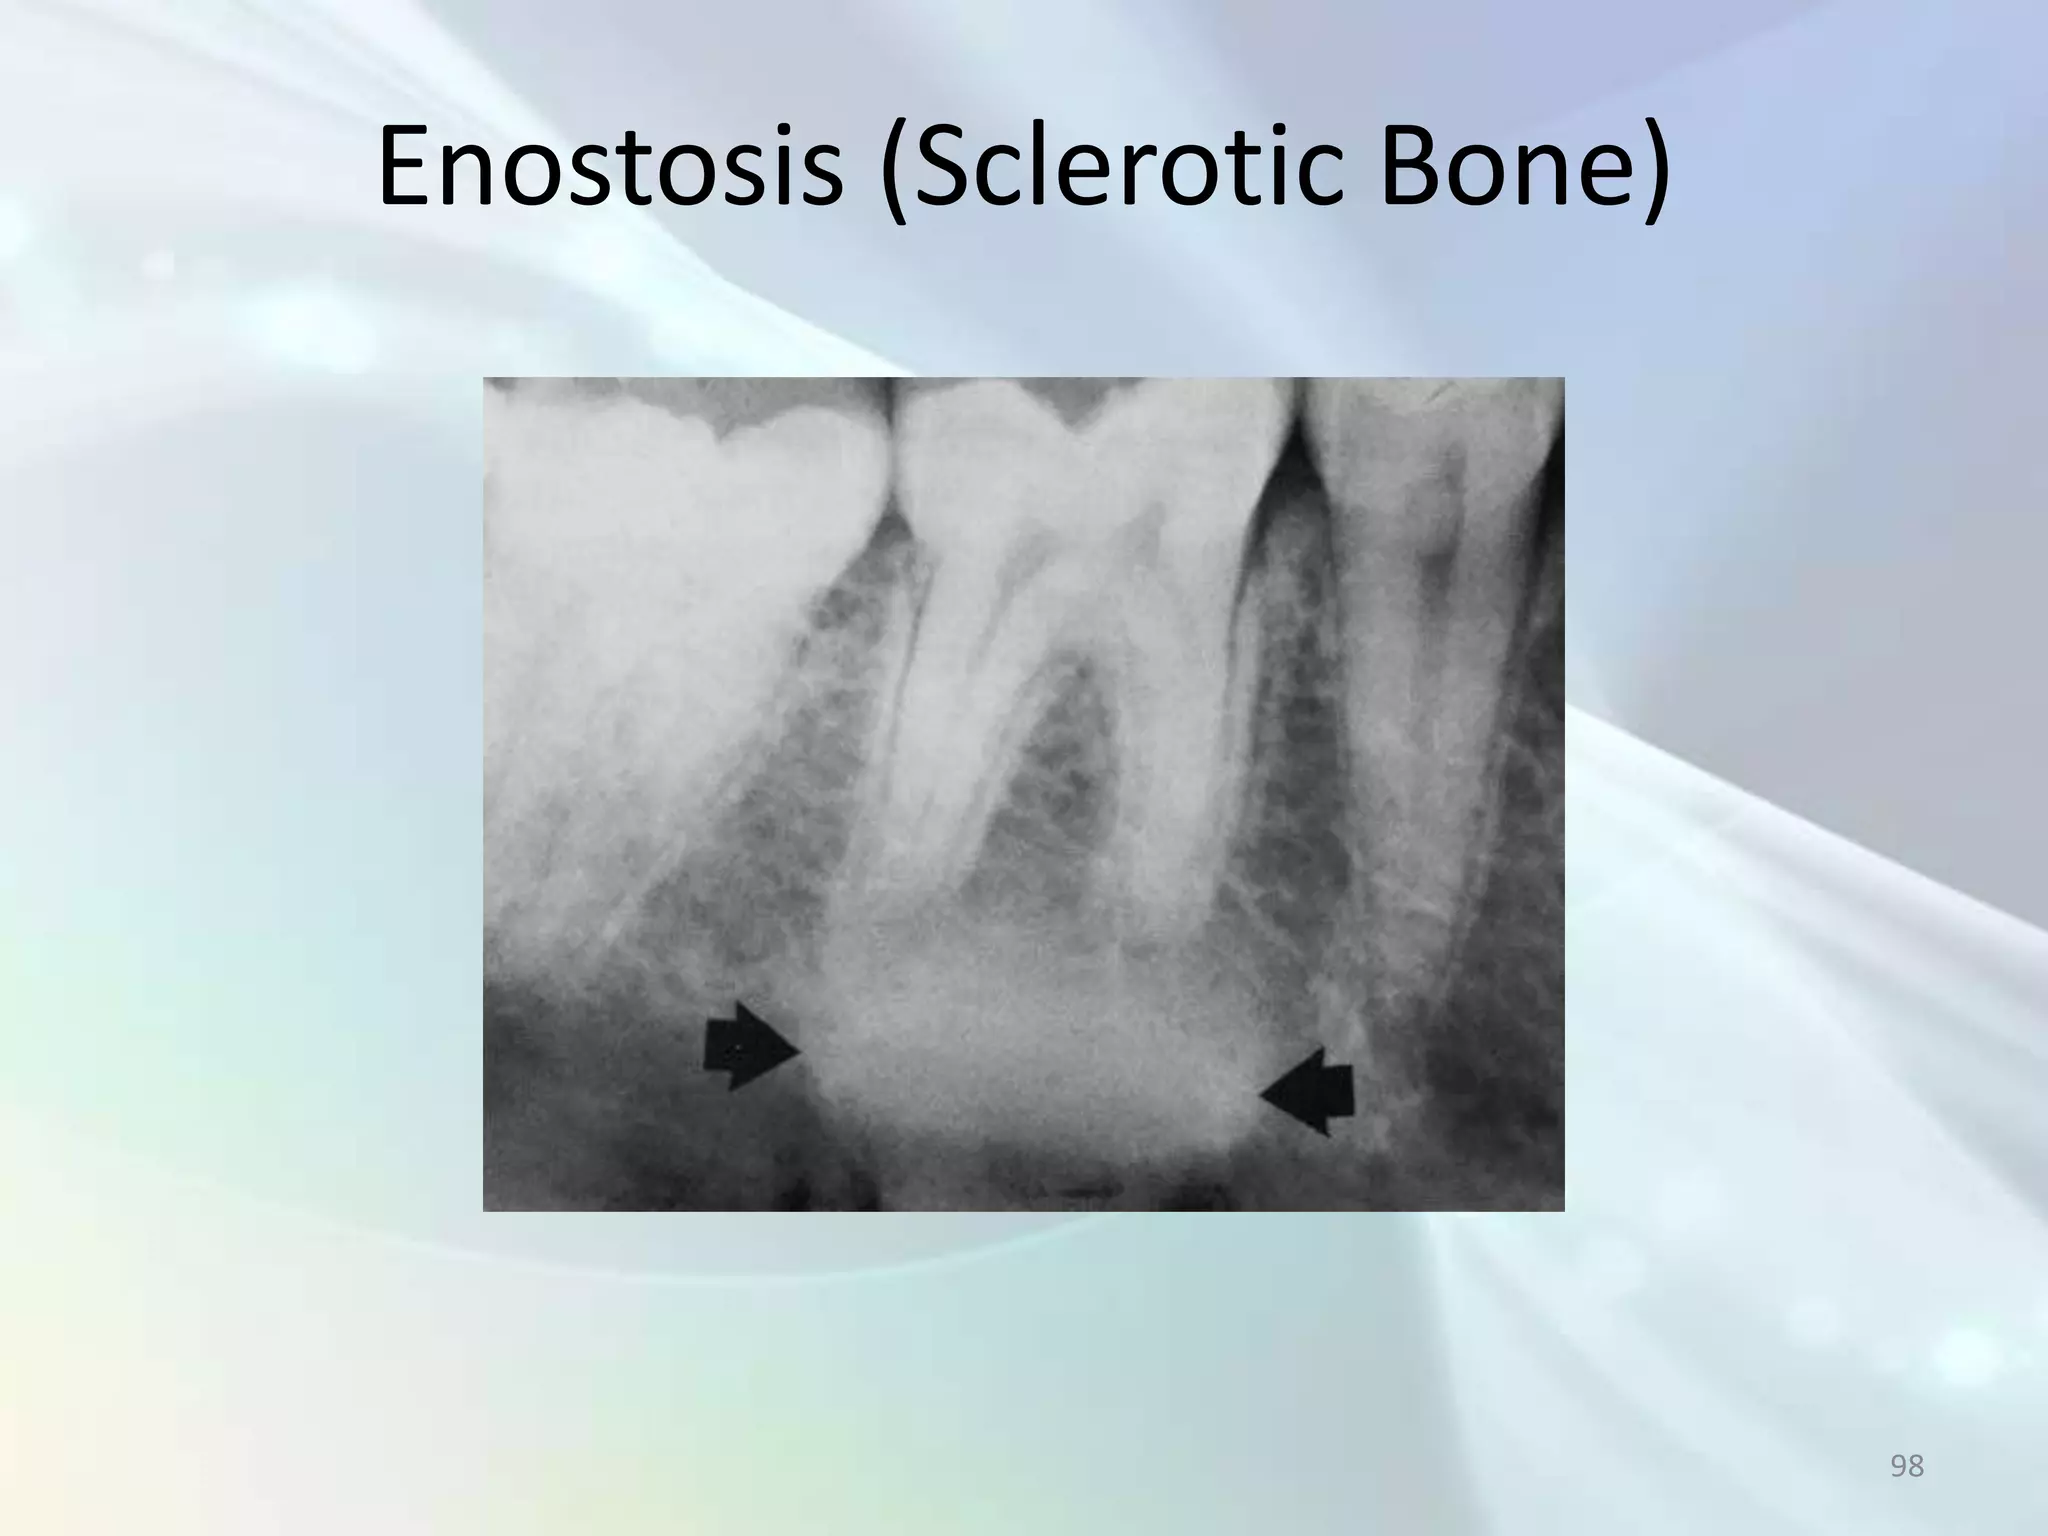
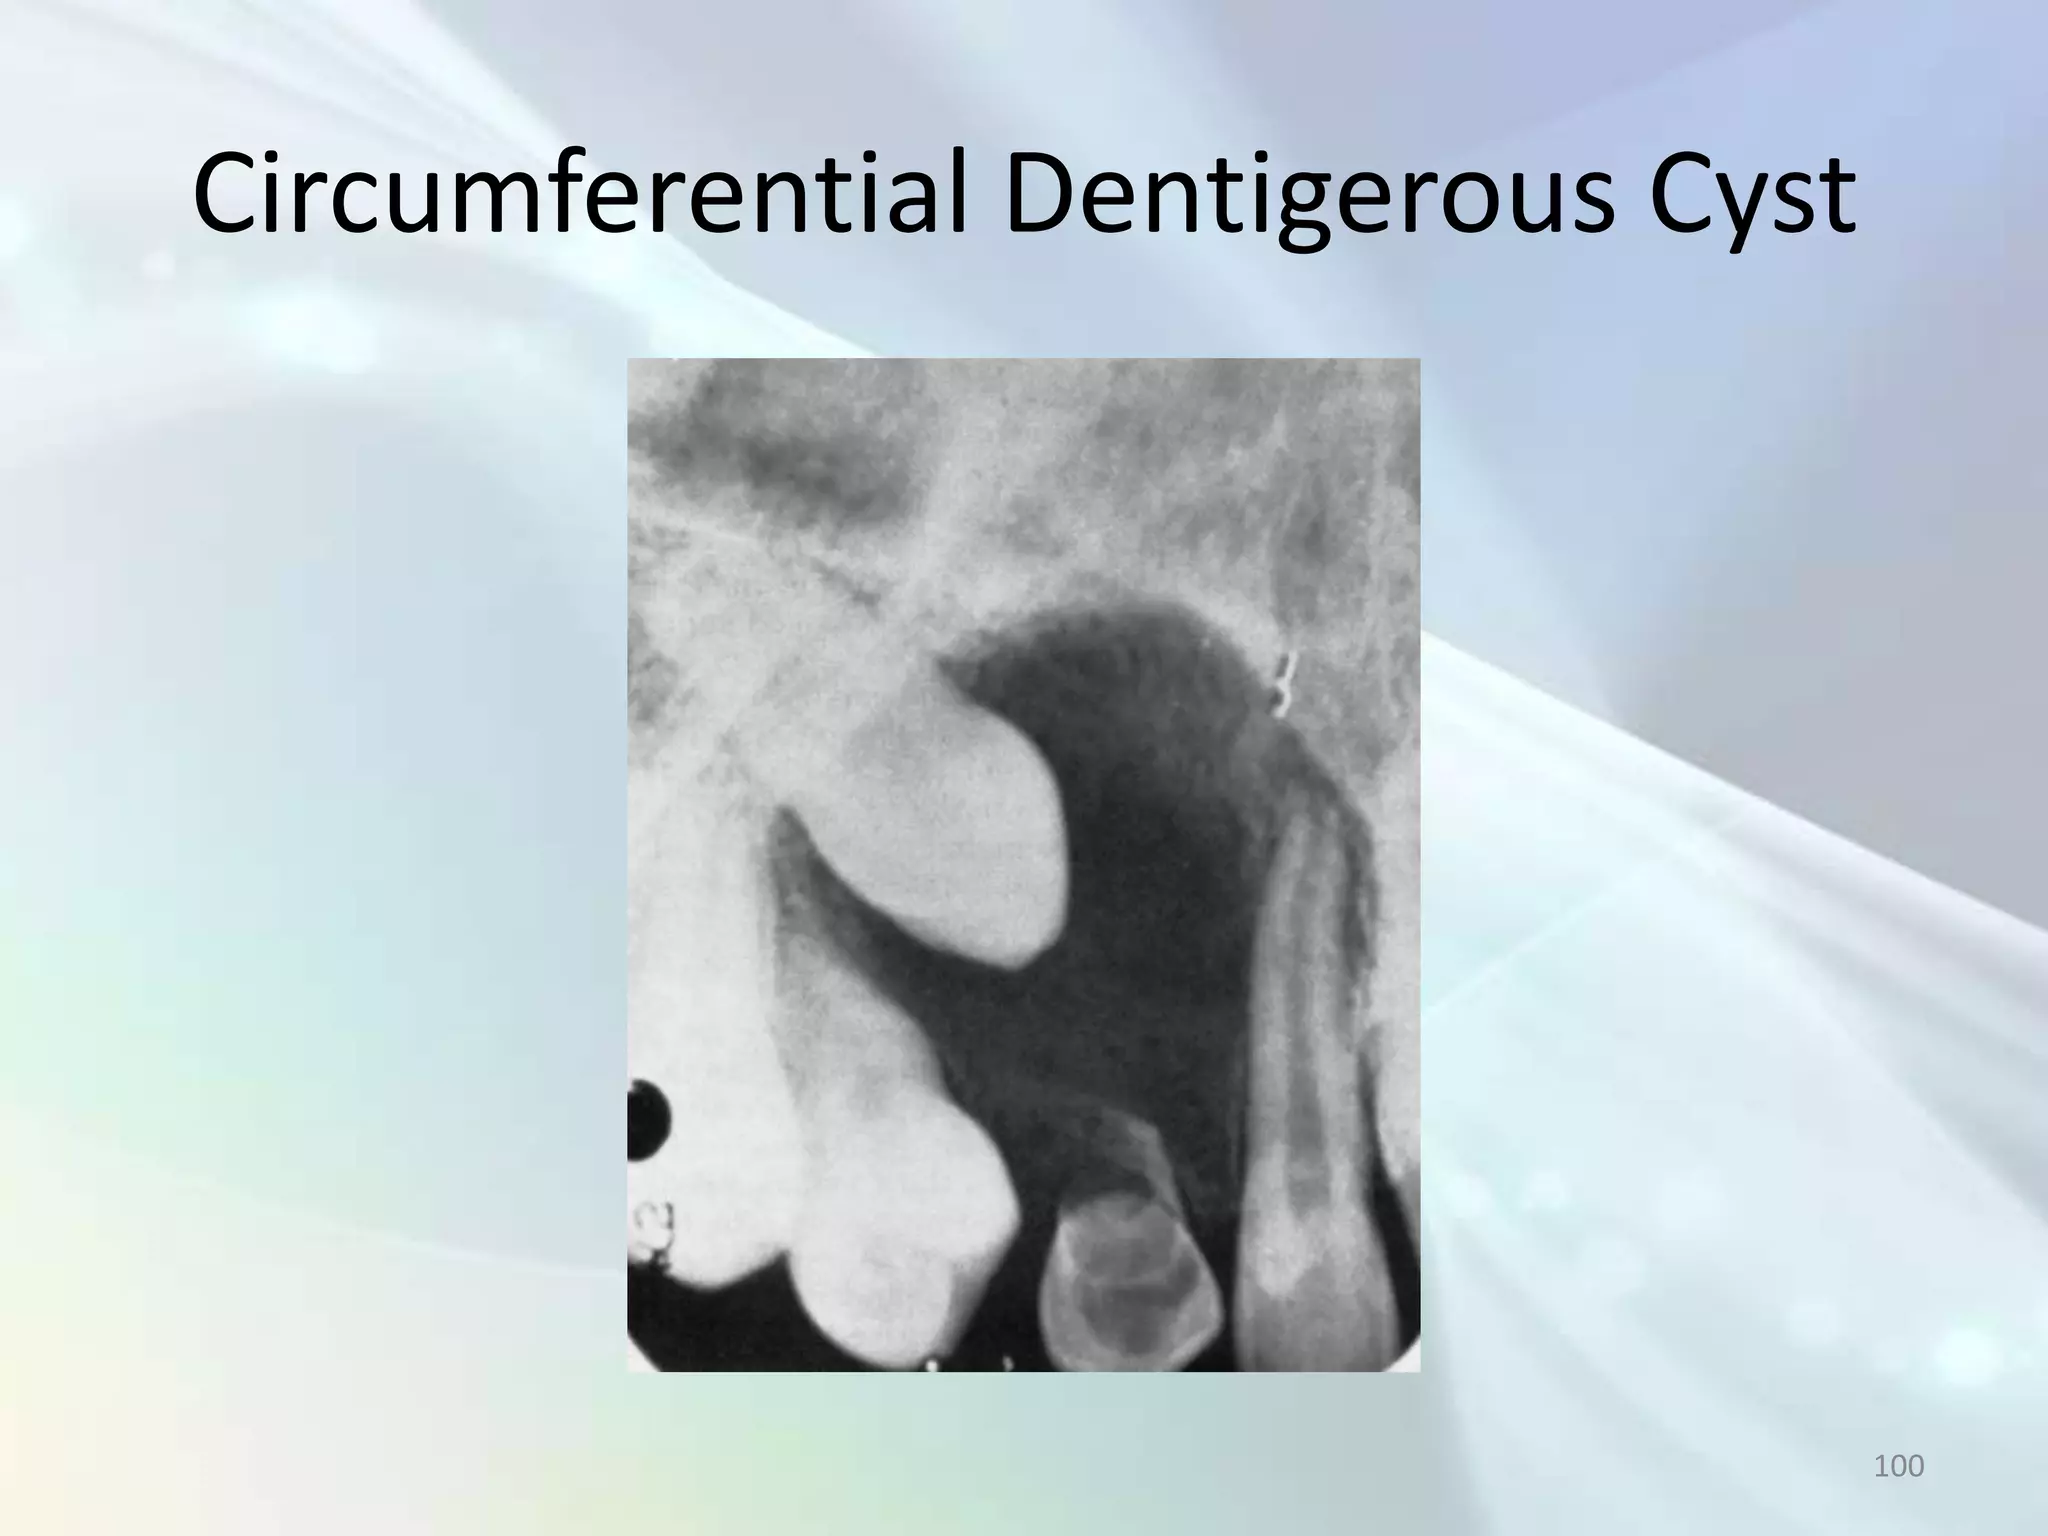
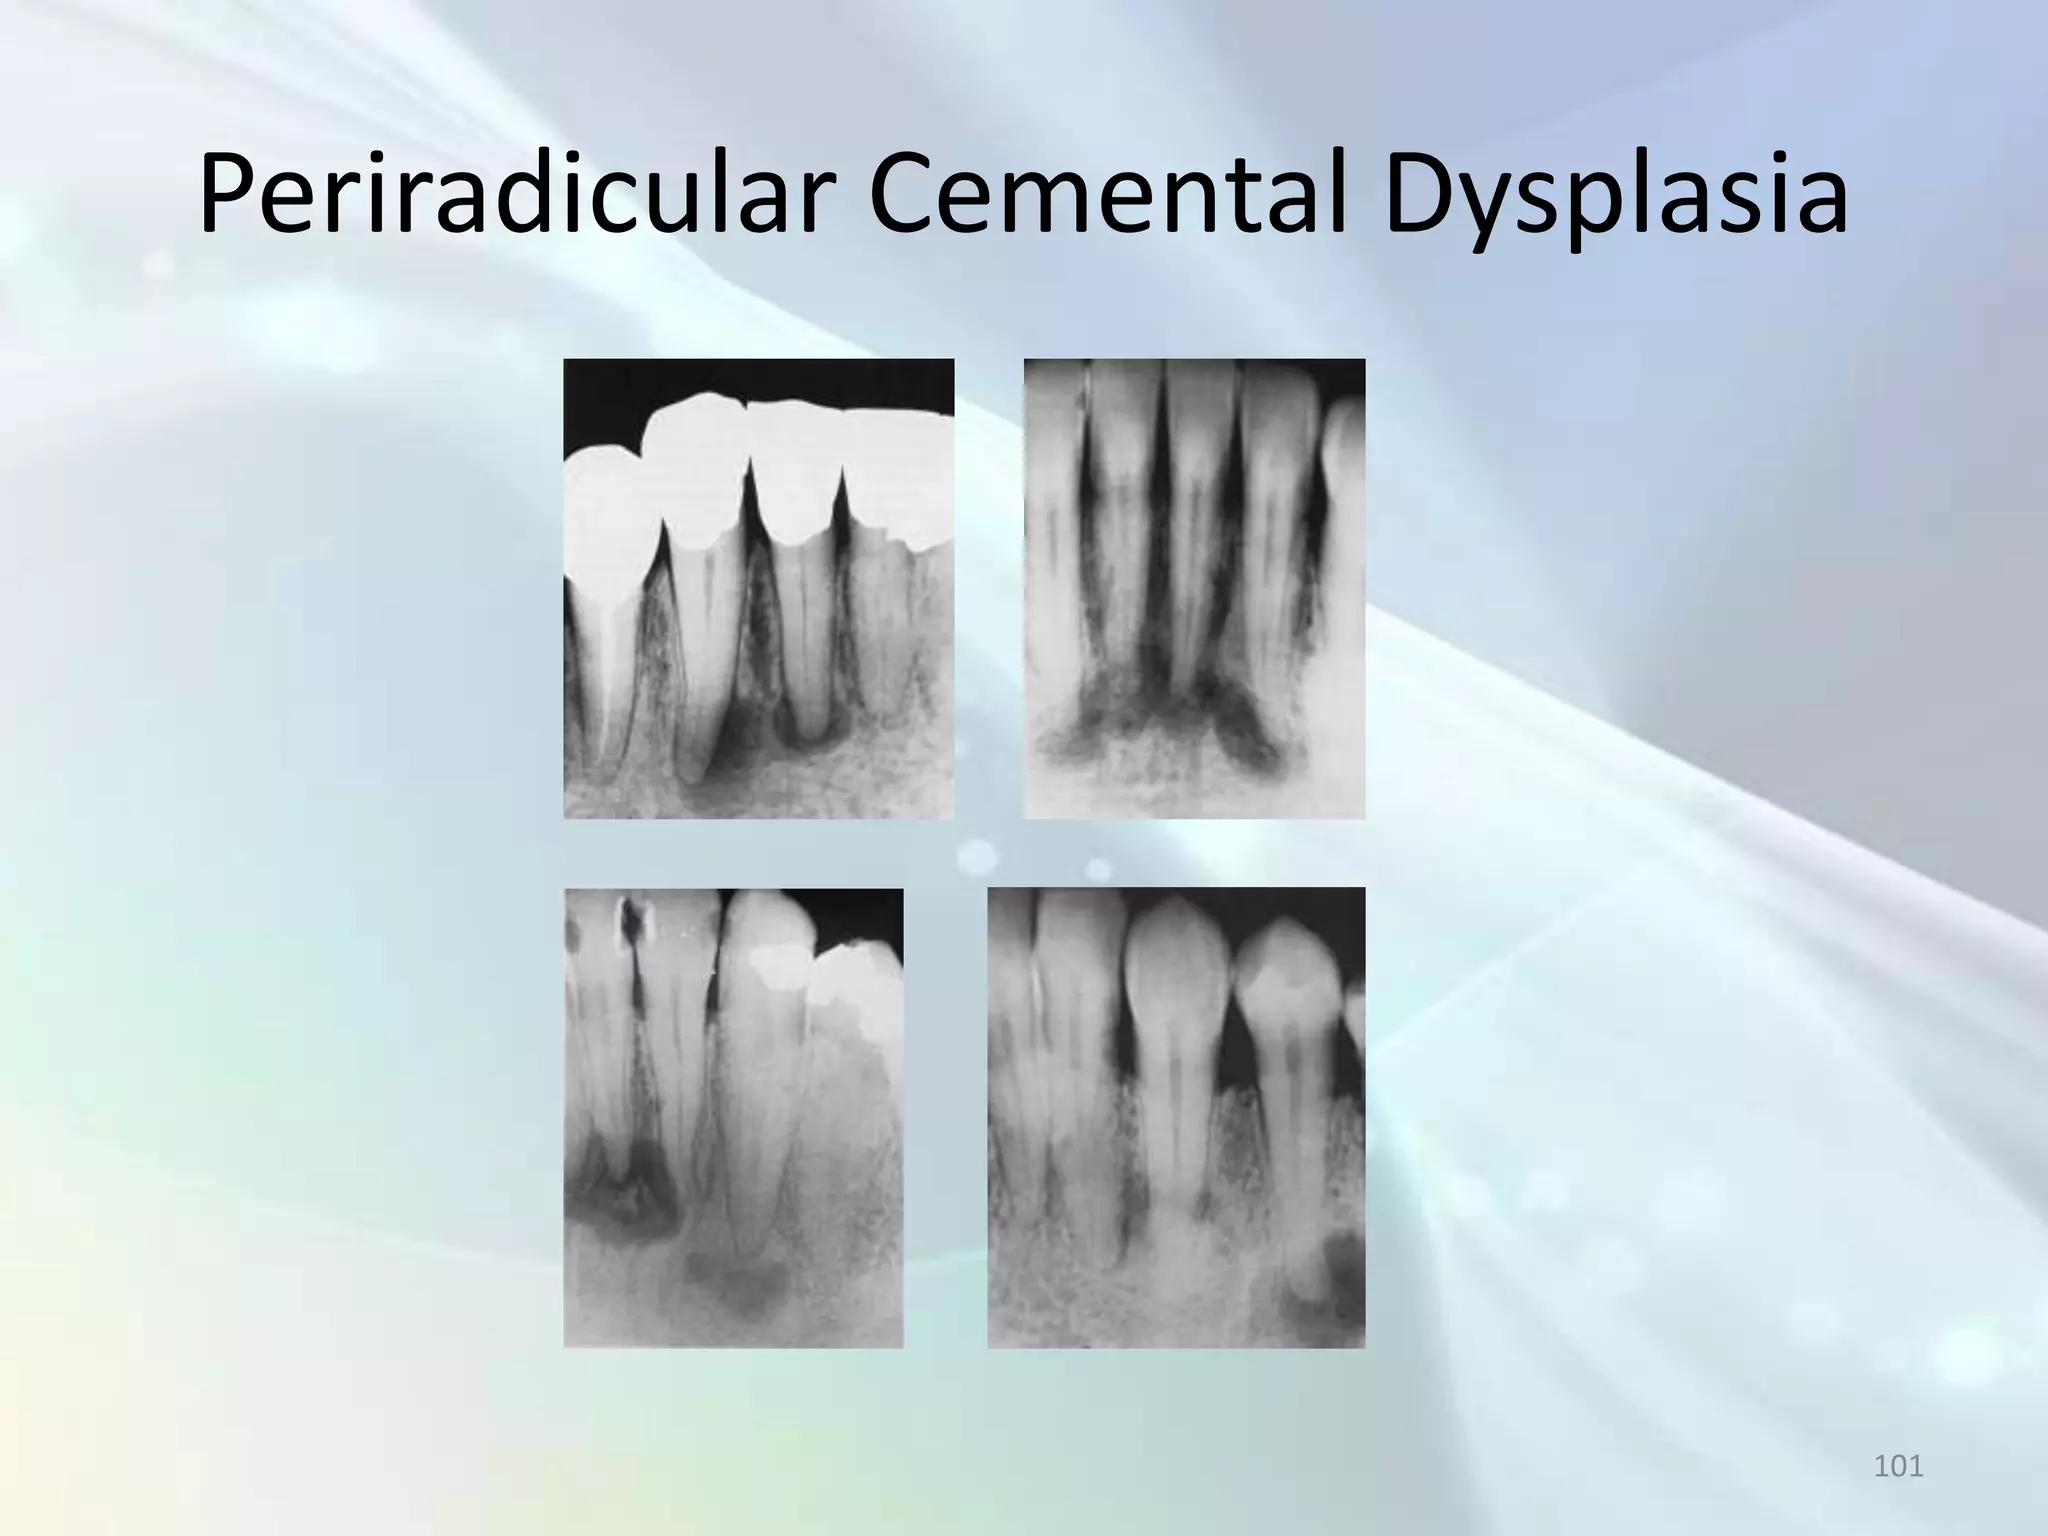
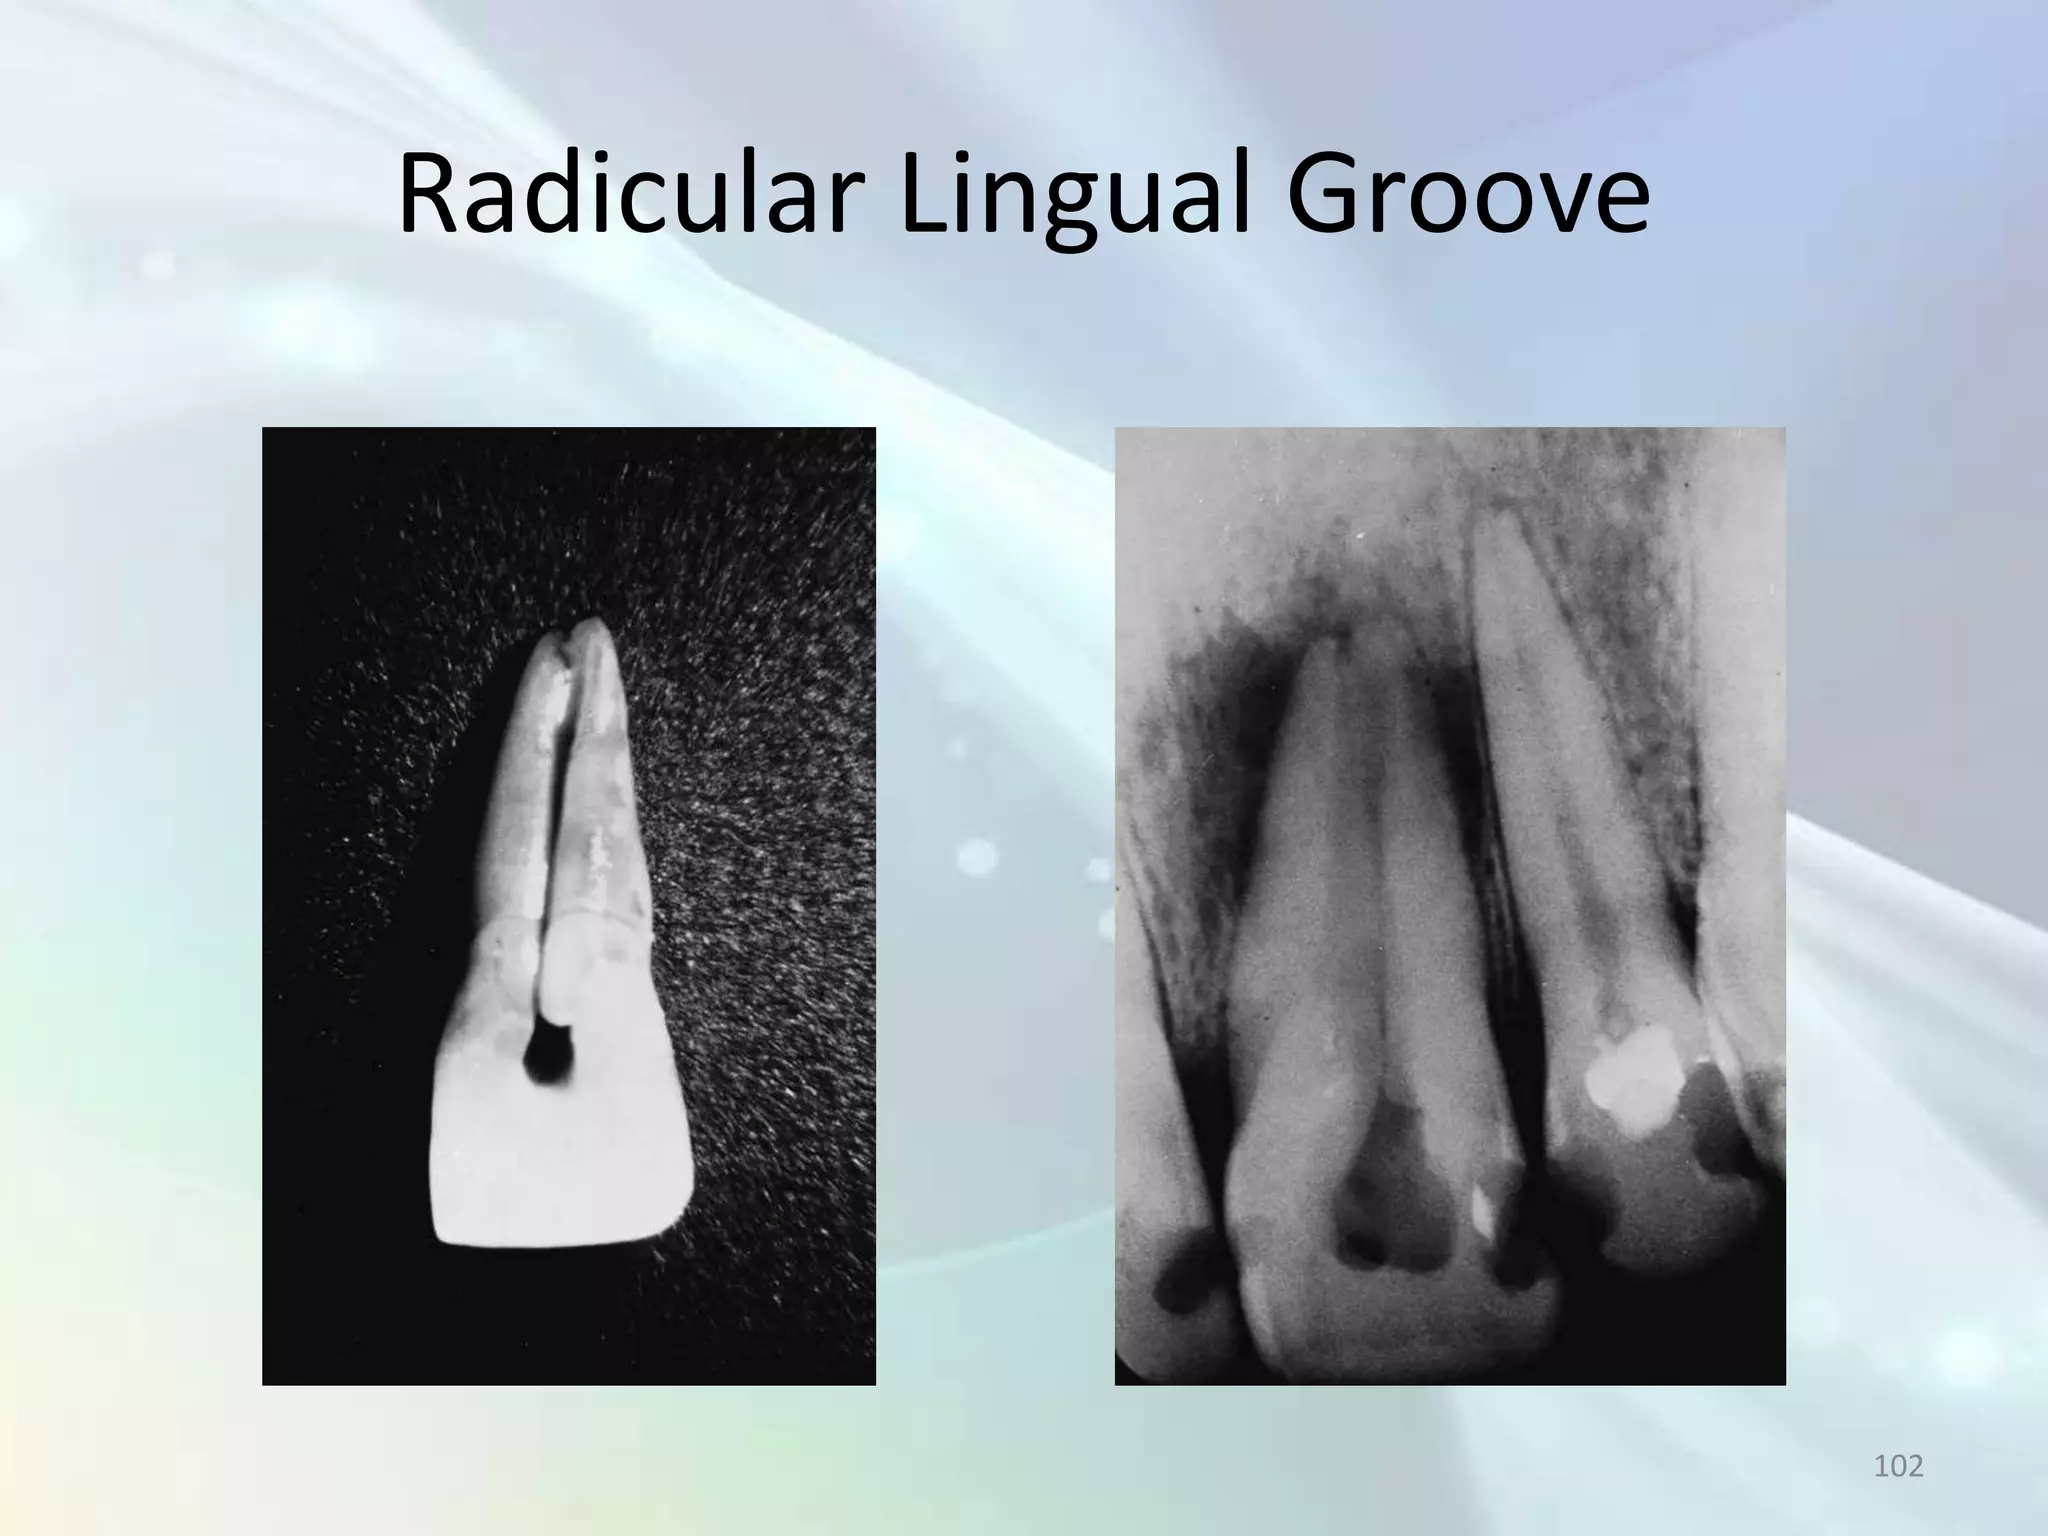
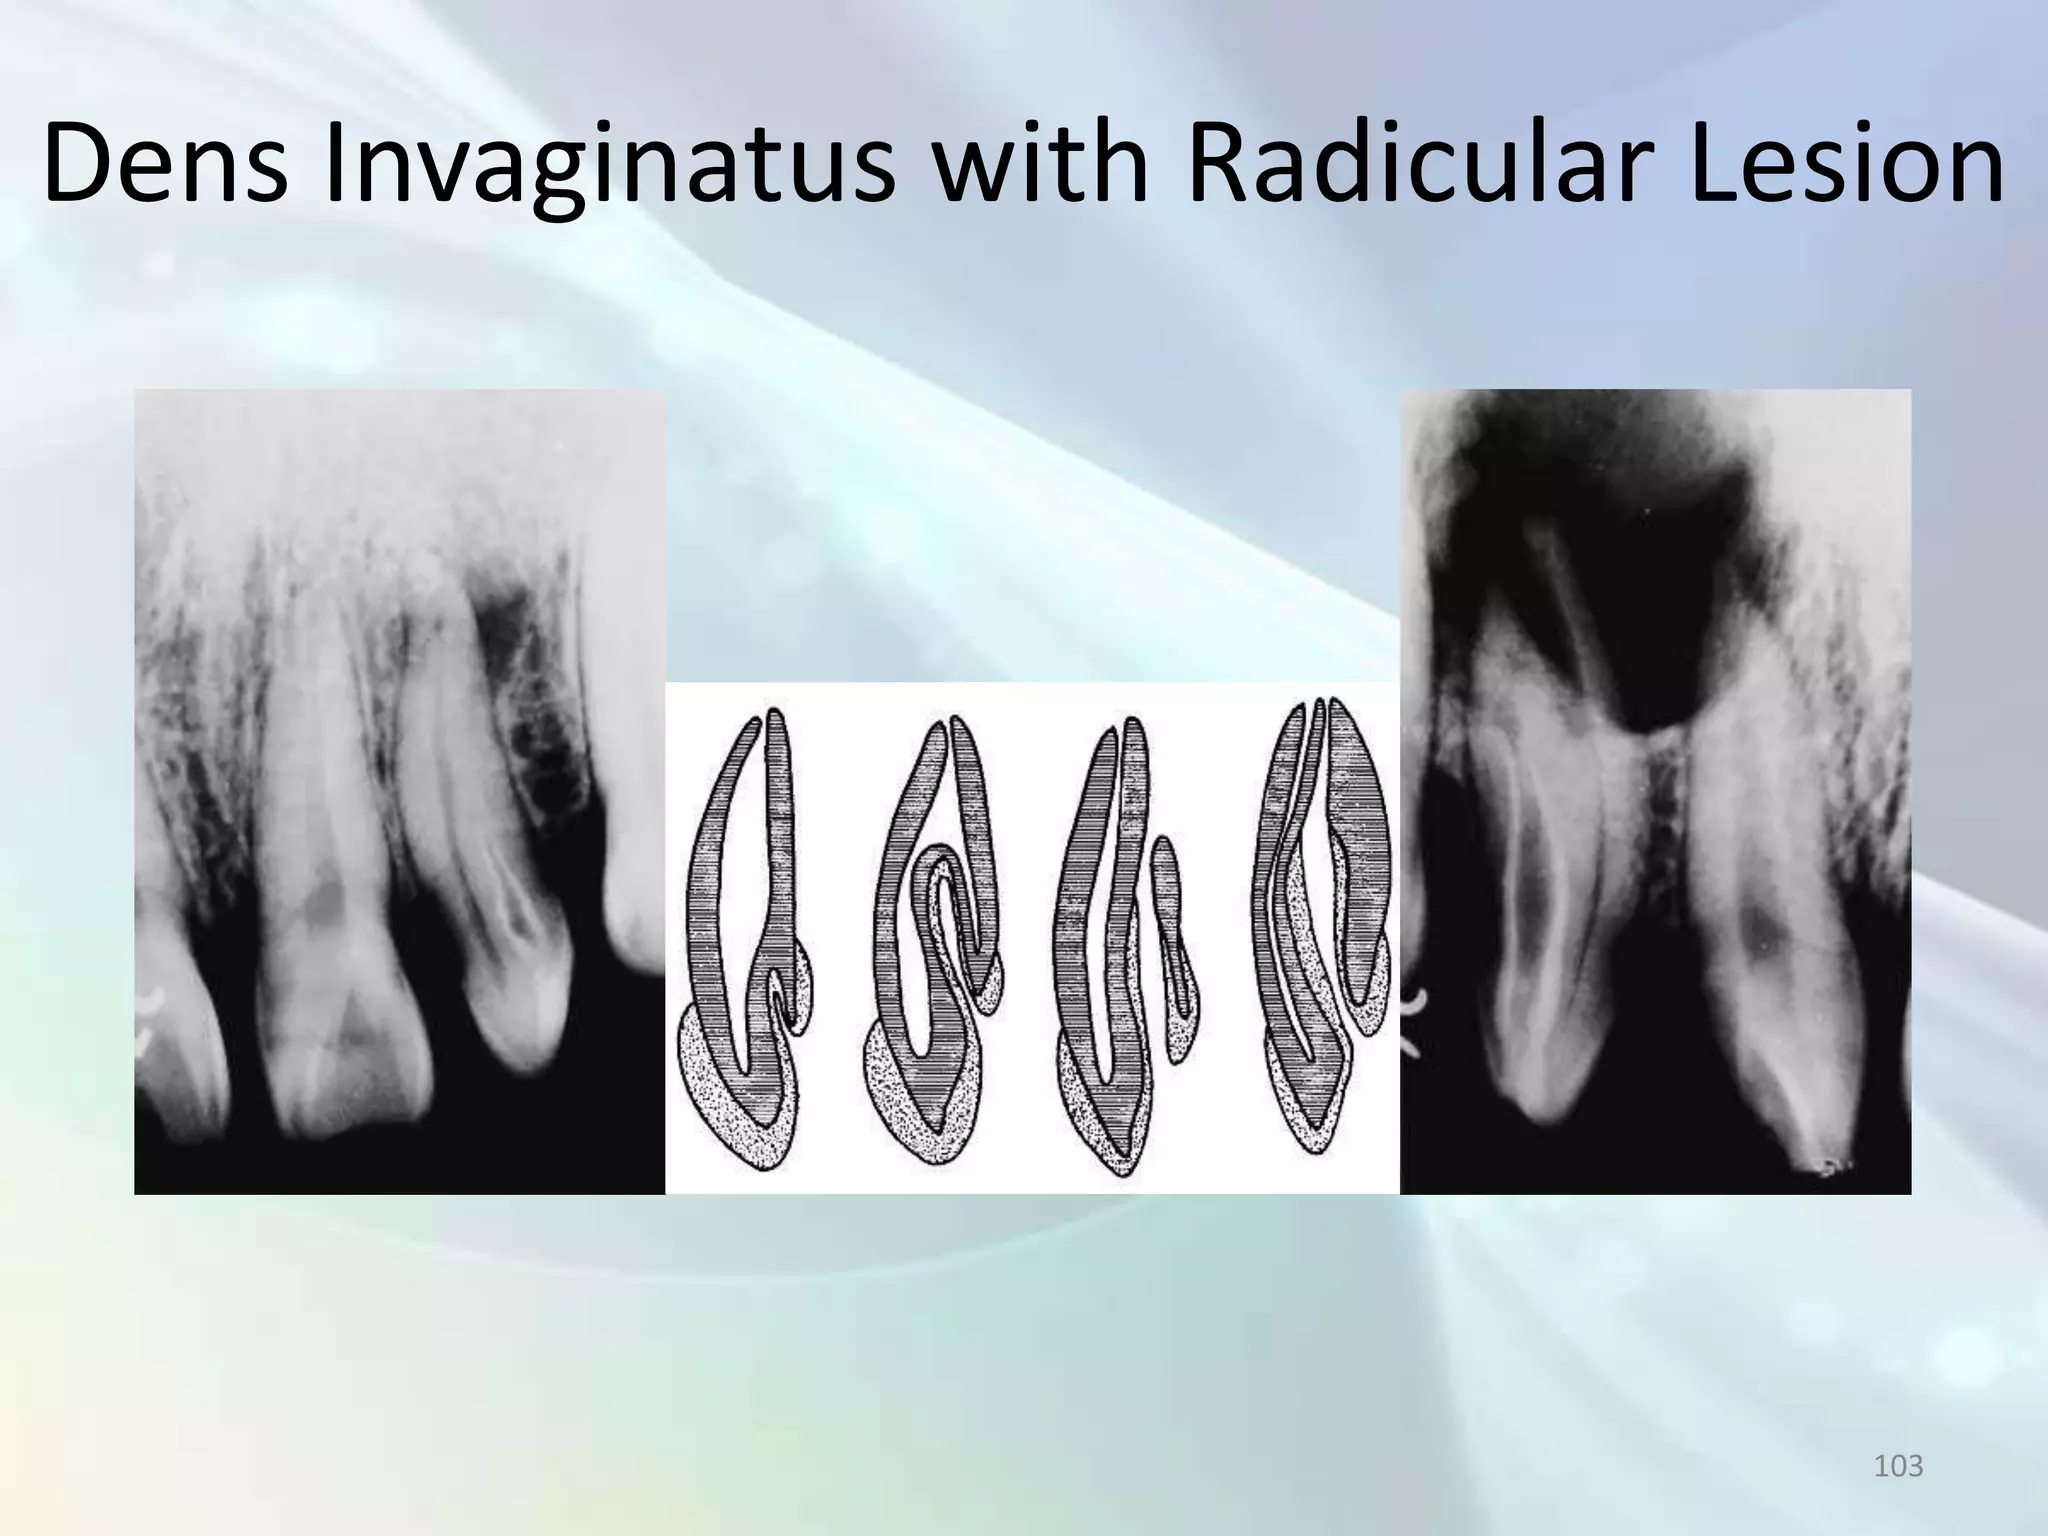
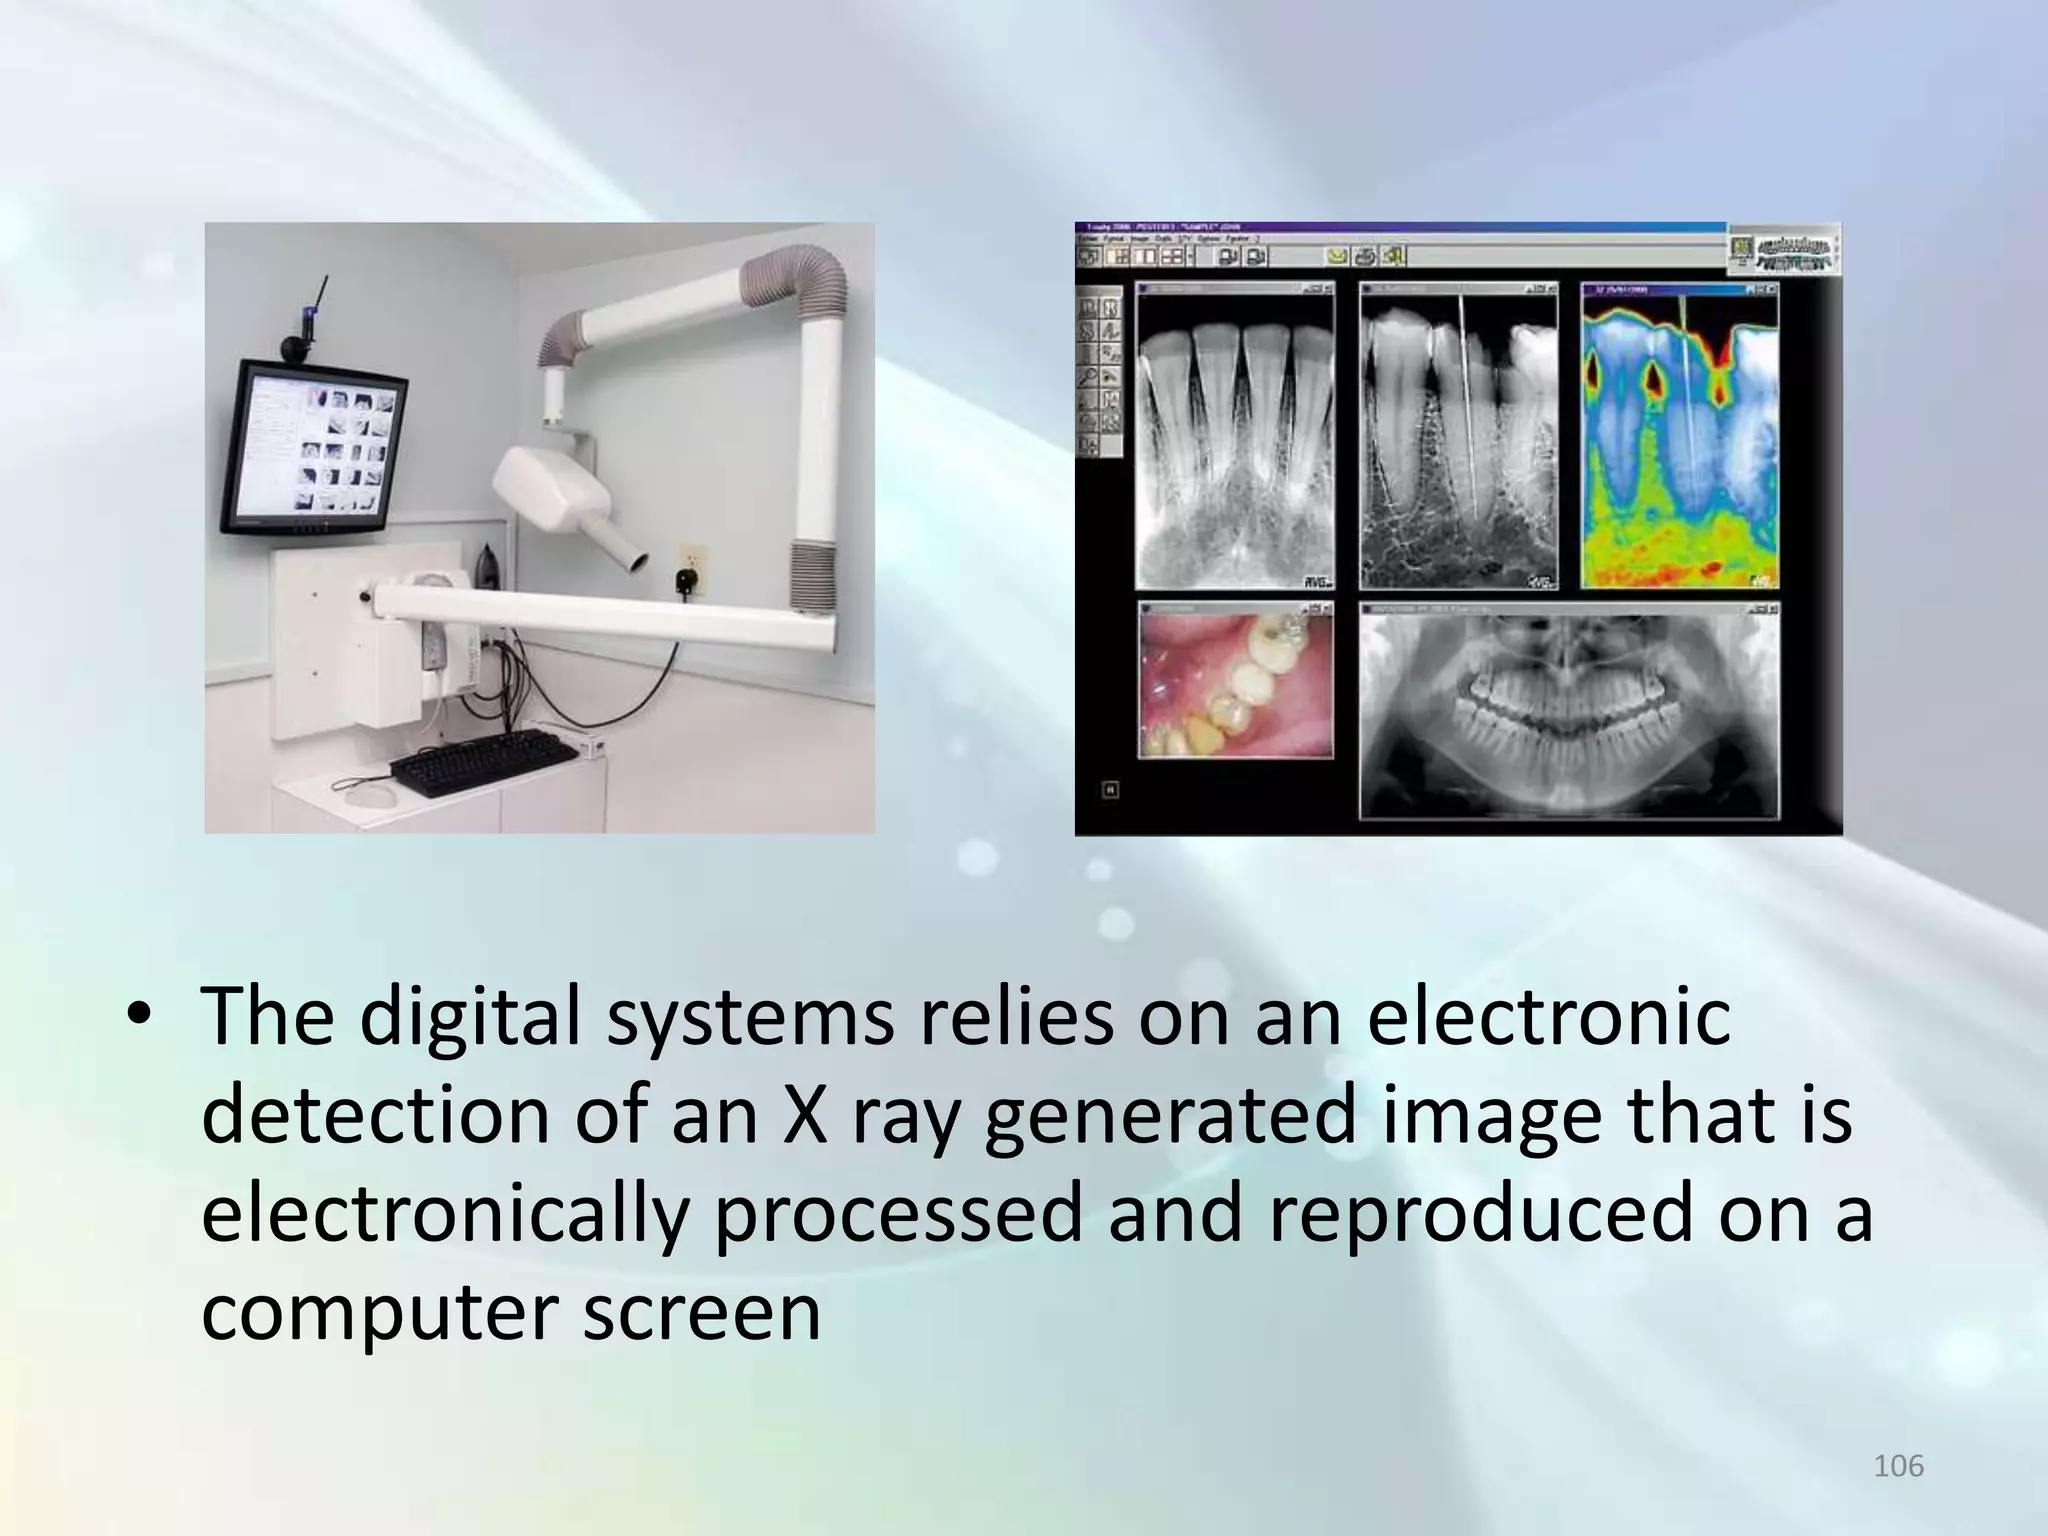
RADIOLOGY
     IN
ENDODONTICs


         Presented By
         Jean Michael

                        1
History
• 1895 – Discovery of cathode rays by Roentgen
• 1895 – Dr. Otto Walkoff took the 1st dental X ray
         (of his own teeth)
• 1899 – Dr. Edmund Kells used Radiographs to
         determine the root length during RCT
• 1900 – Dr. Weston Price advocated the use of
         radiographs to check the adequacy of
         root canal fillings
                                                 2
How To Obtain A Good Radiograph

1. Proper placement of film in the patient’s
   mouth
2. Correct Angulation of the cone in relation to
   the film and oral structures
3. Correct exposure time
4. Proper developing technique


                                                   3
Relevant Findings For An Endodontist
• Presence of Caries that may involve or threaten
  to involve the Pulp
• Number, course, shape and length of root
  canals
• Calcification or obliteration of pulp cavity
• Internal and External Resorption
• Thickening of Periodontal Ligament
• Nature and extend of Periapical and Alveolar
  Bone Destruction
                                               4
• Diagnose abnormalities like Dilaceration and
  Taurodontism
• Diagnose fracture of root
• To estimate and confirm the length of root
  canals before instrumentation (working length
  determination)
• To confirm the position and adaptation of
  master cone
• Evaluation of outcome of root canal therapy
  (post operative radiograph)
                                              5
Types of Radiographs
• Intraoral Radiographs
   – Intraoral Periapical (IOPA)
   – Occlusal Radiographs
   – Bitewing Radiographs
• Extraoral Radiographs
   – Panoramic Radiographs
   – Lateral Cephalograms

                                   6
Intraoral Periapical Radiographs


                                   7
Occlusal Radiographs


                       8
Bitewing Radiographs


                       9
Panoramic Radiograph


                       10
Lateral Cephalogram


                      11
Disadvantages of Radiographs
• Radiographs are 2D shadow of a 3D Object
• They are only suggestive and not the final
  evidence in judging a clinical problem
• Bucco-lingual dimension cannot be assessed in
  an IOPA
• The bacterial status of the hard and soft tissues
  cannot be determined
• Chronic inflammatory tissues cannot be
  differentiated from healed fibrous scar tissue
                                                 12
• Lesions of the medullary bone are undetected
  in the radiographs till there is substantial bone
  loss and the involvement of cortical bone
• For a hard tissue lesion to be evident on a
  radiograph, there should be at least a mineral
  loss of 6.6 %
• Even a single error in the procedure can render
  a radiograph useless
• Over exposure to X rays are harmful to the body
  and strict precautions are to be maintained for
  the patient and the operator
                                                13
Techniques Employed for IOPA

• Paralleling Technique

• Bisecting Angle Technique


                                  14
ParallelingTechnique
• Film is placed parallel
  to the long axis of
  the tooth to be
  radiographed
• The film is exposed
  using X rays which
  are perpendicular to
  its surface
• Requires special film
  holding devices
                                 15
Film Holding Devices


                       16
Bisecting Angle Technique
• The X rays pass
  perpendicular to the
  angular bisector of the
  angle formed by the
  long axis of the tooth
  and the X ray film
• No film holding devices
  are required

                                  17
Normal Anatomical Landmarks


                              18
Enamel, Dentin & Pulp


                        19
Cervical Burnout


                   20
Radical Pulp & Apical Foramen


                                21
Radical Pulp


               22
Lamina Dura


              23
Lamina Dura (extracted tooth)


                                24
Double Periodontal Ligament and Lamina Dura


                                              25
Periodontal Ligament Space


                             26
Periodontal Ligament Space


                             27
Intermaxillary Suture


                        28
Incisive Foramen


                   29
Soft Tissue Shadow of the Nose


                                 30
Nasolacrimal Duct


                    31
Inferior Border of Maxillary Sinus


                                     32
Neurovascular Canals in the Walls of Maxillary Sinus


                                                       33
Zygomtic Process of Maxilla


                              34
Shadow of Nasolabial Fold


                            35
Genial Tubercles


                   36
Lingual Foramen


                  37
Mental Foramen


                 38
Mental Foramen


                 39
Mandibular Canal


                   40
Mandibular Canal


                   41
Nutrient Canals


                  42
Nutrient Canals


                  43
Mylohyoid Ridge


                  44
Mylohyoid Ridge


                  45
Coronoid Process of Mandible


                               46
IOPA Radiographs in Endodontic Therapy
• Diagnostic Radiographs

• Working Radiographs

• Post operative Radiographs

• Follow up Radiographs

                                    47
Diagnostic Radiographs
• Ideally, these radiographs should be taken
  using paralleling angle technique
• They should be of high quality without any
  foreshortening or elongination
• They help for proper diagnosis of the case
• These radiographs helps in determining the
  prognosis by comparison with post operative
  and follow up radiographs

                                                48
49
Comparison between Diagnostic and
     Follow up Radiographs

  Periapical Cyst Before RCT   Complete Bony repair after RCT


                                                                50
Working Radiographs
• These radiographs are used for determining
  the position of instruments – files etc during
  the procedure
• These radiographs are to be taken without
  removing the rubber dam as it can cause
  contamination of the operating field
• Bisecting angle technique can be used
• A better alternative is the use of a hemostat as
  a film holding device
                                                 51
Radiograph showing Endodontic
Instruments & Rubber Dam Clamp


                             52
Working Radiograph with Master Cone


                                53
Working Radiographs of same tooth
   using Different Angulations


                                54
Advantages of using a Hemostat

• Film placement is easier when the opening is
  restricted by the Rubber dam and frame

• In the mandibular posterior area, the closing
  of mouth relaxes the mylohyoid muscle
  permitting the film to be placed farther
  apically

                                                  55
• The handle of the hemostat is a guide to align
  the cone in a proper vertical and horizontal
  angulation

• There is less risk of distortion caused by finger
  pressure and film displacement as in bisecting
  angle technique

• Any movement can be detected by the shift of
  the handle and corrected before the exposure
                                                   56
Using a Hemostat as a Film Holder


                                57
Film is Perpendicular to X Ray Beam


                                  58
View From Above


                  59
Mesial Angulation of X ray Beam


                                  60
Distal Angulation of X ray Beam


                                  61
Rubber Dam – Is It Necessary ?


                                 62
Postoperative Radiographs
• They are used to evaluate the endodontic
  treatment
• They are taken after removing the rubber dam
• Ideally paralleling angle technique should be
  used
• They can be compared with the diagnostic
  radiograph


                                              63
Post Operative Radiograph


                            64
65
Overdenture Abutment


                       66
Overextension into Inferior Alveolar Canal
   leading to Permanent Paresthesia


                                       67
Follow-up Radiographs
• These radiographs are taken to evaluate the
  prognosis of the endodontically treated tooth
• After obturation, the tooth may have to
  undergo procedures like core build up, crown
  fabrication etc
• The follow up radiograph gives the health of
  the periodontium and the tooth by evaluating
  the presence of root resorption, other
  treatment failures etc
                                              68
69
External Root Resorption
Before Bleaching   2 Years After Bleaching


                                             70
Follow up Radiographs After RCT


                                  71
Recovery from Furcal Bone Loss after RCT


                                     72
Endo – Perio Lesion


                      73
Vertical Angulation
• Elongation – Corrected by increasing the
  vertical angle of the central ray


• Foreshortening – Corrected by decreasing the
  vertical angle of the central ray


                                                 74
Horizontal Angulation
Clarke’s Rule (S.L.O.B Rule)

• The object that moves in the SAME direction
  as the cone is located toward the LINGUAL

• The object that moves in the OPPOSITE
  direction as the cone is located toward the
  BUCCAL

                                                75
76
Central Ray Perpendicular to the Film


                                   77
Central Ray directed 20˚ Mesial to film


                                    78
Working Radiographs with Instruments
       inside the Root Canals

    Superimposition of Files   4 separate Files in root canals


                                                                 79
X-ray Beam passing through Two
  Thicknesses of Root Structure


                                  80
X-ray Beam aimed 20˚ Mesially through
 Single Thicknesses of Hourglass Root


                                  81
Radiographic Diagnosis Of
  Pathologic Conditions


                            82
Caries Involving the Pulp


                            83
Pulp Calcification following Avulsion


                                    84
Internal Resorption following Trauma


                                  85
Internal Resorption


                      86
Internal Resorption following Trauma


                                  87
Extensive Internal Resorption


                                88
External Resorption following Trauma


                                  89
Fracture of Crown Exposing the Pulp

     Crown Fracture   After 3 Years


                                      90
Fracture of Crown involving Pulp


                                   91
Root Fracture at Multiple Sites


                                  92
Fracture Healed by Interproximal Bone


                                  93
Extensive Wear of Mandibular Incisors


                                  94
Luxation


           95
Apical Condensing Osteitis


                             96
Apical Condensing Osteitis associated
        with Chronic Pulpitis
      Just after RCT   1 Year after Treatment


                                                97
Enostosis (Sclerotic Bone)


                             98
Tooth Intruded due to Trauma


                               99
Circumferential Dentigerous Cyst


                                   100
Periradicular Cemental Dysplasia


                                   101
Radicular Lingual Groove


                           102
Dens Invaginatus with Radicular Lesion


                                   103
Hereditary Hypophosphatemia


                              104
Digital Radiography


                      105
• The digital systems relies on an electronic
  detection of an X ray generated image that is
  electronically processed and reproduced on a
  computer screen
                                              106
Advantages
•   Reduced exposure to radiation
•   Increased speed of obtaining the image
•   Possibility for digital enhancement
•   Storage as digital data in computers
•   Ease of transmissibility
•   Elimination of manual processing steps


                                             107
Intraoral X ray Sensors


                          108
Digital Image Enhancement


                            109
Inversion


            110
Contrast


           111
Measurement of Angle of Root Curvature


                                   112
Flash Light


              113
Magnification


                114
Pseudocolour


               115
Linear Measurement


                     116
Conclusion
• Radiograph is a very powerful tool for a
  dentist, especially an Endodontist with which
  he are able to examine the status of hard
  tissue which are beyond the field of his naked
  eyes
• Application of radiology gives new standards
  for the diagnosis, treatment and prognosis of
  a dental problem

                                               117
REFERENCE
• Grossman’s Endodontic Practice 12th edition
• Endodontics 6th edition – Ingle
• Oral Radiology 6th edition – White & Pharoah


                                                 118
119
120
121

Radiology in Endodontics

Editor's Notes

  • #54 Fitting the master gutta-percha cone. A, Cone fit to radiographic terminus. B, Cone is cut back 0.5 mm.When placed to depth, the incisal reference remains the same. C, Compaction film reveals two apical foramina as well as large lateral canal opposite lateral lesion.
  • #74 A, Bony lesion in furcation draining through buccalgingival sulcus. The molar pulp is necrotic. B, Obturation reveals the lateral accessory canal. C, Three-year recall radiograph. Total healing is apparent. No surgery was used.
  • #84 A vital coronal pulp and associated periradicularresorptive lesions (arrows), most likely to occur in young persons, as demonstrated by a newly erupted, but cariously involved, second molar in a 15-year-old patient. Usually, a periradicular lesion is associated with necrotic pulp, as is the case on the first molar.
  • #85 An avulsed left central incisor in a 6-year-old boy was replanted immediately. A,When re-evaluated after 8 weeks, there was still response to electric pulp testing. B, One year after trauma, the tooth was in the normal position and had no discoloration but did not respond to electric pulp testing. The root has continued to develop and the pulp appears to be calcifying. Also note hourglass erosion/resorption cervically(arrows). (Courtesy of Dr. Robert Bravin.)
  • #87 Advanced internal resorption of a first molar. The process spread distally from the pulp to undermine restoration and perforate externally. The pulp is now necrotic, as evidenced by inflammatory lesion at apex. The cause of internal resorption may be from deep caries, pulp cap, or trauma from extraction of the second molar.
  • #88 Differing pulp responses to trauma. Both incisors suffered impact as well as caries and restorative trauma. It is not clear why one pulp may react with extensive internal resorption and why another pulp may form calcifications. Treatment was successful in the central incisor but unsuccessful in the lateral incisor; the “cork-in-a-sewer” retrofilling failed.
  • #89 Extensive internal resorption apparently triggered by iatral causes. Normal condition of teeth prior to crown preparation is seen in “before” radiographs (A and B). Development of internal resorption from high-speed preparation without water coolant is seen 1 year later (C and D).
  • #90 External inflammatory resorption. A, Accidentally luxated tooth, radiograph taken 8 weeks after the incident. Note resorption of both dental hard tissues as well as adjacent alveolar bone. B, Immediately after root canal therapy. C, Control radiograph taken 12 months later. Note repair of the alveolus and establishment of a new periodontal ligament space. The root canal procedure arrested the resorptive process. (Courtsey of Dr. Romulo de Leon.)Figure 15-33 A, Internal resorption with a history of trauma. B, Immediately following root canal therapy.
  • #91 Fractured premolar restored by endodontics and post-and-core crown. A, Tooth immediately following fracture. B, Restoration and periradicular healing at 3-year recall. Note the spectacular fill of arborization (arrows) at the apex. (Courtesy of Dr. Clifford J. Ruddle.)
  • #93 Root fractures involve cementum, dentin, and pulp and may occur in any part of the root: apical, middle, or coronal thirds. B, Fractures may also be Comminuted (arrows).
  • #94 A,Healing by interproximal bone. B, Root fracture (arrow) resulting in total separation of fragments. C,Midroot facture stabilizedfor 3 months. D, Note that after removing the splint, the incisal edges are even, yet a space is apparent between the segments. E, Eightmonths later, bone is now apparent between segments. F, The interproximal space has enlarged further 2 years after the accident. The toothis firm and functional. Note calcification of the pulp space.
  • #95 C, Pulps of three incisors have been devitalized by the force of traumatic habit. Acute abscess has separated central incisors. D, One year following root canal therapy, some repair has occurred; however, persistent habit prevents complete healing.
  • #96 Tooth luxation with loosening and displacement is often accompanied by fracture or comminution of the alveolar socket. B, Luxation displacement of left central and lateral incisor and canine (arrows). C, After repositioning. D, The incisor required root canal therapy about 3 months later. Canine retained its pulp vitality.
  • #97 Apical condensing osteitis that developed in response to chronic pulpitis. Additional bony trabeculae have been formed and marrow spaces have been reduced to a minimum. The periodontal ligament space is visible, despite increased radiopacity of nearby bone.
  • #98 Figure 5-9 A, Apical condensing osteitis associated with chronic pulpitis. Endodontic treatment has just been completed. Obvious condensation of alveolar bone (black arrow) is noticeable around the mesial root of the first molar. Radiolucent area is evident at the apex of the distal root of the same tooth. The retained primary molar root tip (open arrow) lies within the alveolar septum mesialto the molar. B, Resolution (arrow) of apical condensing osteitisshown in A, 1 year after endodontic treatment. From a radiographic standpoint, complete repair of both periradicular lesions has been obtained. Reversal of apical condensing osteitis and disappearance of radiopaque area are possible.
  • #99 Enostosis. Also known as sclerotic bone. The radiopaque mass (arrows) probably represents an outgrowth of cortical bone on the endosteal surface. It is associated with neither pulpal nor periradicularpathosis and can be differentiated radiographically from condensing osteitis (see Figure 5-9) by its well-defined borders and homogeneous opacity
  • #100 Canine
  • #101 Circumferential dentigerous cyst developed around the crown of an unerupted canine. The cyst may be enucleated (care must be taken to avoid the incisor) and the canine brought into position with an orthodontic appliance.
  • #102 Initial – Later – Intermediate - Mature
  • #105 Unusual pulp dystrophy seen with hereditary hypophosphatemia. Incomplete calcification of dentin and huge pulps leave these teeth vulnerable to pulp infection and necrosis.