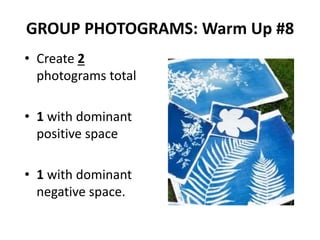
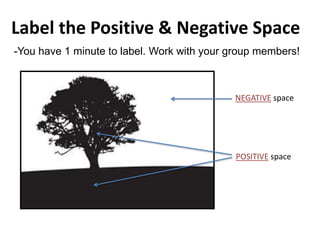
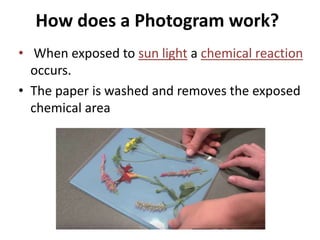
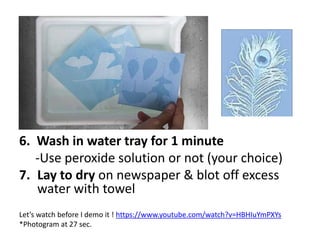
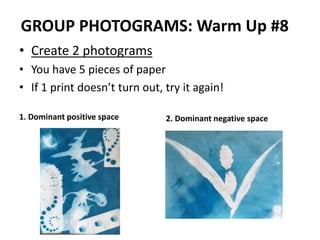
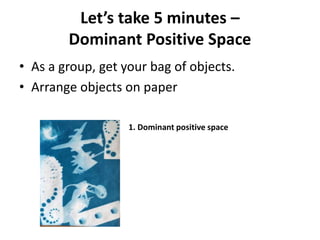
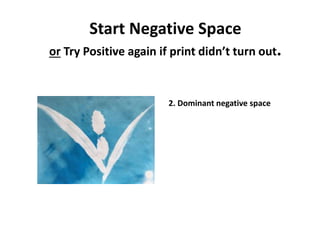
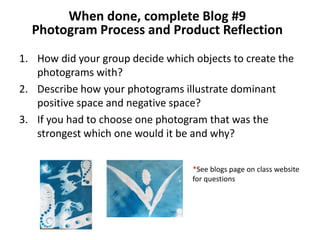
GROUP PHOTOGRAMS: Warm Up #8
• Create 2
photograms total
• 1 with dominant
positive space
• 1 with dominant
negative space.
Positive Space (Fill in note sheet)
• Positive Space = The occupied space.
The actual object.
TREE
GROUND
Negative Space
• Negative Space = The space surrounding the
objects. The unoccupied space.
- All the white space
around the tree
- Even the small
white areas
between the
branches.
Label the Positive & Negative Space
NEGATIVE space
POSITIVE space
-You have 1 minute to label. Work with your group members!
Understanding Positive vs. Negative Space
Does this photo
have more
negative or
positive space?
NEGATIVE SPACE: The sky
POSITIVE SPACE: the light
That’s right, More NEGATIVE space!
Understanding Positive vs. Negative Space
Does this photo
have more
negative or
positive space?
NEGATIVE SPACE:
blank space in background
POSITIVE SPACE: the flower
That’s right, More Positive space!
More positive or negative?
NEGATIVE
How does a Photogram work?
• When exposed to sun light a chemical reaction
occurs.
• The paper is washed and removes the exposed
chemical area
• This image is
the “positive”
or outline of the
object used.
This results is a white image on a blue
background
You can buy paper that is already
light sensitive.
This is the type of paper we are using.
STEPS (on project note sheet)
1. Arrange your objects on the paper
2. Place glass over paper and objects
3. Place paper over glass before going outside
-paper is sunlight sensitive!
4. Expose to sunlight
Timing: Depends on amount of sunlight
– Cloudy (2-3 minutes)
– Partly cloudy (1-2 minutes)
– Full sun (1 minute – 30 seconds)
5. Cover up print and take back inside.
6. Wash in water tray for 1 minute
-Use peroxide solution or not (your choice)
7. Lay to dry on newspaper & blot off excess
water with towel
Let’s watch before I demo it ! https://www.youtube.com/watch?v=HBHIuYmPXYs
*Photogram at 27 sec.
GROUP PHOTOGRAMS: Warm Up #8
• Create 2 photograms
• You have 5 pieces of paper
• If 1 print doesn’t turn out, try it again!
1. Dominant positive space 2. Dominant negative space
Let’s take 5 minutes –
Dominant Positive Space
• As a group, get your bag of objects.
• Arrange objects on paper
1. Dominant positive space
Start Negative Space
or Try Positive again if print didn’t turn out.
2. Dominant negative space
When done, complete Blog #9
Photogram Process and Product Reflection
1. How did your group decide which objects to create the
photograms with?
2. Describe how your photograms illustrate dominant
positive space and negative space?
3. If you had to choose one photogram that was the
strongest which one would it be and why?
*See blogs page on class website
for questions
Photograph your 2 best Photograms
1. Include 2 photogram images on blog
2. Post 2 images to your Warm Ups page on
your website. (Warm Up #8)
Reminder - Due Dates:
Wednesday (P.1) Thursday (P.2)
6 photographs exploring Opposites theme
• 3 with strong/dominant negative space
• 3 with strong/dominant positive space
Pinterest
Opposites Photography
• Start opposites photography board
• 10 or more pins
• Google search “opposites photography art”

Warm up #8 photogram

  • 1.
    GROUP PHOTOGRAMS: WarmUp #8 • Create 2 photograms total • 1 with dominant positive space • 1 with dominant negative space.
  • 2.
    Positive Space (Fillin note sheet) • Positive Space = The occupied space. The actual object. TREE GROUND
  • 3.
    Negative Space • NegativeSpace = The space surrounding the objects. The unoccupied space. - All the white space around the tree - Even the small white areas between the branches.
  • 4.
    Label the Positive& Negative Space NEGATIVE space POSITIVE space -You have 1 minute to label. Work with your group members!
  • 5.
    Understanding Positive vs.Negative Space Does this photo have more negative or positive space? NEGATIVE SPACE: The sky POSITIVE SPACE: the light That’s right, More NEGATIVE space!
  • 6.
    Understanding Positive vs.Negative Space Does this photo have more negative or positive space? NEGATIVE SPACE: blank space in background POSITIVE SPACE: the flower That’s right, More Positive space!
  • 7.
    More positive ornegative? NEGATIVE
  • 8.
    How does aPhotogram work? • When exposed to sun light a chemical reaction occurs. • The paper is washed and removes the exposed chemical area
  • 9.
    • This imageis the “positive” or outline of the object used. This results is a white image on a blue background
  • 10.
    You can buypaper that is already light sensitive. This is the type of paper we are using.
  • 11.
    STEPS (on projectnote sheet) 1. Arrange your objects on the paper 2. Place glass over paper and objects 3. Place paper over glass before going outside -paper is sunlight sensitive!
  • 12.
    4. Expose tosunlight Timing: Depends on amount of sunlight – Cloudy (2-3 minutes) – Partly cloudy (1-2 minutes) – Full sun (1 minute – 30 seconds) 5. Cover up print and take back inside.
  • 13.
    6. Wash inwater tray for 1 minute -Use peroxide solution or not (your choice) 7. Lay to dry on newspaper & blot off excess water with towel Let’s watch before I demo it ! https://www.youtube.com/watch?v=HBHIuYmPXYs *Photogram at 27 sec.
  • 14.
    GROUP PHOTOGRAMS: WarmUp #8 • Create 2 photograms • You have 5 pieces of paper • If 1 print doesn’t turn out, try it again! 1. Dominant positive space 2. Dominant negative space
  • 15.
    Let’s take 5minutes – Dominant Positive Space • As a group, get your bag of objects. • Arrange objects on paper 1. Dominant positive space
  • 16.
    Start Negative Space orTry Positive again if print didn’t turn out. 2. Dominant negative space
  • 17.
    When done, completeBlog #9 Photogram Process and Product Reflection 1. How did your group decide which objects to create the photograms with? 2. Describe how your photograms illustrate dominant positive space and negative space? 3. If you had to choose one photogram that was the strongest which one would it be and why? *See blogs page on class website for questions
  • 18.
    Photograph your 2best Photograms 1. Include 2 photogram images on blog 2. Post 2 images to your Warm Ups page on your website. (Warm Up #8)
  • 19.
    Reminder - DueDates: Wednesday (P.1) Thursday (P.2) 6 photographs exploring Opposites theme • 3 with strong/dominant negative space • 3 with strong/dominant positive space
  • 20.
    Pinterest Opposites Photography • Startopposites photography board • 10 or more pins • Google search “opposites photography art”