

Recommended
More Related Content
What's hot
What's hot (20)
Similar to Cyanotype slideshow
Similar to Cyanotype slideshow (20)
More from Brooke Nelson
More from Brooke Nelson (20)
Recently uploaded
Recently uploaded (20)
Cyanotype slideshow
- 2. 1. Photographic print made by placing objects onto light sensitive paper. 2. No camera used! What is a photogram?
- 4. • It wasn’t until the MODERNIST MOVEMENT in the 20th Century that they became artwork! • Also known as Rayogram because he claims he discovered the process
- 6. So….you can lay objects on light sensitive paper & make a “copy”.
- 7. Then what is a Cyanotype Photo ? • Paper is coated with an Iron Salt solution (potassium ferricyanide) and Ammonium Citrate • An object is fixed on this paper (Surface Negative) under glass
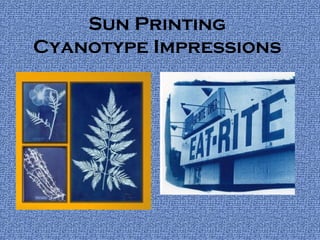
- 8. Cyanotypes of British and Foreign Flower Plants and Ferns (1854) 2. Cyanotype also known as Blue Print 2. Anna Atkins also called her work shadowgraphs Horse Tail
- 9. Anna Atkins(1799-1871) • First woman photographer. • She became interested in Making accurate drawings of plant life, and used Photography and the Cyanotype process as her tools.
- 10. 4. Cyanotypes are Monochromatic Mono = 1 Chromatic = color
- 11. How does a Photogram & Cyanotype work? 5. When exposed to sun light a chemical reaction occurs. - The paper is washed and removes the exposed chemical area
- 12. • This results in a white image on a deep blue background • This image is the “positive” or outline of the object used.
- 13. The pictures should depict both of the ‘Opposites’ •hot and cold •old and new •tall and short •big and small •weak and strong •happy and sad •ETC. PROJECT: Create 2 Cyanotypes Opposites Theme
- 14. More Opposite EXAMPLES • Keep in mind that you will be creating cyanotypes from your photos. Rough & Smooth: cheese & sponge
- 16. • Remember you are changing it to Grayscale then inverting to make negative. 1. ORIGINAL 2. GRAYSCALE 3. INVERTED FOR NEGATIVE 4. CYANOTYPE
- 17. Opposites Cont.
- 18. • We are using photoshop to create the negative on transparency paper…so you can overlay or experiment with “opposites”
- 23. Remember…You can combine photogram (actual object) with your negative!
- 24. Combine your photo with drawing? • Around border • Adding to your photo
- 25. How to make cyanotypes with photo negatives not just objects! https://www.youtube.com/watch?v=I0ATpHCyYvU&nohtml5=False -Start at 4minutes
- 26. Reminder! Due on: Wednesday (P.1) Thursday (P.2) 6 photographs exploring Opposites theme •-3 with strong/dominant negative space •-3 with strong/dominant positive space
- 27. Next class – Photograms Warm Up #8 • You will be making a photogram as a group with objects tomorrow!
- 28. GROUP PHOTOGRAMS: Warm Up #8 • Create 2 photograms total • 1 with dominant positive space and • 1 with dominant negative space. Bring any materials from home too!
- 29. SO TODAY…. Find outside • 4 found objects • Look for -Geometric Shapes -Interesting shapes -Strong bold lines • Place in zip lock bags - Write group# on it. END OF DAY 1
- 30. First 5 minutes 1.Create Pinterest Board – Photograms 2. Pin 10 or more Photograms you find interesting. 3. You can share any discoveries with classmates! 4. Finish early? Search for “Sunprints”. -Pin any findings
- 31. GROUP PHOTOGRAMS: Warm Up #8 • Create 2 photograms total • 1 with dominant positive space • 1 with dominant negative space.
- 32. Positive Space (Fill in note sheet) • Positive Space = The occupied space. The actual object. TREE GROUND
- 33. Negative Space • Negative Space = The space surrounding the objects. The unoccupied space. - All the white space around the tree - Even the small white areas between the branches.
- 34. Label the Positive & Negative Space NEGATIVE space POSITIVE space -You have 1 minute to label. Work with your group members!
- 35. Understanding Positive vs. Negative Space Does this photo have more negative or positive space? NEGATIVE SPACE: The sky POSITIVE SPACE: the light That’s right, More NEGATIVE space!
- 36. Understanding Positive vs. Negative Space Does this photo have more negative or positive space? NEGATIVE SPACE: blank space in background POSITIVE SPACE: the flower That’s right, More Positive space!
- 37. More positive or negative? NEGATIVE
- 38. How does a Photogram work? • When exposed to sun light a chemical reaction occurs. • The paper is washed and removes the exposed chemical area
- 39. •This image is the “positive” or outline of the object used. This results is a white image on a blue background
- 40. You can buy paper that is already light sensitive. This is the type of paper we are using.
- 41. STEPS (on project note sheet) 1. Arrange your objects on the paper 2. Place glass over paper and objects 3. Place paper over glass before going outside -paper is sunlight sensitive!
- 42. 4. Expose to sunlight Timing: Depends on amount of sunlight – Cloudy (2-3 minutes) – Partly cloudy (1-2 minutes) – Full sun (1 minute – 30 seconds) 5. Cover up print and take back inside.
- 43. 6. Wash in water tray for 1 minute -Use peroxide solution or not (your choice) 7.Lay to dry on newspaper & blot off excess water with towel Let’s watch before I demo it ! https://www.youtube.com/watch?v=HBHIuYmPXYs *Photogram at 27 sec.
- 44. GROUP PHOTOGRAMS: Warm Up #8 • Create 2 photograms • You have 5 pieces of paper • If 1 print doesn’t turn out, try it again! 1. Dominant positive space 2. Dominant negative space
- 45. Let’s take 5 minutes – Dominant Positive Space • As a group, get your bag of objects. • Arrange objects on paper 1. Dominant positive space
- 46. Start Negative Space or Try Positive again if print didn’t turn out. 2. Dominant negative space
- 47. When done, complete Blog #9 Photogram Process and Product Reflection 1. How did your group decide which objects to create the photograms with? 2. Describe how your photograms illustrate dominant positive space and negative space? 3. If you had to choose one photogram that was the strongest which one would it be and why? *See blogs page on class website for questions
- 48. Photograph your 2 best Photograms 1. Include 2 photogram images on blog 2. Post 2 images to your Warm Ups page on your website. (Warm Up #8)
- 49. Reminder - Due Dates: Wednesday (P.1) Thursday (P.2) 6 photographs exploring Opposites theme •3 with strong/dominant negative space •3 with strong/dominant positive space
- 50. Pinterest Opposites Photography • Start opposites photography board • 10 or more pins • Google search “opposites photography art”