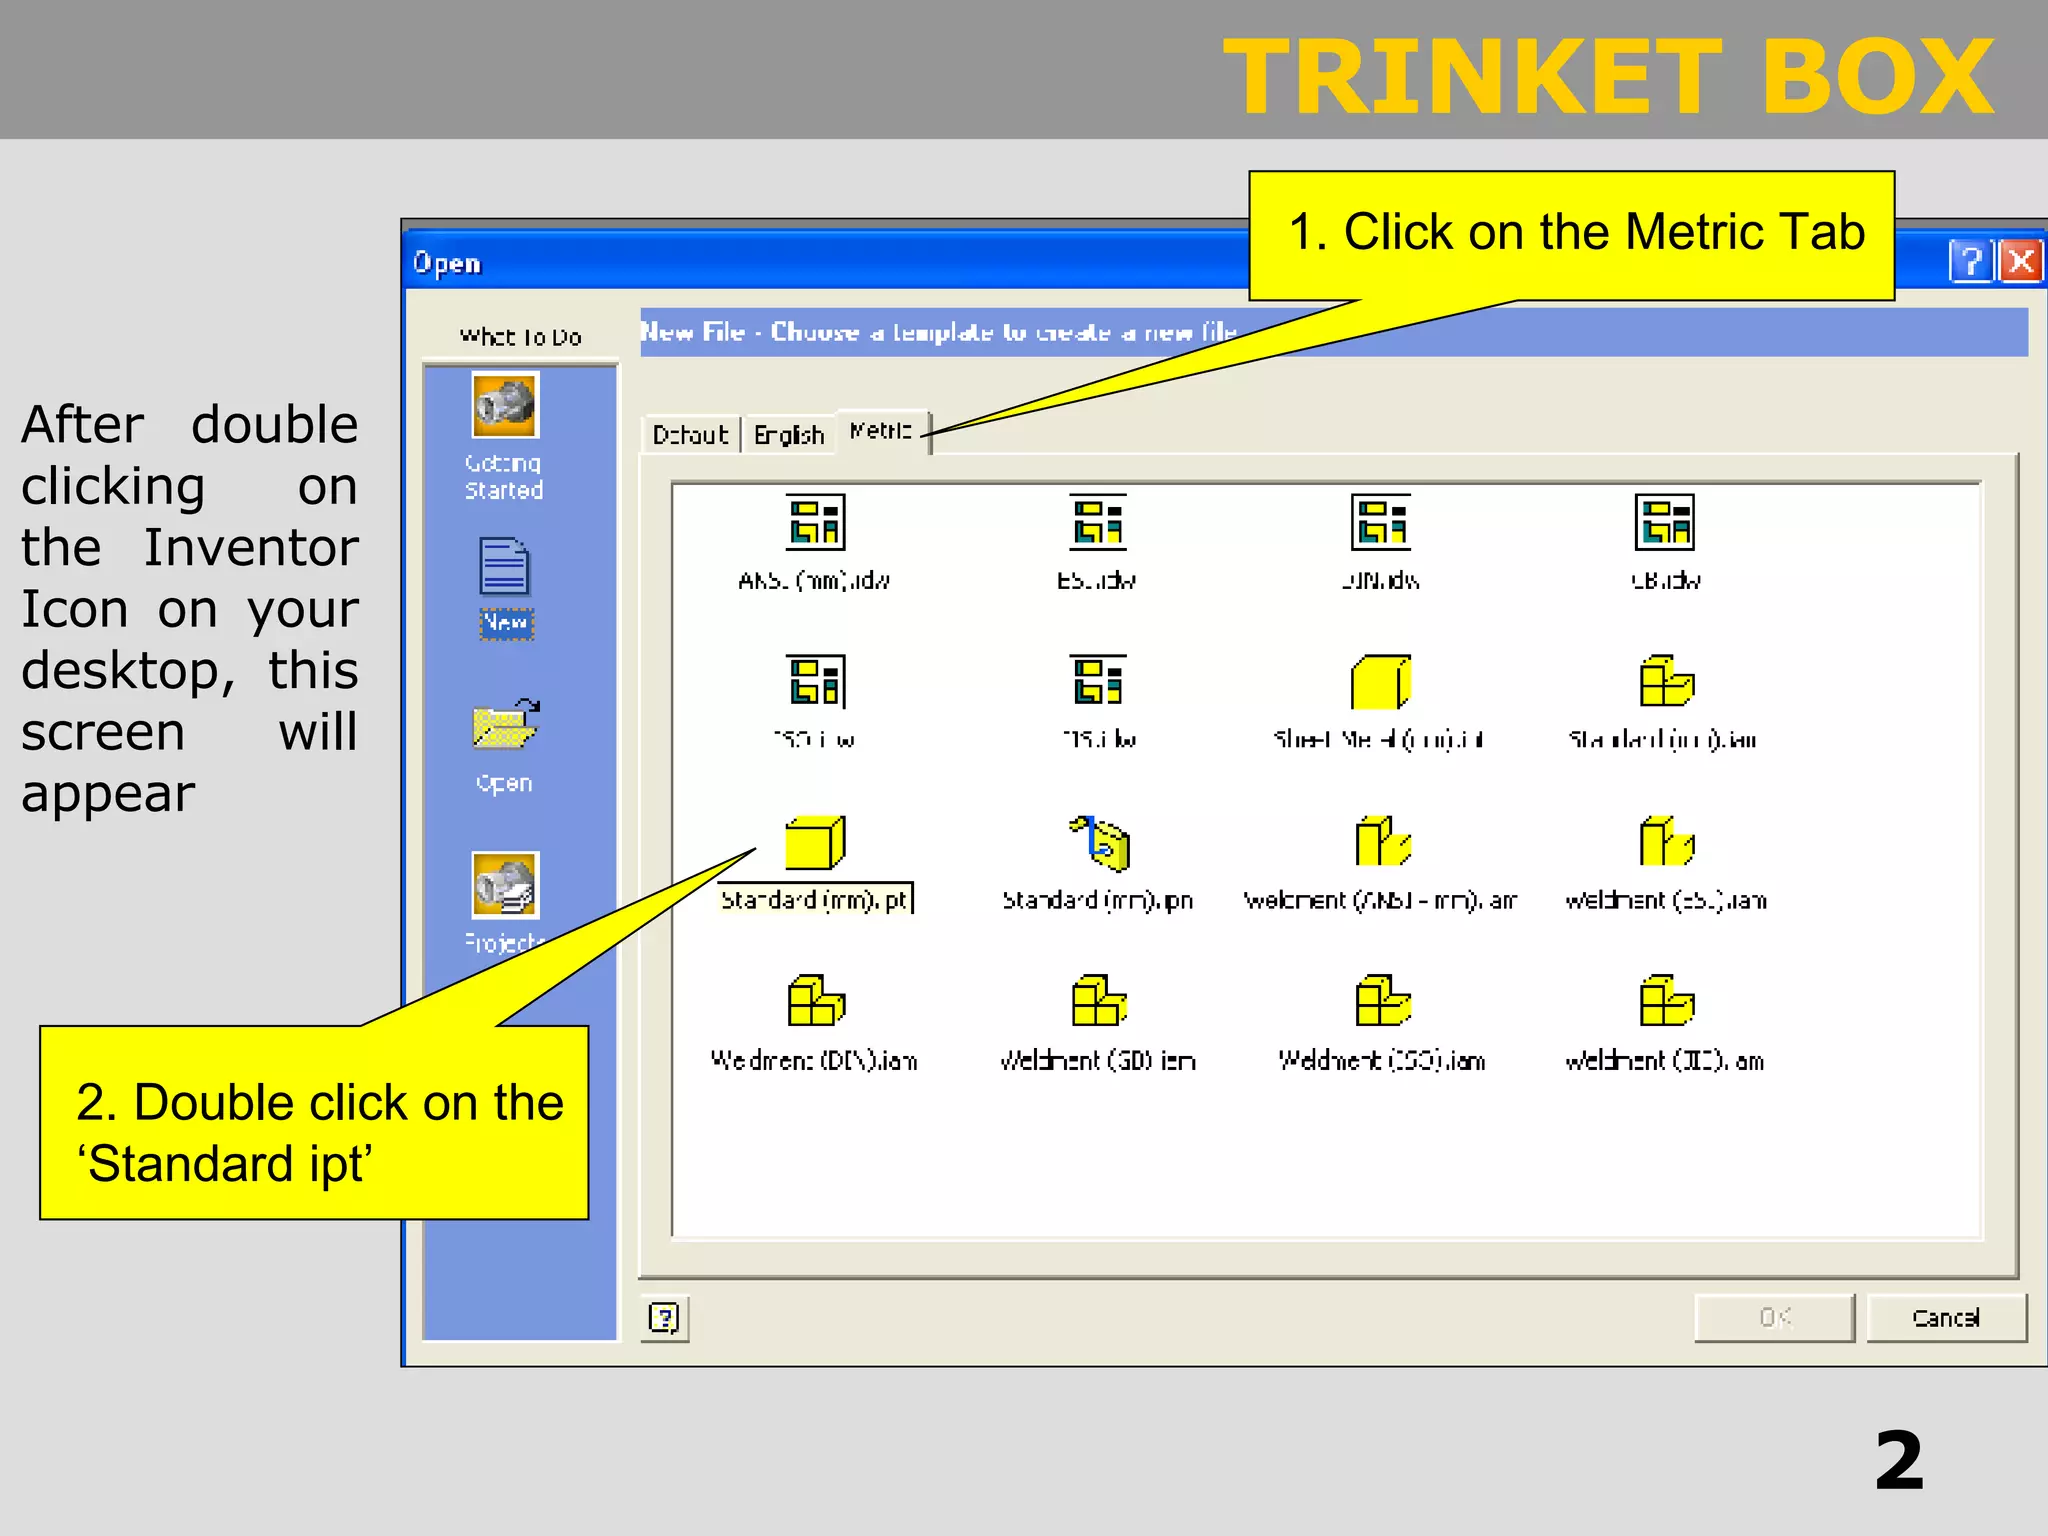
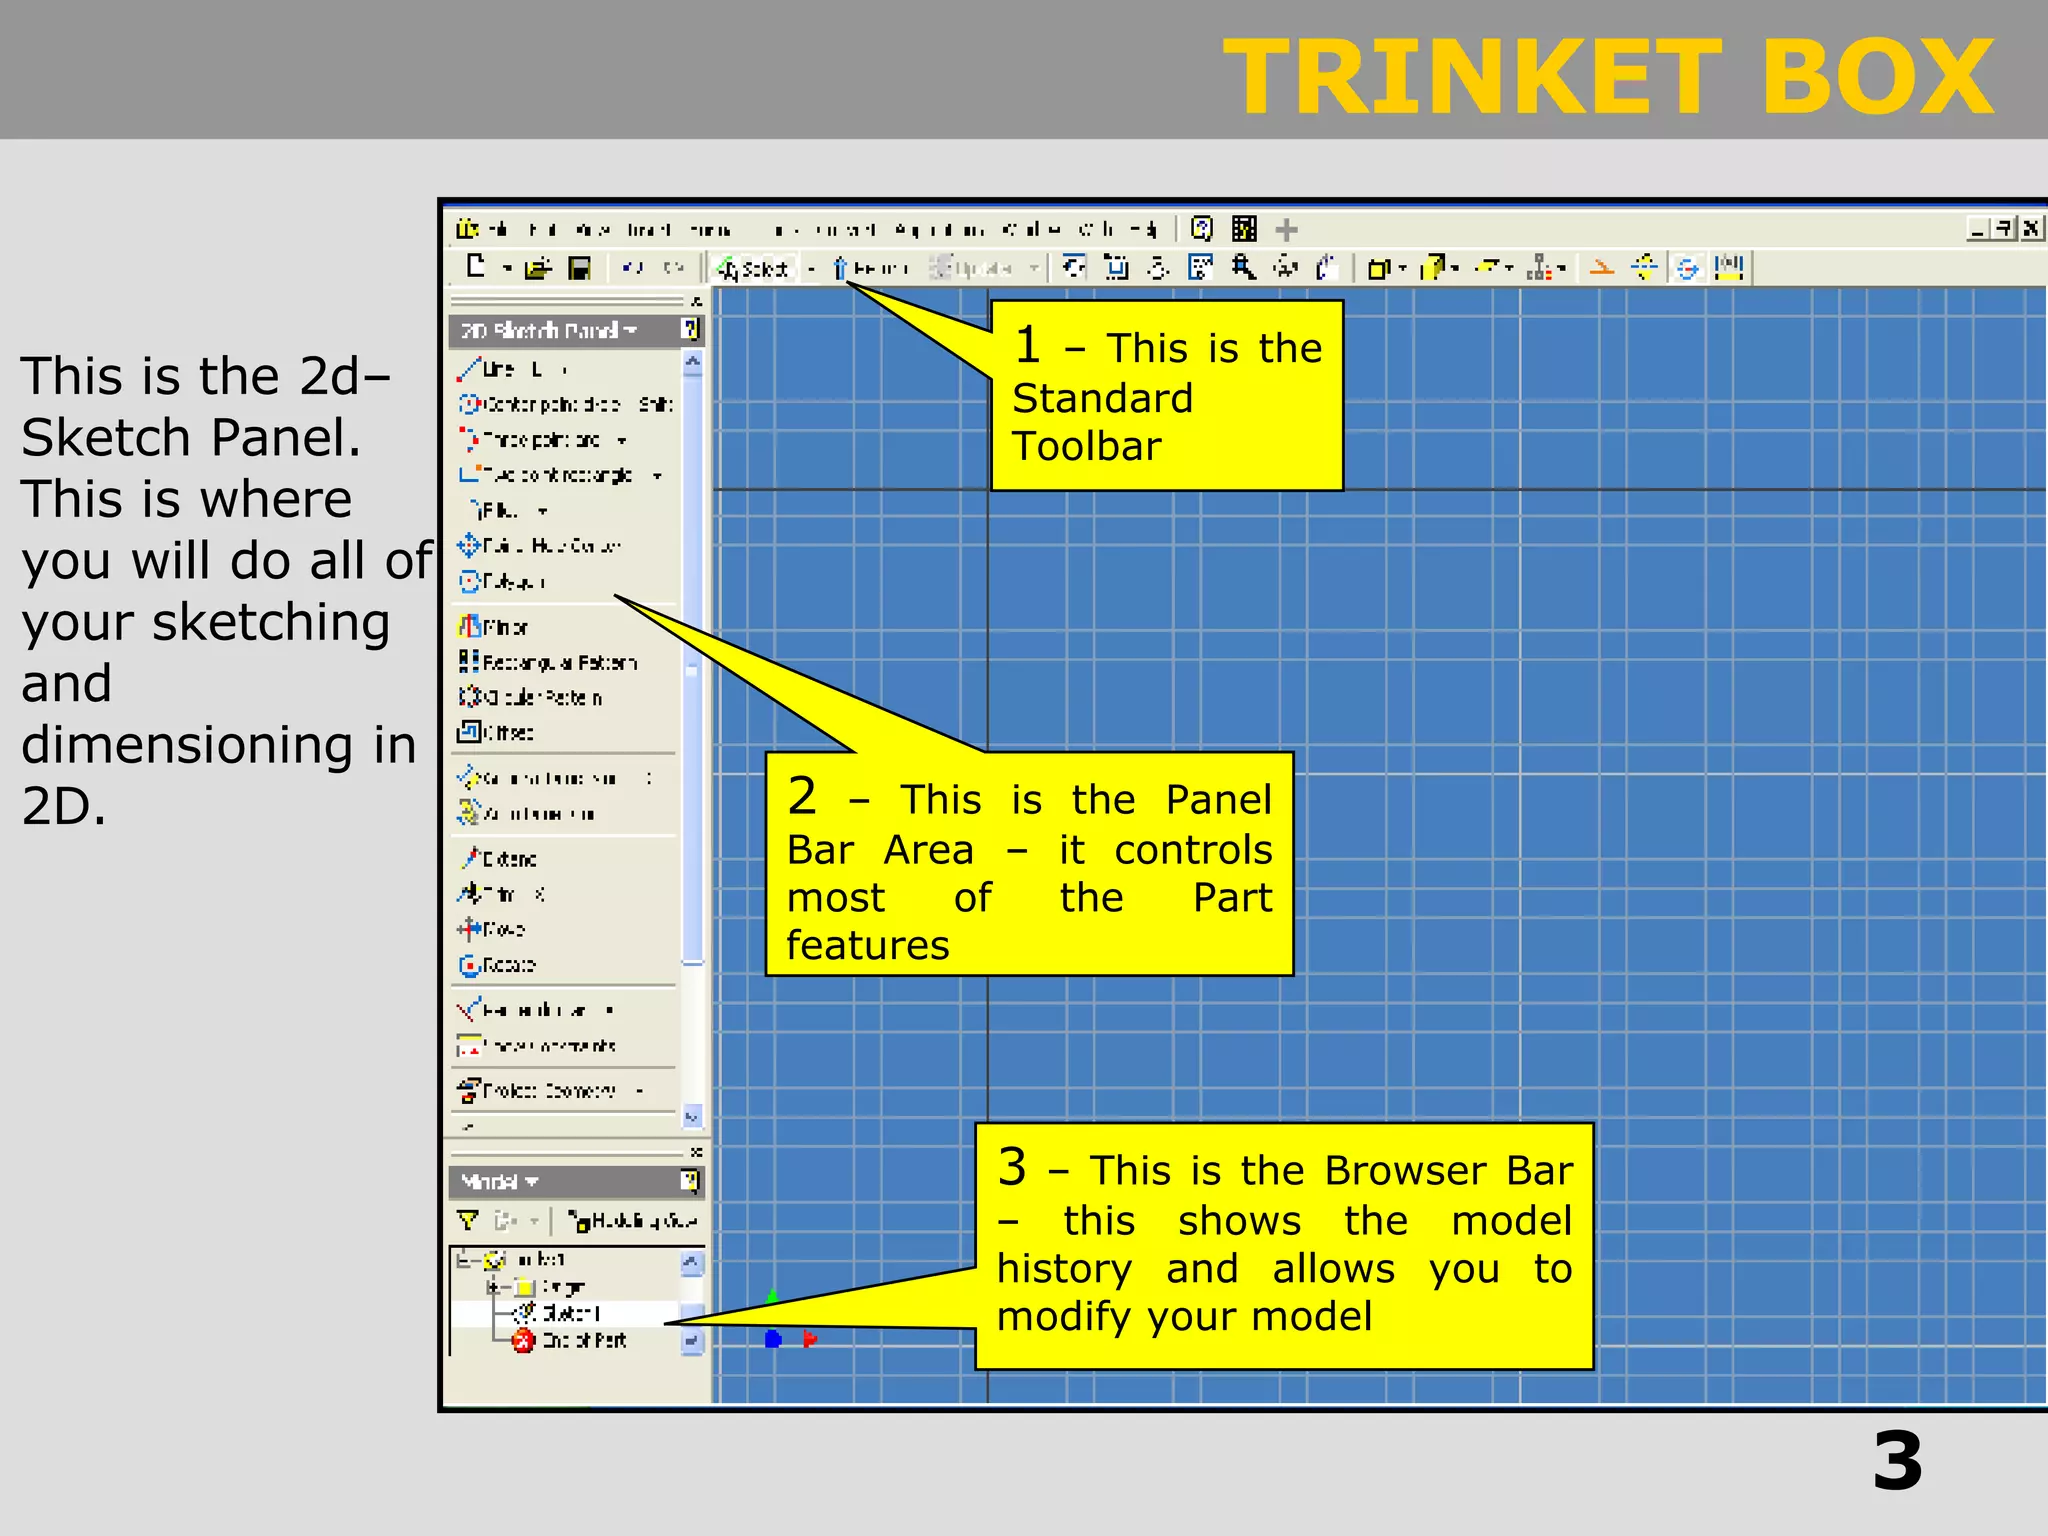
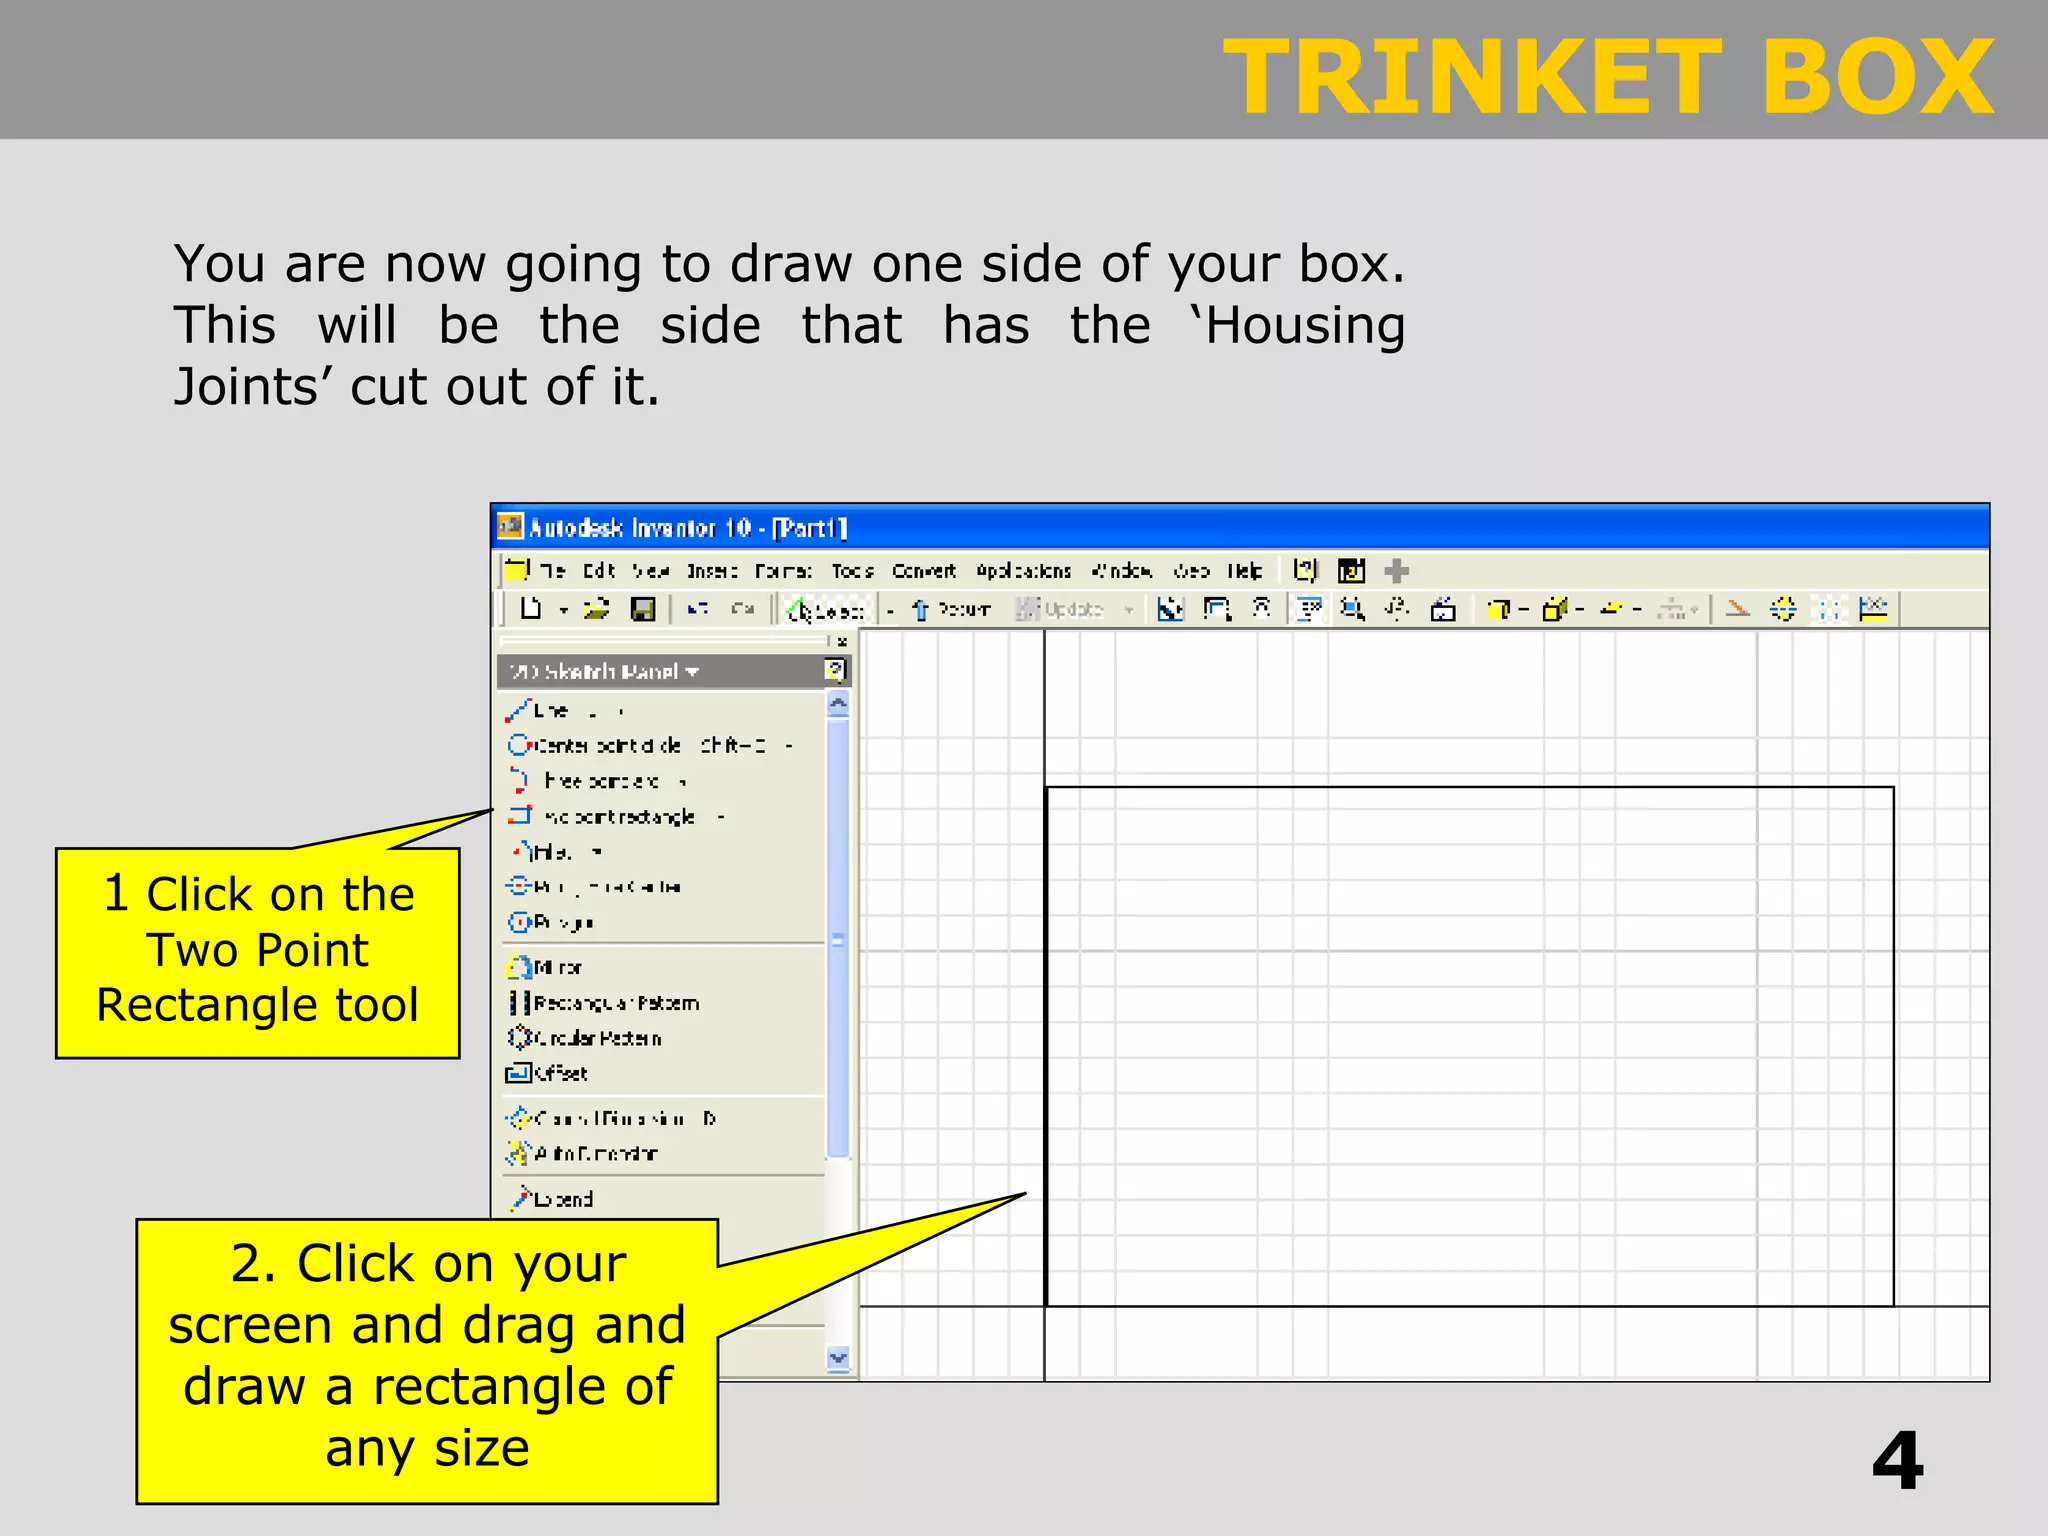
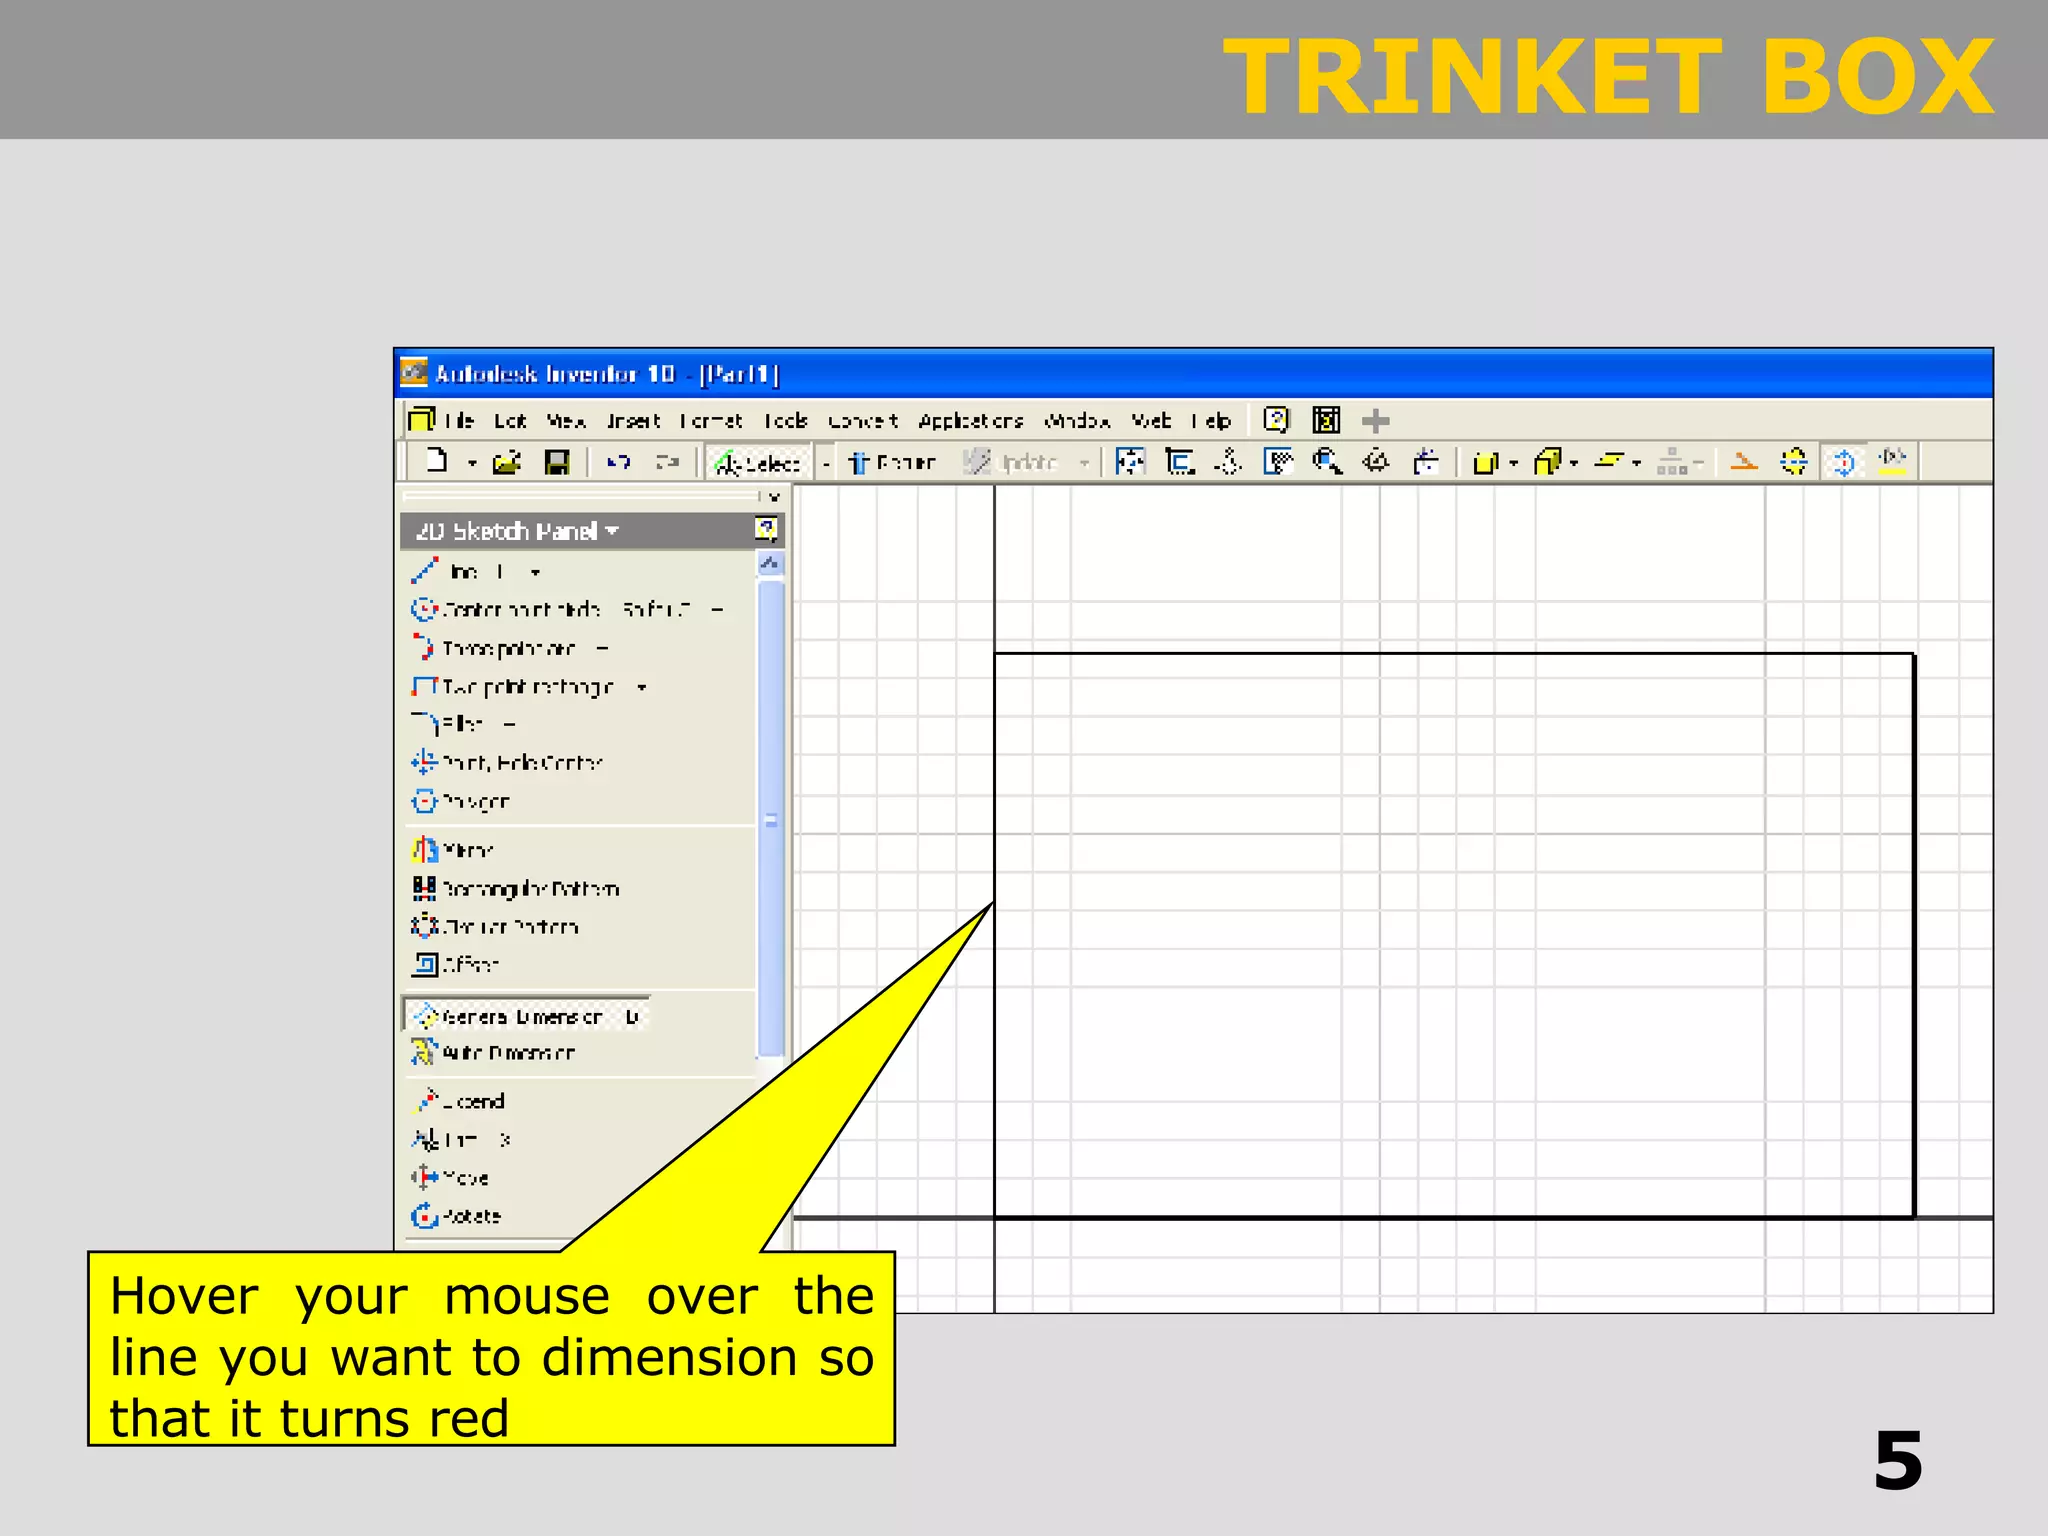
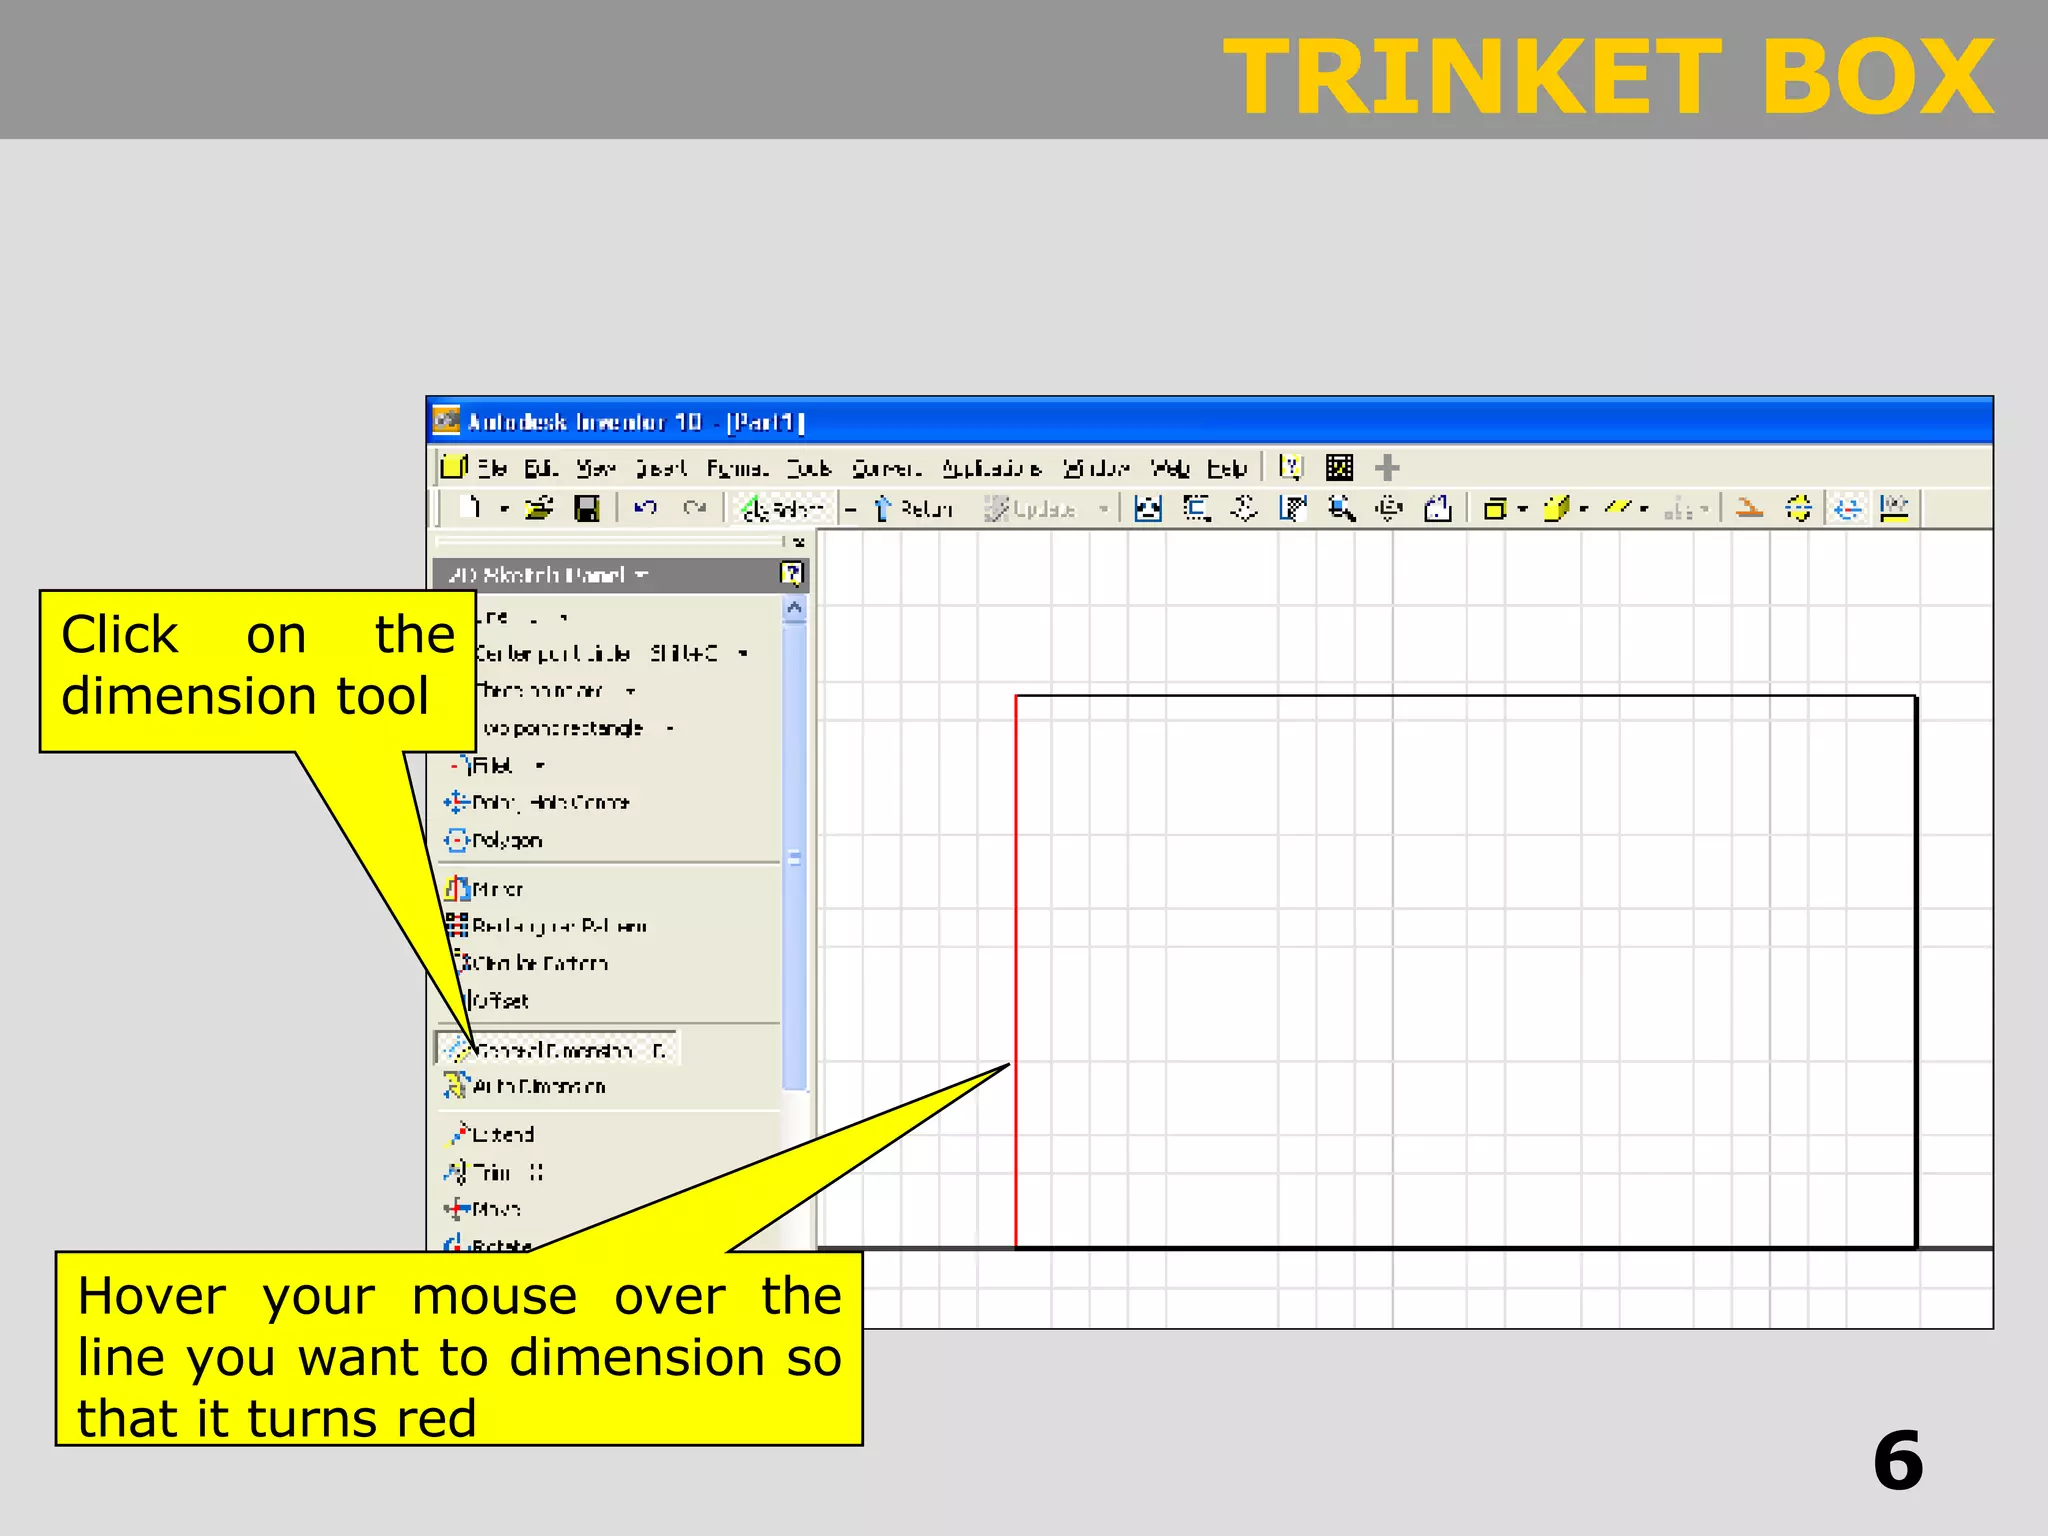
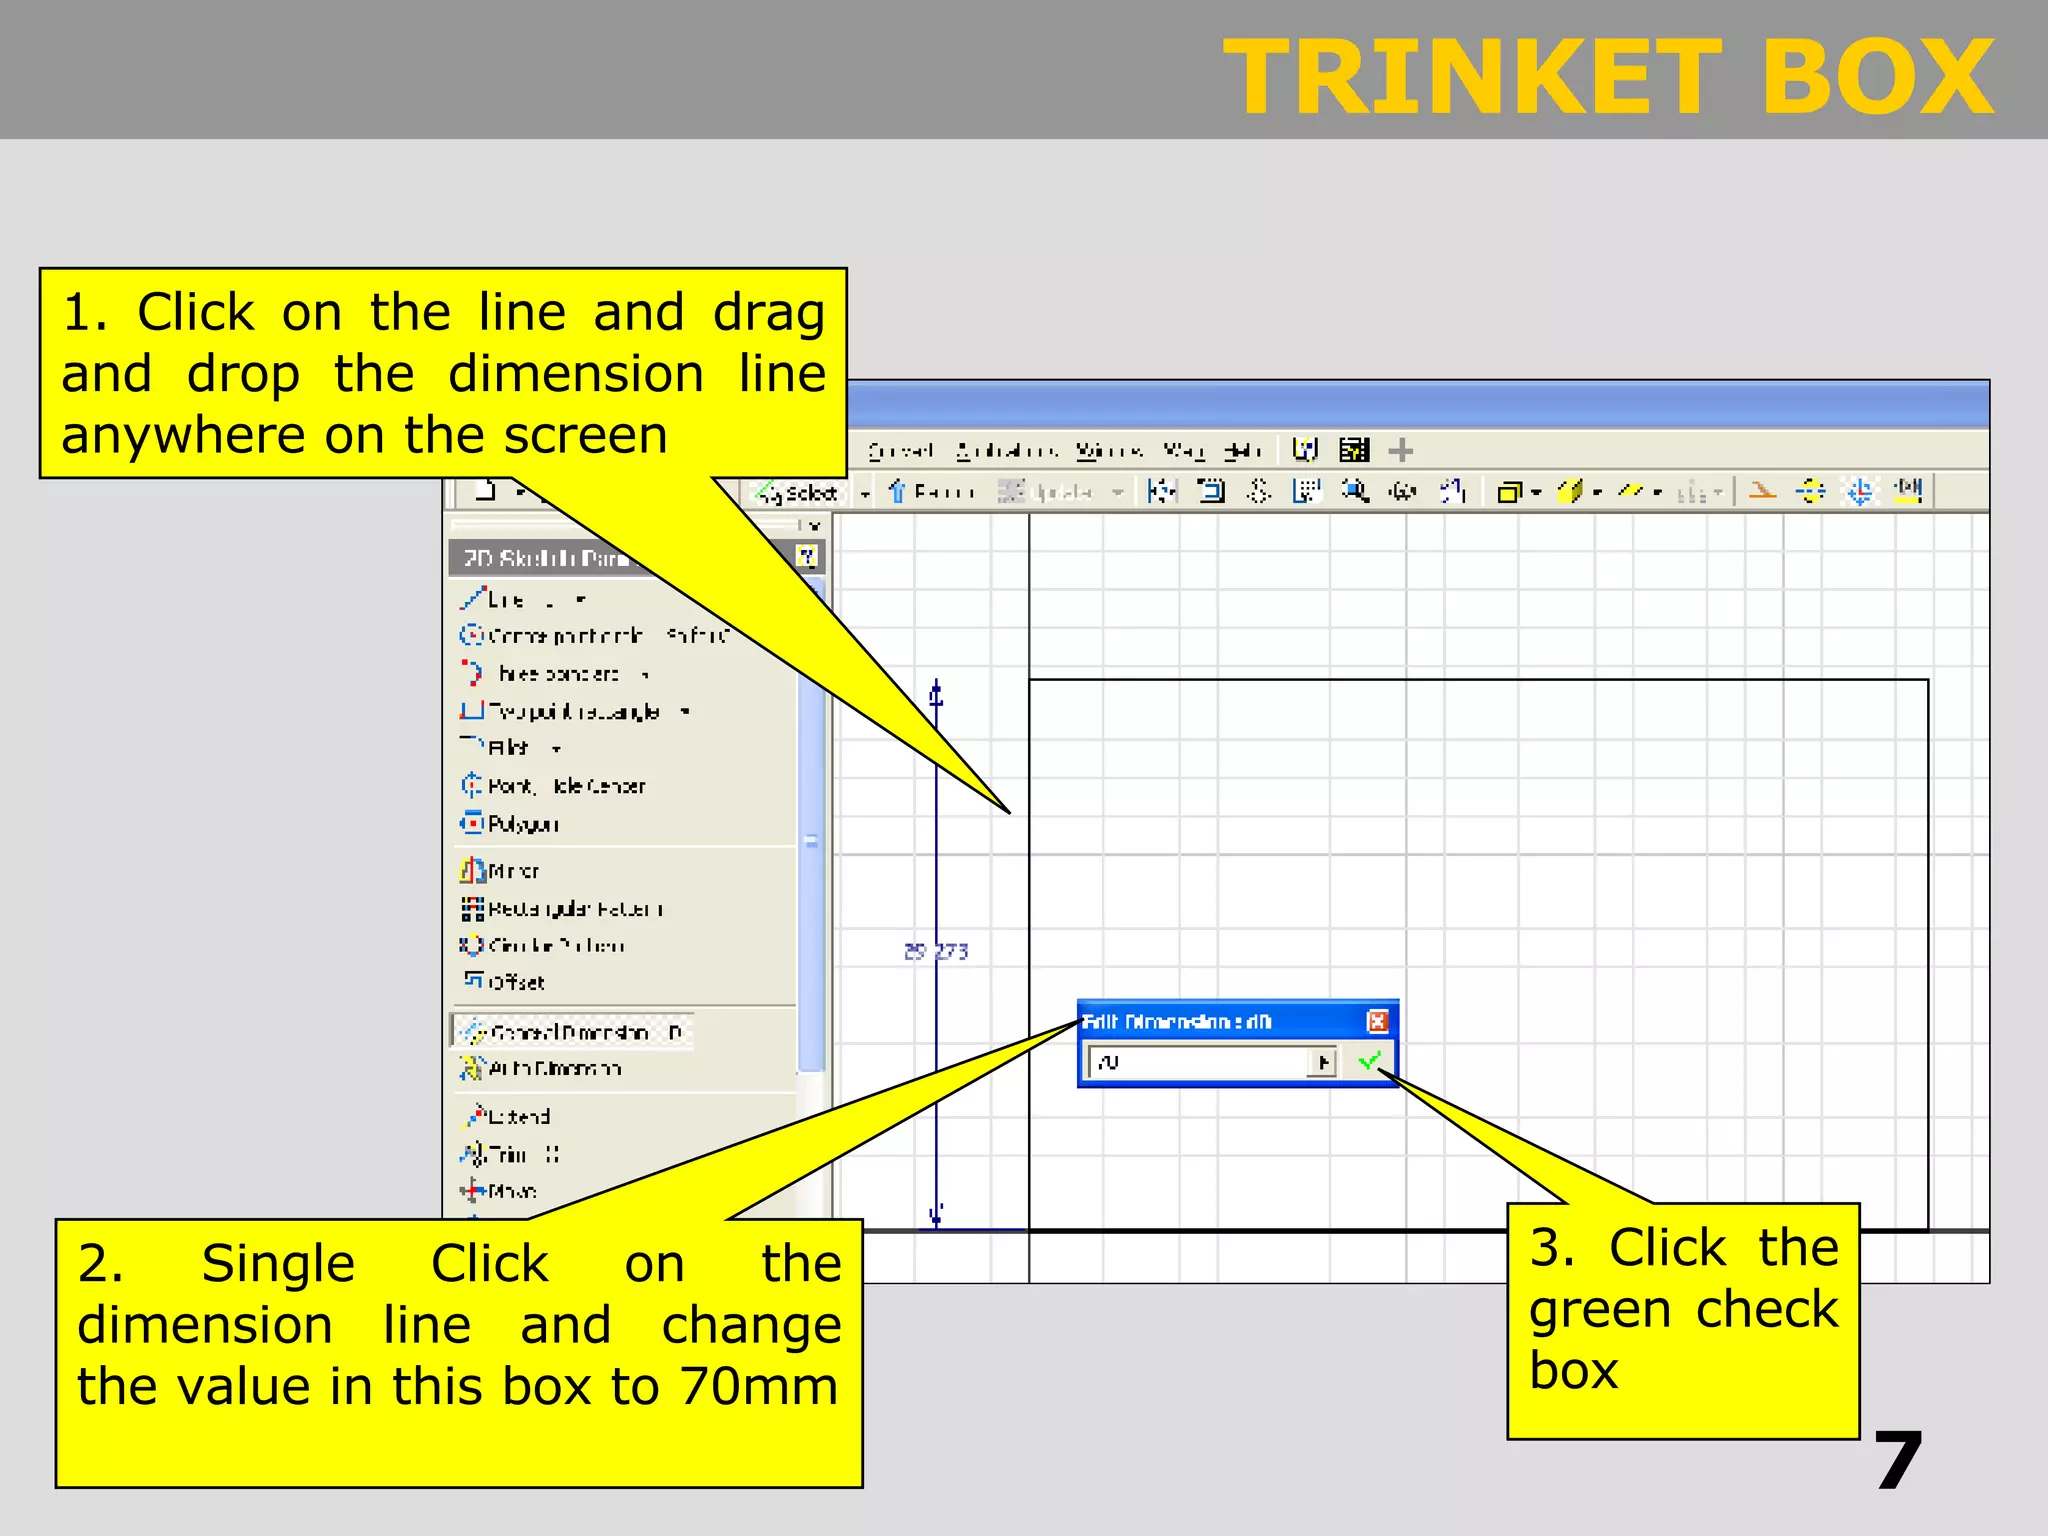
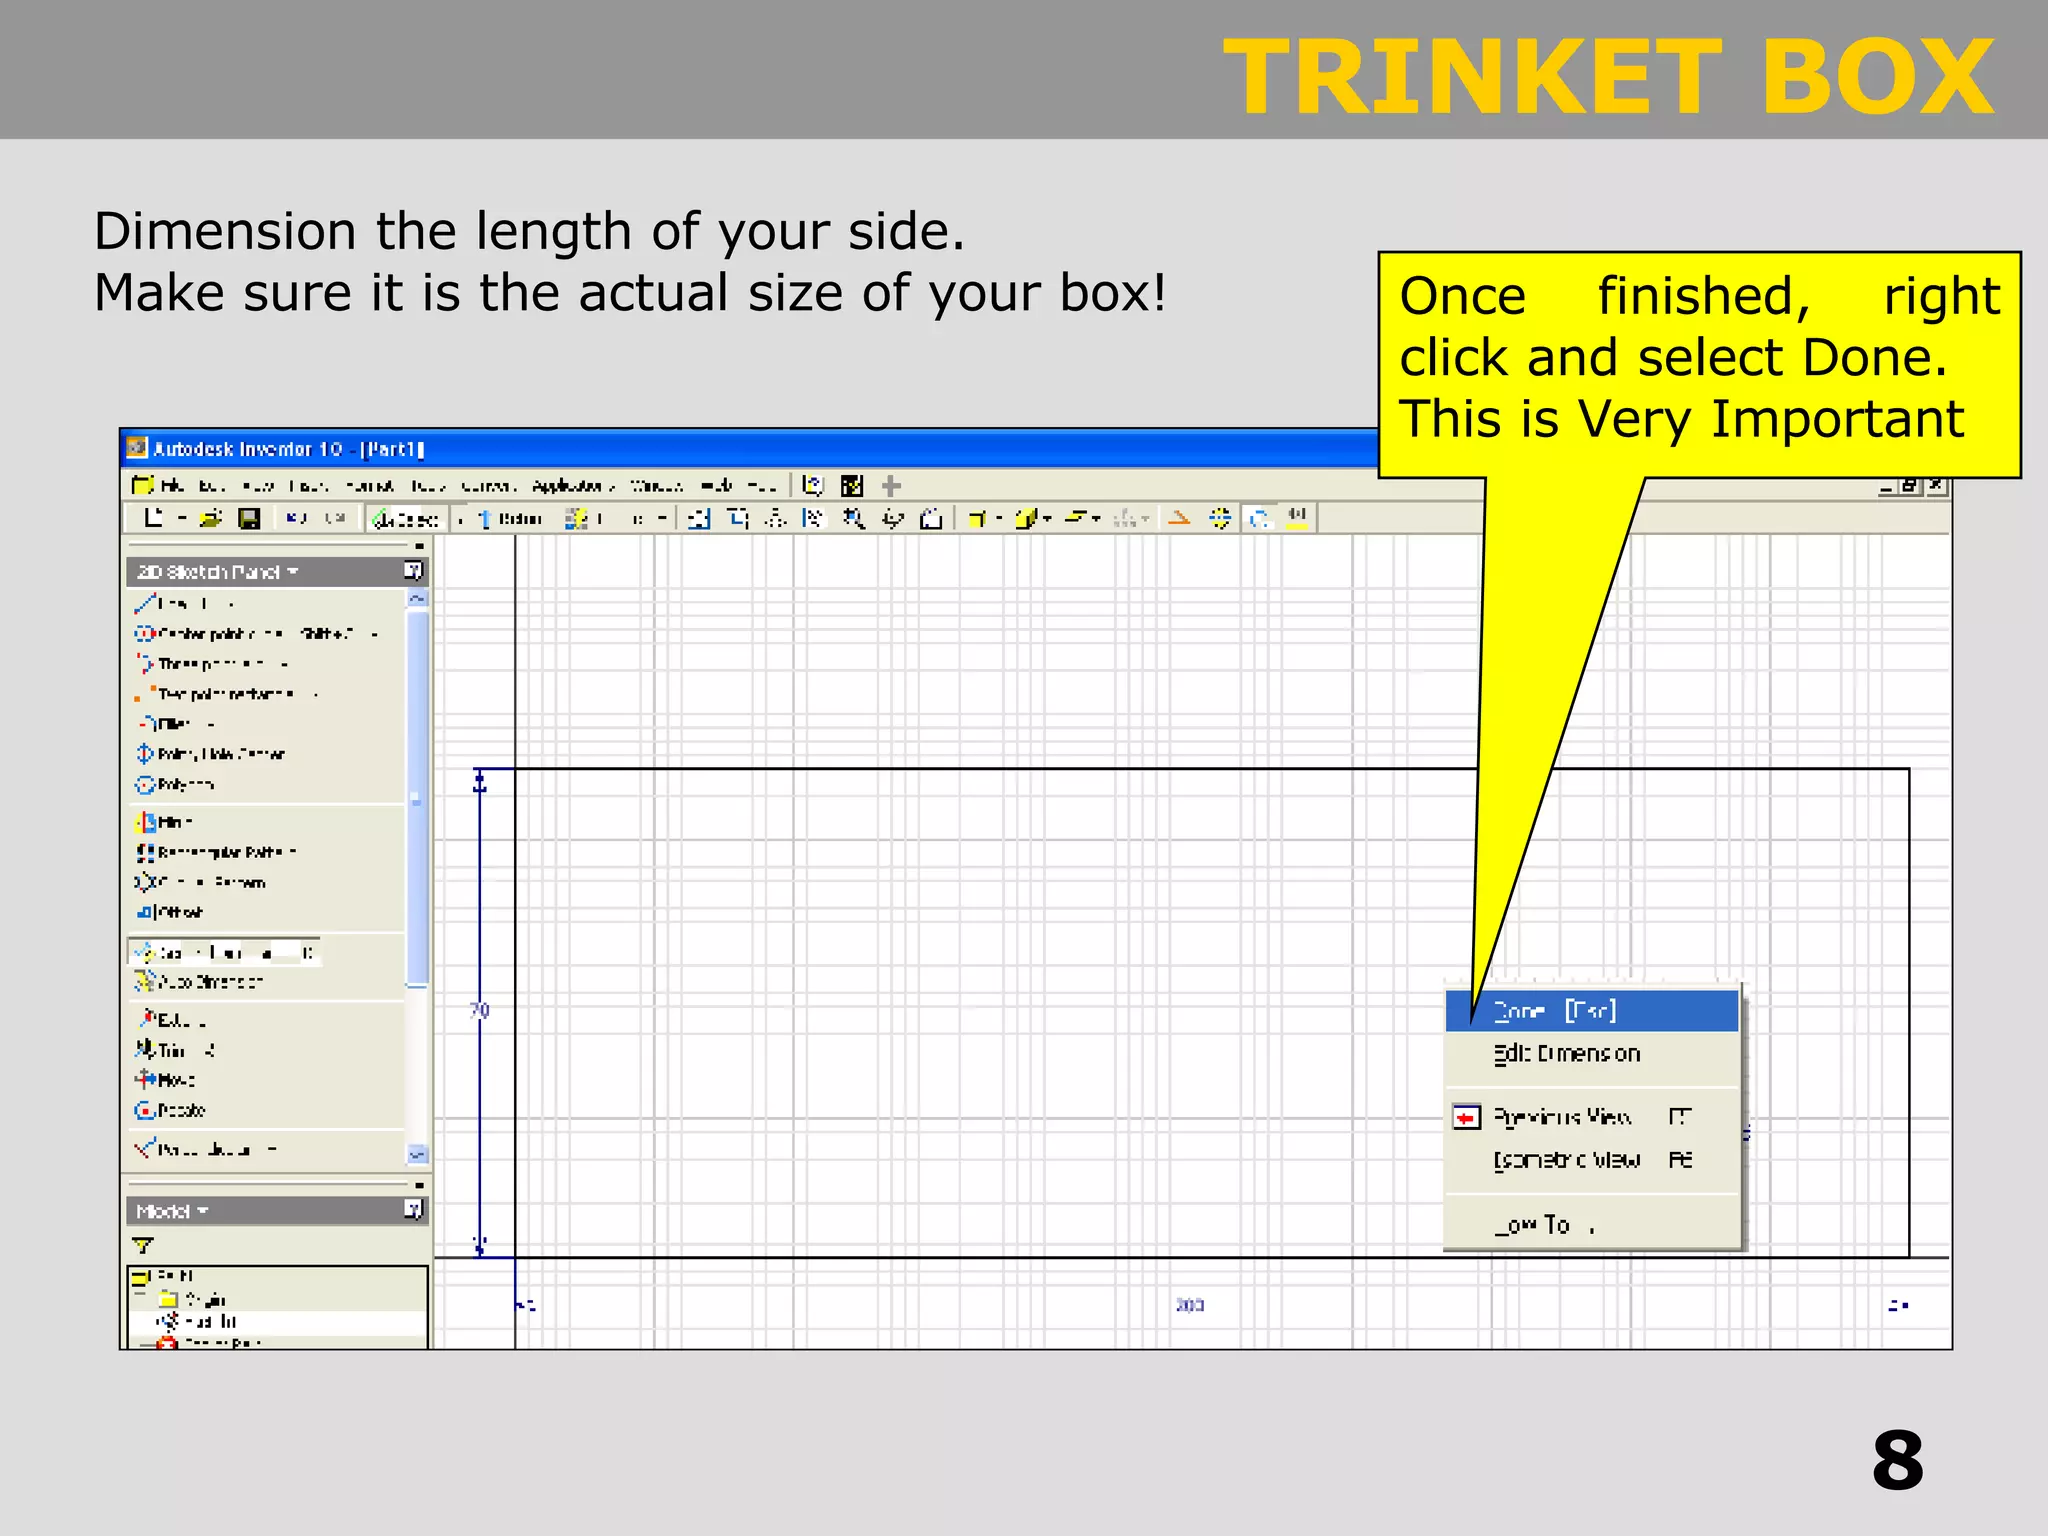
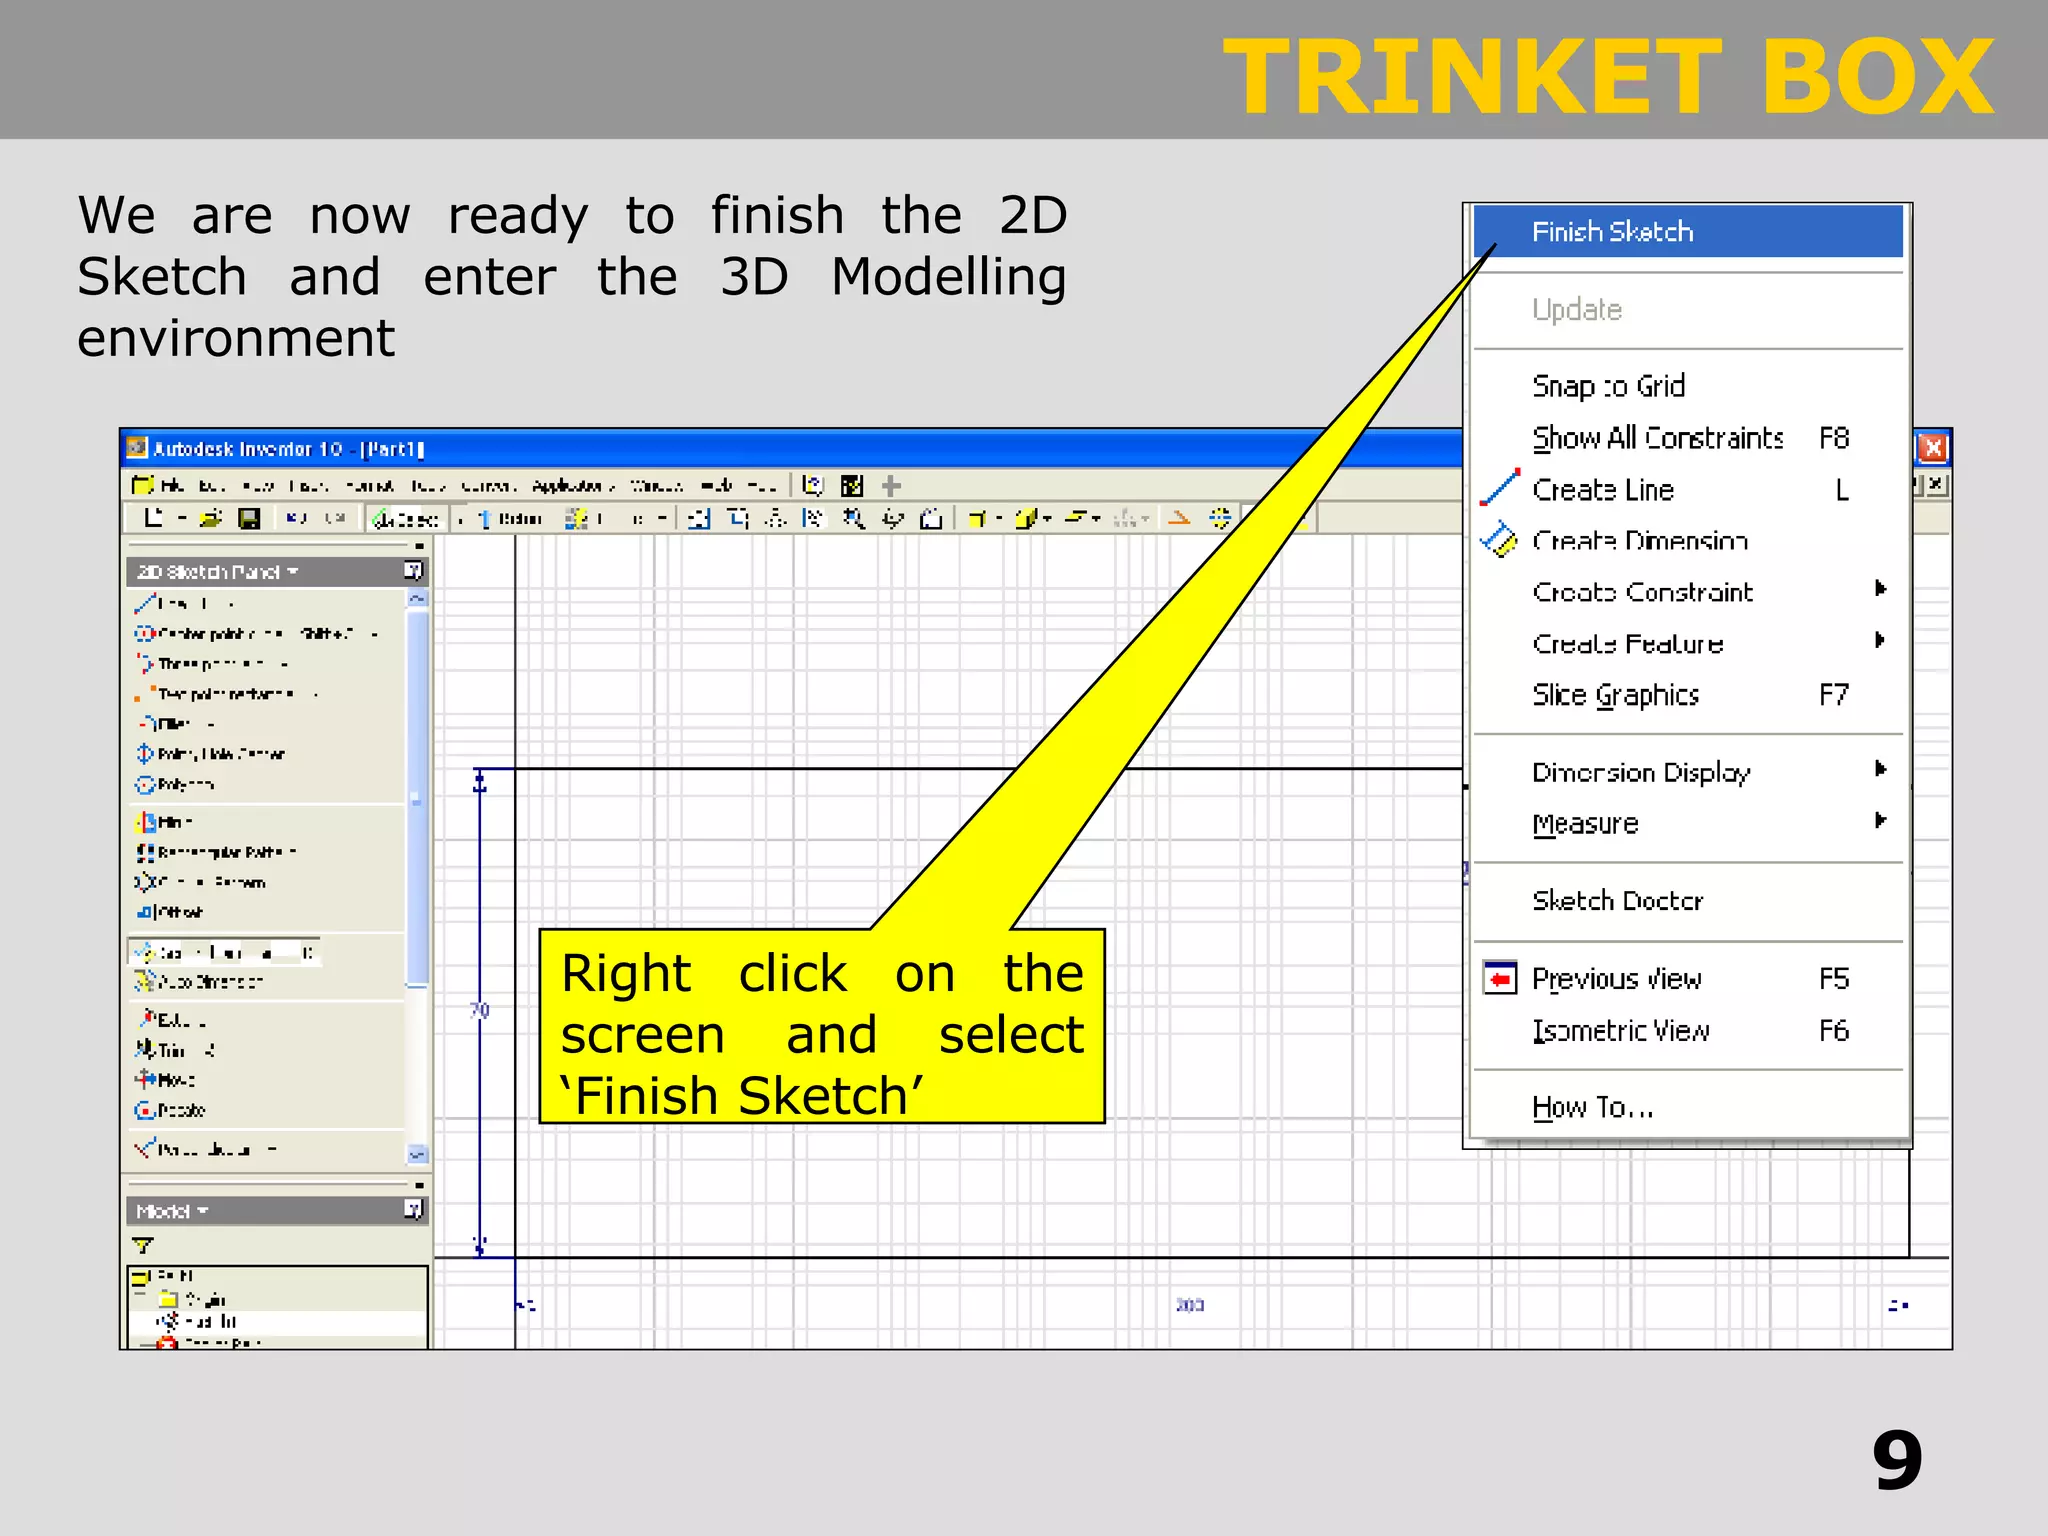
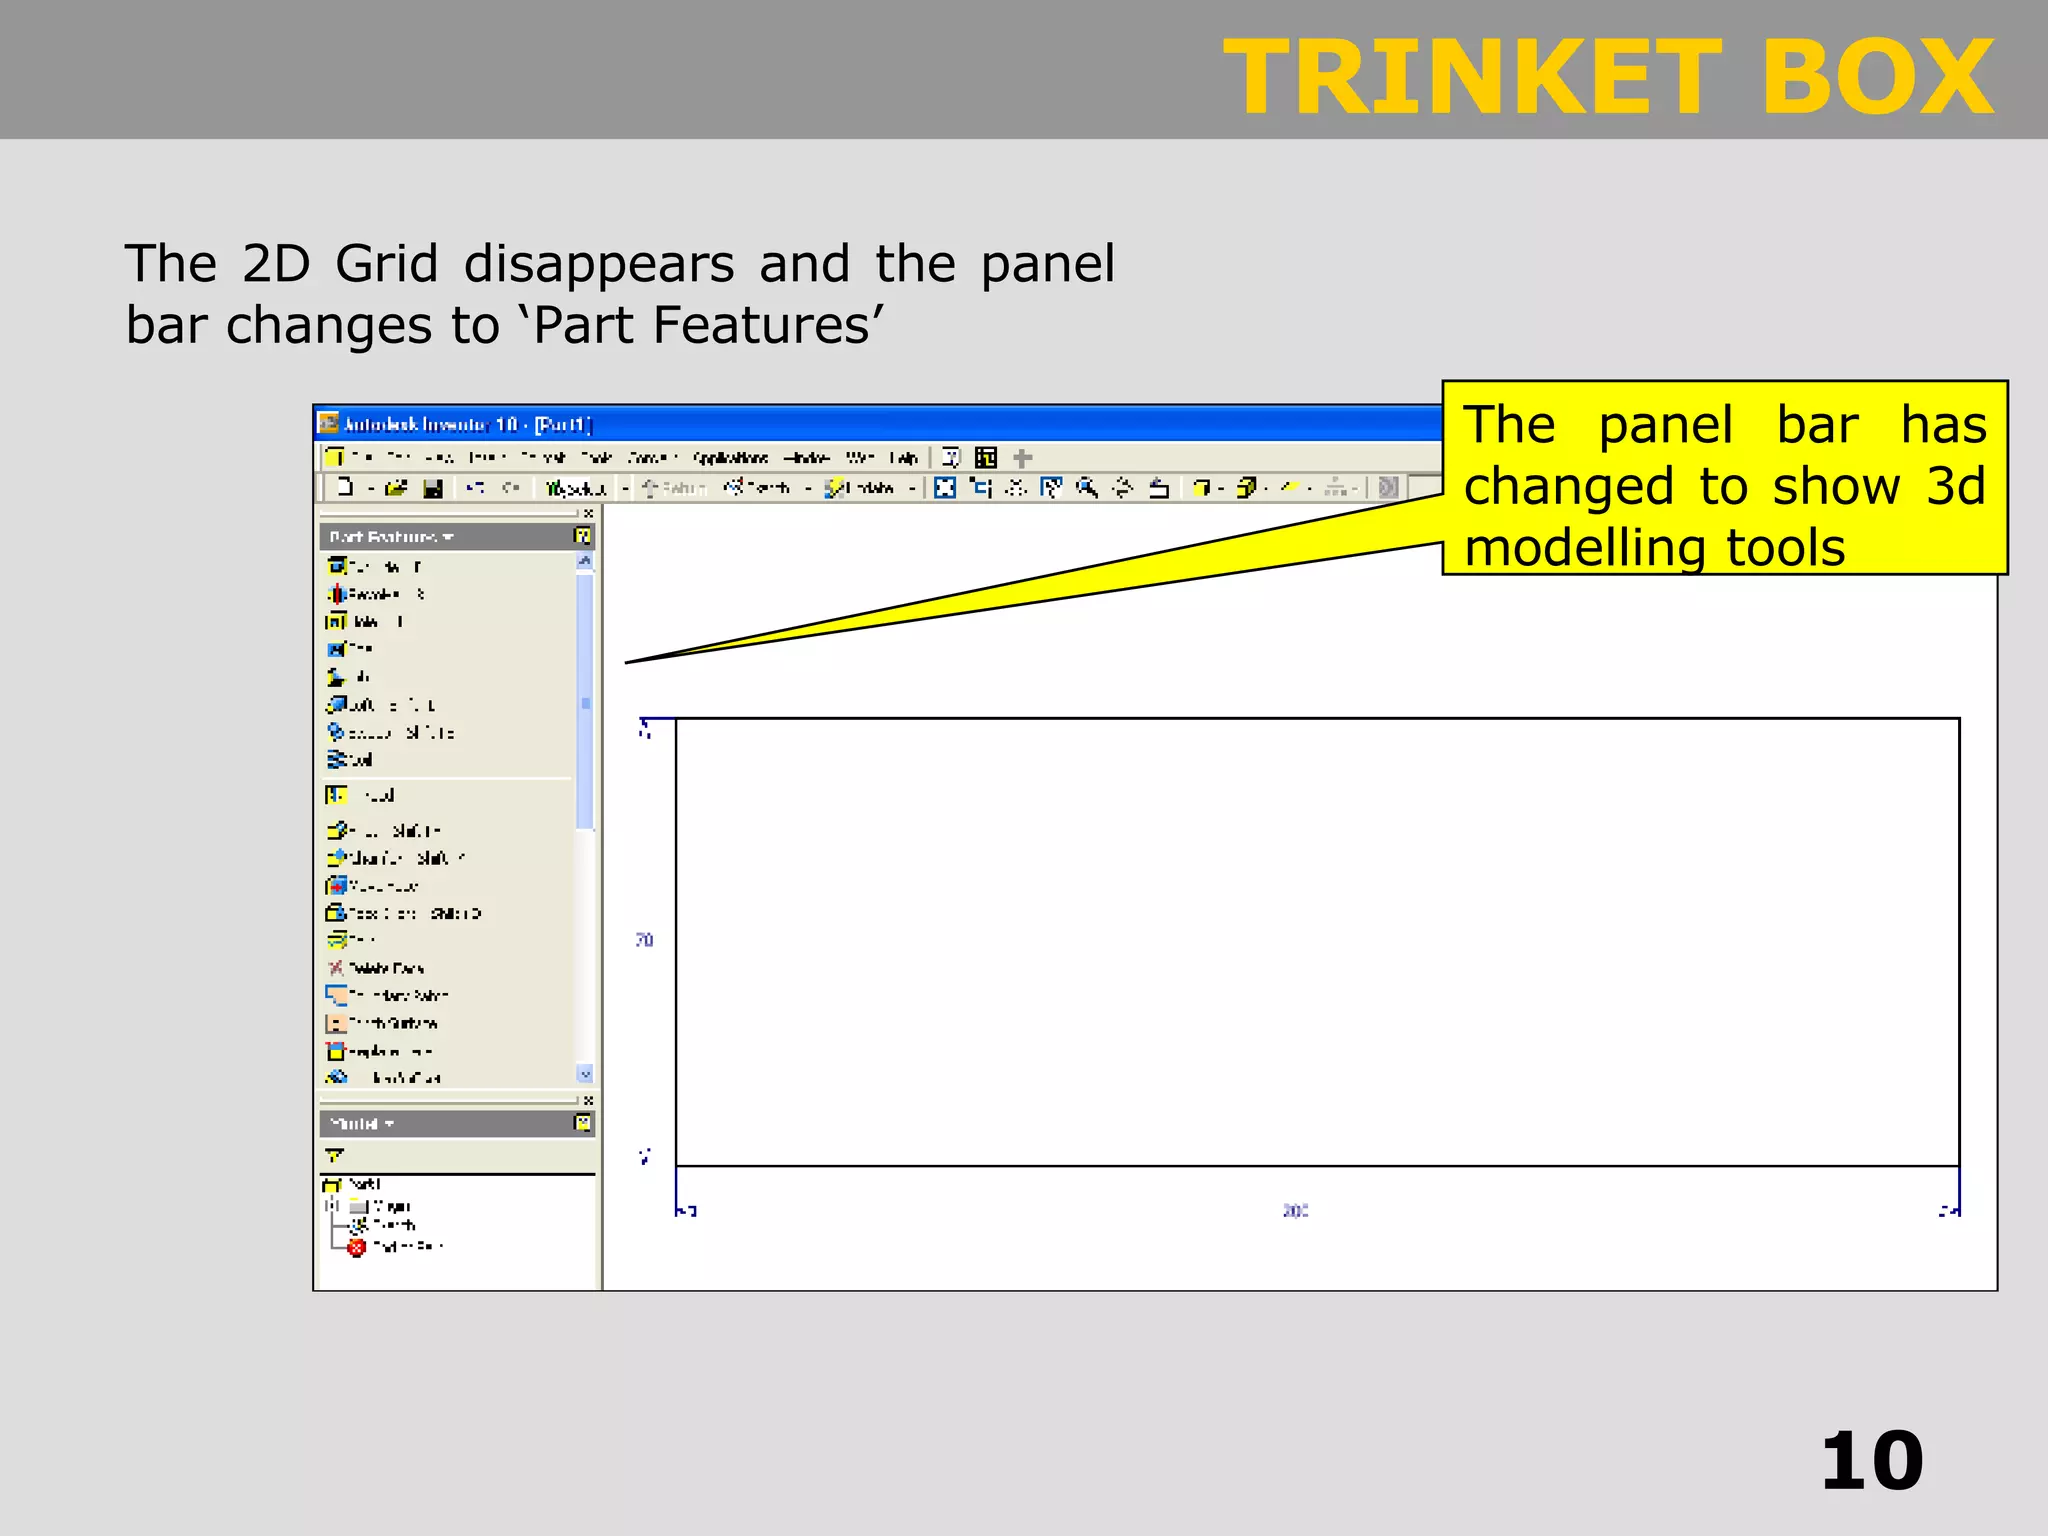
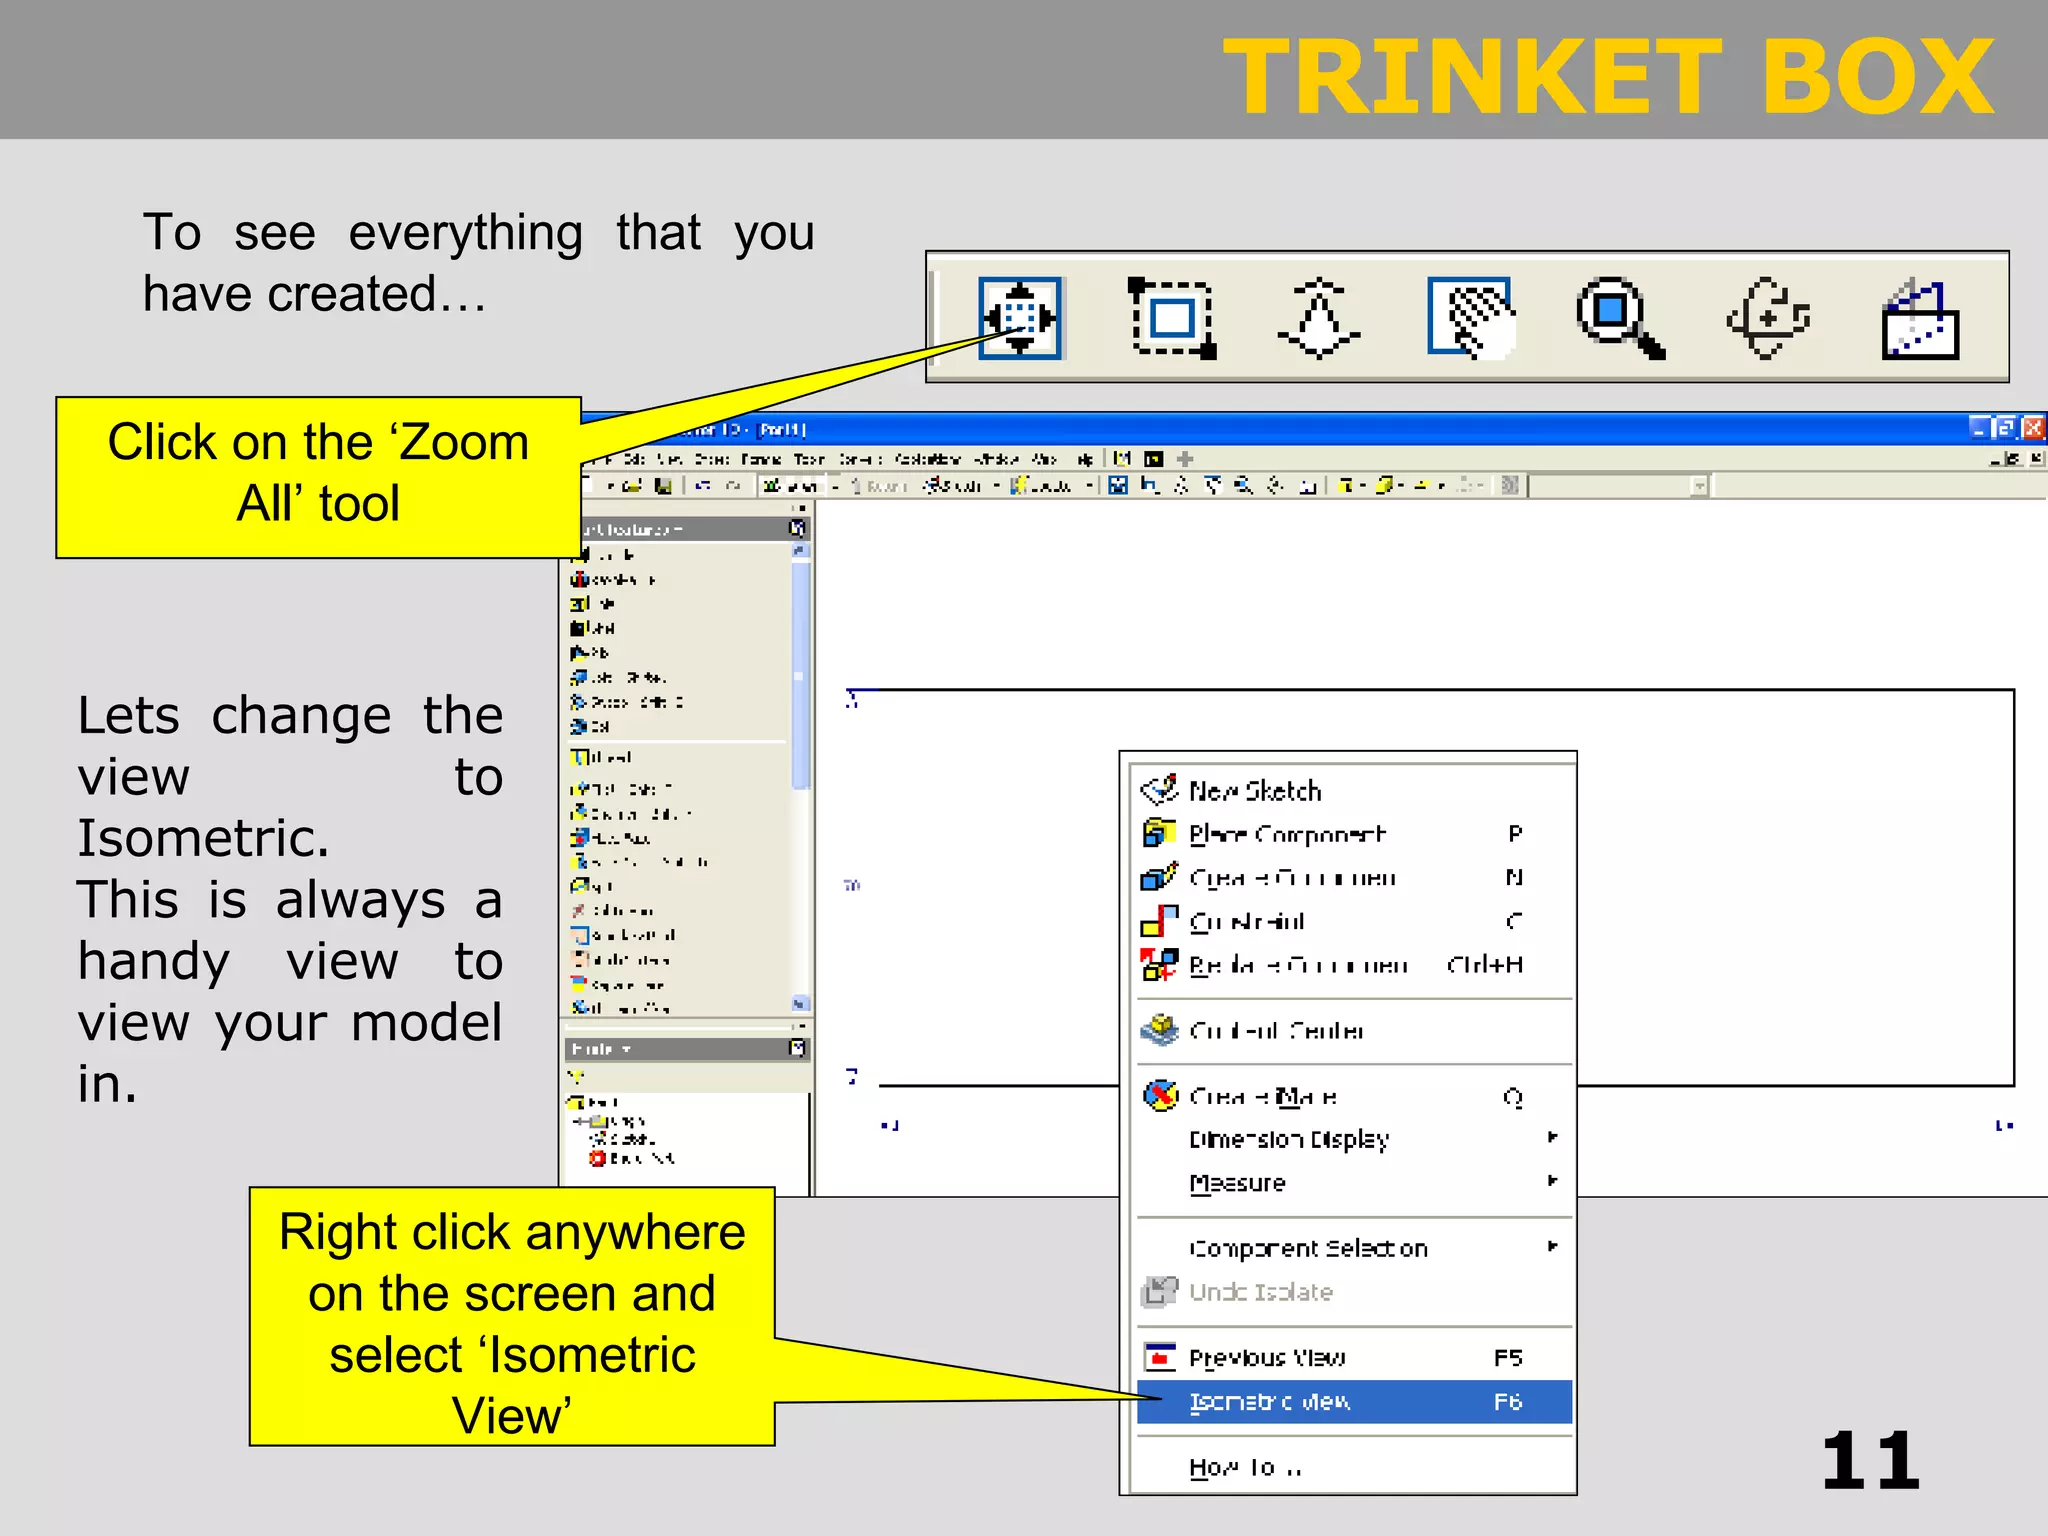
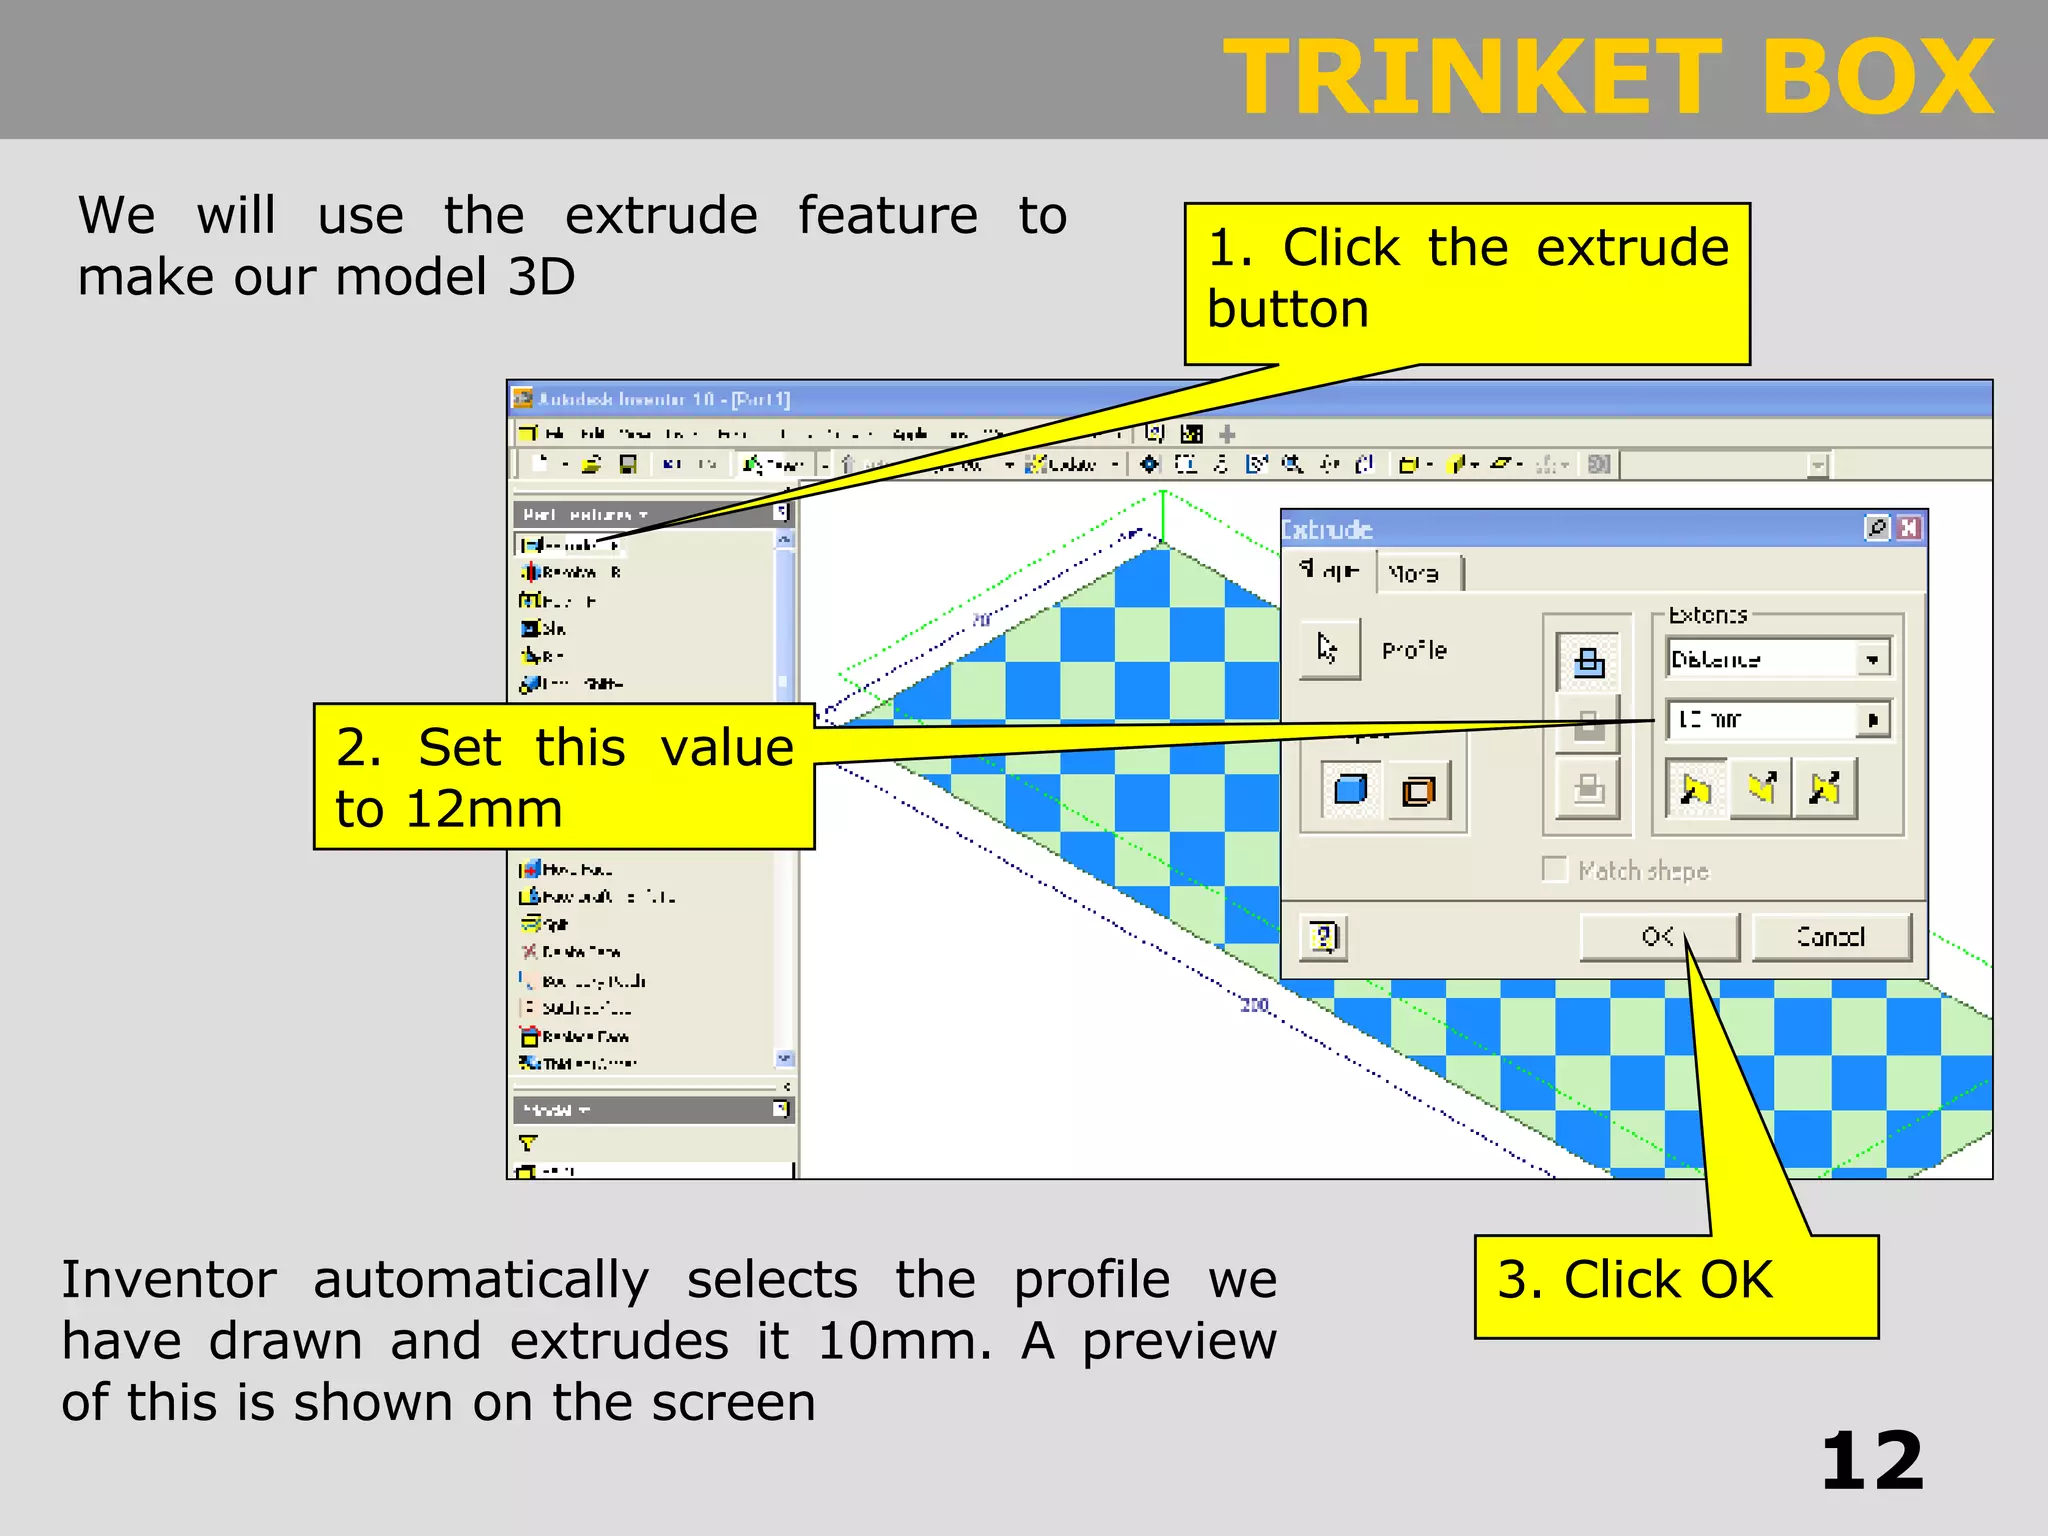
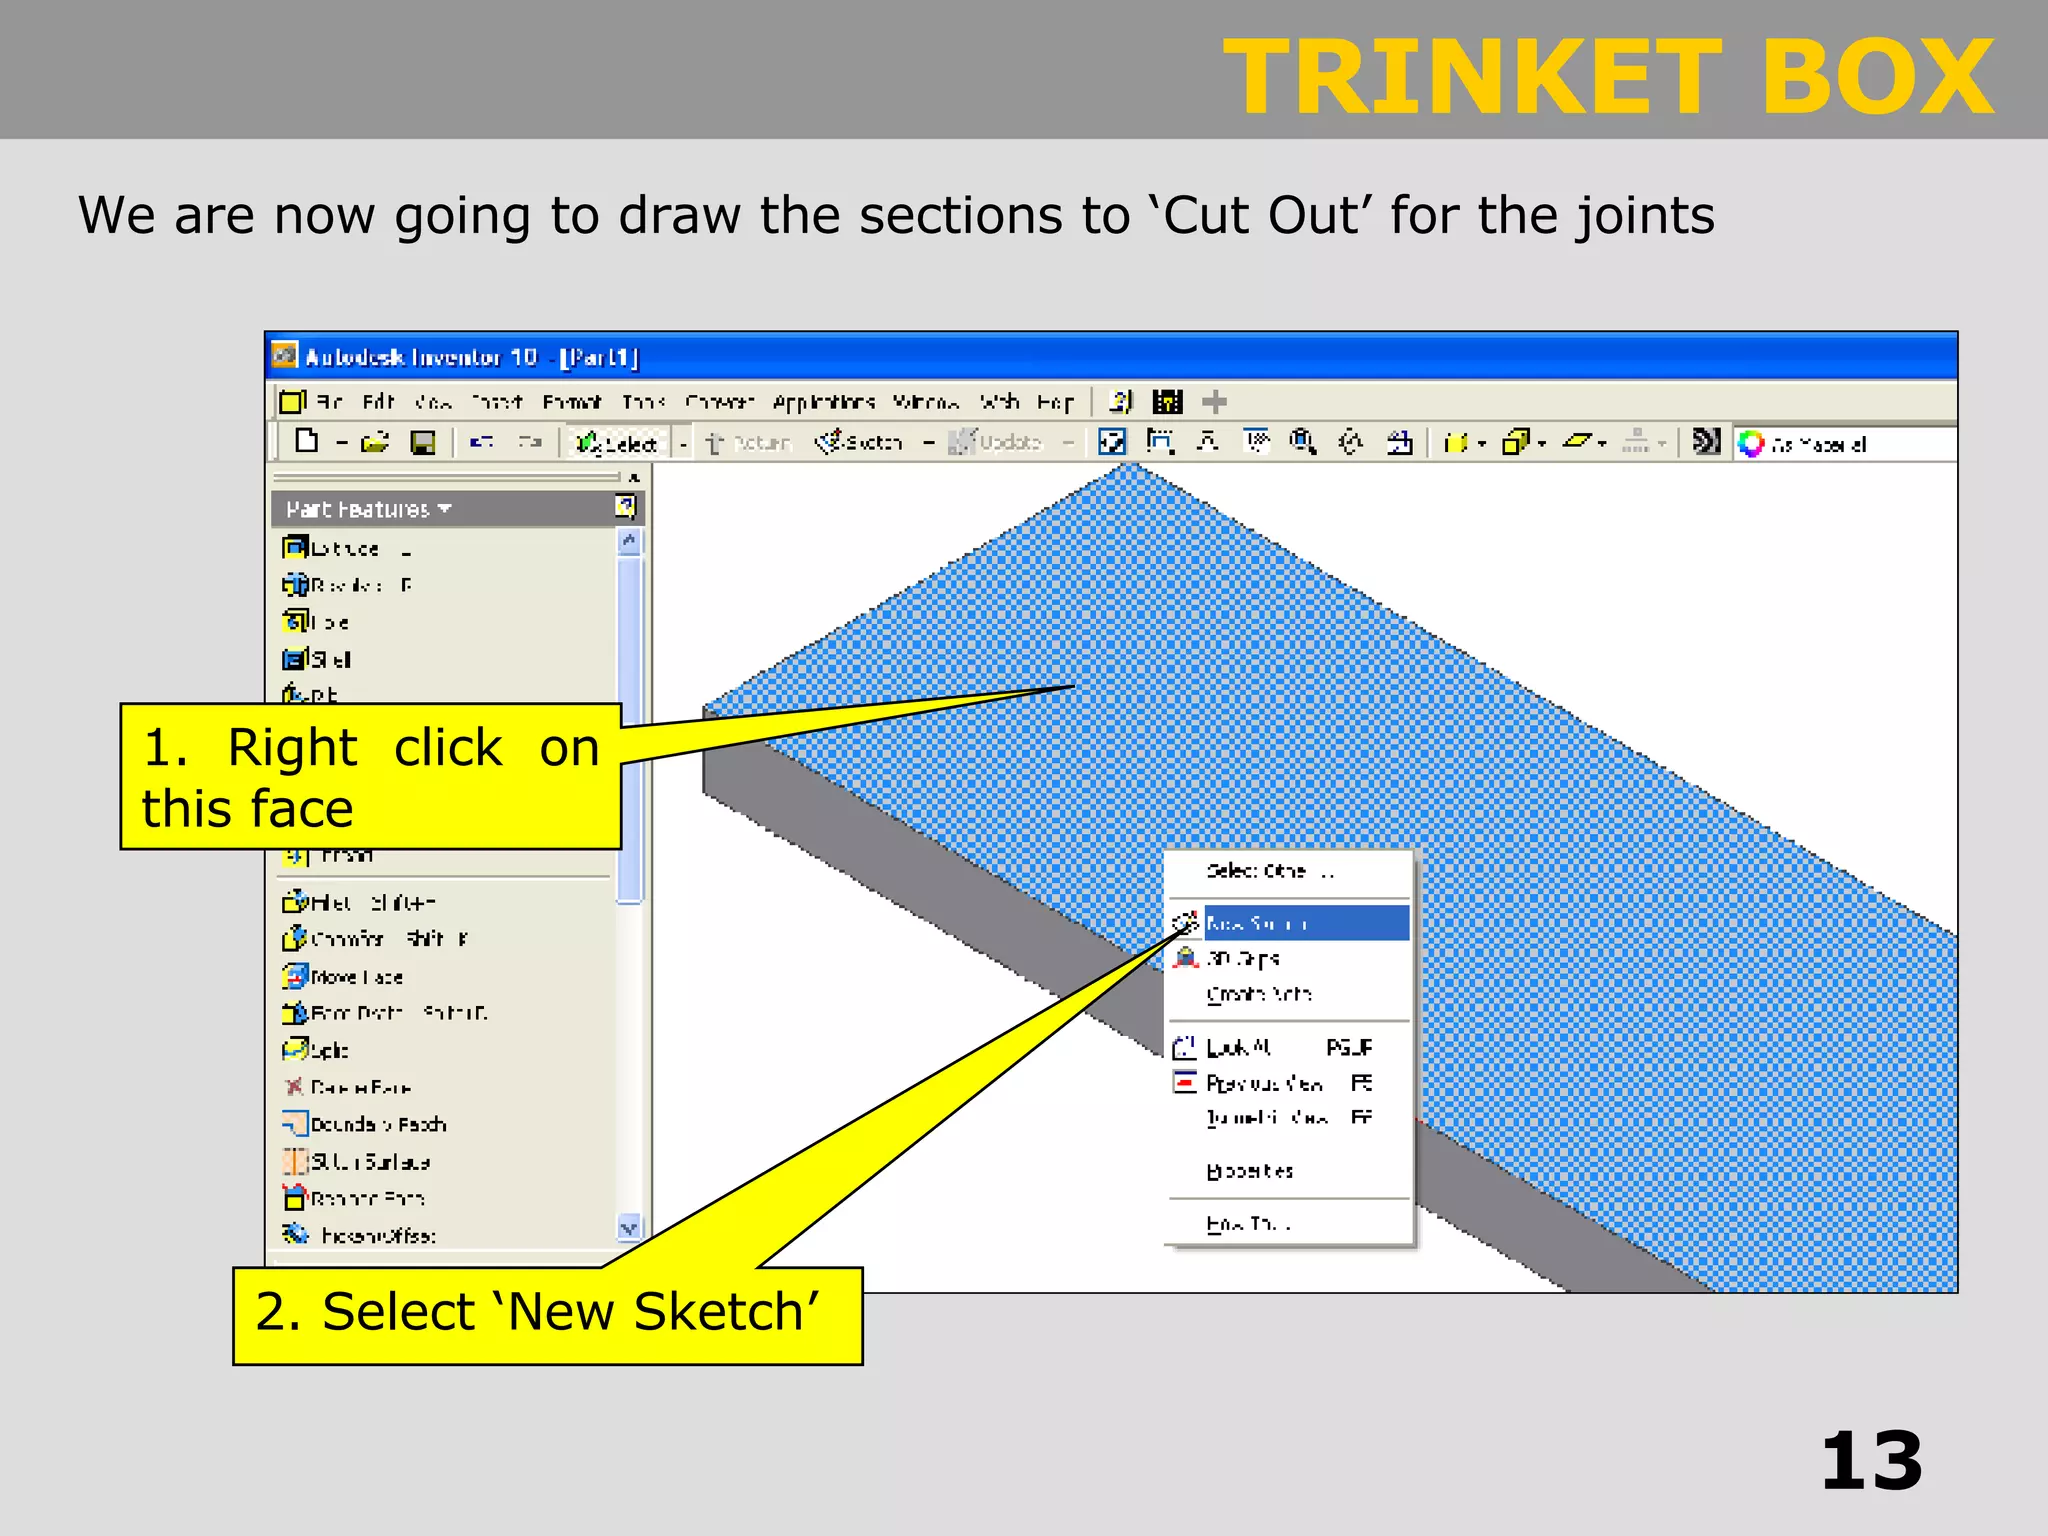
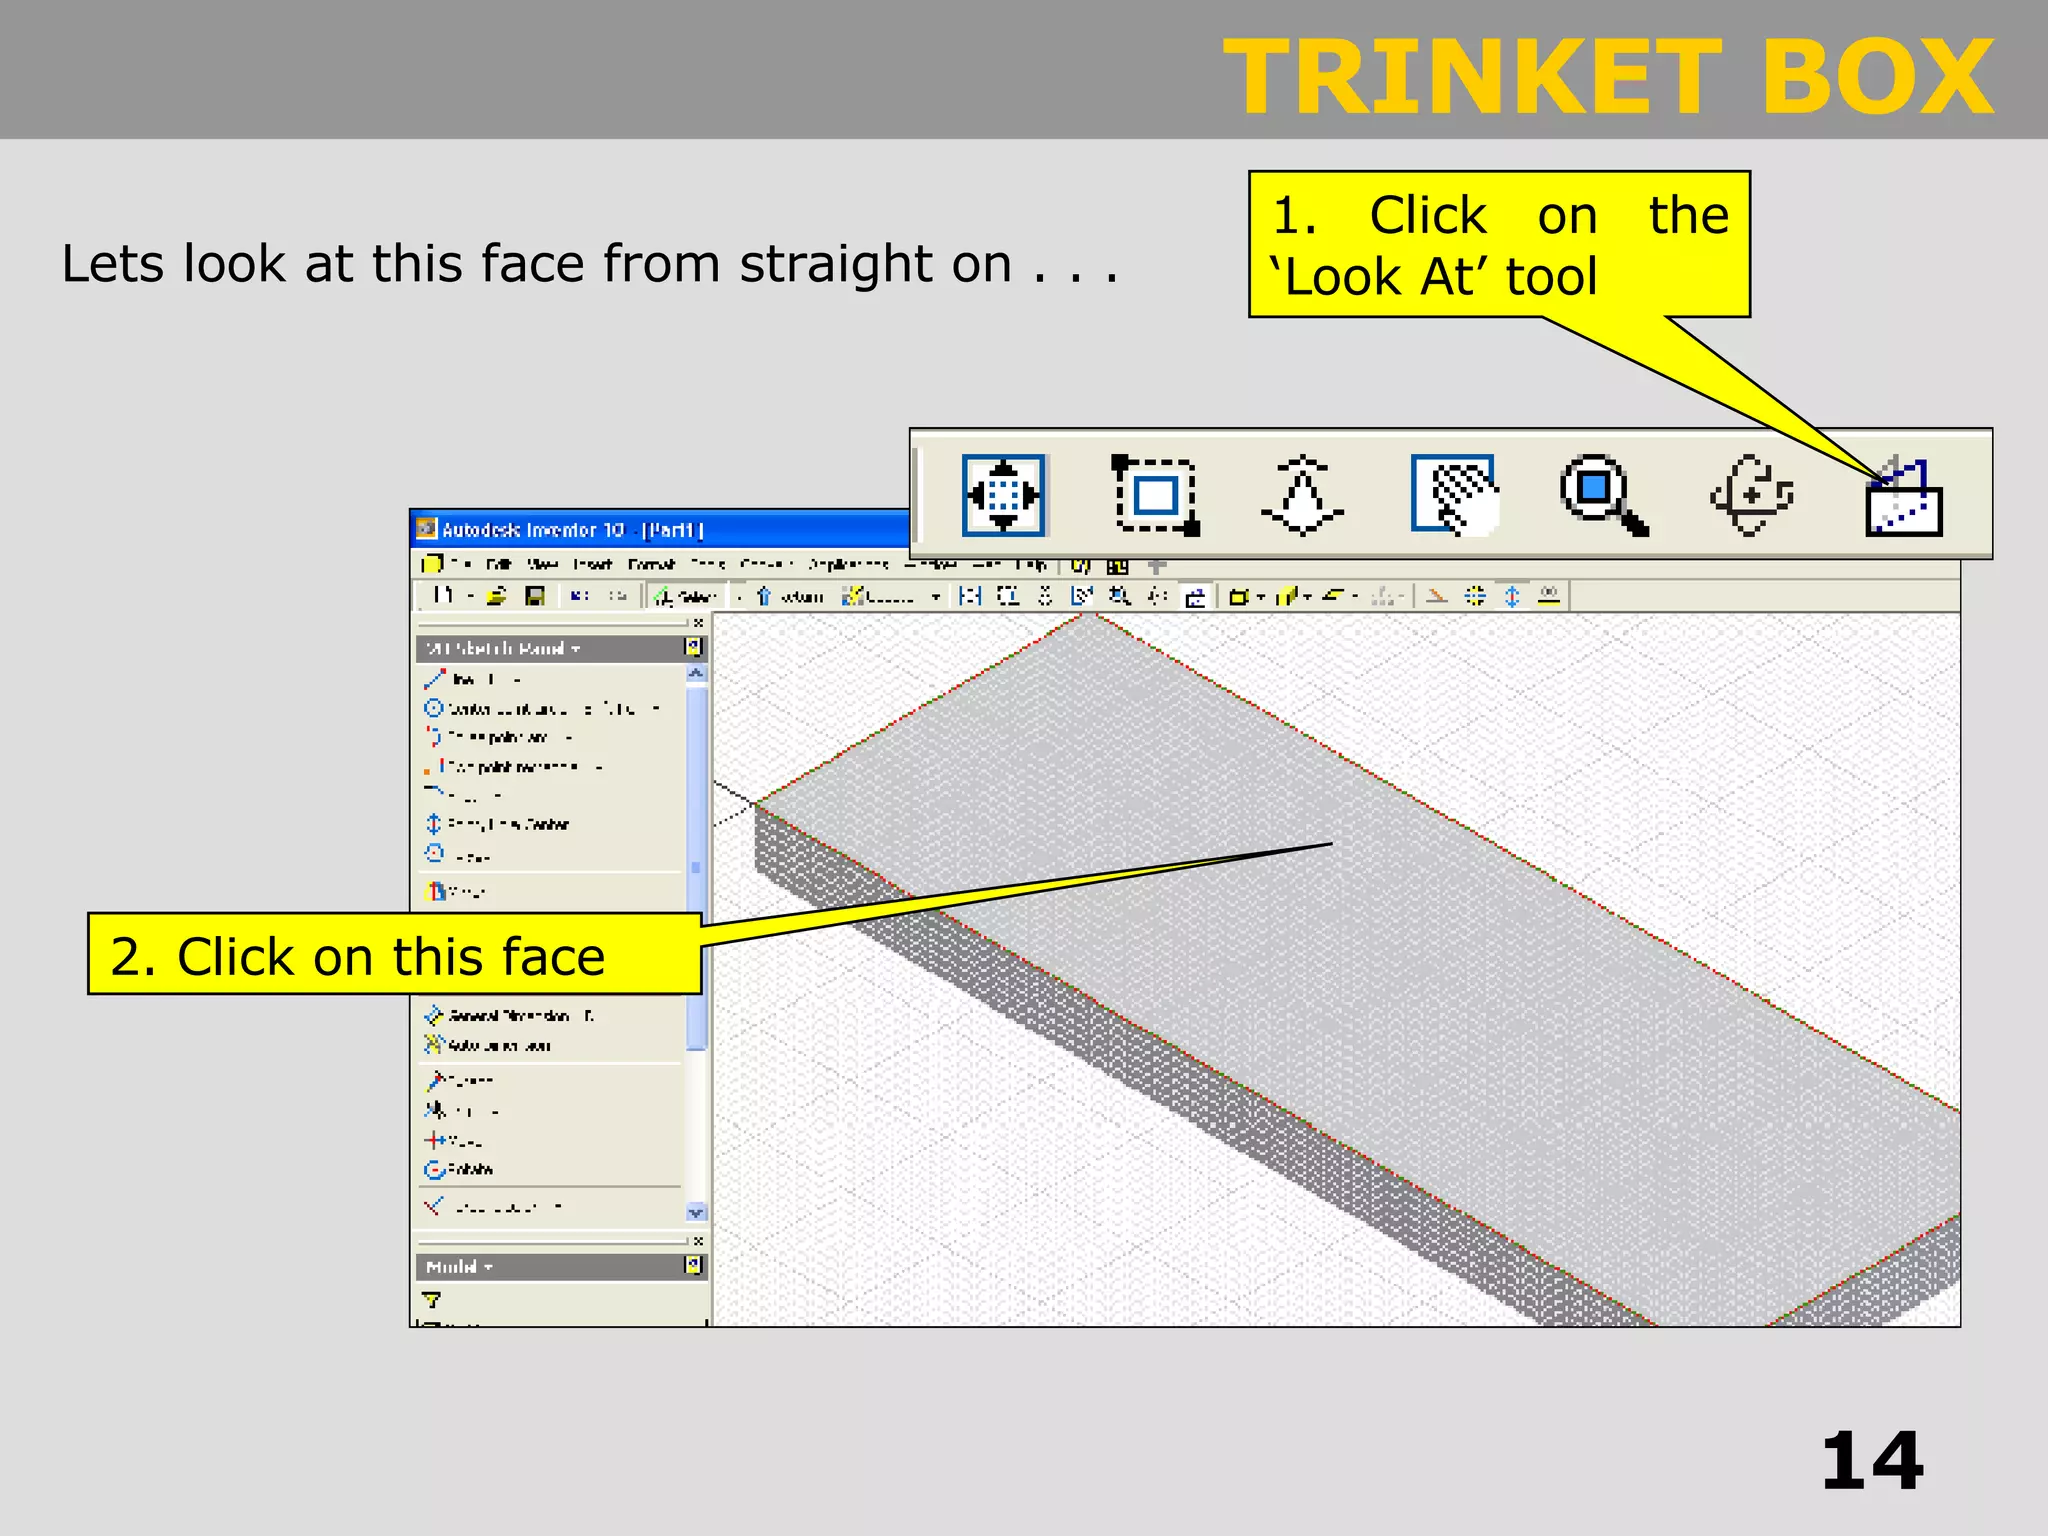
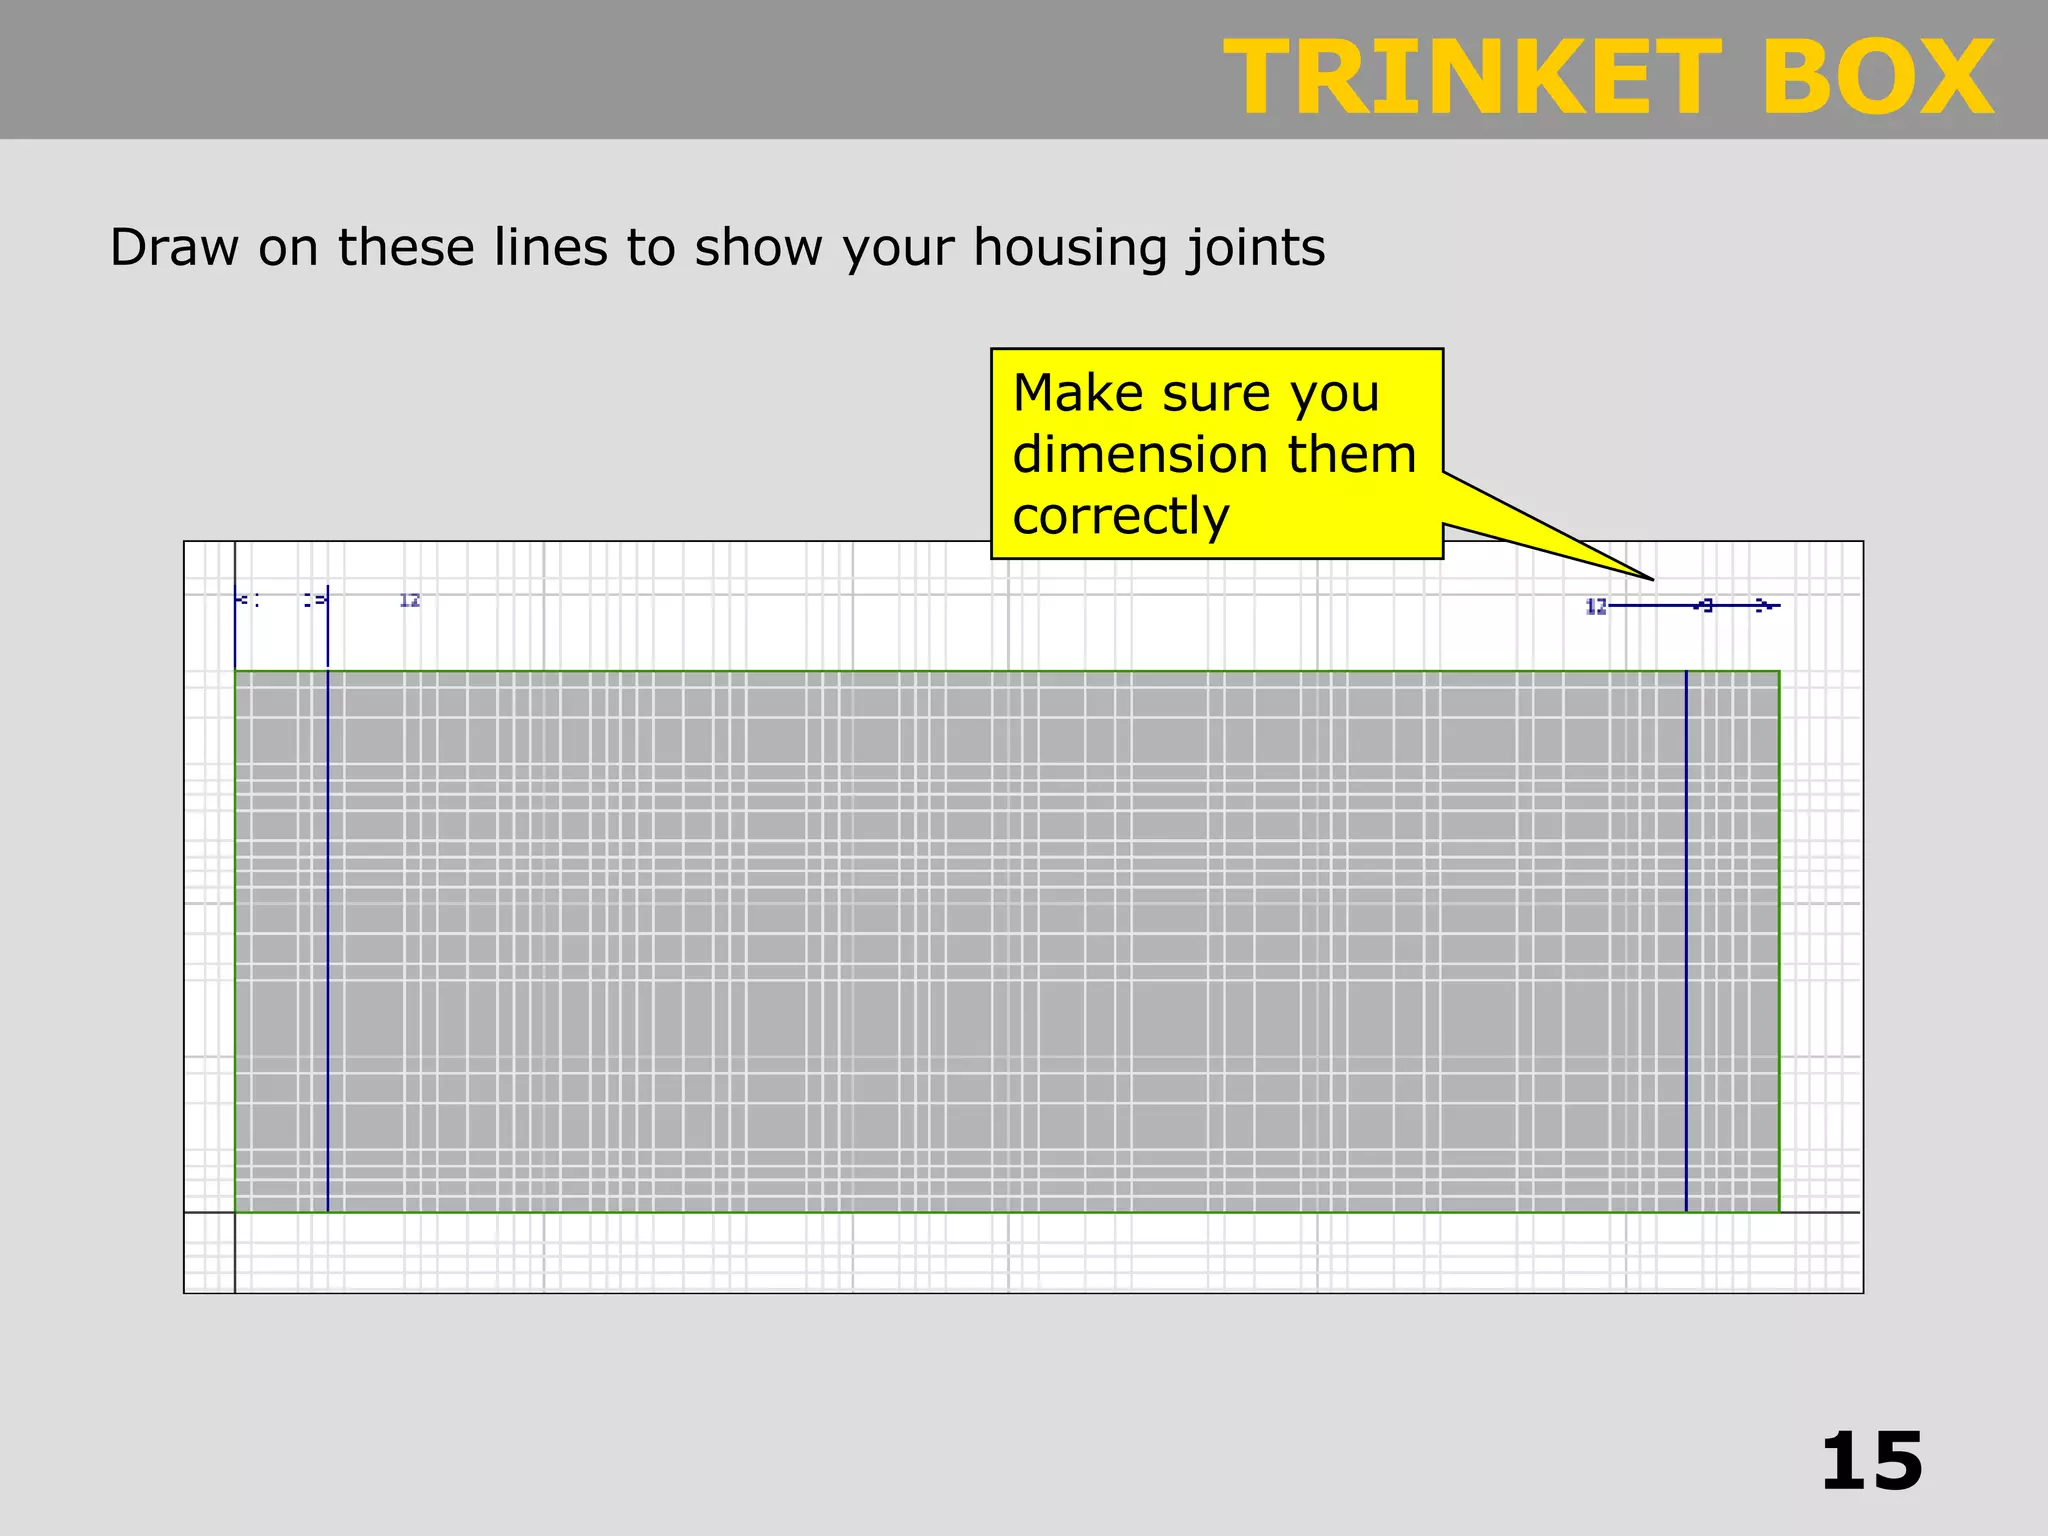
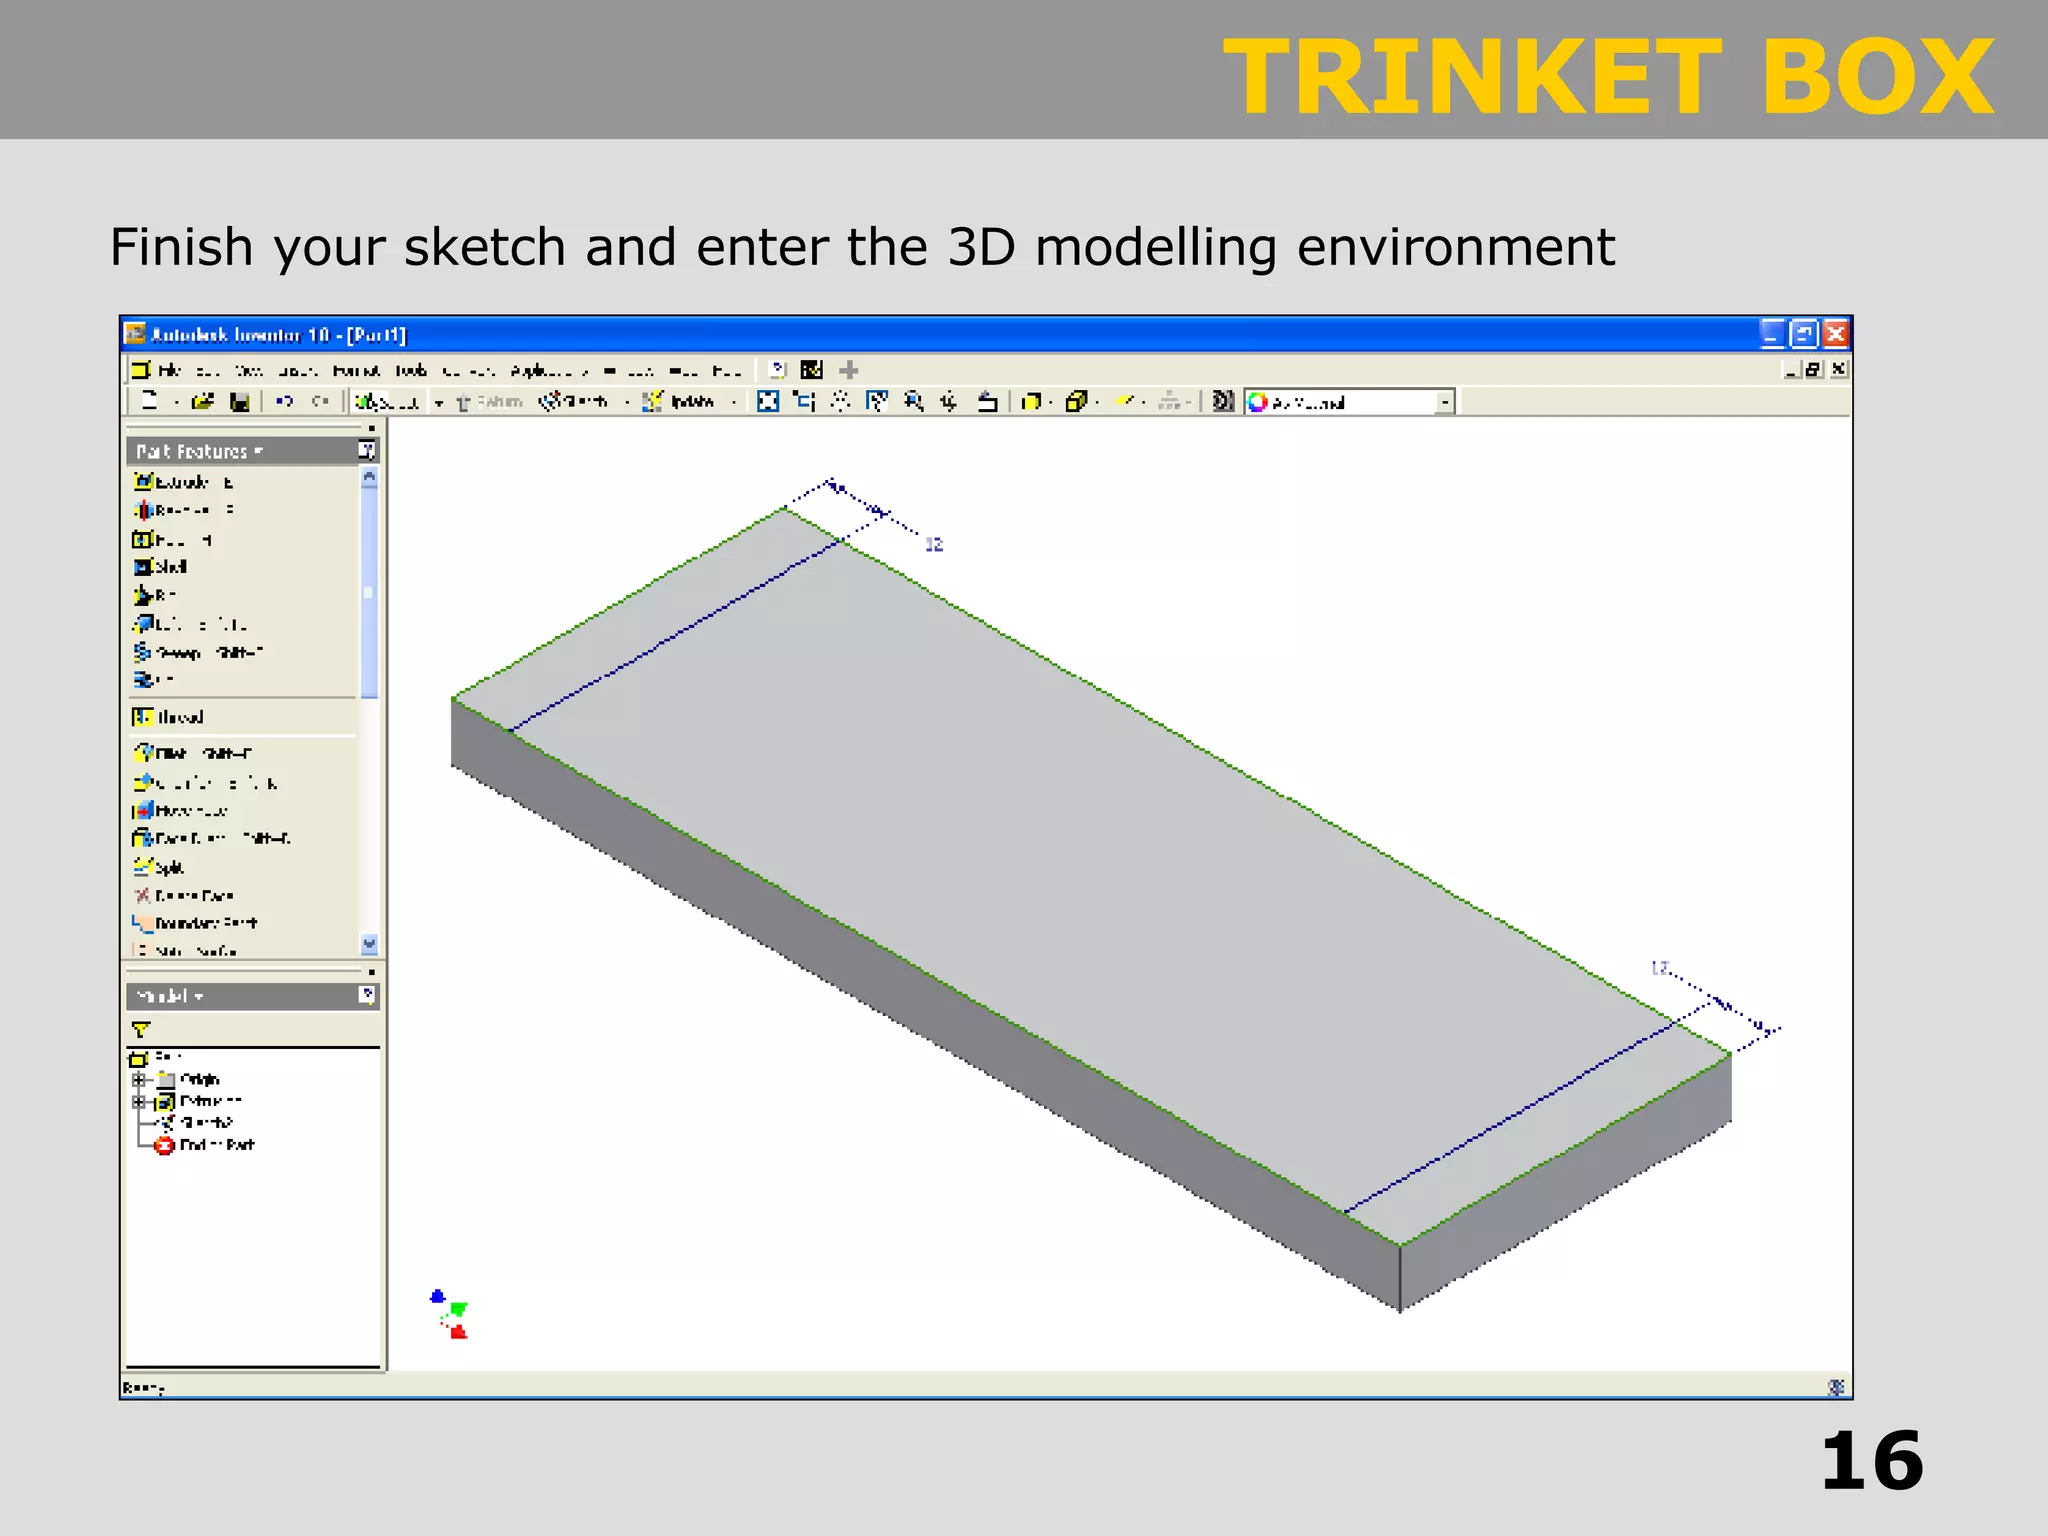
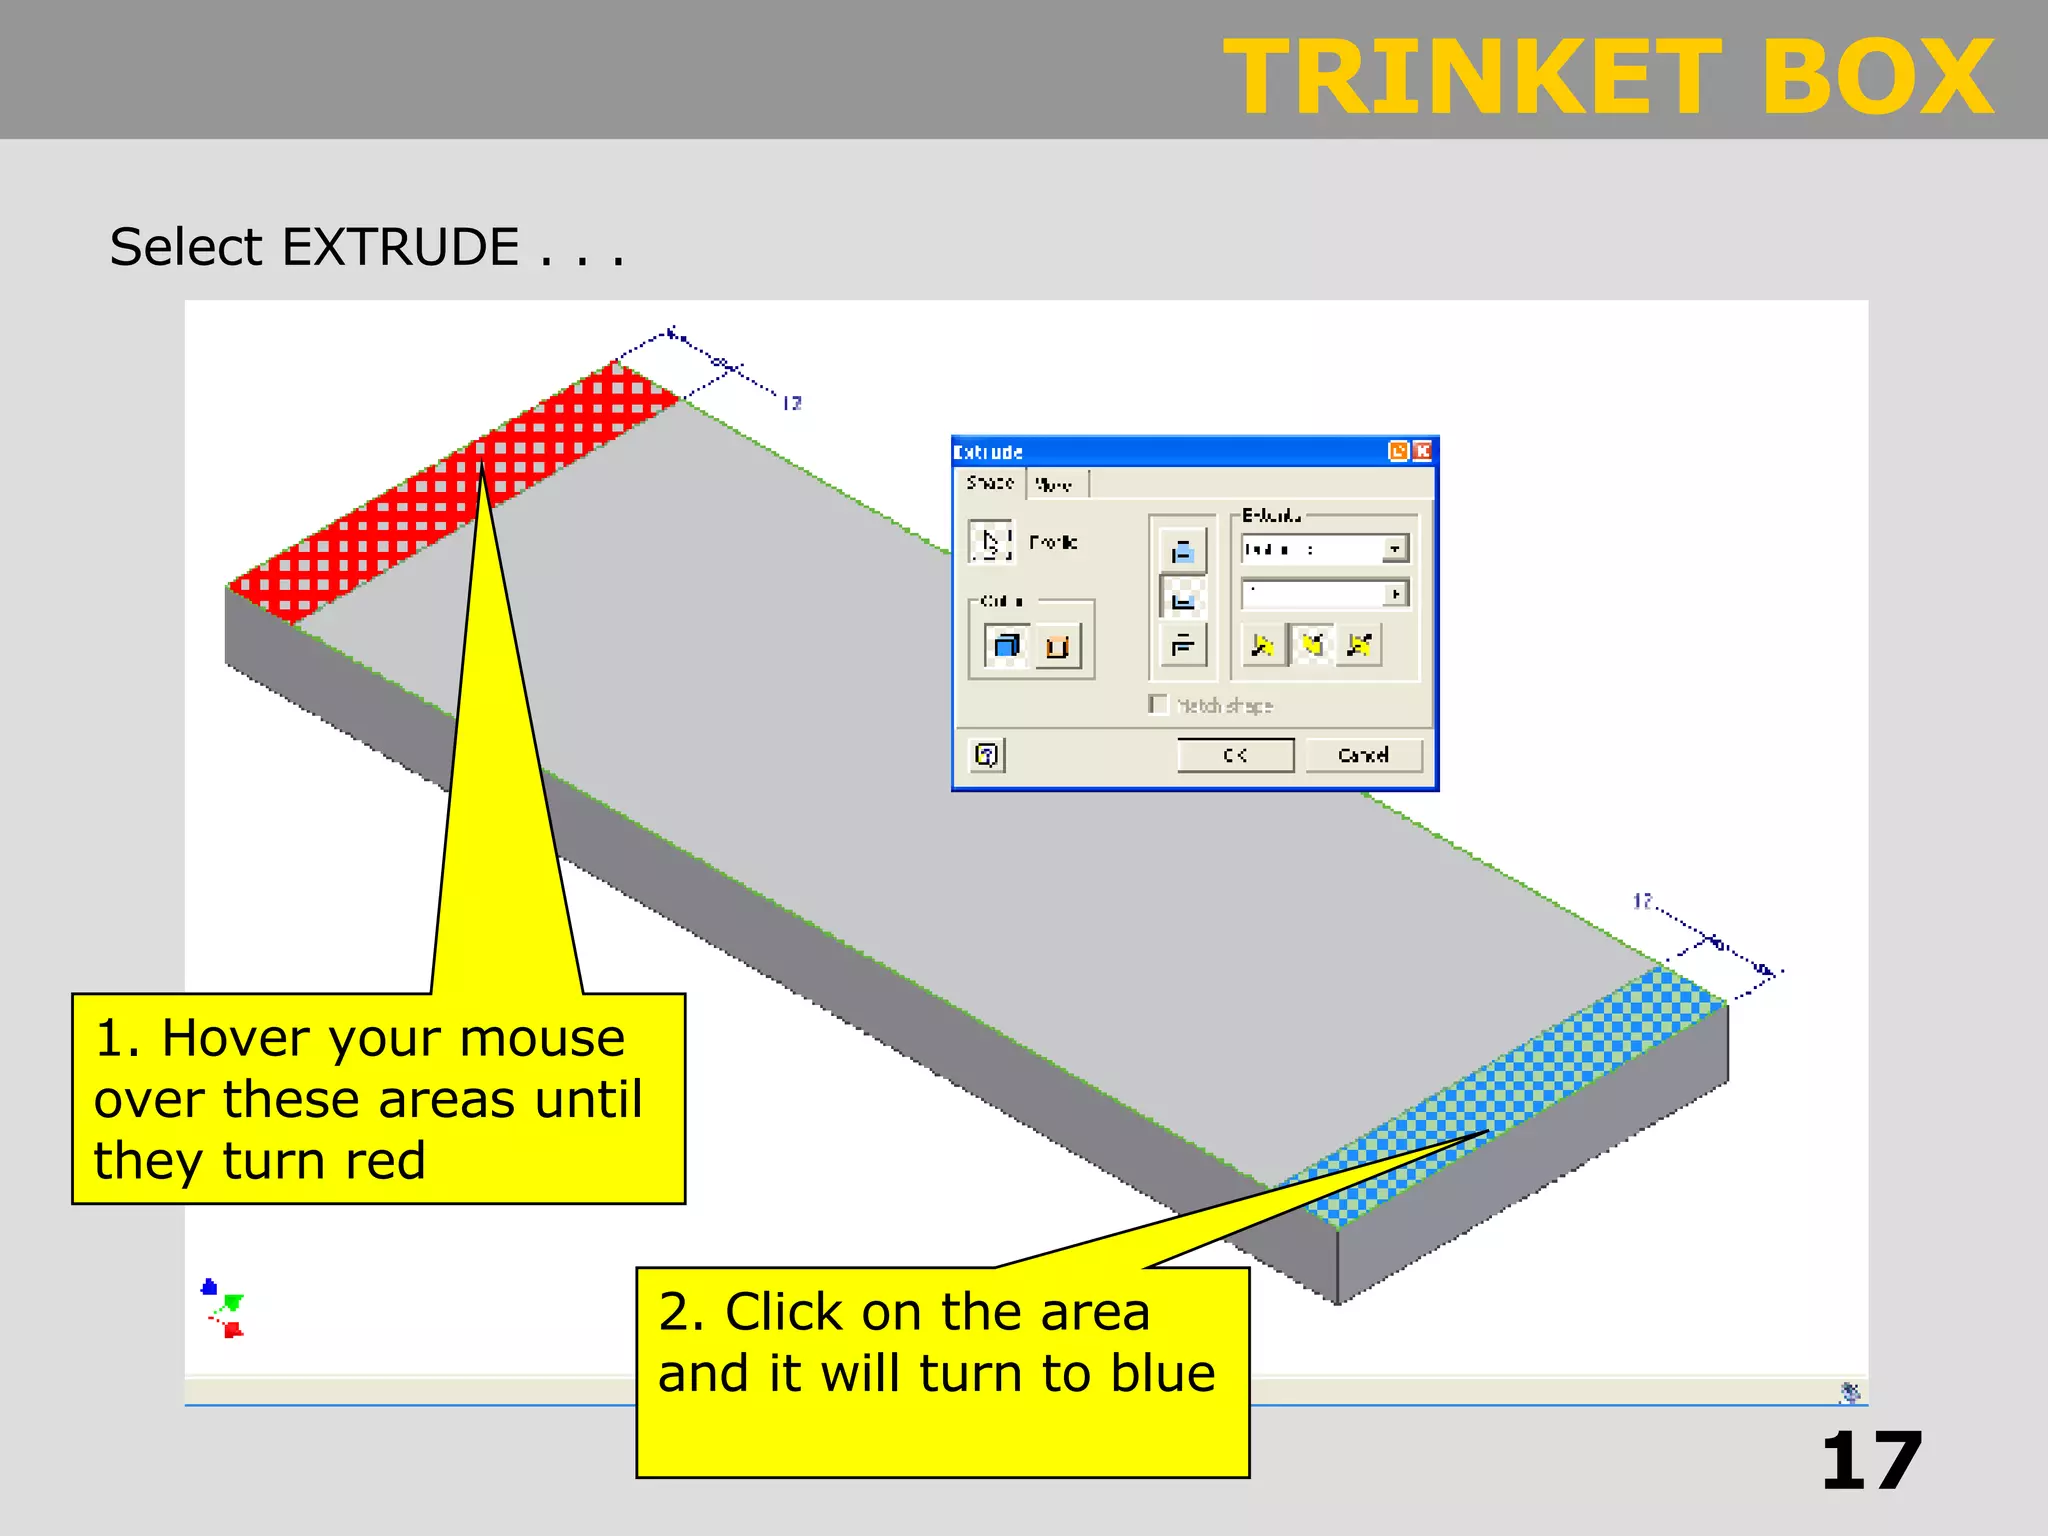
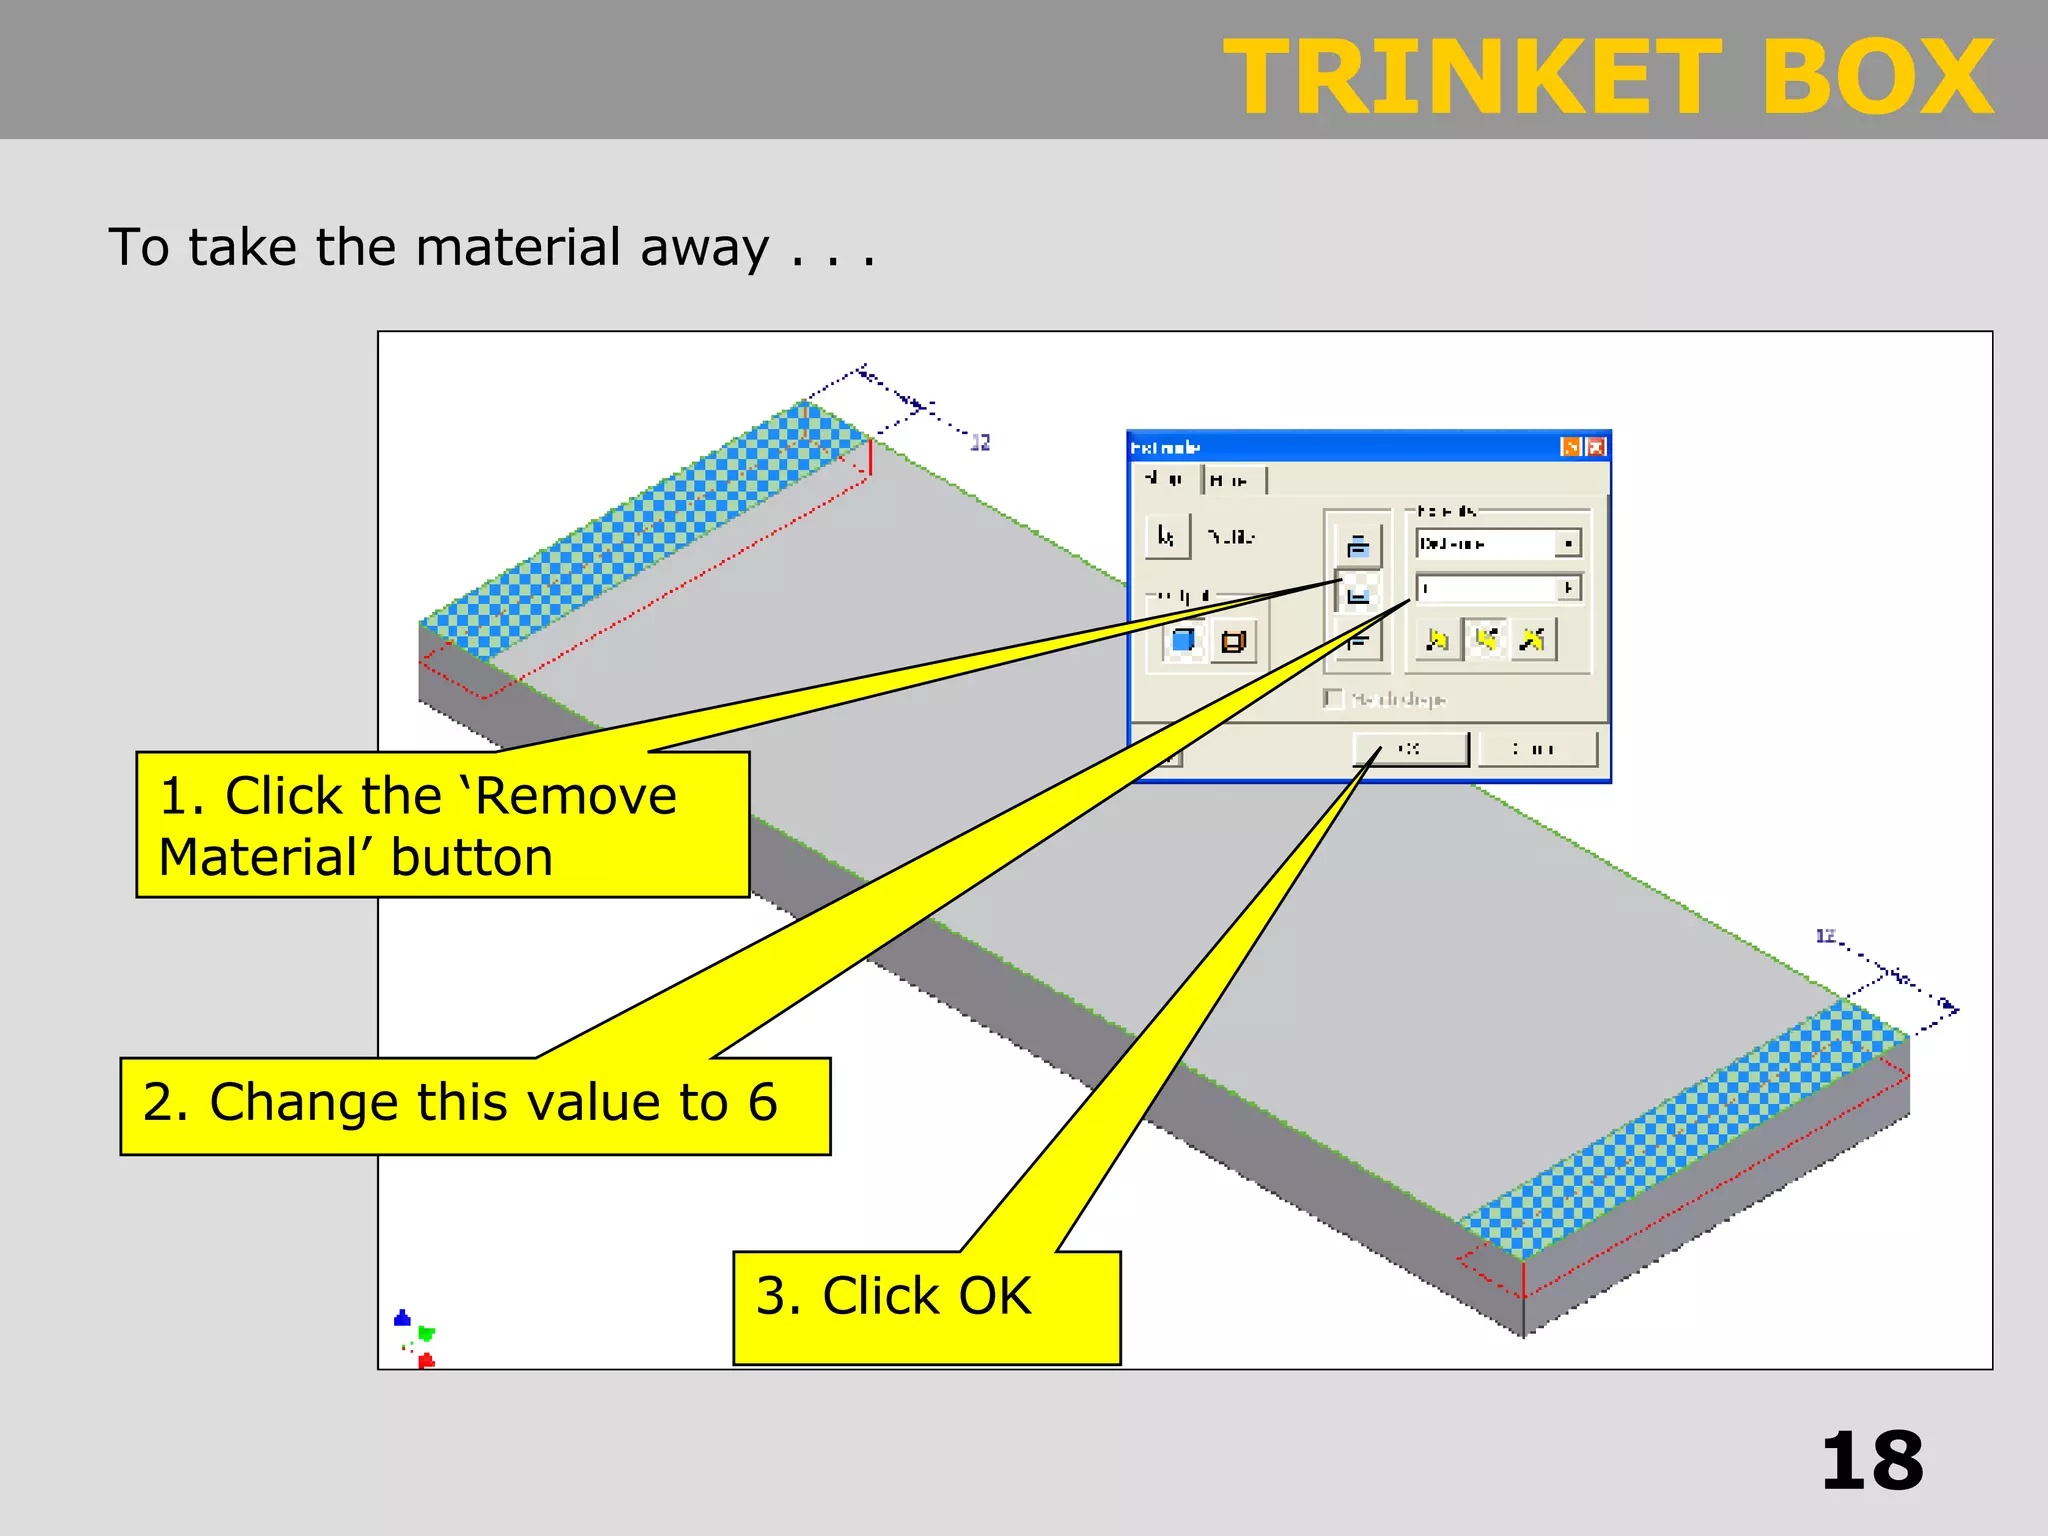
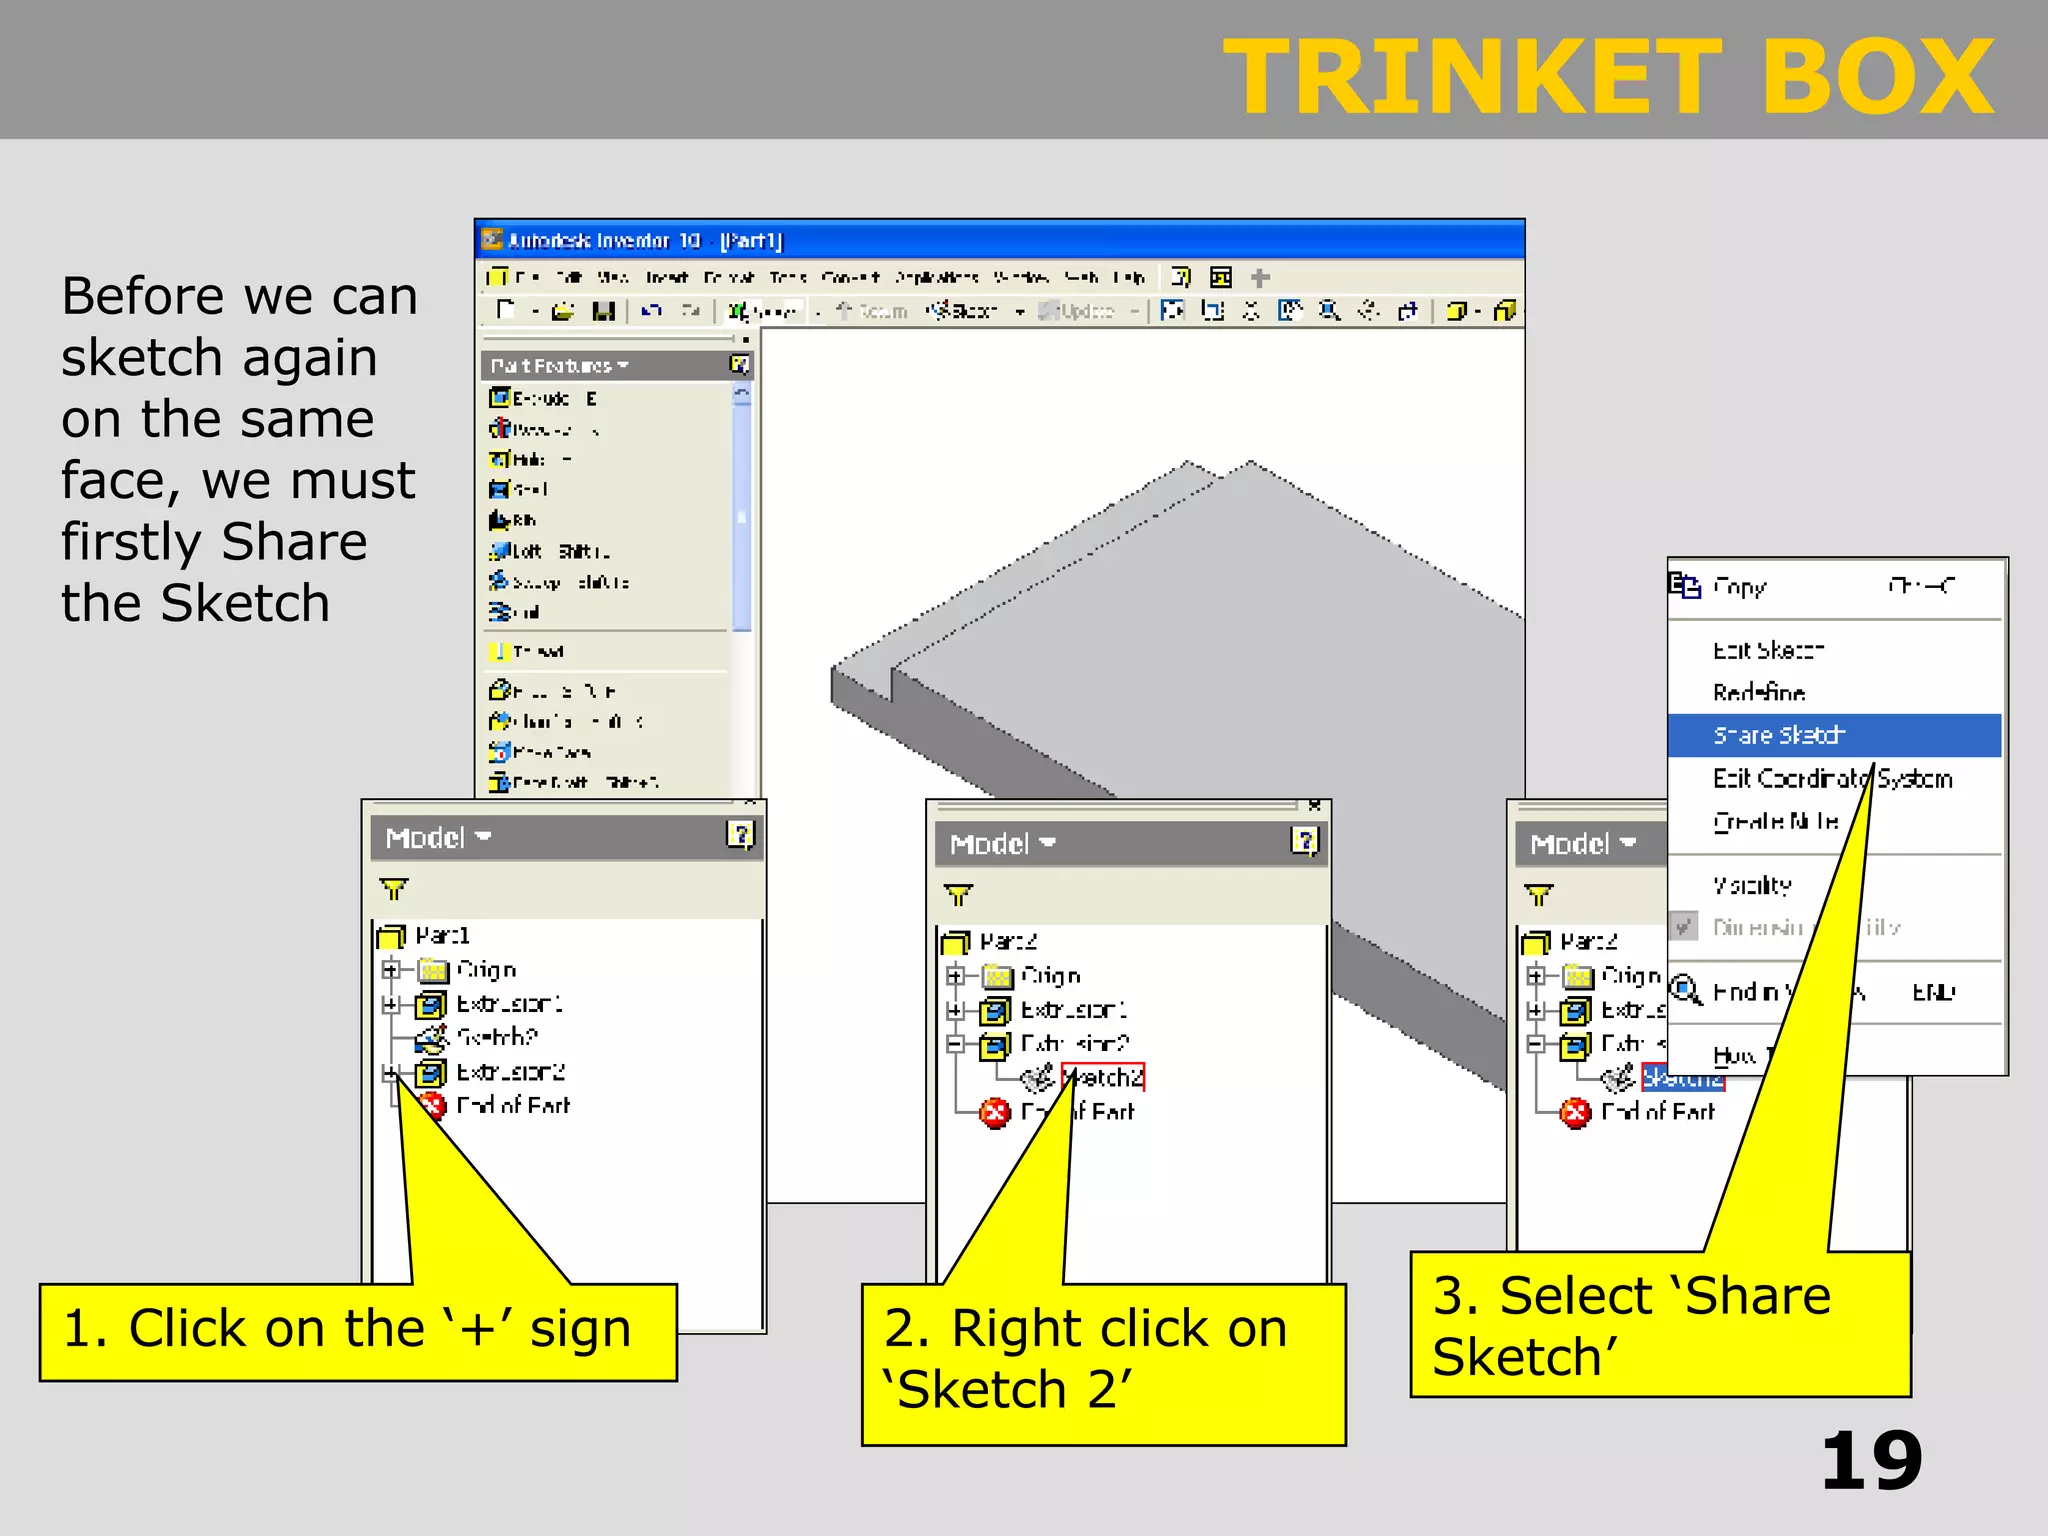
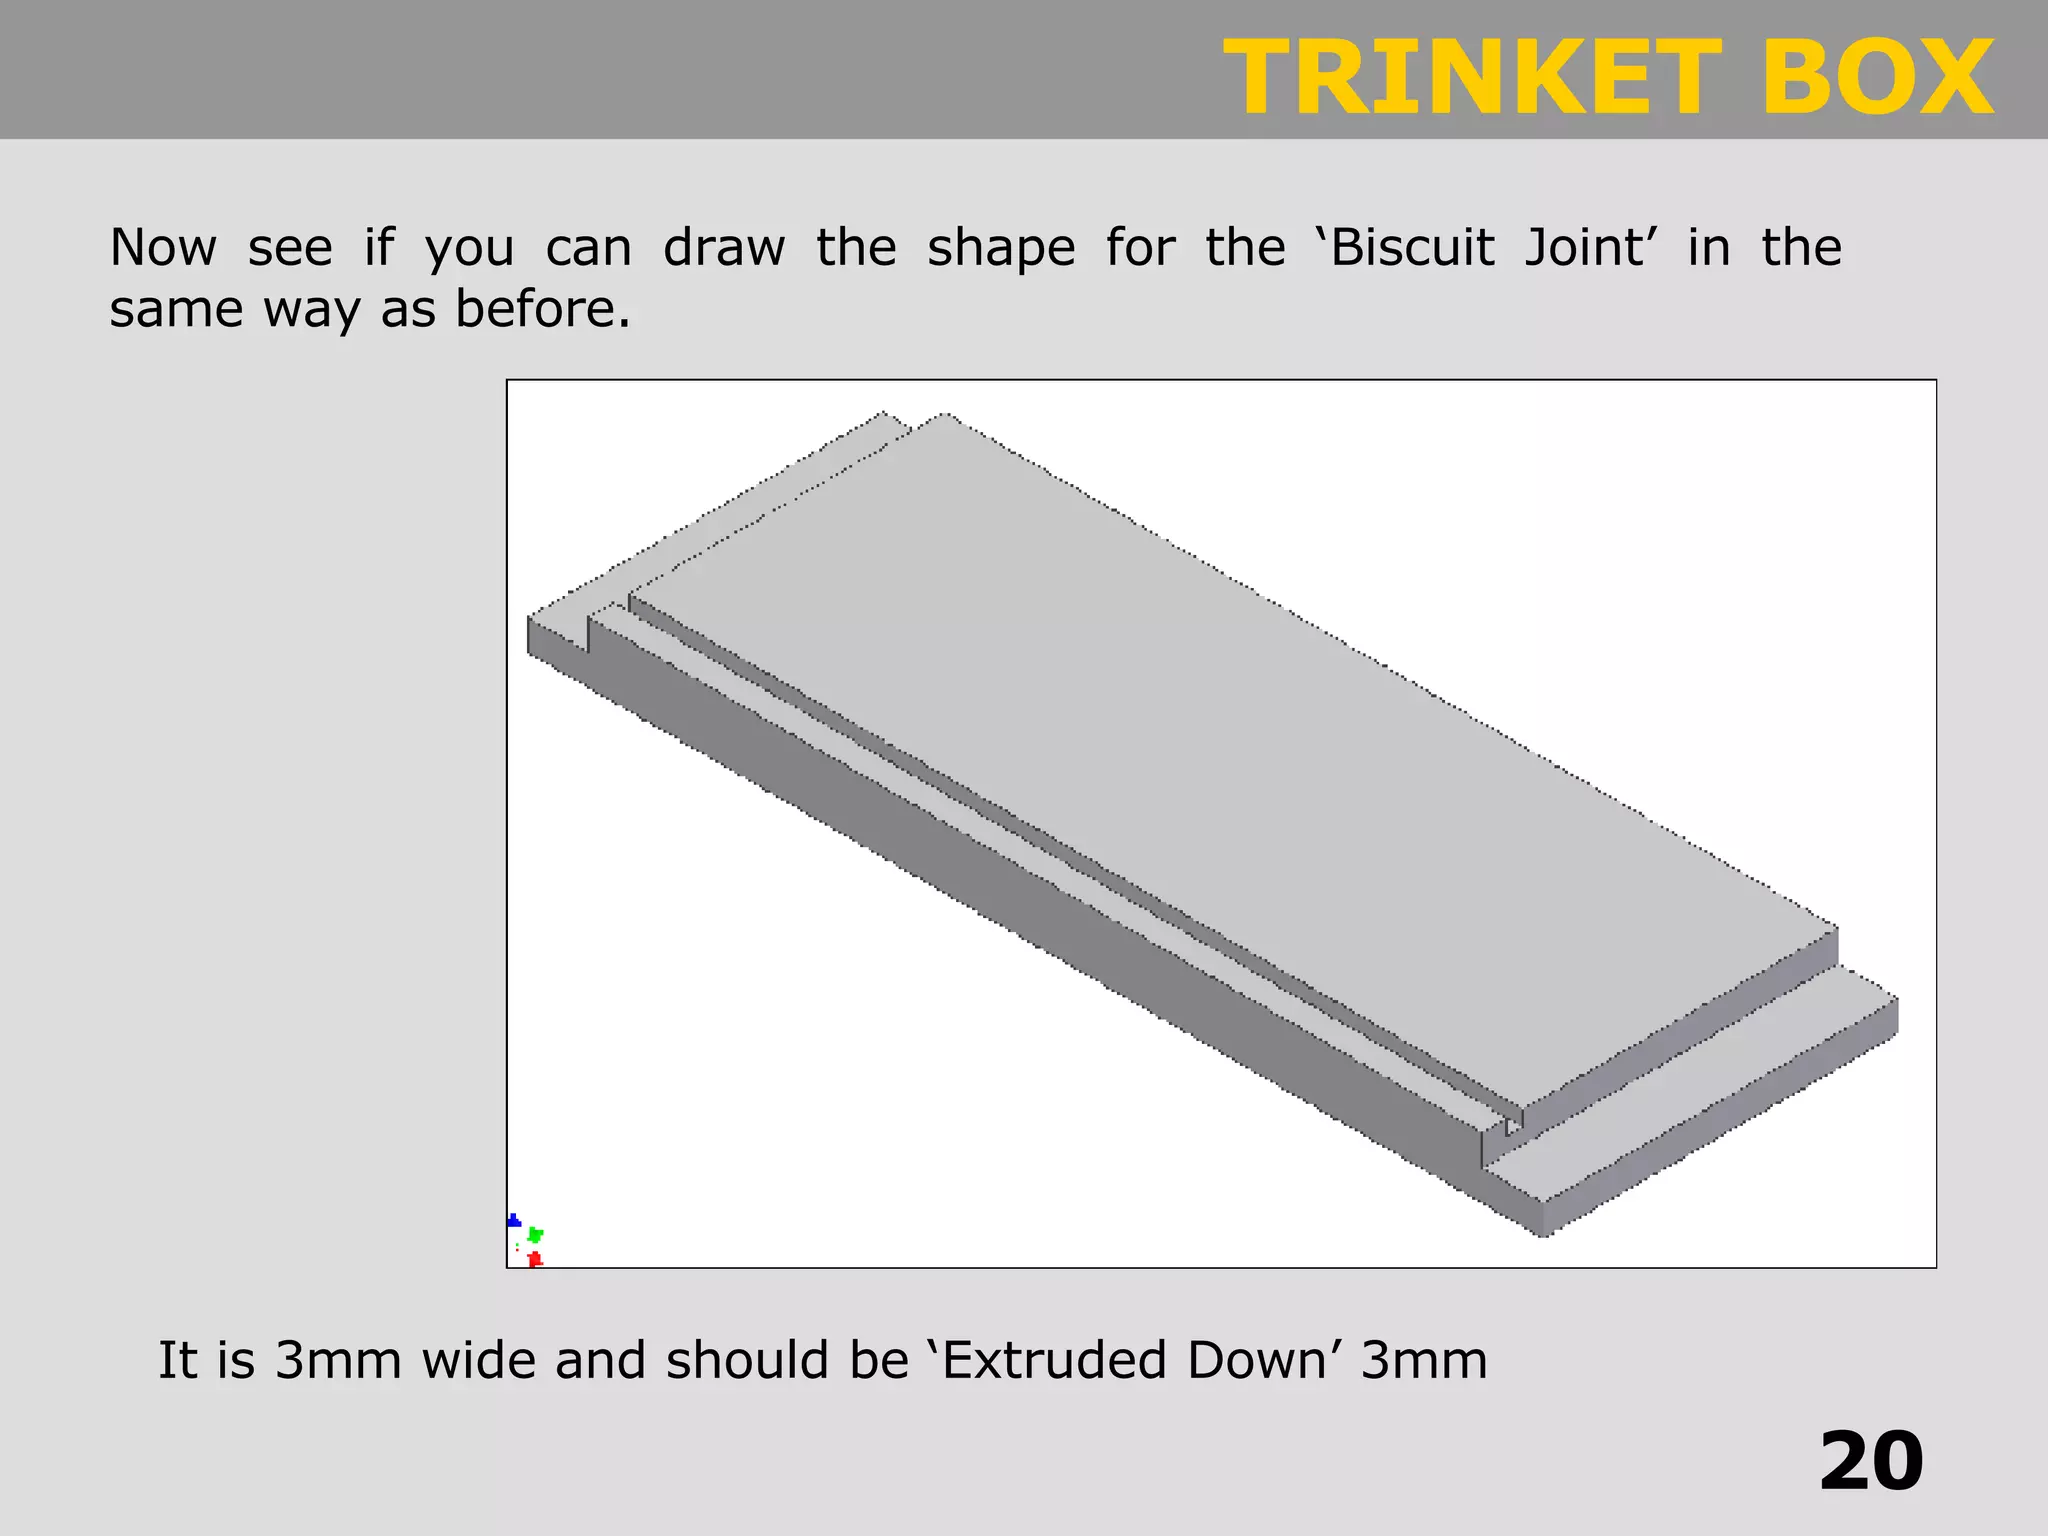
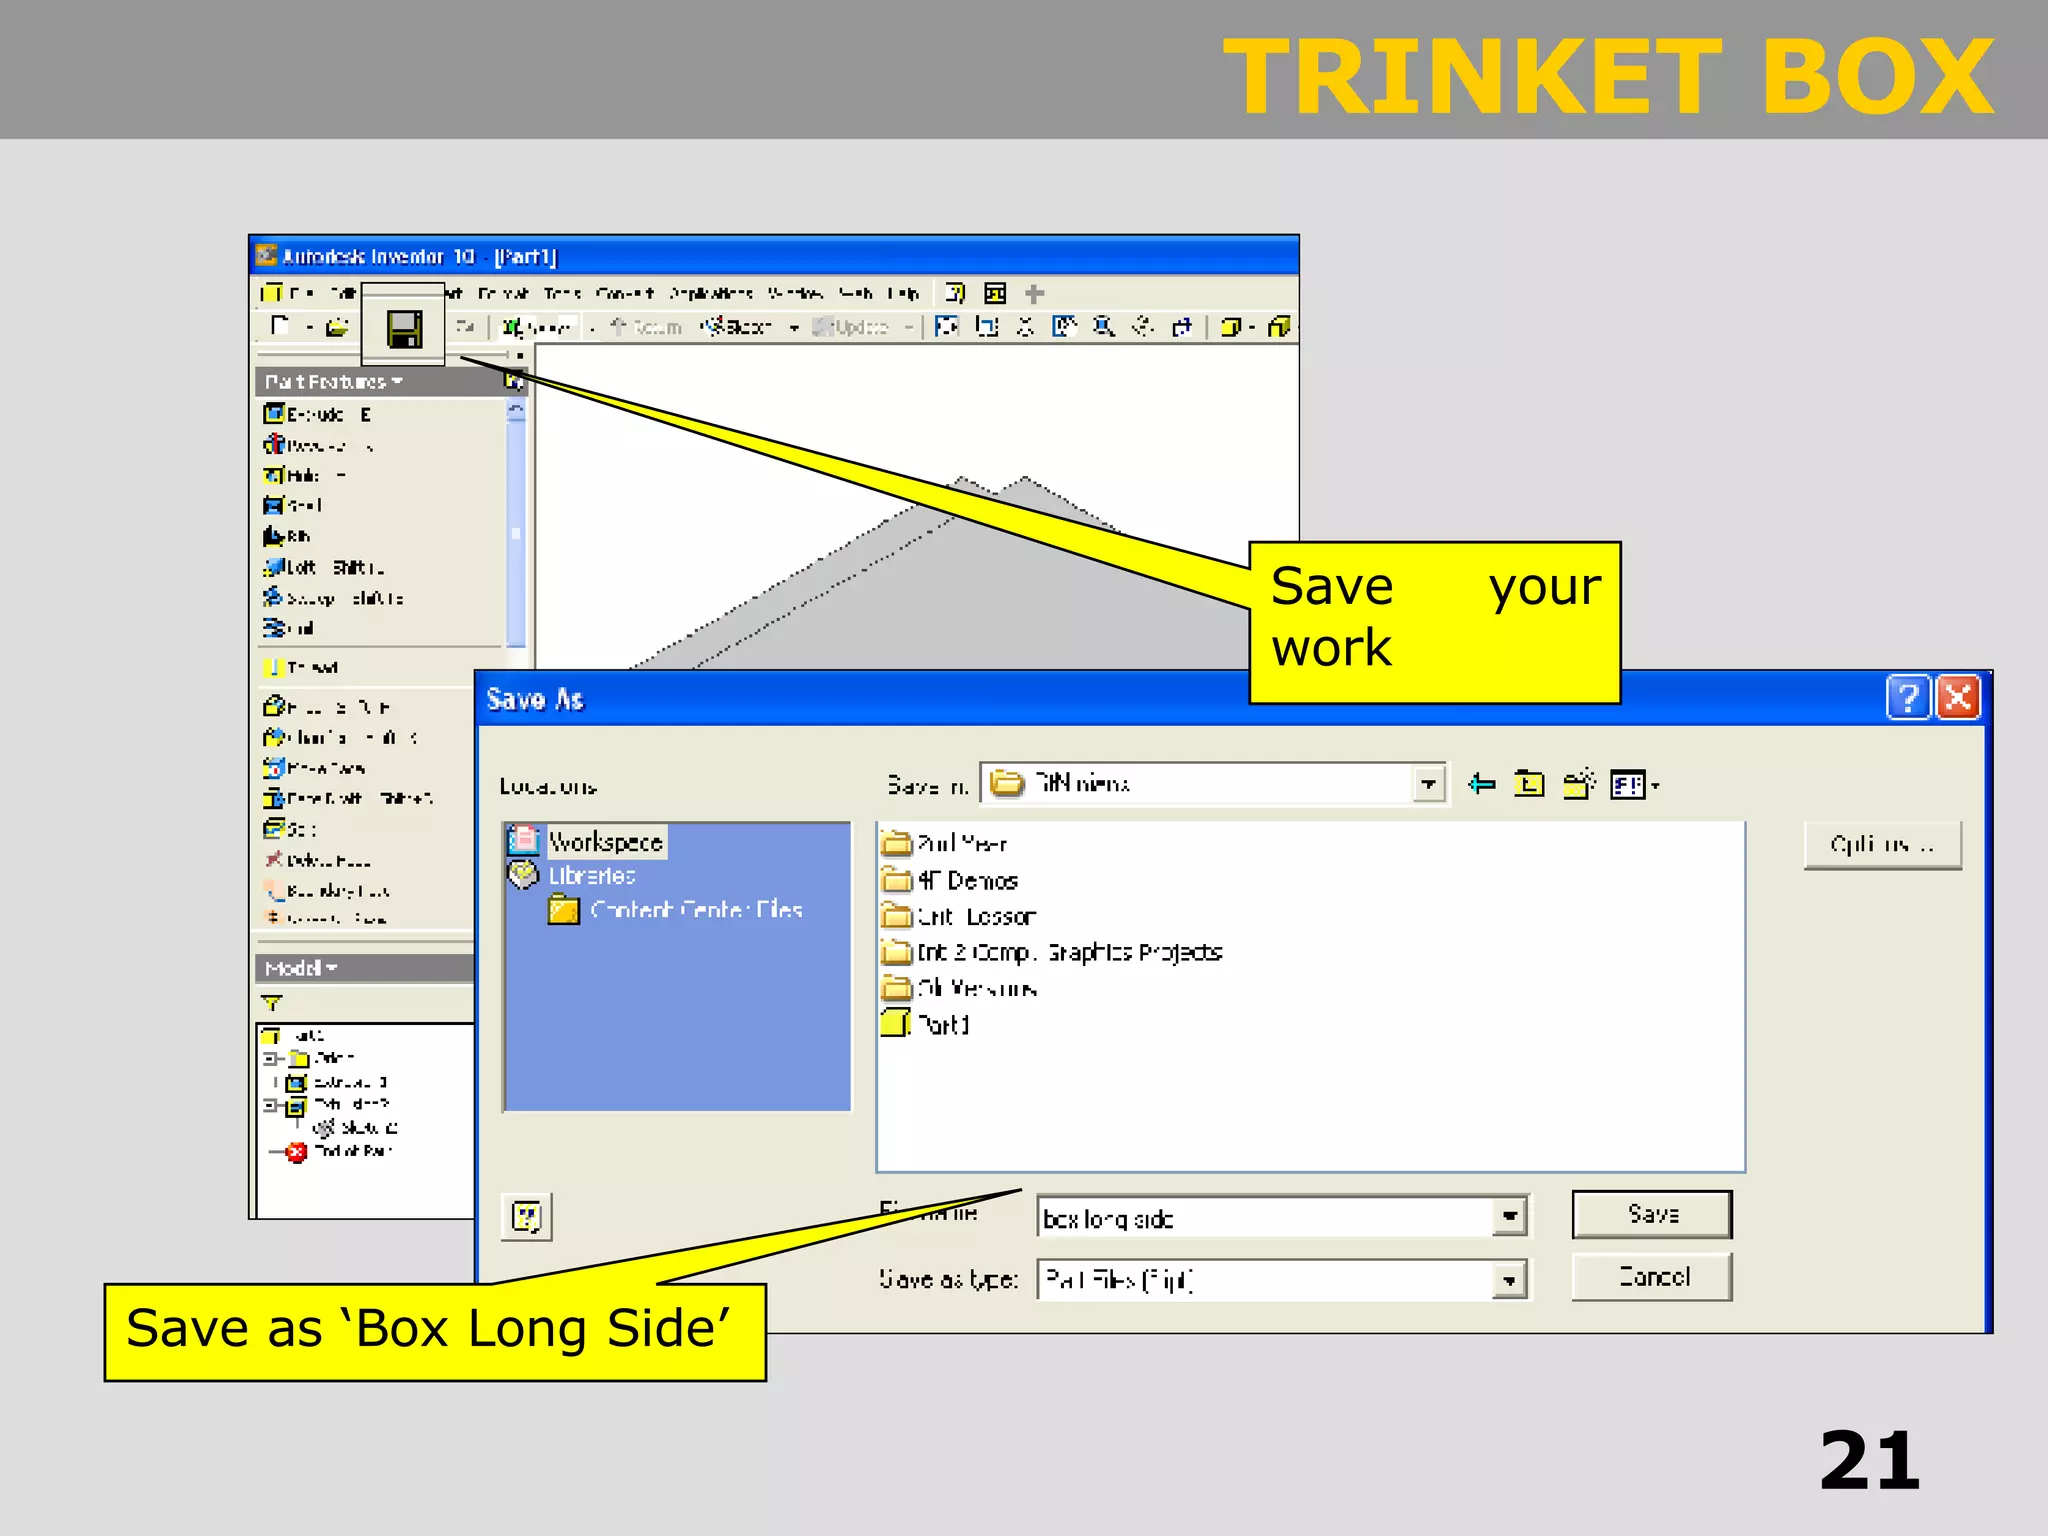
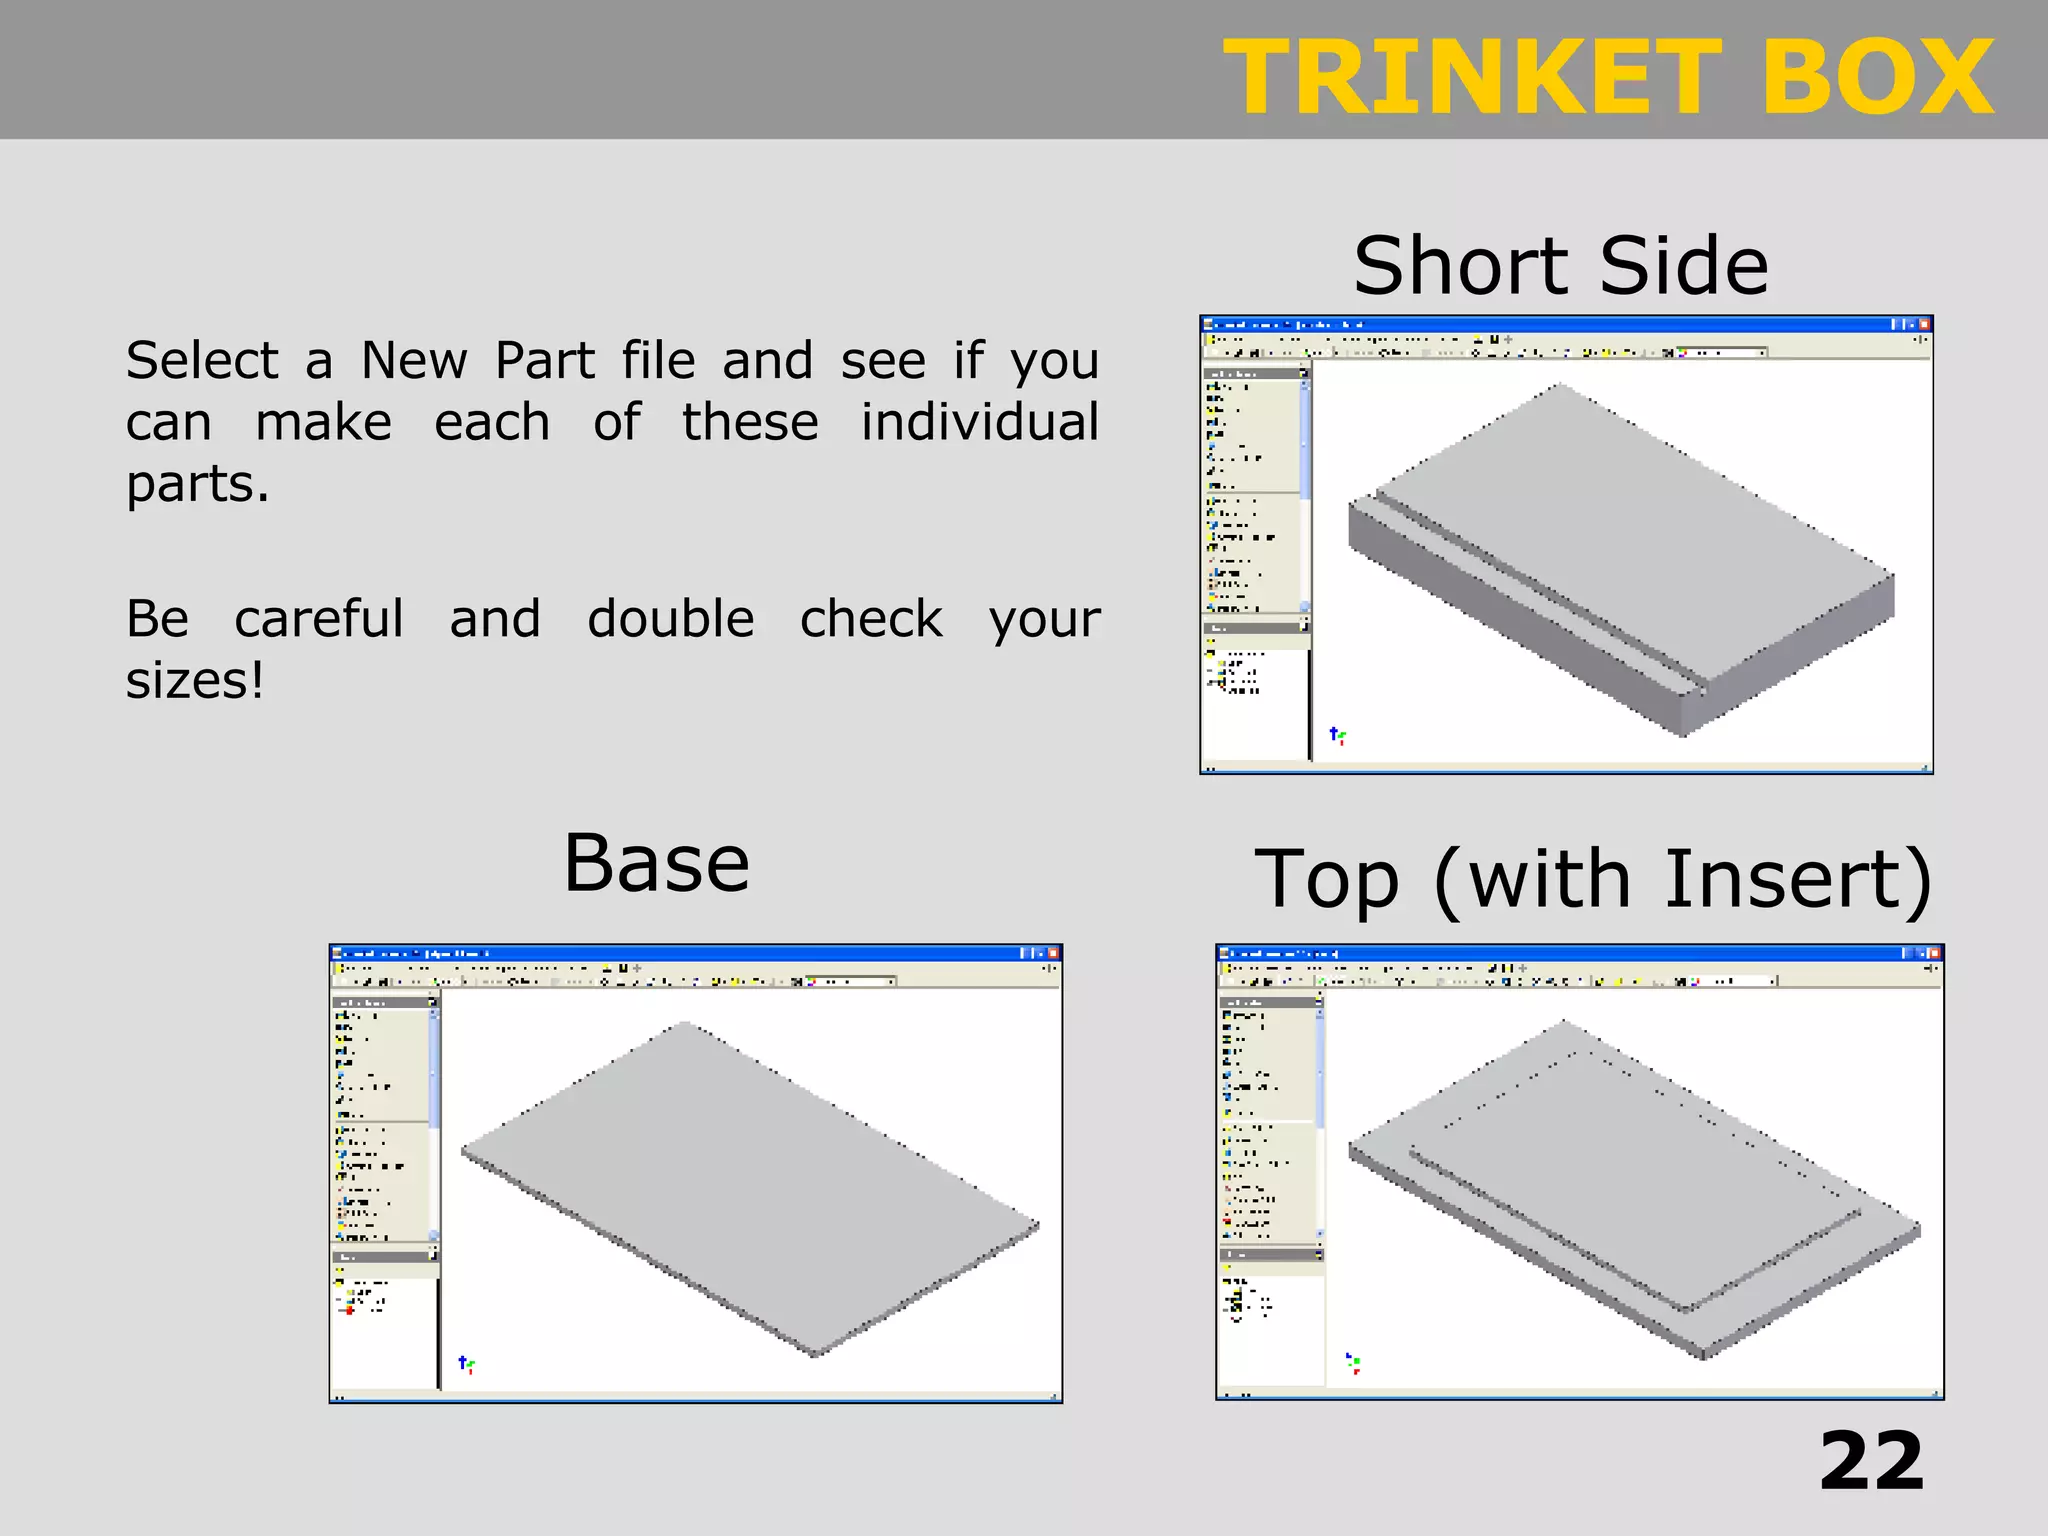
SlideShare a Scribd company logo
 
After double clicking on the Inventor Icon on your desktop, this screen will appear 1. Click on the Metric Tab 2. Double click on the ‘Standard ipt’
3  – This is the Browser Bar – this shows the model history and allows you to modify your model 1  – This is the Standard Toolbar 2  – This is the Panel Bar Area – it controls most of the Part features This is the 2d–Sketch Panel. This is where you will do all of your sketching and dimensioning in 2D.
1   Click on the Two Point Rectangle tool 2. Click on your screen and drag and draw a rectangle of any size You are now going to draw one side of your box. This will be the side that has the ‘Housing Joints’ cut out of it.
Hover your mouse over the line you want to dimension so that it turns red
Hover your mouse over the line you want to dimension so that it turns red Click on the dimension tool
1. Click on the line and drag and drop the dimension line anywhere on the screen 2. Single Click on the dimension line and change the value in this box to 70mm 3. Click the green check box
Dimension the length of your side. Make sure it is the actual size of your box! Once finished, right click and select Done. This is Very Important
We are now ready to finish the 2D Sketch and enter the 3D Modelling environment Right click on the screen and select ‘Finish Sketch’
The panel bar has changed to show 3d modelling tools The 2D Grid disappears and the panel bar changes to ‘Part Features’
To see everything that you have created…  Click on the ‘Zoom All’ tool Right click anywhere on the screen and select ‘Isometric View’ Lets change the view to Isometric. This is always a handy view to view your model in.
1. Click the extrude button We will use the extrude feature to make our model 3D Inventor automatically selects the profile we have drawn and extrudes it 10mm. A preview of this is shown on the screen 2. Set this value to 12mm 3. Click OK
We are now going to draw the sections to ‘Cut Out’ for the joints 1. Right click on this face 2. Select ‘New Sketch’
Lets look at this face from straight on . . . 1. Click on the ‘Look At’ tool 2. Click on this face
Draw on these lines to show your housing joints Make sure you dimension them correctly
Finish your sketch and enter the 3D modelling environment
1. Hover your mouse over these areas until they turn red 2. Click on the area and it will turn to blue Select EXTRUDE . . .
To take the material away . . . 1. Click the ‘Remove Material’ button 2. Change this value to 6 3. Click OK
1. Click on the ‘+’ sign 2. Right click on ‘Sketch 2’ 3. Select ‘Share Sketch’ Before we can sketch again on the same face, we must firstly Share the Sketch
Now see if you can draw the shape for the ‘Biscuit Joint’ in the same way as before. It is 3mm wide and should be ‘Extruded Down’ 3mm
Save your work Save as ‘Box Long Side’
Short Side Base Top (with Insert) Select a New Part file and see if you can make each of these individual parts. Be careful and double check your sizes!

More Related Content

What's hot

Diamond text
Diamond textDiamond text
Diamond text
sumitavaghosh2
 
Lesson 9
Lesson 9Lesson 9
Lesson 9
CDI Aljeer
 
Lesson4 designinganametag
Lesson4 designinganametagLesson4 designinganametag
Lesson4 designinganametag
CDI Aljeer
 
Lesson6
Lesson6Lesson6
Lesson6
CDI Aljeer
 
Photoshop level 2 part 1
Photoshop level  2 part 1Photoshop level  2 part 1
Photoshop level 2 part 1
SarahSherwood
 
Sim autocad
Sim autocadSim autocad
Lesson8
Lesson8Lesson8
Lesson8
CDI Aljeer
 
Adobe Flash CS4 - Shape tween
Adobe Flash CS4 - Shape tweenAdobe Flash CS4 - Shape tween
Adobe Flash CS4 - Shape tween
Fatima AlSaadi
 
Owl Clock
Owl ClockOwl Clock
Owl Clock
Adil Jafri
 
Making a Circular Cropping in Photoshop
Making a Circular Cropping in PhotoshopMaking a Circular Cropping in Photoshop
Making a Circular Cropping in Photoshop
ds2kGTS
 
Writing ED material
Writing ED materialWriting ED material
Writing ED material
ملامح شفافة
 
Lesson 10 pdf
Lesson 10 pdfLesson 10 pdf
Lesson 10 pdf
CDI Aljeer
 
Lesson 11
Lesson 11Lesson 11
Lesson 11
CDI Aljeer
 
Photoshop tutorial
Photoshop tutorialPhotoshop tutorial
Photoshop tutorial
DiamondLSilva
 
Google sketchup8
Google sketchup8Google sketchup8
Google sketchup8
Trianz King
 
Adobe After Effects
Adobe After EffectsAdobe After Effects
Adobe After Effects
Kat350
 
NewTek Lightwave 3D: Modeler II
NewTek Lightwave 3D: Modeler IINewTek Lightwave 3D: Modeler II
NewTek Lightwave 3D: Modeler II
Samuel Edsall
 
3 d,2d
3 d,2d3 d,2d
3 d,2d
nidhis26
 
3 d,2d
3 d,2d3 d,2d
3 d,2d
nidhis26
 
Create a canvas banner in photoshop
Create a canvas banner in photoshopCreate a canvas banner in photoshop
Create a canvas banner in photoshop
NaomiPB
 

What's hot (20)

Diamond text
Diamond textDiamond text
Diamond text
 
Lesson 9
Lesson 9Lesson 9
Lesson 9
 
Lesson4 designinganametag
Lesson4 designinganametagLesson4 designinganametag
Lesson4 designinganametag
 
Lesson6
Lesson6Lesson6
Lesson6
 
Photoshop level 2 part 1
Photoshop level  2 part 1Photoshop level  2 part 1
Photoshop level 2 part 1
 
Sim autocad
Sim autocadSim autocad
Sim autocad
 
Lesson8
Lesson8Lesson8
Lesson8
 
Adobe Flash CS4 - Shape tween
Adobe Flash CS4 - Shape tweenAdobe Flash CS4 - Shape tween
Adobe Flash CS4 - Shape tween
 
Owl Clock
Owl ClockOwl Clock
Owl Clock
 
Making a Circular Cropping in Photoshop
Making a Circular Cropping in PhotoshopMaking a Circular Cropping in Photoshop
Making a Circular Cropping in Photoshop
 
Writing ED material
Writing ED materialWriting ED material
Writing ED material
 
Lesson 10 pdf
Lesson 10 pdfLesson 10 pdf
Lesson 10 pdf
 
Lesson 11
Lesson 11Lesson 11
Lesson 11
 
Photoshop tutorial
Photoshop tutorialPhotoshop tutorial
Photoshop tutorial
 
Google sketchup8
Google sketchup8Google sketchup8
Google sketchup8
 
Adobe After Effects
Adobe After EffectsAdobe After Effects
Adobe After Effects
 
NewTek Lightwave 3D: Modeler II
NewTek Lightwave 3D: Modeler IINewTek Lightwave 3D: Modeler II
NewTek Lightwave 3D: Modeler II
 
3 d,2d
3 d,2d3 d,2d
3 d,2d
 
3 d,2d
3 d,2d3 d,2d
3 d,2d
 
Create a canvas banner in photoshop
Create a canvas banner in photoshopCreate a canvas banner in photoshop
Create a canvas banner in photoshop
 

Similar to Using AutoDesk Inventor to create a Trinket box

Tsa Co2 Solidworks To Mcamx2 Rev 6
Tsa Co2 Solidworks To Mcamx2  Rev 6Tsa Co2 Solidworks To Mcamx2  Rev 6
Tsa Co2 Solidworks To Mcamx2 Rev 6
mike
 
Blender and Bezier Curves for 3D Printing
Blender and Bezier Curves for 3D PrintingBlender and Bezier Curves for 3D Printing
Blender and Bezier Curves for 3D Printing
VickyTGAW
 
Google sketchup8
Google sketchup8Google sketchup8
Google sketchup8
Trianz King
 
AiM Spinner Design Tutorial in Solidworks
AiM Spinner Design Tutorial in SolidworksAiM Spinner Design Tutorial in Solidworks
AiM Spinner Design Tutorial in Solidworks
dsp39
 
Tutorial 1 - Computer Aided Design (Final Release)
Tutorial 1 - Computer Aided Design (Final Release)Tutorial 1 - Computer Aided Design (Final Release)
Tutorial 1 - Computer Aided Design (Final Release)
Charling Li
 
Solidworks apple mouse Design
Solidworks apple mouse DesignSolidworks apple mouse Design
Solidworks apple mouse Design
Ra'uf Tailony
 
Fluid Mechanics Project Assignment (Total 15)  Due Dates  .docx
Fluid Mechanics Project Assignment (Total 15)  Due Dates  .docxFluid Mechanics Project Assignment (Total 15)  Due Dates  .docx
Fluid Mechanics Project Assignment (Total 15)  Due Dates  .docx
bryanwest16882
 
Sketchup basic course by Eng. Khalid A. Mter
Sketchup basic course by Eng. Khalid A. MterSketchup basic course by Eng. Khalid A. Mter
Sketchup basic course by Eng. Khalid A. Mter
khalid mter
 
mastercam_full
mastercam_fullmastercam_full
mastercam_full
tutorialsruby
 
mastercam_full
mastercam_fullmastercam_full
mastercam_full
tutorialsruby
 
SolidWorks mini guide
SolidWorks mini guideSolidWorks mini guide
SolidWorks mini guide
Bolaji Oladipo
 
FEA
FEA FEA
Finite Element Simulation with Ansys Workbench 14
Finite Element Simulation with Ansys Workbench 14Finite Element Simulation with Ansys Workbench 14
Finite Element Simulation with Ansys Workbench 14
Prem Prakash Pandey
 
SnagIt Job Aid
SnagIt Job AidSnagIt Job Aid
SnagIt Job Aid
Brooke Johnson
 
Creo parametric-quick-start
Creo parametric-quick-startCreo parametric-quick-start
Creo parametric-quick-start
P.N.Bhatt +919997960333
 
Powerpoint class 4
Powerpoint class 4Powerpoint class 4
Powerpoint class 4
Nicholas Charles
 
how to use design by software.pptx
how to use design by software.pptxhow to use design by software.pptx
how to use design by software.pptx
NitinKumar12570
 
Adobe illustrator basics
Adobe illustrator basicsAdobe illustrator basics
Adobe illustrator basics
Val Pirch Montgomery
 
coreldrawX7_qucik_guide
coreldrawX7_qucik_guidecoreldrawX7_qucik_guide
coreldrawX7_qucik_guide
Salah Ali
 
ETECH_WEEK7-Image-Manipulation-Techniques-1.pdf
ETECH_WEEK7-Image-Manipulation-Techniques-1.pdfETECH_WEEK7-Image-Manipulation-Techniques-1.pdf
ETECH_WEEK7-Image-Manipulation-Techniques-1.pdf
bongsantiago96
 

Similar to Using AutoDesk Inventor to create a Trinket box (20)

Tsa Co2 Solidworks To Mcamx2 Rev 6
Tsa Co2 Solidworks To Mcamx2  Rev 6Tsa Co2 Solidworks To Mcamx2  Rev 6
Tsa Co2 Solidworks To Mcamx2 Rev 6
 
Blender and Bezier Curves for 3D Printing
Blender and Bezier Curves for 3D PrintingBlender and Bezier Curves for 3D Printing
Blender and Bezier Curves for 3D Printing
 
Google sketchup8
Google sketchup8Google sketchup8
Google sketchup8
 
AiM Spinner Design Tutorial in Solidworks
AiM Spinner Design Tutorial in SolidworksAiM Spinner Design Tutorial in Solidworks
AiM Spinner Design Tutorial in Solidworks
 
Tutorial 1 - Computer Aided Design (Final Release)
Tutorial 1 - Computer Aided Design (Final Release)Tutorial 1 - Computer Aided Design (Final Release)
Tutorial 1 - Computer Aided Design (Final Release)
 
Solidworks apple mouse Design
Solidworks apple mouse DesignSolidworks apple mouse Design
Solidworks apple mouse Design
 
Fluid Mechanics Project Assignment (Total 15)  Due Dates  .docx
Fluid Mechanics Project Assignment (Total 15)  Due Dates  .docxFluid Mechanics Project Assignment (Total 15)  Due Dates  .docx
Fluid Mechanics Project Assignment (Total 15)  Due Dates  .docx
 
Sketchup basic course by Eng. Khalid A. Mter
Sketchup basic course by Eng. Khalid A. MterSketchup basic course by Eng. Khalid A. Mter
Sketchup basic course by Eng. Khalid A. Mter
 
mastercam_full
mastercam_fullmastercam_full
mastercam_full
 
mastercam_full
mastercam_fullmastercam_full
mastercam_full
 
SolidWorks mini guide
SolidWorks mini guideSolidWorks mini guide
SolidWorks mini guide
 
FEA
FEA FEA
FEA
 
Finite Element Simulation with Ansys Workbench 14
Finite Element Simulation with Ansys Workbench 14Finite Element Simulation with Ansys Workbench 14
Finite Element Simulation with Ansys Workbench 14
 
SnagIt Job Aid
SnagIt Job AidSnagIt Job Aid
SnagIt Job Aid
 
Creo parametric-quick-start
Creo parametric-quick-startCreo parametric-quick-start
Creo parametric-quick-start
 
Powerpoint class 4
Powerpoint class 4Powerpoint class 4
Powerpoint class 4
 
how to use design by software.pptx
how to use design by software.pptxhow to use design by software.pptx
how to use design by software.pptx
 
Adobe illustrator basics
Adobe illustrator basicsAdobe illustrator basics
Adobe illustrator basics
 
coreldrawX7_qucik_guide
coreldrawX7_qucik_guidecoreldrawX7_qucik_guide
coreldrawX7_qucik_guide
 
ETECH_WEEK7-Image-Manipulation-Techniques-1.pdf
ETECH_WEEK7-Image-Manipulation-Techniques-1.pdfETECH_WEEK7-Image-Manipulation-Techniques-1.pdf
ETECH_WEEK7-Image-Manipulation-Techniques-1.pdf
 

Recently uploaded

Public CyberSecurity Awareness Presentation 2024.pptx
Public CyberSecurity Awareness Presentation 2024.pptxPublic CyberSecurity Awareness Presentation 2024.pptx
Public CyberSecurity Awareness Presentation 2024.pptx
marufrahmanstratejm
 
Fueling AI with Great Data with Airbyte Webinar
Fueling AI with Great Data with Airbyte WebinarFueling AI with Great Data with Airbyte Webinar
Fueling AI with Great Data with Airbyte Webinar
Zilliz
 
Best 20 SEO Techniques To Improve Website Visibility In SERP
Best 20 SEO Techniques To Improve Website Visibility In SERPBest 20 SEO Techniques To Improve Website Visibility In SERP
Best 20 SEO Techniques To Improve Website Visibility In SERP
Pixlogix Infotech
 
Skybuffer AI: Advanced Conversational and Generative AI Solution on SAP Busin...
Skybuffer AI: Advanced Conversational and Generative AI Solution on SAP Busin...Skybuffer AI: Advanced Conversational and Generative AI Solution on SAP Busin...
Skybuffer AI: Advanced Conversational and Generative AI Solution on SAP Busin...
Tatiana Kojar
 
A Comprehensive Guide to DeFi Development Services in 2024
A Comprehensive Guide to DeFi Development Services in 2024A Comprehensive Guide to DeFi Development Services in 2024
A Comprehensive Guide to DeFi Development Services in 2024
Intelisync
 
Presentation of the OECD Artificial Intelligence Review of Germany
Presentation of the OECD Artificial Intelligence Review of GermanyPresentation of the OECD Artificial Intelligence Review of Germany
Presentation of the OECD Artificial Intelligence Review of Germany
innovationoecd
 
Overcoming the PLG Trap: Lessons from Canva's Head of Sales & Head of EMEA Da...
Overcoming the PLG Trap: Lessons from Canva's Head of Sales & Head of EMEA Da...Overcoming the PLG Trap: Lessons from Canva's Head of Sales & Head of EMEA Da...
Overcoming the PLG Trap: Lessons from Canva's Head of Sales & Head of EMEA Da...
saastr
 
Columbus Data & Analytics Wednesdays - June 2024
Columbus Data & Analytics Wednesdays - June 2024Columbus Data & Analytics Wednesdays - June 2024
Columbus Data & Analytics Wednesdays - June 2024
Jason Packer
 
Let's Integrate MuleSoft RPA, COMPOSER, APM with AWS IDP along with Slack
Let's Integrate MuleSoft RPA, COMPOSER, APM with AWS IDP along with SlackLet's Integrate MuleSoft RPA, COMPOSER, APM with AWS IDP along with Slack
Let's Integrate MuleSoft RPA, COMPOSER, APM with AWS IDP along with Slack
shyamraj55
 
AWS Cloud Cost Optimization Presentation.pptx
AWS Cloud Cost Optimization Presentation.pptxAWS Cloud Cost Optimization Presentation.pptx
AWS Cloud Cost Optimization Presentation.pptx
HarisZaheer8
 
HCL Notes and Domino License Cost Reduction in the World of DLAU
HCL Notes and Domino License Cost Reduction in the World of DLAUHCL Notes and Domino License Cost Reduction in the World of DLAU
HCL Notes and Domino License Cost Reduction in the World of DLAU
panagenda
 
June Patch Tuesday
June Patch TuesdayJune Patch Tuesday
June Patch Tuesday
Ivanti
 
Freshworks Rethinks NoSQL for Rapid Scaling & Cost-Efficiency
Freshworks Rethinks NoSQL for Rapid Scaling & Cost-EfficiencyFreshworks Rethinks NoSQL for Rapid Scaling & Cost-Efficiency
Freshworks Rethinks NoSQL for Rapid Scaling & Cost-Efficiency
ScyllaDB
 
Driving Business Innovation: Latest Generative AI Advancements & Success Story
Driving Business Innovation: Latest Generative AI Advancements & Success StoryDriving Business Innovation: Latest Generative AI Advancements & Success Story
Driving Business Innovation: Latest Generative AI Advancements & Success Story
Safe Software
 
Building Production Ready Search Pipelines with Spark and Milvus
Building Production Ready Search Pipelines with Spark and MilvusBuilding Production Ready Search Pipelines with Spark and Milvus
Building Production Ready Search Pipelines with Spark and Milvus
Zilliz
 
How to Interpret Trends in the Kalyan Rajdhani Mix Chart.pdf
How to Interpret Trends in the Kalyan Rajdhani Mix Chart.pdfHow to Interpret Trends in the Kalyan Rajdhani Mix Chart.pdf
How to Interpret Trends in the Kalyan Rajdhani Mix Chart.pdf
Chart Kalyan
 
JavaLand 2024: Application Development Green Masterplan
JavaLand 2024: Application Development Green MasterplanJavaLand 2024: Application Development Green Masterplan
JavaLand 2024: Application Development Green Masterplan
Miro Wengner
 
Monitoring and Managing Anomaly Detection on OpenShift.pdf
Monitoring and Managing Anomaly Detection on OpenShift.pdfMonitoring and Managing Anomaly Detection on OpenShift.pdf
Monitoring and Managing Anomaly Detection on OpenShift.pdf
Tosin Akinosho
 
Serial Arm Control in Real Time Presentation
Serial Arm Control in Real Time PresentationSerial Arm Control in Real Time Presentation
Serial Arm Control in Real Time Presentation
tolgahangng
 
“Temporal Event Neural Networks: A More Efficient Alternative to the Transfor...
“Temporal Event Neural Networks: A More Efficient Alternative to the Transfor...“Temporal Event Neural Networks: A More Efficient Alternative to the Transfor...
“Temporal Event Neural Networks: A More Efficient Alternative to the Transfor...
Edge AI and Vision Alliance
 

Recently uploaded (20)

Public CyberSecurity Awareness Presentation 2024.pptx
Public CyberSecurity Awareness Presentation 2024.pptxPublic CyberSecurity Awareness Presentation 2024.pptx
Public CyberSecurity Awareness Presentation 2024.pptx
 
Fueling AI with Great Data with Airbyte Webinar
Fueling AI with Great Data with Airbyte WebinarFueling AI with Great Data with Airbyte Webinar
Fueling AI with Great Data with Airbyte Webinar
 
Best 20 SEO Techniques To Improve Website Visibility In SERP
Best 20 SEO Techniques To Improve Website Visibility In SERPBest 20 SEO Techniques To Improve Website Visibility In SERP
Best 20 SEO Techniques To Improve Website Visibility In SERP
 
Skybuffer AI: Advanced Conversational and Generative AI Solution on SAP Busin...
Skybuffer AI: Advanced Conversational and Generative AI Solution on SAP Busin...Skybuffer AI: Advanced Conversational and Generative AI Solution on SAP Busin...
Skybuffer AI: Advanced Conversational and Generative AI Solution on SAP Busin...
 
A Comprehensive Guide to DeFi Development Services in 2024
A Comprehensive Guide to DeFi Development Services in 2024A Comprehensive Guide to DeFi Development Services in 2024
A Comprehensive Guide to DeFi Development Services in 2024
 
Presentation of the OECD Artificial Intelligence Review of Germany
Presentation of the OECD Artificial Intelligence Review of GermanyPresentation of the OECD Artificial Intelligence Review of Germany
Presentation of the OECD Artificial Intelligence Review of Germany
 
Overcoming the PLG Trap: Lessons from Canva's Head of Sales & Head of EMEA Da...
Overcoming the PLG Trap: Lessons from Canva's Head of Sales & Head of EMEA Da...Overcoming the PLG Trap: Lessons from Canva's Head of Sales & Head of EMEA Da...
Overcoming the PLG Trap: Lessons from Canva's Head of Sales & Head of EMEA Da...
 
Columbus Data & Analytics Wednesdays - June 2024
Columbus Data & Analytics Wednesdays - June 2024Columbus Data & Analytics Wednesdays - June 2024
Columbus Data & Analytics Wednesdays - June 2024
 
Let's Integrate MuleSoft RPA, COMPOSER, APM with AWS IDP along with Slack
Let's Integrate MuleSoft RPA, COMPOSER, APM with AWS IDP along with SlackLet's Integrate MuleSoft RPA, COMPOSER, APM with AWS IDP along with Slack
Let's Integrate MuleSoft RPA, COMPOSER, APM with AWS IDP along with Slack
 
AWS Cloud Cost Optimization Presentation.pptx
AWS Cloud Cost Optimization Presentation.pptxAWS Cloud Cost Optimization Presentation.pptx
AWS Cloud Cost Optimization Presentation.pptx
 
HCL Notes and Domino License Cost Reduction in the World of DLAU
HCL Notes and Domino License Cost Reduction in the World of DLAUHCL Notes and Domino License Cost Reduction in the World of DLAU
HCL Notes and Domino License Cost Reduction in the World of DLAU
 
June Patch Tuesday
June Patch TuesdayJune Patch Tuesday
June Patch Tuesday
 
Freshworks Rethinks NoSQL for Rapid Scaling & Cost-Efficiency
Freshworks Rethinks NoSQL for Rapid Scaling & Cost-EfficiencyFreshworks Rethinks NoSQL for Rapid Scaling & Cost-Efficiency
Freshworks Rethinks NoSQL for Rapid Scaling & Cost-Efficiency
 
Driving Business Innovation: Latest Generative AI Advancements & Success Story
Driving Business Innovation: Latest Generative AI Advancements & Success StoryDriving Business Innovation: Latest Generative AI Advancements & Success Story
Driving Business Innovation: Latest Generative AI Advancements & Success Story
 
Building Production Ready Search Pipelines with Spark and Milvus
Building Production Ready Search Pipelines with Spark and MilvusBuilding Production Ready Search Pipelines with Spark and Milvus
Building Production Ready Search Pipelines with Spark and Milvus
 
How to Interpret Trends in the Kalyan Rajdhani Mix Chart.pdf
How to Interpret Trends in the Kalyan Rajdhani Mix Chart.pdfHow to Interpret Trends in the Kalyan Rajdhani Mix Chart.pdf
How to Interpret Trends in the Kalyan Rajdhani Mix Chart.pdf
 
JavaLand 2024: Application Development Green Masterplan
JavaLand 2024: Application Development Green MasterplanJavaLand 2024: Application Development Green Masterplan
JavaLand 2024: Application Development Green Masterplan
 
Monitoring and Managing Anomaly Detection on OpenShift.pdf
Monitoring and Managing Anomaly Detection on OpenShift.pdfMonitoring and Managing Anomaly Detection on OpenShift.pdf
Monitoring and Managing Anomaly Detection on OpenShift.pdf
 
Serial Arm Control in Real Time Presentation
Serial Arm Control in Real Time PresentationSerial Arm Control in Real Time Presentation
Serial Arm Control in Real Time Presentation
 
“Temporal Event Neural Networks: A More Efficient Alternative to the Transfor...
“Temporal Event Neural Networks: A More Efficient Alternative to the Transfor...“Temporal Event Neural Networks: A More Efficient Alternative to the Transfor...
“Temporal Event Neural Networks: A More Efficient Alternative to the Transfor...
 

Using AutoDesk Inventor to create a Trinket box

  • 1.  
  • 2. After double clicking on the Inventor Icon on your desktop, this screen will appear 1. Click on the Metric Tab 2. Double click on the ‘Standard ipt’
  • 3. 3 – This is the Browser Bar – this shows the model history and allows you to modify your model 1 – This is the Standard Toolbar 2 – This is the Panel Bar Area – it controls most of the Part features This is the 2d–Sketch Panel. This is where you will do all of your sketching and dimensioning in 2D.
  • 4. 1 Click on the Two Point Rectangle tool 2. Click on your screen and drag and draw a rectangle of any size You are now going to draw one side of your box. This will be the side that has the ‘Housing Joints’ cut out of it.
  • 5. Hover your mouse over the line you want to dimension so that it turns red
  • 6. Hover your mouse over the line you want to dimension so that it turns red Click on the dimension tool
  • 7. 1. Click on the line and drag and drop the dimension line anywhere on the screen 2. Single Click on the dimension line and change the value in this box to 70mm 3. Click the green check box
  • 8. Dimension the length of your side. Make sure it is the actual size of your box! Once finished, right click and select Done. This is Very Important
  • 9. We are now ready to finish the 2D Sketch and enter the 3D Modelling environment Right click on the screen and select ‘Finish Sketch’
  • 10. The panel bar has changed to show 3d modelling tools The 2D Grid disappears and the panel bar changes to ‘Part Features’
  • 11. To see everything that you have created… Click on the ‘Zoom All’ tool Right click anywhere on the screen and select ‘Isometric View’ Lets change the view to Isometric. This is always a handy view to view your model in.
  • 12. 1. Click the extrude button We will use the extrude feature to make our model 3D Inventor automatically selects the profile we have drawn and extrudes it 10mm. A preview of this is shown on the screen 2. Set this value to 12mm 3. Click OK
  • 13. We are now going to draw the sections to ‘Cut Out’ for the joints 1. Right click on this face 2. Select ‘New Sketch’
  • 14. Lets look at this face from straight on . . . 1. Click on the ‘Look At’ tool 2. Click on this face
  • 15. Draw on these lines to show your housing joints Make sure you dimension them correctly
  • 16. Finish your sketch and enter the 3D modelling environment
  • 17. 1. Hover your mouse over these areas until they turn red 2. Click on the area and it will turn to blue Select EXTRUDE . . .
  • 18. To take the material away . . . 1. Click the ‘Remove Material’ button 2. Change this value to 6 3. Click OK
  • 19. 1. Click on the ‘+’ sign 2. Right click on ‘Sketch 2’ 3. Select ‘Share Sketch’ Before we can sketch again on the same face, we must firstly Share the Sketch
  • 20. Now see if you can draw the shape for the ‘Biscuit Joint’ in the same way as before. It is 3mm wide and should be ‘Extruded Down’ 3mm
  • 21. Save your work Save as ‘Box Long Side’
  • 22. Short Side Base Top (with Insert) Select a New Part file and see if you can make each of these individual parts. Be careful and double check your sizes!