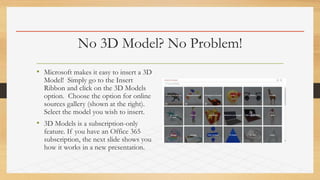
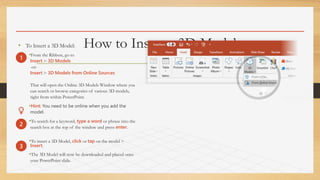
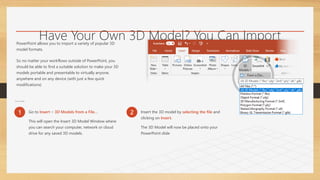
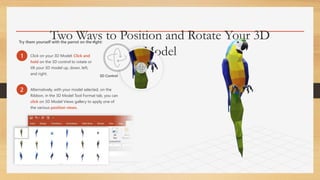
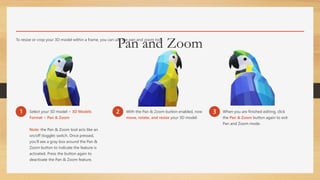
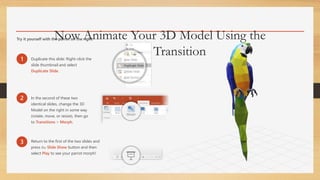
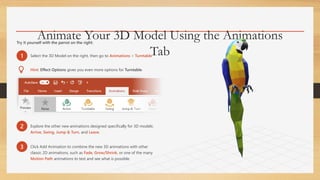
A layer style is one or more effects applied to a layer or layer group. You can apply one of the preset styles provided with Photoshop or create a custom style using the Layer Style dialog box. The layer effects icon appears to the right of the layer's name in the Layers panel.
How to Merge Images or Pictures in Microsoft Office WordJaff Tiger
When using Word, you may need to merge some image to one so that you can make the Word document more readable. Want to learn how to merge images in Word? just follow my words.
How to Merge Images or Pictures in Microsoft Office WordJaff Tiger
When using Word, you may need to merge some image to one so that you can make the Word document more readable. Want to learn how to merge images in Word? just follow my words.
This tutorial offers a step-by-step guide on how to effectively use Pinterest. It covers the basics such as account creation and navigation, as well as advanced techniques including creating eye-catching pins and optimizing your profile. The tutorial also explores collaboration and networking on the platform. With visual illustrations and clear instructions, this tutorial will equip you with the skills to navigate Pinterest confidently and achieve your goals.
Hadj Ounis's most notable work is his sculpture titled "Metamorphosis." This piece showcases Ounis's mastery of form and texture, as he seamlessly combines metal and wood to create a dynamic and visually striking composition. The juxtaposition of the two materials creates a sense of tension and harmony, inviting viewers to contemplate the relationship between nature and industry.
Boudoir photography, a genre that captures intimate and sensual images of individuals, has experienced significant transformation over the years, particularly in New York City (NYC). Known for its diversity and vibrant arts scene, NYC has been a hub for the evolution of various art forms, including boudoir photography. This article delves into the historical background, cultural significance, technological advancements, and the contemporary landscape of boudoir photography in NYC.
1. Bring Your
Presentations
to Life with 3D
How to get started with 3D in PowerPoint
About this deck
Office 365 subscribers can add 3D models to
documents and rotate the angle to show the right view.
If you don’t have a subscription, the deck simply shows
a single view.
2. Why Use 3D?2D Slides
Slides are a static portrait.
Audience is passive and cannot interact.
3D Models
3D helps foster conceptual understanding
and visual and spatial thinking.
Animated 3D models display objects within
space in ways text and images cannot.
3. No 3D Model? No Problem!
• Microsoft makes it easy to insert a 3D
Model! Simply go to the Insert
Ribbon and click on the 3D Models
option. Choose the option for online
sources gallery (shown at the right).
Select the model you wish to insert.
• 3D Models is a subscription-only
feature. If you have an Office 365
subscription, the next slide shows you
how it works in a new presentation.
4. How to Insert a 3D Model• To Insert a 3D Model:
•From the Ribbon, go to
Insert > 3D Models
-or-
Insert > 3D Models from Online Sources
That will open the Online 3D Models Window where you
can search or browse categories of various 3D models,
right from within PowerPoint.
•Hint: You need to be online when you add the
model.
•To search for a keyword, type a word or phrase into the
search box at the top of the window and press enter.
•To insert a 3D Model, click or tap on the model >
Insert.
•The 3D Model will now be downloaded and placed onto
your PowerPoint slide.
1
2
3
5. Have Your Own 3D Model? You Can Import
It!
PowerPoint allows you to import a variety of popular 3D
model formats.
So no matter your workflows outside of PowerPoint, you
should be able to find a suitable solution to make your 3D
models portable and presentable to virtually anyone,
anywhere and on any device (with just a few quick
modifications)
To Insert a 3D Model:
1 Go to Insert > 3D Models from a File…
This will open the Insert 3D Model Window where
you can search your computer, network or cloud
drive for any saved 3D models.
2 Insert the 3D model by selecting the file and
clicking on Insert.
The 3D Model will now be placed onto your
PowerPoint slide
6. Two Ways to Position and Rotate Your 3D
Model
Try them yourself with the parrot on the right:
1 Click on your 3D Model: Click and
hold on the 3D control to rotate or
tilt your 3D model up, down, left,
and right. 3D Control
2 Alternatively, with your model selected, on the
Ribbon, in the 3D Model Tool Format tab, you can
click on 3D Model Views gallery to apply one of
the various position views.
7. Pan and ZoomTo resize or crop your 3D model within a frame, you can use the pan and zoom tool.
1 Select your 3D model > 3D Models
Format > Pan & Zoom
Note: the Pan & Zoom tool acts like an
on/off (toggle) switch. Once pressed,
you’ll see a gray box around the Pan &
Zoom button to indicate the feature is
activated. Press the button again to
deactivate the Pan & Zoom feature.
2 With the Pan & Zoom button enabled, now
move, rotate, and resize your 3D model.
3 When you are finished editing, click
the Pan & Zoom button again to exit
Pan and Zoom mode.
8. Now Animate Your 3D Model Using the
Morph Transition
Try it yourself with the parrot on the right:
1 Duplicate this slide: Right-click the
slide thumbnail and select
Duplicate Slide.
2 In the second of these two
identical slides, change the 3D
Model on the right in some way
(rotate, move, or resize), then go
to Transitions > Morph.
3 Return to the first of the two slides and
press the Slide Show button and then
select Play to see your parrot morph!
9. Animate Your 3D Model Using the Animations
Tab
Try it yourself with the parrot on the right:
1 Select the 3D Model on the right, then go to Animations > Turntable
Hint: Effect Options gives you even more options for Turntable.
2 Explore the other new animations designed specifically for 3D models:
Arrive, Swing, Jump & Turn, and Leave.
3 Click Add Animation to combine the new 3D animations with other
classic 2D animations, such as Fade, Grow/Shrink, or one of the many
Motion Path animations to test and see what is possible.
10. More questions about
PowerPoint?
Select the Tell button and type what you want to know.
SELECT THE ARROW WHEN IN SLIDE SHOW MODE
Visit the PowerPoint team blog
Go to free PowerPoint training