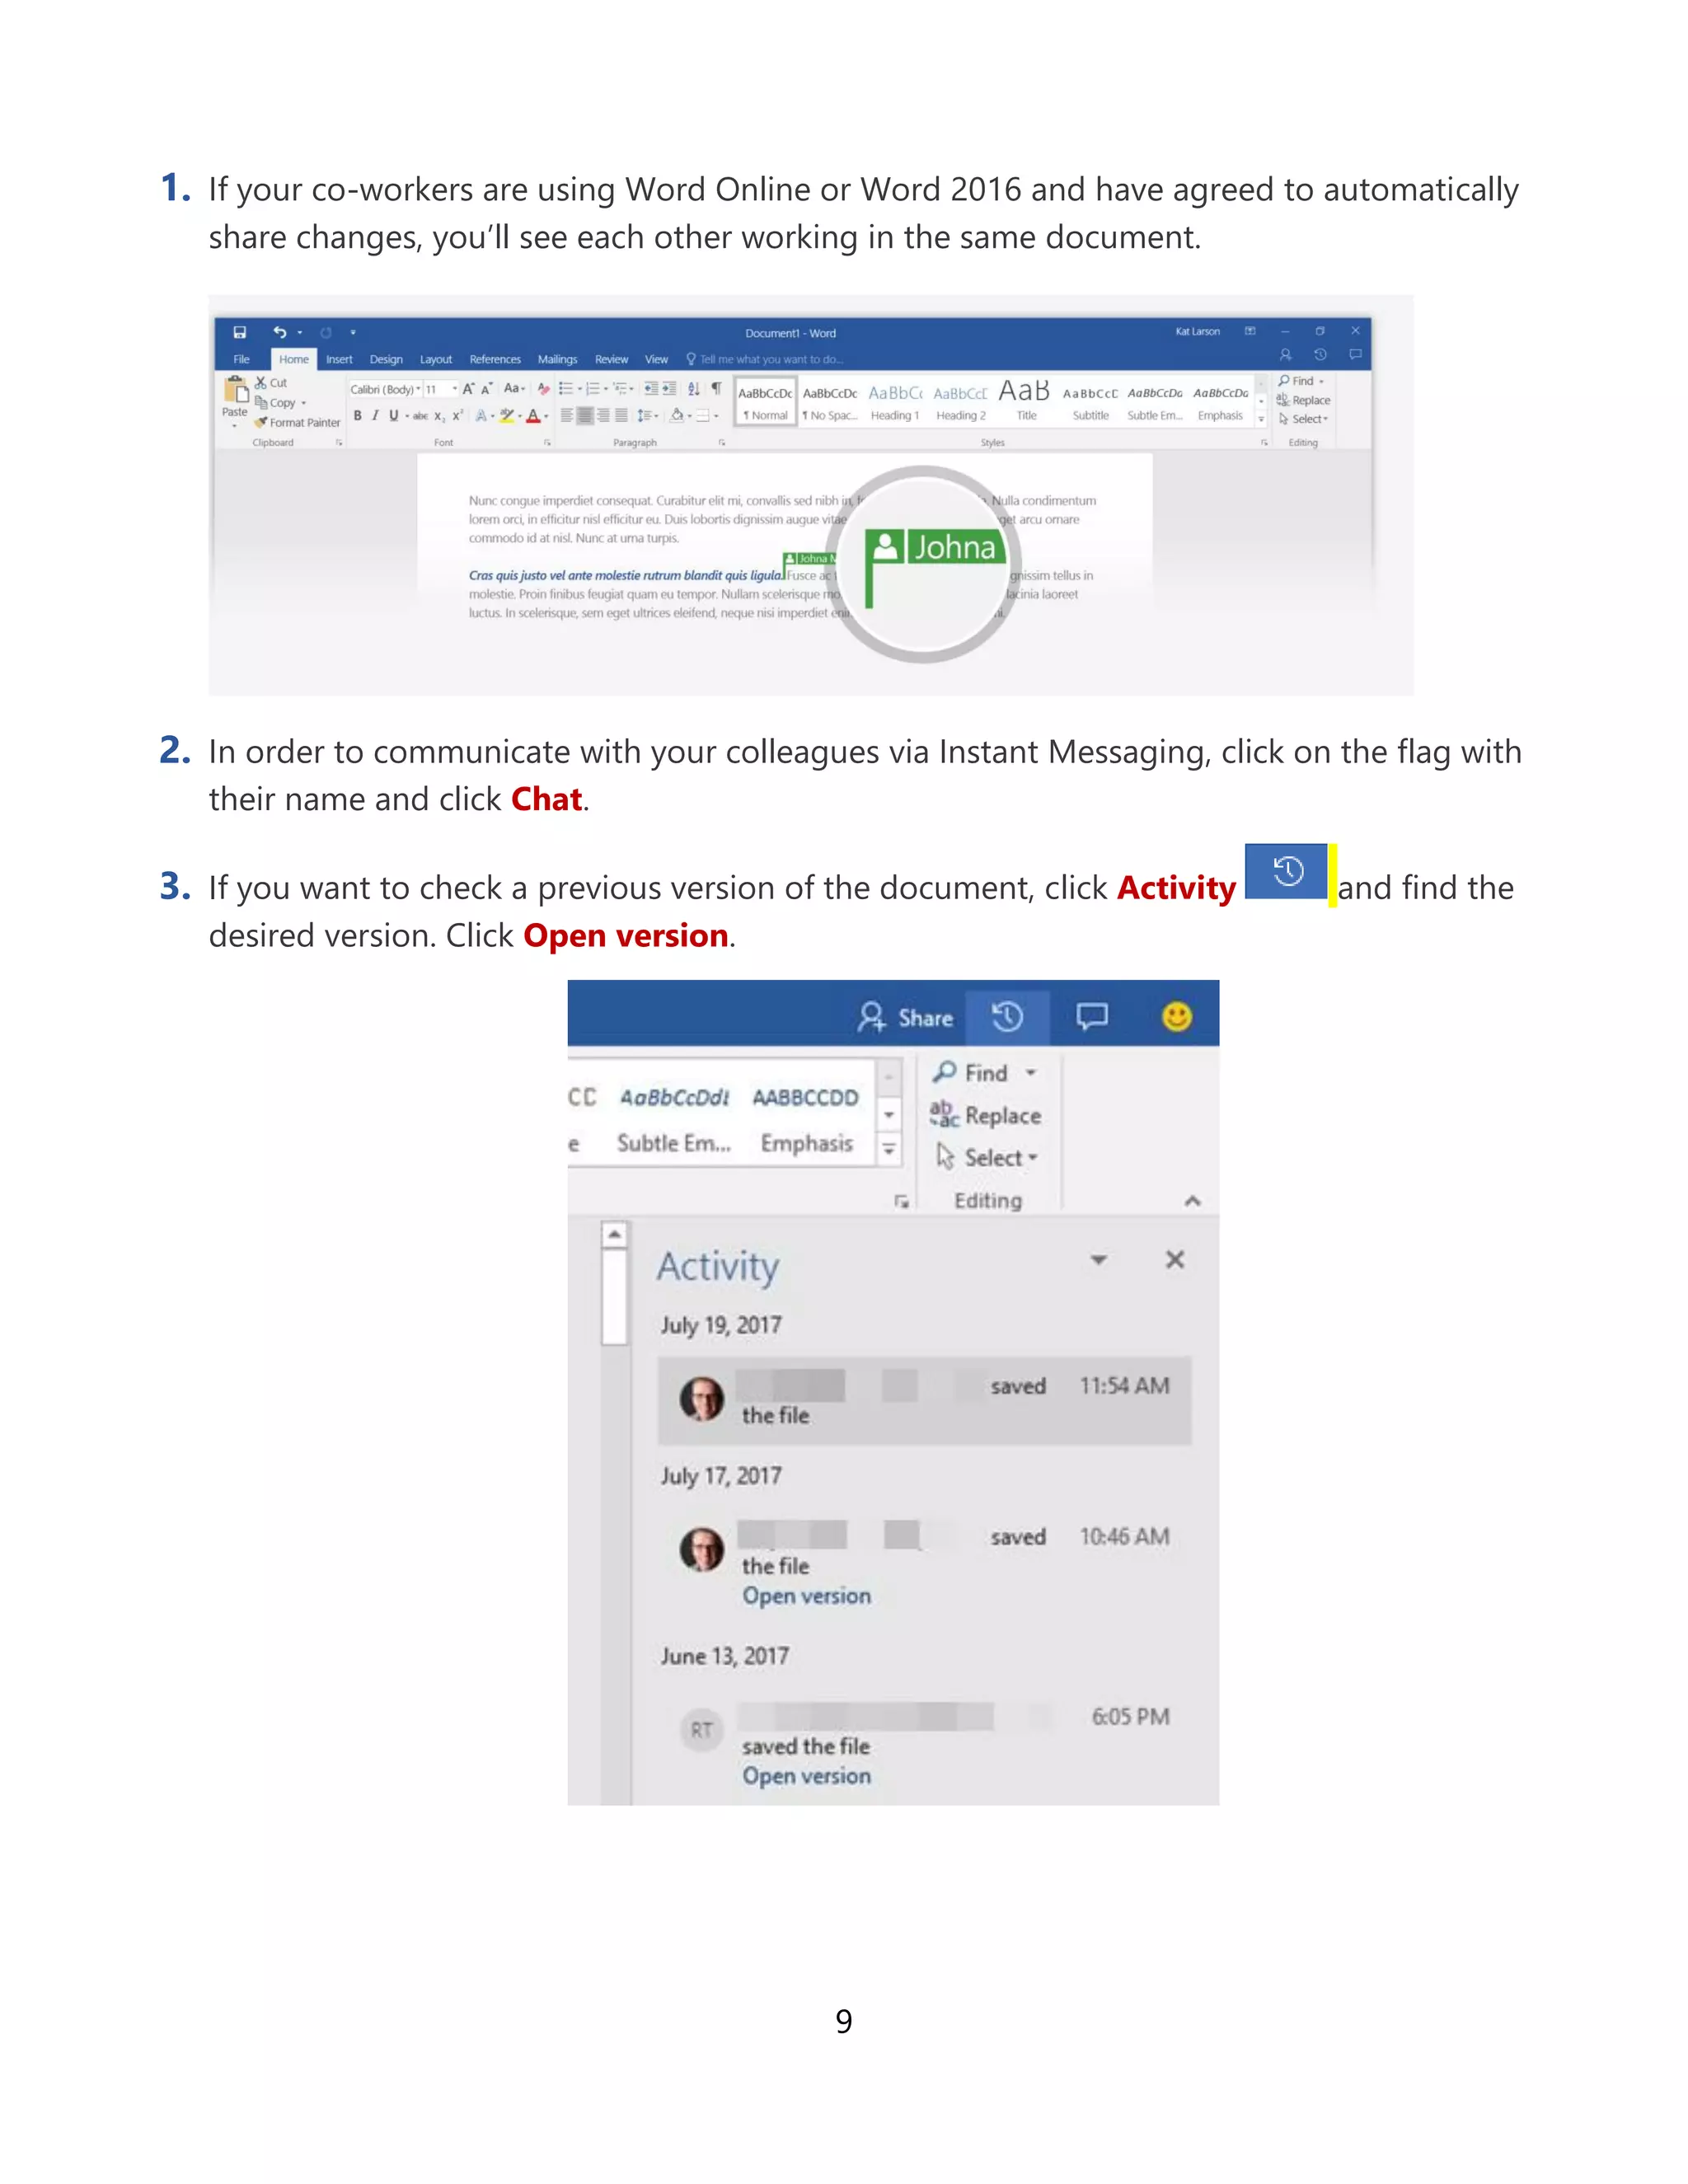
HR professionals use Microsoft Office on a daily basis: to write and refine job descriptions, to present proposals to business owners, to analyze employee engagement data, to work remotely, and more.
We’ve created this guide to help you save time in your day-to-day work, and to spark ideas for getting even more out of Office.
* Save hundreds of keystrokes every day: quickly insert words, phrases and paragraphs in Word and Outlook.
* Work together for better, faster results: sharing and co-authoring documents in Word.
* Keep email under control: keyboard shortcuts for Outlook.
* Stay connected while away from your desk: using Outlook on phone or tablet.
* Stay organized with a digital notebook: meeting minutes and training notes in OneNote.
* Streamline new employee onboarding: create and share an onboarding notebook in OneNote.
* Analyze and visualize data like a boss: data import, filtering, and visualization in Excel.
* Make your presentations stand out: designs in PowerPoint.
* Make online trainings engaging: preparing and giving trainings with Skype for Business.
Some of the Outlook 2016 features including Mail - Contacts - Calendar - Rules and Automatic replies. Some of basics functions we can do using Outlook 2016
Outlook is an email client provided by Microsoft for free. It several features which help in easy working in Industry. In this file, you will be able to learn everything about the Microsoft Outlook.
The document provides training on using Microsoft Outlook 2007. It covers the basics of using the new Ribbon interface, including finding common commands for composing emails, working with calendars and contacts. It also discusses new features like the To-Do bar and explains how to perform everyday tasks like scheduling meetings and setting reminders in the updated interface.
Presentation present to client's staff after hearing they were overwhelmed with email. Just some quick tips and methods to gain control over MS Outlook
Microsoft Outlook 2013 is an email client and personal information manager that comes with Microsoft Office. It allows users to manage emails, schedule meetings, track tasks and contacts. The interface includes a ribbon, folder pane, navigation bar and status bar. Users can organize emails using rules, folders, flags and categories. Messages can be composed, sent, replied to, forwarded and have attachments. Signatures and outbox settings are customizable.
The document provides guidance on using Microsoft Outlook 2016 for email functions such as composing, sending, and reading emails. It discusses how to create signatures, change fonts, view conversations, search emails, and access Outlook online. It also offers tips for cleaning up mailboxes and best practices for email and calendar functions.
Microsoft Outlook is a personal information manager included in the Microsoft Office suite that can be used for email as well as calendars, tasks, contacts, notes, and web browsing. When composing emails in Outlook, the ribbon interface at the top is similar to Microsoft Word and provides formatting options organized into tabs. Additional options can be accessed by clicking the down arrow at the bottom of groups. The mini toolbar allows quick formatting anywhere in the email body. Creating a new email is done by selecting New Mail Message from the File menu or using the keyboard shortcut Ctrl+Shift+M.
The document provides instructions for using Agenda Builder in Centra to build the synchronous content for a curriculum area. It describes how to insert various files like text, graphics, PowerPoint presentations, audio, video and URLs. It also explains how to add tools like whiteboards, web safari, appshare and surveys. Instructions are provided for creating evaluations, using nesting features, and checking agendas in and out. The final sections cover creating a subject, uploading the agenda, creating an event, and editing enrollment.
This document provides an overview of Office 365 and outlines features of the Outlook Web App (OWA) and Microsoft Outlook 2013. It discusses how OWA allows users to access email, calendar, contacts and tasks from any device with an internet connection. Key features covered include changing passwords, creating email rules and auto-replies, managing multiple calendars, and creating tasks. Microsoft Outlook 2013 customization options are also summarized, such as customizing the view, filtering emails, and adding calendar permissions.
The document provides instructions for getting started with and navigating Office 365. It describes the main interface elements like the App Launcher and Navigation Pane. It explains how to sign in to Office 365 by entering your user ID and password at portal.office.com. The App Launcher button accesses apps and features, and items can be pinned to the nav bar for easy access. Settings allow changing your password, signing out, and setting your start page.
Using Microsoft Outlook: E-mail Basics provides an overview of using Outlook for e-mail. It covers navigating the Outlook interface, composing and sending e-mails, reading and replying to messages, adding attachments and signatures, and using folders to organize emails. The document also compares Outlook e-mail features to the similar features in GroupWise and provides instructions for using Outlook's contacts manager.
Microsoft Outlook 2010 is an email management software that allows users to send and receive emails, manage contacts and calendars. It provides features like emailing, attaching files to emails up to 20MB in size, adding signatures, taking notes, creating appointments and tasks. Outlook will no longer be supported by Microsoft after 2020.
The document provides instructions for basic Outlook skills, including how to log in, use email folders, add a signature line, open and attach files, and manage calendar events. Key points covered are logging in through Firefox, using the Inbox, Clutter, Sent Items and Drafts folders, turning Clutter off through Options, adding a signature, downloading and saving attachments, attaching files to emails, and adding and responding to calendar events.
This document provides instructions for using basic email and calendar functions in an email client. It describes how to open and reply to emails, attach and save files, create contact groups and send emails to groups. It also outlines how to create appointments and meeting requests in the calendar, invite others and view the calendar in different views.
The document introduces the new Ribbon interface in Outlook 2007. It describes how the Ribbon displays tabs and commands tailored for different items like emails, contacts, appointments. It also covers other new or changed features like the Quick Access Toolbar, mini toolbar, and To-Do Bar and how to access options and settings in Outlook 2007.
Handout for Outlook 365 Email and Outlook CalendarRachel Miller
This document provides a summary of the key features and functions of Office 365. It outlines how to get started with Office 365 by logging in and exploring the navigation bar and app tiles. It then describes how to use key Office 365 apps like Outlook 365 for email, Calendar for scheduling, and OneDrive for file storage. The document includes step-by-step instructions and activities for adding a profile photo, sending an email with an attachment and BCC, instant messaging coworkers, adding contacts, and changing calendar views.
This document provides an overview and lessons for a Microsoft Outlook 2007 training course on using the program to organize email messages and tasks. The course teaches how to use features like flags, categories, folders and the To-Do bar to take action on emails and prioritize tasks. Color-coded categories allow organizing related emails visually. The To-Do bar displays flagged emails, tasks and calendar items to help ensure follow up.
Use outlook 2010 / 2013 best practices to achieve your personal goalsBjørn Hopland
One of the challenges today is that you have to both have a good overview of everything within your field of work, as well follow up on all details. The risk is that when you try to get a good perspective of the strategic aspect of your work, it’s easy to forget the details. Also, there will always be much more work to do than is possible, and you are the only one that knows your work load. So you have to decide on your priorities.
Using Outlook to manage the details, and support you in prioritizing, will free up your brain so you can keep a good overview, work more on a strategic level, and get all your work done with less stress.
The outcome of this training will enable you to achieve or exceed your goals. You will also have full control at any time, with no hidden “iceberg” under the water. The time and capacity you free up by what you will learn, you can spend as you like. For more time off, to work on a project, or on long term development activities.
The document provides an overview of new features in Microsoft Outlook 2007, including the Ribbon interface. It describes the Ribbon, its tabs and groups, and how it displays commands relevant to the current task. It also discusses the Quick Access Toolbar, Mini toolbar, To-Do Bar, and changes to the calendar and contacts. The goal is to help users get up to speed with Outlook 2007's new design and features while still allowing them to accomplish regular tasks. Self-assessment questions are included to check understanding.
Microsoft Word (or simply Word) is a word processor developed by Microsoft.
Commercial versions of Word are licensed as a standalone product or as a component of Microsoft Office, Office 365 and Windows RT.
This document provides instructions for setting up RSS feeds and email alerts from various sources to stay current on research. It discusses using iGoogle or other aggregators to combine feeds, alerts from Zetoc which provides table of contents from journals, and setting up alerts from specific journals or searches in the Zetoc database. The aim is to help researchers efficiently monitor the latest information in their field through these digital tools.
Microsoft Outlook is a personal information manager from Microsoft, available as a part of the Microsoft Office suite. Although often used mainly as an email application, it also includes a calendar, task manager, contact manager, note taking, journal, and web browsing.
It can be used as a stand-alone application, or can work with Microsoft Exchange Server and Microsoft SharePoint Server for multiple users in an organization, such as shared mailboxes and calendars, Exchange public folders, SharePoint lists, and meeting schedules.
This document provides instructions for connecting Outlook to Salesforce and syncing data between the two systems. It outlines steps for setting up the Connect for Outlook app, configuring sync settings for contacts, events, tasks and emails. It also describes how to add new emails, contacts, accounts and calendar events to Salesforce from within Outlook. The goal is to enable syncing of all relevant data between the CRM and email/calendar to track activities and automate follow ups.
This document provides instructions for various functions in Microsoft Outlook 2013, including creating and formatting email messages, adding signatures and filtering junk email, managing contacts and calendars, customizing views, using templates and forms, delegating access, and archiving old emails and other items. It covers the basic, intermediate, and some advanced features available in Outlook 2013.
This document discusses advanced techniques in Microsoft Word, including mail merge, inserting and formatting various types of illustrations, and customizing SmartArt graphics and charts. It provides step-by-step instructions on how to perform mail merge by creating a main document and data source, and then merging them. It also explains how to insert, format, and design pictures, clipart, shapes, SmartArt, charts, and screenshots in Word documents. The document aims to teach learners how to effectively use these advanced Word features.
This eGuide explores how to:
-Increase productivity with simple tips
-Stay on task by integrating new email habits
-Protect your inbox from unwanted messages
-Use Outlook to speed up your agency’s processes
Setting up email templates in Outlook can save time by automating regularly sent messages. The document provides instructions for creating a template: 1) Start a new email message and include content like a welcome letter; 2) Add a subject line and any attachments; 3) Include a confidentiality statement; 4) Save the message as a template so it can be reused; 5) To send, open the template and add the recipient before sending. Templates are useful for regularly sent documents like new client paperwork, satisfaction surveys, and information to bishops. Filling in just the recipient email saves time over recreating the message repeatedly.
In this latest installment of the O365 Productivity Tips series, Tom Duff (@duffbert) and Christian Buckley (@buckleyplanet) return with another head-to-head battle of the Microsoft Office and Office 365 productivity hints and tips, recorded July 30th, 2019 with viewers voting on each round.
Follow us on Twitter for future webinars and sessions where we'll share more great tips, and be sure to follow the CollabTalk YouTube channel at https://youtube.com/c/collabtalk
Microsoft Outlook is primarily used as an email client software that allows users to send and receive emails. It also enables calendaring, task management, contact management, note taking, and scheduling appointments. Major functions include email, calendaring, tasks, contacts, notes, and scheduling. Outlook can be used as a standalone application or deployed in organizations using Microsoft Exchange Server or SharePoint for shared functions like mailboxes, calendars, and appointment scheduling.
Office 365 provides email, calendaring, contacts, instant messaging, video conferencing, and productivity apps like Word, Excel, PowerPoint, OneNote, and SharePoint through an online subscription service. It allows access to files and communications from any device through an internet connection. Nonprofit organizations can get discounted or donated subscriptions. The document provides instructions on setup and using key features like email, calendar sharing, meetings, file storage on SkyDrive, and customizing the interface.
This document provides guidance on using Outlook 2003 for sales professionals. It covers how to change the email view to include calendars, tasks and folders; build an email template; follow proper email etiquette; and create an effective filing system. The objectives are to customize the Outlook view, build a template, understand email best practices, and set up a folder structure to stay organized. Specific tips are provided on setting views, building templates, email etiquette rules, and using folders and rules to automatically file emails.
The document provides tips and tricks for using various Microsoft Office applications including Word, Excel, PowerPoint, Outlook, and OneNote. It discusses how to use mail merge in Word to send personalized letters, utilize the backstage view and ribbon in Excel, create presentations with impact using PowerPoint themes and graphics, organize email messages with Outlook's search and flagging tools, and create new notebooks and sections in OneNote.
IBM Verse is a cloud-based email, calendar, contacts and file sharing platform. It aims to help users focus on top priorities by integrating these tools and using analytics to surface important messages, meetings and tasks. Key features include powerful search across content, integration with IBM Connections for collaboration, and an engaging email interface that reduces email overload. The document provides an agenda and overview of the main Verse capabilities for sending and managing email, calendar events, contacts, files, chat, and finding expertise within the organization.
This document provides guidance on writing effective emails and memos. It discusses analyzing the structure of emails and memos, which includes the subject line, opening, body and closing. It also provides tips for formatting emails, using email smartly and safely, and writing plans for different types of emails and memos.
20 Microsoft Teams Productivity Tips that You've Probably Never Used (But Sho...Christian Buckley
The document provides 20 productivity tips for Microsoft Teams that may not be widely known. It discusses tips like viewing all your Teams memberships, accessing the history menu to move between locations, creating tabs in chats, connecting to cloud storage in Teams, bookmarking important conversations, and leveraging features like the immersive reader, copying Teams to create new ones, and syncing files to your desktop for easier access. The tips are meant to help users optimize their use of Teams' features to be more efficient.
Office 365 Productivity Tips November 2017 November Smack-DownThomas Duff
In this latest installment, Tom Duff (@duffbert) and Christian Buckley (@buckleyplanet) return with another head-to-head battle of the Microsoft Office and Office 365 productivity hints and tips, delivered via webinar in November 2017 with audience members voting on each round. Follow us on Twitter for future webinars and sessions where we'll share more great tips!
Office 365 Productivity Tips -- November Smack-DownChristian Buckley
In this latest installment, Tom Duff (@duffbert) and Christian Buckley (@buckleyplanet) are back with another head-to-head battle of the Microsoft Office and Office 365 productivity hints and tips, delivered via webinar on November 28th, 2017 with audience members voting on each round. Follow us on Twitter for future webinars and sessions where we'll share more great tips!
The document provides step-by-step instructions for creating a Gmail email account and using basic email functions like composing, replying, forwarding, attaching and downloading files. It explains email terminology like inbox, outbox, attachments, and addresses the importance of keeping work and personal emails separate.
Outlook 2013 allows users to customize the interface through color schemes and backgrounds. It provides powerful search and message management tools. The reading pane, calendar, people, and tasks panes provide quick access to important information. The guide reviews how to add accounts, change themes, and locate common tools and commands. It also discusses using Lync for online meetings, peeking at calendar and appointment details, and viewing other people's calendars. Effective time management includes tasks, calendar, and contact features. Signatures can be created, set as defaults, and manually added to messages.
The document provides an overview of topics covered in a technology training session, including email management, working with PDF documents, and using shared resources in Outlook. Email management tips include only checking email 4 times per day, following best practices like clear subject lines, and enabling security features. Creating bookmarks and forms are demonstrated for PDF documents. Room calendars and reservations can now be managed in Outlook. Skype for Business, Office 365 portal, and Microsoft 365 mobile apps are also briefly discussed. A Q&A session is included at the end.
Microsoft PowerPoint - First Class- Virtual Towns and SchoolsAngela Carey
This document provides a training session on how to use the First Class - Virtual Towns and Schools (VTS) software. It covers how to log in, format text, get assistance from VTS, post news and announcements, attach files, create hyperlinks, add pages to the index, archive files, add events to the calendar, work with pictures, and make changes to home pages. The training includes step-by-step instructions on various functions within the VTS platform.
In this latest installment of the O365 Productivity Tips series, Tom Duff (@duffbert) and Christian Buckley (@buckleyplanet) return with another head-to-head battle of the Microsoft Office and Office 365 productivity hints and tips, recorded June 20th, 2019 with viewers voting on each round. You can watch the video recording at https://youtu.be/0ZMD0RScBaQ
Follow us on Twitter for future webinars and sessions where we'll share more great tips, and be sure to follow the CollabTalk YouTube channel at https://youtube.com/c/collabtalk
Memos are internal documents used by managers to inform and motivate employees. They announce policies, disseminate information, and report results. Memos should be concise yet adequately developed. There are three main types of memos: to persuade action, issue a directive, or provide a report. The format includes elements like the header, opening, discussion, and closing segments. Memos require a formal but not stuffy tone. Lists and headings can help organize important points for the reader. The closing should encourage action from the recipient.
Similar to The Best Microsoft Office 365 Tips for Busy HR Professionals (20)
Building Meaningful Talent Communities with AI - Heather Pysklywec - SocialHR...SocialHRCamp
Speaker: Heather Pysklywec
Digital transformation has transformed the talent acquisition landscape over the past ten years. Now, with the introduction of artificial intelligence, HR professionals are faced with a new suite of tools to choose from. The question remains, where to start, what to be aware of, and what tools will complement the talent acquisition strategy of the organization? This session will give a summary of helpful AI tools in the industry, explain how they can fit into existing systems, and encourage attendees to explore if AI tools can improve their process.
Start Smart: Learning the Ropes of AI for HR - Celine Maasland - SocialHRCamp...SocialHRCamp
Speaker: Celine Maasland
In this session, we’ll demystify the process of integrating artificial intelligence into everyday HR tasks. This presentation will guide HR professionals through the initial steps of identifying AI opportunities, choosing the right tools, and effectively implementing technology to streamline operations. Additionally, we’ll delve into the specialized skill of prompt engineering, demonstrating how to craft precise prompts to enhance interactions between AI systems and employees. Whether you’re new to AI or looking to refine some of your existing strategies, this session will equip you with the knowledge and tools to harness AI’s potential in transforming HR functions.
AI Considerations in HR Governance - Shahzad Khan - SocialHRCamp Ottawa 2024SocialHRCamp
Speaker: Shahzad Khan
This session on "AI Considerations in Human Resources Governance" explores the integration of Artificial Intelligence (AI) into HR practices, examining its history, current applications, and the governance issues it raises. A framework to view Government in modern organizations is provided, along with the transformation and key considerations associated with each element of this framework, drawing lessons from other AI projects to illustrate these aspects. We then dive into AI's use in resume screening, talent acquisition, employee retention, and predictive analytics for workforce management. Highlighting modern governance challenges, it addresses AI's impact on the gig economy as well as DEI. We then conclude with future trends in AI for HR, offering strategic recommendations for incorporating AI in HR governance.
How to Leverage AI to Boost Employee Wellness - Lydia Di Francesco - SocialHR...SocialHRCamp
Speaker: Lydia Di Francesco
In this workshop, participants will delve into the realm of AI and its profound potential to revolutionize employee wellness initiatives. From stress management to fostering work-life harmony, AI offers a myriad of innovative tools and strategies that can significantly enhance the wellbeing of employees in any organization. Attendees will learn how to effectively leverage AI technologies to cultivate a healthier, happier, and more productive workforce. Whether it's utilizing AI-powered chatbots for mental health support, implementing data analytics to identify internal, systemic risk factors, or deploying personalized wellness apps, this workshop will equip participants with actionable insights and best practices to harness the power of AI for boosting employee wellness. Join us and discover how AI can be a strategic partner towards a culture of wellbeing and resilience in the workplace.
Accelerating AI Integration with Collaborative Learning - Kinga Petrovai - So...SocialHRCamp
Speaker: Kinga Petrovai
You have the new AI tools, but how can you help your team use them to their full potential? As technology is changing daily, it’s hard to learn and keep up with the latest developments. Help your team amplify their learning with a new collaborative learning approach called the Learning Hive.
This session outlines the Learning Hive approach that sets up collaborations that foster great learning without the need for L&D to produce content. The Learning Hive enables effective knowledge sharing where employees learn from each other and apply this learning to their work, all while building stronger community bonds. This approach amplifies the impact of other learning resources and fosters a culture of continuous learning within the organization.
Watch this expert-led webinar to learn effective tactics that high-volume hiring teams can use right now to attract top talent into their pipeline faster.
Your Guide To Finding The Perfect Part-Time JobSnapJob
Part-time workers account for a significant part of the workforce, including individuals of all ages. A lot of industries hire part-time workers in different capacities, including temporary or seasonal openings, ranging from managerial to entry-level positions. However, many people still doubt taking on these roles and wonder how a temporary part-time job can help them achieve their long-term goals.
Becoming Relentlessly Human-Centred in an AI World - Erin Patchell - SocialHR...SocialHRCamp
Speaker: Erin Patchell
Imagine a world where the needs, experiences, and well-being of people— employees and customers — are the focus of integrating technology into our businesses. As HR professionals, what tools exist to leverage AI and technology as a force for both people and profit? How do we influence a culture that takes a human-centred lens?
The Rules Do Apply: Navigating HR ComplianceAggregage
https://www.humanresourcestoday.com/frs/26903483/the-rules-do-apply--navigating-hr-compliance
HR Compliance is like a giant game of whack-a-mole. Once you think your company is compliant with all policies and procedures documented and in place, there’s a new or amended law, regulation, or final rule that pops up landing you back at ‘start.’ There are shifts, interpretations, and balancing acts to understanding compliance changes. Keeping up is not easy and it’s very time consuming.
This is a particular pain point for small HR departments, or HR departments of 1, that lack compliance teams and in-house labor attorneys. So, what do you do?
The goal of this webinar is to make you smarter in knowing what you should be focused on and the questions you should be asking. It will also provide you with resources for making compliance more manageable.
Objectives:
• Understand the regulatory landscape, including labor laws at the local, state, and federal levels
• Best practices for developing, implementing, and maintaining effective compliance programs
• Resources and strategies for staying informed about changes to labor laws, regulations, and compliance requirements
2. 2
Welcome, busy HR Pro
As an HR professional, your mission is to recruit and retain great people, and empower them to do
their best work. We realize what a big and important job that is.
HR professionals like you told us that Microsoft Office 365 is a big part of how they get things done
every day. So, we decided to lend you a helping hand. We’ve created this guide to help you save time
in your day-to-day work, and to spark ideas for getting even more out of Office.
Here are some of the tips you’ll find in this guide:
• Spend less time typing frequently used terms and paragraphs
• Quickly write and review documents with colleagues
• Keep email under control
• Get more things done on your phone
• Streamline employee onboarding
• Visualize and analyze data
• Engage employees with better online trainings
Want to learn even more? If you’re an HR professional who gets excited about technology, and you’re
often looking for new ways to be more productive, you should join our exclusive Microsoft Office 365
Champion Program. You’ll have access to the latest Office resources and connect with a community of
like-minded professionals.
Finally, if you have colleagues who can benefit from these tips, please share this e-book with them
http://aka.ms/officeHRtips.
Best wishes,
Sanjeevini Mittal
Group Manager Office 365
Microsoft Corporation
3. 3
Table of Contents
Welcome, busy HR Pro ...........................................................................................................................................................2
Save hundreds of keystrokes every day ...........................................................................................................................4
Work together for better, faster results............................................................................................................................7
Keep email under control ....................................................................................................................................................10
Stay connected while away from your desk..................................................................................................................13
Stay organized with a digital notebook .........................................................................................................................17
Streamline new employee onboarding ..........................................................................................................................21
Analyze and visualize data like a boss ............................................................................................................................26
Make your presentations stand out.................................................................................................................................34
Make online trainings and webinars engaging ...........................................................................................................39
Next steps..................................................................................................................................................................................44
4. 4
Save hundreds of keystrokes every day
Type a few letters, get HR terms
Every industry, company and job has its terminology. Undoubtedly, you use certain terms, phrases or
sentences many times per day, like “employee engagement”, “employee benefits”, or “Please let me
know if you have any questions or comments.“ With AutoCorrect, you won’t need to type those
again.
Set it up
1. In Microsoft Word, click File > Options > Proofing > Autocorrect Options
2. Type “zeb” and “employee benefits”. Click Add.
5. 5
Tip
Make sure your abbreviations are non-existing words, or you’ll have a frustrating experience. To
create non-existing abbreviations, start them with the letter “z” or “q”.
3. Type “zta” and “talent acquisition” and click Add. Type “zdi” and “Diversity and Inclusion”. Click
Add.
4. Type “zplm” and “Please let me know if you have any questions or comments.” Click Add.
5. Click OK. Click OK.
Now use it
6. Now type “zta” followed by a space, Enter, or punctuation and it will change to “talent
acquisition”.
7. Repeat with “zeb”, “zdi” and “zplm”.
Re-use paragraphs over and over
Do you tend to re-use the same paragraphs in documents and email messages? The description of
your company, the company values, the mission of the HR department, a response to an applicant, an
equal opportunity employer statement, a “best place to work” banner. Tired of typing those
paragraphs in Word? Or copying and pasting them in Outlook? Then this tip is for you.
Set it up
1. In Word, select one or more paragraphs you use frequently, for example a description of your
company or the mission of the HR department.
2. Click Insert > Quick Parts > Save selection to Quick Part Gallery.
6. 6
3. Type a name for the Quick Part, for example About.
Use it
4. Position your cursor in a Word document.
5. Click Insert > Quick Parts, and select About.
Tips
• The paragraphs you add to the Quick Part Gallery can include images, tables, charts, etc.
• If you have many Quick Parts, you can organize them in different categories, for example
Onboarding, Recruiting, Personal.
7. 7
Work together for better, faster results
You can’t run an HR department with 140-character messages. Often you need to do the hard work of
putting ideas, plans and policies into words. You may write job profiles, compensation and benefits
plans, describe the company structure or document performance evaluation guidelines. Luckily you
don’t have to do it alone. With your document saved in the cloud, you can select which colleagues
can read, write and review a document.
Share your work in a few clicks
1. In the upper right of the document, click Share.
2. Invite people so they can edit with you. They’ll get email with a link to your doc.
3. If this is a brand-new document, you’ll see a message “Please choose where you want to
upload a copy of your file.” Select OneDrive. Now enter a name for the document. Click OK.
4. You’ll see a confirmation that the document is uploaded. Now your colleagues can help you
review or write the document.
8. 8
5. Back in the document, select Share in the upper right, and invite people so they can edit
with you. They’ll get email with a link to your document.
6. When they follow the link, your doc opens for them in their version of Word, or in Word
Online in their web browser.
Tips
• Sharing works the same in Excel and PowerPoint.
• Your shared document can be found in the “Documents” folder in your OneDrive for Business
storage. An easy way to find the document is to click File > Open > Recent and you’ll see a
chronological list of Word documents you’ve worked on recently.
• It’s also easy to send a link to a document from Outlook. Read more in Stop hunting for
attachments.
Work together in harmony
Once you’ve shared your document with specific colleagues for editing, they can make updates or
add comments. You can see who is in the document and what they’re working on.
9. 9
1. If your co-workers are using Word Online or Word 2016 and have agreed to automatically
share changes, you’ll see each other working in the same document.
2. In order to communicate with your colleagues via Instant Messaging, click on the flag with
their name and click Chat.
3. If you want to check a previous version of the document, click Activity and find the
desired version. Click Open version.
10. 10
Keep email under control
Dealing with email messages sometimes takes too much time. Here are some tips to help keep your
Inbox lean and free up time for more important things.
Quickly triage email with keyboard shortcuts
With just three keys, you can start taming the email overload in your Inbox. The Spacebar, Backspace
and Delete keys will soon be your best friends.
1. In Outlook, select the email at the top of your Inbox. Next, tap the spacebar on your keyboard
to scroll through the body of the email.
Now you have 3 choices:
2. When you arrive at the end of the message, press the spacebar one more time to go to the
next message. The first message stays in your inbox.
3. Press the Delete button on your keyboard to delete the message.
4. Press the Backspace button on your keyboard to archive the message. Archiving moves the
message to a folder named Archive. You can easily find the message again later (read more
about finding email messages fast).
More handy keyboard shortcuts to reply and forward
Wouldn't life be easy if you could just read, delete and archive email messages? Unfortunately,
sometimes people expect a reply.
1. Press CTRL + R to reply to the sender of the message (or CTRL + Shift + R to reply to all).
Type your reply.
2. Press ALT + S to send your message.
Alternatively, you can forward the message to others.
3. Press CTRL + F to forward the message. Type the names of the addressees. Press the Tab key
until your cursor is positioned in the body of the message. Type your message.
4. Press ALT + S to send your reply.
11. 11
Tip
Want to quickly start a new email message? Just press CTRL + N.
Stop hunting for attachments
1. Press CTRL + N to create a new message. Add the addressees and subject.
2. Click Attach File .
3. You’ll see a list of recently saved files. Select a file from the list.
4. If the selected file resides in OneDrive or SharePoint, you will see a cloud on the file icon. This
means that you will send a link to the file instead of the actual file. This ensures that people
will always have the latest version of the attached document.
5. Press Alt + S to send the message.
Keep confidential messages… confidential
As an HR Professional, you often deal with confidential information about employees, the business, or
compensation plans. Luckily there are ways to make sure that information stays confidential.
Note
In order for the following to work, your organization must have Azure RMS activated. Talk to your IT
department if you do not see the Permission option in Outlook. The IT team may be able to activate Azure
RMS if they wish to do so.
12. 12
1. Press CTRL + N to create a new email message. Add addressees and a subject line.
2. On the ribbon, click Options, then choose Permission.
3. From the dropdown select Do Not Forward.
4. Press Alt + S to send the email. The receiver of the message will not be able to forward the
message to others.
Find email messages fast
Want to find an email message from 2 months ago? And you don’t remember which folder the message is
saved in? Do the following:
1. Press CTRL + E to position the cursor in the Search box.
2. Type benefits to find messages containing the word “benefits”
3. Type “employee benefits” (in quotation marks) to find messages containing the phrase
“employee benefits”
4. Add from:John to find all messages from John.
5. On the ribbon, click Has Attachments to only show messages that have attachments.
13. 13
Stay connected while away from your desk
Whether you’re walking between meetings, taking public transportation or at a coffee shop, you can
stay in the loop and get stuff done on your phone.
Quickly tackle email on your phone
How do you get rid of email messages if you only have a few minutes and your phone? You swipe!
Set it up
1. Open the Outlook app on your iPhone or Android phone.
2. Tap Settings > Swipe Options.
3. Set Swipe Right to Archive. Set Swipe Left to Delete.
Use it
4. Tap Mail. Swipe right on an email message to move the message to the Archive folder.
5. Swipe left on an email message to delete the message.
14. 14
Tip
Other options for the swipe gestures are:
• Flag: to flag a message for follow up.
• Schedule: to temporarily remove a message from your inbox and make it reappear at a later
scheduled time.
• Move: to move a message in a selected folder.
Send your availability
Do you panic when people ask when you’re available to meet, and all you have is your phone? Don’t
worry, the Outlook app has you covered.
1. Tap the Pencil icon to create a new email message. Add addressees and subject.
2. Tap the Calendar icon at the bottom right of the screen.
3. Tap Send Availability.
4. Tap a few different open timeslots in your calendar to select them. You can select timeslots
across several days.
5. Tap the checkmark in the top right corner.
6. The email message now includes a table with the available time slots.
7. Tap the arrow in the top right corner to send the message.
Running a few minutes late?
Inform your colleagues with just a few taps.
1. In the Outlook app, tap the Calendar icon .
2. Now tap a meeting.
15. 15
3. Scroll to the bottom of the meeting invitation and tap Email Attendees. Choose if you want
to email the meeting organizer or everyone. Then tap “I’m running late”.
4. This creates an email message. Tap the arrow in the top right corner to send the message.
Review a PowerPoint presentation on the go
This tip also applies to Word and Excel, but watching a PowerPoint presentation on your phone is
much cooler.
Set it up
1. Install the Microsoft PowerPoint app from the App Store or Google Play store.
2. Open the PowerPoint app for the first time.
3. Sign in with your Office 365 account, typically your work email address. Next type your
password.
4. You’re all set. Tap the home button on your phone to close PowerPoint.
Use it
5. Tap PowerPoint on your phone to open it.
6. Open a recent presentation.
17. 17
Stay organized with a digital notebook
With more information coming your way, how do you keep track of it all? And how do you find it
again later? A digital notebook helps you capture and organize many types of information.
Meeting minutes in minutes
Taking and sharing meeting minutes doesn’t have to be a hassle. Microsoft OneNote does a lot of the
legwork for you.
1. Open OneNote 2016.
2. On the right-hand side, click Add Page.
3. On the ribbon, click Meeting Details and select a meeting from your Outlook Calendar. This
automatically adds information like the meeting topic, date, location, participants, and more.
4. Type meeting minutes. They will be saved automatically.
5. Add a checkbox in front of action items by placing the cursor on a line and pressing CTRL + 1.
6. When you’ve finished taking notes, click Email Page. This will create an email message with
your notes – already addressed to the meeting attendees. Press Alt + S to send the email
message.
Tip
You can also initiate meeting notes from your Outlook Calendar. In Outlook, open an appointment or
meeting. Click Meeting Notes. All meeting information will be included in the OneNote page.
Study notes for lifelong learners
You don’t have to be in Learning & Development to realize the value of good notes. OneNote is a
great tool to capture notes during trainings or conferences. It also lets you annotate training materials
and record audio while you’re taking notes.
Take notes next to a PowerPoint presentation
Many employee trainings or conference sessions make supporting materials available on beforehand.
OneNote lets you annotate those materials.
18. 18
1. On the ribbon, click Insert > File Printout. Now choose a PowerPoint file from your computer.
Click OK.
2. The slides of the presentation will be printed on the OneNote page.
3. Click anywhere next to the slides and type your notes and comments.
Tip
When you insert a document in a OneNote page, the content of the document will be indexed so
that you can easily find the document later by searching for keywords.
Record audio and keep it with your notes
1. On the ribbon, click Insert > Record Audio. OneNote will start recording audio through your
computers microphone.
2. While recording, type some notes. Press Enter so that your notes are spread out over a couple
of lines.
3. In Record, click Stop.
4. In Playback, click Play. You’ll hear the audio you recorded.
19. 19
5. Hover with your cursor over the lines you typed. You’ll see a tiny Play icon to the left of the
lines. Now click on one of the Play icons , and the audio will jump to what was recorded
while you were typing that note.
Clip Web content
Whether you’re researching a topic, or you see an interesting article on the Web, OneNote is the
perfect place to collect that information for later. Here’s how you can quickly get content from your
browser in OneNote.
Set it up
1. Browse to www.onenote.com/clipper.
2. Click the button Get OneNote Web Clipper. Follow the instructions.
3. Sign In with your Microsoft Office 365 account.
Use it
4. In your Web browser, go to www.cnn.com. Now click on a news article.
5. Click on the OneNote Web Clipper in your browser toolbar.
6. Click Article. Select the OneNote notebook and section you want to collect this in. Click OK.
20. 20
7. OneNote saves the content in an easy to read layout with a link pointing to the original
Webpage.
Tip
The OneNote Web Clipper offers additional options for special content. For example, clipping a PDF
will save a printout of the PDF document to OneNote. Clipping a YouTube video will create a
OneNote page with a playable video.
21. 21
Streamline new employee onboarding
When a new employee joins the organization, you often need to provide vast amounts of information
and documents as part of onboarding. This can be a hefty administrative effort. Good news! You can
streamline onboarding with a shared Microsoft OneNote notebook.
New employees can access the onboarding notebook from their computers, tablets, and phones, and
can learn at their own pace. And they can search for information easily by using keywords and tags.
Create the onboarding notebook
It’s easy to create a shared notebook together with the hiring team. And you can instantly modify or
add information as job requirements change.
1. Open OneNote. On the ribbon, click File > New.
2. Create the notebook on OneDrive for Business or SharePoint Online. Select OneDrive – or Sites
–, followed by your organization’s name.
3. Type the notebook name New Employee Onboarding. Click Create.
22. 22
4. At this point, choose not to share the notebook with others. You’ll do this later, after you’ve
created the initial structure.
5. You can create a structure by using sections. Double-click on the section tab named “New
Section 1” and change the name to “Welcome”.
6. Click the + sign to the right of the Welcome tab to add more sections. You could add 4
tabs named Week 1, Week 2, Week 3, and Week 4. The sections will depend on your
onboarding program.
7. Add pages to the sections. Click on the Welcome section tab. Position your cursor in the
heading of the page and type We’re happy you’re here!
8. Click + Add Page . Type What to expect. Click + Add Page. Type How to use this
notebook.
Add content to the onboarding notebook
Of course, you can type to add content to the pages of the onboarding notebook. But you can also
copy and paste information from many sources, like the Internet and intranet, email, and Office files.
Additionally, you can add handwritten notes, drawn diagrams, embed audio, video, and pictures.
1. Open your Web browser and browse to a Website, for example www.hrbartender.com. Select a
block of text from the homepage and press CTRL + C to copy the selected content.
23. 23
2. In OneNote, click + Add Page. Now press CTRL + V to paste the content on the page. You’ll
see that OneNote added a hyperlink at the bottom of the page pointing to the original
location.
3. In OneNote, click + Add Page. On the ribbon, click Insert > Online Video. Add the URL of a
YouTube or Vimeo video, for example https://www.youtube.com/watch?v=x1YBhCSsEEA. Click
OK.
4. You can also attach relevant Word, Excel, PowerPoint, PDF or other files to a page. On the
ribbon, choose Insert > File Attachment, and select a file. Select Attach File.
5. Feel free to experiment with other types of content from the Insert menu.
6. In order to make it easier for new employees to identify and find types of content, you can
add tags to pages or paragraphs. Place the cursor on the line of text you want to tag. On the
ribbon, click Home. In the Tags group, click the tag symbol you want to apply. Use the arrows
to scroll through the list or click the More arrow to show all available tags.
Tip
It’s easy to create a custom set of tags relevant for your organization or onboarding process. In the
Tags Group, click the More arrow and select Customize Tags from the bottom of the list. Click
New Tag… and choose the name and icon for the new tag.
Collaborate on the onboarding notebook
After creating the draft notebook, it’s time to share it with the hiring team or business owners, so they
can add sections and content.
1. On the ribbon, click File > Share. Share with People will be highlighted.
2. Type the name or email address of people you want to invite. Separate the names or email
addresses with a semicolon (“;”).
3. Ensure that the dropdown field on the right says Can edit.
4. Include a personal message explaining to provide the hiring team background information.
5. Click Share.
6. The people you shared with will receive an email message with a link to the shared
onboarding notebook. They can now contribute to the notebook.
24. 24
7. When others make changes to the notebook, you can see these changes almost instantly. New
or modified pages and sections will have bold titles.
8. You can also filter the most recent changes in the notebook. On the ribbon, click on History >
Recent Edits > Since Yesterday… to only see the latest updates.
9. Likewise, you can review changes made by certain people. Click History > Find by Author to
see updates sorted by contributor.
Share the onboarding notebook with new employees
Once the notebook is ready for primetime, you can start sharing it with new employees. This is similar
to sharing with collaborators with one important difference: you’ll want to ensure that new employees
can view the notebook without editing it.
1. Choose File > Share.
2. Under Share with People, type the names or email addresses of people you'd like to share
your notebook with.
3. In the drop-down box on the right, select Can view.
4. Add a personal note, if you'd like, and choose Share. The new employees you've selected will
get an email invitation to open your notebook.
25. 25
Tip
If your organization adds new employees to an Office 365 Group or Distribution List (for example,
New Employees August 2017), you can use the email address of the Group or Distribution List. This
way, you don’t have to manually add hundreds of email addresses for every onboarding cycle.
26. 26
Analyze and visualize data like a boss
HR professionals increasingly have access to data about employees. Most HR Information Systems
have great reporting tools to get insight in the state of the HR business. But sometimes you want to
do your own analysis. Or you may want to track data that’s not yet included in systems. Microsoft
Excel to the rescue!
Get data in Excel
There are many ways to get data into Excel. We could write a guide just on that topic alone. For this
guide, we’ll focus on the most common technique.
Export data from your HR Information System
1. Most HR Information Systems let you export data as an Excel file or CSV (Comma Separated
Values) file. For this exercise, we’ll pretend you’ve exported employee data as a CSV file.
2. Download the CSV file from https://aka.ms/officehrtipsfiles. It will automatically be saved in
your Downloads folder named Sample_Employees.csv.
Import the data in Excel
1. In Excel, click File > New > Blank workbook. Select cell A1.
2. On the ribbon, click Data > From Text/CSV.
3. Browse to your Downloads folder and select the Sample_Employees.csv file you saved
previously. Click Import.
4. You’ll see a preview of the data. Click Load.
5. In the latest version of Excel, the data will be automatically formatted as a table.
27. 27
6. If the data isn’t formatted yet, click on any cell with content. Then click Format as Table.
Select one of the designs. When your data is formatted as a table, it is much easier to work
with the data.
Making sense of data with filters
A simple way of analyzing a large set of data in Excel is filtering the data based on certain criteria. By
using filters. You’ll be able to answer questions like “How many employees in the United States have
been with the company for more than 5 years?” or “What’s the average tenure of employees with a
level higher than 50 in our Manufacturing Department?” Here’s how:
Count the ways
1. Position your cursor in a cell directly under the table you created, for example B118.
2. On the Home ribbon, click AutoSum .
3. Click the dropdown button and select Count. Now you’ll see the number of non-empty cells.
28. 28
Filter
1. Press CTRL + Home to jump to cell A1.
2. Along row 1, you’ll see Filter arrows.
3. At the top of Column H (Area), click the Filter arrow.
4. Clear the “Select All” checkbox, then scroll down and select “United States”.
29. 29
5. Now click the Filter arrow at the top of Column C (Hire Date).
6. Click the “2017” checkbox to uncheck it.
7. You now have the list of employees in the United States who joined the company before 2017.
8. Remove the filter by clicking Data > Clear Filter.
9. Try some other filters and see the results.
Making sense of data with colors
If you’re a visual person, Excel has a useful way of applying colors or icons to your data, so that you
and others can see trends at a glance. Conditional formatting allows you to apply colors to cells based
on certain conditions. For example, you can apply a bright yellow color to job candidates that move to
30. 30
the next interview round. Or apply a color scale - from red to green - to employee poll scores ranging
from poor to excellent. Conditional formatting is dynamic, so as your values change, the formatting
will automatically adjust.
1. Switch to the 90 Day Checkpoint Sheet.
2. Click to highlight column F (Supervisor).
3. On the ribbon, select Home > Conditional Formatting > Highlight Cell Rules.
4. Select Equal To. Enter “Y” (without the quotation marks). Select Yellow Fill with Dark Yellow
Text. Click OK.
31. 31
5. All cells with Y will now stand out with a bright yellow color. You can see at a glance who is a
manager.
6. Now, click to highlight column E (Level).
7. On the ribbon, select Home > Conditional Formatting > Color Scales.
8. Hover over the color scales on the left-hand side. The color of the cells in column E will
change. Click on one of the color scale thumbnails to select it.
9. Now you can easily distinguish different levels.
32. 32
Adding thousands of rows of data with a few keystrokes
When you export data out of HR information systems, it often includes text data types like employee
names (Angela Padilla), city names (Redmond) and state abbreviations (WA). Too often, that data is
not exactly in the format you want. For example, you may want to use just the last name, or to
combine the city and state. With Flash Fill, you can automatically extract and combine data across
multiple columns. Let’s look at this magical feature.
1. Position cursor in cell J1, to the right of the table.
2. Type Last Name. Press Enter. A column will be added to the table.
3. In cell J2, type the last name of the employee (or manager or HR manager), for example
Kristiansen. In cell J3, type Vangara.
33. 33
4. Excel will begin to automatically fill data in cells from the pattern it discovered. In gray, the
other last names are appearing down column J.
5. Press Enter and the entire column will be filled.
34. 34
Make your presentations stand out
Employees get bombarded with information every day. It’s not easy to break through the noise and
make your messages stand out. With these PowerPoint tips, you’ll be able to get people’s attention
and get your point across more effectively.
Take people on a journey through your story
When you have a long or complicated story to tell, your audience sometimes loses track. The new
Zoom feature in PowerPoint guides the audience through the different sections of your presentation,
and makes your presentations more dynamic and exciting.
1. In PowerPoint, open a presentation with more than 10 slides.
2. Position your cursor between thumbnails of slide 1 and 2 on the left-hand side.
3. On the ribbon, click Insert > Zoom > Summary Zoom.
4. Select a few slides that mark the beginning of different sections.
5. Click Insert.
6. A new summary slide will appear with thumbnails of the section slides.
35. 35
7. On the ribbon, click Slide Show > From Beginning. As you move through the presentation,
you’ll zoom in and out of sections.
8. You can also click on a slide thumbnail in the summary slide to jump to a particular section.
Become a designer overnight
PowerPoint Designer improves your slides by automatically generating design ideas that you can
choose from. PowerPoint Designer makes it easy to create a beautiful slide with just one click.
Design ideas for pictures and charts
1. Click File > New, and select one of the presentation templates, for example Integral. Click
Create.
2. Click Home > New Slide.
3. Use Insert > Online Pictures to add one, two or three images to the slide (You could also use
Insert > Pictures or Insert > Charts).
36. 36
4. The first time you use Designer, a message will appear asking your permission to get design
ideas for you. If you want to use Designer, select Turn on.
5. Designer opens a task pane for you with a wide range of suggestions. Select a thumbnail to
apply that design idea to your slide.
37. 37
Tip
You can open Designer any time by going to Design > Design Ideas.
Design ideas for bulleted lists
PowerPoint Designer notices when you write a bulleted list of "steps" on a slide, or a list of statements
in which each one begins with a verb. In either case, Designer reacts by offering to turn your list into a
SmartArt graphic.
1. Click Home > New Slide
2. Type your sequential or action-oriented list of items.
3. The Design Ideas pane opens and shows several graphical depictions for you to choose from.
38. 38
4. Click a thumbnail to select the one you want, and your text is changed to a SmartArt graphic
that you can continue to edit.
5. If you want to revert to your original text-based list, select the entire SmartArt graphic, right-
click it, and select Convert to Text.
39. 39
Make online trainings and webinars engaging
It’s become easier than ever to provide employees with expert trainers and outstanding content
without the need to get all employees in the same room. Next time you organize a leadership training
or have a companywide communication, why not make it a webinar. Here are some guidelines on how
to make an online training engaging for remote attendees.
It’s all in the preparation
Schedule the training
1. In Outlook, click New Items > New Meeting.
2. Add attendees on the To Line, a meeting subject, and a start and end time. On the ribbon click
Meeting > Skype Meeting. The Skype meeting details will be included in the meeting
request body.
3. Click Send. The meeting attendees will receive your meeting request via email.
Prepare for the training
As you prepare for the training, you’ll want to think beyond the talking points and PowerPoint
presentation. You can make the training more interactive and quiz attendees by using Polls. And you
want to be prepared to answer people’s questions without disrupting the training.
1. Prior to the start of the meeting, open the meeting request on your Outlook Calendar and
click the link Join Skype Meeting.
2. Click Share Content > Share PowerPoint files. Select a PowerPoint file from your
computer and click Open. The PowerPoint presentation will be uploaded and shared.
3. To make training materials available for download, click Share Content > Add
Attachments… Select one or more files from your computer and click Open.
4. Polls are great tools to involve meeting participants, get their opinion, or wake them up. To
create polls for use during the online meeting or training, click Share Content > More… >
Poll.
40. 40
5. Give the poll a name, type a poll question, and add up to 7 choices. Click Create. You’ll see a
preview of the poll on screen. Select Poll Actions > Poll results are shown to everyone. If
you want to prepare additional polls, you can repeat this process.
6. Click Share Content > More… > Q&A. This will create a Q&A session where meeting
participants can type questions for presenters to answer. For now, click Stop Q&A.
41. 41
7. Now, everything is ready for the online training. You can close Skype for Business.
Showtime! Have an amazing online training
Start and present
1. In Outlook, open the meeting request on your Calendar and click the link Join Skype Meeting.
2. Select Use Skype for Business (full Audio and Video experience) and click OK.
3. Click Share Content > Manage Content. Find the PowerPoint presentation you want to use
and click Start sharing this content .
4. If you want attendees to line up questions for presenters, then activate Q&A by finding the
Q&A content in the list and click Start sharing this content. Then switch to the presentation
by clicking on the Presentation tab
5. When attendees have joined, you can start the online meeting. Move the presentation forward
by clicking on the slides or the slide arrows.
42. 42
Annotate
1. Use the annotation tools to draw attention to certain points or to keep people engaged. Click
the pen symbol at the top right of the slide, and select one of the tools: a laser pointer,
pen, highlighter, stamp, and more.
2. When you’re done with a tool, click the “X” under the Annotation Tool icon .
Tip
Use the Stamp tool to check off points on the slide as you handle them. People will pay
attention and see where you are.
Poll your audience
1. When you’re ready to poll the participants, click Share Content > Manage Content. Find the
poll you want to use and click Start sharing this content.
2. Attendees will now see the poll and can select an answer. You’ll see poll results on the screen.
When you have enough responses, you can close the poll by clicking Poll Actions > Poll is
closed. Since everyone can see a summary of the poll results, you have an opportunity to
discuss the results.
3. When you want to return to the presentation, click Share Content > Manage Content and
click Start sharing this content for your presentation. The presentation will return to the slide
where you last left off.
43. 43
4. At one point, you or a co-presenter might want to answer questions from participants. Click
on the Q&A tab and select an unanswered question. Click on Answer and type your
response. Once you press Enter, your answer will be visible to everyone.
Tips:
• You could prepare your answer in Word or OneNote and then copy it in Skype for Business.
• If you want to redo an answer, click the X to the right of the answer.
5. Return to the presentation tab.
Congratulations! You had a successful, engaging online training.
Tip
You can record an online training or meeting in Skype for Business for later consumption. Click
More Options > Start Recording. It is a good practice to inform people that the call is being
recorded.
44. 44
Next steps
We hope you discovered new ways of using Microsoft Office 365 that will save you time every day.
Time you can use to make your organization an amazing place to work.
Please share this e-book with colleagues who can benefit from these time-saving tips. They can
download it at http://aka.ms/officeHRtips.
Are you interested in learning more?
1. You’ll find many more tips, videos and how-to guides for HR professionals in the Office 365
Productivity Library.
2. If you enjoyed this guide and you’re excited about technology and productivity, you should
probably join our Microsoft Office 365 Champion Program. You’ll have access to exclusive
Office resources and connect with a community of like-minded professionals.
Finally, we would love to get your feedback and ideas. Are you looking for other tips? Do you have
any suggestions? Please send an email to officeHRtips@microsoft.com.
Thank you,
Sanjeevini Mittal
Group Manager Office 365
Microsoft Corporation